
Центр безопасности данных
Информация о посещаемых вами сайтах сохраняется в браузере и может быть извлечена из него, в основном в виде файлов cookie. Это могут быть сведения о вас, ваших предпочтениях и устройстве, которые в основном необходимы для повышения удобства работы с сайтом. Такая информация обычно не служит непосредственно для идентификации пользователей, а лишь учитывает ваши интересы при использовании сетевых ресурсов.
Мы уважаем право на неприкосновенность частной жизни, поэтому вы можете установить запрет на использование некоторых типов файлов cookie.
Для получения дополнительных сведений и изменения настроек по умолчанию щёлкните по заголовку каждой категории.
Однако обратите внимание, что блокировка определённых типов файлов cookie может повлиять на удобство работы с сайтом и нашими сервисами, включая LiveChat.
Дополнительная информация
Управление настройками согласия
Обязательные файлы cookie
Всегда активно
Эти файлы cookie необходимы для работы веб-сайта и не могут быть деактивированы в наших системах. Как правило, они активируются только в ответ на ваши действия, аналогичные запросу услуг, такие как настройка уровня конфиденциальности, вход в систему или заполнение форм. Вы можете настроить браузер таким образом, чтобы он блокировал эти файлы cookie или предупреждал вас об их использовании, но в таком случае некоторые разделы веб-сайта не будут работать. Эти файлы cookie не хранят никакой личной информации.
Аналитические/рабочие файлы cookie
Всегда активно
Эти файлы cookie позволяют нам подсчитывать количество посетителей и источники трафика, чтобы оценивать и улучшать работу нашего веб-сайта. Они помогают нам узнавать, какие страницы являются наиболее и наименее популярными, а также отслеживать перемещение пользователей по сайту.
Все данные, собираемые с помощью файлов cookie данного типа, обобщаются и поэтому остаются анонимными. Если вы запретите эти файлы cookie, мы не узнаем, когда вы посещали наш сайт, и не сможем отслеживать его работу.
Информация об использовании содержимого, собранная с помощью файлов cookie, может быть объединена с собранной ранее информацией и использована для анализа, понимания и составления отчётов об общем использовании сайтов. Эти файлы cookie не используются для персонализации наших веб-сайтов и/или отображения контекстной рекламы для вас на других ресурсах.
Функциональные файлы cookie
Функциональные файлы cookie
Эти файлы cookie позволяют использовать дополнительные функции веб-сайта и настраивать его в соответствии со своими предпочтениями. Такие файлы могут размещаться нами или сторонними разработчиками, сервисы которых мы добавили на наши страницы.
Если вы запретите эти файлы cookie, то все сервисы или некоторые из них (например, LiveChat или рейтинги и обзоры) могут работать неправильно.
Рекламные и целевые файлы cookie
Рекламные и целевые файлы cookie
Эти файлы cookie настраиваются через веб-сайт нашими партнёрами по рекламе, которые могут использовать их для сбора данных о ваших интересах и отображения актуальной для вас рекламы на других сайтах.
Они не хранят личную информацию напрямую, а работают посредством уникальной идентификации браузера и устройства. Если вы запретите эти файлы cookie, вы не увидите адресную рекламу на различных сайтах.
Файлы cookie социальных сетей
Файлы cookie социальных сетей
Эти файлы cookie устанавливаются различными социальными сетями, функции которых добавлены на наш сайт. Они позволяют вам обмениваться информацией с друзьями и публиковать её на ваших страницах. Эти файлы cookie отслеживают посещаемые страницы в браузере и собирают информацию о ваших интересах. Это может отразиться на содержимом и сообщениях, отображаемых на других сайтах.
Если вы запретите эти файлы cookie, вы не сможете пользоваться этими функциями обмена данных.
Руководство
пользователя
QL-810W
QL-820NWB
Чтобы избежать ошибок при установке, прочтите Руководство по
безопасности устройства, а затем Руководство по быстрой
установке. После прочтения сохраните данное руководство в
надежном месте, чтобы обратиться к нему при необходимости.
Версия A
RUS
Введение 0
Важная информация 0
Содержимое этого руководства и технические характеристики изделия могут быть изменены без
предварительного уведомления.
Компания Brother сохраняет за собой право без предварительного уведомления изменять
характеристики и материалы, указанные в этом руководстве, и не несет ответственности за ущерб
(в том числе косвенный), возникший в связи с использованием предоставленных сведений, в том
числе
Снимки экрана, приведенные в этом документе, могут отличаться от реального интерфейса
в зависимости от операционной системы компьютера, модели устройства и версии программного
обеспечения.
Перед использованием принтера для печати наклеек ознакомьтесь со всей прилагаемой
документацией, в которой содержатся сведения об эксплуатации принтера и мерах
Принтер, показанный на иллюстрациях, может отличаться от приобретенного вами.
Некоторые модели недоступны в ряде стран.
Предлагаемые варианты исполнения и расходные материалы зависят от страны.
при наличии типографских и других ошибок в документе.
безопасности.
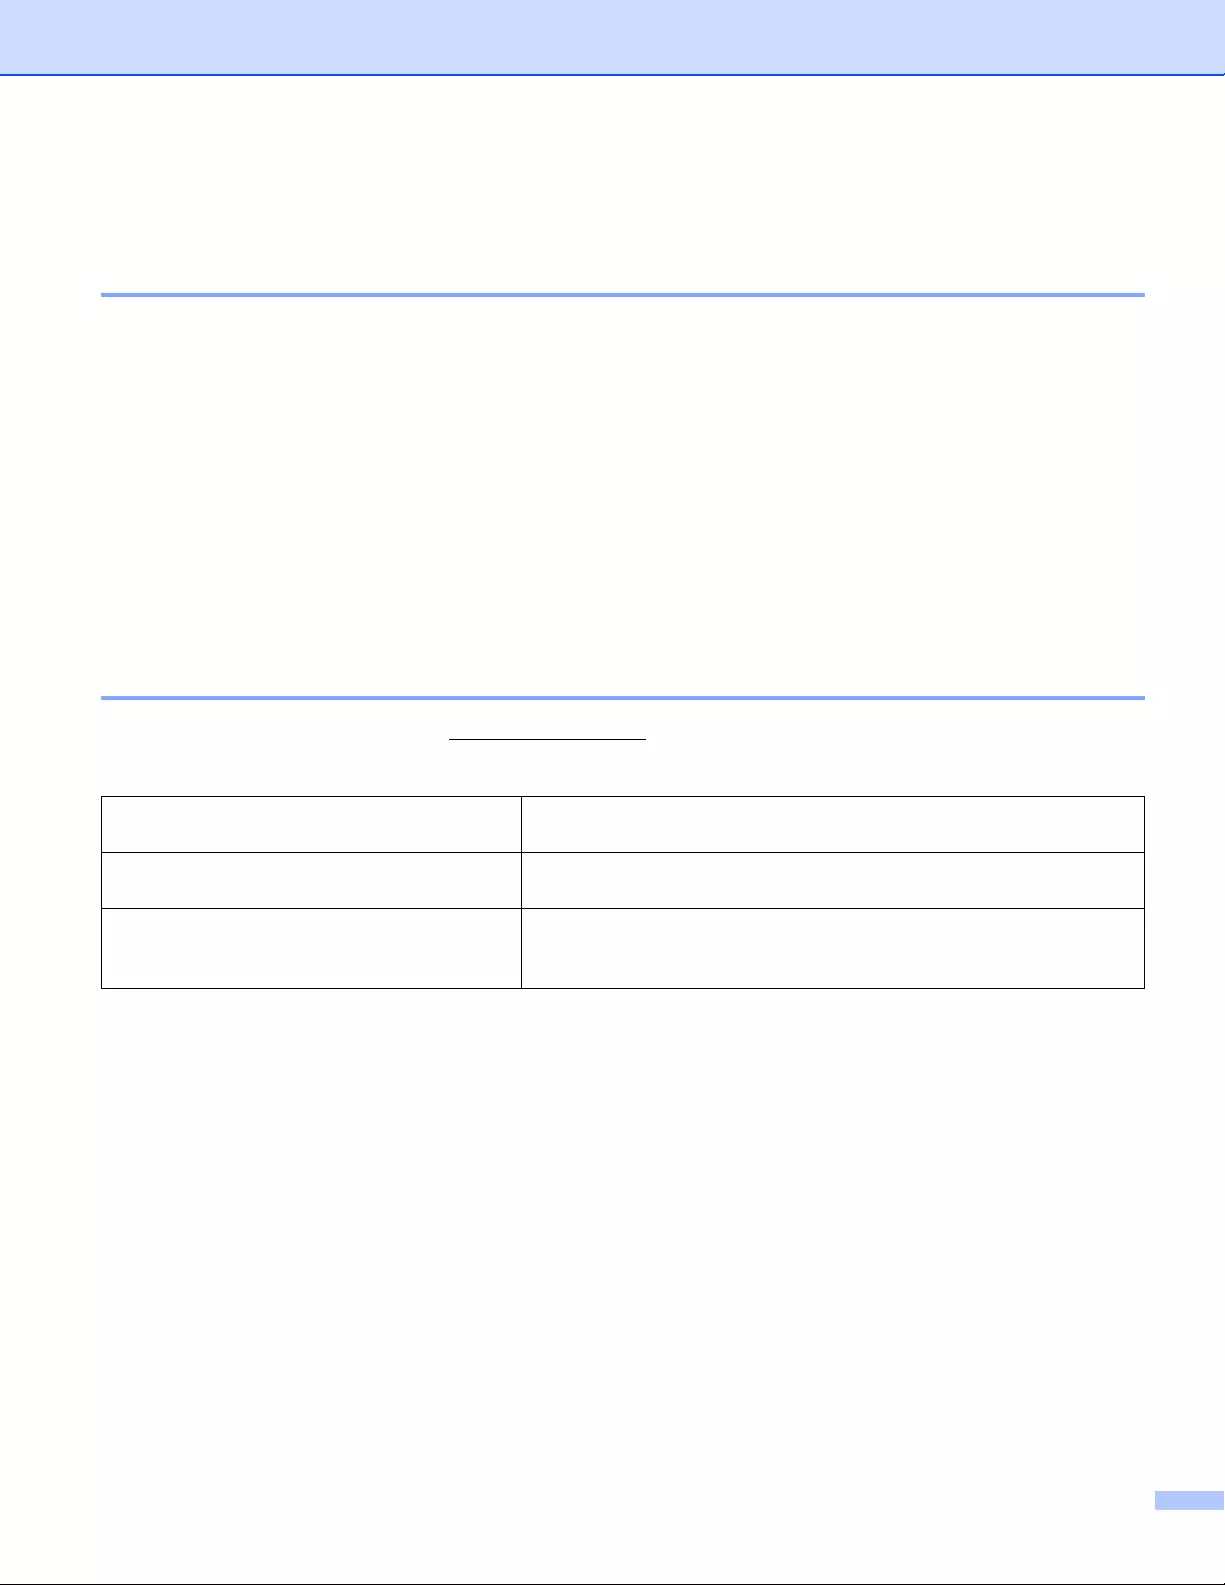
Доступные руководства 0
Чтобы загрузить последние версии руководств, перейдите на веб-сайт Brother Solutions Center по
адресу support.brother.com
Руководство по безопасности
устройства
Руководство по быстрой установке
Руководство пользователя
1
Печатная версия руководства в комплекте поставки
2
Руководство в формате PDF на веб—сайте Brother Solutions Center
1
и выберите раздел «Руководства» на странице используемой модели.
В этом руководстве содержится информация о мерах
безопасности. Прочитайте его перед началом работы с
принтером.
1
В этом руководстве содержатся основные сведения о работе
с принтером, а также советы по устранению неполадок.
2
В этом руководстве содержатся дополнительные сведения
о параметрах и операциях, сетевом подключении и параметрах
сети, советы по устранению неполадок и указания по
техническому обслуживанию принтера.
i
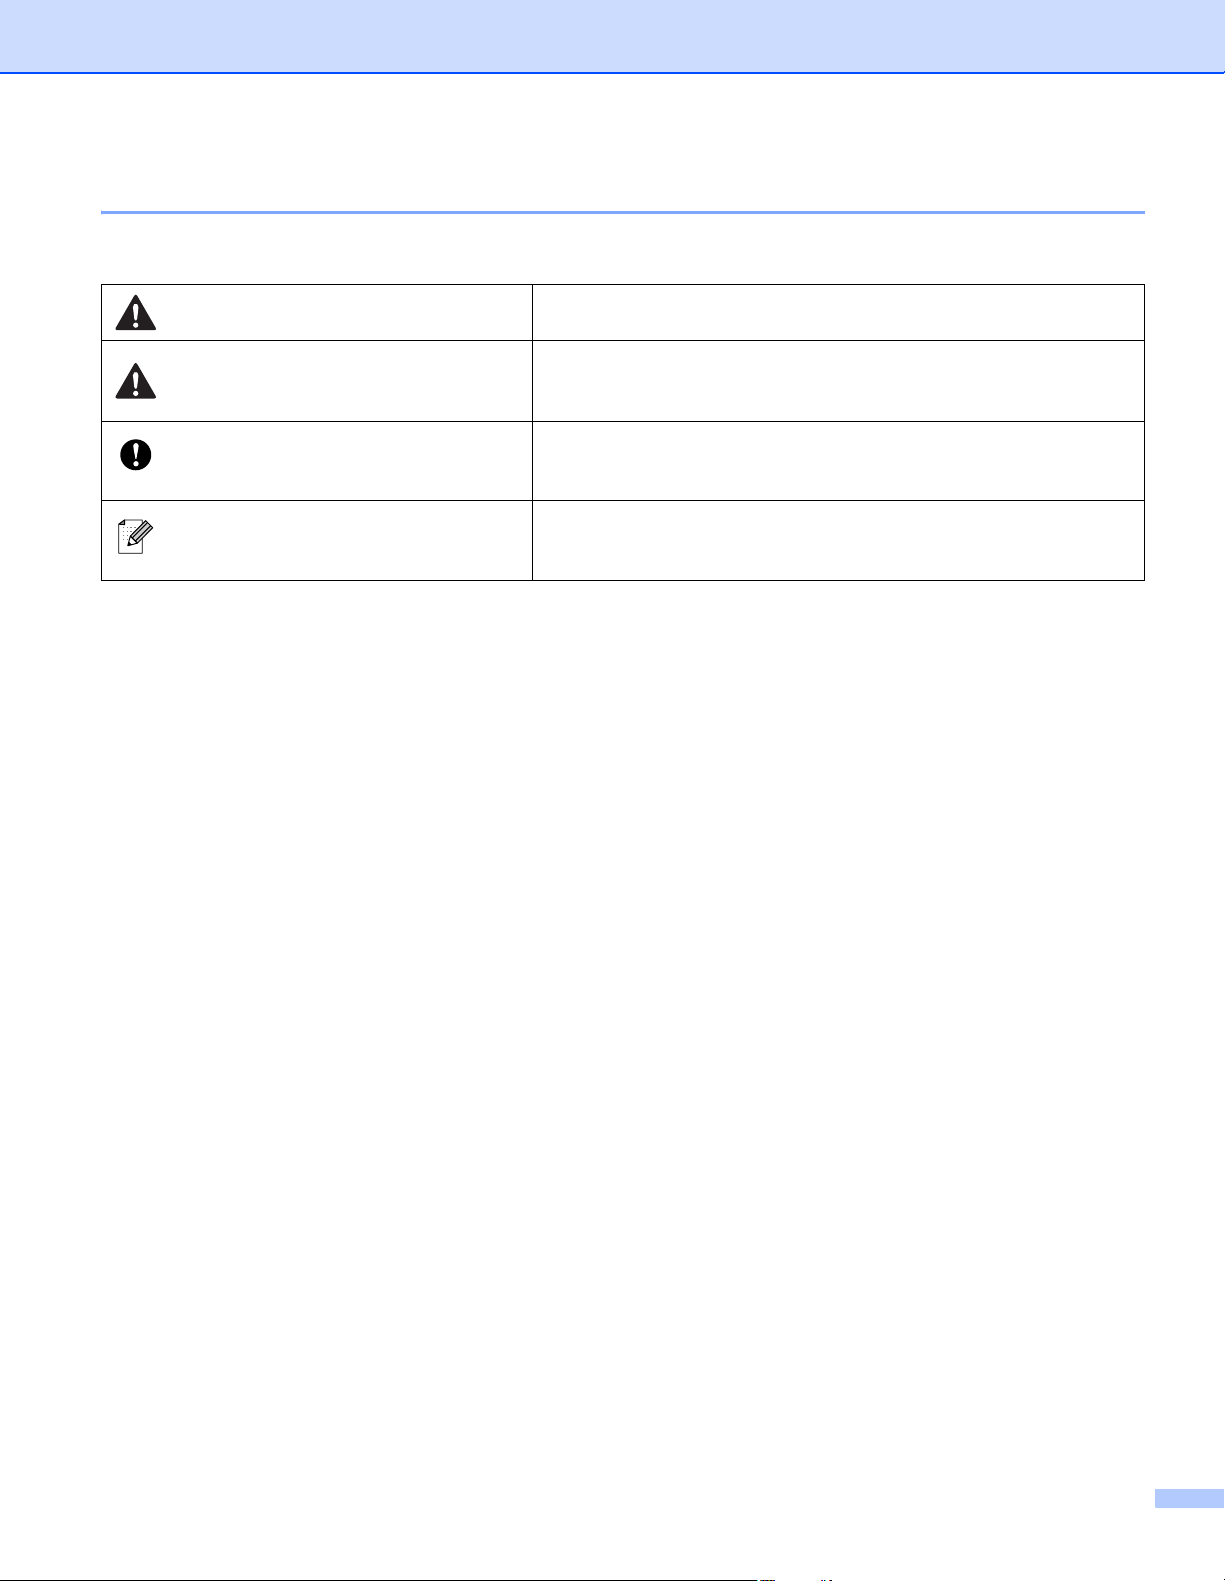
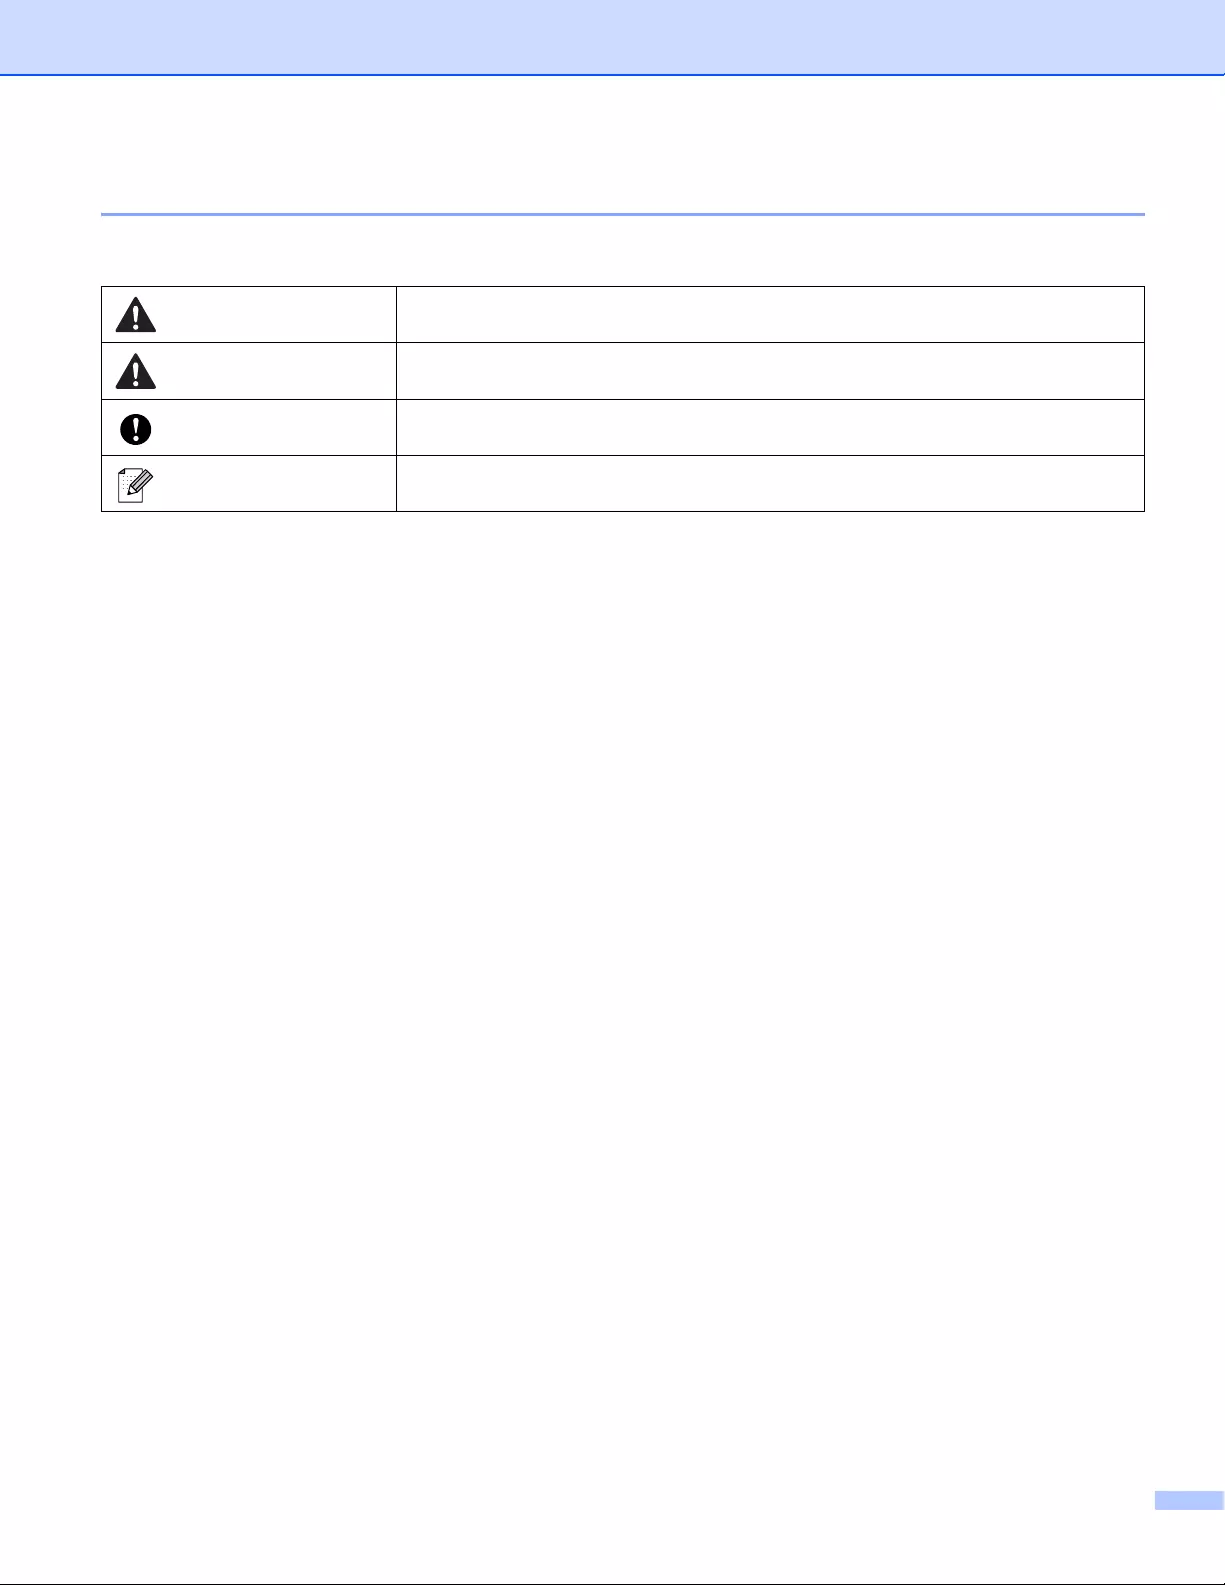
Символы, используемые в этом руководстве 0
В данном руководстве используются приведенные ниже символы.
Обозначает инструкции, которые необходимо соблюдать,
чтобы избежать травм.
Обозначает инструкции, которые необходимо соблюдать,
чтобы избежать незначительных травм или повреждений
принтера для печати наклеек.
Обозначает важные сведения или инструкции, которые следует
Важная информация
Примечание
соблюдать. Их несоблюдение может привести к повреждению
или неправильной работе устройства.
Обозначает примечания, содержащие сведения или указания,
которые помогут разобраться в работе устройства и использовать
его более эффективно.
ii
Общие меры предосторожности
Рулон DK (с наклейками или лентой)
Используйте только подлинные принадлежности и расходные материалы Brother с маркировкой
или . Использование других принадлежностей и расходных материалов запрещено.
Наклейки плохо крепятся к влажной, загрязненной и жирной поверхности, поэтому ее нужно
заранее протереть.
В рулонах DK используется бумага или пленка для термопечати, которая может выцветать либо
отклеиваться под воздействием ультрафиолетового излучения, ветра
НЕ подвергайте рулоны DK воздействию прямых солнечных лучей, высоких температур, сильной
влажности и пыли. Храните их в прохладном темном месте. Используйте рулоны DK сразу после
извлечения из упаковки.
Не царапайте лицевую поверхность наклеек ногтями или металлическими предметами и не
прикасайтесь к ней влажными, потными либо смазанными кремом руками. Это
к изменению цвета или выцветанию наклеек.
НЕ прикрепляйте наклейки на людей, животных и растения. Кроме того, никогда не прикрепляйте
наклейки на объекты общественной или частной собственности без надлежащего разрешения.
Поскольку конец рулона DK не прикреплен к катушке, последняя наклейка может быть обрезана
неправильно. В этом случае извлеките остальные наклейки, вставьте
напечатайте последнюю наклейку.
Примечание. Из-за вероятности неправильной обрезки в рулонах DK может быть больше наклеек,
чем указано на упаковке.
Фрагменты снимаемых наклеек могут оставаться на поверхности, к которой были прикреплены.
Прежде чем прикреплять наклейки на компакт- и DVD-диски, ознакомьтесь с соответствующими
инструкциями к проигрывателю.
НЕ
прикрепляйте наклейки к компакт- и DVD-дискам, которые будут использоваться в
проигрывателях с приемными щелями.
НЕ пытайтесь снять наклейки с компакт— и DVD-дисков, потому что вместе с ними можно снять
слой покрытия и повредить диски.
НЕ прикрепляйте наклейки к компакт- и DVD-дискам, на которые нанесены изображения с помощью
струйных принтеров,
использования диска, содержащиеся на нем данные могут быть утеряны или повреждены.
Прикрепляйте наклейки к компакт— и DVD-дискам только с помощью аппликатора, входящего
в комплект поставки соответствующих рулонов. Несоблюдение этого правила может привести
к повреждению проигрывателя.
Пользователи несут полную ответственность за прикрепление наклеек к компакт- и DVD-дискам.
Компания Brother не несет ответственности за потерю или повреждение данных в результате
неправильного использования наклеек для дисков.
Не роняйте рулон DK.
В рулонах DK используются бумага и пленка для термопечати. Они выцветают под воздействием
солнечного света и тепла.
НЕ используйте рулоны DK для создания наклеек, предназначенных для
использования вне помещений.
В зависимости от материалов, на которые крепятся наклейки, а также места и условий эксплуатации
наклейки могут отклеиваться или, наоборот, приклеиваться слишком сильно, а изображение на
них — менять цвет или переноситься на другие предметы. Прикрепляя наклейки, всегда учитывайте
окружающие условия и материалы, на которые они приклеиваются. Чтобы
прикрепите небольшой ее фрагмент к малозаметному участку нужной поверхности.
Если результаты печати не соответствуют ожиданиям, воспользуйтесь параметрами настройки
в драйвере принтера или Инструментом настройки принтера.
потому что наклейки легко отклеиваются от них. Если это произойдет во время
или дождя.
может привести
новый рулон DK и повторно
длительного
испытать наклейку,
iii

ВАЖНАЯ ИНФОРМАЦИЯ 0
Это устройство разрешено использовать только в той стране, в которой оно приобретено.
Не используйте его в других регионах, иначе вы можете нарушить местные требования в отношении
беспроводной связи и электропитания.
Windows Vista
Windows
Windows
Windows
Windows
Windows
Windows
Корпоративная и Windows
Windows Server
Windows Server
Windows Server
Windows Server
© Brother Industries, Ltd., 2018. Все права защищены.
®
в этом документе соответствует всем выпускам Windows Vista®.
®
7 в этом документе соответствует всем выпускам Windows®7.
®
8 в этом документе соответствует всем выпускам Windows®8.
®
8.1 в этом документе соответствует всем выпускам Windows®8.1.
®
10 в этом документе соответствует выпускам Windows®10 Домашняя, Windows®10 Pro,
®
10 Корпоративная и Windows®10 для образовательных учреждений.
®
10 в этом документе не подразумевает выпуски Windows®10 Mobile, Windows®10 Mobile
®
2008 в этом документе соответствует всем выпускам Windows Server®2008 и
®
2008 R2.
®
2012 в этом документе соответствует всем выпускам Windows Server®2012 и
®
2012 R2.
®
10 IoT Базовая.
iv

Оглавление
Раздел I Основные операции
1 Настройка принтера для печати наклеек 2
Описание деталей …………………………………………………………………………………………………………………..2
Вид спереди ………………………………………………………………………………………………………………………2
Вид сзади…………………………………………………………………………………………………………………………..4
Установка рулона DK……………………………………………………………………………………………………………….5
Подключение адаптера переменного тока ………………………………………………………………………………..7
Установка дисковой батарейки (только для QL-820NWB)…………………………………………………………..8
Включение и отключение питания…………………………………………………………………………………………..10
Настройка языка ЖК-дисплея (только для QL-820NWB)…………………………………………………………..10
Настройка даты и времени (только для QL-820NWB) ………………………………………………………………10
ЖК-дисплей (только для QL-820NWB) …………………………………………………………………………………….11
Экран ………………………………………………………………………………………………………………………………11
Параметры ЖК-дисплея……………………………………………………………………………………………………12
2 Печать с помощью компьютера (P-touch Editor) 22
Установка программного обеспечения и драйверов принтера на компьютере…………………………..22
Подключение принтера для печати наклеек к компьютеру……………………………………………………….23
Подключение с помощью USB ………………………………………………………………………………………….23
Подключение с помощью Wi-Fi
Подключение с помощью проводной локальной сети (только для QL-820NWB)…………………..28
Подключение с помощью Bluetooth (только для QL-820NWB)……………………………………………..28
Подключение принтера для печати наклеек к сканеру штрихкодов с помощью Bluetooth
(только для QL-820NWB)……………………………………………………………………………………………………..29
Печать с использованием компьютера ……………………………………………………………………………………30
Доступные приложения …………………………………………………………………………………………………….30
Создание наклеек на компьютере……………………………………………………………………………………..31
Прикрепление наклеек ……………………………………………………………………………………………………..32
®
……………………………………………………………………………………….23
3 Печать с помощью мобильного устройства 33
Установка приложений для мобильных устройств …………………………………………………………………..33
Доступные приложения …………………………………………………………………………………………………….33
Подключение принтера для печати наклеек к мобильному устройству……………………………………..33
Печать с мобильного устройства ……………………………………………………………………………………………35
Печать с помощью мобильного устройства шаблонов, созданных на компьютере ………………35
Прикрепление наклеек ……………………………………………………………………………………………………..36
4 Изменение параметров принтера для печати наклеек 37
Инструмент настройки принтера для Windows®………………………………………………………………………37
Подготовка к использованию Инструмента настройки принтера …………………………………………37
Использование Инструмента настройки принтера для Windows
Параметры подключения для Windows
Диалоговое окно параметров ……………………………………………………………………………………………40
Строка меню…………………………………………………………………………………………………………………….42
®
…………………………………………………………………………………40
®
…………………………………………….38
v

Вкладка общего назначения ……………………………………………………………………………………………..44
Вкладки проводной (только для QL-820NWB) и беспроводной сетей ………………………………….46
Вкладка Wireless Direct……………………………………………………………………………………………………..48
Вкладка Bluetooth (только для QL-820NWB)……………………………………………………………………….49
Применение измененных параметров к нескольким принтерам ………………………………………….50
Параметры устройства для Windows
®
…………………………………………………………………………………….51
Диалоговое окно параметров ……………………………………………………………………………………………51
Строка меню…………………………………………………………………………………………………………………….53
Вкладка основных параметров………………………………………………………………………………………….54
Вкладка дополнительных параметров……………………………………………………………………………….55
Вкладка дисплея (только для QL-820NWB)………………………………………………………………………..56
Вкладка управления …………………………………………………………………………………………………………57
Применение измененных параметров к нескольким принтерам для печати наклеек ……………58
Параметры P-touch Template для Windows
®
……………………………………………………………………………59
Диалоговое окно параметров P-touch Template………………………………………………………………….60
Программа Printer Setting Tool для Mac …………………………………………………………………………………..62
Подготовка к использованию Printer Setting Tool ………………………………………………………………..62
Использование программы Printer Setting Tool для Mac …………………………………………………………..62
Диалоговое окно параметров ……………………………………………………………………………………………63
Вкладка Basic (Основные)…………………………………………………………………………………………………64
Вкладка Advanced (Дополнительные)………………………………………………………………………………..65
Вкладка Management (Управление) …………………………………………………………………………………..65
Вкладка Bluetooth Settings (Параметры Bluetooth) (только для QL-820NWB)………………………..66
Вкладка Wireless LAN (Беспроводная сеть) ……………………………………………………………………….66
Применение измененных параметров к нескольким принтерам для печати наклеек ……………67
Изменение параметров при печати с мобильного устройства ………………………………………………….68
5 Печать наклеек с использованием P-touch Template 69
Операции с шаблонами в P-touch Template …………………………………………………………………………….69
Подготовка…………………………………………………………………………………………………………………………….70
Настройка параметров с помощью инструмента настройки параметров P-touch Template …..70
Подключение сканера штрихкодов …………………………………………………………………………………………72
Обычная печать шаблонов …………………………………………………………………………………………………….73
Печать шаблонов с использованием дополнительных функций……………………………………………….75
Печать с поиском в базе данных …………………………………………………………………………………………….78
Последовательная нумерация (серийная печать)……………………………………………………………………81
Последовательная нумерация текста………………………………………………………………………………..81
Последовательная нумерация штрихкодов ……………………………………………………………………….82
Дополнительные функции при последовательной нумерации (серийной печати) ………………..83
6 Другие функции 84
Проверка параметров принтера для печати наклеек ……………………………………………………………….84
Настройка двухцветной печати с помощью других приложений ……………………………………………….85
Режим запоминающего устройства (только для QL-820NWB)…………………………………………………..85
Описание …………………………………………………………………………………………………………………………85
Использование режима запоминающего устройства ………………………………………………………….86
Печать JPEG-изображений …………………………………………………………………………………………………….87
Печать шаблонов на принтере для печати наклеек спомощью меню ЖК-дисплея
(только для QL-820NWB)……………………………………………………………………………………………………..88
Удалённое обновление ………………………………………………………………………………………………………….91
Распределенная печать (только для Windows
®
) ……………………………………………………………………..91
vi

Раздел II Работа с приложениями
7 Использование P-touch Editor 96
Windows®………………………………………………………………………………………………………………………………96
Запуск P-touch Editor ………………………………………………………………………………………………………..96
Печать с помощью P-touch Editor ………………………………………………………………………………………98
Передача данных на принтер для печати наклеек ……………………………………………………………..99
Настройка двухцветной печати ……………………………………………………………………………………….100
Mac……………………………………………………………………………………………………………………………………..104
Запуск P-touch Editor ………………………………………………………………………………………………………104
Режимы работы ……………………………………………………………………………………………………………..105
Передача данных на принтер для печати наклеек ……………………………………………………………106
Настройка двухцветной печати ……………………………………………………………………………………….107
8 Использование P-touch Editor Lite (только для Windows®) 108
Использование P-touch Editor Lite (только для QL-810W) (только для Windows®) ……………………108
Использование P-touch Editor Lite LAN (только для Windows
®
) ………………………………………………112
9 Использование P-touch Transfer Manager и P-touch Library
(только для Windows®) 117
P-touch Transfer Manager………………………………………………………………………………………………………117
Передача шаблона в P-touch Transfer Manager ……………………………………………………………………..117
Передача шаблонов и других данных с компьютера на принтер для печати наклеек ………………120
Архивация шаблонов и других данных, хранящихся на принтере для печати наклеек …………….125
Удаление данных с принтера для печати наклеек………………………………………………………………….126
Создание файлов передачи и файлов пакетов передачи ………………………………………………………127
P-touch Library ……………………………………………………………………………………………………………………..128
Запуск P-touch Library …………………………………………………………………………………………………………..128
Открытие и редактирование шаблонов …………………………………………………………………………………130
Печать шаблонов…………………………………………………………………………………………………………………131
Поиск
шаблонов…………………………………………………………………………………………………………………..132
10 Передача шаблонов с помощью P-touch Transfer Express
(только для Windows®) 134
Подготовка P-touch Transfer Express……………………………………………………………………………………..134
Передача шаблона в P-touch Transfer Manager ……………………………………………………………………..135
Сохранение шаблона в виде файла пакета передачи PDZ …………………………………………………….136
Отправка пользователю файла пакета передачи (PDZ) иприложения P-touch Transfer Express
Перенос файла пакета передачи (PDZ) на принтер для печати наклеек …………………………………139
….138
11 Обновление программного обеспечения P-touch 142
Обновление P-touch Editor (только для Windows®)…………………………………………………………………142
Windows
Mac………………………………………………………………………………………………………………………………..144
Обновление P-touch Editor Lite (только для Windows
Windows
Mac………………………………………………………………………………………………………………………………..147
®
………………………………………………………………………………………………………………………142
®
®
………………………………………………………………………………………………………………………145
) и микропрограммы ……………………………..145
vii

Раздел III Сеть
12 Введение 150
Сетевые функции…………………………………………………………………………………………………………………150
13 Изменение сетевых параметров принтера для печати наклеек 151
Изменение сетевых параметров (IP-адрес, маска подсети и шлюз) принтера
для печати наклеек……………………………………………………………………………………………………………151
Использование утилиты BRAdmin Light (только для Windows
Другие утилиты управления………………………………………………………………………………………………….153
Использование веб-интерфейса управления (веб-браузера) ……………………………………………153
Использование утилиты BRAdmin Professional (только для Windows
®
) ………………………………………..151
®
) ……………………………..153
14 Веб—интерфейс управления 154
Общие сведения ………………………………………………………………………………………………………………….154
Настройка параметров принтера с помощью веб-интерфейса управления (веб-браузера) ……..155
Раздел IV Приложение
15 Сброс настроек принтера для печати наклеек 157
Сброс всех параметров до заводских настроек с помощью кнопок на принтере
для печати наклеек (только для QL-810W)………………………………………………………………………….157
Сброс данных с помощью меню ЖК-дисплея (только для QL-820NWB) ………………………………….157
Сброс данных с помощью Инструмента настройки принтера …………………………………………………158
16 Обслуживание 159
Очистка внешней поверхности устройства ……………………………………………………………………………159
Очистка печатающей головки ……………………………………………………………………………………………….159
Очистка ролика ……………………………………………………………………………………………………………………159
Очистка слота для вывода наклеек……………………………………………………………………………………….161
17 Устранение неполадок 162
Общие сведения ………………………………………………………………………………………………………………….162
Проблемы при печати …………………………………………………………………………………………………….163
Проблемы с настройкой сети ………………………………………………………………………………………….168
Принтер для печати наклеек не печатает по сети
Принтер для печати наклеек не удается найти в сети даже после успешной установки….170
Проблемы с защитным программным обеспечением ……………………………………………………….170
Проверка работы сетевых устройств……………………………………………………………………………….171
Сведения о версии …………………………………………………………………………………………………………171
Светодиодные индикаторы…………………………………………………………………………………………………..172
QL-810W ………………………………………………………………………………………………………………………..172
QL-820NWB ……………………………………………………………………………………………………………………174
Устранение неполадок ……………………………………………………………………………………………………176
viii

18 Технические характеристики 177
Технические характеристики принтера для печати наклеек ……………………………………………………177
19 Примечания по использованию P-touch Transfer Manager 179
Примечания о создании шаблонов ……………………………………………………………………………………….179
Примечания о передаче шаблонов……………………………………………………………………………………….179
Примечания о передаче других данных (не шаблонов) ………………………………………………………….180
20 Сетевая терминология и информация 181
Поддерживаемые протоколы и функции безопасности ………………………………………………………….181
Типы сетевых подключений и протоколы ………………………………………………………………………………182
Типы сетевых подключений…………………………………………………………………………………………….182
Настройка принтера для печати наклеек для работы в сети…………………………………………………..184
IP-адреса, маски подсетей и шлюзы ………………………………………………………………………………..184
Беспроводная сеть: термины и понятия ………………………………………………………………………………..186
Термины, связанные с безопасностью …………………………………………………………………………….186
21 Список штрихкодов для функции P-touch Template 190
Общие указания по использованию функции P-touch Template ………………………………………………190
Список штрихкодов для установки параметров……………………………………………………………………..191
22 Использование аккумуляторного блока (приобретается
дополнительно: PA-BU-001) 194
Использование аккумуляторного блока (литиево-ионный аккумулятор) ………………………………….194
Технические характеристики ………………………………………………………………………………………………..196
ix

Раздел I
Основные операции I
Настройка принтера для печати наклеек 2
Печать с помощью компьютера (P-touch Editor) 22
Печать с помощью мобильного устройства 33
Изменение параметров принтера для печати наклеек 37
Печать наклеек с использованием P-touch Template 69
Другие функции 84
1
11
12
13
14
8
3
5
9
1
10
2
4
76
Настройка принтера для печати наклеек1
Описание деталей 1
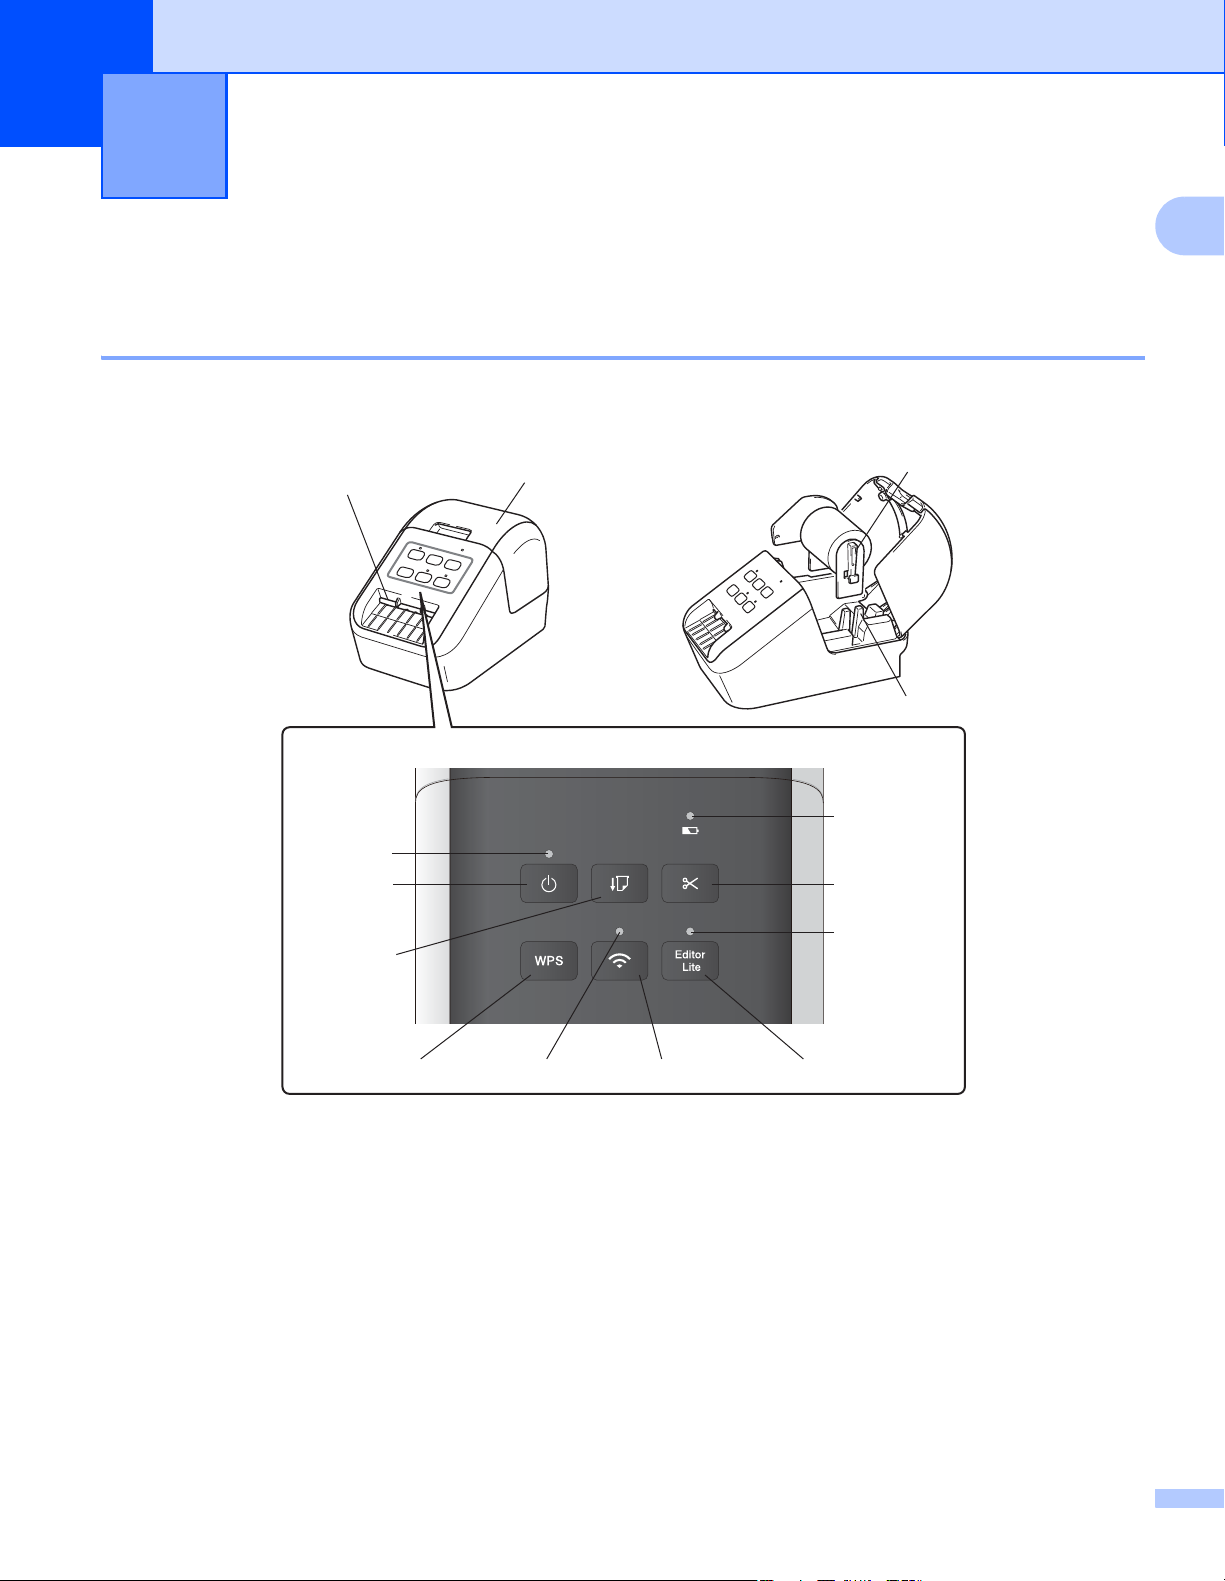
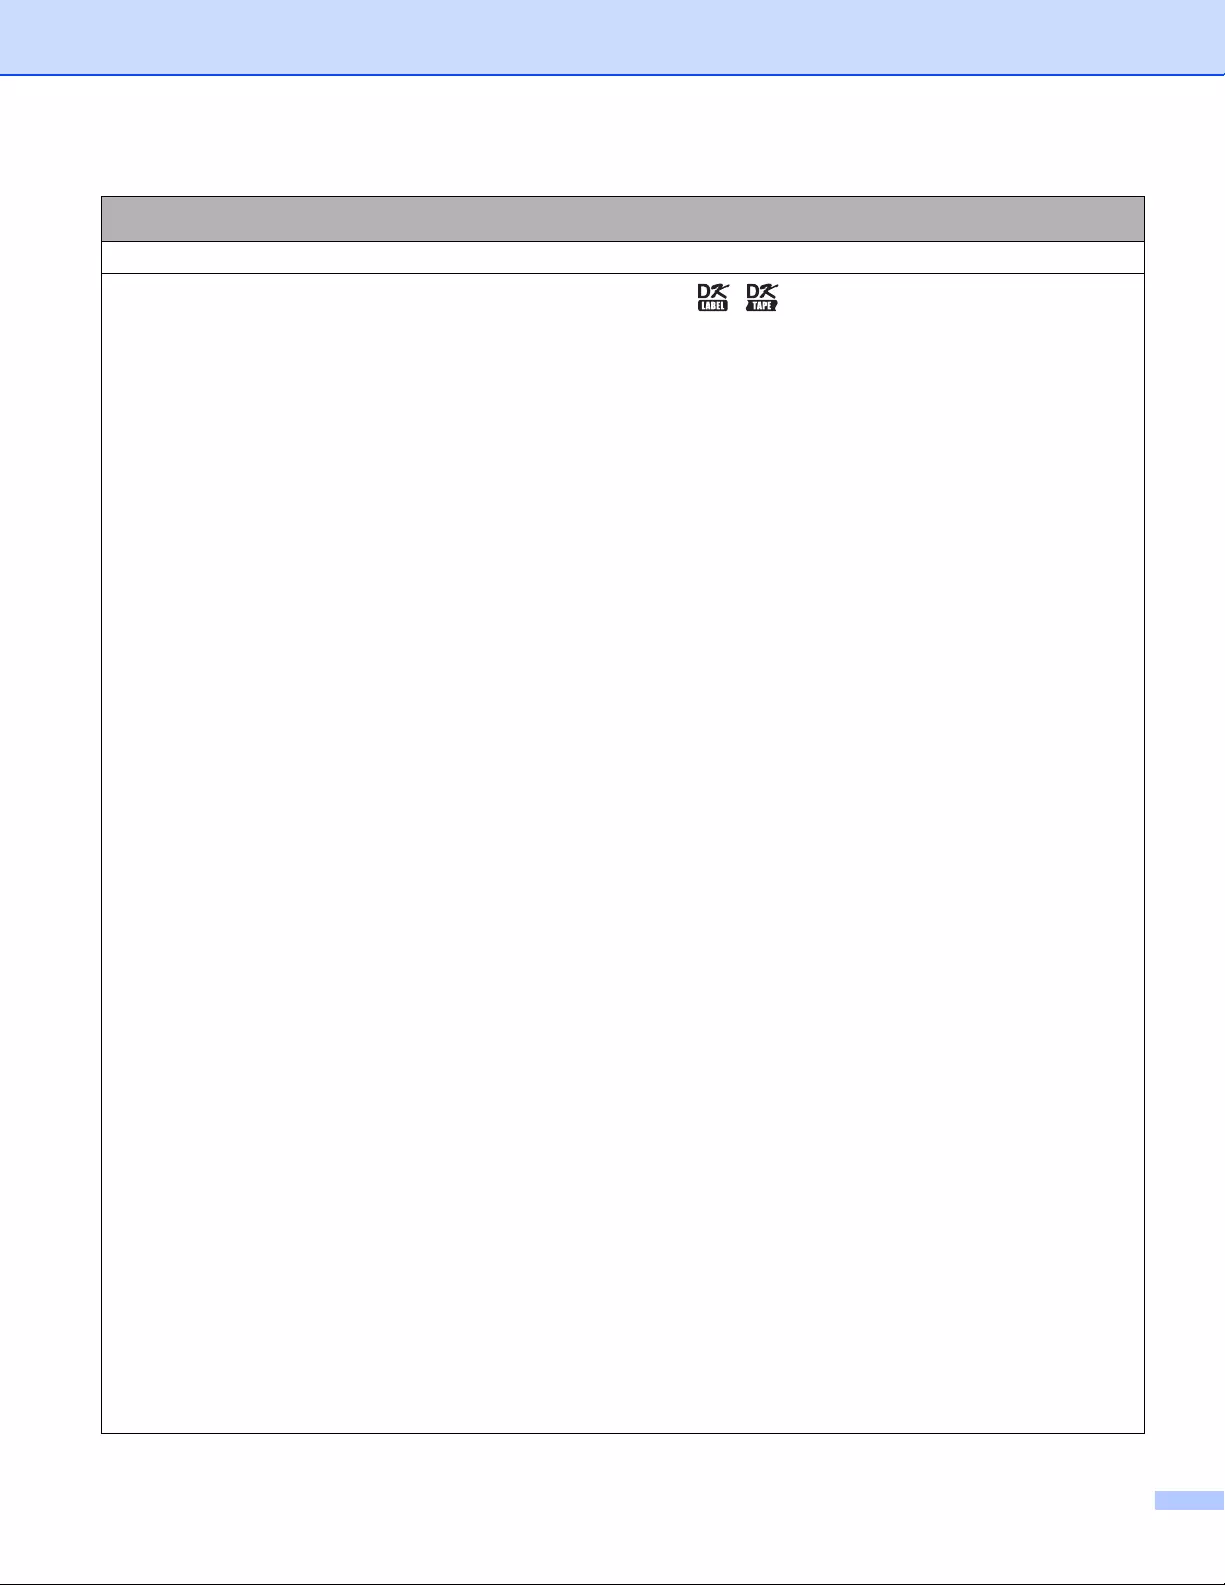
Вид спереди 1
QL-810W 1
1
1 Индикатор аккумулятора
2 Индикатор состояния
3 Кнопка питания
4 Кнопка подачи
5 Кнопка обрезки
6 Кнопка WPS
7 Индикатор Wi-Fi
8 Кнопка Wi-Fi
9 Индикатор Editor Lite
10 Кнопка Editor Lite
11 Крышка отсека для рулона DK
12 Слот для вывода наклеек
13 Держатели рулона
14 Направляющие рулона
2
Настройка принтера для печати наклеек
14
15
16
12
13
11
10
9
76
8
5
2
3
1
4
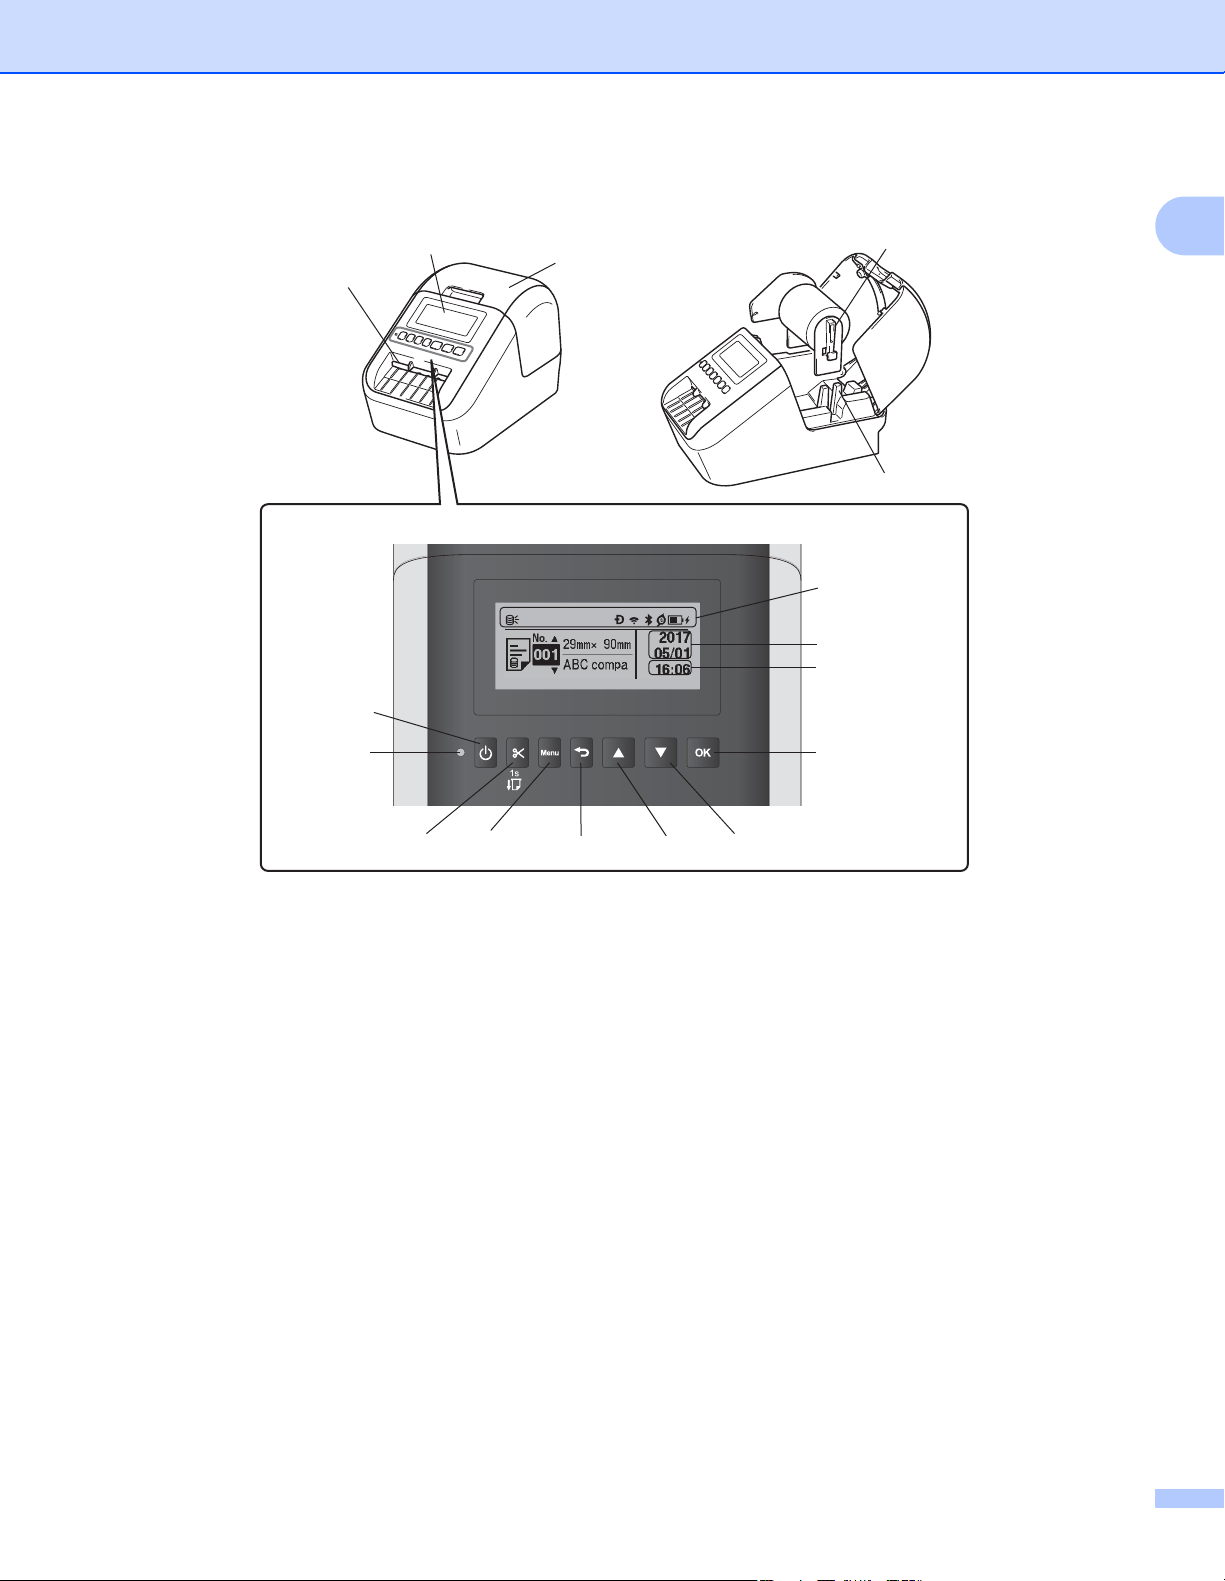
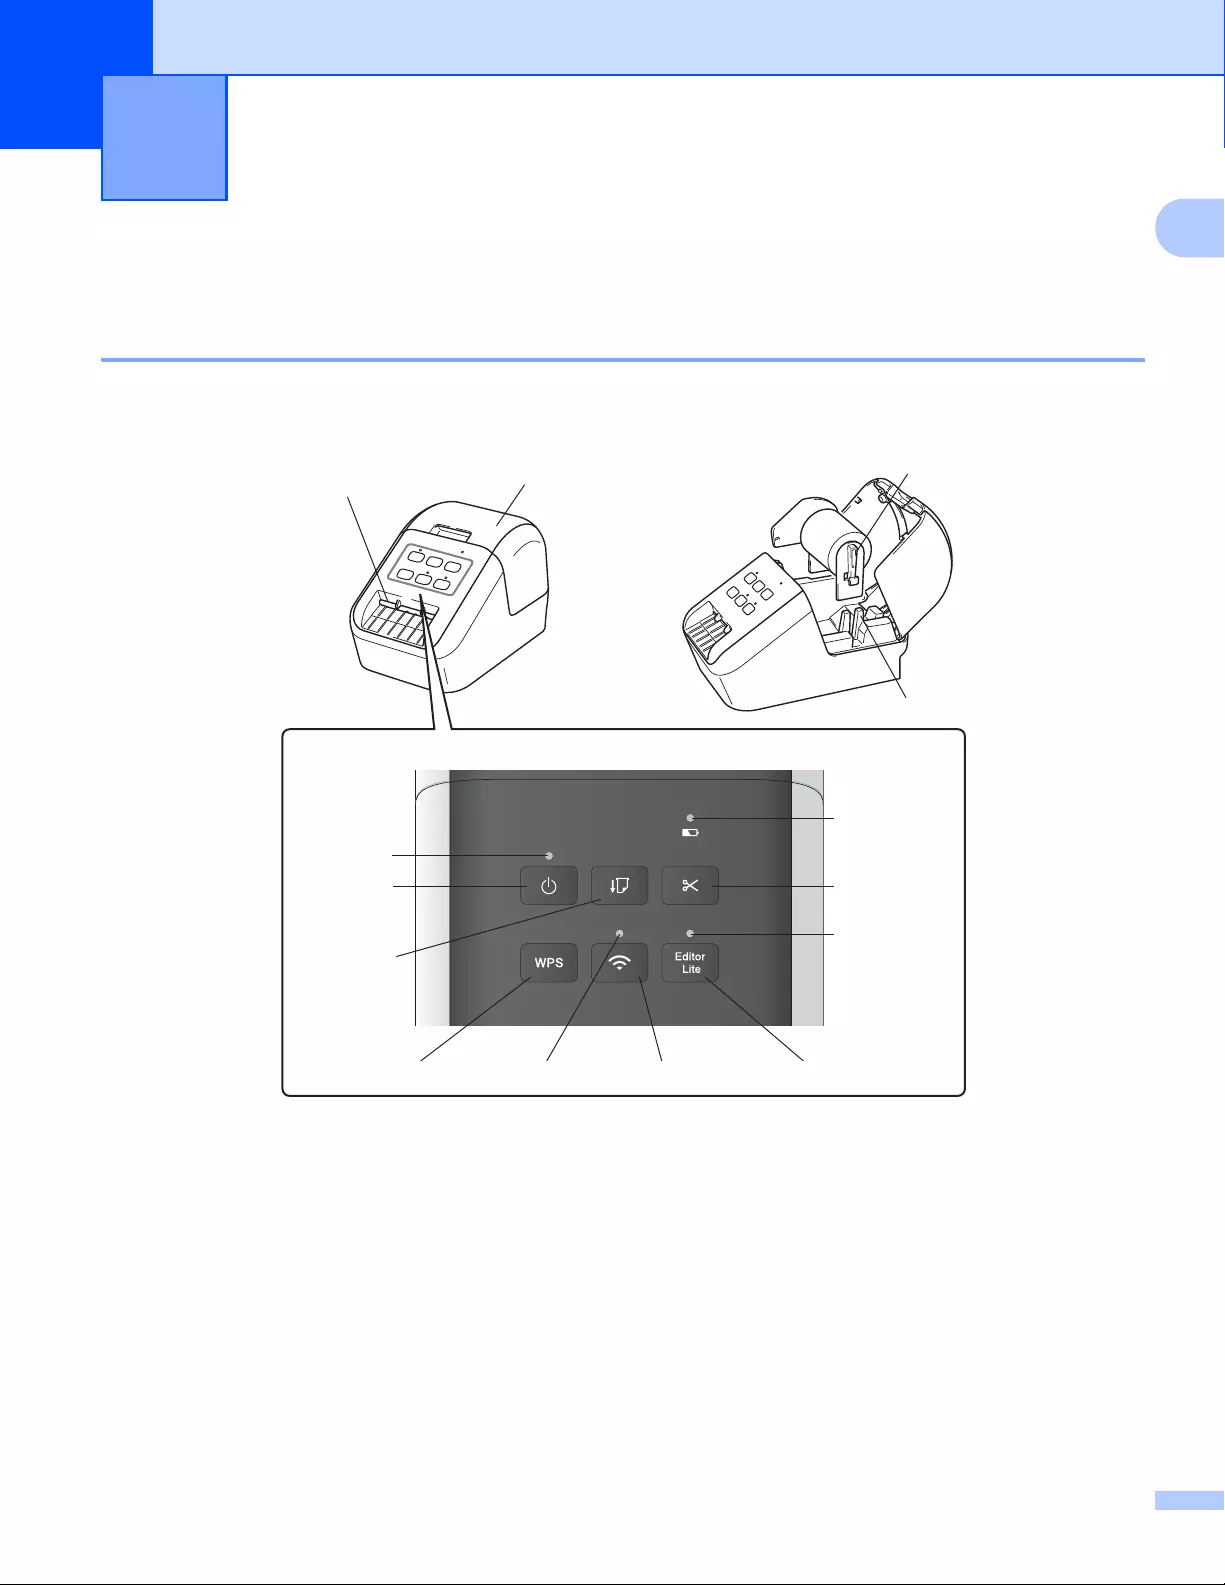
QL-820NWB 1
1
1 Отображение индикаторов
2 Отображение даты
3 Отображение времени
4 Индикатор состояния
5 Кнопка питания
6 Кнопка обрезки
7 Кнопка Menu (Меню)
8 Кнопка отмены
9 Кнопка со стрелкой вверх
10 Кнопка со стрелкой вниз
11 Кнопка OK
12 ЖК—дисплей
13 Слот для вывода наклеек
14 Крышка отсека для рулона DK
15 Держатели рулона
16 Направляющие рулона
3
Настройка принтера для печати наклеек
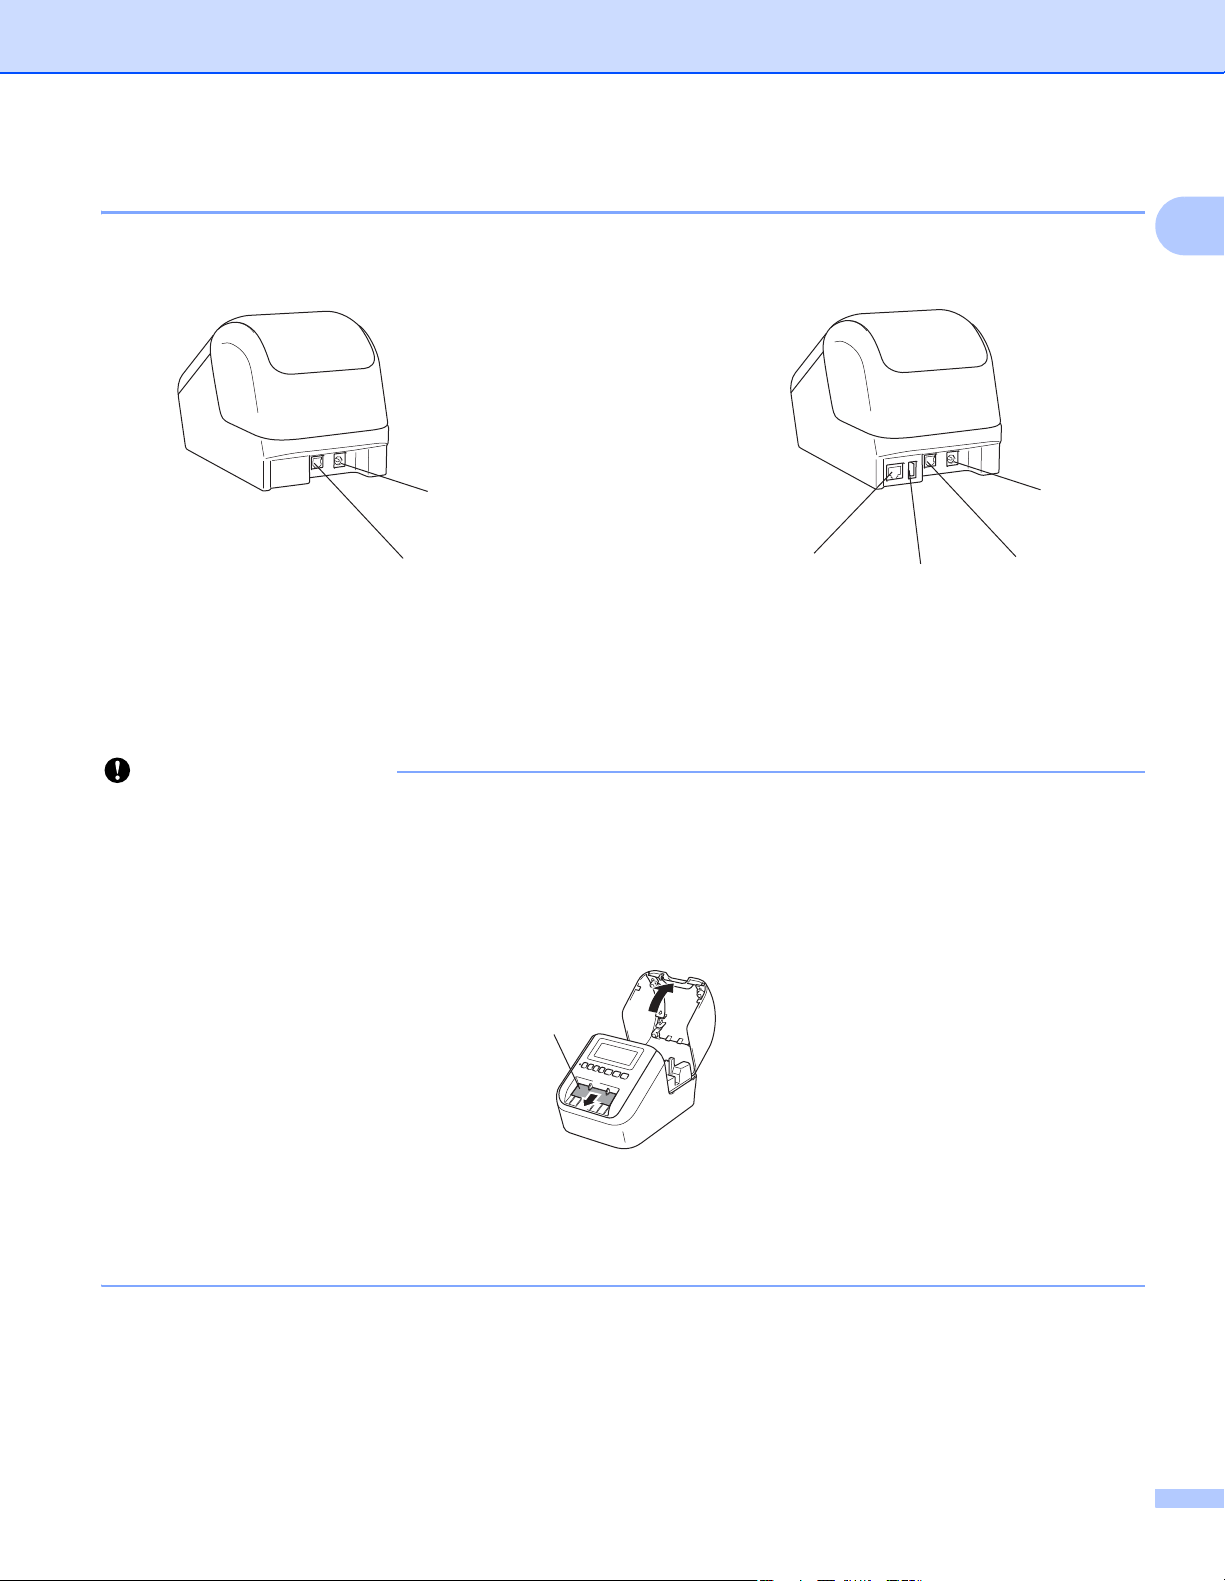
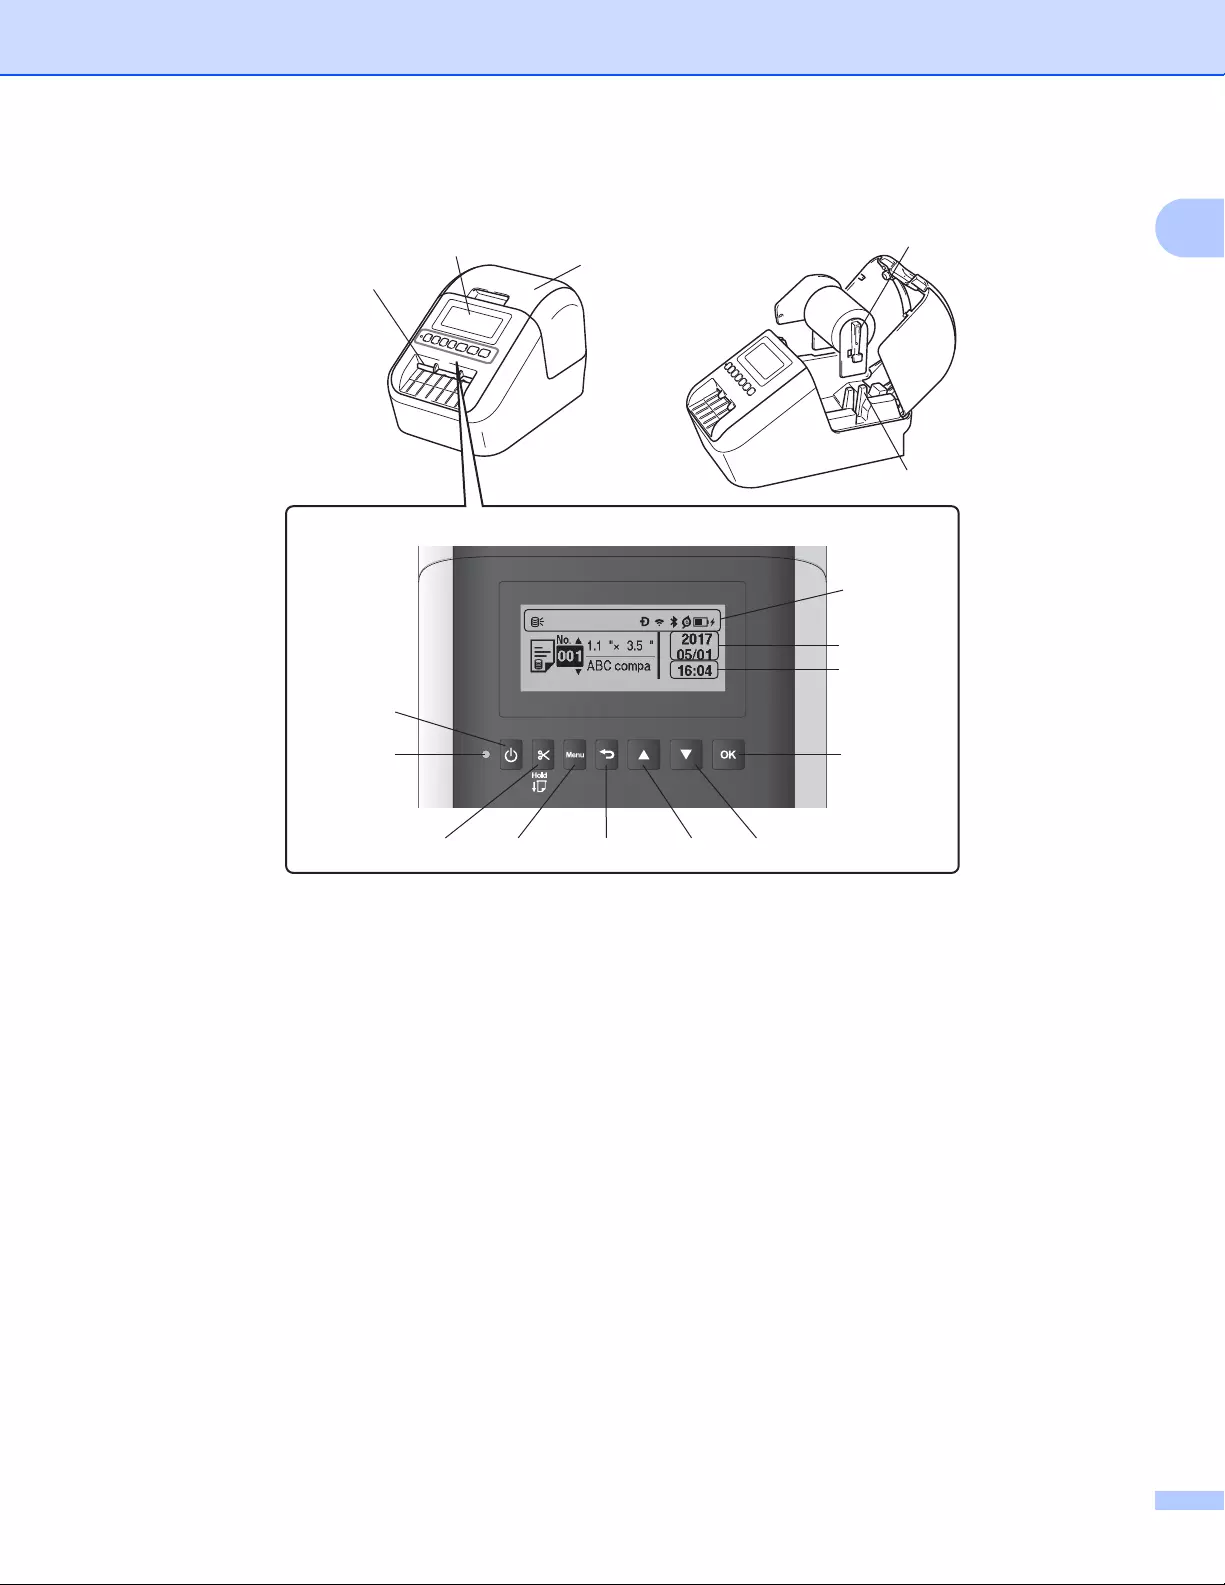
Вид сзади 1
QL-810W QL-820NWB
1 Порт адаптера переменного тока
2USB-порт
3USB-хост
4 Порт локальной сети
1
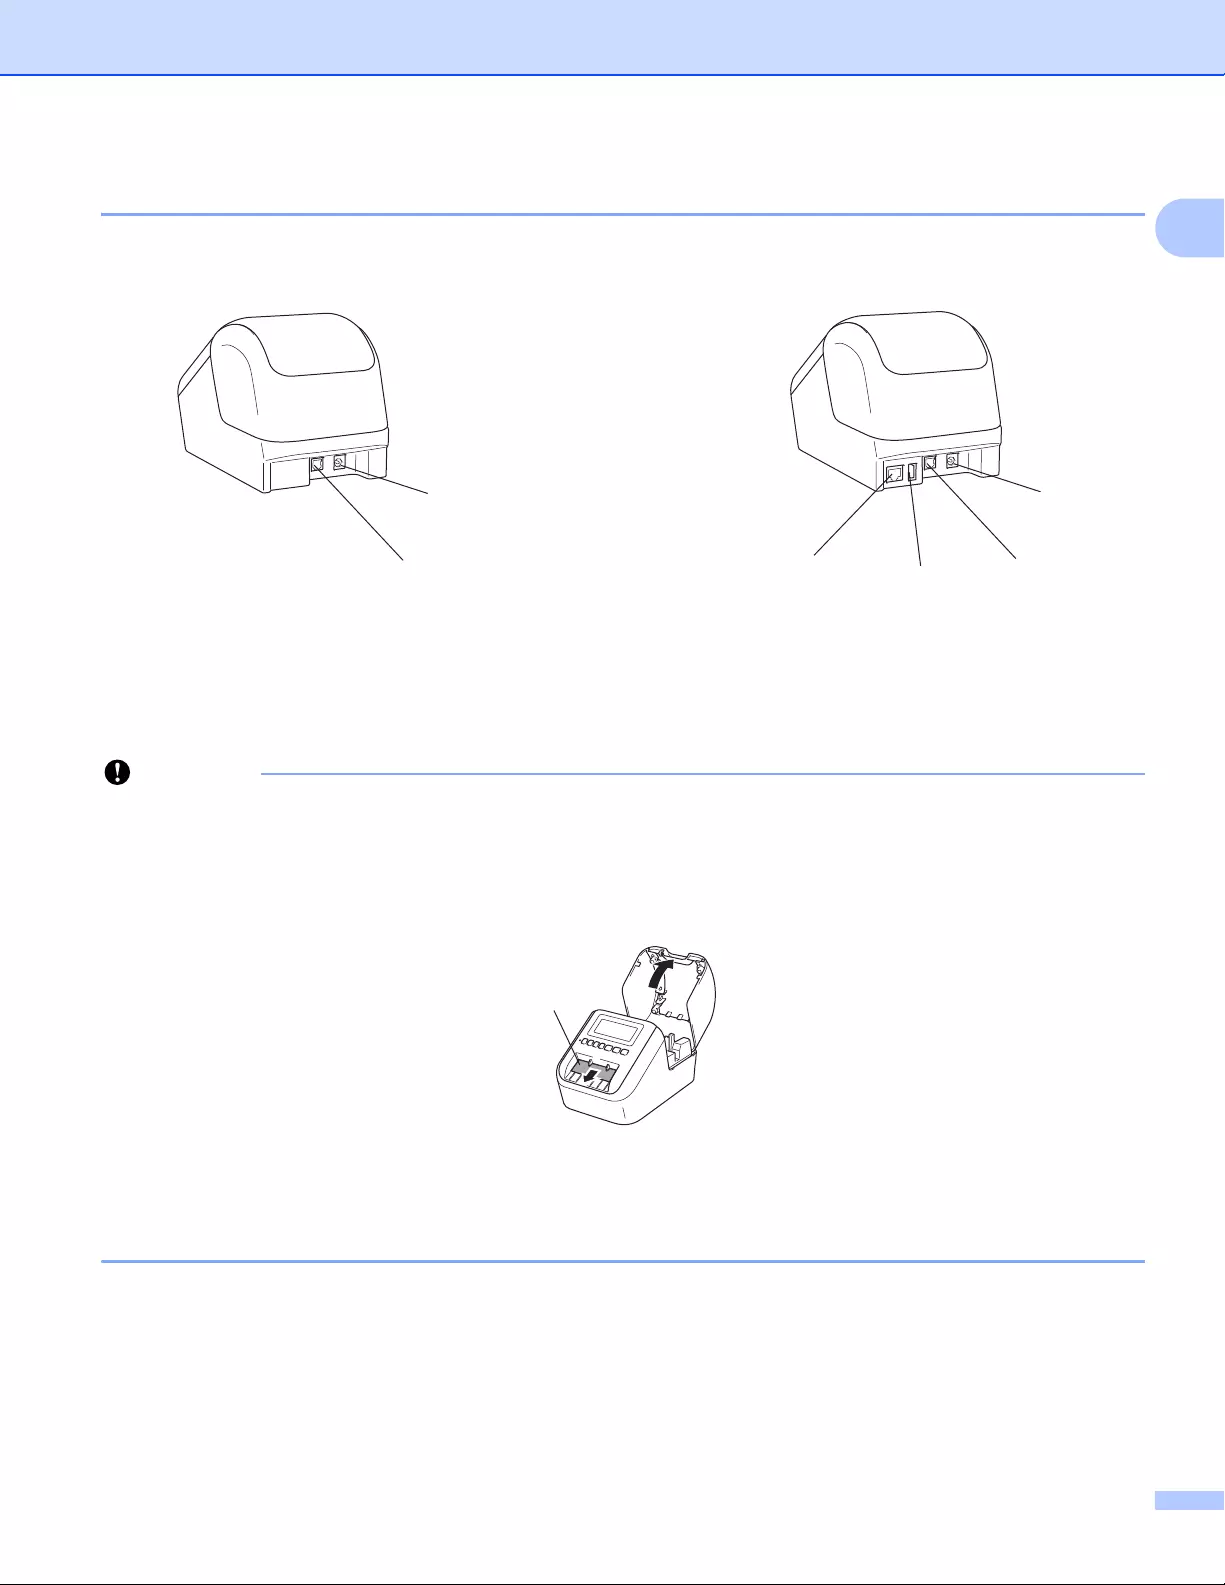
Перед использованием принтера извлеките защитный лист. Ниже описано, как это сделать.
1 Убедитесь, что принтер выключен.
Удерживая принтер за переднюю часть, откройте крышку отсека для рулона DK, с усилием
потянув ее вверх.
2 Удалите защитный лист из слота для вывода наклеек.
• Не выбрасывайте защитный лист.
• Если принтер не используется, поднимите крышку отсека
для рулона DK и извлеките рулон из
принтера. Вставьте защитный лист в слот для вывода наклеек, чтобы сохранить высокое
качество печати.
4

Настройка принтера для печати наклеек
Установка рулона DK 1
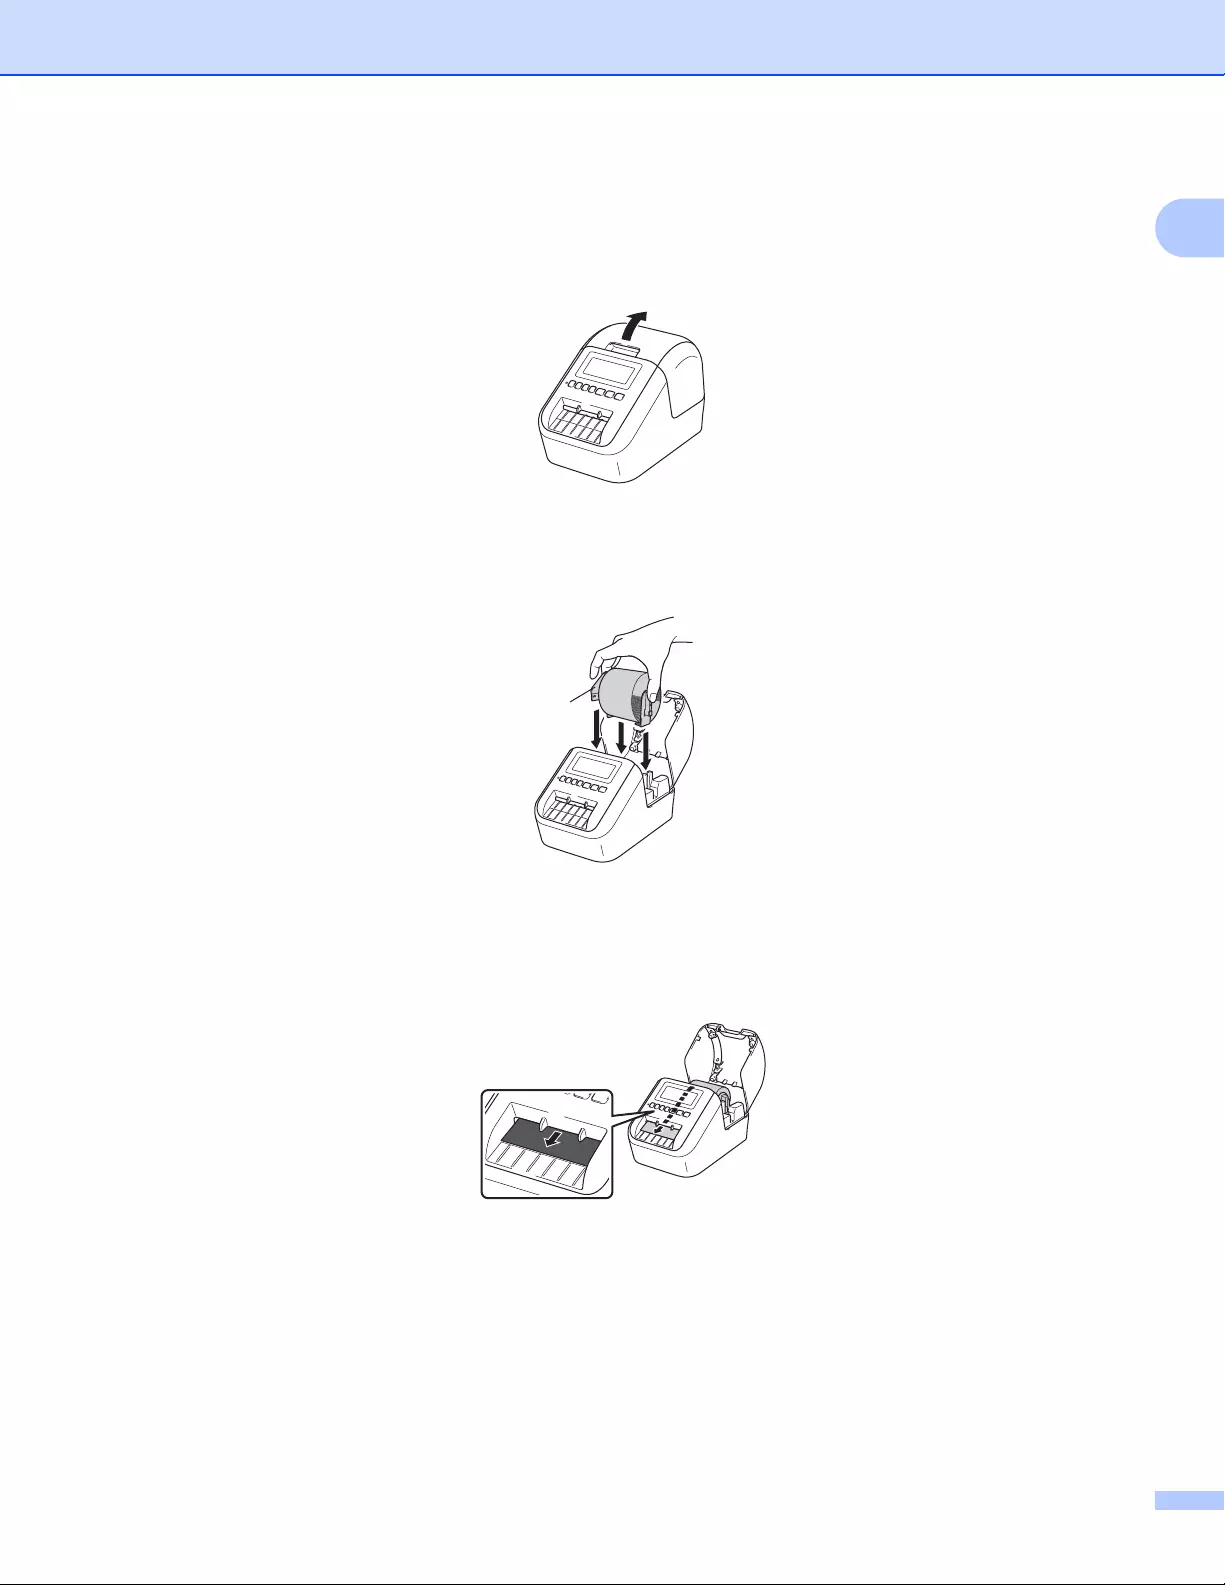
a Убедитесь в том, что принтер для печати наклеек выключен.
Удерживая принтер за переднюю часть, откройте крышку отсека для рулона DK, с усилием
потянув ее вверх.
b Поместите рулон DK в направляющие рулона.
• Убедитесь в том, что держатели рулона прочно вставлены в направляющие рулона.
• Стабилизатор (1) должен войти в паз на принтере.
1
1
c Протяните рулон DK через принтер.
• Совместите край рулона DK с верхним краем слота для вывода наклеек.
• Вставьте первую наклейку в слот внутри отсека.
• Протяните наклейку через слот для вывода наклеек, пока ее конец не достигнет отметки
(как показано ниже).
5
Настройка принтера для печати наклеек
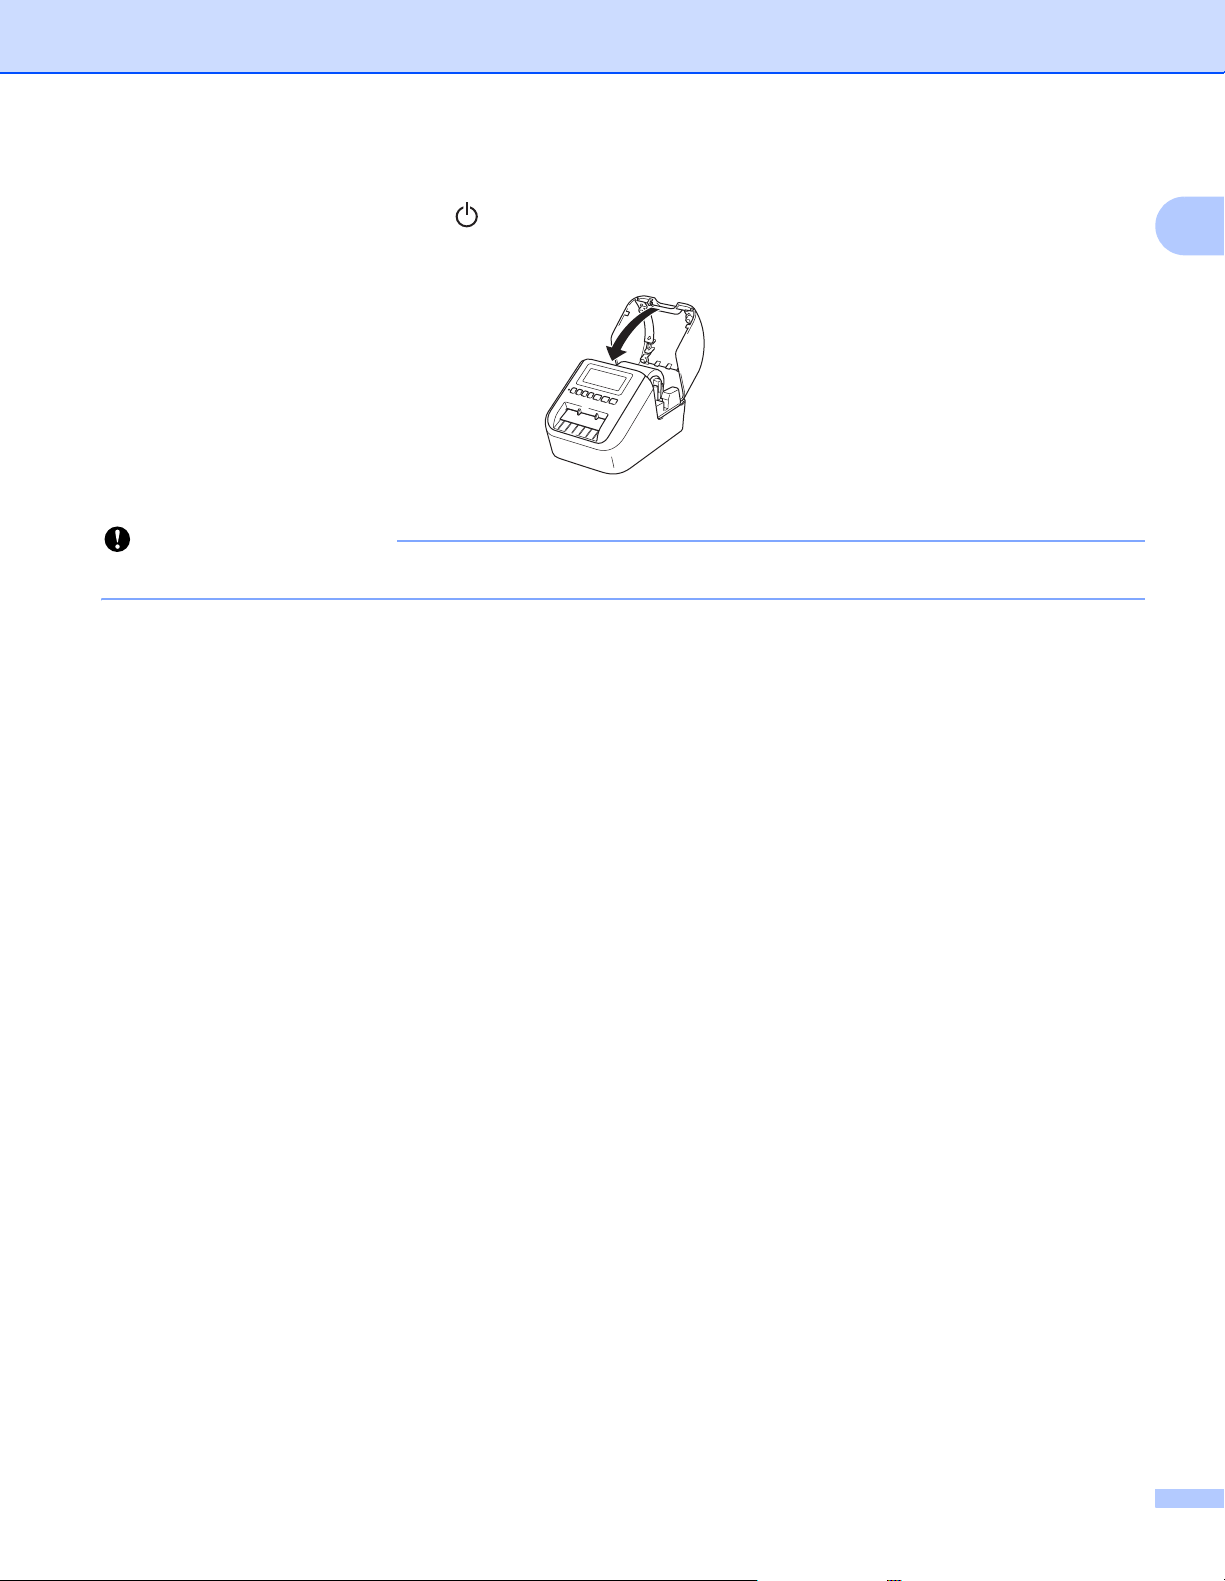
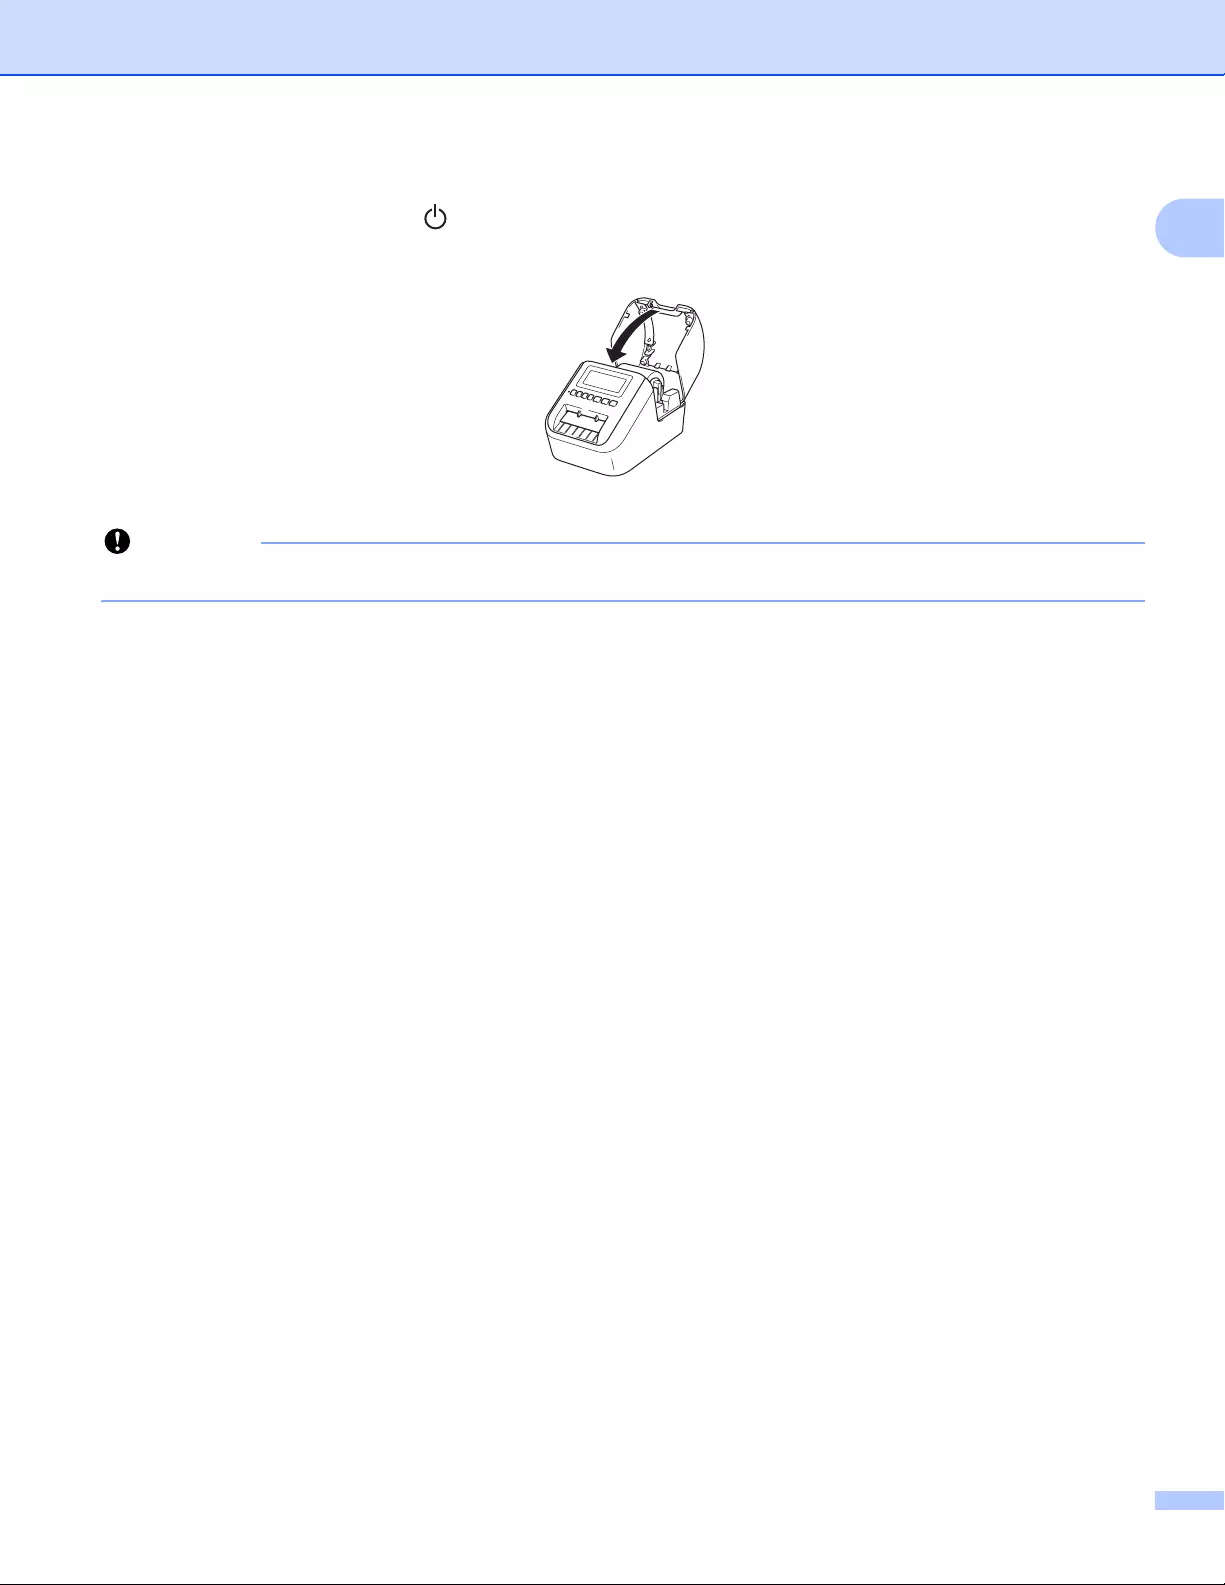
d Закройте крышку отсека для рулона DK.
При нажатии кнопки питания () для включения принтера конец рулона DK автоматически
выравнивается.
Не оставляйте в принтере напечатанные наклейки. Это может привести к их замятию.
1
6

Настройка принтера для печати наклеек
Подключение адаптера переменного тока 1
Подключите шнур питания переменного тока к принтеру и адаптеру переменного тока, а затем
к заземленной электрической розетке.
Можно также использовать аккумуляторный блок PA-BU-001 (приобретается дополнительно).
1
7
Настройка принтера для печати наклеек
Установка дисковой батарейки (только для QL-820NWB) 1
Чтобы настройки времени не сбивались, в качестве резервного источника питания используется
дисковая батарейка. Помните, что принтер потребляет питание от батарейки, даже когда не
используется.
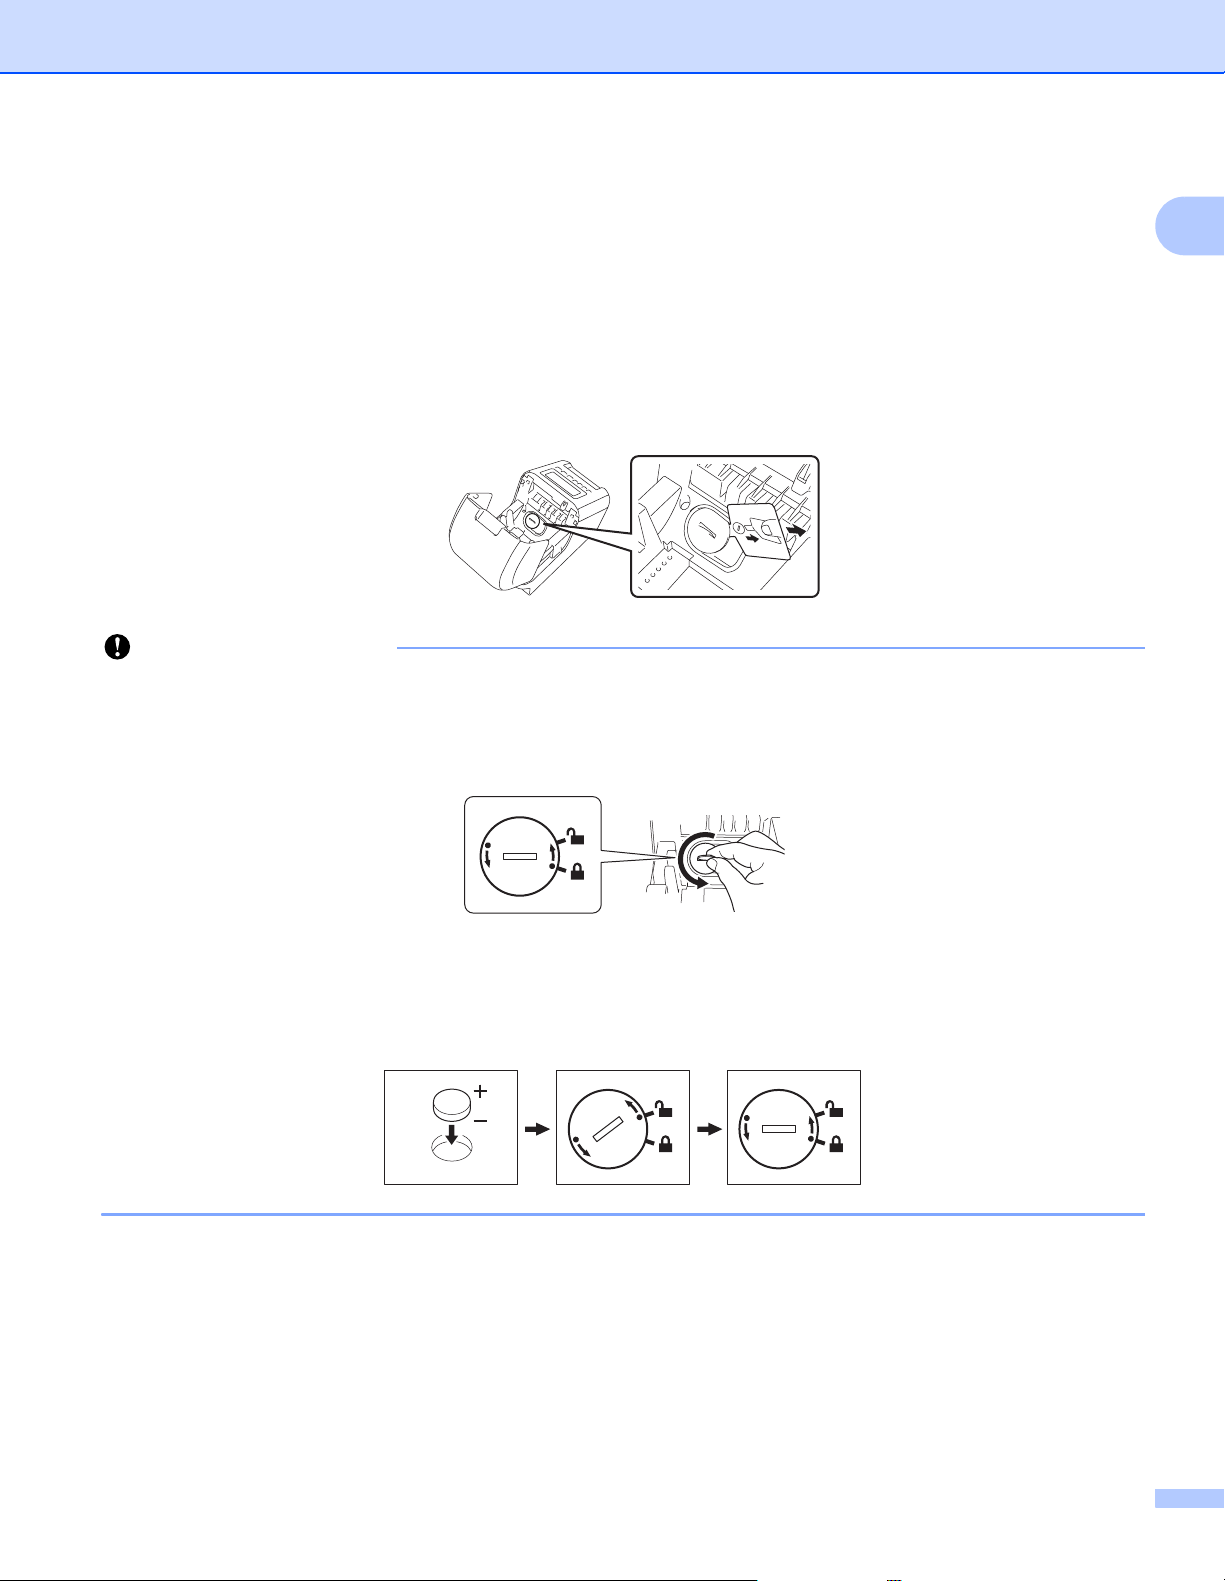
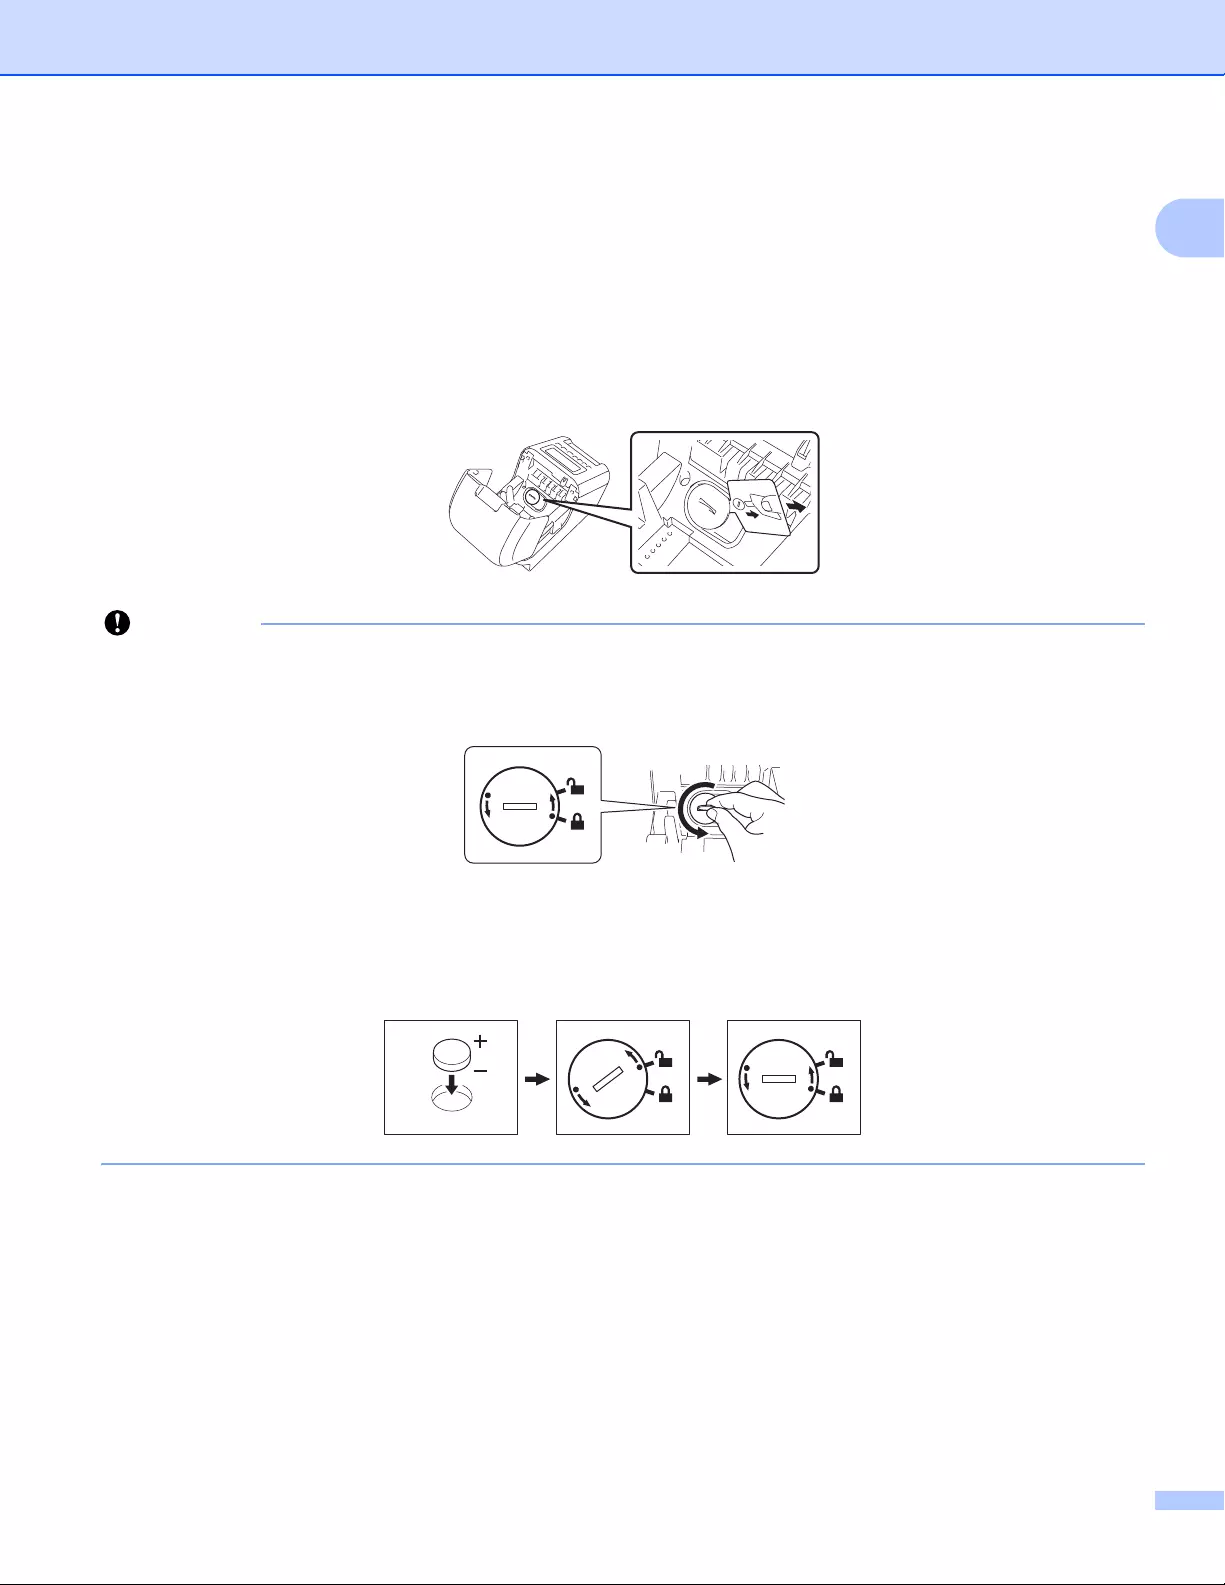
a Убедитесь, что принтер выключен. Удерживая принтер за переднюю часть, откройте крышку
отсека для рулона DK, с усилием потянув ее вверх.
b Снимите изоляцию с дисковой батарейки.
• Снимите крышку дисковой батарейки, аккуратно повернув ее до упора по направлению стрелки
с помощью монеты или подобного предмета.
Не поворачивайте крышку дисковой батарейки после того, как она встала в открытое положение,
иначе вы можете повредить ее.
1
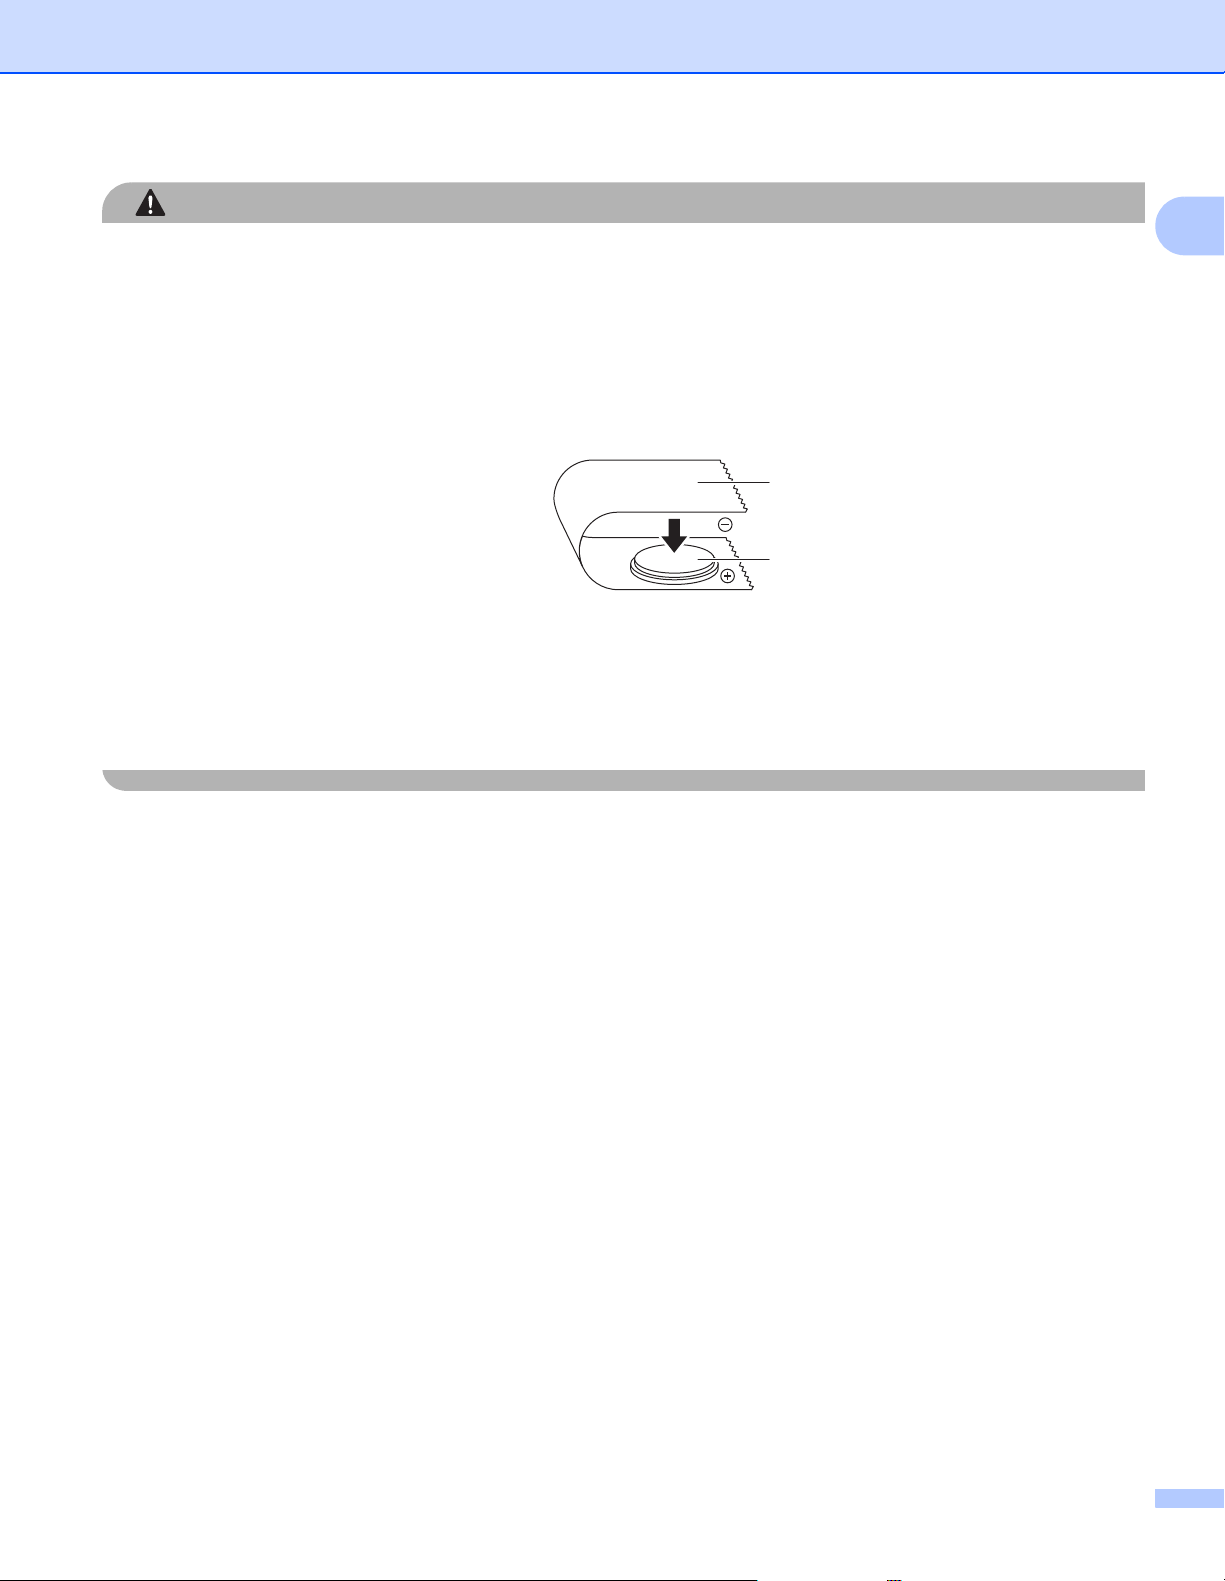
• Замените дисковую батарейку.
При установке новой батарейки соблюдайте полярность (+ и –).
Установите на место крышку дисковой
противоположном стрелке, с помощью монеты или подобного предмета.
батарейки, аккуратно повернув ее до упора в направлении,
8
Настройка принтера для печати наклеек
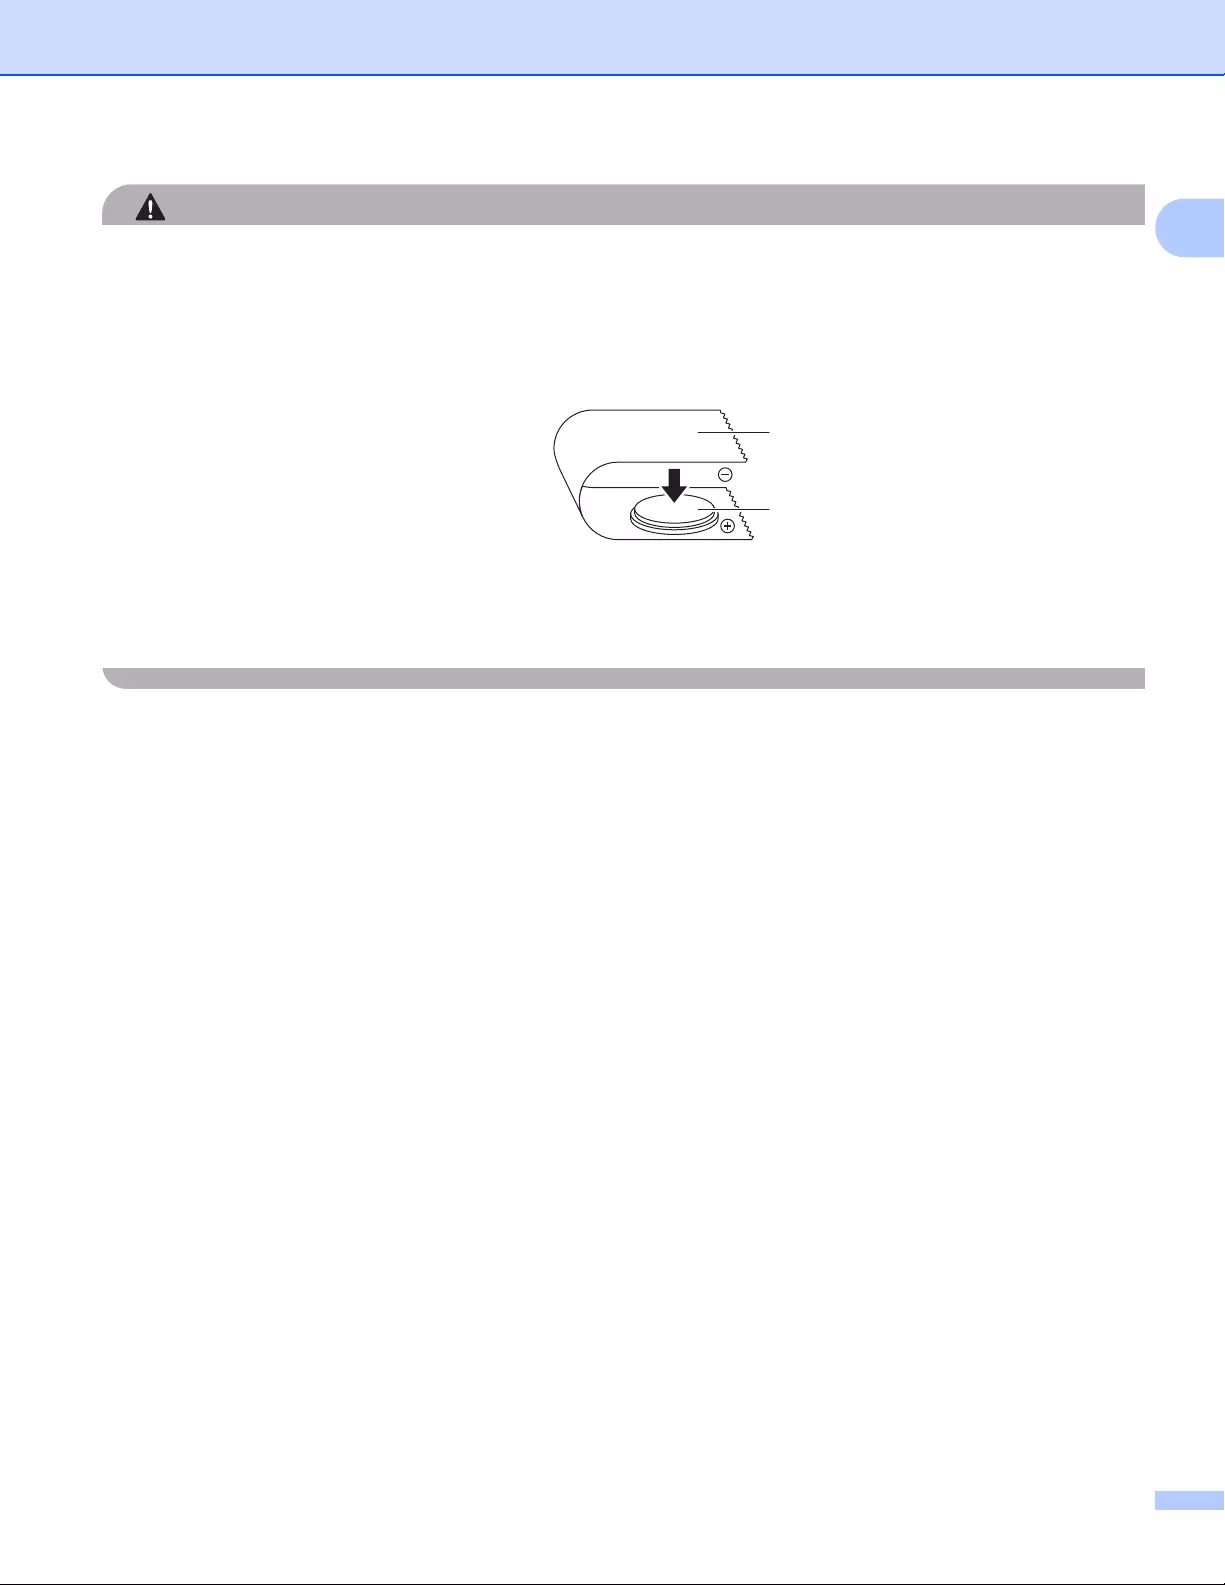
• Если вы не планируете использовать принтер в течение длительного времени, извлеките
батарейку.
• Не выбрасывайте батарейки вместе с бытовым мусором, а сдавайте их в специализированные
пункты приема. Обязательно соблюдайте требования всех соответствующих федеральных,
региональных и местных нормативных актов.
• Для хранения или утилизации оберните батарейку клейкой лентой, чтобы не допустить
замыкания
1 Клейкая лента
2 Дисковая
батарейка
• Рекомендуется заменять батарейку каждые два года.
• Если часы сбрасываются во время подачи питания на устройство, замените батарейку.
Для замены покупайте батарейку CR2032 (рекомендуемые производители: Hitachi Maxell, Ltd.;
FDK Corporation).
контактов (см. иллюстрацию).
1
2
1
9
Настройка принтера для печати наклеек
Включение и отключение питания 1
Включение. Чтобы включить принтер, нажмите кнопку питания ( ). Индикатор состояния начнет
светиться зеленым.
Выключение. Чтобы выключить принтер, еще раз нажмите кнопку питания ().
При выключении принтера не извлекайте аккумулятор и не отсоединяйте адаптер переменного
тока, пока не перестанет светиться оранжевый индикатор состояния.
Настройка языка ЖК-дисплея (только для QL-820NWB) 1
a Нажмите кнопку [Menu] (Меню).
b С помощью кнопки [▲] или [▼] выберите меню [Administration] (Администрирование) и нажмите
кнопку [OK].
c Выберите параметр [ Language] (Язык), с помощью прокрутки найдите свой язык и нажмите
кнопку [OK].
1
При первом запуске принтера экран настройки языка отображается автоматически без выбора
соответствующего меню.
Настройка даты и времени (только для QL-820NWB) 1
Настройте для часов текущие дату и время. Заданные дата и время отображаются на главном экране.
a С помощью кнопки [Menu] (Меню), [▲] или [▼] выберите меню [Settings] (Настройки) и нажмите
кнопку [OK].
b С помощью кнопки [▲] или [▼] выберите параметр [Set Clock] (Настройка времени) и нажмите
кнопку [OK]. Откроется экран настройки часов.
c Нажимая кнопки [▲] и [▼], укажите две последние цифры года, затем нажмите кнопку [OK]. Точно
так же укажите месяц и день.
d Нажимая кнопки [▲] и [▼], укажите по две цифры для часов и минут, затем выберите [AM], [PM] или
[24].
e Нажмите кнопку [OK]. Появится меню [Settings] (Настройки).
• При первом запуске принтера экран настройки даты и времени отображается автоматически без
выбора соответствующего меню.
• Формат даты и времени можно изменить. Выберите меню [Administration] (Администрирование),
затем выберите пункт [Date Format] (Формат даты) или [Time Format] (Формат времени) и
укажите формат.
10
Настройка принтера для печати наклеек
ЖК-дисплей (только для QL-820NWB) 1
Экран 1
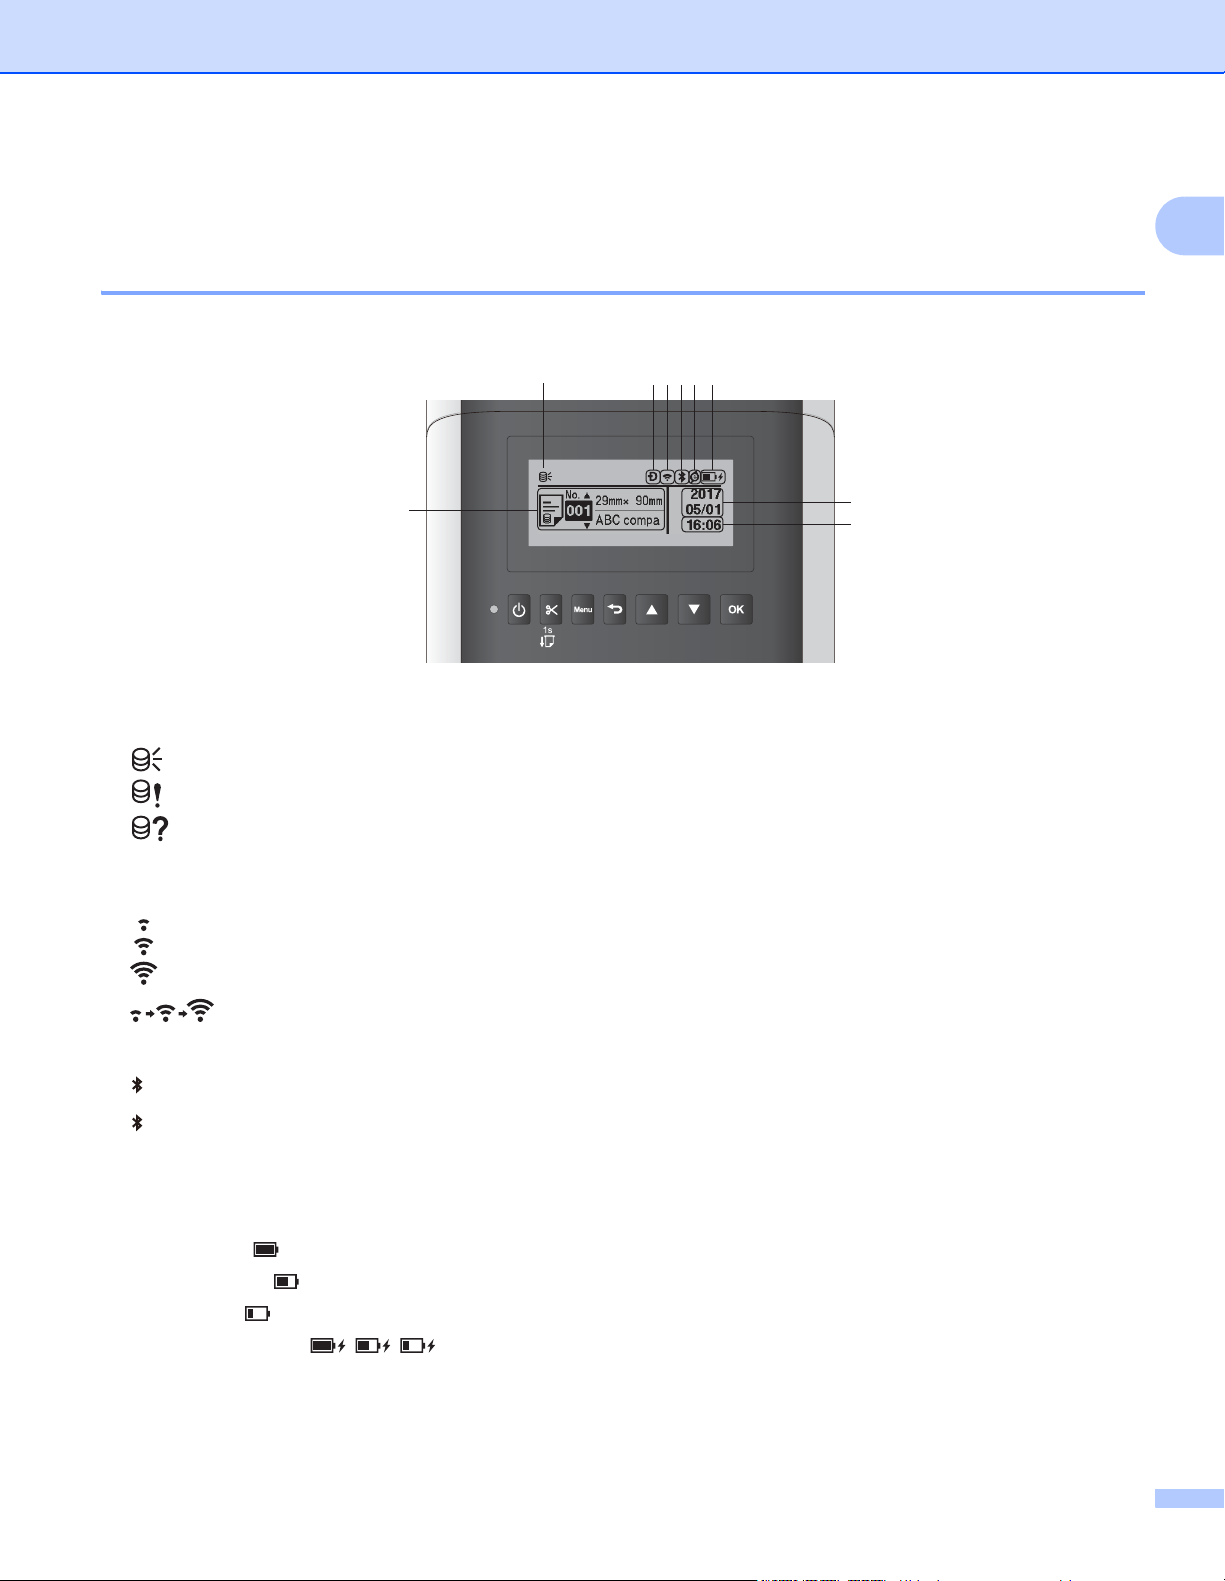
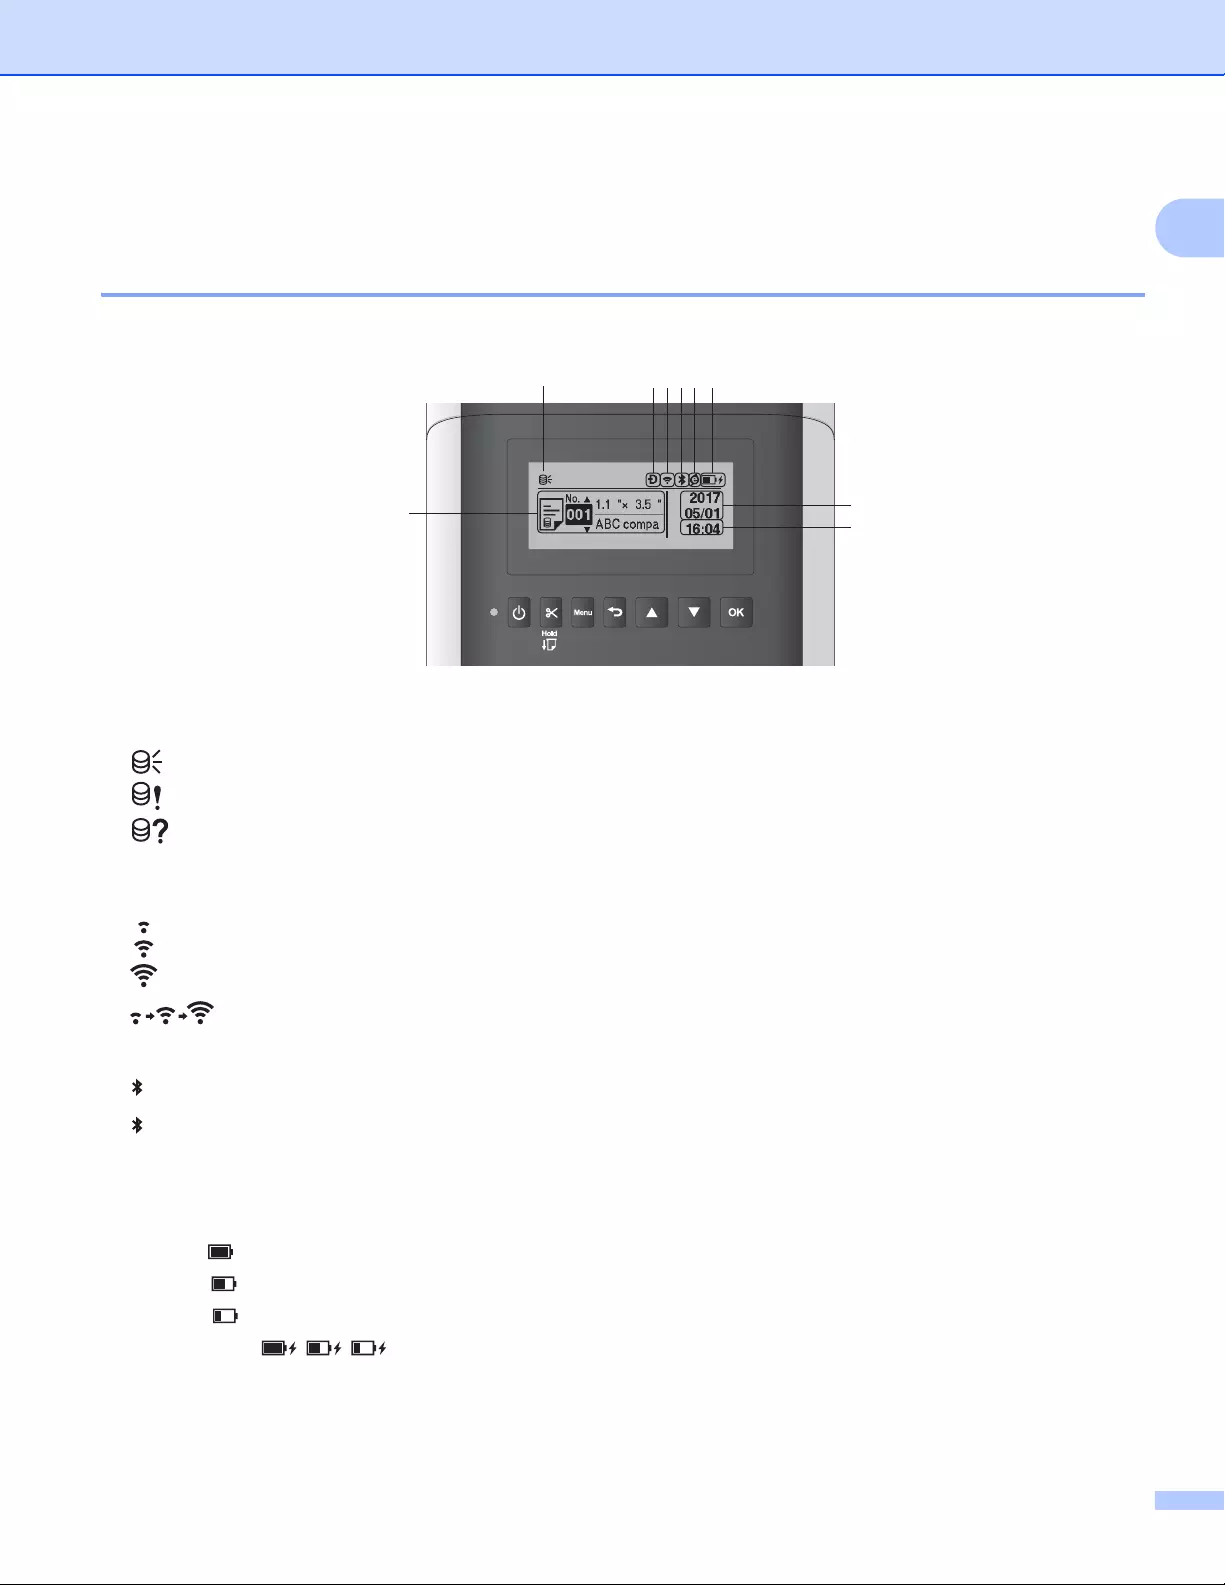
При включении принтера появляется главный экран.
1
1 Значок обновления
Показывает, что доступны обновленные шаблоны, базы данных и другие данные.
: есть новые данные.
(мигает): обновить данные не удалось.
(мигает): нет связи с сервером.
2 Значок Wireless Direct
3 Значок беспроводной сети
: подключение к сети выполнено правильно.
: принтер ищет сеть.
4 Значок Bluetooth
: режим Bluetooth.
(мигает):
5 Значок экозарядки (появляется, только если установлен аккумуляторный блок)
6 Уровень заряда аккумулятора (появляется, только если установлен аккумуляторный блок)
Показывает уровень оставшегося заряда аккумулятора.
Полный:
Половина:
Низкий:
Идет зарядка:
7 Шаблон
8 Отображение даты
функция повторного подключения активна, но подключения нет.
11
Настройка принтера для печати наклеек
9 Отображение времени
При использовании кнопок на принтере не отправляйте задания на печать и не изменяйте
настройки с компьютера или другого устройства.
Параметры ЖК-дисплея 1
Параметры ЖК—дисплея можно настраивать на принтере или в программе Инструмент настройки
принтера на компьютере, подключенном к принтеру. Дополнительные сведения о подключении
компьютера и настройке параметров см. в разделе Изменение параметров принтера для печати
наклеек на стр. 37.
1
Настройка параметров на принтере
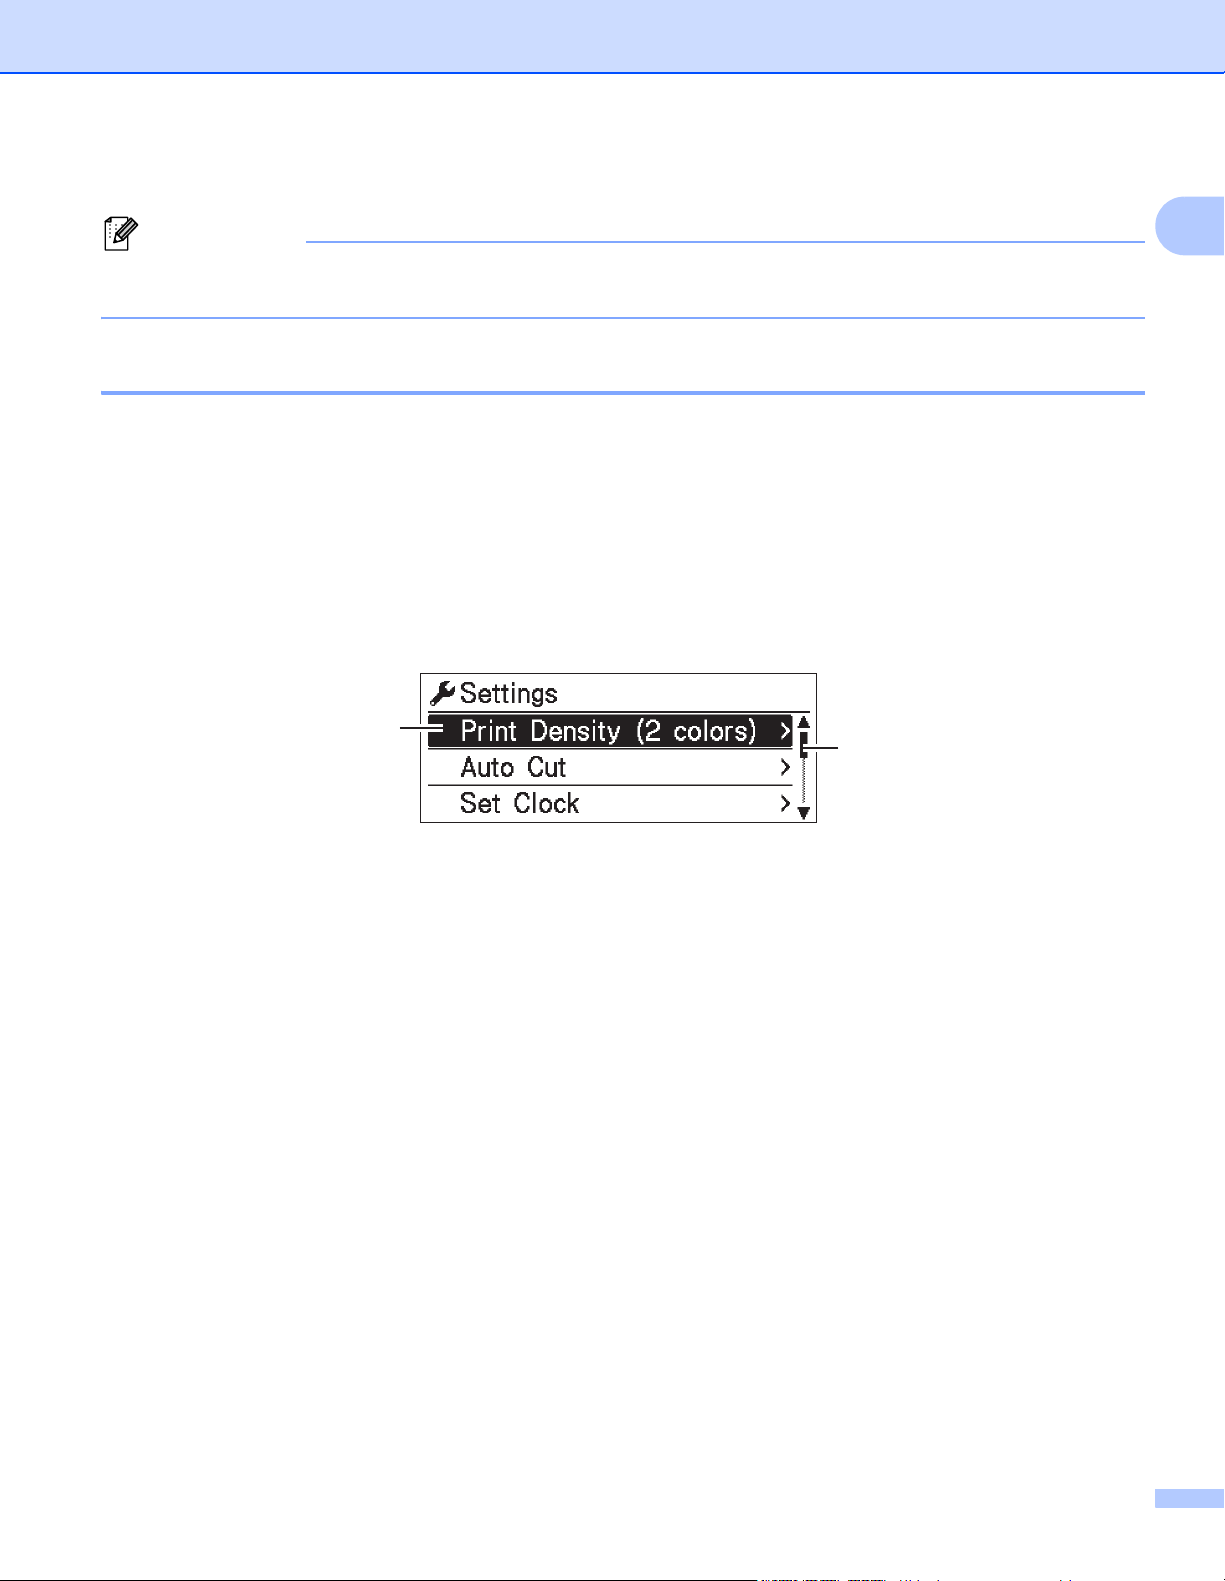
С помощью кнопок [Menu] (Меню), [▲] и [▼] выберите нужный пункт меню и нажмите кнопку [OK].
Нажимая кнопку [▲] или [▼], выберите параметр и нажмите кнопку [OK].
1
2
1 Текущее значение параметра выделено.
2 Полоса прокрутки показывает расположение элемента в списке.
1
12
Настройка принтера для печати наклеек
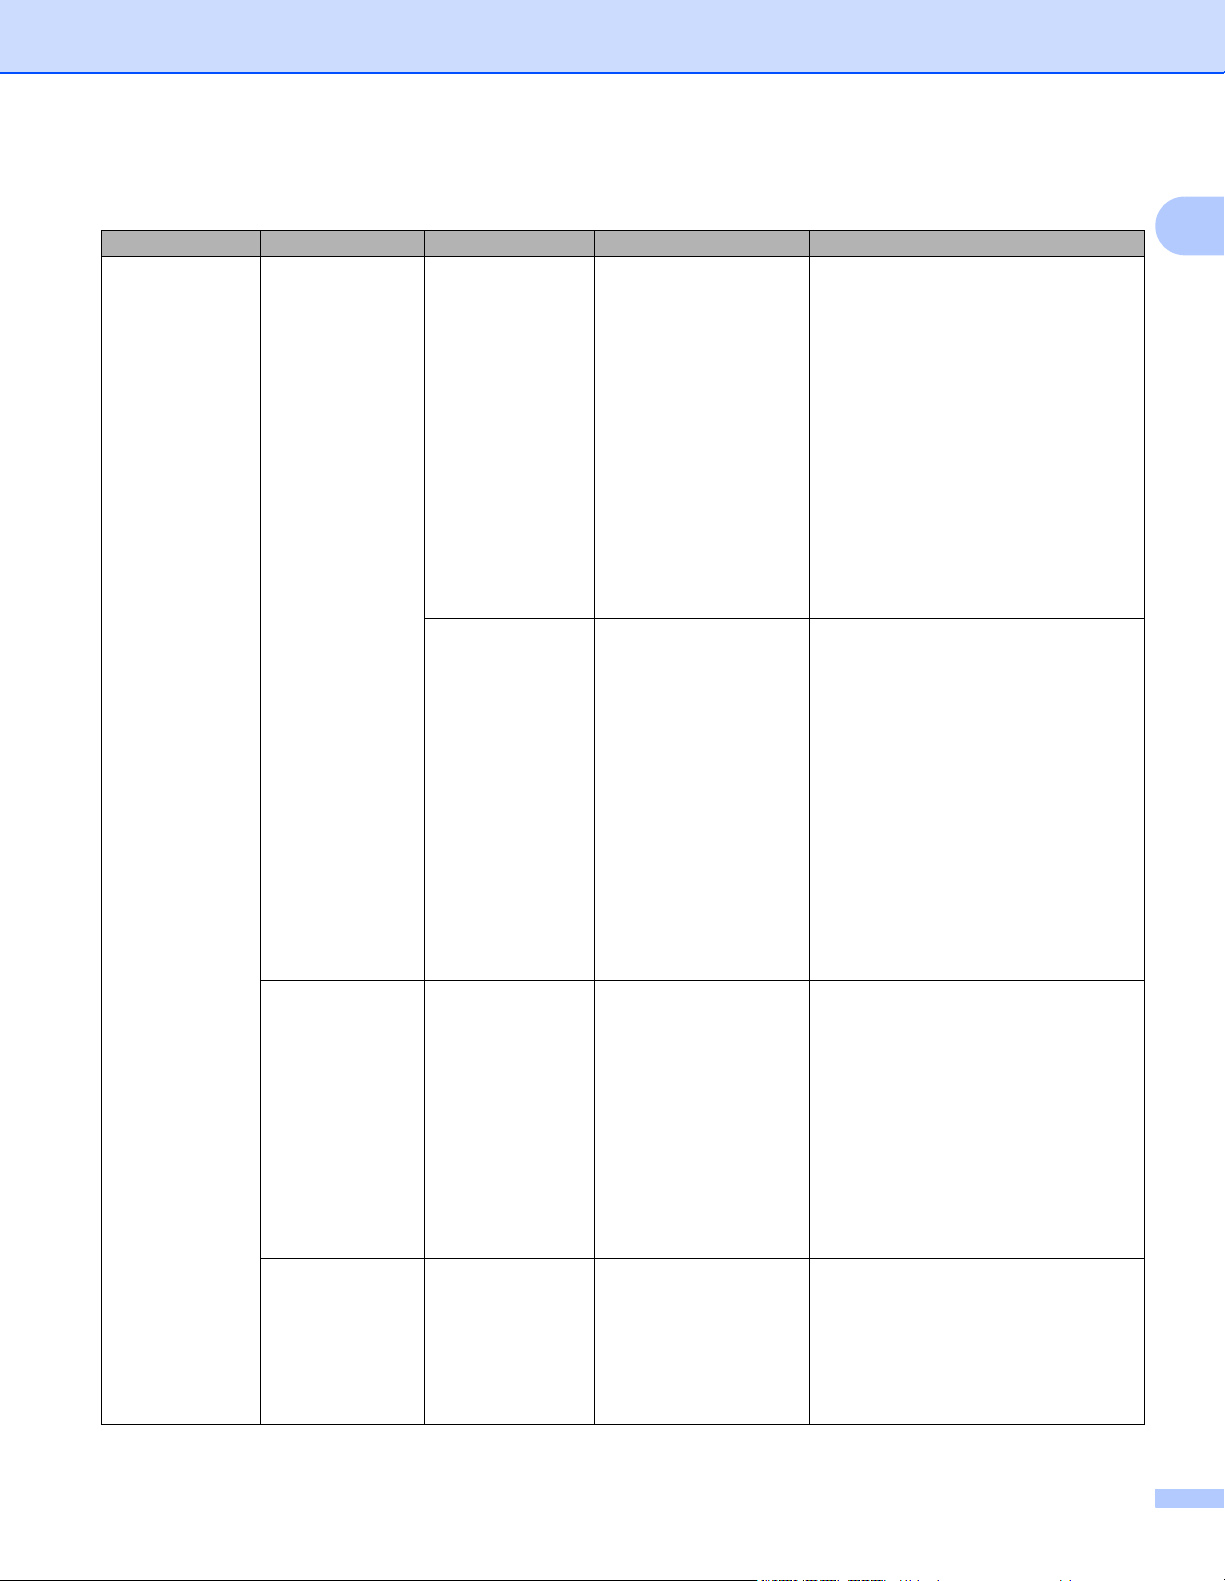
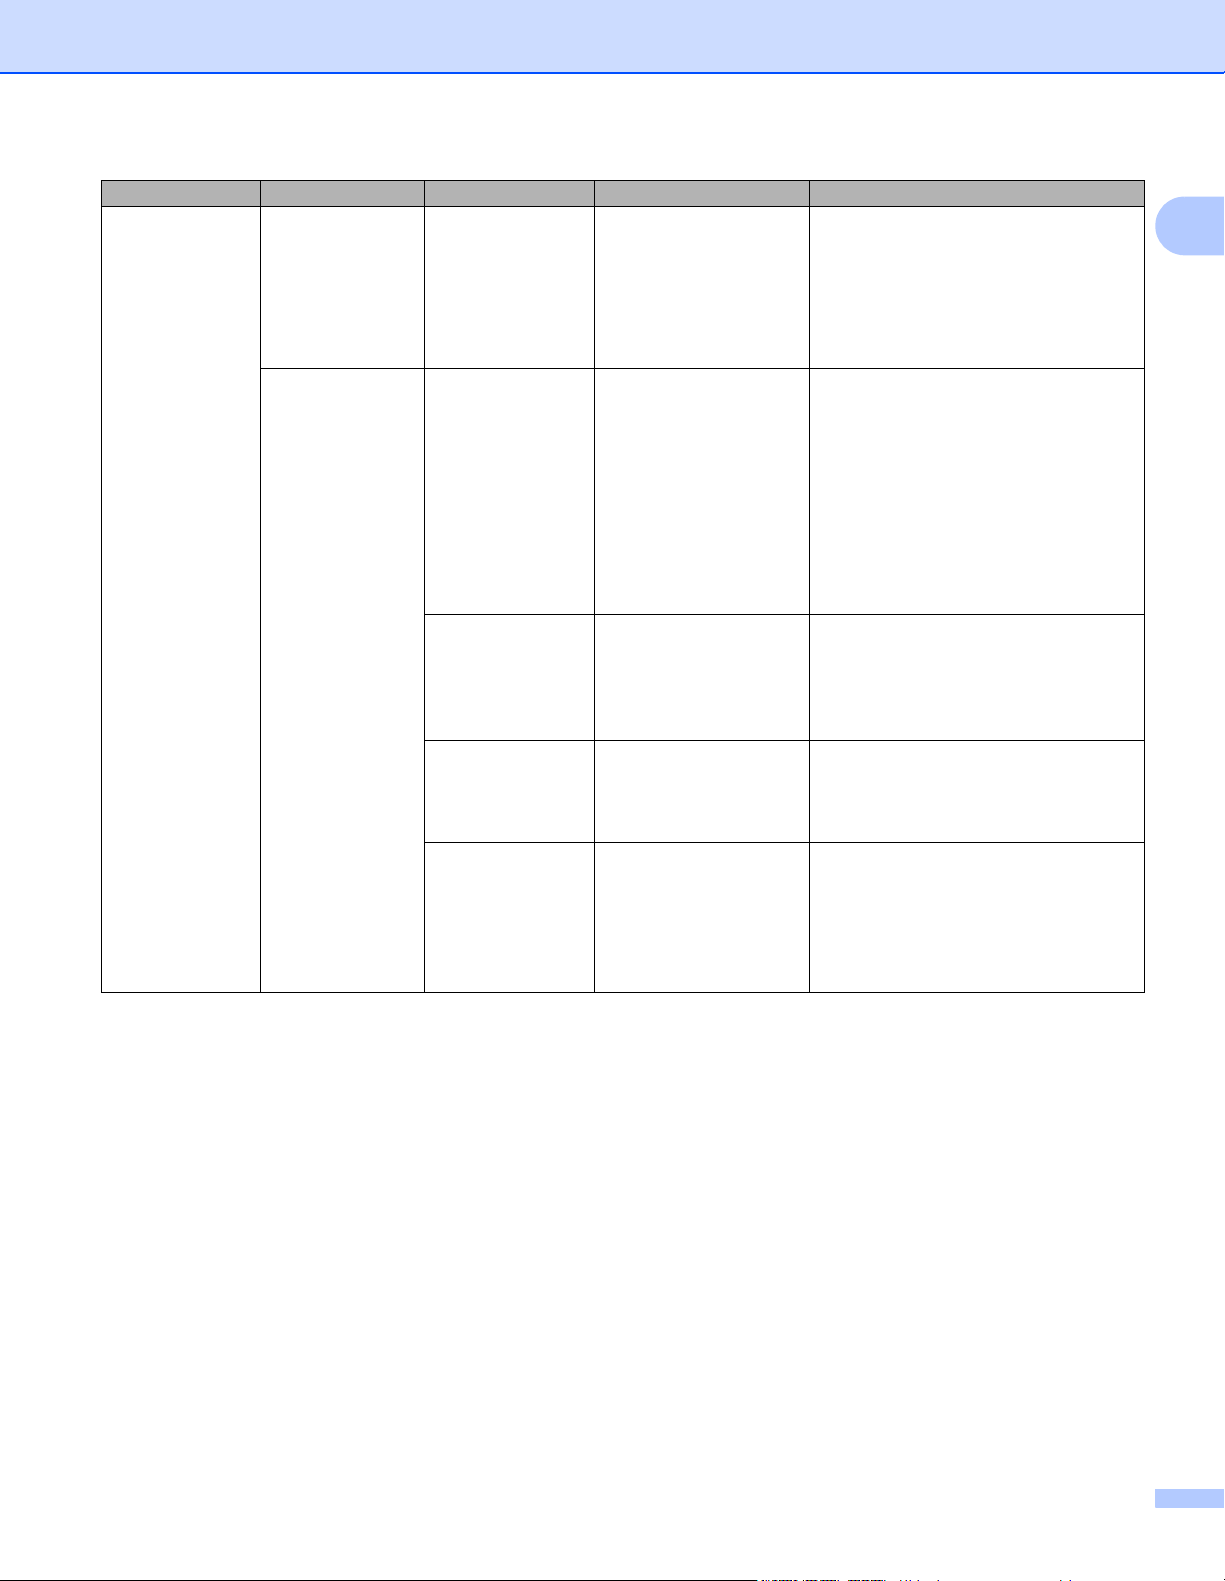
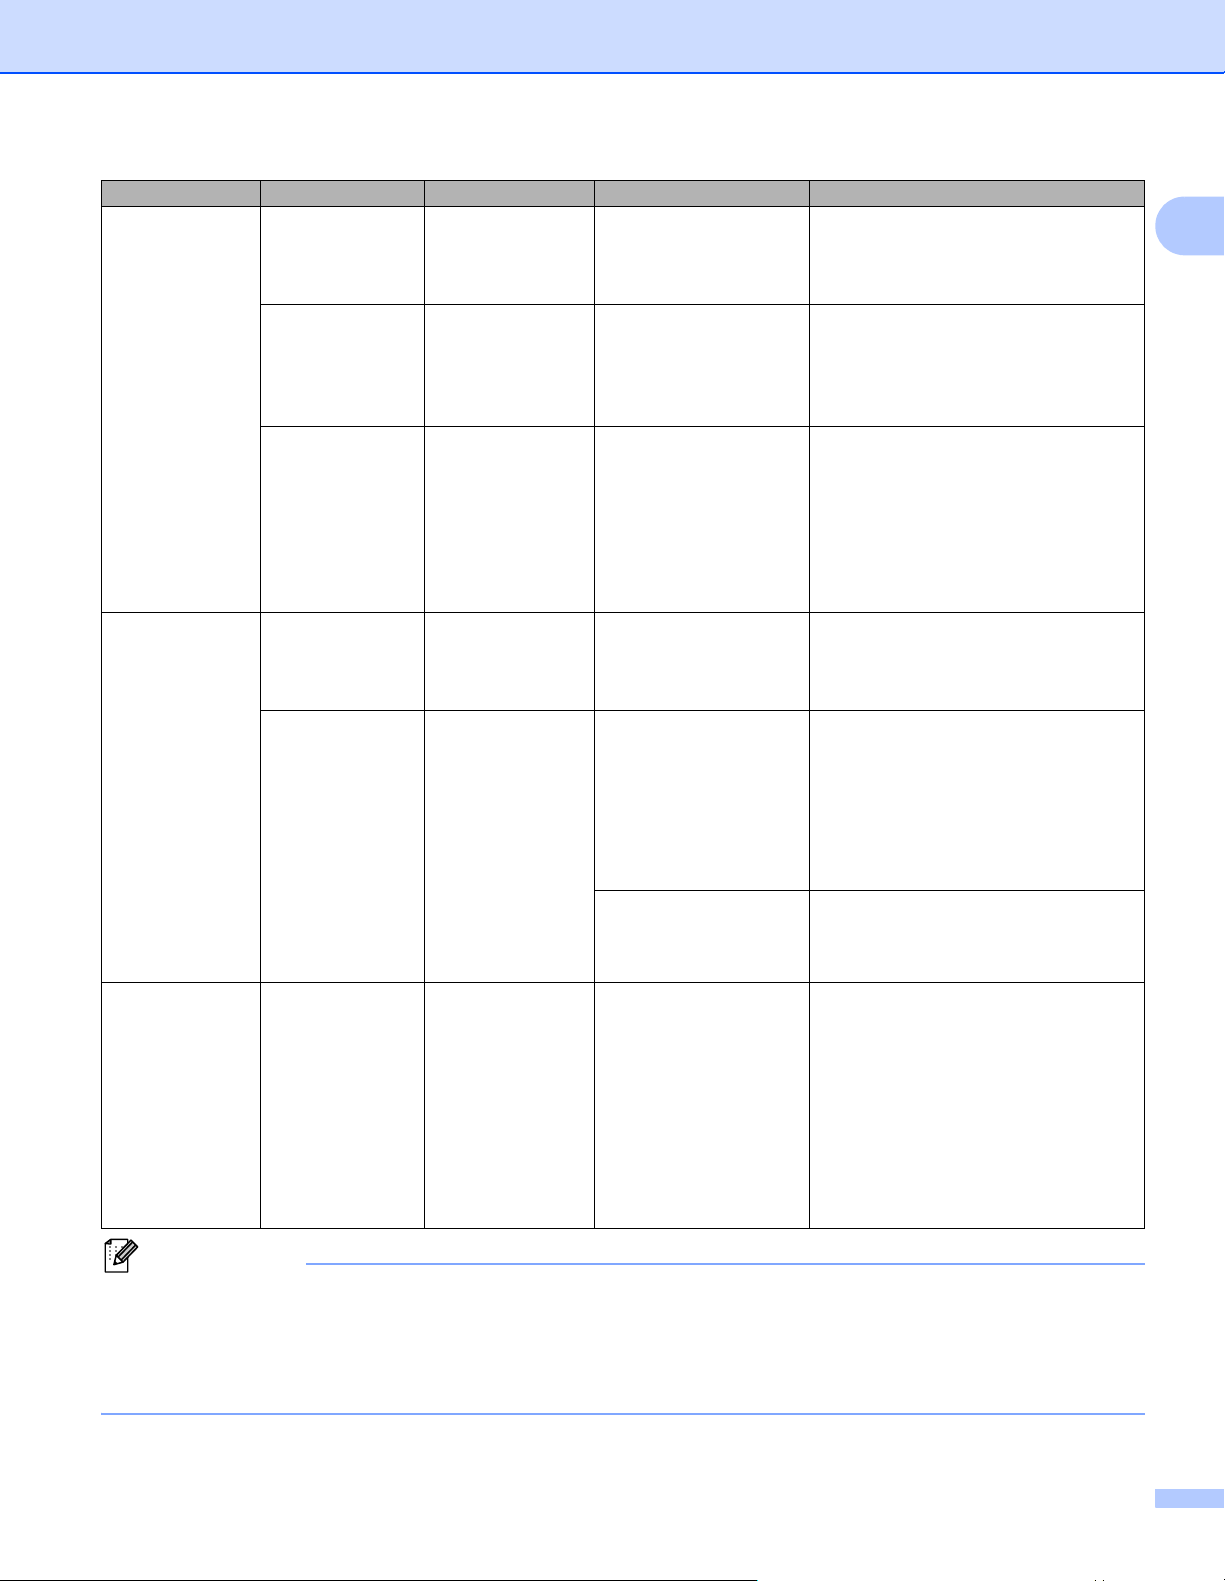
С помощью кнопок на принтере можно настроить указанные ниже параметры.
Меню Заголовок Подзаголовок Настройки Описание
Settings
(Настройки)
Print
Density
(2 colors)
(Плотность
печати,
2 цвета)
Auto Cut
(Автоматическая
обрезка)
Set Clock
(Настройка
времени)
Color 1
(Black)
(Цвет 1, черный)
Color 2 (Red)
(Цвет 2,
красный)
-6
-5
-4
-3
-2
-1
0
+1
+2
+3
+4
+5
+6
-6
-5
-4
-3
-2
-1
0
+1
+2
+3
+4
+5
+6
Auto Cut
(Автоматическая
обрезка)
OFF (Выкл.)
Cut at End
(Обрезка
Y (Г) (2000-2099)
M (М) (1-12)
D (Д) (1-31)
H (Ч) (0-23)
M (М) (0-59)
AM/PM/24
в конце)
Настройка плотности первого
цвета при двухцветной печати.
Настройка плотности второго
цвета при двухцветной печати.
Настройка способа обрезки при
печати нескольких наклеек.
Auto Cut (Автоматическая
обрезка): всегда обрезать
автоматически.
OFF (Выкл.): не обрезать
автоматически.
Cut at End (Обрезка в конце):
обрезать только наклейки, печать
которых завершена (при печати
нескольких наклеек).
Настройка даты и времени.
1
13
Настройка принтера для печати наклеек
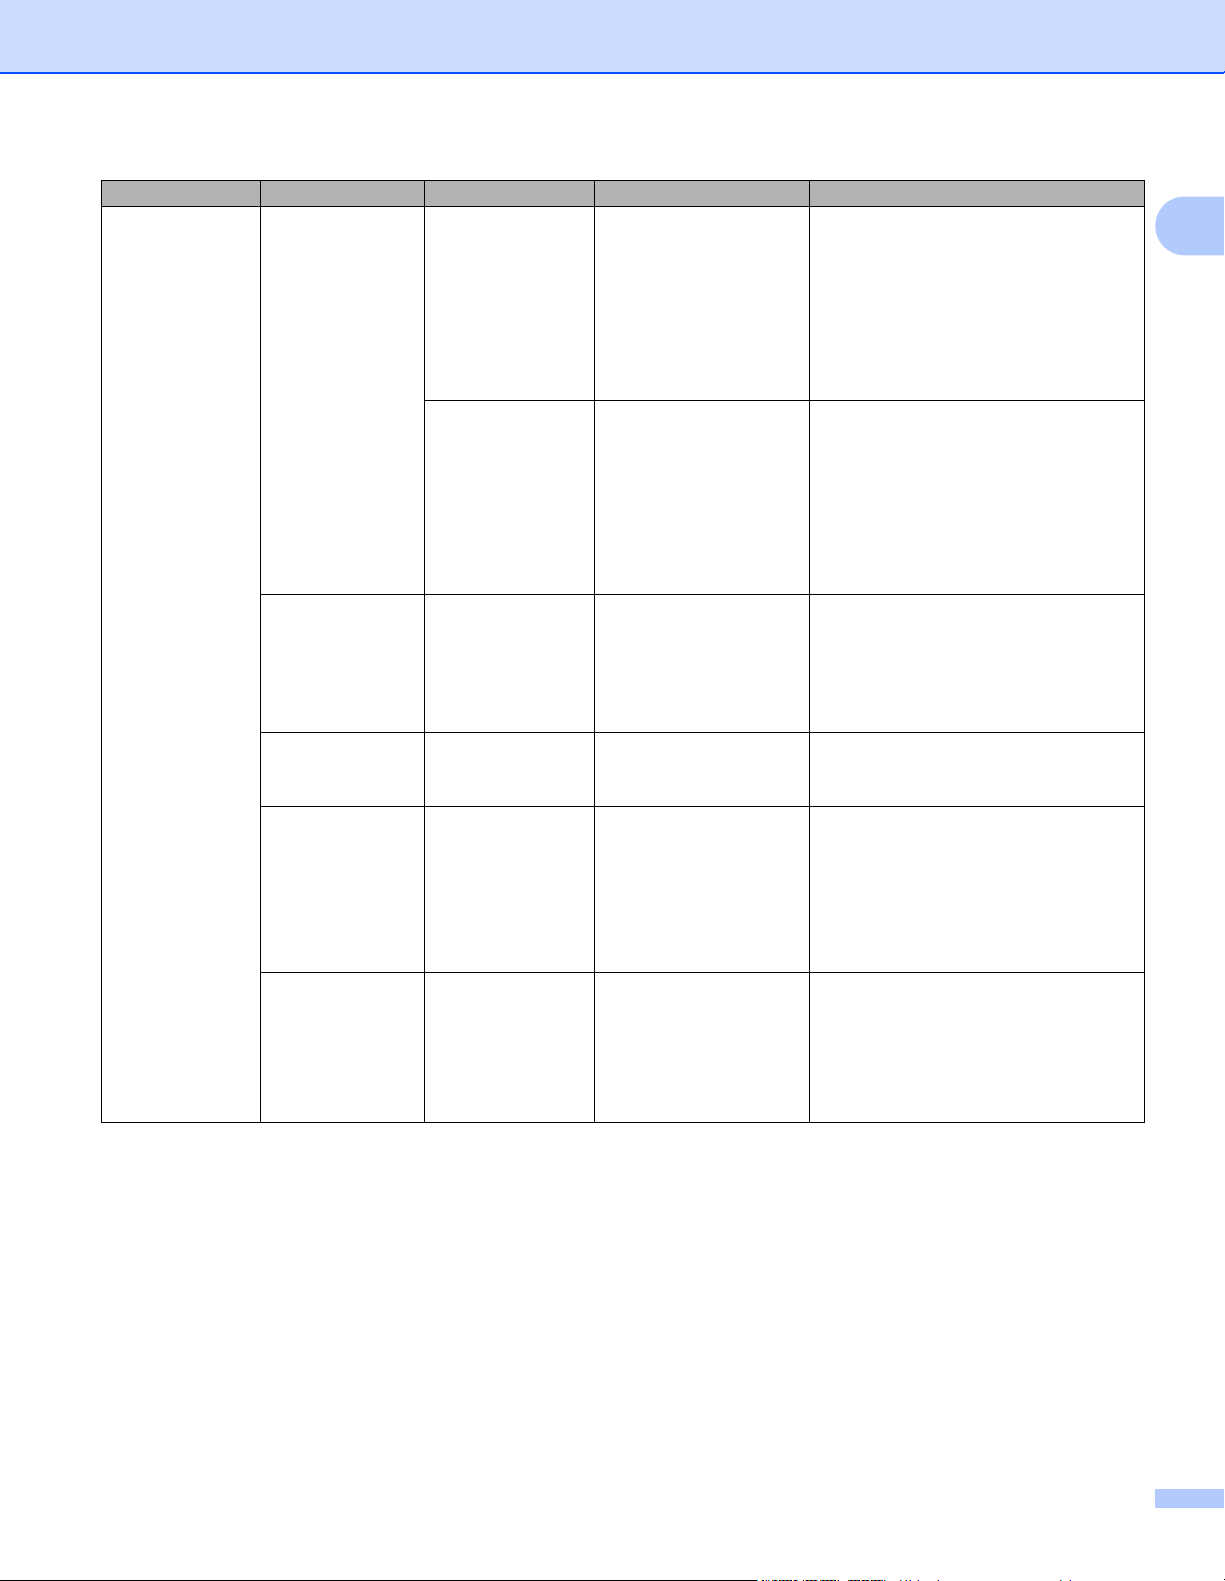
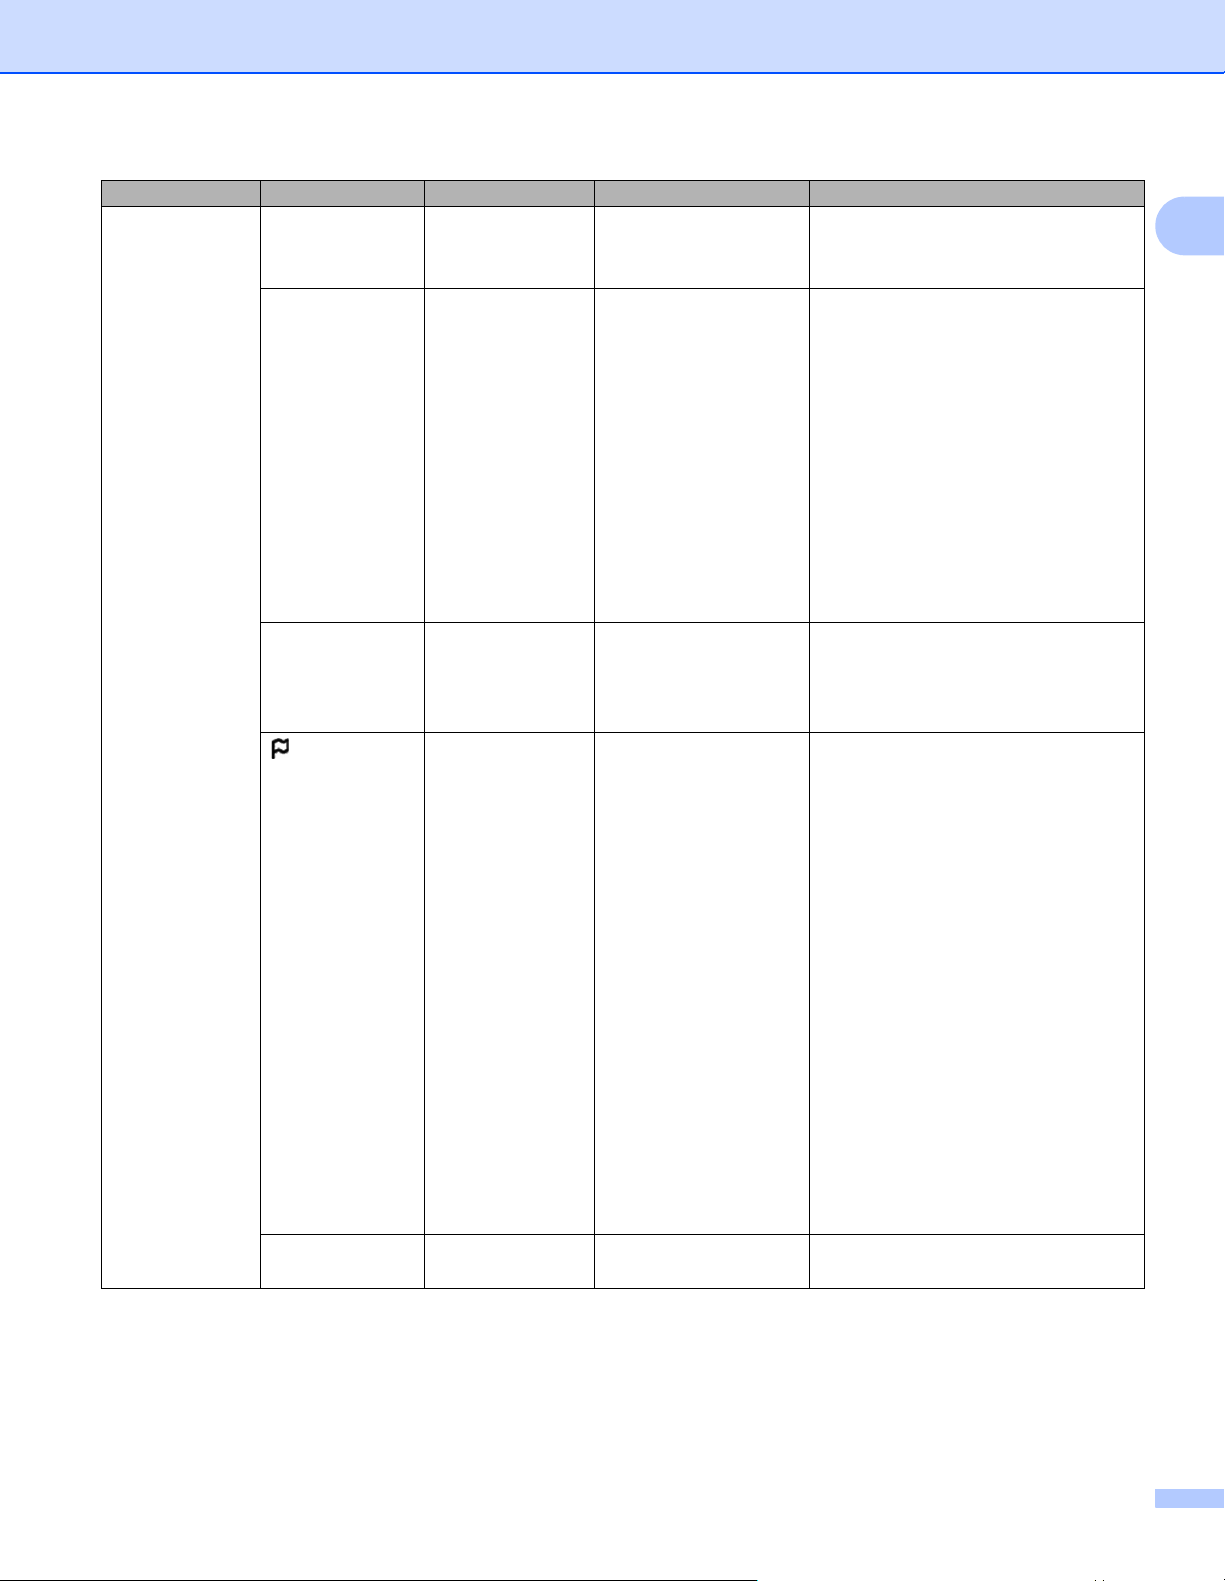
Меню Заголовок Подзаголовок Настройки Описание
Settings
(Настройки)
(продолжение)
Auto Power
Off (Авто—
выключение)
LCD Contrast
(Контрастность
ЖК—дисплея)
Backlight
(Подсветка)
Eco Charging
(Экозарядка)
Adapter
(Адаптер)
Li-ion
Battery
(Литиевоионный
аккумулятор)
Backlight
Timeout
(Время до
отключения
подсветки)
Off (Выкл.)
10
20
30
40
50
60
Off (Выкл.)
10
20
30
40
50
60
-2
-1
0
+1
+2
On (Вкл.)
Off (Выкл.)
Off (Выкл.)
5s (5 с)
10s (10 с)
20s (20 с)
30s (30 с)
60s (60 с)
100%
80%
Настройка времени ожидания
перед автоматическим
выключением принтера при
питании от электрической
розетки.
Настройка времени ожидания
перед автоматическим
выключением принтера при
питании от литиево-ионного
аккумулятора.
Настройка контрастности
ЖК-дисплея.
Чем больше значение, тем выше
уровень контрастности.
Включение и выключение
подсветки: On (Вкл.) или
Off (Выкл.).
Настройка времени
после которого подсветка ЖКдисплея автоматически
выключается.
Переход в режим Eco Charging
(Экозарядка).
Если задано значение 80 %,
зарядка автоматически
остановится после достижения
уровня заряда в 80 %.
1
бездействия,
14
Настройка принтера для печати наклеек
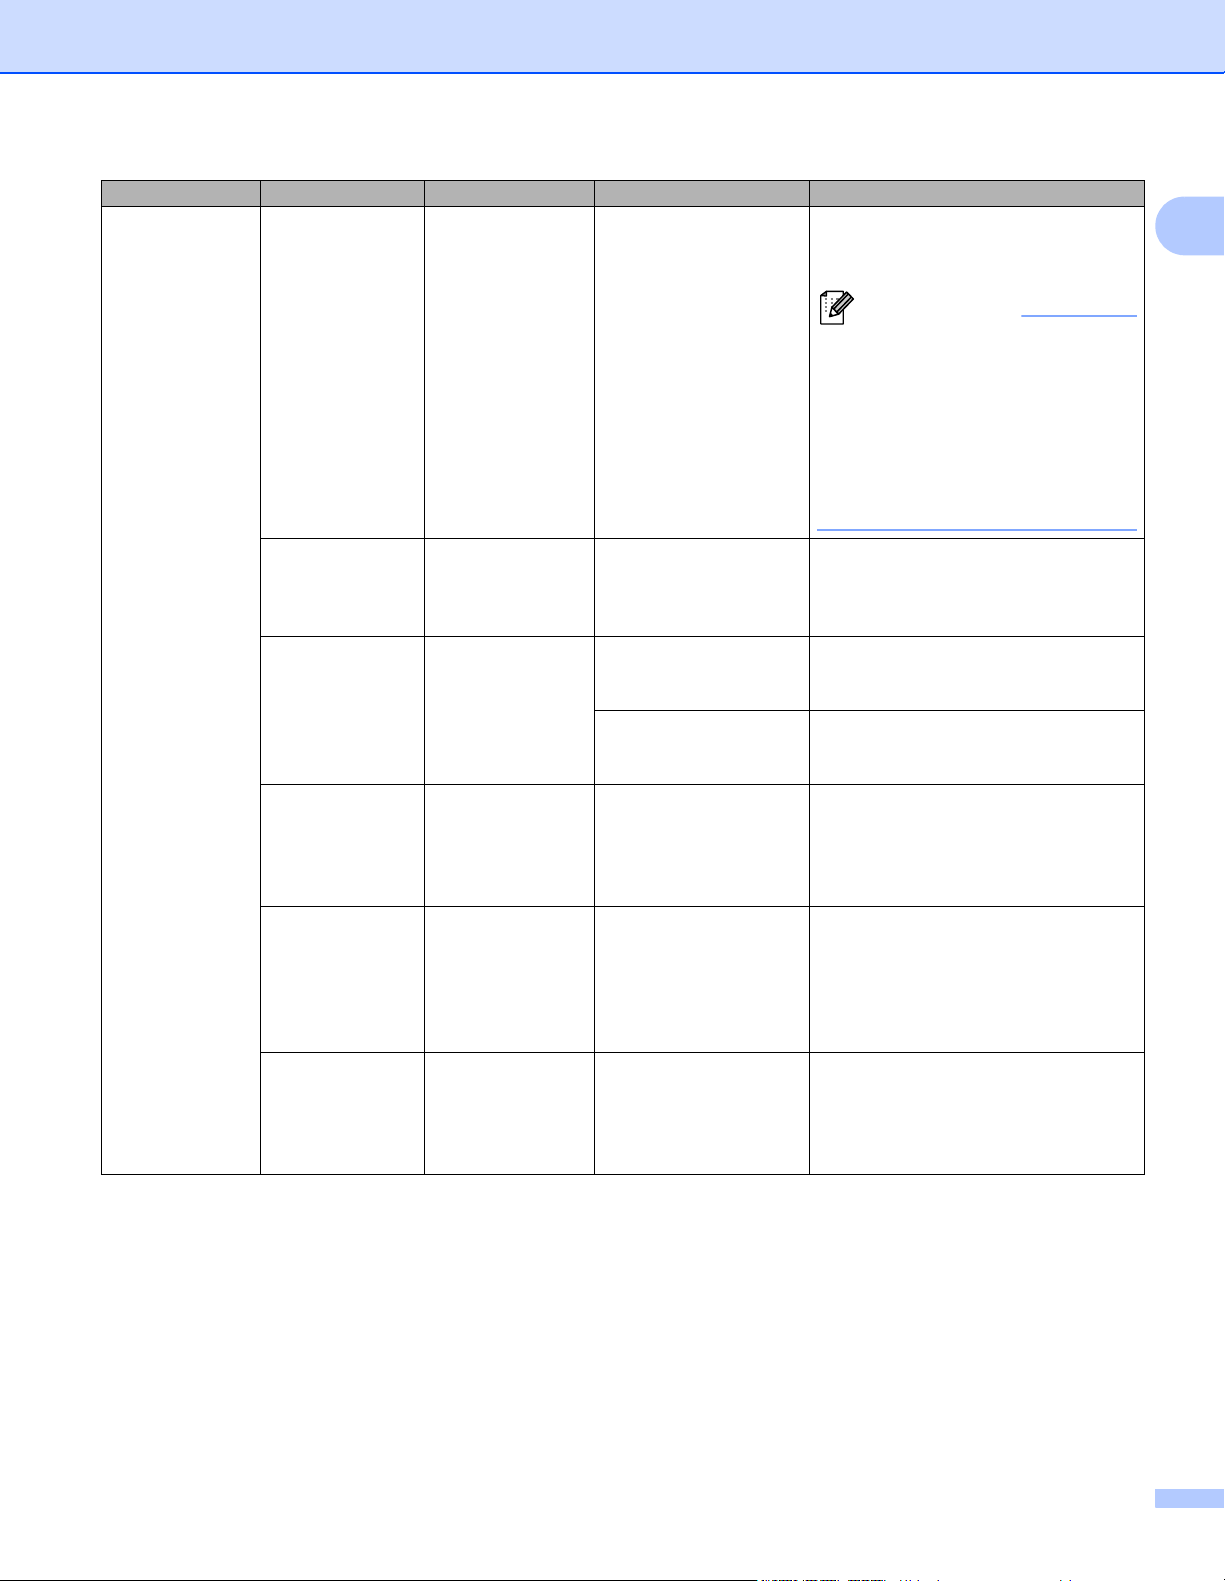
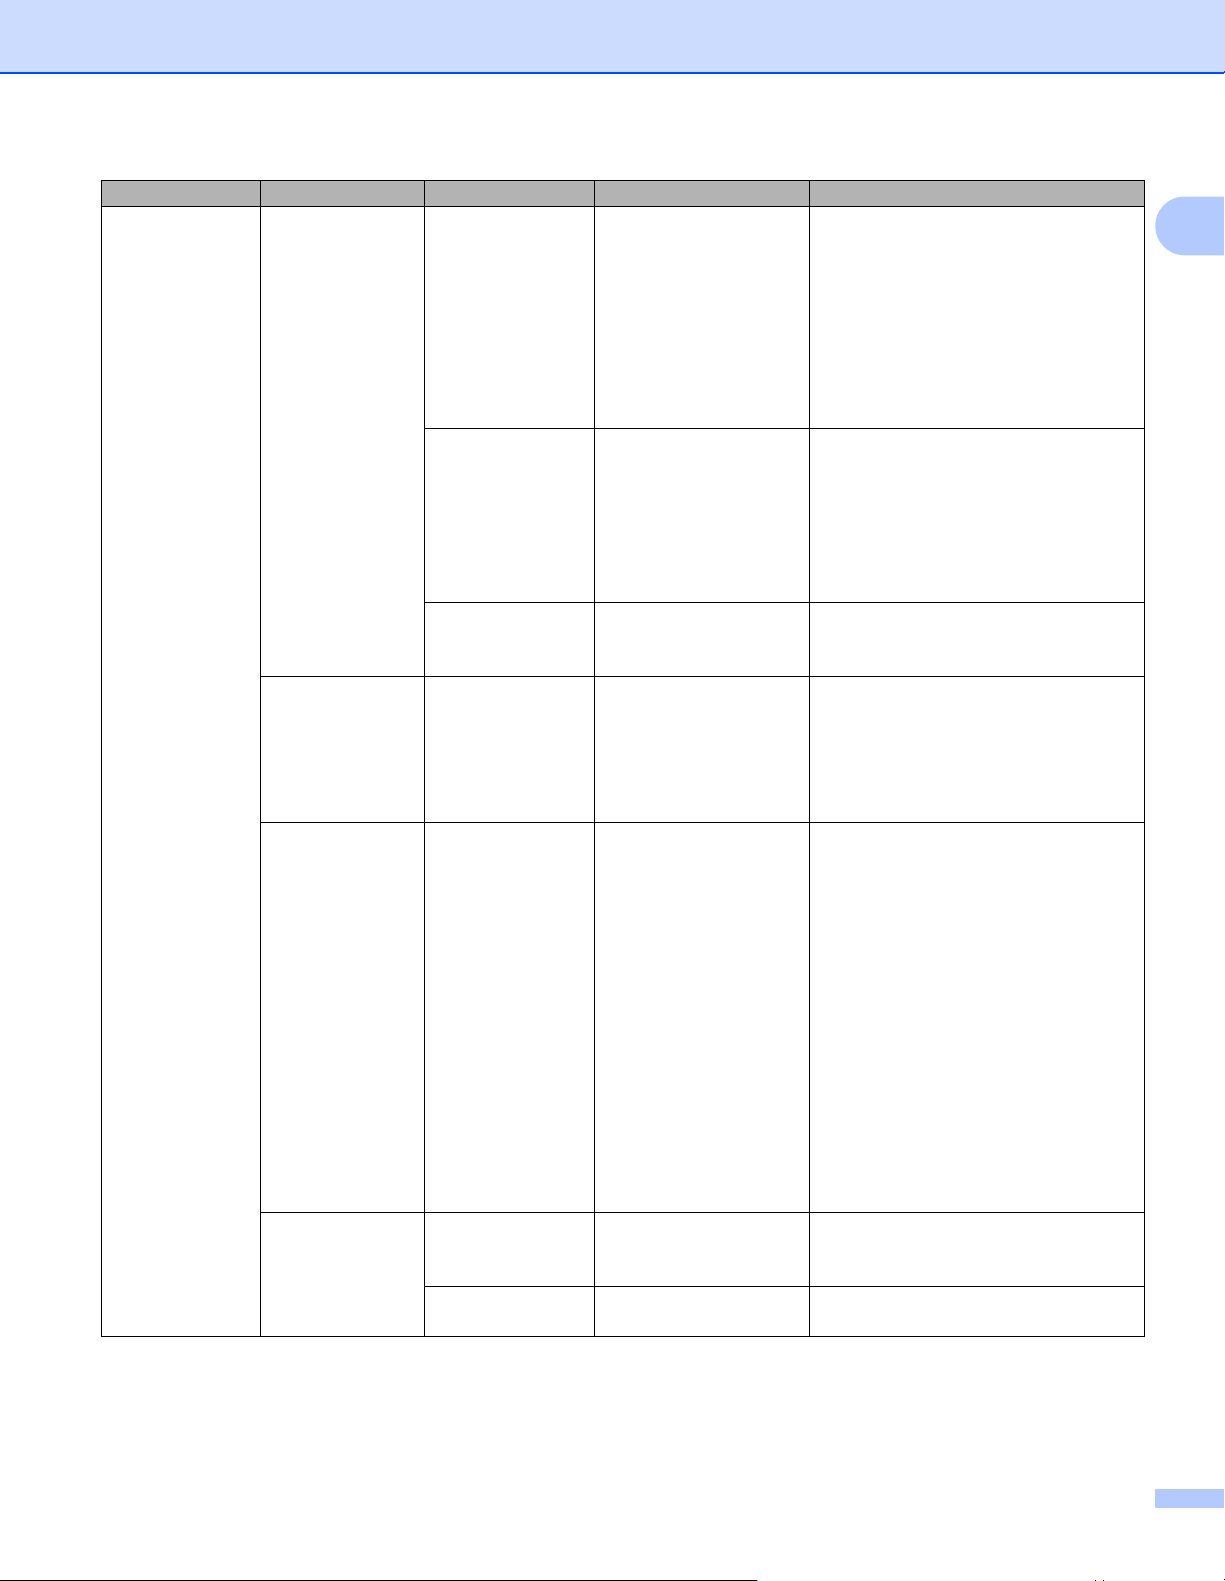
Меню Заголовок Подзаголовок Настройки Описание
Template
Settings
(Настройки
шаблонов)
Template
Mode (Режим
шаблонов)
On (Вкл.)
Off (Выкл.)
Включение или отключение
режима шаблонов при включении
принтера.
В режиме шаблонов можно
заменять содержимое
сохраненных на принтере
шаблонов и печатать их.
Дополнительные сведения см.
в разделе Печать наклеек с
использованием P-touch
Template на стр.69.
1
Confirm
Print
(Подтверждать
печать)
Serialize
Mode
(Серийная
печать)
Serialize
Reset (
нумерации)
Default
Print
Quantity
(Количество
копий по
умолчанию)
Preset
Template
(Предустановленный
шаблон)
Сброс
On (Вкл.)
Off (Выкл.)
Cont From Last
(Продолжить с
последнего)
From Starting #
(С номера)
Reset (Сброс)
Back (Назад)
001
|
999
Show (Показать)
Hide (Скрыть)
Включение или отключение
сообщения для подтверждения
количества копий перед печатью.
Выбор последовательной печати,
начиная с последнего
напечатанного номера.
Выбор последовательной печати,
начиная с номера по умолчанию,
при каждой печати.
Сброс порядкового номера до
номера по умолчанию. Для
возврата на предыдущий экран
без сброса номера выберите
пункт [Back] (Назад).
Установка значения по
умолчанию для количества
отпечатков.
Отображение или
предустановленных шаблонов
при использовании других
шаблонов.
скрытие
15
Настройка принтера для печати наклеек
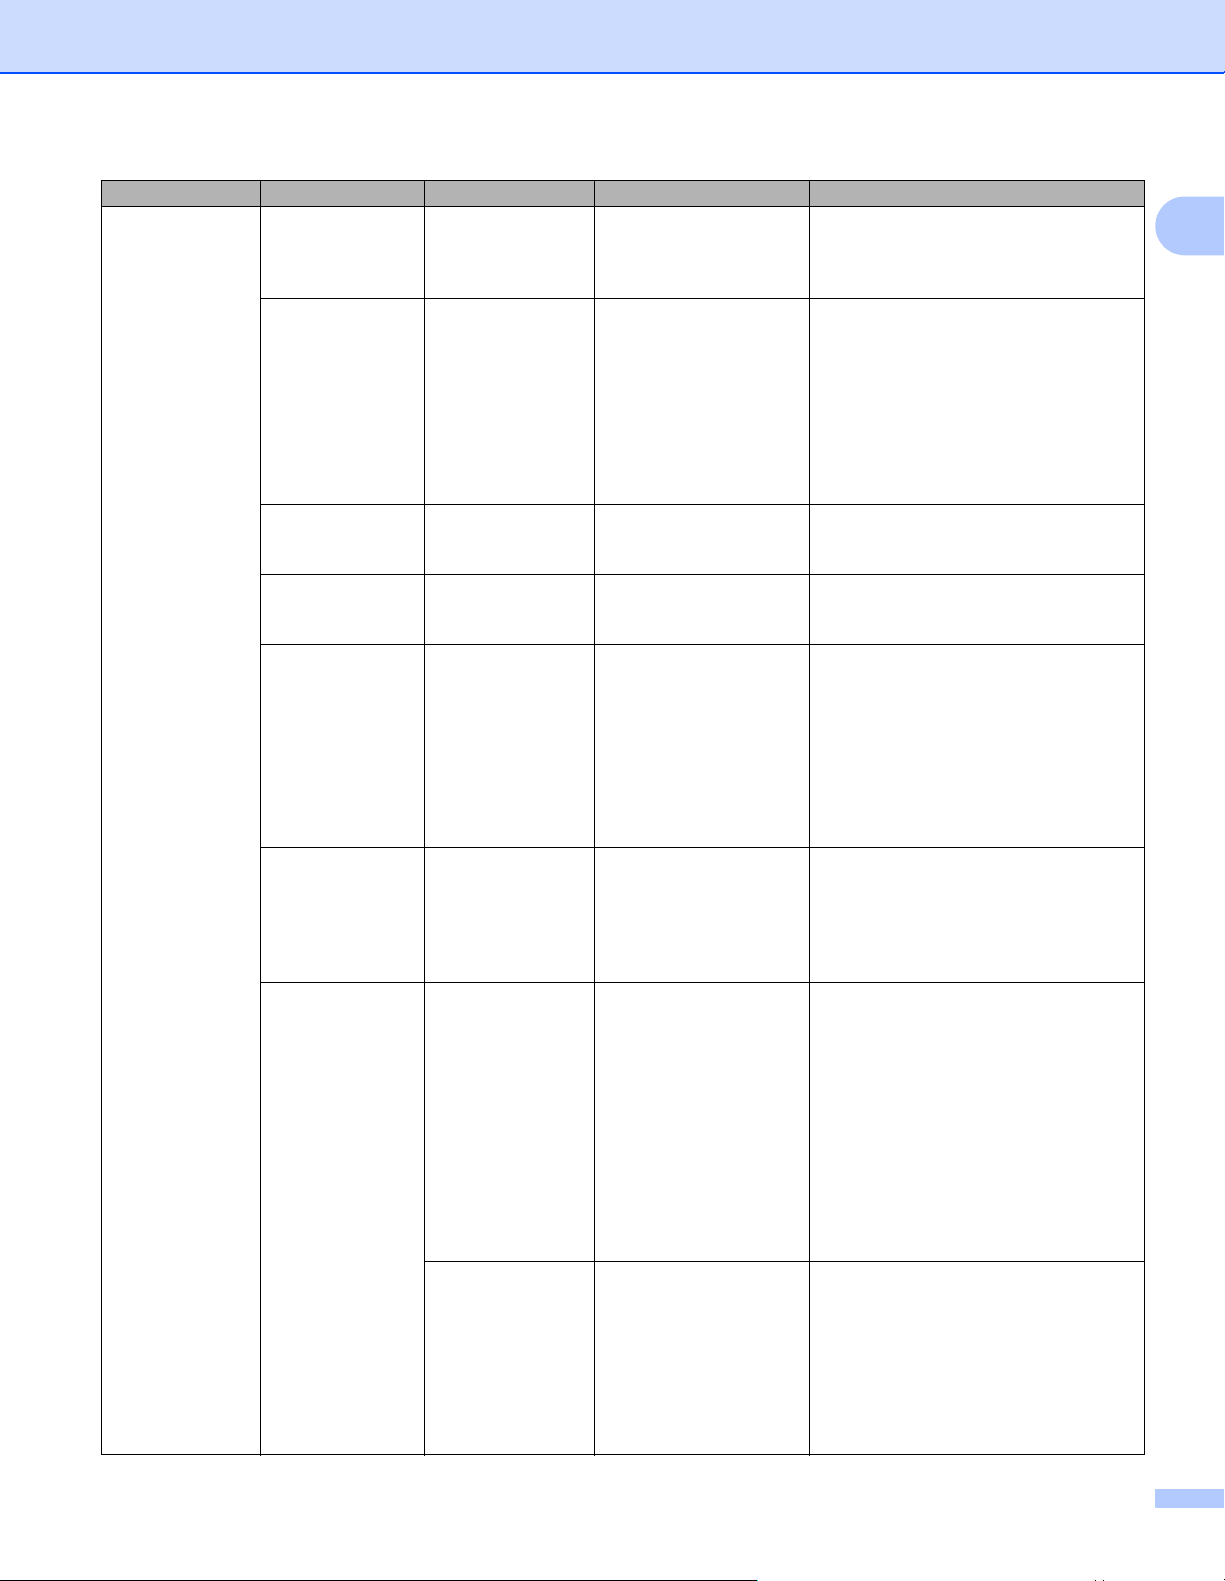
Меню Заголовок Подзаголовок Настройки Описание
Information
(Информация)
Configuration
(Конфигурация)
Print
Configuration
(Печать
конфигурации)
All (Все) Start (Начать)
Usage Log
(Журнал
использования)
Printer
Settings
(Параметры
принтера)
Transfer Data
(Передача
данных)
Printer:
QL-820NWB
ProgVer: *.**
FontVer: *.**
Memory:
***/8064kbytes
Back (Назад)
Start (Начать)
Back (Назад)
Start (Начать)
Back (Назад)
Start (Начать)
Back (Назад)
Отображение сведений о принтере.
Печать сведений о настройках
принтера (шаблон для проверки
отсутствующих точек, журнал
использования, параметры
принтера, параметры
беспроводной сети и передача
данных).
Для возврата на предыдущий
экран без печати сведений
выберите команду [Back] (Назад).
Печать журнала использования
принтера.
Для
возврата на предыдущий
экран без печати журнала
выберите команду [Back] (Назад).
Печать параметров принтера.
Для возврата на предыдущий
экран без печати параметров
выберите команду [Back] (Назад).
Печать сведений о передаче
данных.
Для возврата на предыдущий
экран без печати сведений
о передаче данных выберите
команду [Back] (Назад).
1
16
Настройка принтера для печати наклеек
Меню Заголовок Подзаголовок Настройки Описание
Administration
(Администрирование)
Command Mode
(Командный
режим)
Date Format
(Формат даты)
Time Format
(Формат
времени)
Language
(Язык)
Unit
(Ед. измерения)
P-touch Template
ESC/P
Raster
1/31/2099
01/31/2099
31/1/2099
31/01/2099
31.1.2099
31.01.2099
31-1-2099
31-01-2099
2099/1/31
2099/01/31
2099-1-31
2099-01-31
01:59(24)
1:59(24)
1:59AM
01:59AM
Čeština
Dansk
Deutsch
English
Español
Français
Hrvatski
Italiano
Magyar
Nederlands
Norsk
Polski
Português
Română
Slovenski
Slovenský
Suomi
Svenska
inch (дюйм)
mm (мм)
Выбор типа режима команд.
Выбор формата даты для часов.
Выбор формата времени для
часов.
Выбор языка для ЖК-дисплея.
Выбор единиц измерения для
отображаемых параметров.
1
17
Настройка принтера для печати наклеек
Меню Заголовок Подзаголовок Настройки Описание
Administration
(Администрирование)
(продолжение)
Reset (Сброс) Factory Reset
(Возврат
заводских
настроек)
User Data
Reset (Сброс
данных
пользователя)
Network Reset
(Сброс настроек
сети)
Airplane
Mode (Режим
«в самолете»)
Menu Locks
(Блокировка
меню)
Menu
Security
(Защита меню)
Reset (Сброс)
Back (Назад)
Reset (Сброс)
Back (Назад)
Reset (Сброс)
Back (Назад)
On (Вкл.)
Off (Выкл.)
Settings
(Настройки)
Template Settings
(Настройки
шаблонов)
Information
(Информация)
WLAN (Беспроводная
сеть)
Bluetooth
Feed (Подача)
Remote Update
(Удалённое
обновление)
Finish (Готово)
On (Вкл.)
Off (Выкл.)
Set Password
(Установка пароля)
Возврат заводских настроек
сбрасывает все параметры
принтера, включая параметры
подключения и параметры
устройства, к заводским
настройкам.
Удаляются также все
сохраненные на принтере
шаблоны и базы данных.
Сброс пользовательских данных
возвращает
устройства к заводским
настройкам.
Удаляются также все
сохраненные на принтере
шаблоны и базы данных.
Сброс настроек сети возвращает
параметры подключения
к заводским настройкам.
При выборе значения On (Вкл.)
принтер переключается в режим
«
в самолете», и с ЖК-дисплея
исчезают меню [WLAN]
(Беспроводная сеть) и
[Bluetooth].
Установите флажки возле тех
параметров, изменение которых
через ЖК-дисплей принтера
нужно запретить.
Затем
выберите команду
[Finish] (Готово) для
завершения настройки.
Когда включена эта функция, для
параметров, которые нельзя
выбрать, отображается значок
блокировки.
Включение и отключение
требования пароля при переходе
в режим администрирования.
При выборе значения [On] (Вкл.)
укажите 4-значный пароль.
1
все параметры
18
Настройка принтера для печати наклеек
Меню Заголовок Подзаголовок Настройки Описание
WLAN
(Беспроводная
сеть)
WLAN
(On/Off)
(Беспроводная
сеть вкл./выкл.)
Network Mode
(Режим сети)
WPS Button
Push (Нажатие
кнопки WPS)
WPS PIN Code
(PIN-код для
WPS)
Infra Manual
Setting
(Настройка
режима
инфраструктуры
вручную)
Direct
Manual
Setting
(Настройка
режима Direct
вручную)
WLAN Status
(Состояние
беспроводной
сети)
Infrastructure
Mode
(Режим
инфраструктуры)
Direct Mode
(Режим Direct)
On (Вкл.)
Off (Выкл.)
Infrastructure
Mode (Режим
инфраструктуры)
Direct Mode
(Режим Direct)
Infra/Direct Mode
(Режим
инфраструктуры/
Direct)
Status
(Состояние): ****
SSID: ****
IP Addr
(IP-адрес): *.*.*.*
NodeName
(Имя узла): ****
Subnet
(Подсеть): *.*.*.*
Gateway
(Шлюз): *.*.*.*
MAC Addr
(MAC-адрес): ****
Status
(Состояние): ****
SSID: ****
IP Addr
(IP-адрес): *.*.*.*
Password
(Пароль): ****
Channel
(Канал): ****
Включение и отключение функции
беспроводной сети.
Выбор режима сети, который
используется при выборе
значения [On] (Вкл.) для
параметра [WLAN (On/Off)]
(Беспроводная сеть вкл./выкл.).
Попытка подключения к
ближайшим беспроводным
точкам доступа.
Отображение 8-значного PIN-кода
принтера.
Отображение сетевых имен (SSID)
ближайших беспроводных
доступа.
После выбора SSID и нажатия
кнопки [OK] появится экран ввода
пароля. Чтобы до завершения
операции вернуться на
предыдущий экран, несколько раз
нажмите кнопку отмены.
Ввод вручную сетевого имени
(SSID) и пароля беспроводной точки
доступа для подключения. Чтобы до
завершения операции вернуться на
предыдущий экран, несколько раз
нажмите кнопку отмены.
Отображение состояния
беспроводной сети.
Отображение состояния
беспроводной сети.
1
точек
19
Настройка принтера для печати наклеек
Меню Заголовок Подзаголовок Настройки Описание
Bluetooth Bluetooth
(On/Off)
(Bluetooth
вкл./выкл.)
Automatic
Reconnection
(Автоматическое
повторное
подключение)
Bluetooth
Status
(Состояние
Bluetooth)
Feed (Подача) Feed Start
(Начать
подачу)
Die-cut Feed
Setting
(Настройка
подачи
вырезанных
наклеек)
Remote
Update
(Удалённое
обновление)
Remote
Update?
(Обновить
удаленно?)
On (Вкл.)
Off (Выкл.)
On (Вкл.)
Off (Выкл.)
Usage (Использование): ****
Device Name (Имя
устройства): ****
Visible
(Видимый): ****
Address
(Адрес): ****
Current Page
(Текущая страница)
Next Page
(Следующая
страница)
Start (Начать)
Back (Назад)
Включение и выключение
функции Bluetooth.
Переход в режим
автоматического повторного
подключения (только для
устройств Apple: iPad, iPhone или
iPod touch).
Отображение состояния
Bluetooth.
Определение начала подачи
наклейки. Режимы могут
различаться в зависимости от
используемого рулона DK.
Подача наклейки начинается на
текущей странице при обнаружении
на обратной стороне черной метки
для обрезки. Если такая метка на
текущей странице не
выполняется подача до следующей
страницы, и обнаружение метки
начинается с нее.
В этом режиме подача всегда
выполняется до следующей
страницы, с которой и начинается
обнаружение.
Доступно, только если принтер
для печати наклеек подключен
к FTP-
серверу и требуется
обновить шаблоны, базы данных
и другие файлы. Чтобы начать
удаленное обновление, выберите
команду [Start] (Начать).
По завершении обновления
принтер для печати наклеек
автоматически вернется на
главный экран.
1
функции
обнаружена,
• Некоторые настройки могут различаться в зависимости от версии микропрограммы (программного
обеспечения принтера).
• Если нужно сбросить настройки, выберите команду [Параметры устройства] в программе
Инструмент настройки принтера, чтобы восстановить заводские настройки. Дополнительные
сведения см. в разделе Строка меню на стр. 53.
20
Loading…
User’s Guide
QL-810W
QL-820NWB
Read the Product Safety Guide first, then read the Quick Setup Guide for the correct
setup procedure. After reading this guide, keep it in a safe place for quick reference. Version B
US ENG
i
Introduction
Important Notice
The contents of this document and the specifications of this product are subject to change without notice.
Brother reserves the right to make changes without notice in the specifications and materials contained
herein and shall not be responsible for any damages (including consequential) caused by reliance on the
materials presented, including but not limited to typographical and other errors relating to the publications.
Screen images in this document may differ depending on your computer’s operating system, your product
model, and software version.
Before using the Label Printer, make sure you read all the documents included with the Label Printer for
information about safety and operation.
The Label Printer shown in the illustrations may be different from your Label Printer.
The available options and supplies may vary depending on the country.
Available Manuals
Visit the Brother Solutions Center at support.brother.com and click Manuals on your model page to download
the latest manuals.
1Printed manual in the box
2PDF manual on the Brother Solutions Center website
Product Safety Guide 1This guide provides safety information; read it before you use the
Label Printer.
Quick Setup Guide 1This guide provides basic information about using the Label Printer
along with troubleshooting tips.
User’s Guide 2This guide provides additional information about the Label Printer
settings and operations, network connection and settings,
troubleshooting tips, and maintenance instructions.
ii
Symbols Used in This Guide
The following symbols are used throughout this guide:
Tells you what to do to avoid the risk of injury.
Tells you about procedures you must follow to avoid minor personal injury or
damage to the Label Printer.
Important Indicates information or directions that should be followed. Ignoring them may result
in damage, or failed operations.
Note Indicates notes that provide information or directions that can help you better
understand and use the product more efficiently.
iii
General Precautions
DK Roll (DK Label and DK Tape)
Use only genuine Brother accessories and supplies (with , marks). DO NOT use any
unauthorized accessories or supplies.
If the label is attached to a wet, dirty, or oily surface, it may peel off easily. Before applying the label,
clean the surface to which the label will be applied.
DK Rolls use thermal paper or film that can fade in color or peel off surfaces if exposed to ultraviolet light,
wind or rain.
DO NOT expose the DK Rolls to direct sunlight, high temperatures, high humidity, or dust. Store in a
cool, dark place. Use the DK Rolls soon after opening the package.
Scratching the printed surface of the label with your finger nails or metal objects, or touching the printed
surface with damp or wet hands can cause the color to change or fade.
DO NOT apply labels to any persons, animals, or plants. In addition, never apply labels to public or
private property without permission.
As the end of the DK Roll is designed to not adhere to the label spool, the last label may not be cut
correctly. If this happens, remove the remaining labels, insert a new DK Roll, and reprint the last label.
Note: To account for this, the number of DK Labels included on each DK Roll may be more than indicated
on the package.
When a label is removed after being applied to a surface, a portion of the label may remain applied.
Prior to using CD/DVD labels, be sure to follow the instructions in your CD/DVD player’s instruction guide
regarding applying CD/DVD labels.
DO NOT use CD/DVD labels in a slot loading CD/DVD player.
DO NOT peel off the CD/DVD label once it is applied to the CD/DVD, a thin surface layer may come off,
resulting in damage to the disc.
DO NOT apply CD/DVD labels to CDs/DVDs designed for use with inkjet printers. Labels peel off these
discs easily and using discs with peeling labels can result in loss or damage of data.
When applying CD/DVD labels, use the applicator included with the CD/DVD label rolls. Failure to do so
could cause damage to the CD/DVD player.
Users shall take full responsibility for applying CD/DVD labels. Brother accepts no responsibility for any
loss or damage of data caused by the inappropriate use of CD/DVD labels.
Be careful not to drop the DK Roll.
DK Rolls use thermal paper and thermal film. Both the label and print will fade with sunlight and heat.
DO NOT use DK Rolls for any outdoor use that requires durability.
Depending on the area, material, and environmental conditions, the label may unpeel or become
irremovable, or the color of the label may change or be transferred to other objects. Before applying the
label, check the environmental conditions and the material. Test the label by affixing a small piece of it
to an inconspicuous area of the intended surface.
If print results are not as expected, use the adjustment options in the printer driver or the Printer Setting
Tool.

iv
IMPORTANT NOTE
This product is approved for use in the country of purchase only. Do not use this product outside the
country of purchase as it may violate the wireless telecommunication and power regulations of that
country.
Windows Vista® in this document represents all editions of Windows Vista®.
Windows® 7 in this document represents all editions of Windows® 7.
Windows® 8 in this document represents all editions of Windows® 8.
Windows® 8.1 in this document represents all editions of Windows® 8.1.
Windows® 10 in this document represents Windows® 10 Home, Windows® 10 Pro, Windows® 10
Enterprise, and Windows® 10 Education.
Windows® 10 in this document does not represent Windows® 10 Mobile, Windows® 10 Mobile Enterprise,
or Windows® 10 IoT Core.
Windows Server® 2008 in this document represents all editions of Windows Server® 2008 and Windows
Server® 2008 R2.
Windows Server® 2012 in this document represents all editions of Windows Server® 2012 and Windows
Server® 2012 R2.
Not all models are available in all countries.
©2016 Brother Industries, Ltd. All rights reserved.

v
Section I Basic Operations
1 Setting Up the Label Printer 2
Parts Description …..…………….…………….…………….……………..…………….…………….……..…………..………..2
Front ………………………….…………….…………….…………….…………….……………..………………………..…….2
Rear…………….…………….…………….…………….…………….…………….……………..………………….…………..4
Loading the DK Roll….………………..…………….…………….…………….…………….…………….……………………...5
Connecting the AC Adapter ………………………….……………….…………….……………..…………….………………..7
Installing the Coin Cell Battery (QL-820NWB only) .……….…………….…………….…………….……………..…….8
Turning Power On/Off………..…………….…………….…………….…………….……………..………………………..…..10
Setting LCD Language (QL-820NWB only)……………………………………….…………….……………….…………10
Setting the Time and Date (QL-820NWB only)……..………………..…………….…………….……………….………10
LCD (QL-820NWB only) ………….…………….……………..…………….…………….……………….……….…………...11
Screen ………………………….…………….…………….……………..…………….…………….………………………....11
LCD Settings ………………………….…………….…………….…………….…………….…………….….………………12
2 Printing Using a Computer (P-touch Editor) 22
Installing the Software and Printer Drivers to a Computer………..…………….…………….……………….……...22
Connecting the Label Printer to a Computer …..…………….……………….………………..…………….……………23
Connecting Using USB………………….………………..…………….…………….…………….……………..………..23
Connecting Using Wi-Fi®………………………..…………….…………….…………….…………….………….………23
Connecting Using a Wired LAN (QL-820NWB only) ……………….………………..……………….……………28
Bluetooth Connection (QL-820NWB only)…………….…………….……………….…………….………………....28
Connecting the Label Printer to a Barcode Scanner using Bluetooth (QL-820NWB only) ………………….29
Printing from a Computer………………….……………….……………..…………….…………….………….………………30
Available Applications………………………….…………….……………….…………….…………….…….……………30
Creating Labels from Your Computer………………..………….…………….…………….…………….……………31
Attaching Labels ………….…………….…………….…………….…………….……………..……………..……………..32
3 Printing Using the Mobile Device 33
Installing Applications for Use with Mobile Devices………..…………….………………..…………….………….…..33
Available Applications………………………….…………….……………….…………….…………….…….……………33
Connecting the Label Printer to a Mobile Device..…………….…………….……………..…………….………….…..33
Printing from a Mobile Device…………………….………………….…………….………….…………….………………….35
Using a Mobile Device to Print Templates Created on a Computer ………………….……………….………35
Attaching Labels ………….…………….…………….…………….…………….……………..……………..……………..36

vi
4 Changing the Label Printer Settings 37
Printer Setting Tool for Windows®..…………….…………….…………….…………….…………….…………….………37
Before Using the Printer Setting Tool …………….…….…………….…………….…………….…………….………37
Using the Printer Setting Tool for Windows®……..…………….…………….……………..…………….……………...38
Communication Settings for Windows®……………………..…………….…………….…………….…………….………40
Settings Dialog Box ………..…………….…………….……………..…………….…………….…………….……………40
Menu Bar ……………..……………..…………….…………….…………….…………….…………….…..………………..42
General Tab……………..…………….…………….…………….…………….…………….…………….………………....44
Wired LAN (QL-820NWB only) / Wireless LAN Tabs …………………………….………………..………………46
Wireless Direct Tab ……..…………….…………….…………….…………….……………..…………….………………48
Bluetooth Tab (QL-820NWB only)…………………………….………………..…………….…………….………..….49
Applying Setting Changes to Multiple Printers ………………………….……………..…………….……………...50
Device Settings for Windows®……..…………….…………….…………….…………….…………….…………….………51
Settings Dialog Box ………..…………….…………….……………..…………….…………….…………….……………51
Menu Bar ……………..……………..…………….…………….…………….…………….…………….…..………………..53
Basic Tab.…………….……………..…………….…………….…………….…………….…………….….…………………54
Advanced Tab ……………….……………….……………..…………….…………….…………….…………………..…..55
Display Tab (QL-820NWB only) ……..…………….………………..…………….…………….…………….…….…..56
Management Tab .………………..…………….…………….…………….…………….…………….…………………....57
Applying Setting Changes to Multiple Label Printers……………………..…………….…………….……………58
P-touch Template Settings for Windows®…………………………..…………….…………….…………….……………59
P-touch Template Settings Dialog Box…..…………….…………….…………….…………….…………….………60
Printer Setting Tool for Mac …………………………….…………….…………….……………..…………….………………62
Before Using the Printer Setting Tool …………….…….…………….…………….…………….…………….………62
Using the Printer Setting Tool for Mac………………………….…………….…………….…………….……….…………62
Settings Dialog Box ………..…………….…………….……………..…………….…………….…………….……………63
Basic Tab.…………….……………..…………….…………….…………….…………….…………….….…………………64
Advanced Tab ……………….……………….……………..…………….…………….…………….…………………..…..65
Management Tab .………………..…………….…………….…………….…………….…………….…………………....65
Bluetooth Settings Tab (QL-820NWB only)…………..………….…………….…………….…………….…………66
Wireless LAN Tab…………..…………….…………….……………..……………….…………….………….…………...66
Applying Setting Changes to Multiple Label Printers……………………..…………….…………….……………67
Changing Settings When Printing from a Mobile Device ………….…………….……………….…………….………68
5 Printing Labels Using P-touch Template 69
P-touch Template Operations…………………….……………….…………….…………….…………….……..…………..69
Preparation …………..…………….…………….…………….……………..…………….…………….…..……………………..70
Specifying Settings in the P-touch Template Settings Tool………………….…………….…………….………70
Connecting a Barcode Scanner……………………….………………..…………….…………….……………….…….…..72
Standard Template Printing ..…………….…………….…………….………………..…………….……………….…………73
Advanced Template Printing….…………….…………….………………..…………….…………….………….……….…..75
Database Lookup Printing …….…………….…………….………………..…………….…………….……………………....78
Numbering (Serialized Number) Printing ……..……………….…………….…………….…………….…………..……..81
Text Numbering (Serializing) ….……………….…………….…………….…………….…………….………………….81
Barcode Numbering (Serializing)….…………….…………….…………….……………..…………….………..…….82
Printing with Numbering (Serializing) Advanced Operation…………….…………….…………….……………83

vii
6 Other Functions 84
Confirming the Label Printer Settings …………….…………….…………….………………..…………….………………84
2-color Printing Configuration with Other Applications ………………….…………….………………..………………85
Mass Storage Mode (QL-820NWB only) ……..……………….…………….…………….………………..…………..….85
Description…………………………..…………….…………….…………….…………….…………….….…………………85
Using the Mass Storage Mode ….……………….…………….…………….………………..…………….……………86
JPEG Printing …………………..…………….…………….…………….………………..…………….…….……………………87
Template Printing from the Label Printer Using the LCD menu (QL-820NWB only) ………….………………88
Remote Update……..…………….…………….…………….……………..…………….…………….……………………..…..91
Distributed Printing (Windows® only)…….…………….……………..…………….…………….…………….……………91
Section II Application
7 How to Use P-touch Editor 96
For Windows®………………..…………….…………….…………….…………….…………….…………….………..………..96
Starting P-touch Editor ………………….…………….……………..…………….…………….……………..…………..96
Printing with P-touch Editor ………………….……………….…………….…………….…………….……….…………98
Transferring Data to the Label Printer ………………….…………….…………….…………….…………….………99
2-color Printing Configuration …………………….…………….…………….………………..…………….….………100
For Mac……….………….…………….…………….……………..…………….…………….…………….……….…………….104
Starting P-touch Editor ………………….…………….……………..…………….…………….……………..…………104
Operation modes ……………………….…………….…………….…………….……………..……………….……….…105
Transferring Data to the Label Printer ………………….…………….…………….…………….…………….…….106
2-color Printing Configuration …………………….…………….…………….………………..…………….….………107
How to use the P-touch Address Book (Windows® only) ………………………………..…………….…………….108
Starting the P-touch Address Book ……………….……………..…………….…………….…………….……….…108
Creating a new contact…………………….……………..…………….……………….…………….…………………..110
8 How to use P-touch Editor Lite (Windows® only) 112
How to use P-touch Editor Lite (QL-810W only) (Windows® only) ………..…………….…………….………….112
How to use P-touch Editor Lite LAN (Windows® only) …………….…………….…………….…………….……….116
9 How to Use P-touch Transfer Manager and P-touch Library (Windows® only) 121
P-touch Transfer Manager…………..…………….……………….…………….…………….…………….……………..…121
Transferring the Template to P-touch Transfer Manager ……………………….……………….…………….…….121
Transferring Templates or Other Data from the Computer to the Label Printer ………….………………..…124
Backing up Templates or Other Data Saved in the Label Printer …………….…………….…………….……….129
Deleting Label Printer Data………….…………….…………….……………….…………….…………….….…………….130
Creating Transfer Files and Transfer Package Files ……………………….……………..…………….…………….131
P-touch Library ………..…………….………………..…………….…………….…………….……………..………………….132
Starting P-touch Library …..…………….……………….…………….…………….………………..………..………………132
Opening and Editing Templates ……..…………….…………….…………….…………….…………….……….……….134
Printing Templates………………….…………….……………..…………….…………….…………….……………….…….135
Searching for Templates…….…………….…………….…………….………………..…………….………….…………….136

viii
10 Transferring Templates with P-touch Transfer Express (Windows® only) 138
Preparing P-touch Transfer Express ……….……….……….…………….…………….…………….…………………..138
Transferring the Template to P-touch Transfer Manager ……………………….……………….…………….…….139
Saving the Template as a Transfer Package File (.pdz)………..…………….………….…………….…………….140
Distributing the Transfer Package File (.pdz) and P-touch Transfer Express to the User …………………142
Transferring the Transfer Package File (.pdz) to Your Label Printer ………..……………….…………….…….143
11 How to Update P-touch Software 146
Updating P-touch Editor and P-touch Address Book (Windows® only) …….…………….…………….……….146
For Windows®……………………..…………….………….…………….…………….…………….…………….……....146
For Mac …………………..…………….…………….…………….…………….………………..………….……………….148
Updating P-touch Editor Lite (Windows® only) and the Firmware ……..………………..……………….……….149
For Windows®……………………..…………….………….…………….…………….…………….…………….……....149
For Mac …………………..…………….…………….…………….…………….………………..………….……………….151
Section III Network
12 Introduction 154
Network Features …….…………….…………….……………..…………….…………….…………….…….……………….154
13 Changing Your Label Printer Network Settings 155
Changing Your Label Printer’s Network Settings
(IP Address, Subnet Mask and Gateway) ………………………..…………….……………….…………….……….155
Using the BRAdmin Light Utility (Windows® only)……….…………….……………..…………….…………….155
Other Management Utilities …………………………….………………..…………….…………….………………….…….157
Using Web Based Management (Web Browser)…………….…………….…………….…………….………….157
Using the BRAdmin Professional Utility (Windows® only) …..…………….…………….…………….……….157
14 Web Based Management 158
Overview………………………….…………….…………….…………….…………….……………..………………………..…158
Configuring the Printer Settings Using Web Based Management (Web Browser) …………………….…….159

ix
Section IV Appendix
15 Resetting the Label Printer 161
Resetting All Settings to the Factory Settings Using the Label Printer Buttons (QL-810W only) ……….161
Resetting Data Using the LCD menu (QL-820NWB only) ……..……………….…………….…………….……….161
Resetting Data Using the Printer Setting Tool ……………………..…………….…………….…………….……..…..162
16 Maintenance 163
Cleaning the Exterior of the Unit……..…………….…………….……………….……………..……………...…………..163
Cleaning the Print Head.……………..……………….…………….…………….…………….…………….………………..163
Cleaning the Roller …………………….…………….…………….…………….…………….……………….….…………….163
Cleaning the Label Outlet ………………………………….……………..……………….…………….……….…………….165
17 Troubleshooting 166
Overview………………………….…………….…………….…………….…………….……………..………………………..…166
Printing Problems …………..………….…………….…………….…………….……………..……………...…………..167
Network Setup Problems……………………..…………….…………….…………….……………….………………..172
Label Printer Cannot Print over the Network
Label Printer Is Not Found on the Network Even after Successful Installation .…………….……….174
Security Software Problems …..………………………..…………….…………….…………….…………….……….174
Checking the Operation of Network Devices…..………………..…………….…………….…………….……….175
Version Information .……………..…………….…………….…………….…………….…………….……….………….175
LED Indicators …………………………..…………….…………….…………….…………….……………..………………….176
QL-810W ………..…………….…………….…………….……………..…………….…………….……………………..…176
QL-820NWB ………………………..…………….…………….…………….…………….…………….…………………..178
Troubleshooting………..…………….…………….…………….……………….……………..……………..……………180
18 Product Specifications 181
Label Printer Specifications ……………………….…………….………….…………….…………….……….………….…181
19 Notes on Using P-touch Transfer Manager 183
Notes on Creating Templates ………………………….…………….………………..…………….……………..…………183
Notes on Transferring Templates …………………….…………….………….…………….…………….……….……….183
Notes on Transferring Data Other Than Templates ……………..…………….…………….…………….………….184
20 Network Terms and Information 185
Supported Protocols and Security Features ………………………..……………….…………….……………….…….185
Types of Network Connections and Protocols………….…………….…………….…………….…………….……....186
Types of Network Connections….…………….…………….…………….………………..…………….………..…..186
Configuring Your Label Printer for a Network .…………….……………….…………….…………….………………..188
IP Addresses, Subnet Masks and Gateways ………..……….…………….…………….…………….………….188
Wireless Network Terms and Concepts ……………………….…………….…………….…………….…………….….190
Security Terms ……………………….…………….…………….…………….…………….…………….…..……………190

x
21 List of Barcodes for the P-touch Template Function 194
General Procedure for the P-touch Template Function ………………………….……………….…………….…….194
List of Barcodes for Specifying Settings …………………….…………….……………….…………….………..………195
22 Using the Battery Unit (Optional: PA-BU-001) 198
Using the Battery Unit (Rechargeable Li-ion Battery included) ………………………..…………….…………….198
Product Specifications ………………..…………….…………….…………….…………….…………….…..………………200
23 Using the Brother Barcode Scanner (Optional: PA-BR-001) (QL-820NWB only) 201

Section I
Basic Operations I
Setting Up the Label Printer 2
Printing Using a Computer (P-touch Editor) 22
Printing Using the Mobile Device 33
Changing the Label Printer Settings 37
Printing Labels Using P-touch Template 69
Other Functions 84
2
1
1
Parts Description 1
Front 1
QL-810W 1
Setting Up the Label Printer 1
1 Battery LED
2 Status LED
3 Power Button
4 Feed Button
5 Cutter Button
6 WPS Button
7 Wi-Fi LED
8 Wi-Fi Button
9 Editor Lite LED
10 Editor Lite Button
11 DK Roll Compartment Cover
12 Label Output Slot
13 Roll Spool Arm
14 Roll Spool Guide
Setting Up the Label Printer
3
1
QL-820NWB 1
1 Indicator Display
2 Date Display
3 Time Display
4 Status LED
5 Power Button
6 Cutter Button
7 Menu Button
8 Cancel Button
9 Up Arrow Button
10 Down Arrow Button
11 OK Button
12 LCD
13 Label Output Slot
14 DK Roll Compartment Cover
15 Roll Spool Arm
16 Roll Spool Guide
14
15
16
12
13
11
10
9
76 8
5
2
3
1
4
Setting Up the Label Printer
4
1
Rear 1
1 AC Adapter Port
2 USB Port
3 USB Host
4LAN Port
Before using the Label Printer, make sure you remove the protective sheet according in the following way:
1 Make sure that the Label Printer is turned Off.
Hold the Label Printer by the front, and firmly lift the DK Roll Compartment Cover to open it.
2 Remove the protective sheet from the Label Output Slot.
•Do not throw away the protective sheet.
• When the Label Printer is not in use, lift the DK Roll Compartment Cover and remove any DK Rolls
from inside the Label Printer. Reinsert the protective sheet into the Label Output Slot to maintain good
printing quality.
QL-810W QL-820NWB
Setting Up the Label Printer
5
1
Loading the DK Roll 1
aMake sure that the Label Printer is turned Off.
Hold the Label Printer by the front, and firmly lift the DK Roll Compartment Cover to open it.
bPlace the DK Roll into the Roll Spool Guide.
• Make sure that the Roll Spool Arm is inserted firmly in the Roll Spool Guide.
• Make sure the Stabilizer (1) slides into the notch of the Label Printer.
cThread the DK Roll through the Label Printer.
• Align the edge of the DK Roll with the upright edge of the Label Output Slot.
• Insert the first label into the slot inside the compartment.
• Push the label through the Label Output Slot until the end reaches the mark, as shown below.
1
Setting Up the Label Printer
6
1
dClose the DK Roll Compartment Cover.
When you press the Power ( ) Button to turn the Label Printer On, the end of the DK Roll aligns
automatically.
Do not leave any printed labels in the Label Printer. Doing so will cause the labels to jam.

Setting Up the Label Printer
7
1
Connecting the AC Adapter 1
Connect the AC Power Cord to the Label Printer and to the AC Adapter. Then, plug the AC Power Cord into
a grounded AC power outlet.
The PA-BU-001 (optional battery unit) can also be used.
Setting Up the Label Printer
8
1
Installing the Coin Cell Battery (QL-820NWB only) 1
A coin cell battery is used as a backup power supply to maintain the settings for the internal clock. Please
note that battery power will be consumed even if the Label Printer is not in use.
aThe Label Printer has a preinstalled coin cell battery. Make sure that the Label Printer is turned Off. Hold
the Label Printer by the front, and firmly lift the DK Roll Compartment Cover to open it.
bRemove the insulation seal on the coin cell battery.
• Using a coin or similar object, slowly turn the coin cell battery cover in the direction of the arrow on the
battery cover until it stops, and then remove the coin cell battery cover.
Do not turn the coin cell battery cover past the unlock position, or you may damage it.
• Replace the coin cell battery.
Be sure to insert the new battery with the + and — sides facing the correct direction.
Using a coin or similar object, slowly turn the coin cell battery cover in the opposite direction of the arrow
on the battery cover until it locks into place.
Setting Up the Label Printer
9
1
• Remove the battery if you do not intend to use the Label Printer for an extended period of time.
• Dispose of the battery at an appropriate collection point, not in the general waste stream. Be sure to
observe all applicable federal, state, and local regulations.
• When storing or discarding a battery, wrap it with cellophane tape to prevent it from short-circuiting.
(see illustration)
1 Cellophane tape
2 Coin Cell battery
• We recommend replacing the battery every two years.
• If the clock is reset while power is supplied to the machine, replace this battery. When replacing the
battery, buy a CR2032 battery (recommended manufacturers: Hitachi Maxell, Ltd., FDK Corporation).
1
2
Setting Up the Label Printer
10
1
Turning Power On/Off 1
On: Press the Power ( ) Button to turn the Label Printer On. The Status LED turns green.
Off: Press and hold the Power ( ) Button again to turn the Label Printer Off.
When turning the Label Printer Off, do not remove the battery or disconnect the AC Adapter until the
orange Status LED turns Off.
Setting LCD Language (QL-820NWB only) 1
aPress the Menu Button.
bPress the [▲] or [▼] Button to select the [Administration] menu, and then press the [OK] Button.
cSelect [ Language], scroll to select your language, and then press the [OK] Button.
The first time you start up the Label Printer, the language configuration is automatically displayed without
going through the menu.
Setting the Time and Date (QL-820NWB only) 1
Adjust the clock to the current time and date. The time and date set here are displayed on the main screen.
aPress the Menu, [▲], or [▼] Button to select the [Settings] menu, and then press the [OK] Button.
bSelect [Set Clock] using [▲] or [▼] Button, and then press the [OK] Button. The clock setting screen
appears.
cUse [▲] or [▼] to specify the last two digits of the year, and then press the [OK] Button. Specify two digits
for the month and day in the same way.
dUse [▲] or [▼] to specify two digits each for the hours and minutes, and then select [AM], [PM] or [24].
ePress the [OK] Button. The [Settings] menu is displayed.
The format for the time and date can be changed. Select [Administration], and then select [Date
Format] or [Time Format] to specify the setting.
Setting Up the Label Printer
11
1
LCD (QL-820NWB only) 1
Screen 1
When the Label Printer is turned on, the main screen appears.
1 Update icon
Indicates whether updated templates, databases, and other data are available.
: There is new data.
(flashing) : Data update failed.
(flashing) : Cannot communicate with the server.
2 Wireless Direct icon
3 WLAN icon
: The network is connected correctly.
: Your Label Printer is searching for the network.
4 Bluetooth icon
: Bluetooth mode
(flashing): Auto Reconnect function is On, and not connected.
5 Eco Charging icon (only appears when Battery Unit is installed)
6 Battery level (only appears when Battery Unit is installed)
Indicates the remaining battery level.
Full:
Half:
Low:
Charging:
7 Template
8 Date display
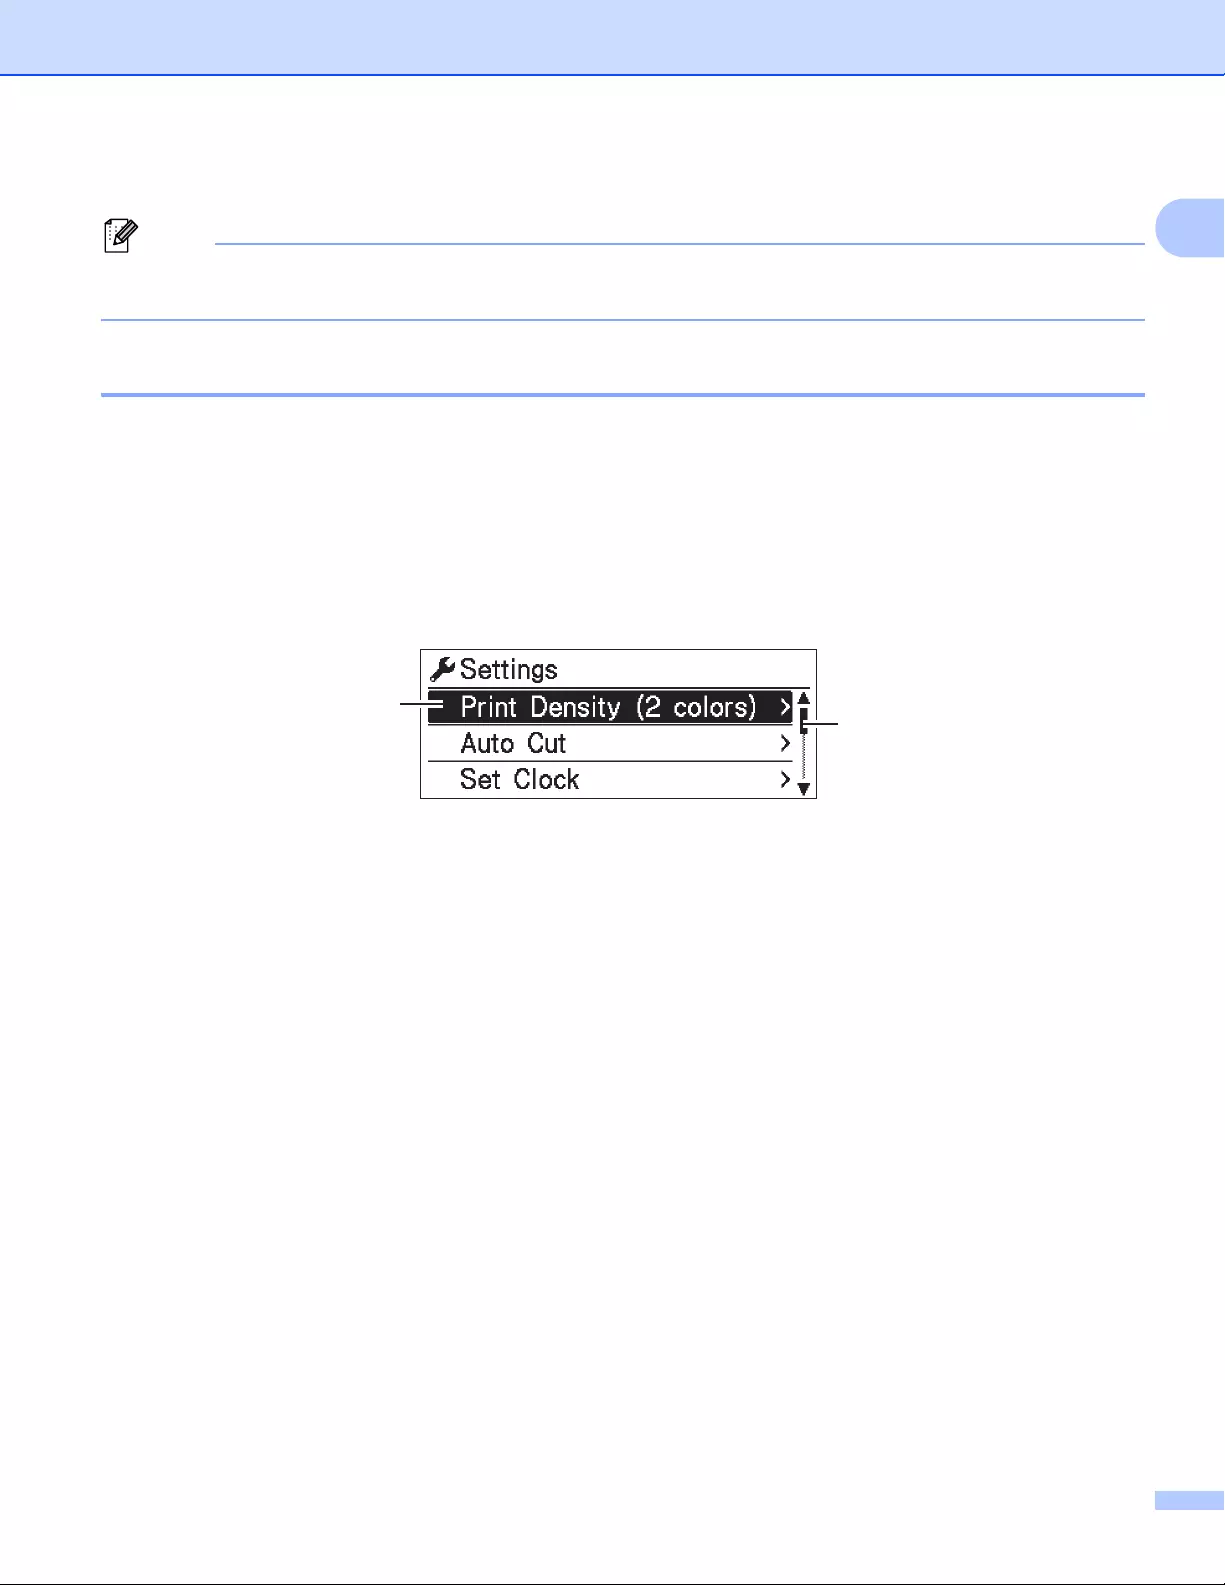
Setting Up the Label Printer
12
1
9 Time display
While using the buttons on the Label Printer, do not send prints or change settings from your computer or
other devices.
LCD Settings 1
The settings for the LCD can be specified either by using the Label Printer or by using the Printer Setting
Tool on a computer connected to the Label Printer. For more information on connecting a computer and
specifying settings, see Changing the Label Printer Settings on page 37.
Specifying Settings from the Printer 1
Press the Menu, [▲], or [▼] Button to select a menu option, and then press the [OK] Button. Press [▲] or [▼]
to select an option, and then press the [OK] Button.
1 The currently selected option is highlighted.
2 The scroll bar shows the position of the highlighted option on the list.
1
2

Setting Up the Label Printer
13
1
Using the buttons on the Label Printer, the following settings can be specified:
Menu Title Sub title Settings Description
Settings Print
Density
(2 colors)
Color 1
(Black)
-6
-5
-4
-3
-2
-1
0
+1
+2
+3
+4
+5
+6
Adjust the density of the first color
when using 2-color printing.
Color 2 (Red) -6
-5
-4
-3
-2
-1
0
+1
+2
+3
+4
+5
+6
Adjust the density of the second
color when using 2-color printing.
Auto Cut Auto Cut
OFF
Cut at End
Set the cutting method when printing
multiple labels.
Auto Cut: Always cuts automatically.
OFF: Does not cut automatically.
Cut at End: Only cuts at the end,
when multiple labels are printed.
Set Clock Y(2000-2099)
M(1-12)
D(1-31)
0-23(H)
0-59(M)
AM/PM/24
Specify the date and time.
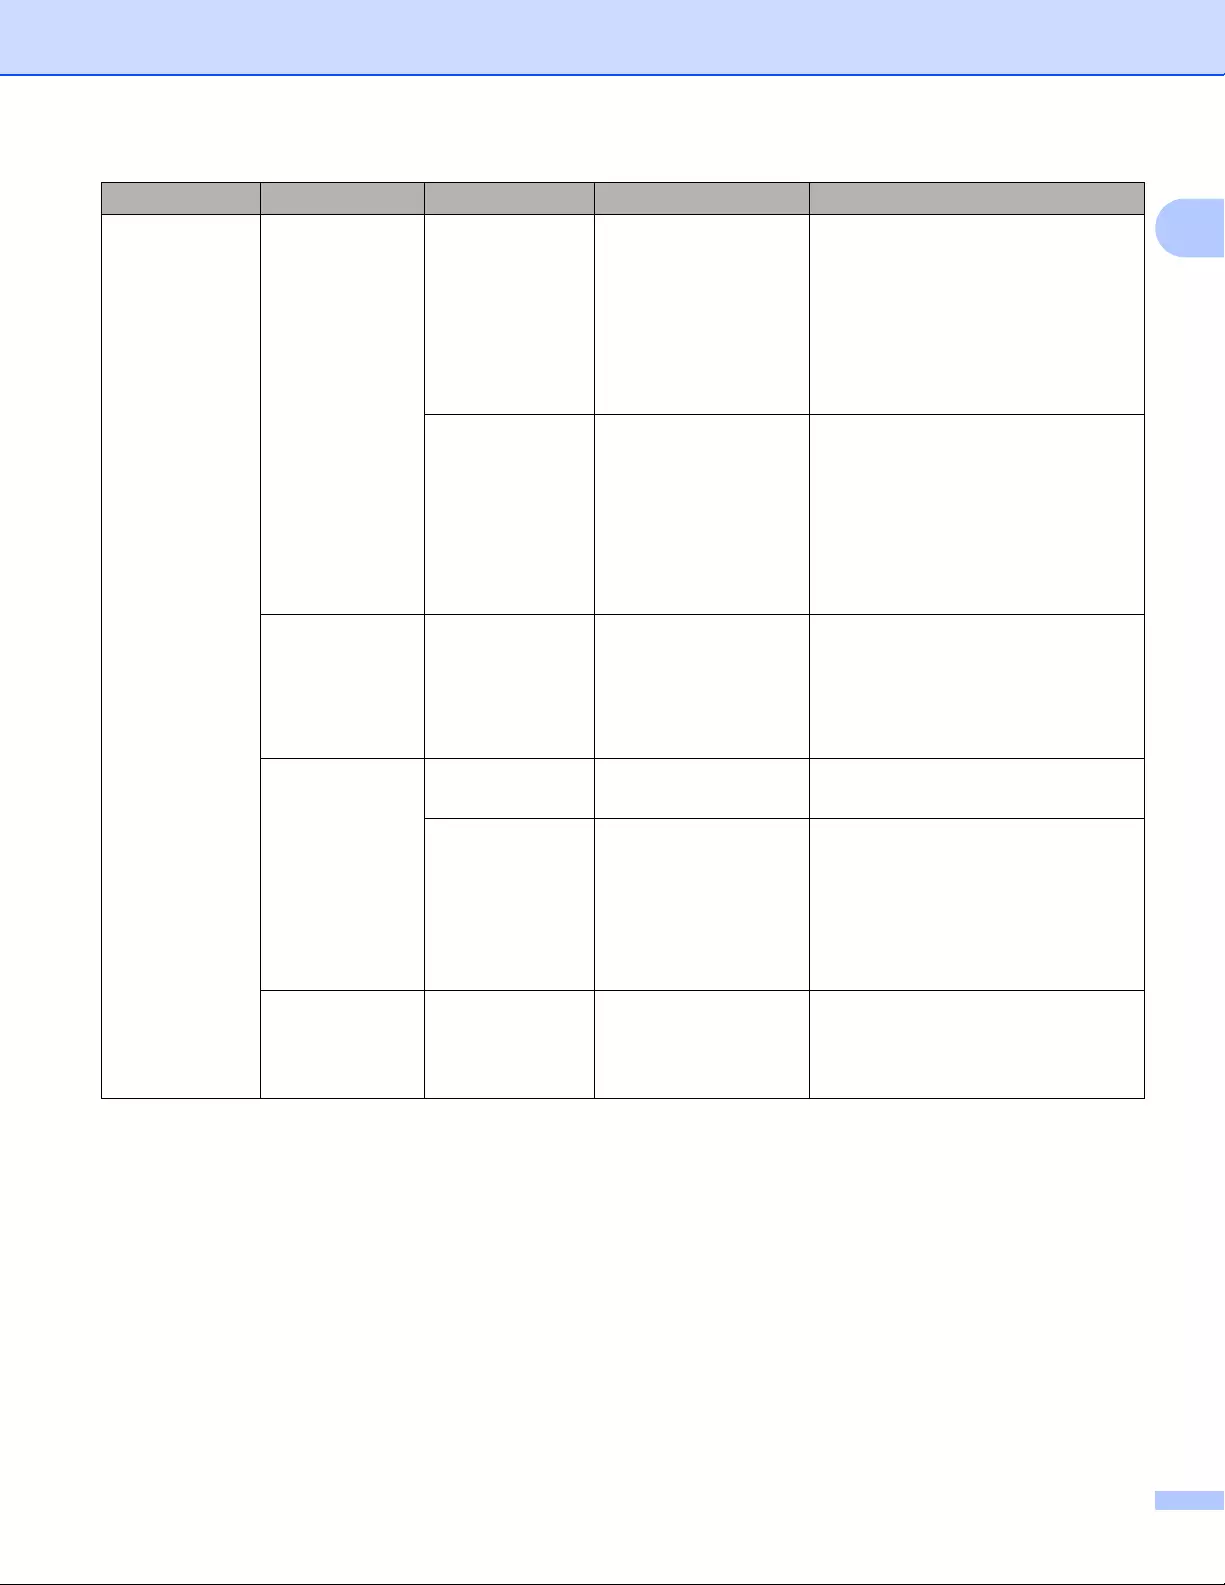
Setting Up the Label Printer
14
1
Settings
(Continued)
Auto Power
Off
Adapter Off
10
20
30
40
50
60
Specify the period of time that
passes before the Label Printer
turns off automatically when
connected to an AC power outlet.
Li-ion
Battery
Off
10
20
30
40
50
60
Specify the period of time that
passes before the Label Printer
turns off automatically when
powered by the Rechargeable Li-ion
Battery.
LCD Contrast -2
-1
0
+1
+2
Set the contrast of the LCD.
The higher the number, the stronger
the contrast.
Backlight On
Off
Switch the backlight On or Off.
Backlight
Timeout
Off
5s
10s
20s
30s
60s
Specify the amount of time of
inactivity that passes before the
backlight of the LCD turns off
automatically.
Eco Charging 100%
80%
Switch to Eco Charging.
If set at 80%, charging will stop
automatically when 80% charge is
reached.
Menu Title Sub title Settings Description
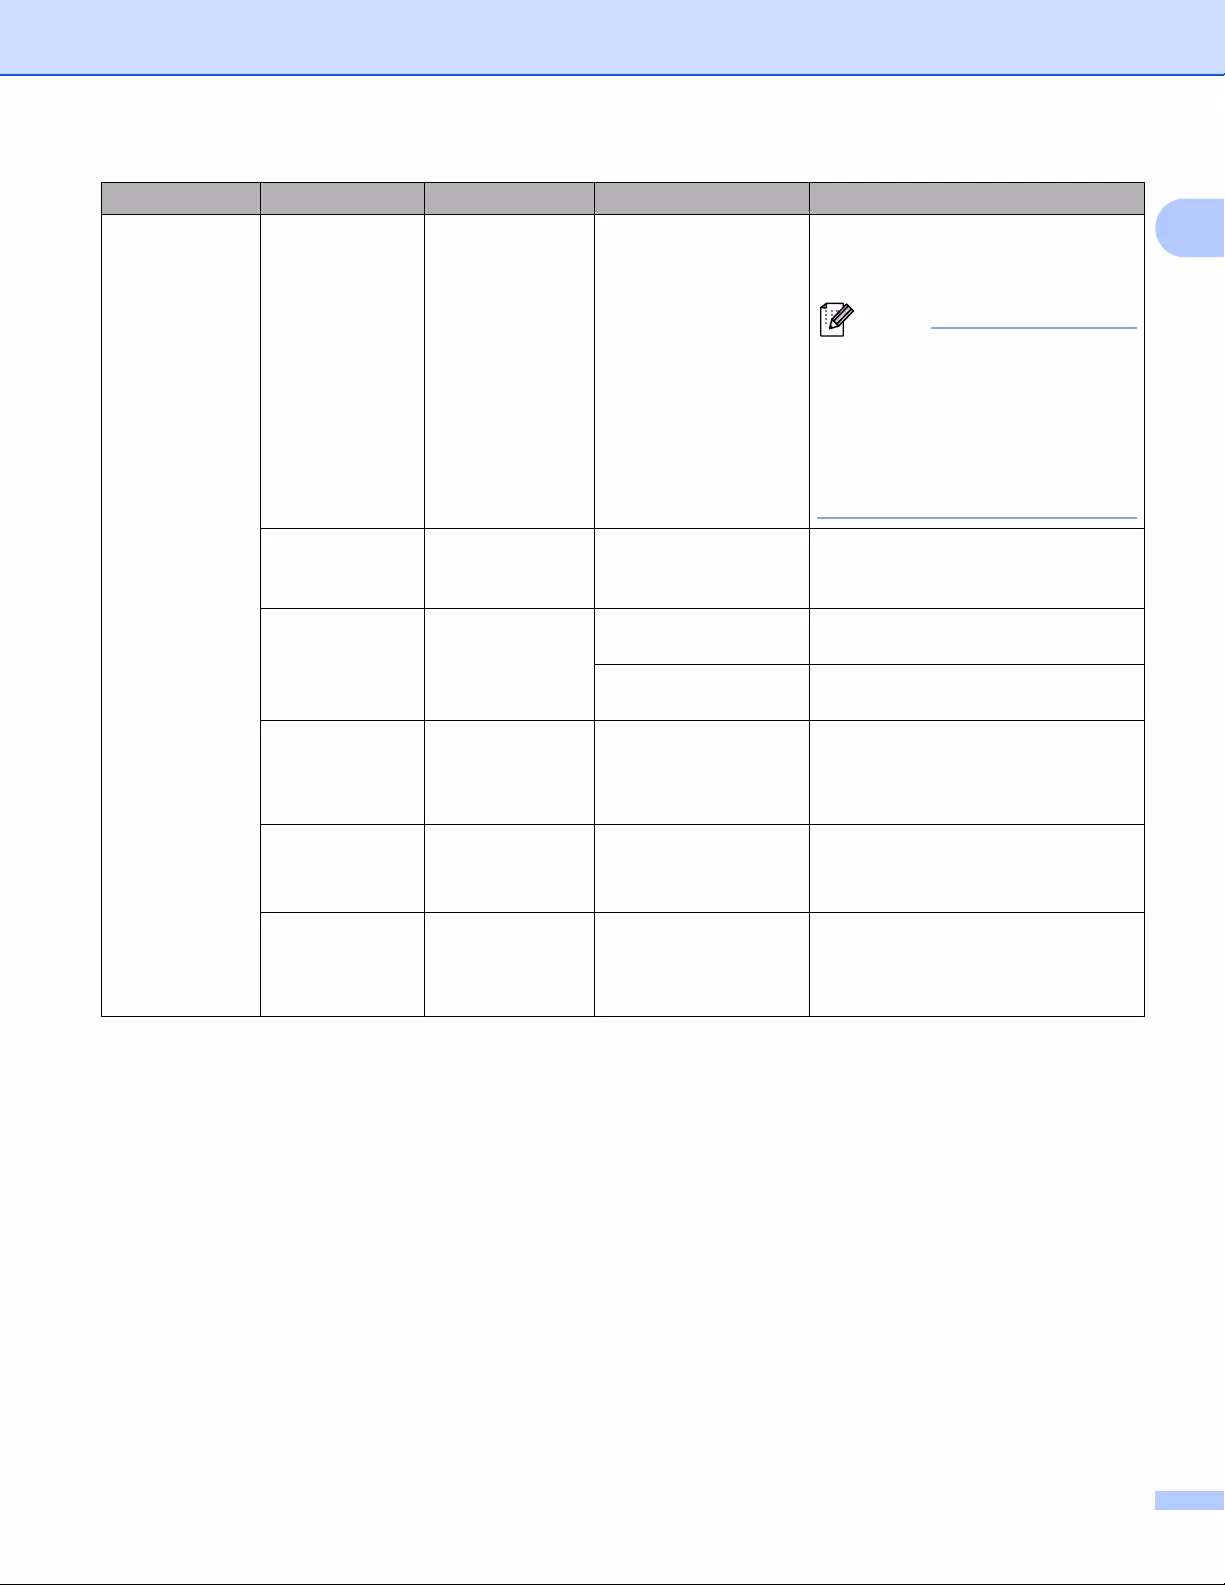
Setting Up the Label Printer
15
1
Template
Settings
Template
Mode
On
Off
Select whether the template mode
starts when the Label Printer is
turned on.
In the template mode, you can
replace the contents of the
templates stored in the Label
Printer and print them. For further
information, see Printing Labels
Using P-touch Template
on page 69.
Confirm
On
Off
Select whether a message appears
before printing so that the number of
copies can be confirmed.
Serialize
Mode
Cont From Last Select to serialize from the last
number printed.
From Starting # Select to serialize from the default
number each time you print.
Serialize
Reset
Reset
Back
Reset the sequential number to the
default number. Select [Back] to
return to the previous screen without
resetting the number.
Default
Quantity
001
|
999
Specify the default value for the print
quantity.
Preset
Template
Show
Hide
Select whether or not to display
preset templates when using
templates other than the factory
preset templates.
Menu Title Sub title Settings Description
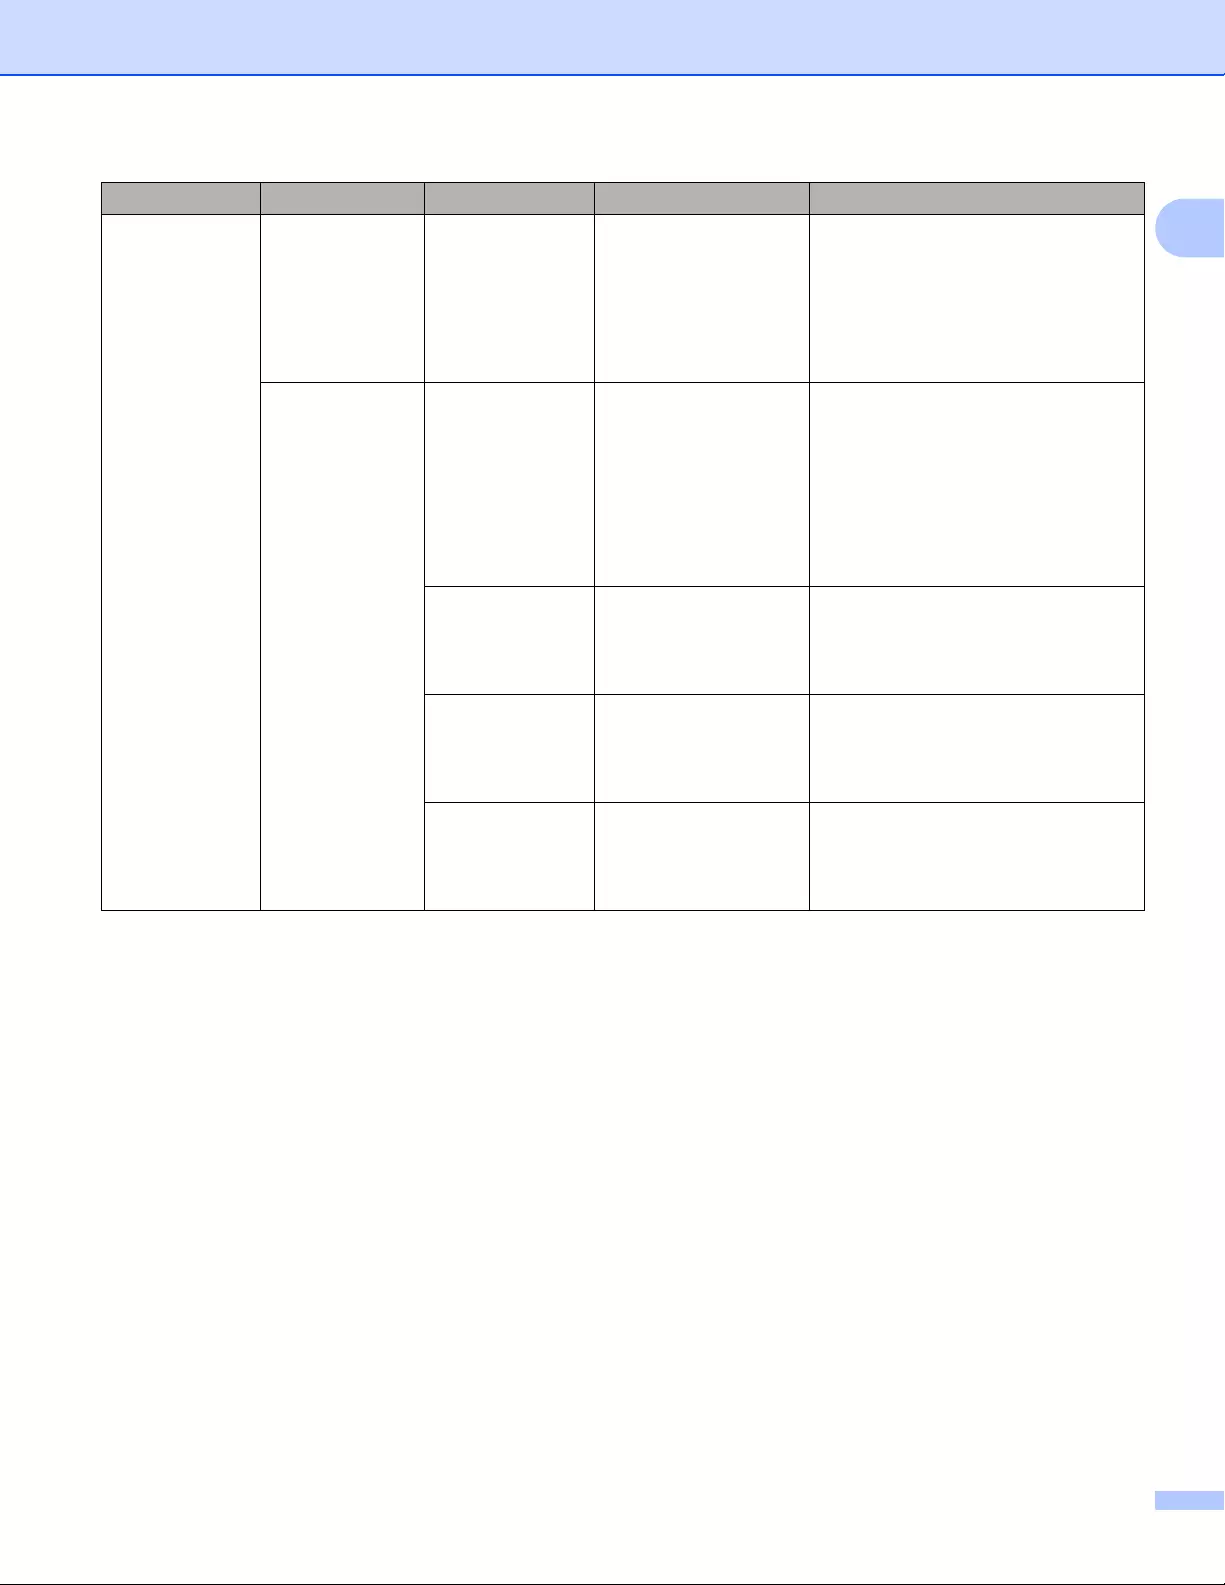
Setting Up the Label Printer
16
1
Information
Configuration
Printer:
QL-820NWB
ProgVer: *.**
FontVer: *.**
Memory:
***/8064kbytes
Display the Label Printer
information.
Configuration
All Start
Back
Print the Label Printer set-up
information (missing dot test pattern,
usage log, printer settings, wireless
setting information and transfer
data).
Select [Back] to return to the
previous screen without printing the
information.
Usage Log Start
Back
Print the Label Printer usage log.
Select [Back] to return to the
previous screen without printing the
log.
Printer
Settings
Start
Back
Print the Label Printer settings.
Select [Back] to return to the
previous screen without printing the
settings.
Transfer Data Start
Back
Print the transfer data.
Select [Back] to return to the
previous screen without printing the
transfer data.
Menu Title Sub title Settings Description
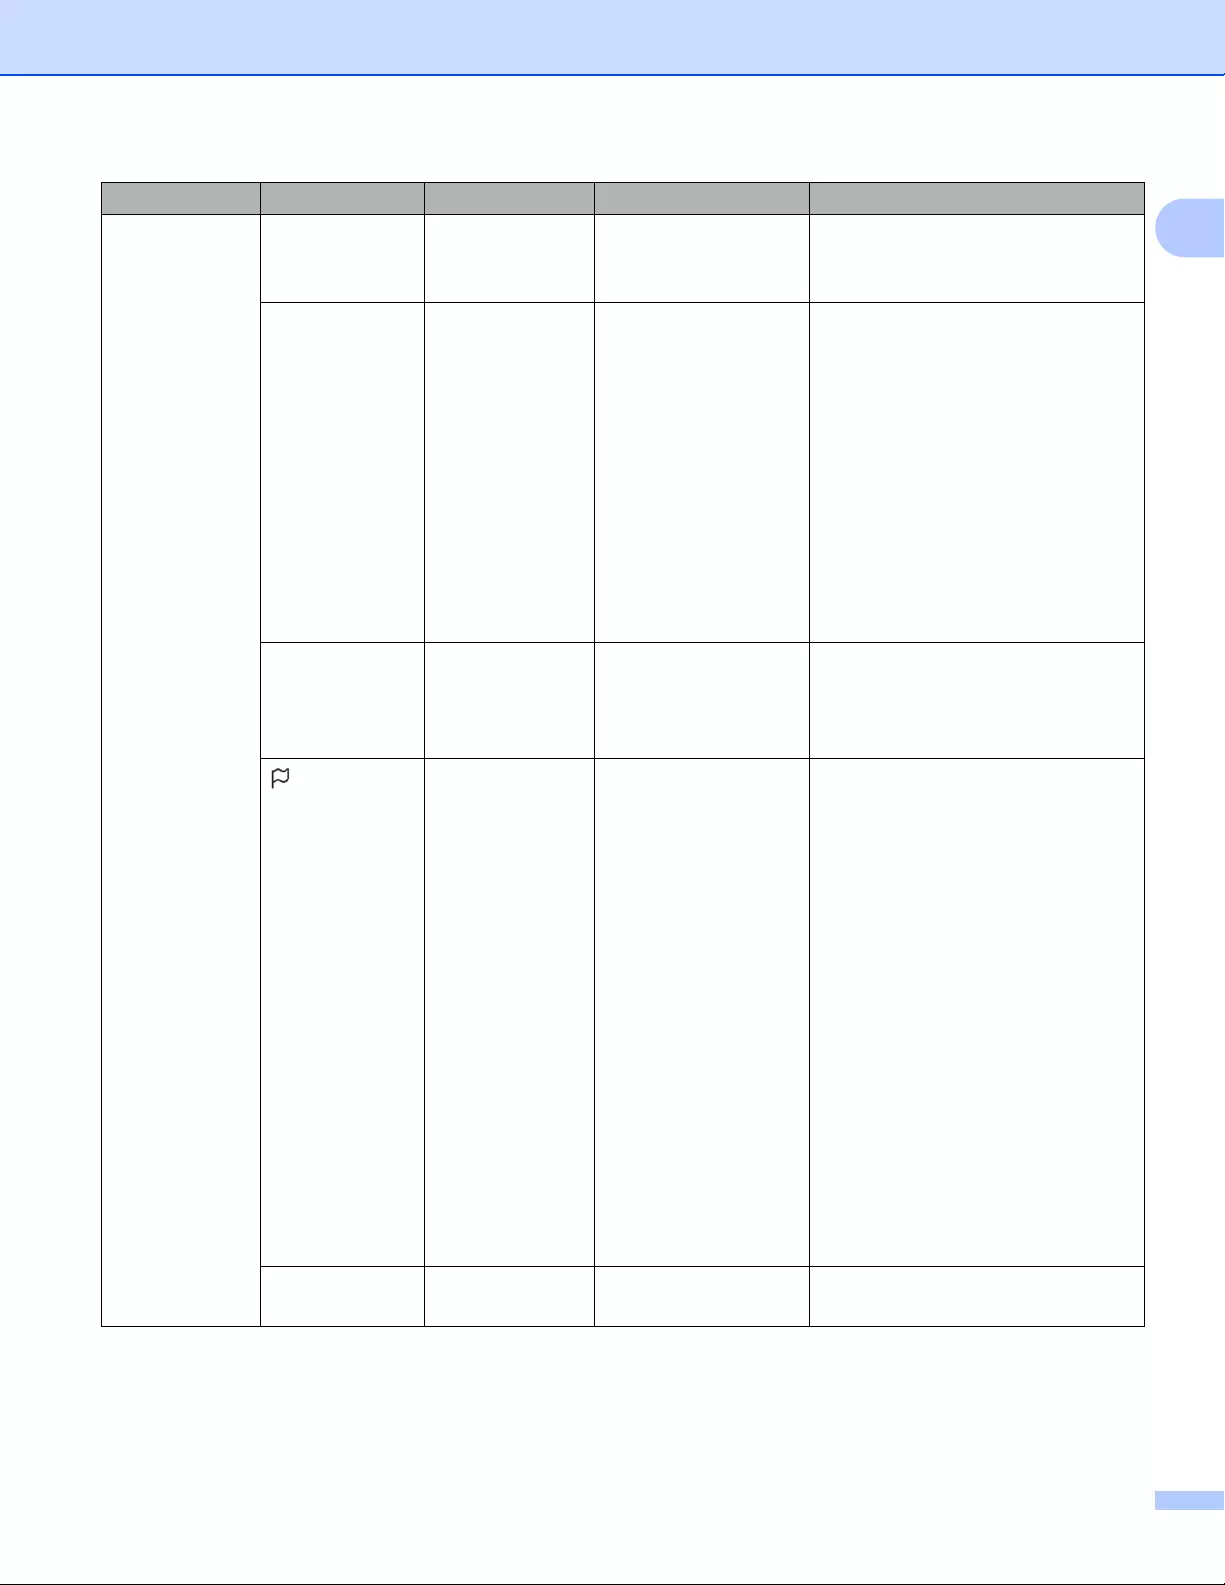
Setting Up the Label Printer
17
1
Administration
Command Mode P-touch Template
ESC/P
Raster
Select the type of command mode.
Date Format 1/31/2099
01/31/2099
31/1/2099
31/01/2099
31.1.2099
31.01.2099
31-1-2099
31-01-2099
2099/1/31
2099/01/31
2099-1-31
2099-01-31
Select the date format for the clock.
Time Format 01:59(24)
1:59(24)
1:59AM
01:59AM
Select the time format for the clock.
Language Čeština
Dansk
Deutsch
English
Español
Français
Hrvatski
Italiano
Magyar
Nederlands
Norsk
Polski
Português
Română
Slovenski
Slovenský
Suomi
Svenska
Select the language of the LCD.
Unit inch
mm
Select the measurement units for
displayed settings.
Menu Title Sub title Settings Description
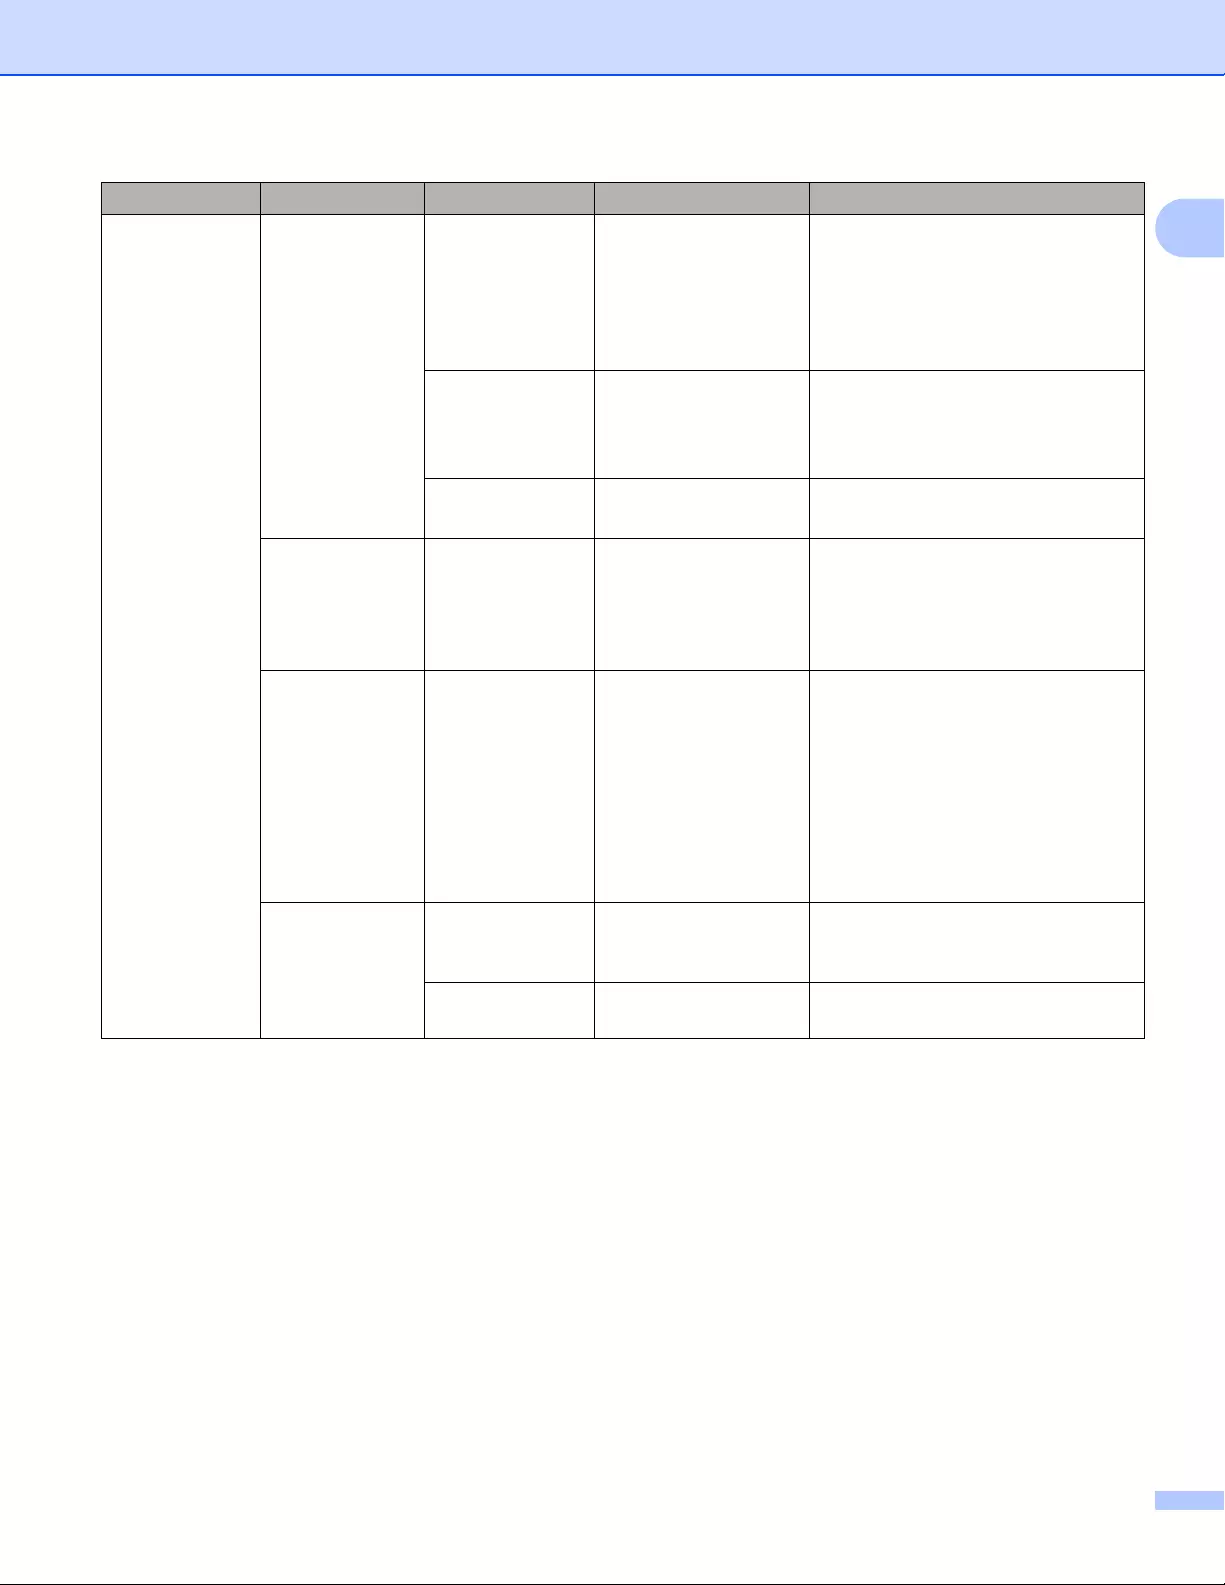
Setting Up the Label Printer
18
1
Administration
(Continued)
Reset Factory Reset Reset
Back
Returns all printer settings, including
the communication settings and
device settings, to their factory
defaults.
Templates and databases stored in
the Label Printer are also deleted.
User Data
Reset
Reset
Back
Returns all device settings to their
factory defaults.
Templates and databases stored in
the Label Printer are also deleted.
Network Reset Reset
Back
Returns the communication settings
to their factory defaults.
Airplane
Mode
On
Off
If you select [On], the Label Printer is
set to Airplane Mode. The following
conditions apply:
[WLAN] and [Bluetooth] will
disappear from the LCD.
Menu Locks Settings
Template Settings
Information
WLAN
Bluetooth
Feed
Remote Update
Finish
Select the check boxes for any
options you want to prevent changes
from the LCD of the Label Printer.
After selecting the check boxes,
select [Finish] to complete the
settings.
If the Menu Locks are set, a lock icon
is displayed for parameters that
cannot be selected.
Menu
Security
On
Off
Select whether a password is
required to enter the Administration
mode.
Set Password If you select [On], specify the 4-digit
password.
Menu Title Sub title Settings Description
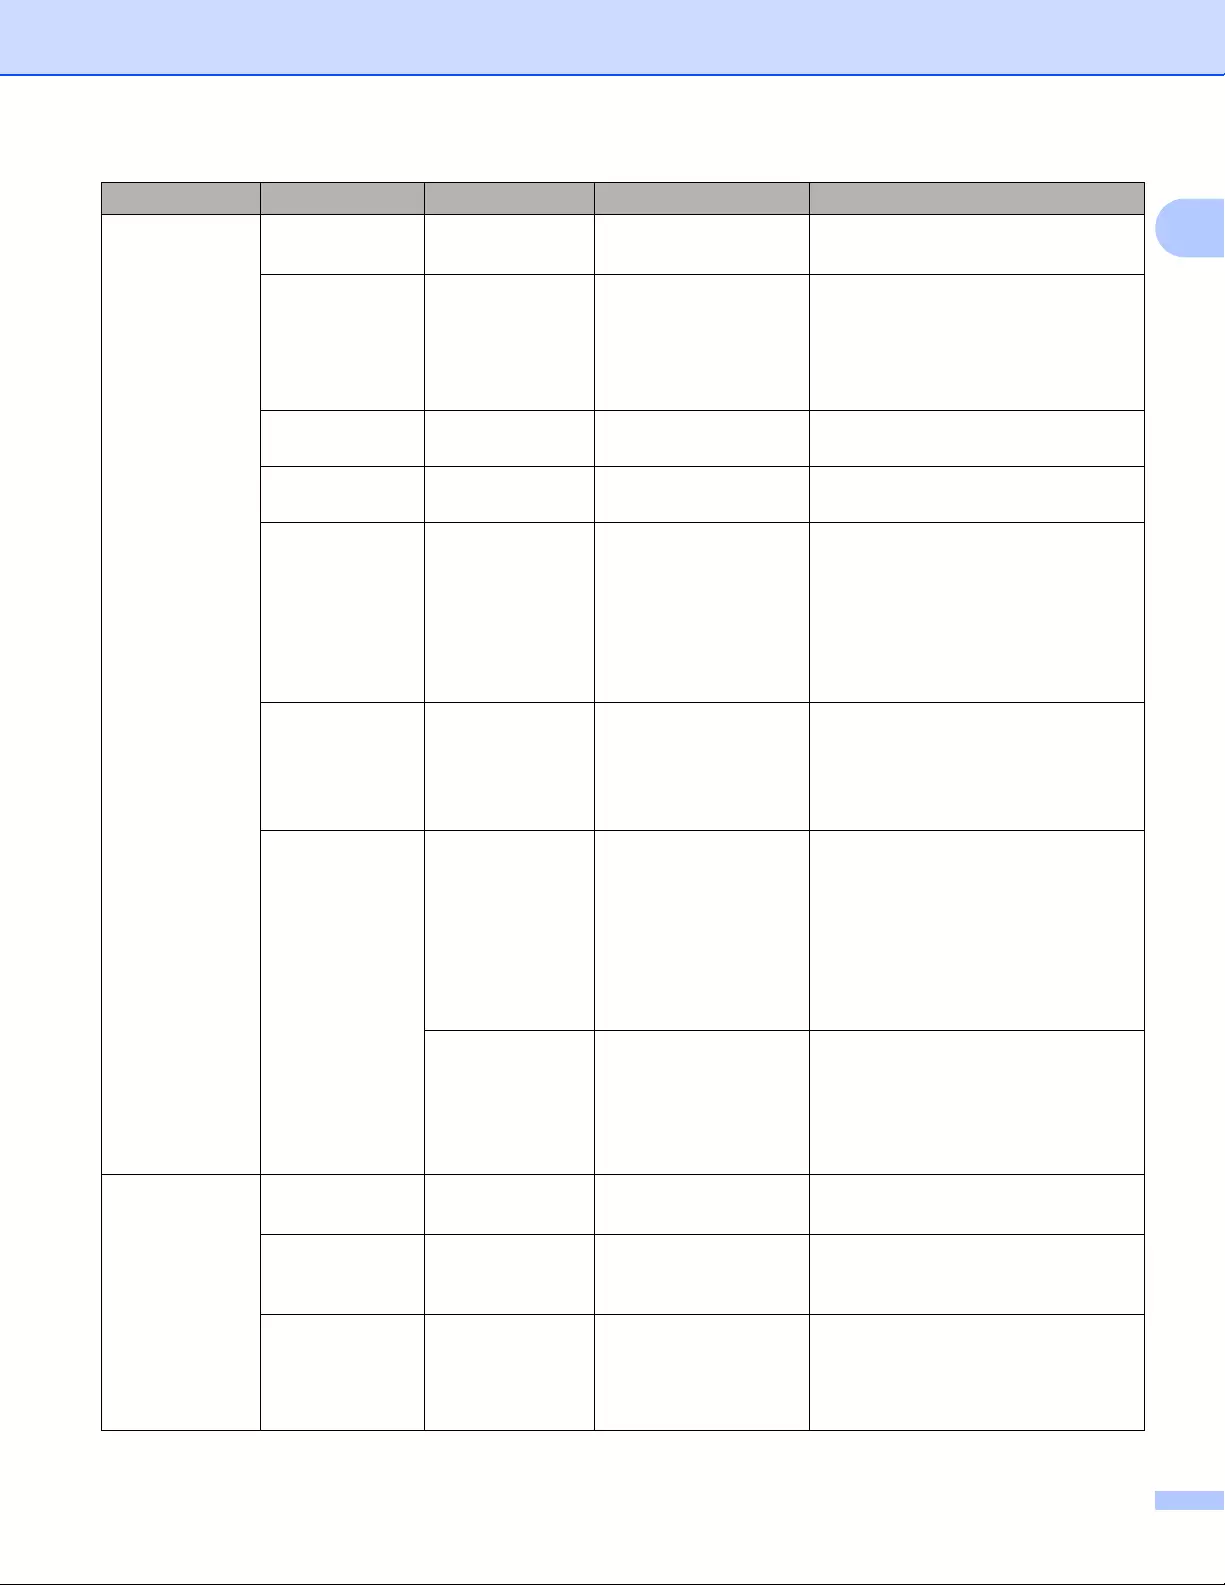
Setting Up the Label Printer
19
1
WLAN WLAN
(On/Off)
On
Off
Select whether to turn the WLAN
function On or Off.
Network Mode Infrastructure
Mode
Direct Mode
Infra/
Direct Mode
Set which network is used when you
select [On] from [WLAN (On/Off)].
WPS Button
Push
Try to connect to wireless access
points in the vicinity.
WPS PIN Code Display the Label Printer’s 8-digit pin
code.
Infra
Manual
Setting
Display the SSIDs of wireless
access points in the vicinity.
After you select an SSID and press
the [OK] Button, the password entry
screen will appear. Push the Cancel
Button several times to return to the
previous screen until it is displayed.
Direct
Manual
Setting
Manually enter the SSID and
password of a wireless access point
to connect. Push the Cancel Button
several times to return to the
previous screen until it is displayed.
WLAN Status
Infrastructure
Mode
Status: ****
SSID: ****
IP Addr: *.*.*.*
NodeName: ****
Subnet: *.*.*.*
Gateway: *.*.*.*
MAC Addr: ****
Display the WLAN status.
Direct Mode Status: ****
SSID: ****
IP Addr: *.*.*.*
Password: ****
Channel: ****
Display the WLAN status.
Bluetooth Bluetooth
(On/Off)
On
Off
Turn the Bluetooth function on or off.
Automatic
Reconnection
On
Off
Switch to Automatic Reconnection
mode (only for Apple device : iPad,
iPhone, or iPod touch).
Bluetooth
Status
Usage: ****
Device: ****
Visible: ****
Address: ****
Display the status of the Bluetooth
function.
Menu Title Sub title Settings Description
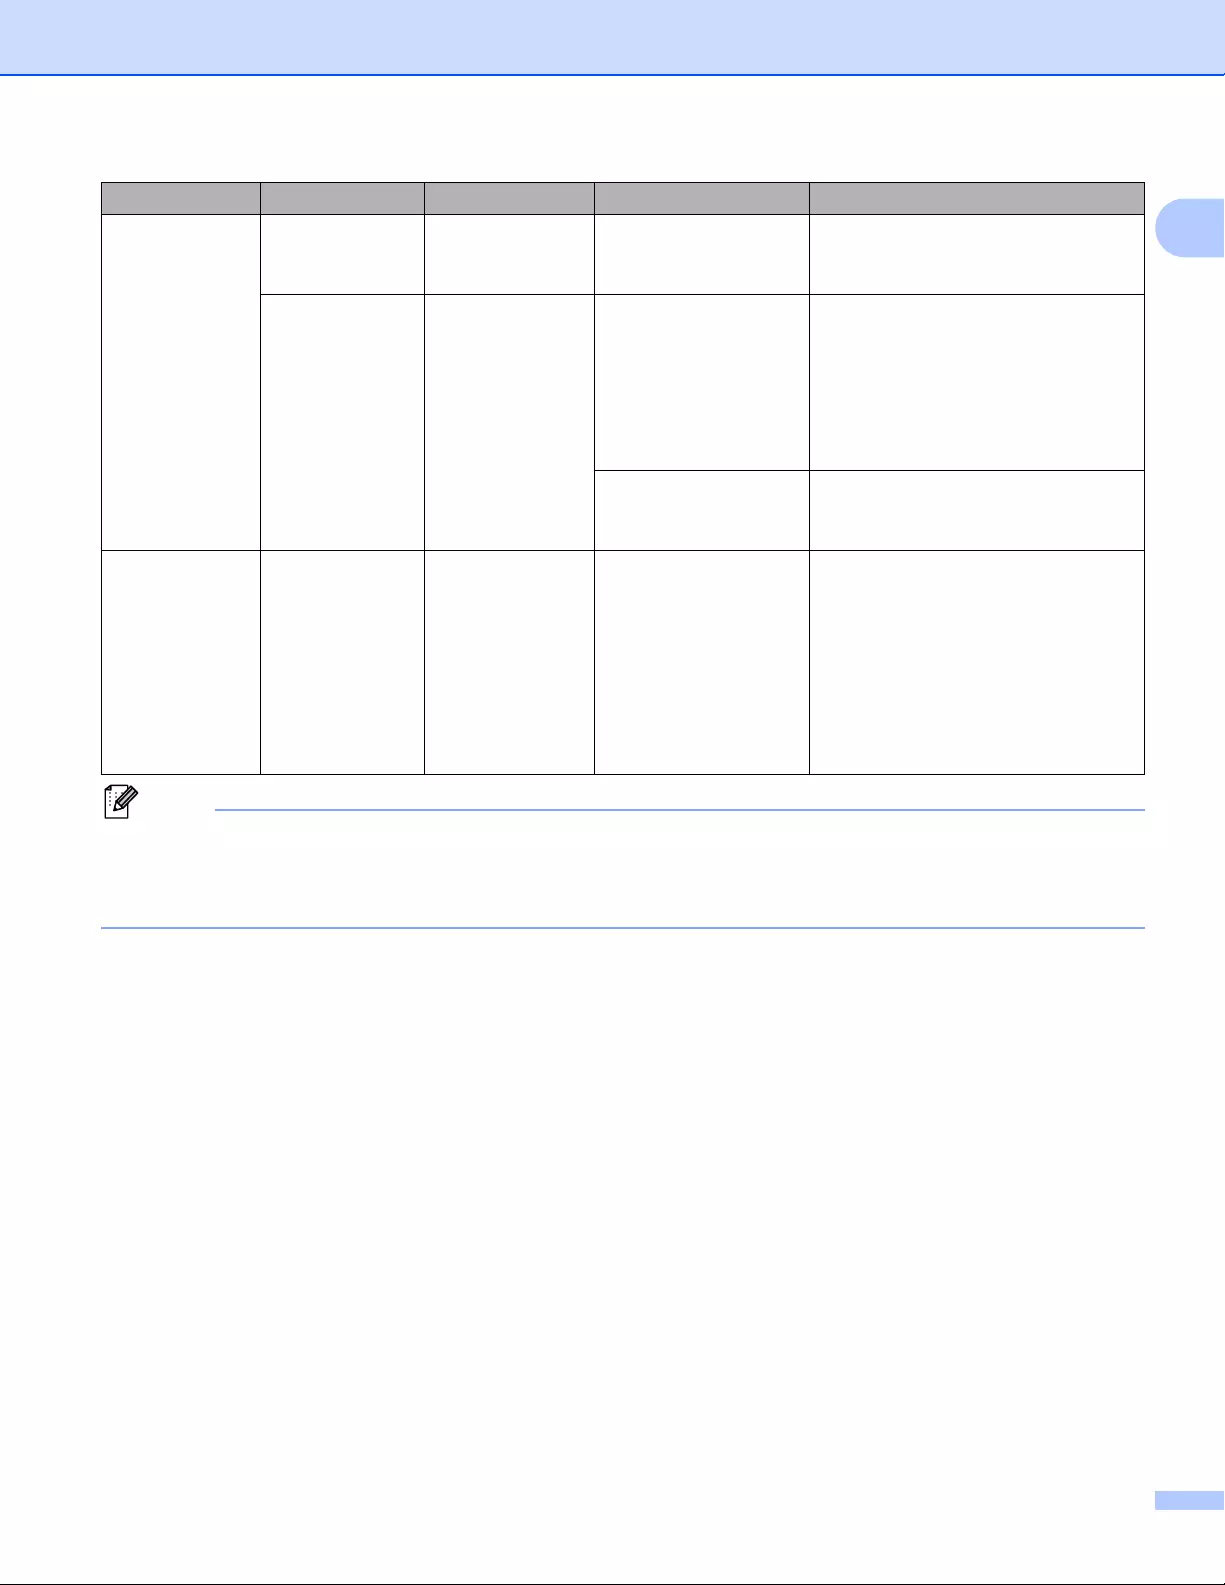
Setting Up the Label Printer
20
1
• Some settings may differ depending on the firmware (printer software).
• If you want to reset the settings, use [Device settings] in the Printer Setting Tool to return all settings to
their factory defaults. For more information, see Menu Bar on page 53.
Feed Feed Start Determine when the label feed
starts. These modes may vary
depending on the DK Roll used.
Die-cut Feed
Setting
Current Page Label feed starts on the current page
when the die-cut black mark is
detected on the reverse side. If a
die-cut black mark is undetected on
the current page, this mode feeds to
the next page and detection begins
from there.
Next Page This mode always feeds to the next
page and detection begins from
there.
Remote
Update
Remote
Update?
Start
Back
Available only when the Label
Printer is connected to the FTP
Server and when the templates,
databases, and other files need to
be updated. Press [Start] to begin
the remote update. After the update
is completed, the Label Printer
automatically returns to the main
screen.
Menu Title Sub title Settings Description
Setting Up the Label Printer
21
1
Setting the Menu Security 1
When setting the menu security, access to the Administration mode can be restricted by setting a password.
aPress the Menu, [▲], or [▼] Button to select the [Administration] menu, and then press the [OK]
Button.
bSelect [Menu Security], press [▲] or [▼] to select [On], and then press the [OK] Button.
Specify the first number using [▲] or [▼], and then press the [OK] Button to proceed to the next number.
Specify the remaining three numbers in the same way.
• After a password has been set, the password input screen appears when the [Administration] menu
is selected. Enter the specified 4-digit password using [▲] or [▼], and then press the [OK] Button.
• To cancel the password settings, select the [Administration] menu and enter the password. Then,
select [Menu Security] > [Off].
• If you do not remember the password, use [Device settings] in the Printer Setting Tool to return all
settings to their factory defaults, or specify the password again and apply it. For more information, see
Menu Bar on page 53.
22
2
2
Installing the Software and Printer Drivers to a Computer 2
To print from your Windows® computer or Mac, install the printer drivers, P-touch Editor, and other
applications to your computer.
For Windows®:
Printer Driver, P-touch Editor, P-touch Address Book, P-touch Update Software, Printer Setting Tool,
BRAdmin Light and BRAdmin Professional
For Mac:
Printer Driver, P-touch Editor, P-touch Update Software, Printer Setting Tool and Wireless Device Setup
Wizard
QL-810W only: When printing with P-touch Editor, press and hold the P-touch Editor Lite Button until the
green Editor Lite LED turns off.
aVisit our website (install.brother) and download the Software Installer for the latest software and
manuals.
bDouble-click the downloaded EXE file (for Windows®) or DMG file (for Mac), and follow the on-screen
instructions to proceed with the installation.
To connect the Label Printer to a computer using a wireless connection, we recommend the following:
• Configure the wireless network settings while installing the software. You can change the settings later
using the Printer Setting Tool.
• Install the software on a computer wirelessly connected to your network and configure the Label Printer
using a USB cable.
• Make a note of the SSID (network name) and password (network key) of the wireless network in
advance. If you cannot find this information, ask your network administrator or wireless access
point/router manufacturer.
• If your wireless access point/router supports WPS, you can use WPS (Wi-Fi Protected Setup) to quickly
configure the wireless network settings.
cClose the dialog box when the installation is complete.
Printing Using a Computer
(P-touch Editor) 2

Printing Using a Computer (P-touch Editor)
23
2
Connecting the Label Printer to a Computer 2
Refer to these directions for the type or connection method:
USB cable connection
See Connecting Using USB on page 23.
Wireless LAN connection
See Connecting Using Wi-Fi® on page 23.
Bluetooth Connection (QL-820NWB only)
See Bluetooth Connection (QL-820NWB only) on page 28.
Wired LAN connection (QL-820NWB only)
See Connecting Using a Wired LAN (QL-820NWB only) on page 28.
Connecting Using USB 2
aBefore connecting the USB cable, make sure that the Label Printer is turned Off.
bConnect the USB cable to the USB Port on the back of the Label Printer.
cConnect the USB cable to the USB Port on the computer.
dTurn the Label Printer On.
Connecting Using Wi-Fi®
2
The following Wi-Fi connection methods are available:
Wireless Direct
Infrastructure Mode
Infrastructure Mode + Wireless Direct
WPS (Wi-Fi Protected Setup™)
Wireless Direct 2
Wireless Direct allows you to connect the Label Printer to your computer or mobile device directly without a
Wi-Fi access point/router; the printer serves as a Wi-Fi access point.
aConfirm the Wireless Direct settings of the Label Printer.
Using the Label Printer (QL-820NWB only)
1 Press the Menu and [▼] Buttons to select the [WLAN] menu, and then press the [OK] Button.
Set [WLAN (On/Off)] to [On].
2 Press the Menu and [▼] Buttons to select the [WLAN] menu, and then press the [OK] Button.
3 Press the [▼] Button to select the [Network Mode] menu, and then press the [OK] Button.
Printing Using a Computer (P-touch Editor)
24
2
4 Select [Direct Mode], and then press the [OK] Button. The Wireless Direct icon appears on the
LCD.
For Windows®
Connect the Label Printer and computer with a USB cable. Start the Printer Setting Tool on your
computer, and click [Communication Settings]. Select [Infrastructure and Wireless Direct] or
[Wireless Direct] for [Selected Interface] in [Communication Settings] in the [General] tab, and
confirm the [Wireless Direct] tab.
For more information, see Communication Settings for Windows® on page 40.
For Mac
Start the Printer Setting Tool on your computer, and select [On] for [Wireless Direct] in the [Wireless
LAN] tab.
bUse your computer to select the SSID of the Label Printer («DIRECT-*****_QL-810W» or «DIRECT-
*****_QL-820NWB» where ***** is the last five digits of the product serial number). If required, enter the
password (810*****/820***** where ***** is the last five digits of the product serial number).
• You can change the Label Printer’s network settings using the Printer Setting Tool. For more information,
see Wireless Settings on page 46.
• The Printer Setting Tool also allows you to apply the network settings changes to multiple Label Printers.
For more information, see Applying Setting Changes to Multiple Printers on page 50.
• You can find the serial number label in the DK Roll Compartment of the Label Printer.
• You cannot connect to the Internet on your computer via Wi-Fi while using Wireless Direct.
• The SSID can also be entered using the LCD. Select the SSID from the displayed list, or press the [▼]
Button to select the [Direct Manual setting], and then manually enter the SSID and password. Push
the Cancel Button several times to return to the previous screen until it is displayed.
Infrastructure Mode 2
Infrastructure Mode allows you to connect the Label Printer to a computer via a Wi-Fi access point/router.
Before You Begin
First, you must configure the Wi-Fi settings of the Label Printer to communicate with your Wi-Fi access
point/router. After the Label Printer is configured, computers on your network will have access to the Label
Printer.
• If you are going to connect the Label Printer to your network, we recommend that you contact your system
administrator before installation. You must confirm your Wi-Fi settings before you proceed with this
installation.
• To configure the Wi-Fi settings again, or if the status of the Wi-Fi connection for the Label Printer is
unknown, reset the Wi-Fi settings of the Label Printer.
For QL-810W
1 Press and hold the Power ( ) Button to turn the Label Printer off.
Printing Using a Computer (P-touch Editor)
25
2
2 Press and hold the Cutter ( ) Button and the Power ( ) Button for about one second. The Status LED
starts blinking in green.
3 The Status LED is lit in orange, the Editor Lite LED flashes in green and the Wi-Fi LED flashes in blue.
While pressing the Power ( ) Button, press the Cutter ( ) Button once and the Status LED lights in
orange.
4 Release the Power ( ) Button. Then the Status LED is lit in orange, the Editor Lite LED flashes in green
and the Wi-Fi LED flashes in blue. The Wi-Fi settings of the printer is reset.
For QL-820NWB
Select [Network Reset] from the menu.
For more information, see LCD Settings on page 12.
• We recommend making a note of the SSID (network name) and password (network key) of the wireless
network in advance.
• To achieve the best results with normal everyday document printing, use the Label Printer as close to the
Wi-Fi access point/router as possible with minimal obstructions. Large objects and walls between the two
devices as well as interference from other electronic devices can affect communication, or the data
transfer speed of your documents.
Connecting the Label Printer to your Wi-Fi access point/router
aFirst, write down the SSID (network name) and password (network key) of your Wi-Fi access
point/router.
bConnect the Label Printer and computer with a USB cable.
cConfigure the Infrastructure Mode settings of the Label Printer.
Using the Label Printer (QL-820NWB only)
1 Press the Menu and [▼] Buttons to select the [WLAN] menu, and then press the [OK] Button.
2 Press the [▼] Button to select the [Network Mode] menu, and then press the [OK] Button.
3 Select [Infrastructure Mode], and then press the [OK] Button.
The SSID can also be entered using the LCD. Press the Menu and [▼] Buttons to select the [WLAN] menu,
and then press the [OK] Button. Press the [▼] Button to select the [Infra Manual Setting]. Push the
Cancel Button several times to return to the previous screen until it is displayed.
For Windows®
1 Start the Printer Setting Tool on your computer, and click [Communication Settings]. Select
[Infrastructure or Ad-hoc] or [Infrastructure and Wireless Direct] for [Selected Interface] in
[Communication Settings] in the [General] tab, and select [Infrastructure] for
[Communication Mode] in [Wireless Settings] in the [Wireless LAN] tab.

Printing Using a Computer (P-touch Editor)
26
2
2 Enter the SSID that you wrote down, or click [Search] and select the SSID from the displayed
list, and enter the password (network key) of your Wi-Fi access point/router.
3Click [Apply].
For more information, see Communication Settings for Windows® on page 40.
For Mac
Start the Wireless Device Setup Wizard included in the Printer Driver Package, and then follow the
on-screen instructions. The Wireless Device Setup Wizard can be found in the [Utilities] folder.
dFor QL-810W
Press and hold the Wi-Fi ( ) Button for one second.
For QL-820NWB
Press the Menu and [▼] Buttons to select the [WLAN] menu, and then press the [OK] Button. Set
[WLAN (On/Off)] to [On].
eWhen the connection between the Label Printer and your Wi-Fi access point/router is established, the
Wi-Fi ( ) LED starts flashing in blue (QL-810W) or [Connected!] appears on the LCD
(QL-820NWB). Computers and mobile devices that are on the same network as the Label Printer will
have access to the Label Printer.
To change any other network settings, use the Printer Setting Tool. For more information, see Changing
the Label Printer Settings on page 37.
Infrastructure Mode + Wireless Direct 2
Infrastructure Mode and Wireless Direct can be used at the same time.
aSet the Label Printer to Infrastructure/Direct Mode.
Using the Label Printer
1 Press the Menu and [▼] Buttons to select the [WLAN] menu, and then press the [OK] Button.
2 Press the [▼] Button to select the [Network Mode] menu, and then press the [OK] Button.
3 Select [Infra/Direct Mode], and then press the [OK] Button.
For computers
1 Start the Printer Setting Tool on your computer, and click the [Communication Settings] button.
2 Select [Infrastructure and WirelessDirect] for [Selected Interface] in the [General] tab.
For more information on the Communication Settings, see General Tab on page 44.
bFor QL-820NWB, press the Menu and [▼] Buttons to select the [WLAN] menu, and then press the [OK]
Button.
Set [WLAN (On/Off)] to [On].
For QL-810W, press and hold the Wi-Fi ( ) Button.
Printing Using a Computer (P-touch Editor)
27
2
cTo use the computer or mobile device to select the SSID of the Label Printer, see step b of Wireless
Direct on page 24.
To configure the Infrastructure Mode settings of the Label Printer, see step c of Connecting the Label
Printer to your Wi-Fi access point/router on page 25.
WPS (Wi-Fi Protected Setup™) 2
If your Wi-Fi access point/router supports WPS, settings and connections can be configured quickly.
aFirst, confirm that your Wi-Fi access point/router has the WPS symbol.
bPlace the Label Printer within the range of your Wi-Fi access point/router. The range may differ
depending on your environment. See the instructions provided with your Wi-Fi access point/router.
cOn the Label Printer:
For QL-810W
Press and hold the WPS Button for one second.
When the connection is established, The Wi-Fi ( ) LED is lit blue.
For QL-820NWB
a). Press the Menu and [▼] Buttons to select [WLAN] menu, and then press the [OK] Button.
b). Press the [▼] Button to select the [WPS Button Push] menu, and then press the [OK] Button.
When the connection is established, the WLAN icon appears on the Label Printer LCD.
• Computers and mobile devices that are on the same network as the Label Printer will have access to the
Label Printer.
• The Label Printer will try to connect using WPS for two minutes. If the WPS Button (QL-810W) or [OK]
Button (QL-820NWB) is pressed during that time, the Label Printer will continue trying to connect for an
additional two minutes.
• You can also configure this using the PIN code.

Printing Using a Computer (P-touch Editor)
28
2
Connecting Using a Wired LAN (QL-820NWB only) 2
To use a static IP address to connect your Label Printer to a wired LAN connection, install the printer
drivers and Printer Setting Tool, and then specify the wired LAN connection settings.
For more information, see Installing the Software and Printer Drivers to a Computer on page 22.
aUnless wireless LAN is turned off, a wired LAN cannot be used. Turn off wireless LAN using the Printer
Setting Tool before connecting the Label Printer to a wired LAN connection.
bTurn off the Label Printer before connecting the LAN cable.
cConnect the LAN cable to the LAN Port on the back of the Label Printer.
dConnect the LAN cable to an active LAN Port on the network.
eTurn the Label Printer On.
The Label Printer’s communication settings can be changed under [Communication Settings] in the
Printer Setting Tool. For more information on the Communication Settings, see General Tab on page 44.
Network Cable 2
Use a straight-through Category 5 (or greater) twisted-pair cable for 10BASE-T or 100BASE-TX Fast
Ethernet Network.
Do not connect this product to any LAN connection that is subject to overvoltages.
Bluetooth Connection (QL-820NWB only) 2
In order for the Label Printer and your Bluetooth-equipped computer or adapter to communicate, you must
first pair the Label Printer with the computer or handheld device using the Bluetooth management software
using your computer or hand-held device.
aPress the Menu Button.
bPress the [▲] or [▼] Button to select the [Bluetooth] menu.
cPress the [OK] Button.
dPress the [▲] or [▼] Button to select [Bluetooth(On/Off)], then press [OK] Button. Press the [▲] or
[▼] Button to select [On], then press [OK] Button.
eUse your Bluetooth management software to discover the Label Printer. Bluetooth communication is
now available.

Printing Using a Computer (P-touch Editor)
29
2
Connecting the Label Printer to a Barcode Scanner using
Bluetooth (QL-820NWB only) 2
You can connect the Label Printer to a Barcode Scanner using a Bluetooth interface.
• Follow the recommendations of the manufacturer of your Bluetooth-equipped devices, such as Barcode
Scanners, and install any necessary hardware and software.
• The Bluetooth connection settings are saved even after the Label Printer is turned off.
Connecting the Label Printer to a Barcode Scanner using Bluetooth
To print barcodes using a Bluetooth connection you must perform the following steps:
Once a connection has been established, the Label Printer remains connected until it is turned off,
preventing it from connecting to another device.
aPress the Menu and [▼] Button to select the [Bluetooth] menu, and then press the [OK] Button.
Set [Bluetooth (On/Off)] to [On].
For Bluetooth Version 2.0 or earlier
bCheck the PIN code in the Bluetooth tab in the settings dialog box in the Printer Setting Tools, and
enter it into your destination Bluetooth device.
For Bluetooth Version 2.1 or later
bExecute pairing from a destination Bluetooth device.
cWhen the [Request Secure Simple Pairing (SSP) settings during pairing] check box is not selected,
a Bluetooth Pass Key for a Bluetooth device (of destination) is displayed on the LCD and the
Bluetooth connection is made.
When [Request Secure Simple Pairing (SSP) settings during pairing] check box is selected, a
Bluetooth Pass Key is displayed on the LCD. Press [OK] Button on the Label Printer. As the
displayed Bluetooth Pass Key is entered to the Bluetooth device (of destination), the Bluetooth
connection is made.
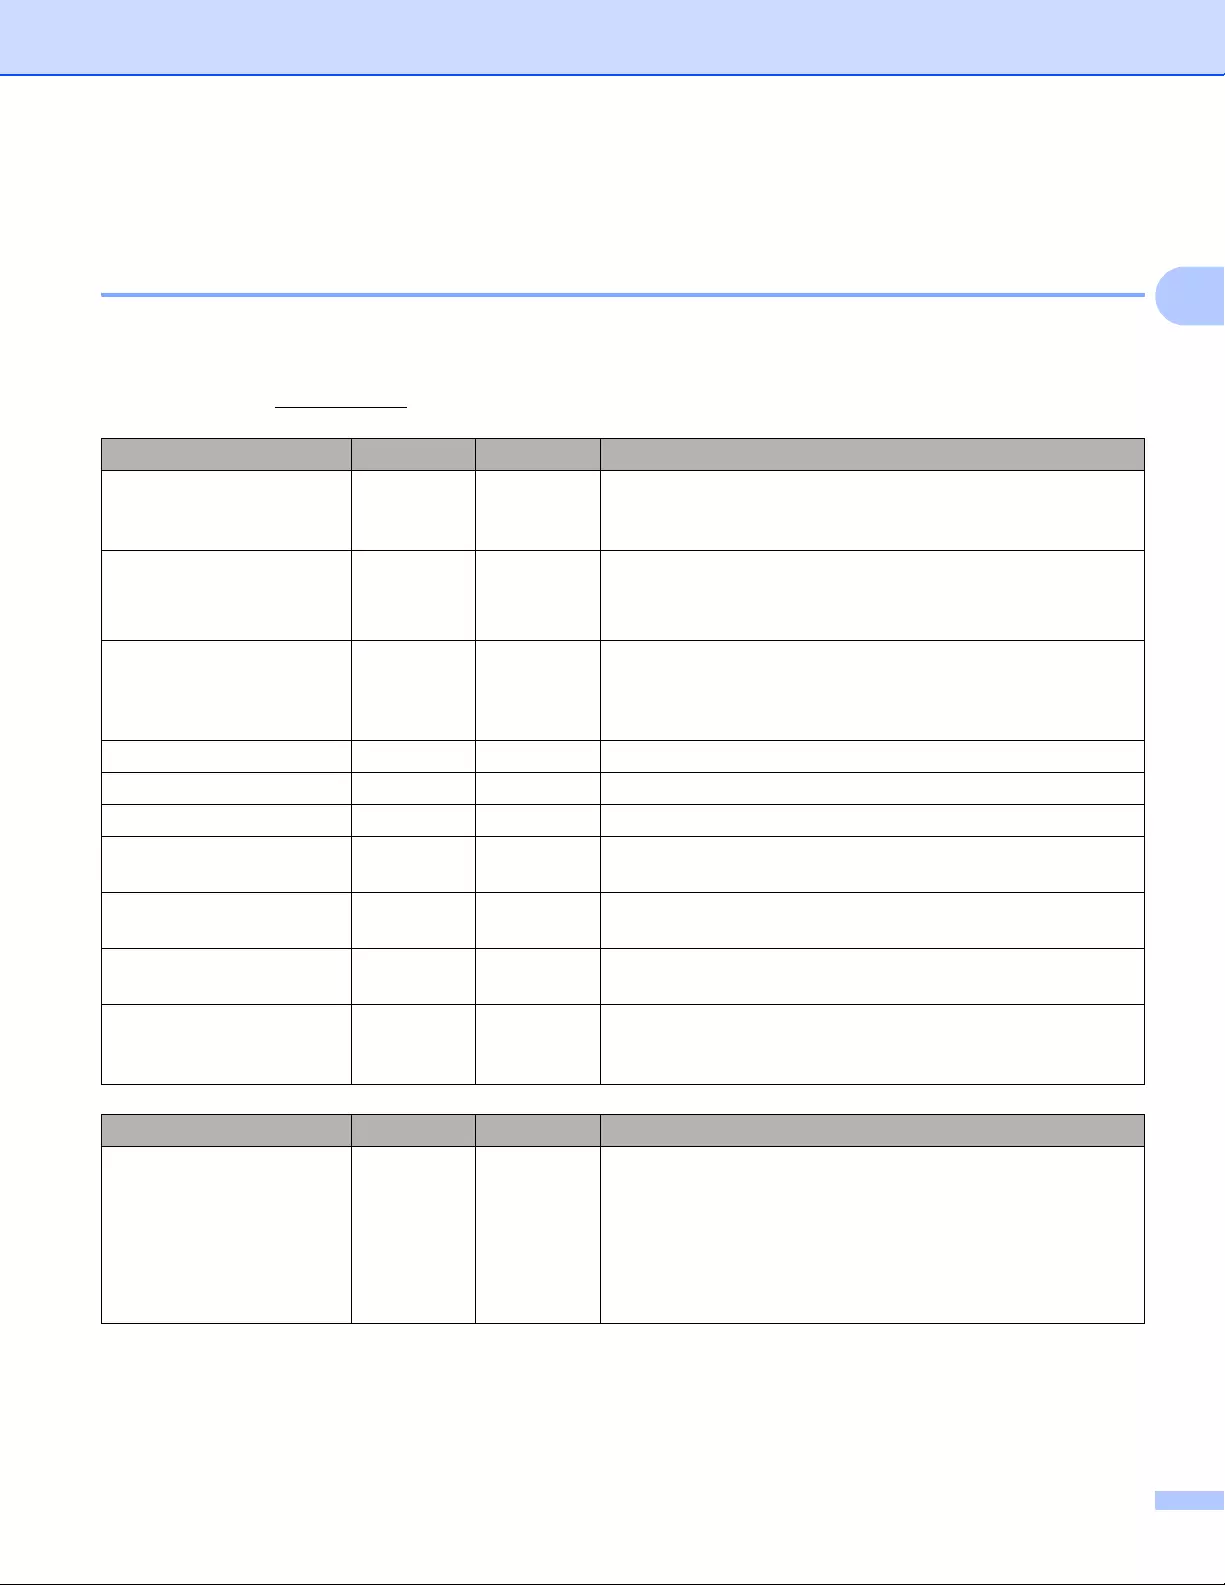
Printing Using a Computer (P-touch Editor)
30
2
Printing from a Computer 2
Available Applications 2
To use the Label Printer effectively, a number of applications and functions are available.
You must install the printer driver to use these applications.
Visit our website (install.brother) and download the installer for the applications and printer driver.
Application Windows Mac Features
P-touch Editor rr
Designs and prints custom labels with built-in drawing tools,
text using different fonts and styles, imported graphic images
and barcodes.
P-touch Transfer Manager r
Allows you to transfer templates and other data to the Label
Printer and save backups of your data on the computer.
This application is installed with P-touch Editor.
P-touch Library r
Manages and prints P-touch Editor templates.
You can use P-touch Library to print templates.
This application is installed with P-touch Editor.
P-touch Update Software rrUpdates software to the latest version.
P-touch Address Book rPrints address labels using an address database.
P-touch Editor Lite LAN rPrints over wireless as well as wired connections.
Printer Setting Tool rr
Specifies the Label Printer’s device settings from a
computer.
Wireless Device Setup
Wizard rAllows you to configure the Label Printer for a wireless
network.
BRAdmin Light rFinds the Label Printer on your network and allows you to
configure basic settings from your computer.
BRAdmin Professional r
Finds the Label Printer on your network and allows you to
configure advanced settings and updates from your
computer.
Function Windows Mac Features
Distributed printing r
When printing a large number of labels, printing can be
distributed among multiple Label Printers.
Because printing is performed at the same time, the total
printing time can be reduced.
For more information, see Distributed Printing (Windows®
only) on page 91.
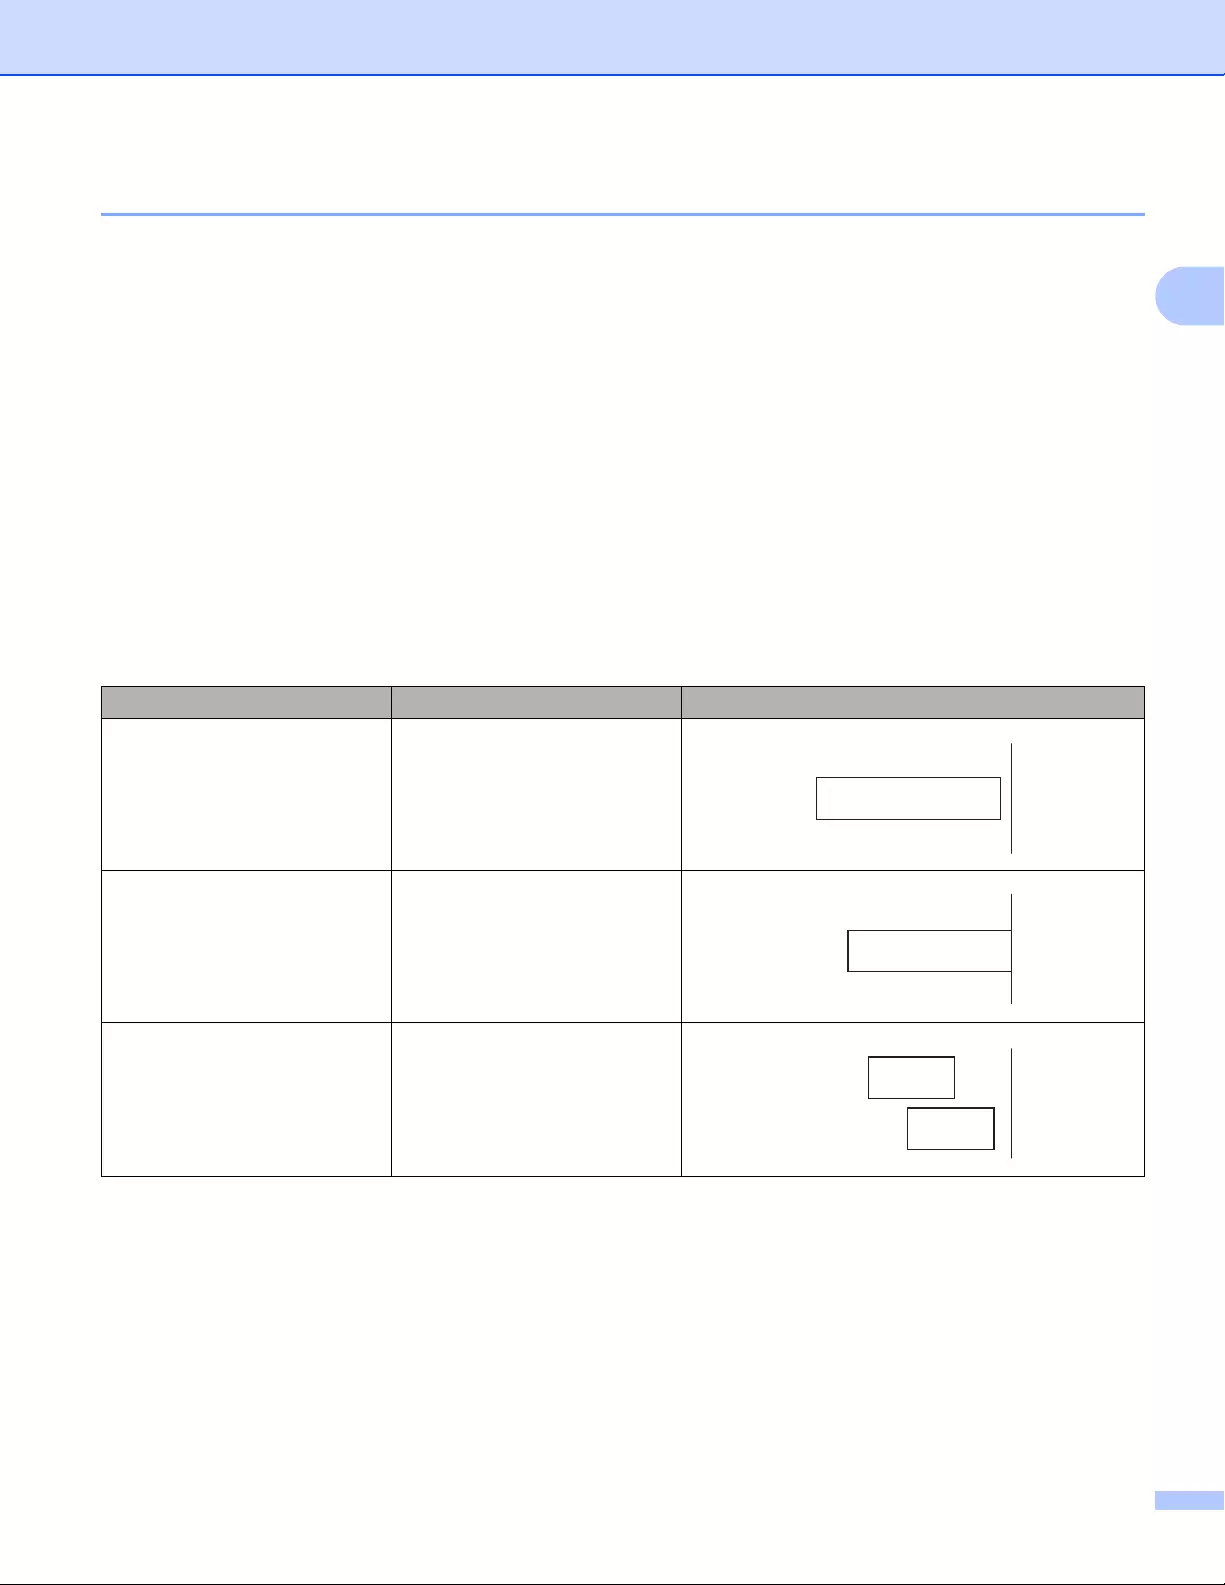
Printing Using a Computer (P-touch Editor)
31
2
Creating Labels from Your Computer 2
There are various methods for printing with this Label Printer.
The following describes the procedure for printing from a computer using P-touch Editor or P-touch Address
Book.
aStart P-touch Editor or P-touch Address Book, and then open the document you want to print.
bCreate a label design.
cCheck the cutting options.
dSelect [File] and then select [Print] from the menu bar or click the [Print] icon.
Cutting Options 2
The cutting options allow you to specify how the item is fed and cut when it is printed. Use the printer driver
to select the cutting option when printing from the computer.
Label Cut Option Table
Auto Cut Cut at end Image
No Yes
No No
Yes Yes or No

Printing Using a Computer (P-touch Editor)
32
2
Attaching Labels 2
aPeel the backing from the label.
bPosition the label, and then press firmly from top to bottom with your finger to attach the label.
Labels may be difficult to attach to surfaces that are wet, dirty, or uneven. The labels may peel off easily
from these surfaces.
33
3
3
Installing Applications for Use with Mobile Devices 3
Brother offers various applications for use with your Label Printer, including applications that allow you to print
directly from your Apple iPhone, iPad, and iPod touch or Android™ smartphone or tablet, and applications
that allow you to transfer data wirelessly, such as templates, symbols, and databases created using a
computer, to your Label Printer.
Available Applications 3
The following free Brother applications can be downloaded from the App Store or Google Play™:
You must purchase a USB cable to connect your printer and Android™ mobile device.
Connecting the Label Printer to a Mobile Device 3
aConfirm the Wireless Direct settings of the Label Printer, and then connect the Label Printer to your
computer using a USB cable.
Using the Label Printer (QL-820NWB only)
1 Press the Menu Button and [▼] Button to select the [WLAN] menu, and then press the [OK] Button.
Set [WLAN (On/Off)] to [On].
2 Press the Menu, [▼] Buttons to select the [WLAN] menu, and then press the [OK] Button.
3 Press the [▼] Button to select the [Network Mode] menu, and then press the [OK] Button.
4 Select [Direct Mode], and then press the [OK] Button. The Wireless Direct icon appears on the
LCD.
For Windows®
Connect the Label Printer and computer with a USB cable. Start the Printer Setting Tool on your
computer, and click [Communication Settings]. Select [Infrastructure and Wireless Direct] or
[Wireless Direct] for [Selected Interface] in [Communication Settings] in the [General] tab, and
confirm the [Wireless Direct] tab.
See Communication Settings for Windows® on page 40 for more information on the Communication
Settings.
Printing Using the Mobile Device 3
Application Features
Brother iPrint&Label Create and print labels using templates on a smartphone, tablet or other
mobile device directly to your Label Printer.
Mobile Transfer Express
Allows you to use a mobile device to download databases and label data,
created on a computer using P-touch Editor and saved to a cloud service,
and send them to your Label Printer.

Printing Using the Mobile Device
34
3
For Mac
a) Launch the Printer Setting Tool on your computer.
b) Click the [Wireless LAN] tab.
c) Confirm that [Wireless Direct] is set to [On].
bFor QL-810W
Press and hold the Wi-Fi ( ) Button on the Label Printer for one second to turn the Wi-Fi function On.
The Wi-Fi ( ) LED starts flashing blue once every three seconds.
For QL-820NWB
Press the Menu and [▼] Buttons to select the [WLAN] menu, and then press the [OK] Button.
Set [WLAN (On/Off)] to [On] to turn the Wi-Fi function On. The Wi-Fi ( ) icon appears on the LCD.
cIn the Wi-Fi settings screen of your mobile device, select the SSID of the Label Printer and enter the
password.
• The factory default SSID and password are as follows:
SSID: «DIRECT-*****_QL-810W» or «DIRECT-*****_QL-820NWB» where ***** is the last five digits of the
product serial number.
(You can find the product serial number label in the DK Roll Compartment of the Label Printer.)
The password: 810*****/820***** where ***** is the last five digits of the product serial number.
• You can connect the Label Printer to a mobile device in the Infrastructure Mode via a wireless access
point/router.
Printing Using the Mobile Device
35
3
Printing from a Mobile Device 3
aMake sure that the Label Printer is connected to your mobile device.
Start the mobile printing application on your mobile device.
See Connecting the Label Printer to a Mobile Device on page 33.
bSelect a label template or design.
You can also select a previously designed label or image and print it.
cTap [Print] in the application menu.
Cutting Options 3
See Cutting Options on page 31.
Using a Mobile Device to Print Templates Created on a Computer 3
You can use P-touch Transfer Manager to save template data, which was created using P-touch Editor, in
the BLF or PDZ format. Then, you can use Mobile Transfer Express to send the saved file from your mobile
device to the Label Printer and print the file.
aSave the template data in the BLF format or the PDZ format using P-touch Transfer Manager.
For more information, see Creating Transfer Files and Transfer Package Files on page 131.
bUse one of the following methods to use a .blf file or .pdz file with your mobile device.
Save the file using a cloud storage service, and then use the sharing function of the mobile device’s
operating system to share the file.
Send the file as an email attachment from the computer to the mobile device, and then save the file
to the mobile device.
cConnect the Label Printer to your mobile device, and then start Mobile Transfer Express.
The template data appears.
dSelect the template that you want to print, and then transfer the template to the Label Printer.
To download a file from a cloud storage service to your mobile device, you must connect your mobile
device using Infrastructure Mode. Therefore, if you also connect your mobile device to the Label Printer
using Infrastructure Mode, you can quickly transfer downloaded files (.blf files only).
eUse the Barcode Scanner or the LCD (QL-820NWB only) to select the template that you want to print
from the transferred file and print it.

Printing Using the Mobile Device
36
3
Attaching Labels 3
aPeel the backing from the label.
bPosition the label, and then press firmly from top to bottom with your finger to attach the label.
Labels may be difficult to attach to surfaces that are wet, dirty, or uneven. The labels may peel off easily
from these surfaces.

37
4
4
Printer Setting Tool for Windows®
4
Use the Printer Setting Tool to specify the Label Printer’s communication settings, device settings and
P-touch Template settings from a Windows® computer.
The Printer Setting Tool is installed automatically when you use the initial installer to install the printer
driver. For more information, see Installing the Software and Printer Drivers to a Computer on page 22.
The Printer Setting Tool is available only with compatible Brother printers.
Before Using the Printer Setting Tool 4
Make sure the AC Adapter is connected to the Label Printer and to an AC power outlet, or a fully-charged
battery is installed.
Make sure the printer driver has been installed correctly and you can print.
Connect this Label Printer to a computer with a USB cable.
Changing the Label Printer Settings 4
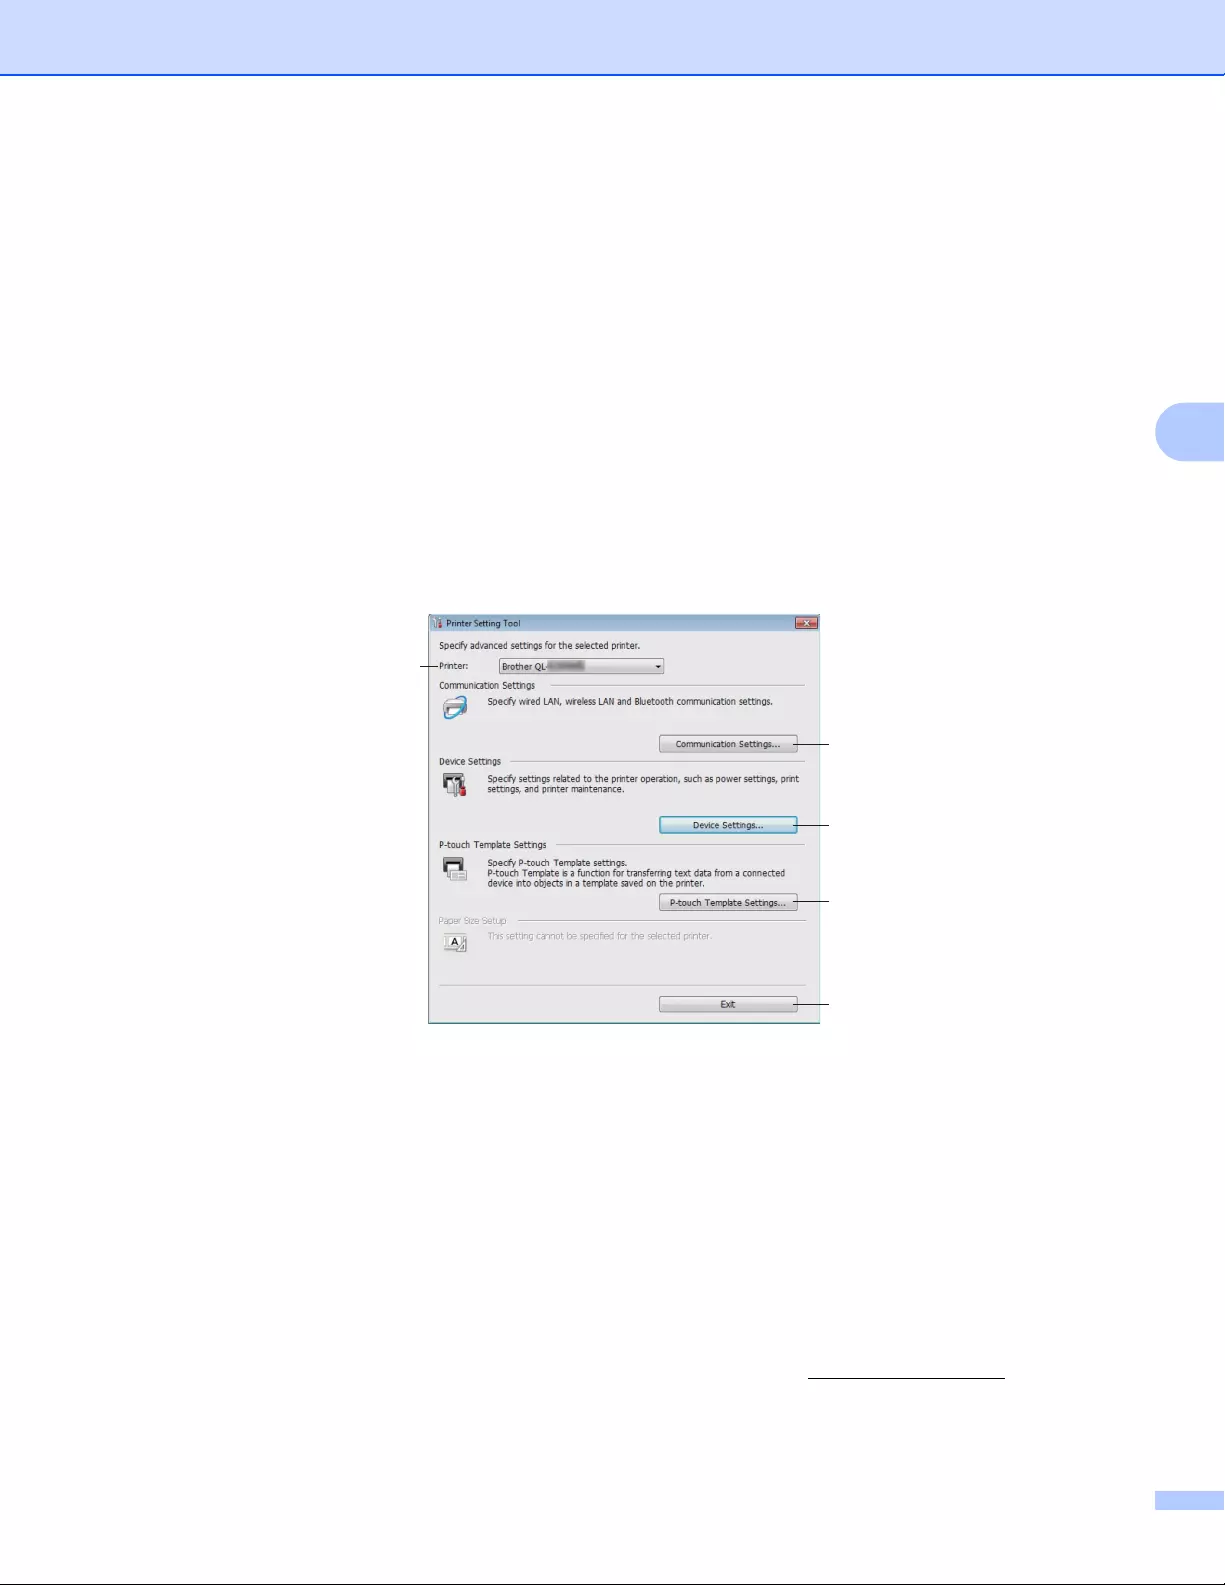
Changing the Label Printer Settings
38
4
Using the Printer Setting Tool for Windows®
4
aConnect the Label Printer you want to configure to the computer.
bStart the Printer Setting Tool.
For Windows Vista® / Windows®7 / Windows Server® 2008 / Windows Server® 2008 R2:
Click Start > All Programs > Brother > Labels & Mobile Printer > Printer Setting Tool.
For Windows®8 / Windows®8.1 / Windows Server® 2012 / Windows Server® 2012 R2:
On the Apps screen, click the Printer Setting Tool.
For Windows® 10:
Click Start > Brother > Label & Mobile Printer > Printer Setting Tool.
The main window appears.
1 Printer
Lists the connected Label Printers.
2 Communication Settings
Specifies wired LAN (QL-820NWB only), wireless LAN and Bluetooth (QL-820NWB only)
communication settings.
3 Device Settings
Specifies printer device settings, such as power settings and printer settings.
4 P-touch Template Settings
Specifies P-touch Template settings.
For more information on P-touch Template, download the P-touch Template Manual/Command
Reference (English only) from the Brother Solutions Center at support.brother.com.
5Exit
Closes the window.
1
2
3
4
5
Changing the Label Printer Settings
39
4
cCheck that the Label Printer you want to configure appears next to [Printer]. If a different Label Printer
appears, select the Label Printer you want from the drop-down list.
If only one Label Printer is connected, it is unnecessary to make a selection because only that Label Printer
is available.
dSelect the settings you want to change, and then specify or change the settings in the dialog box.
For more information on the settings dialog boxes, see Communication Settings for Windows®
on page 40, Device Settings for Windows® on page 51 or P-touch Template Settings for Windows®
on page 59.
eClick [Apply], and then click [Exit…] to apply the settings to the Label Printer.
fClick [Exit] in the main window to finish specifying settings.
Use the Printer Setting Tool to configure the Label Printer only when the Label Printer is waiting for the
next print job. The Label Printer may malfunction if you try to configure it while it is handling a job.
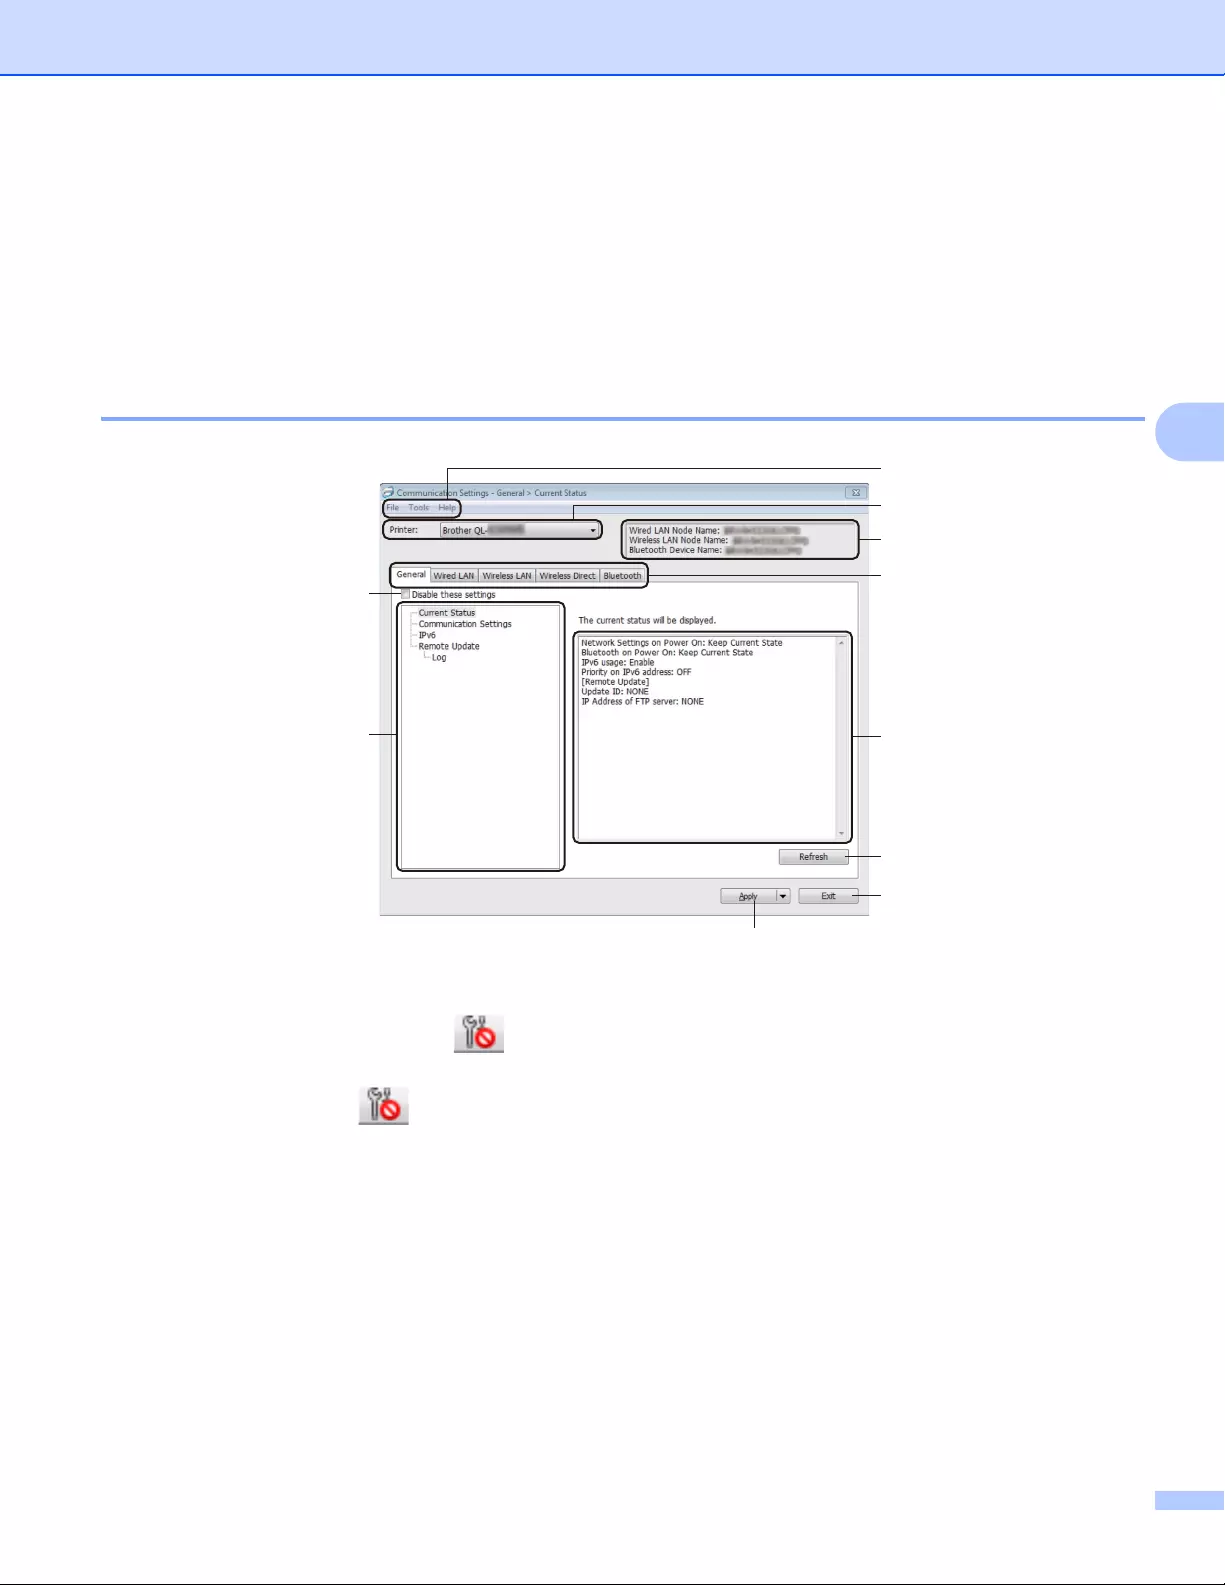
Changing the Label Printer Settings
40
4
Communication Settings for Windows®
4
Use [Communication Settings] in the Printer Setting Tool to specify or change the Label Printer
communication information when connecting the Label Printer and computer with a USB cable or via a
Bluetooth connection (QL-820NWB only). Not only can you change the communication settings for one Label
Printer, but you can also apply the same settings to multiple Label Printer.
Settings Dialog Box 4
1 Disable these settings
When this check box is selected, appears in the tab, and the settings can no longer be specified or
changed.
Settings in a tab where appears will not be applied to the Label Printer even if [Apply] is clicked. In
addition, the settings in the tab will not be saved or exported when the [Save in Command File] or
[Export] command is used.
To apply the settings to the Label Printer, or to save or export them, make sure you clear the check box.
2Items
When [Current Status] is selected, the current settings appear in the settings display/change area.
Select the item for the settings that you want to change.
3 Menu Bar
Commands are categorized under each menu (File, Tools and Help) by function.
4Printer
Lists the connected Label Printers.
1
2
3
4
5
6
7
8
9
10
Changing the Label Printer Settings
41
4
5 Node Name
Displays the node name (nodes can be renamed). For more information, see Menu Bar on page 42.
6 Settings Tabs
Contains settings that may be specified or changed.
If appears in the tab, the settings in that tab will not be applied to the Label Printer.
7 Settings Display/Change Area
Displays the current settings for the selected item.
8Refresh
Updates the displayed settings with the most recent information.
9Exit
Exits [Communication Settings], and returns to the main window of the Printer Setting Tool.
Settings are not applied to Label Printers if [Exit] is clicked without clicking the [Apply] button after
changing the settings.
10 Apply
Applies the settings to the Label Printer.
To save the specified settings in a command file, select [Save in Command File] from the drop-down list.
The saved command file can be used with the mass storage mode to apply the settings to a Label Printer.
For more information, see Mass Storage Mode (QL-820NWB only) on page 85.
Clicking [Apply] applies all settings in all tabs to the Label Printer.
If the [Disable these settings] check box is selected, the settings in that tab are not applied.
Changing the Label Printer Settings
42
4
Menu Bar 4
The following explains about the menu items in the settings dialog box.
•Apply Settings to the Printer
Applies the settings to the Label Printer.
•Save Settings in Command File
Saves the specified settings in a command file. The file extension is .bin.
The saved command file can be used with the mass storage mode to apply the settings to a Label Printer.
For more information, see Mass Storage Mode (QL-820NWB only) on page 85.
If the [Disable these settings] check box is selected, the settings in that tab are not saved.
• The following information is not saved with the command file:
• Node name
• IP address, subnet mask and default gateway (when the IP address is set to [STATIC])
• The saved communication settings commands are intended to be used only for applying settings to a
Label Printer. To apply the settings to the Label Printer using this command file, use the mass storage
mode.
• Saved command files contain authentication keys and passwords. Take necessary measures to protect
saved command files, such as saving them in a location that cannot be accessed by other users.
• Do not send command files to a different printer model.
•Import
Import from the current computer wireless settings
Imports the settings from the computer.
• When importing the computer’s wireless settings, administrator privileges for the computer are needed.
• Only personal security authentication settings (open system, public key authentication and
WPA/WPA2-PSK) can be imported. Enterprise security authentication (such as LEAP and EAP-FAST),
WPA2-PSK (TKIP) and WPA-PSK (AES) settings cannot be imported.
• If multiple wireless LANs are enabled for the computer you use, the first wireless settings (only personal
settings) that are detected will be considered for the import data.
• Only the settings (communication mode, SSID, authentication method, encryption mode and
authentication key) from the [Wireless LAN] tab — [Wireless Settings] pane can be imported.
Select a Profile to import
Imports the exported file and applies the settings to a Label Printer.
Click [Browse] and select the file you want to import. The settings in the selected file appear in the
settings display/change area.
Changing the Label Printer Settings
43
4
• All settings, such as wireless settings or TCP/IP settings, can be imported, except for node names.
• Only profiles that are compatible with the selected Label Printer can be imported.
• If the imported profile’s IP address is set to [STATIC], change the IP address of the imported profile, if
needed, so that it does not duplicate the IP address of an existing configured Label Printer on the network.
•Export
Saves the current settings in a file.
If the [Disable these settings] check box is selected the settings in that tab are not saved.
Exported files are not encrypted.
•Automatically restart the Label Printer after applying new settings
If this check box is selected, the Label Printer automatically restarts after communication settings are
applied.
If this check box is cleared, you must restart the Label Printer manually.
When configuring multiple Label Printer’s, you can reduce the time needed to change settings by clearing
this check box. In this case, we recommend selecting this check box when configuring the first Label
Printer so that you can confirm that each setting is operating as intended.
•Automatically detects the connected Label Printer, and retrieves the current settings
If this check box is selected and a Label Printer is connected to the computer, the Label Printer is
automatically detected and the Label Printer’s current settings are displayed in the [Current Status] pane.
If the model of the connected Label Printer is different from that of the Label Printer shown in the [Printer]
drop-down list, the settings available on all tabs change to match the connected Label Printer.
•Change Node Name/Bluetooth Device Name
Allows renaming a node.
•Reset to Default Communication Settings
Returns the communication settings to their factory settings.
•Display Help
Displays the Help topics.

Changing the Label Printer Settings
44
4
General Tab 4
The following explains about the General Tab in the settings dialog box.
Communication Settings 4
•Network Settings on Power On
Specifies the conditions for connecting via Wi-Fi when the Label Printer is turned on.
QL-810W: Select [On by Default], [Off by Default] or [Keep Current State].
QL-820NWB: Select [Wireless LAN by Default], [Wired LAN by Default] or [Keep Current State].
•Selected Interface
Selects [Infrastructure or Ad-hoc], [Infrastructure and Wireless Direct] or [Wireless Direct].
• Bluetooth on Power On (QL-820NWB only)
Specifies the conditions for connecting via Bluetooth when the Label Printer is turned on.
Select [On by Default], [Off by Default] or [Keep Current State].
IPv6 4
•IPv6 usage
Selects [Enable] or [Disable].
•Priority on IPv6 address
Selects to give priority to an IPv6 address.
Remote Update (QL-820NWB only) 4
Remote Update is a Label Printer feature that enables the semi-automatic update of the Label Printer’s
settings with a simple connection to an FTP server where the update files are saved.
•IP Address of FTP server
Types the FTP server address.
•Port
Specifies the port number used to access the FTP server.
• PASV Mode
Set the PASV Mode to on or off.
•User name
Enters a user name that has permission to login to the FTP server.
•Password
Enters the password associated with the user name you entered in the Username field.
•Display the key and password on-screen
•Path
Enters the path to the folder on the FTP server where you want to download the update file from.
•Setting file name
Specifies the update file name on the FTP server.

Changing the Label Printer Settings
45
4
Log (QL-820NWB only) 4
•Log storage
Selects whether to export the update log to the FTP server.
•Log storage path of FTP server
Enters the path to the folder on the FTP server where you want to export the log data.

Changing the Label Printer Settings
46
4
Wired LAN (QL-820NWB only) / Wireless LAN Tabs 4
The following explains about the Wired LAN (QL-820NWB only) and Wireless Tab in the settings dialog box.
TCP/IP (Wired/Wireless) 4
•Boot Method
Selects [AUTO], [BOOTP], [DHCP], [RARP], or [STATIC].
•IP Address/Subnet Mask/Gateway
Specifies the various networking values.
You can enter these settings only when the IP address is set to [STATIC].
•DNS Server Method
Selects [AUTO] or [STATIC].
•Primary DNS Server IP Address/Secondary DNS Server IP Address
You can enter these settings only when the DNS server is set to [STATIC].
IPv6 4
•Static IPv6 Address
Specifies a permanent IPv6 address.
•Enable this address
Enables the specified static IPv6 address.
•Primary DNS Server IPv6 Address/Secondary DNS Server IPv6 Address
Specifies the DNS server IPv6 addresses.
•IPv6 Address List
Displays the list of IPv6 addresses.
Wireless Settings 4
•Communication Mode
Selects [Infrastructure] or [Ad-hoc].
•SSID (Network Name)
Clicking [Search] displays the available SSID selections in a separate dialog box.
•Channel
Lists available channels.
This setting is valid only in Ad-Hoc mode.
•Authentication Method/Encryption Mode
The supported encryption modes for the authentication methods are as shown in Communication Modes
and Authentication Methods/Encryption Modes on page 47.
•WEP Key
You can specify a setting only when WEP is selected as the encryption mode.
•Passphrase
You can specify a setting only when WPA/WPA2-PSK is selected as the authentication method.
Changing the Label Printer Settings
47
4
•User ID/Password
You can specify settings only when LEAP, EAP-FAST, PEAP, EAP-TTLS or EAP-TLS is selected as the
authentication method. In addition, with EAP-TLS, it is not necessary to register a password, but a client
certificate must be registered. To register a certificate, connect to the Label Printer from a web browser,
and then specify the certificate. For more information on using a web browser, see Web Based
Management on page 158.
•Display the key and password on-screen
If this check box is selected, keys and passwords are displayed in plain (non-encrypted) text.
Communication Modes and Authentication Methods/Encryption Modes 4
When [Communication Mode] is set to [Ad-hoc]
When [Communication Mode] is set to [Infrastructure]
To specify higher level security settings:
When performing certificate verification with EAP-FAST, PEAP, EAP-TTLS or EAP-TLS authentication
methods, the certificate cannot be specified from the Printer Setting Tool. After the Label Printer is
configured to connect to the network, specify the certificate by accessing the Label Printer from a web
browser.
For more information on using a web browser, see Web Based Management on page 158.
Authentication Method Encryption Mode
Open System None / WEP
Authentication Method Encryption Mode
Open System None / WEP
Shared Key WEP
WPA/WPA2-PSK TKIP+AES / AES
LEAP CKIP
EAP-FAST/NONE TKIP+AES / AES
EAP-FAST/MS-CHAPv2 TKIP+AES / AES
EAP-FAST/GTC TKIP+AES / AES
PEAP/MS-CHAPv2 TKIP+AES / AES
PEAP/GTC TKIP+AES / AES
EAP-TTLS/CHAP TKIP+AES / AES
EAP-TTLS/MS-CHAP TKIP+AES / AES
EAP-TTLS/MS-CHAPv2 TKIP+AES / AES
EAP-TTLS/PAP TKIP+AES / AES
EAP-TLS TKIP+AES / AES
Changing the Label Printer Settings
48
4
Wireless Direct Tab 4
The following explains about the Wireless Direct Tab in the settings dialog box.
Wireless Direct Settings 4
•SSID/Network Key Generation
Select [AUTO] or [STATIC].
•SSID (Network Name)/Network Key
Specifies the SSID (25 ASCII characters or fewer) and the network key (63 characters or fewer) you want
to use in the Wireless Direct mode.
The factory settings for the SSID and password are as follows:
SSID: «DIRECT-*****_QL-810W» or «DIRECT-*****_QL-820NWB» where «*****» is the last five digits of the
product serial number.
(You can find the product serial number label in the DK Roll Compartment of the Label Printer.)
The password: 810*****/820***** where ***** is the last five digits of the product serial number.
•Channel
Specifies the channel to use for the Wireless Direct mode.

Changing the Label Printer Settings
49
4
Bluetooth Tab (QL-820NWB only) 4
The following explains about the Bluetooth Tab in the settings dialog box.
Bluetooth Settings 4
•Visible to Other Devices
Allows the Label Printer to be “discovered” by other Bluetooth devices.
Available settings: [Discoverable], [Not Discoverable]
•Change PIN code
If this check box is selected, you can change the PIN.
•PIN code
Specifies the PIN that will be used when pairing with devices compliant with Bluetooth 2.0 or earlier.
•Display the PIN code on-screen
If this check box is selected, your computer displays the PIN by default.
•Request Secure Simple Pairing (SSP) settings during pairing
If this check box is selected, pairing can be performed using the Label Printer buttons for devices that are
compliant with Bluetooth 2.1 or later.
Auto Reconnect 4
•Auto re-paring
Sets whether or not to automatically reconnect to previously connected Apple device (iPad, iPhone or iPod
touch).
Available settings: [Enable], [Disable]
Changing the Label Printer Settings
50
4
Applying Setting Changes to Multiple Printers 4
aAfter applying settings to the first Label Printer, disconnect the Label Printer from the computer, and then
connect the second Label Printer to the computer.
bSelect the newly connected Label Printer from the [Printer] drop-down list.
If the [Automatically detects the connected Label Printer, and retrieves the current settings] check
box in the Option Setting dialog box is selected, the Label Printer connected with the USB cable is
automatically selected. For more information, see Communication Settings for Windows® on page 40.
cClick [Apply].
The same settings that were applied to the first Label Printer are applied to the second Label Printer.
We recommend selecting the [Automatically restart the Label Printer after applying new settings]
check box when configuring the first Label Printer so that you can confirm that a connection with the
wireless access point/router can be correctly established with the settings. For more information, see
Communication Settings for Windows® on page 40.
dRepeat steps a – c for all Label Printers whose settings you want to change.
If the IP address is set to [STATIC], the Label Printer’s IP address will also be changed to the same
address as the first Label Printer. Change the IP address if needed.
To save the current settings in a file, click [File] — [Export].
The same settings can be applied to another Label Printer by clicking [File] — [Import], then selecting the
exported settings file. For further information, see Communication Settings for Windows® on page 40.
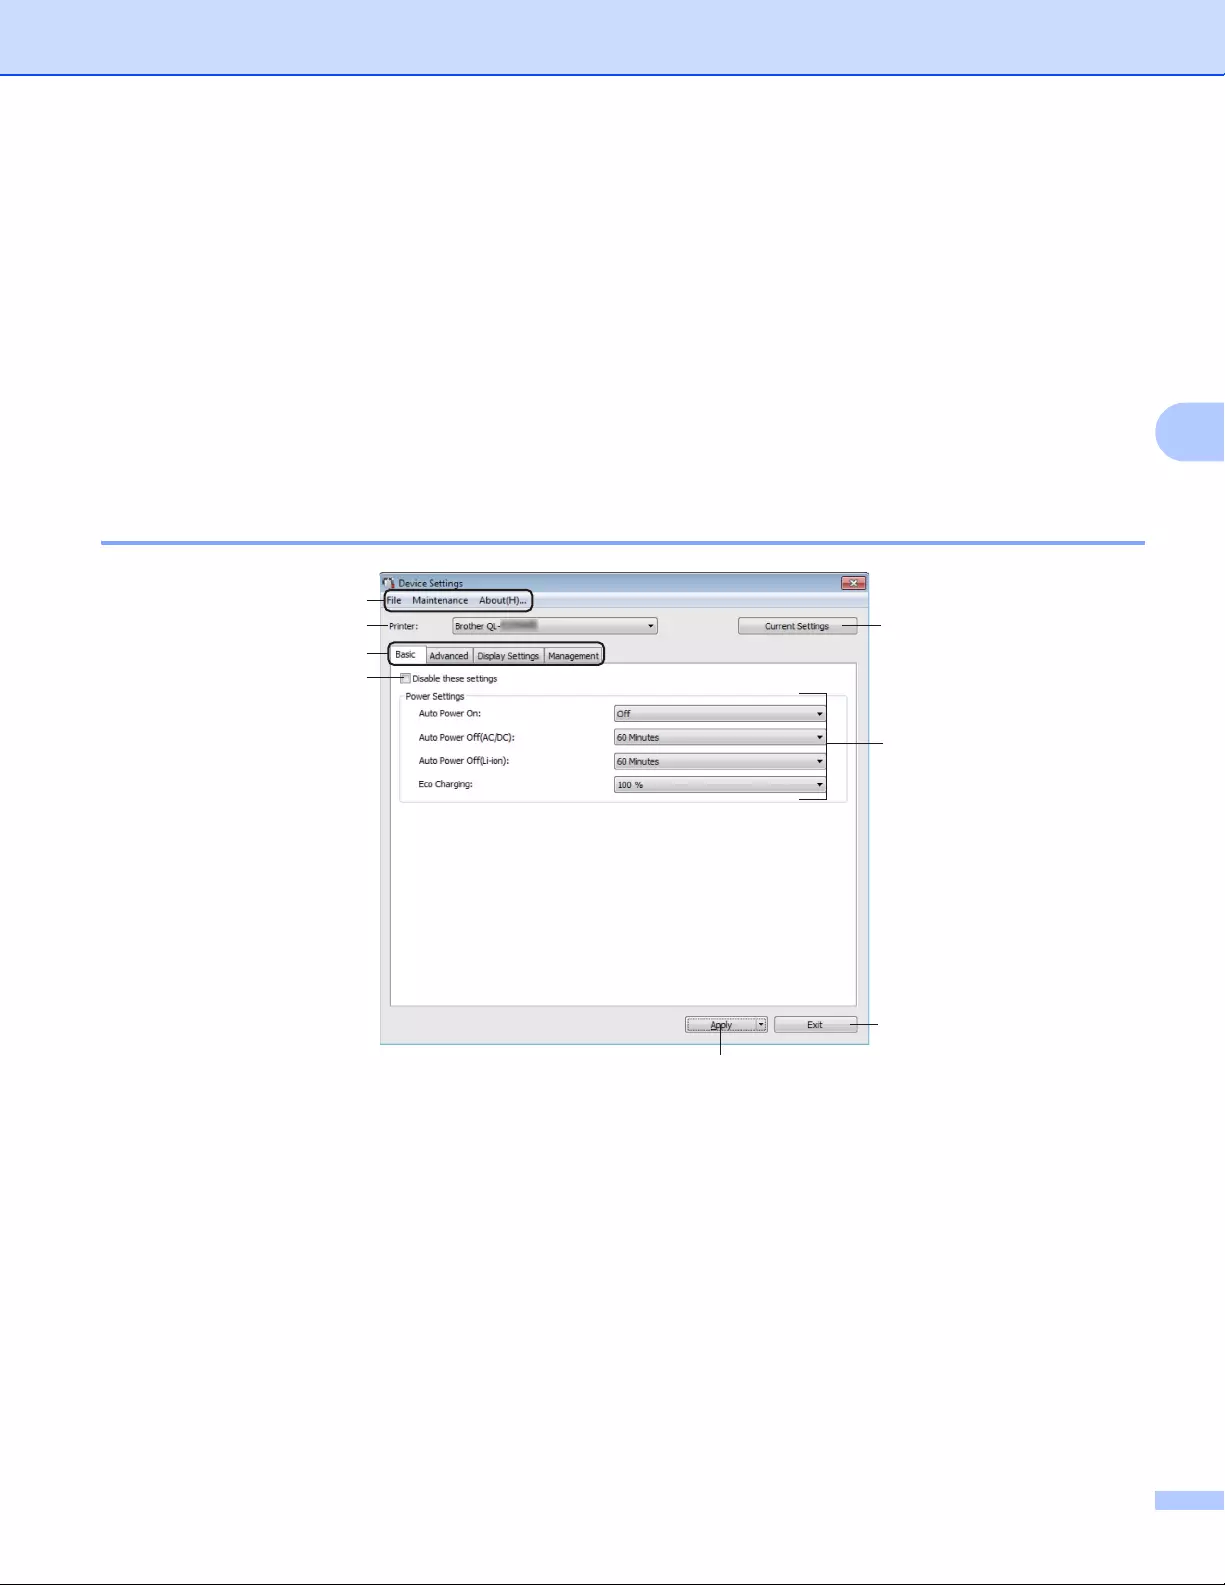
Changing the Label Printer Settings
51
4
Device Settings for Windows®
4
Use [Device Settings] in the Printer Setting Tool to specify or change printer settings when connecting the
Label Printer and computer with a USB cable or via a Bluetooth connection. Not only can you change the
device settings for one Label Printer, but you can also apply the same settings to multiple Label Printer.
When printing from a computer application, various printing settings can be specified from the printer driver;
however, by using [Device Settings] in the Printer Setting Tool, more advanced settings can be specified.
When [Device Settings] is opened, the Label Printer’s current settings are retrieved and displayed. If the
current settings could not be retrieved, the previous settings are displayed. If the current settings could not
be retrieved and previous settings have not been specified, the machine’s factory settings are displayed.
Settings Dialog Box 4
1 Menu Bar
Selects a command contained in each menu from the list.
2Printer
Specifies the Label Printer you want to configure.
If only one Label Printer is connected, it is unnecessary to make a selection because only that Label Printer
will appear.
Changing the Label Printer Settings
52
4
3 Settings Tabs
Contains settings that may be specified or changed.
If appears in the tab, the settings in that tab cannot be specified or changed. In addition, the settings
in the tab will not be applied to the Label Printer even if [Apply] is clicked. The settings in the tab will also
not be saved or exported when the [Save in Command File] or [Export] command is used.
4 Current Settings
Retrieves the settings from the currently connected Label Printer and displays them in the dialog box.
Settings will also be retrieved for parameters on tabs with .
5 Disable these settings
When this check box is selected, appears in the tab, and the settings can no longer be specified or
changed.
Settings in a tab where appears will not be applied to the Label Printer even if [Apply] is clicked. In
addition, the settings in the tab will not be saved or exported when the [Save in Command File] or
[Export] command is used.
6 Parameters
Displays the current settings.
7Exit
Exits [Device Settings] and returns to the main window of the Printer Setting Tool.
8Apply
Applies the settings to the Label Printer.
To save the specified settings in a command file, select [Save in Command File] from the drop-down list.
The saved command file can be used with the mass storage mode to apply the settings to a Label Printer.
For more information, see Mass Storage Mode (QL-820NWB only) on page 85.
Changing the Label Printer Settings
53
4
Menu Bar 4
The following explains about the menu items in the settings dialog box.
• Apply Settings to the Printer
Applies the settings to the Label Printer.
Performs the same operation as when [Apply] is clicked.
• Check Setting
Displays the current settings.
• Save Settings in Command File
Saves the specified settings in a command file.
Performs the same operation as when [Save in Command File] is selected from the [Apply] drop-down
list.
• Import
Imports the exported file.
• Export
Saves the current settings in a file.
• Print Unit Settings…
Prints a report containing firmware version and device setting information.
For QL-810W
You can also print this report using the Cutter ( ) Button. For more information, see Confirming the Label
Printer Settings on page 84.
For QL-820NWB
You can also print this report using the LCD menu. For more information, see LCD Settings on page 12.
When you print this report, use 2.4″ (62 mm) DK Roll.
• Factory Reset
Resets all the Label Printer settings to the factory settings.
• Reset only Device Settings
Deletes the user settings stored in the Label Printer.
• Delete Template and Database
Deletes the templates and databases stored in the Label Printer.
• Option Settings
If the [Do not display an error message if the current settings cannot be retrieved at startup] check
box is selected, a message will not be displayed next time.
Changing the Label Printer Settings
54
4
Basic Tab 4
The following explains about the Basic Tab in the settings dialog box.
•Auto Power On
Specifies whether the Label Printer turns on automatically when the AC Power Cord is plugged into an AC
power outlet.
Available settings: [Off], [On]
• Auto Power Off (AC/DC)
Specifies the period of time that passes before the Label Printer turns off automatically when connected
to an AC power outlet.
Available settings: [None], [10/20/30/40/50/60 Minutes]
• Auto Power Off (Li-ion)
Specifies the period of time that passes before the Label Printer turns off automatically when powered by
the Rechargeable Li-ion Battery.
Available settings: [None], [10/20/30/40/50/60 Minutes]
Auto Power Off is disabled when connecting with wireless network, wired network (QL-820NWB only), or
Bluetooth connection (QL-820NWB only).
• Eco Charging
Specifies to switch to Eco Charging. The service life of the battery can be extended by setting it to charge
to [80%] capacity.
Available settings: [100%], [80%]
To get the longest life from the battery, select [80 %]. Although the number of pages that can be printed
on a single charge will be less when you select [80 %], you can get a longer life from the battery.

Changing the Label Printer Settings
55
4
Advanced Tab 4
The following explains about the Advanced Tab in the settings dialog box.
• Print Density (Black)
Sets the density of black.
Available settings: [+6/+5/+4/+3/+2/+1/0/-1/-2/-3/-4/-5/-6]
• Print Density (Red)
Sets the density of red.
Available settings: [+6/+5/+4/+3/+2/+1/0/-1/-2/-3/-4/-5/-6]
• Print Data after Printing
Specifies whether or not print data is erased after printing.
Available settings: [Keep Print Data], [Erase All Print Data]
• Printer Information Report
Selects the information you want to include in the Printer Information Report.
Available settings: [All], [Usage Log], [Printer Settings], [Printer Transfer Data]
•Auto Cut
Sets the cutting method when printing multiple labels.
Available settings: [OFF], [Auto Cut], [Cut at End] (Only cuts the places that have finished printing when
multiple labels are printed.)
• Serialize Mode
Available settings: [Cont From Last] (Select to serialize from the last number printed.), [From Starting]
(Select to serialize from the default number each time you print.)

Changing the Label Printer Settings
56
4
Display Tab (QL-820NWB only) 4
The following explains about the Display Tab in the settings dialog box.
• Set Clock
Sets date and time.
Clicking the [Current Date/Time] button will sync to the date and time on the computer.
• Display Brightness
Sets the brightness of the display. The higher the number, the brighter the display.
Available settings: [+2/+1/0/-1/-2]
• Backlight
Switches the backlight On or Off.
Available settings: [On], [Off]
• Backlight Timeout
Sets the period of time before the backlight turns off if the Label Printer is not used.
Available settings: [Off] (never turns off), [5/10/20/30/60 seconds]
• Template Mode
Specifies whether the Label Printer operates in P-touch Template Mode.
P-touch Template Mode allows you to enter just text and print labels using a previously configured
template.
Available settings: [On], [Off]
• Preset Template
Specifies whether to display preset templates when using templates other than the factory preset
templates.
Available settings: [Show], [Hide]
•Confirm Print
Specifies whether a message appears before printing so that the number of copies can be confirmed.
Available settings: [On], [Off]
• Default Print
Specifies the default value for the print quantity.
Available settings: [1-999]

Changing the Label Printer Settings
57
4
Management Tab 4
The following explains about the Management Tab in the settings dialog box.
To display these tabs, you must have administrator privileges for the computer or the printer.
You can confirm the administrator privileges for the printer in the [Printer properties] — [Security] tab.
• Command Mode
Selects the type of command mode.
Available settings: [Raster], [ESC/P], [P-touch Template]
• Airplane Mode
Allows disabling the Bluetooth or Wi-Fi interfaces. This function is useful when you use the Label Printer
in a place where signal transmissions are not allowed. The following conditions apply:
QL-810W: Pressing and holding the Wi-Fi ( ) Button and WPS Button will be ineffective.
QL-820NWB: [WLAN] and [Bluetooth] menu will disappear from the LCD.
Available settings: [Off], [On]
• Lock Settings (QL-820NWB only)
Locks the menu settings so that they cannot be changed.
Mark the settings to be locked using the [Select] button.
• Admin Password (QL-820NWB only)
Selects On to configure administrator mode. Set a 4-digit password that must be used in order to change
the menu settings.
Available settings: [Off], [On]
• Unit (QL-820NWB only)
Specifies the default unit.
Available settings: [inch], [mm]
• Language (QL-820NWB only)
Selects the language of the LCD.
• Date Format (QL-820NWB only)
Selects the date format for the clock.
• Time Format (QL-820NWB only)
Selects the time format for the clock.
Changing the Label Printer Settings
58
4
Applying Setting Changes to Multiple Label Printers 4
aAfter applying settings to the first Label Printer, disconnect the Label Printer from the computer, and then
connect the second Label Printer to the computer.
bSelect the newly connected Label Printer from the [Printer] drop-down list.
cClick [Apply]. The same settings that were applied to the first Label Printer are applied to the second
Label Printer.
dRepeat steps a – c for all Label Printers whose settings you want to change.
To save the current settings in a file, click [File] — [Export].
The same settings can be applied to another Label Printer by clicking [File] — [Import], and then selecting
the exported settings file. For more information, see Device Settings for Windows® on page 51.
Changing the Label Printer Settings
59
4
P-touch Template Settings for Windows®
4
The P-touch template mode allows you to insert data into text and barcode objects from a downloaded
template using an optional Barcode Scanner, (PA-BR-001) or other devices connected to the Label Printer.
Please note the available options and supplies may vary depending on your country.
To specify or change P-touch Template functions, go to the Printer Setting Tool, and select [P-touch
Template Settings].
• P-touch template mode is also compatible with other input devices like a scale, testing machine, controller
or a programmable logic device.
• For more information on P-touch Template, download the P-touch Template Manual/Command Reference
(English only) from the Brother Solutions Center at support.brother.com
[Select your region/country.] — [Manuals] — [Choose your product]
• When printing using a P-touch Template, some symbols printed in red or black may look different from
when printed using the computer. For more information, see P-touch Template Manual/Command
Reference (English only) from the Brother Solutions Center at support.brother.com.
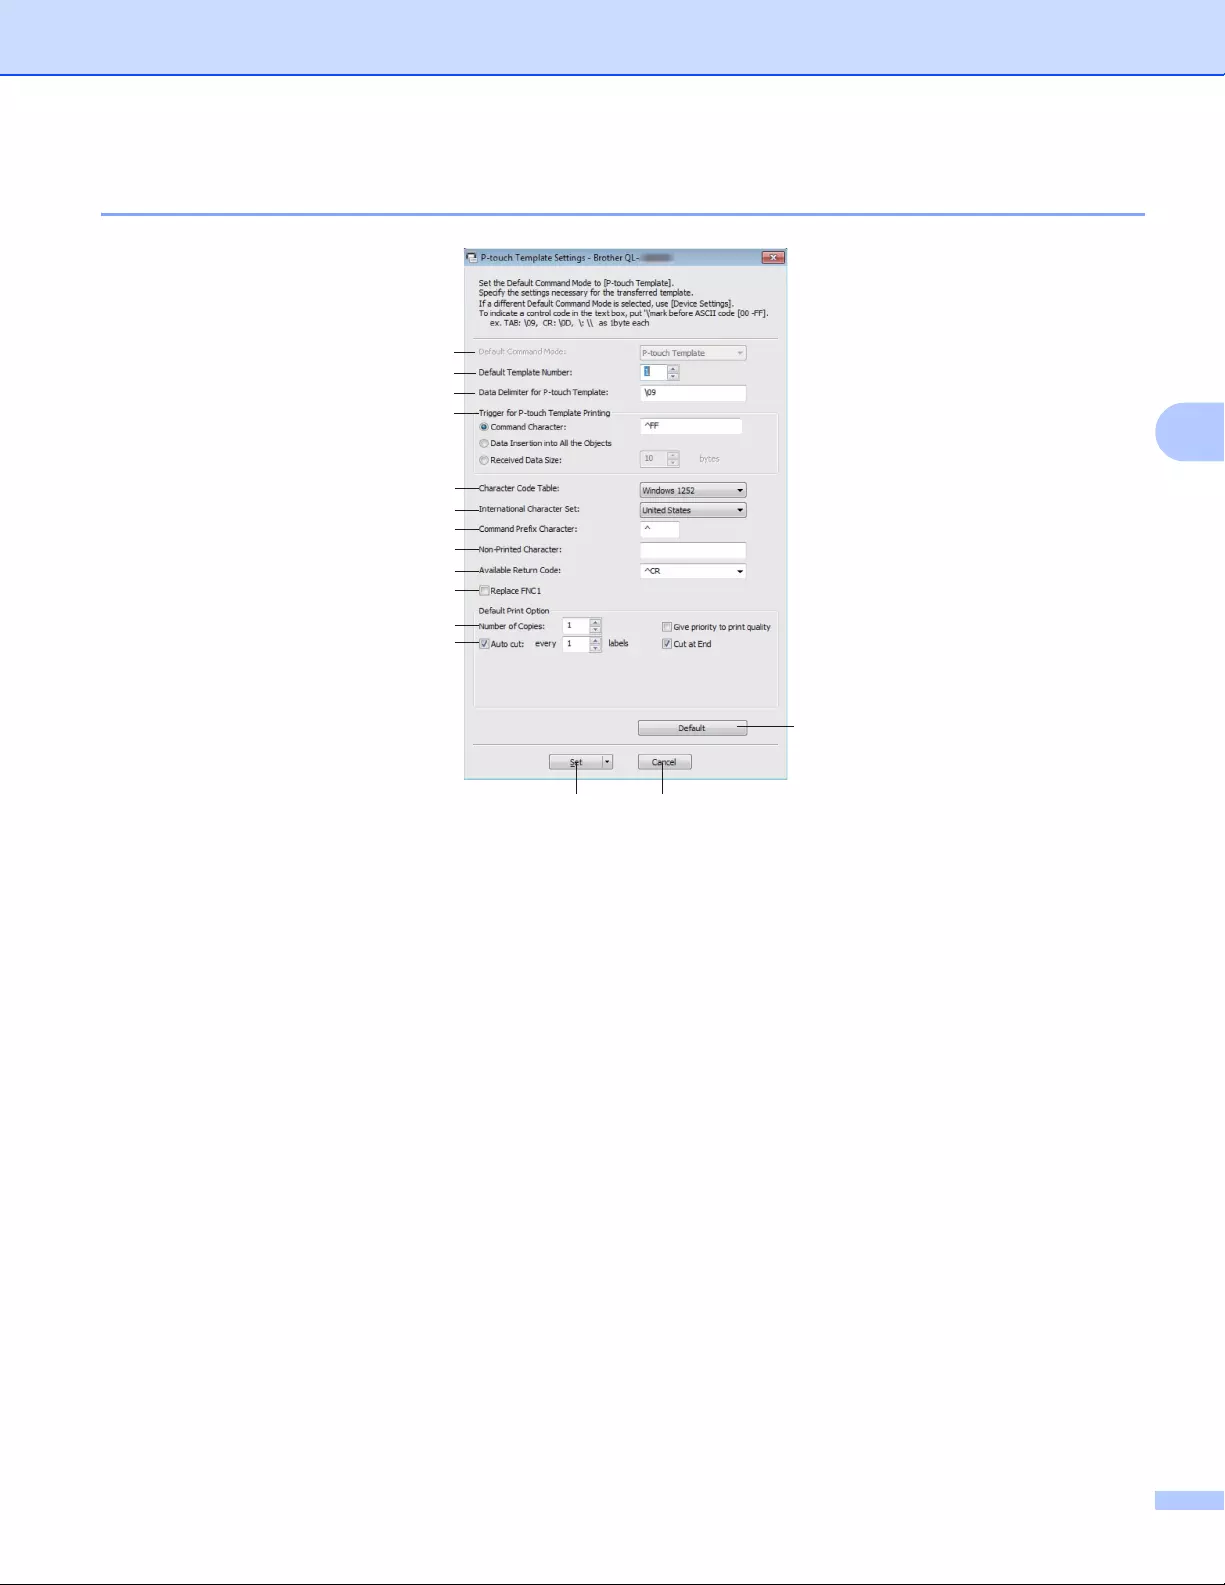
Changing the Label Printer Settings
60
4
P-touch Template Settings Dialog Box 4
1 Default Command Mode
Specifies the P-touch Template mode as the default mode.
To change the mode, see the Management Tab on page 57.
2 Default Template Number
Specifies a default template number that the Label Printer sets when it is turned on. If you do not want to
transfer a template to the Label Printer, do not specify a template number.
3 Data Delimiter for P-touch Template
Displays a symbol used to indicate the boundaries between groups of data in a file. Between 1 and 20
characters can be specified.
4 Trigger for P-touch Template Printing
Specifies a trigger to begin printing from a number of options.
[Command Character]: Printing starts when the command character specified here is received.
[Data Insertion into All the Objects]: Printing starts when the delimiter for the last object is received.
[Received Data Size]: Printing starts when the number of characters specified here is received. However,
delimiters are not counted in the number of characters.
5 Character Code Table
Selects one of the following character code sets:
Available settings: [Windows 1252], [Windows 1250 Eastern Europe], [Brother standard]

Changing the Label Printer Settings
61
4
6 International Character Set
Lists character sets for specific countries.
Available settings: [United States], [France], [Germany], [Britain], [Denmark], [Sweden], [Italy],
[Spain], [Japan], [Norway], [Denmark II], [Spain II], [Latin America], [Korea], [Legal]
The following 12 codes are switched depending on the country selected from the list above:
23h 24h 40h 5Bh 5Ch 5Dh 5Eh 60h 7Bh 7Ch 7Dh 7Eh
For switched characters, download P-touch Template Manual/Command Reference (English only) from
the Brother Solutions Center at support.brother.com.
7 Command Prefix Character
Specifies the prefix character code which identifies commands used in P-touch Template mode.
8 Non-Printed Character
Characters specified here are not printed when data is received. Specify 1 to 20 characters.
9 Available Return Code
The line feed code is used when feeding data to indicate that the following data should be moved to the
next line in a text object. One of the following four line feed codes can be selected, or 1 to 20 characters
can be specified as the line feed code.
Available settings: [^CR], [\0D\0A], [\0A], [\0D]
10 Replace FNC1
See the P-touch Template manual.
11 Number of Copies
Sets the number of copies. A number between 1 and 99 can be specified.
12 Cut option
Specifies whether to cut the labels automatically and how many labels to print before cutting them. A
number between 1 and 99 can be specified.
You can also select other cutting options.
13 Set
Applies the settings to the Label Printer.
To save the specified settings in a command file, select [Save in Command File] from the drop-down list.
The saved command file can be used with the mass storage mode to apply the settings to a Label Printer.
For more information, see Mass Storage Mode (QL-820NWB only) on page 85.
14 Cancel
Cancels the settings and closes the dialog box. The settings will remain unchanged.
15 Default
Returns to factory settings.
Changing the Label Printer Settings
62
4
Printer Setting Tool for Mac 4
Using the Printer Setting Tool, you can specify the Label Printer’s communication settings and device settings
from a Mac. Not only can you change the device settings for one Label Printer, but you can also apply the
same settings to multiple Label Printers.
The Printer Setting Tool is installed automatically when you use the initial installer to install the printer
driver. For more information, see Installing the Software and Printer Drivers to a Computer on page 22.
The Printer Setting Tool is available only with compatible Brother Label Printers.
Before Using the Printer Setting Tool 4
Make sure the AC Adapter is connected to the Label Printer and to an AC power outlet, or a fully-charged
battery is installed.
Make sure the printer driver has been installed correctly and you can print.
Connect the Label Printer to a computer with a USB cable. Settings cannot be specified using Wi-Fi by
using this tool.
Using the Printer Setting Tool for Mac 4
aConnect the Label Printer you want to configure to the computer.
bClick [Macintosh HD] — [Applications] — [Brother] — [Printer Setting Tool] — [Printer Setting Tool.app].
The Printer Setting Tool window appears.
cCheck that the Label Printer you want to configure appears next to [Printer]. If a different Label Printer
appears, select the Label Printer you want from the pop-up list.
If only one Label Printer is connected, it is unnecessary to make a selection because only that Label Printer
will appear.
dSelect a settings tab, and then specify or change the settings.
eClick [Apply Settings to the Printer] in the settings tab to apply the settings to the Label Printer.
fClick [Exit] to finish specifying settings.
Use the Printer Setting Tool to configure the Label Printer only when the Label Printer is waiting for the
next print job. The Label Printer may malfunction if you try to configure it while it is handling a job.
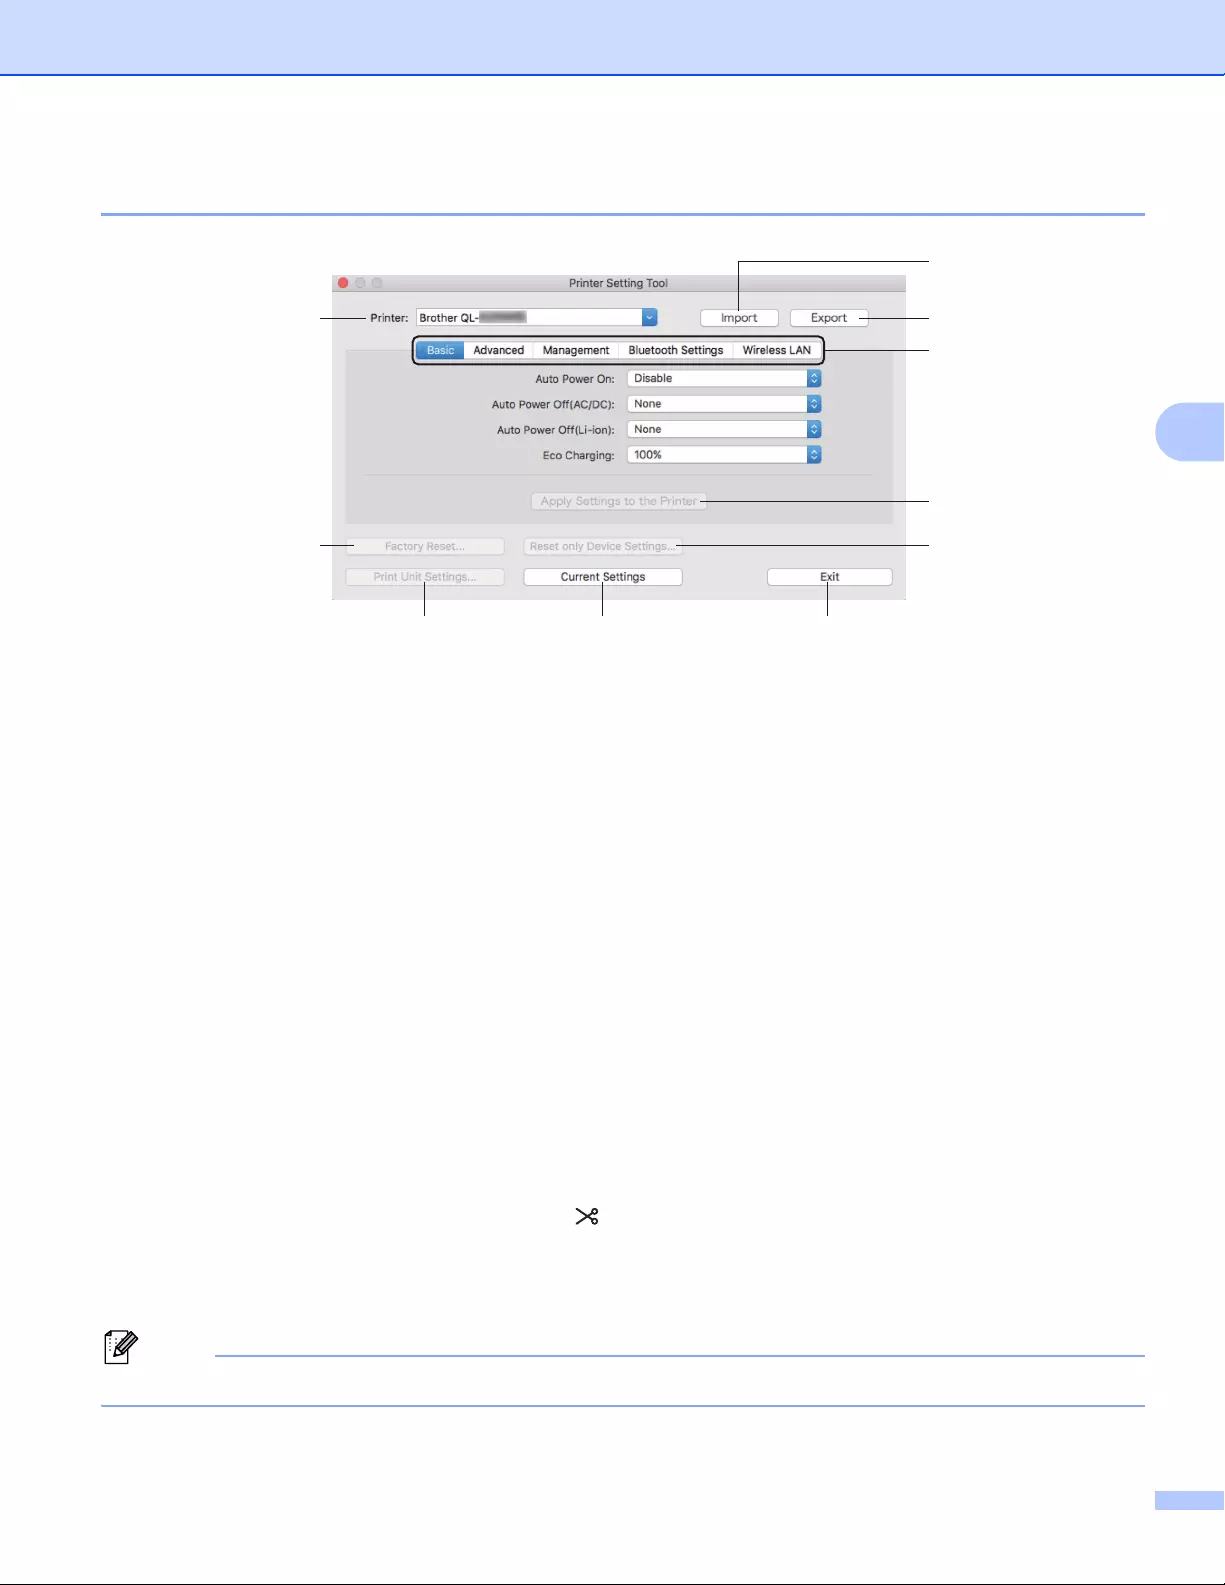
Changing the Label Printer Settings
63
4
Settings Dialog Box 4
1Printer
Lists the connected Label Printers.
2 Import
Imports settings from a file.
3 Export
Saves the current settings in a file.
4 Settings Tabs
Contain settings that may be specified or changed.
5 Apply Settings to the Printer
Applies the settings to the Label Printer.
6 Factory Reset
Resets printer settings to factory settings.
7 Reset only Device Settings…
Resets device settings to the factory settings.
8 Print Unit Settings
Prints a report containing firmware version and device setting information.
For QL-810W
You can also print this report using the Cutter ( ) Button. For more information, see Confirming the Label
Printer Settings on page 84.
For QL-820NWB
You can also print this report using the LCD menu. For more information, see LCD Settings on page 12.
When you print this report, use a 2.4″ (62 mm) DK Roll.
1
2
3
4
6
5
7
89 10
Changing the Label Printer Settings
64
4
9 Current Settings
Retrieves the settings from the currently connected Label Printer and displays them in the dialog box.
10 Exit
Exits the Printer Setting Tool.
Basic Tab 4
The following explains about the Basic Tab in the settings dialog box.
•Auto Power On
Specifies whether the Label Printer turns on automatically when the AC Power Cord is plugged into an AC
power outlet.
Available settings: [Disable], [Enable]
• Auto Power Off (AC/DC)
Specifies the period of time that passes before the Label Printer turns off automatically when connected
to an AC power outlet.
Available settings: [None], [10/20/30/40/50/60 Minutes]
• Auto Power Off (Li-ion)
Specifies the period of time that passes before the Label Printer turns off automatically when powered by
the Rechargeable Li-ion Battery.
Available settings: [None], [10/20/30/40/50/60 Minutes]
Auto Power Off is disabled when connecting with the wireless network, wired network (QL-820NWB
only), or Bluetooth connection (QL-820NWB only).
• Eco Charging
Specifies to switch to Eco Charging. The service life of the battery can be extended by setting it to charge
to [80%] capacity.
Available settings: [100%], [80%]
To get the longest life from the battery, select [80%]. Although the number of pages that can be printed on
a single charge will be less when you select [80%], you can get a longer life from the battery.

Changing the Label Printer Settings
65
4
Advanced Tab 4
The following explains about the Advanced Tab in the settings dialog box.
• Print Density (Black)
Sets the density of black.
Available settings: [+6/+5/+4/+3/+2/+1/0/-1/-2/-3/-4/-5/-6]
• Print Density (Red)
Sets the density of red.
Available settings: [+6/+5/+4/+3/+2/+1/0/-1/-2/-3/-4/-5/-6]
• Printer Information Report
Selects the information you want to include in the Printer Information Report.
Available settings: [All], [Usage Log], [Printer Settings], [Printer Transfer Data]
• Print Data after Printing
Specifies whether or not print data is erased after printing.
Available settings: [Keep Print Data], [Erase All Print Data]
Management Tab 4
The following explains about the Management Tab in the settings dialog box.
• Command Mode
Selects the type of command mode.
Available settings: [Raster], [ESC/P], [P-touch Template]
• Airplane Mode
Selects On to set the Label Printer to Airplane Mode. The following conditions apply:
QL-810W: Pressing and holding the Wi-Fi ( ) Button and WPS Button will be ineffective.
QL-820NWB: [WLAN] and [Bluetooth] menus will disappear from the display.
Available settings: [Off], [On]

Changing the Label Printer Settings
66
4
Bluetooth Settings Tab (QL-820NWB only) 4
The following explains about the Bluetooth Settings Tab in the settings dialog box.
• Bluetooth Device Name
Displays the Bluetooth device name.
• Bluetooth Address
Displays the acquired Bluetooth address.
• Visible to Other Devices
Allows the Label Printer to be «discovered» by other Bluetooth devices.
Available settings: [Discoverable], [Not Discoverable]
• Auto re-pairing
Sets whether or not to automatically reconnect to previously connected Apple device (iPad, iPhone, or
iPod touch).
Available settings: [Enable], [Disable]
• Change PIN code
If [On] is selected, you can change the PIN code that are compliant with Bluetooth 2.1 or earlier.
• Request Secure Simple Pairing (SSP) settings during pairing
If this check box is selected, pairing can be performed using the Label Printer buttons for devices that are
compliant with Bluetooth 2.1 or later.
Wireless LAN Tab 4
The following explains about the Wireless LAN Tab in the settings dialog box.
• WirelessDirect
Turns the Wireless Direct function on or off.
• SSID/Network Key Generation
Selects [AUTO] or [STATIC].
• SSID (Network Name)/Network Key
Specifies the SSID (3 to 25 ASCII characters) and the network key you want to use in the Wireless Direct
mode.
You can specify a setting only when [STATIC] is selected as [SSID/Network Key Generation].
• Display current settings
Displays the current settings for Wireless Direct. Click [Current Settings] to update the displayed settings
with the most recent information.

Changing the Label Printer Settings
67
4
Applying Setting Changes to Multiple Label Printers 4
aAfter applying settings to the first Label Printer, disconnect the Label Printer from the computer, and then
connect the second Label Printer to the computer.
bSelect the newly connected Label Printer from the [Printer] drop-down list.
cClick [Apply Settings to the Printer].
The same settings that were applied to the first Label Printer are applied to the second Label Printer.
dRepeat steps a – c for all Label Printers whose settings you want to change.
To save the current settings in a file, click [Export].
The same settings can be applied to another Label Printer by clicking [Import], then selecting the exported
settings file. For more information, see Settings Dialog Box on page 63.

Changing the Label Printer Settings
68
4
Changing Settings When Printing from a Mobile Device 4
If using a mobile device, change the settings as necessary using the application before printing. The settings
that can be changed vary according to the application.
Before connecting a mobile device, you can specify detailed settings by connecting the Label Printer to a
computer and using the Printer Setting Tool. For more information, see Changing the Label Printer
Settings on page 37.
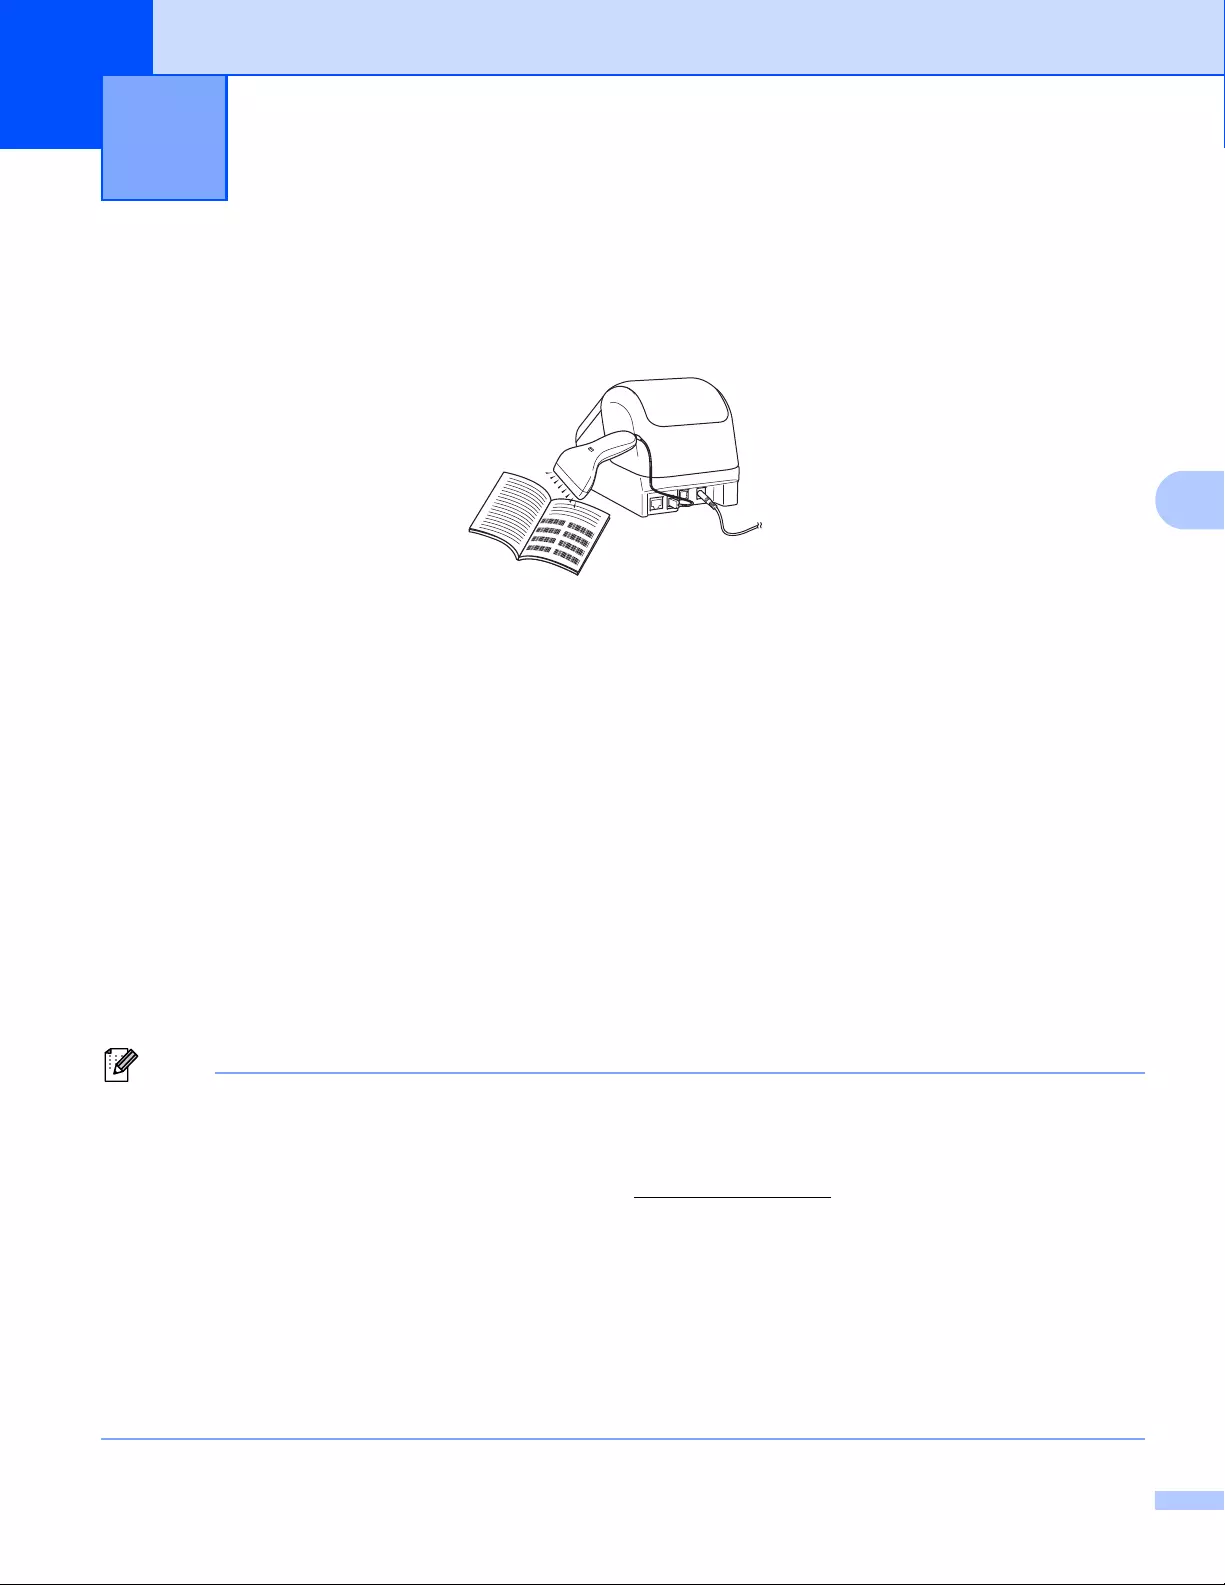
69
5
5
P-touch Template Operations 5
The P-touch template mode allows you to insert data into text and barcode objects from a downloaded
template using an optional Barcode Scanner (PA-BR-001) or other devices connected to the Label Printer.
Basic Operations 5
Standard Template Printing (See page 73)
Download frequently used templates or images and simply scan a barcode to select which one to print.
Advanced Template Printing (See page 75)
Download a template and scan a barcode to print a copy, or insert the scanned data into a different
template.
Database Lookup Printing (See page 78)
Download a database linked to a template, and scan a barcode to find a record to insert into the template
and print it out.
Advanced Features 5
Numbering (Serialized Number) Printing (See page 81)
Automatically increment a text or barcode in any downloaded template while printing.
• P-touch template mode is also compatible with other input devices like a scale, testing machine, controller
or a programmable logic device.
• See the P-touch Template Manual/Command Reference for more information. You can download the
latest versions from the Brother Solutions Center at support.brother.com
[Select your region/country.] — [Manuals] — [Choose your product]
• When printing using a P-touch Template, some symbols printed in red and black may look different from
when printed using the computer. For more information, see the Raster Command reference.
• The use of the GHS (Globally Harmonized System of Classification and Labeling of Chemicals) symbols
is strictly governed by one or more directives.
• The GHS templates provided are samples. Please ensure that any labels you produce using these
symbols conform with the relevant directives.
Printing Labels Using P-touch Template 5
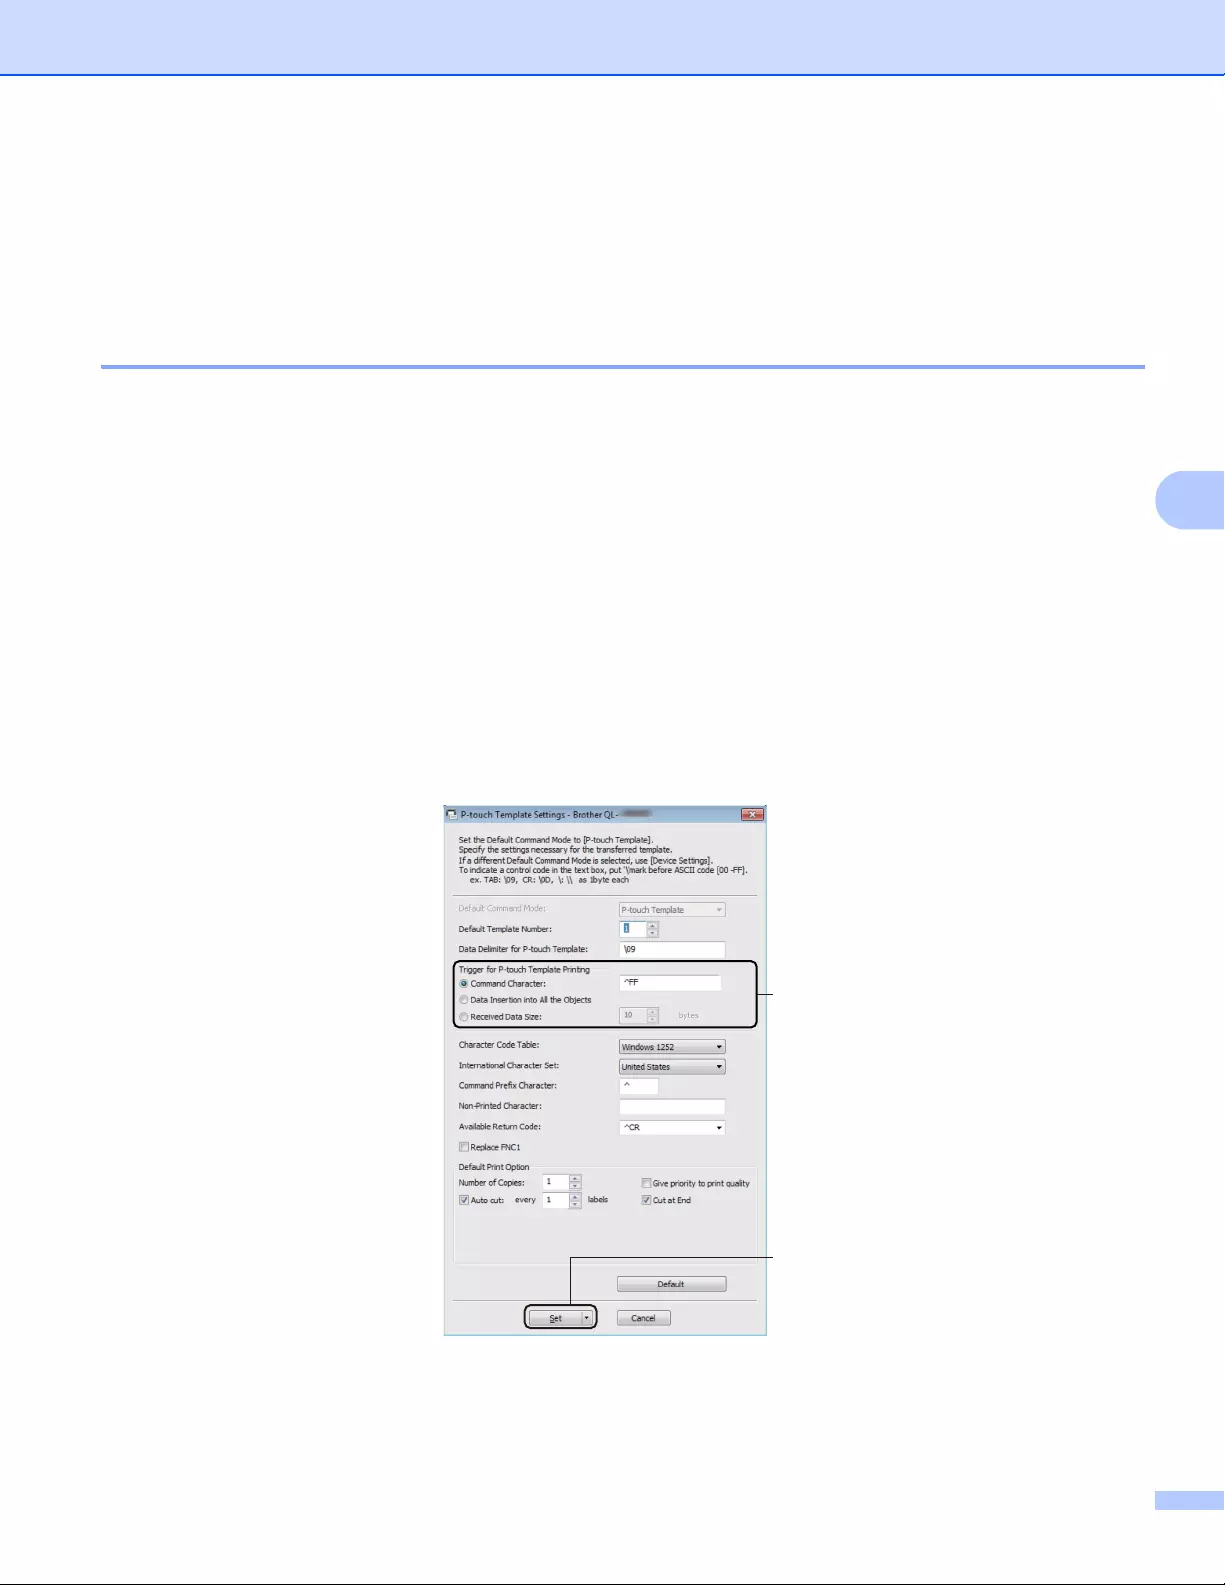
Printing Labels Using P-touch Template
70
5
Preparation 5
Before connecting the Barcode Scanner to the Label Printer, specify the Barcode Scanner settings using the
P-touch Template Settings (inside Printer Setting Tool).
Specifying Settings in the P-touch Template Settings Tool 5
aConnect the Label Printer and the computer using a USB cable, and then turn on the Label Printer.
bStart the Printer Setting Tool.
For Windows Vista® / Windows® 7 / Windows Server® 2008 / Windows Server® 2008 R2:
From the Start button, click [All Programs] — [Brother] — [Label & Mobile Printer] — [Printer Setting
Tool].
For Windows® 8 / Windows® 8.1 / Windows Server® 2012 / Windows Server® 2012 R2:
Click the [Printer Setting Tool] icon on the [Apps] screen.
For Windows® 10:
From the Start button, click [Brother] — [Label & Mobile Printer] — [Printer Setting Tool].
cClick [P-touch Template Settings].
dSelect the appropriate settings, and then click [Set].
(A)
(B)

Printing Labels Using P-touch Template
71
5
• By default, printing begins when the code «^FF» is scanned from a barcode using a Barcode Scanner.
(This can be changed with the settings highlighted by (A) in the previous image.)
If [Received Data Size] is selected with the number of bytes setting, the template will automatically print
after the specified number of bytes have been scanned.
• Because the print mode setting will return to raster mode each time you print from the computer, you must
change the setting to template mode again.
• If you turn off the Label Printer and then turn it on again, the Label Printer starts up in template mode.

Printing Labels Using P-touch Template
72
5
Connecting a Barcode Scanner 5
We recommend you use a reliable high-quality Barcode Scanner and you check the Barcode Scanner
specifications before selecting a model.
Barcode Scanner connection methods:
For QL-810W, use the Wi-Fi interface.
For QL-820NWB, use the USB host interface, the Wi-Fi interface, or the Bluetooth interface.
Recommended Barcode Scanner selection criteria:
• When using the USB host interface: HID-class models that can be identified as a keyboard (ex.
optional: PA-BR-001)
• When using the Bluetooth interface: Bluetooth Ver.2.1+EDR (Class 1) models that support SPP or OPP
profiles
• For P-touch Template mode, templates must first be downloaded from a computer to the Label Printer
using P-touch Transfer Manager. For more information, see How to Use P-touch Transfer Manager and
P-touch Library (Windows® only) on page 121.
• The barcode scanner should be programmed to use the English keyboard. For beginners, the barcode
scanner should be programmed to scan data with no prefix or suffix characters. For advanced users, the
prefix and suffix characters can be used as commands to the Label Printer to make a P-touch Template
mode solution easier to use.
• Contact the manufacturer for more information on how to use and program a specific Barcode Scanner
model.
Printing Labels Using P-touch Template
73
5
Standard Template Printing 5
• For more information on the barcodes that can be scanned using various settings, see List of Barcodes
for the P-touch Template Function on page 194.
• Grouped objects will be converted and sent as an image.
aUsing P-touch Transfer Manager, transfer (from P-touch Editor) a template (label layout) to the Label
Printer. For more information, see How to Use P-touch Transfer Manager and P-touch Library
(Windows® only) on page 121.
A text object in the label layout can be converted to an image. After being converted to an image, the text
cannot be changed. This is useful for protecting frequently used templates from being accidentally edited.
In the P-touch Editor Layout window, right-click the text object, and then click [Properties]. Click the
[Expanded] tab, and then select the [Text Cannot Be Edited] check box.
Otherwise, click [Options] in the [Tools] menu, click the [General] tab, and then select the
[Display Expanded Tabs of Object Properties] check box under [Others].
When the check box is cleared, the object is converted back to text that can be edited.
bWhen you transfer data to [Configurations] in P-touch Transfer Manager, select the folder containing
the data you want to transfer.
• When a template is transferred to [Configurations] in P-touch Transfer Manager, the [Key Assign]
number is automatically assigned.
• You can specify a [Key Assign] number between 1 and 255 by using the Label Printer buttons.
• For advanced operation, you can specify a [Key Assign] number between 1 and 99 (for QL-810W) and 1
and 255 (for QL-820NWB) for any downloaded templates into the Label Printer but you will need to scan
different barcodes in step f to select and print it. For more information, download the P-touch Template
Manual/Command Reference (English only) from the Brother Solutions Center at support.brother.com
[Select your region/country.] — [Manuals] — [Choose your product]
• You can add a custom folder under [Configurations], and drag-and-drop a transferred template into that
custom folder to manage different sets of templates.
cSelect the transferred template and then click [Transfer] to download the template to the [Key Assign]
number in the Label Printer.
dScan the “P-touch template command (Initialize + begin specifying settings)” barcode.
See List of Barcodes for the P-touch Template Function on page 194.
Download frequently used templates or images and
simply scan a barcode to select which one to print.
Example:

Printing Labels Using P-touch Template
74
5
eFrom the list of barcodes under «Basic settings», scan each barcode to send a command or setting to the
Label Printer.
• Settings can be made with multiple commands.
• If no settings have been made by scanning the barcode commands, a template will be printed using the
P-touch Template settings. The default P-touch Template settings are to print a single copy with [Auto
Cut] turned [On].
For more information on P-touch Template Settings, download P-touch Template Manual/Command
Reference (English only) from the Brother Solutions Center at support.brother.com
[Select your region/country.] — [Manuals] — [Choose your product]
• To specify the number of copies you want, scan the “Number of copies” barcode, and then scan the
barcodes under “For entering numbers” to specify a three-digit number.
Example:
Specify numbers by scanning the following barcodes: 7i[0][0][7], 15i[0][1][5]
• To change the setting for the number of copies, scan the “Number of copies” barcode again, and then scan
the barcodes for the new three-digit number.
fScan the barcode under “Preset template number” with the same number as the [Key Assign] number
for the label layout you want.
gThe specified label is printed.
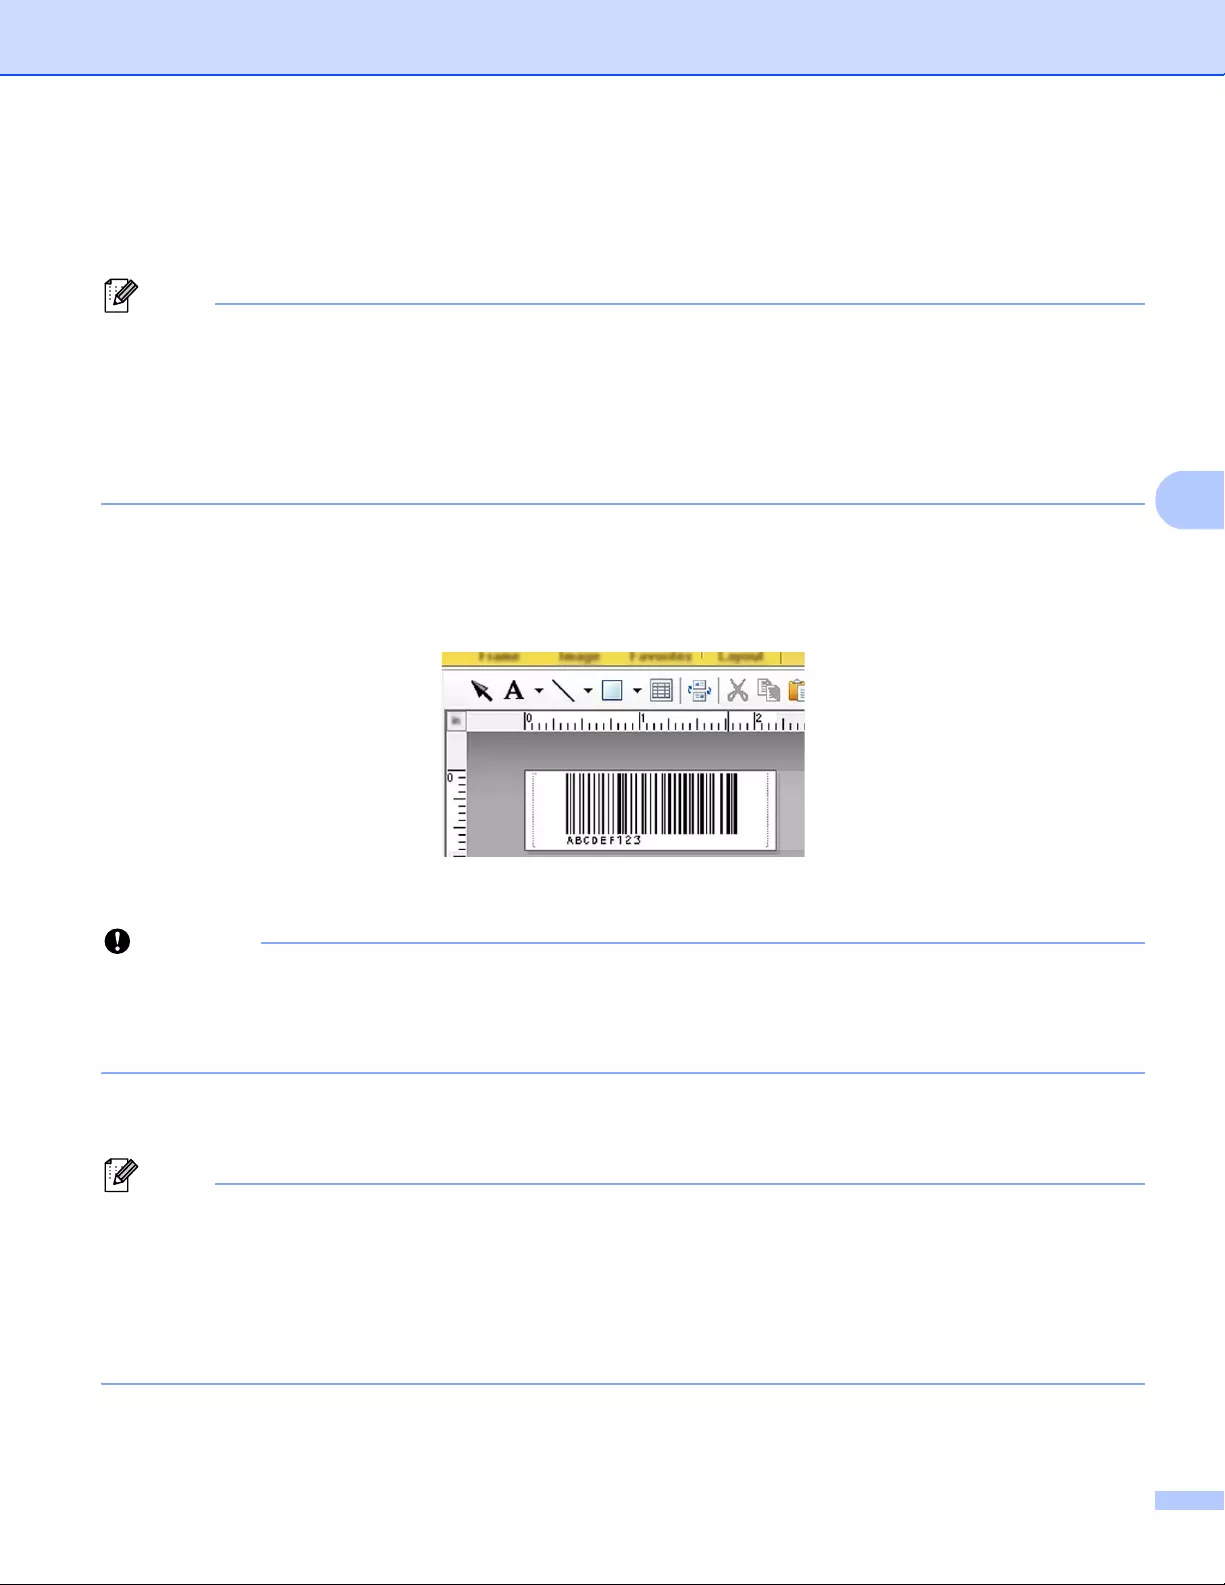
Printing Labels Using P-touch Template
75
5
Advanced Template Printing 5
Download a template and scan a barcode to print a copy or insert the scanned data into a different template.
• For more information on the barcodes that can be scanned using various settings, see List of Barcodes
for the P-touch Template Function on page 194.
• If a barcode has a different protocol than the barcode template already registered with the Label Printer,
you may be unable to create or print the barcode.
• Depending on the Barcode Scanner models, some barcode symbols and protocols may not be supported
by this Label Printer.
aUsing P-touch Transfer Manager, transfer (from P-touch Editor) a template (label layout) to the Label
Printer. For more information, see How to Use P-touch Transfer Manager and P-touch Library
(Windows® only) on page 121.
It is important to design a template to meet the barcode symbology or protocol requirements, especially
for the label size and barcode position in the label to fit the maximum number and type of characters being
inserted from the barcode scanner. A barcode in the template cannot be created or be scanned if the
barcode with the inserted data does not fit entirely within the label printable image area.
bWhen you transfer data to [Configurations] in P-touch Transfer Manager, select the folder containing
the data you want to transfer.
• When a template is transferred to [Configurations] in P-touch Transfer Manager, the [Key Assign]
number is automatically assigned.
• You can specify a [Key Assign] number between 1 and 10 for any downloaded templates into the Label
Printer.
• You can add a custom folder under [Configurations], and drag-and-drop a transferred template into that
custom folder to manage different sets of templates.
cSelect the transferred template and then click [Transfer] to download the template to the [Key Assign]
number in the Label Printer.
CODE128/9-digit
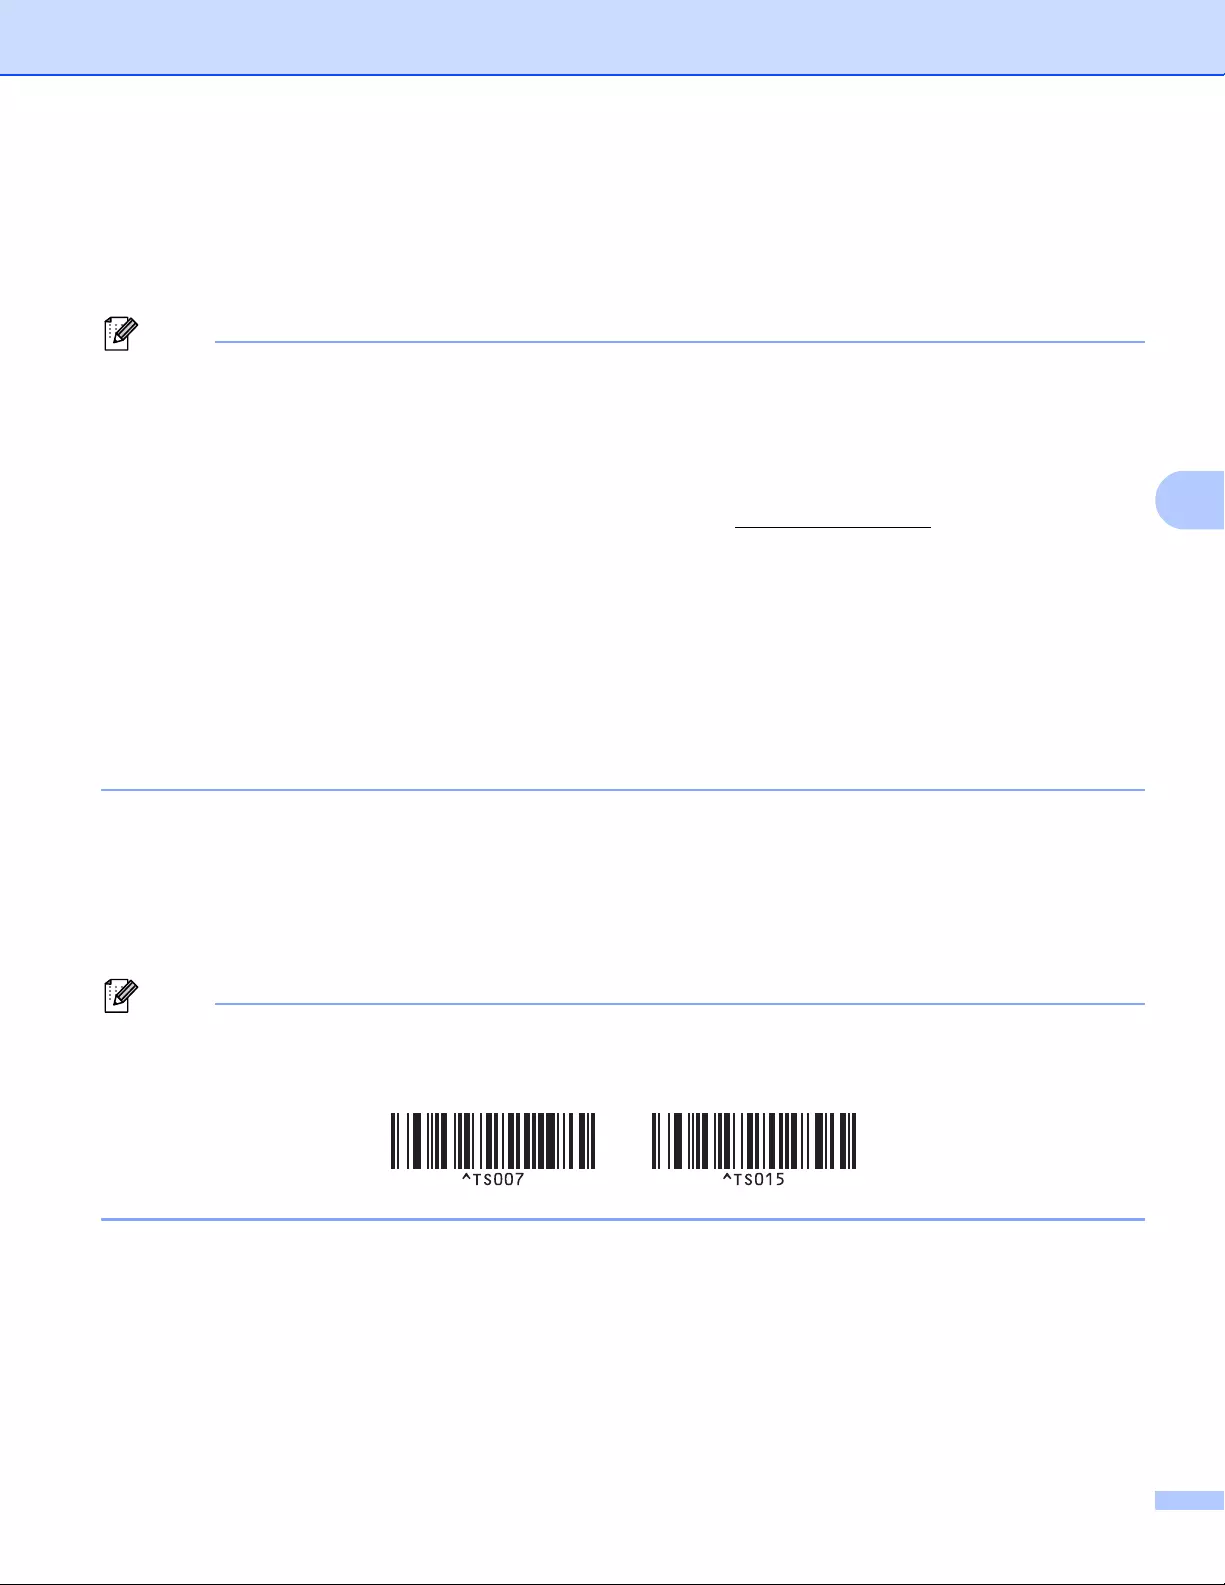
Printing Labels Using P-touch Template
76
5
dScan the “P-touch template command (Initialize + begin specifying settings)” barcode.
For more information, see List of Barcodes for the P-touch Template Function on page 194.
eFrom the list of barcodes under «Basic settings», scan each barcode to send a command or setting to the
Label Printer.
• Settings can be made with multiple commands.
• If no settings have been made by scanning the barcode commands, a template will be printed using the
P-touch Template settings. The default P-touch Template settings are to print a single copy with [Auto
Cut] turned [On].
For more information on P-touch Template Setting Tool, download P-touch Template Manual/Command
Reference (English only) from the Brother Solutions Center at support.brother.com
[Select your region/country.] — [Manuals] — [Choose your product]
• To specify the number of copies you want, scan the “Number of copies” barcode, and then scan the
barcodes under “For entering numbers” to specify a three-digit number. The setting is automatically
applied when three digits have been specified.
Example:
Specify numbers by scanning the following barcodes: 7i[0][0][7], 15i[0][1][5]
• To change the setting for the number of copies, scan the “Number of copies” barcode again, and then scan
the barcodes for the new three-digit number.
fScan the «Select template» barcode and then scan the barcodes under «For entering numbers» with the
same number (three digits) as the [Key Assign] number used for the downloaded template to be printed.
The downloaded template will be automatically selected after the three digit numbers have been
scanned.
Example:
Specify the three digit numbers by scanning the following barcodes: 7i[0][0][7], 15i[0][1][5]
You can use P-touch Editor to create and print a label with a single barcode for step f.
Example:

Printing Labels Using P-touch Template
77
5
gScan a barcode that contains the data you want inserted into the barcode object in the selected
downloaded template from step f.
Example:
hScan the «Begin printing» barcode to send the command to start printing.
iThe barcode in the printed template will contain the data from the barcode scanned in step g.
Example:
(CODE128/9-digit)
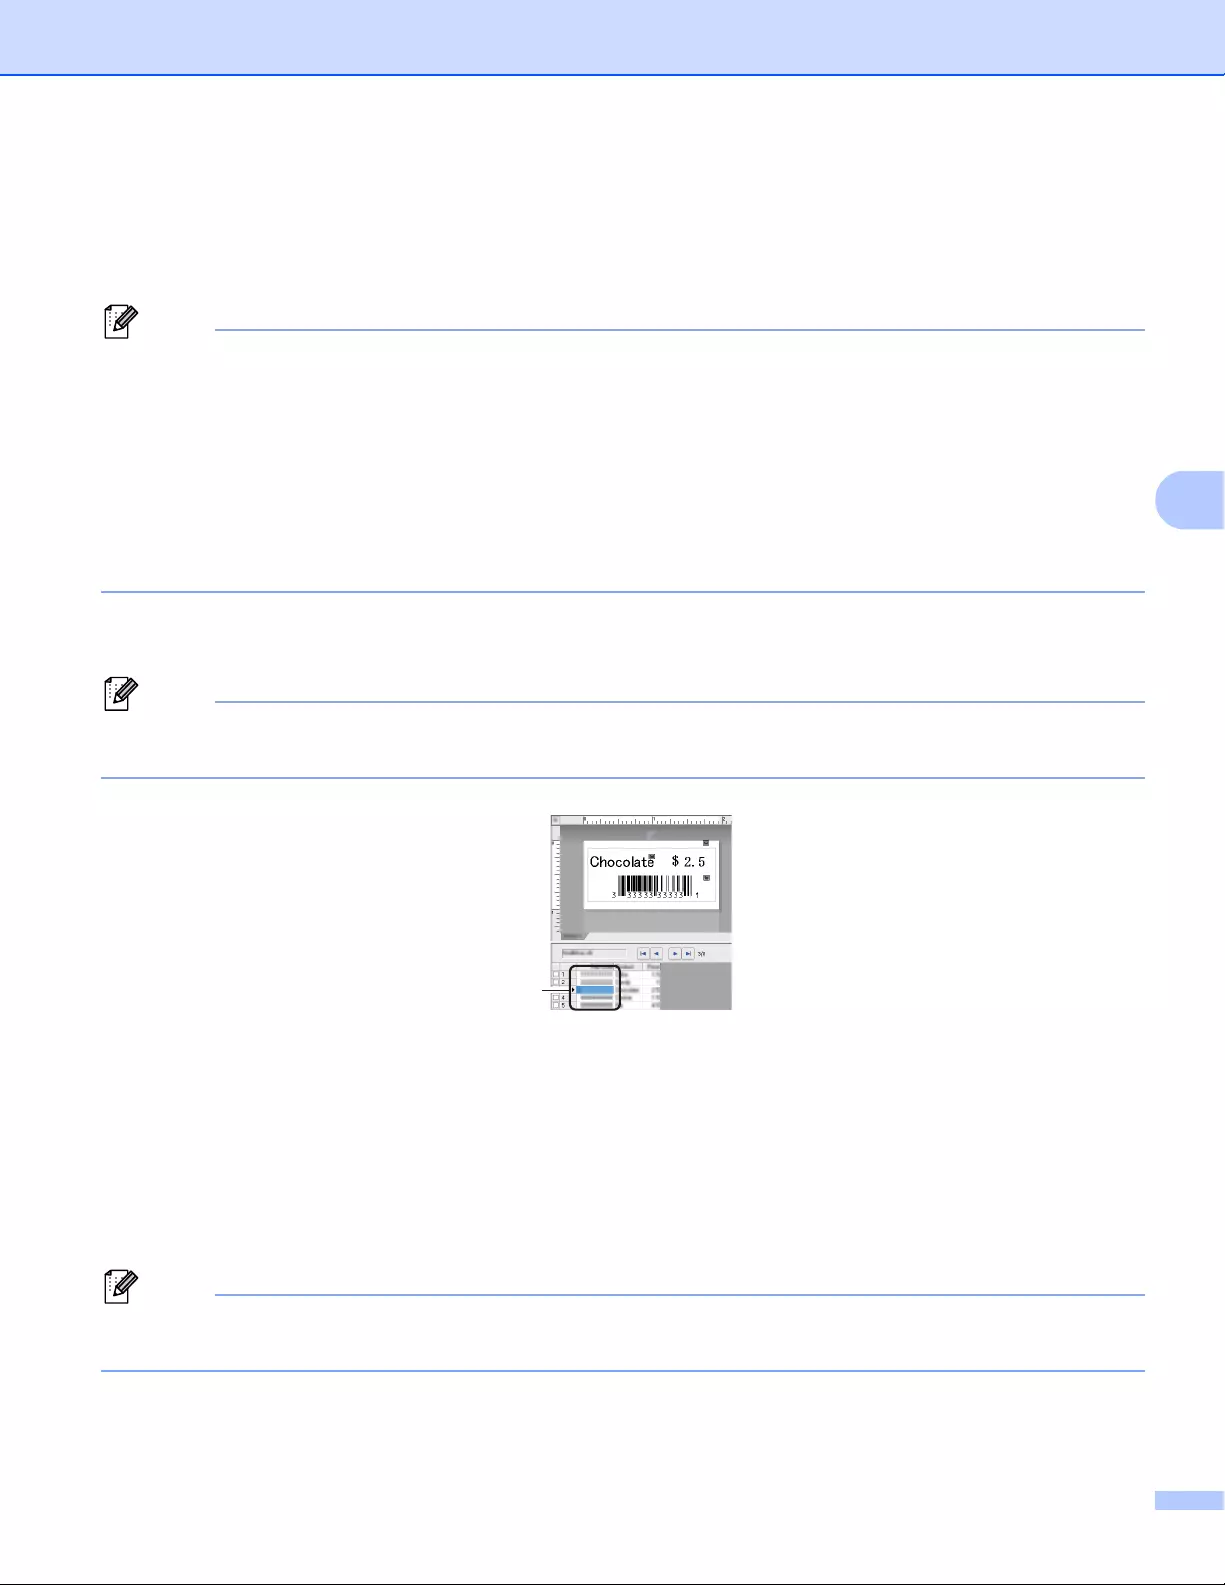
Printing Labels Using P-touch Template
78
5
Database Lookup Printing 5
You can download a database linked to a template, scan a barcode as a keyword to find a record containing
that keyword, and then insert that record into the template and print it out.
• The Label Printer has reserved the leftmost column (field «A») of a downloaded linked database for this
operation, therefore the keyword scanned from a barcode must be in this column of the database.
• For the Label Printer to find keywords successfully, the data in the leftmost column (field «A») must match
exactly the keywords scanned from a barcode.
• P-touch Editor and the Label Printer can only read one line of data in each field of a linked database so
we do not recommend using databases with two or more lines of data in the leftmost column (field «A»).
• For more information on the barcodes that can be scanned using various settings, see List of Barcodes
for the P-touch Template Function on page 194.
aUse P-touch Editor to create a template and connect to a database file. You can link as many columns
to a text and barcode objects in the template as needed.
Make sure the keywords are included in the leftmost column (Field «A») but do not link any text or barcode
object in the template with field «A» if you do not need that data on the printed label.
For more information on specifying the settings, refer to the [P-touch Editor Help].
bUsing P-touch Transfer Manager, transfer (from P-touch Editor) a template (label layout) to the Label
Printer. For more information, see How to Use P-touch Transfer Manager and P-touch Library
(Windows® only) on page 121.
The linked database file will also be transferred.
cWhen a template is transferred to [Configurations] in P-touch Transfer Manager, the [Key Assign]
number is automatically assigned.
You can add a custom folder under [Configurations], and drag-and-drop a transferred template into that
custom folder to manage different sets of templates.
dSelect the transferred template and then click [Transfer] to download the template to the [Key Assign]
number in the Label Printer.

Printing Labels Using P-touch Template
79
5
eScan the “P-touch template command” barcode.
For more information, see List of Barcodes for the P-touch Template Function on page 194.
fFrom the list of barcodes under «Basic settings», scan each barcode to send a command or setting to the
Label Printer.
• Settings can be made with multiple commands.
• If no settings have been made by scanning the barcode commands, a template will be printed using the
P-touch Template settings. The default P-touch Template settings are to print a single copy with [Auto
Cut] turned [On].
For more information on P-touch Template Setting Tool, download P-touch Template Manual/Command
Reference (English only) from the Brother Solutions Center at support.brother.com
[Select your region/country.] — [Manuals] — [Choose your product]
• To specify the number of copies you want to print, scan the “Number of copies” barcode, and then scan
the barcodes under “For entering numbers” to specify a three-digit number. The setting is automatically
applied when three digits have been specified.
Example:
Specify numbers by scanning the following barcodes: 7i[0][0][7], 15i[0][1][5]
• To change the setting for the number of copies, scan the “Number of copies” barcode again, and then scan
the barcodes for the new three-digit number.
gScan the «Select template» barcode and then scan the barcodes under «For entering numbers» with the
same number (three digits) as the [Key Assign] number used for the downloaded template to be printed.
The downloaded template will be automatically selected after the three digit numbers have been
scanned.
Example:
Specify the three digit numbers by scanning the following barcodes: 7i[0][0][7], 15i[0][1][5]
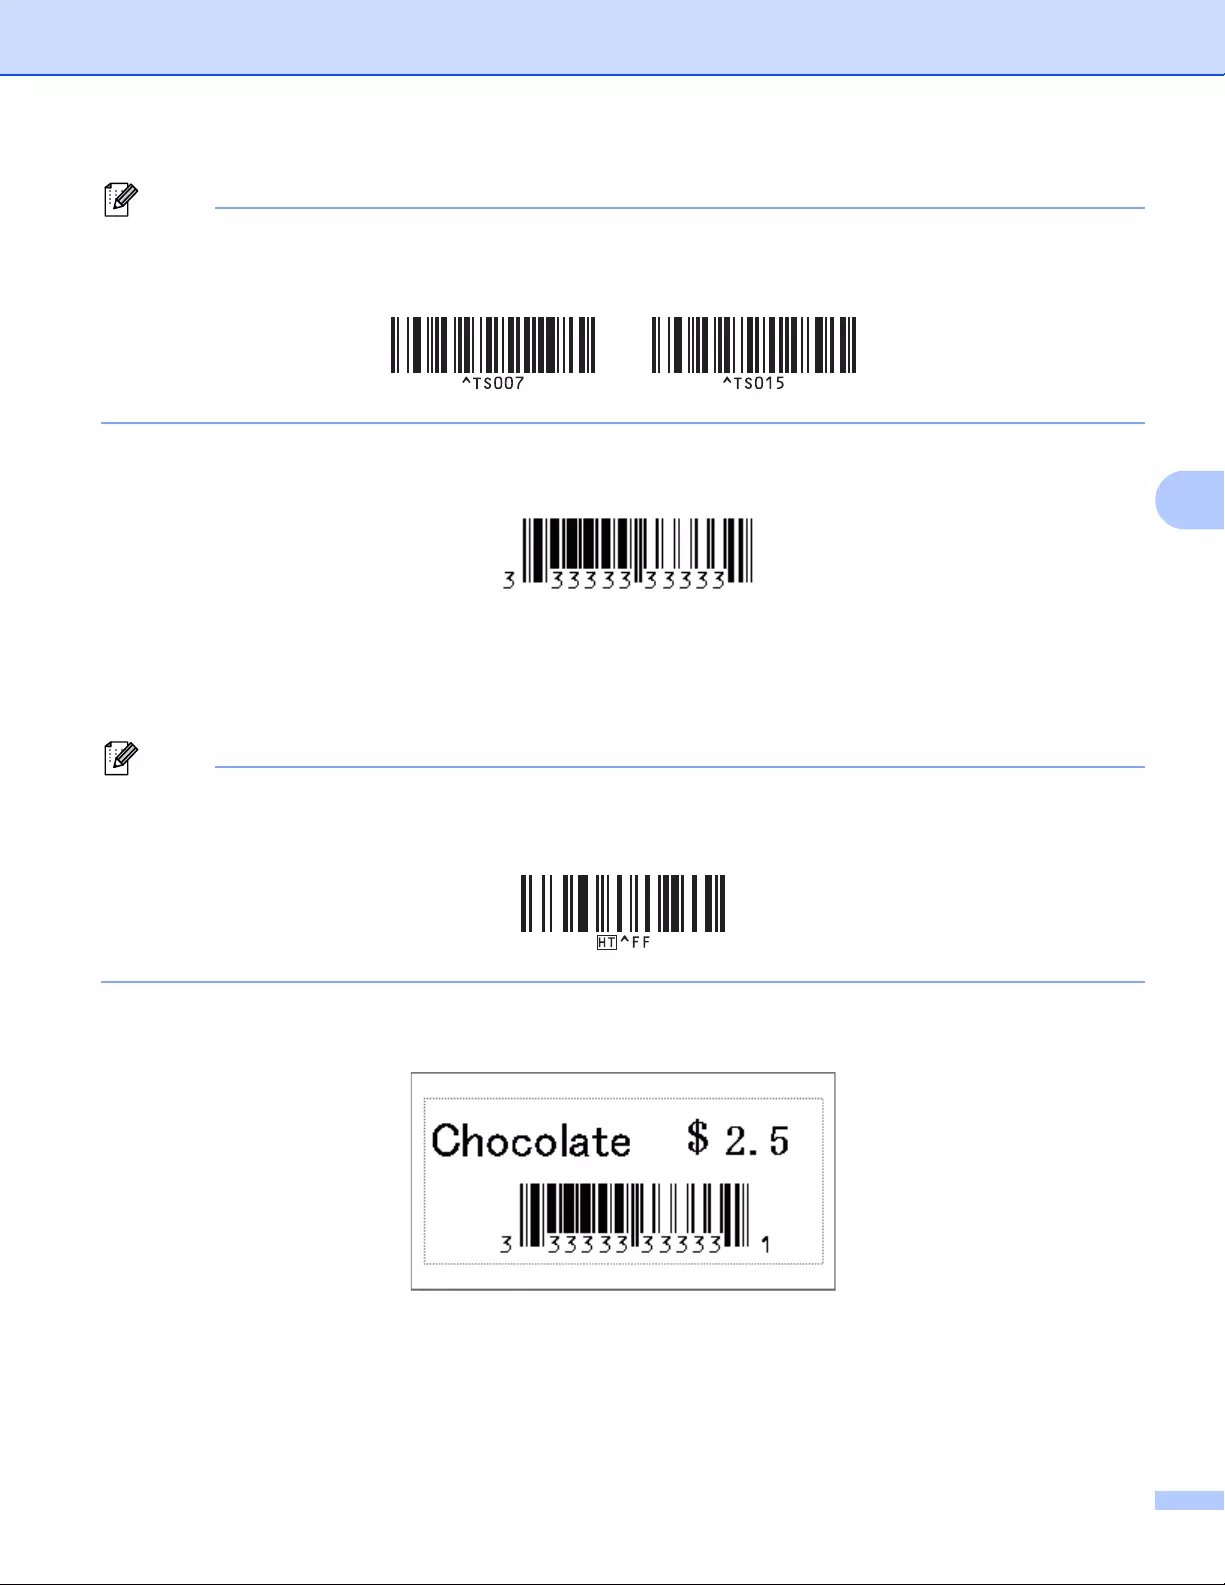
Printing Labels Using P-touch Template
80
5
You can use P-touch Editor to create and print a label with a single barcode for step f.
Example:
hScan a barcode that contains the keyword to look up in downloaded database from step d.
Example:
iScan the «Delimiter» barcode to send the command to start searching the downloaded database for the
keyword that was scanned.
jScan the «Begin printing» barcode to send the command to start printing.
You can use P-touch Editor to create and print a label with a single barcode for steps i and j.
Example:
kThe Label Printer will print the template with the data inserted from the database record found with the
keyword that was scanned.
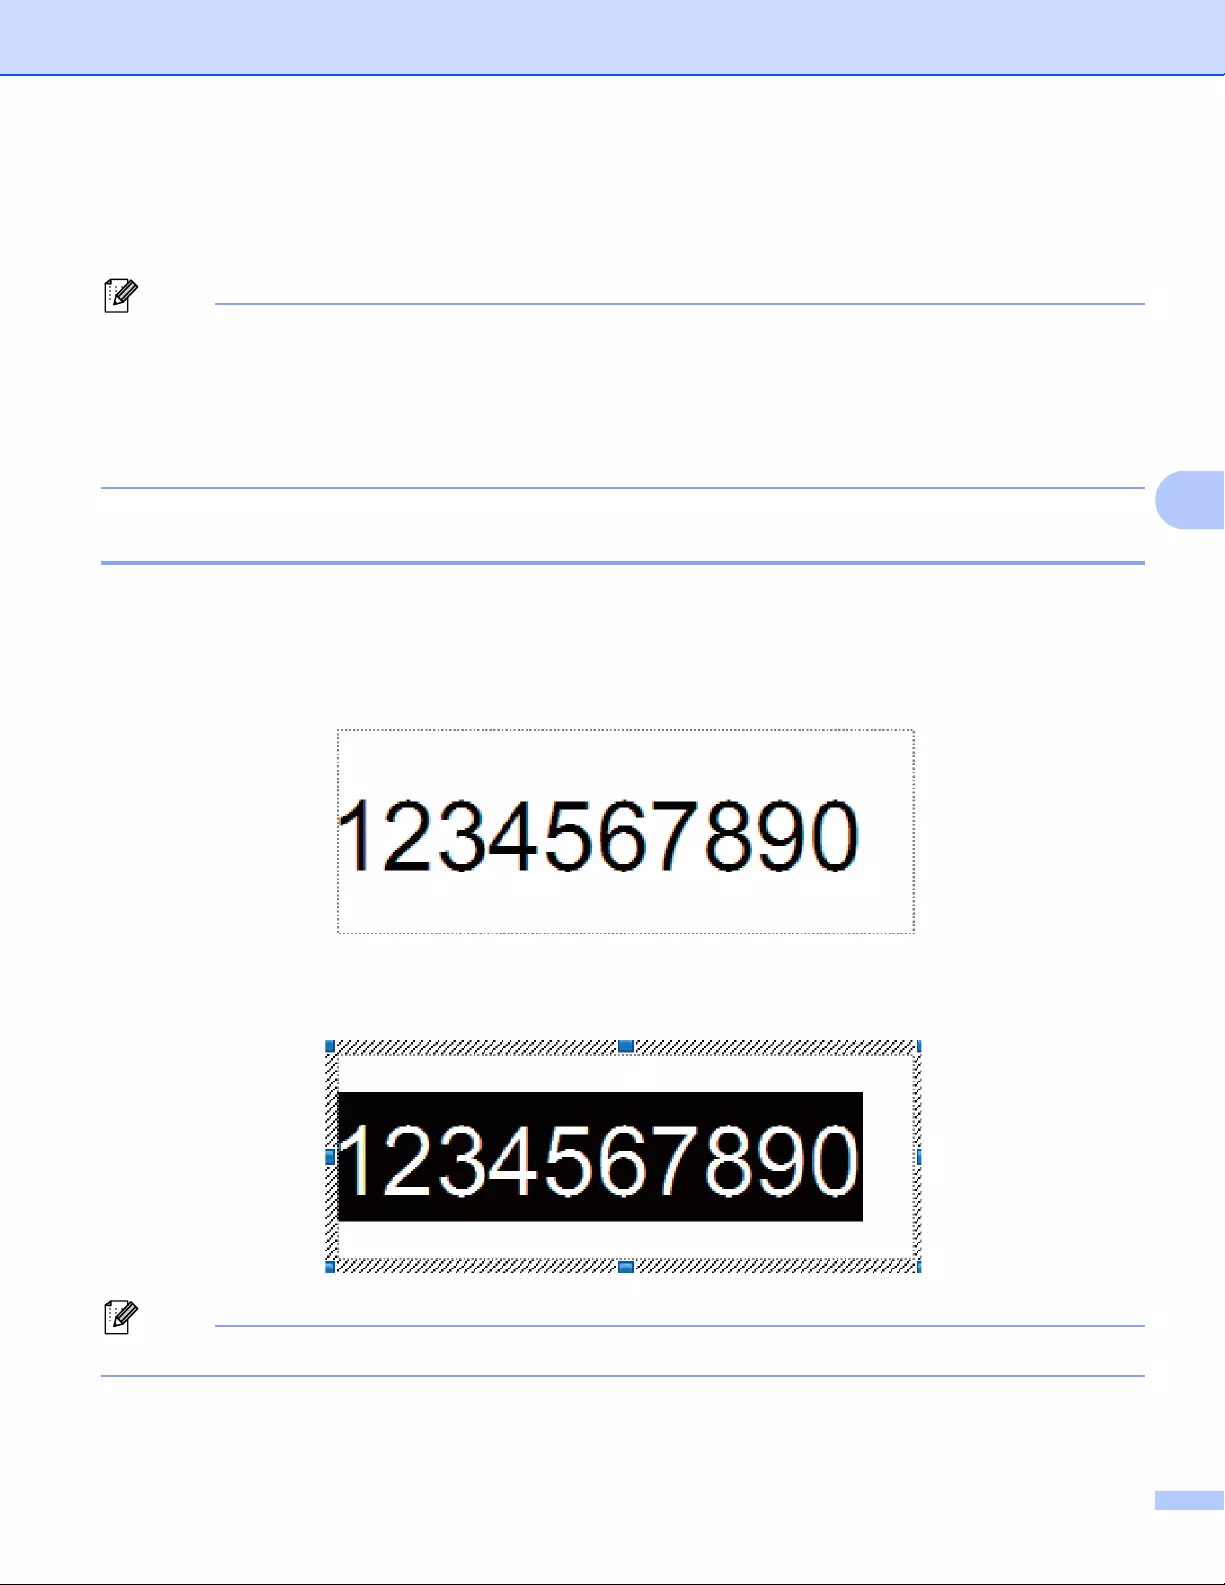
Printing Labels Using P-touch Template
81
5
Numbering (Serialized Number) Printing 5
Automatically increment text or barcodes in any downloaded template while printing.
• This advanced operation can be applied to any of the P-touch Template mode basic operations.
• You can automatically increment up to 999 printed copies.
• You can select up to nine text and barcode objects within each downloaded template that will
simultaneously be incremented while printing.
• Text and barcode objects linked to a database file cannot be incremented.
Text Numbering (Serializing) 5
Procedure
aUse P-touch Editor to create or open a template and select a text object that you want to automatically
increment while printing.
Example:
bHighlight or drag the cursor over a group of numbers and letters within the text object that you want
to increment (Numbering field).
A maximum of 15 numbers and letters can be selected in each Numbering field.
cWith the cursor over the highlighted Numbering field, right-click and select [Numbering].
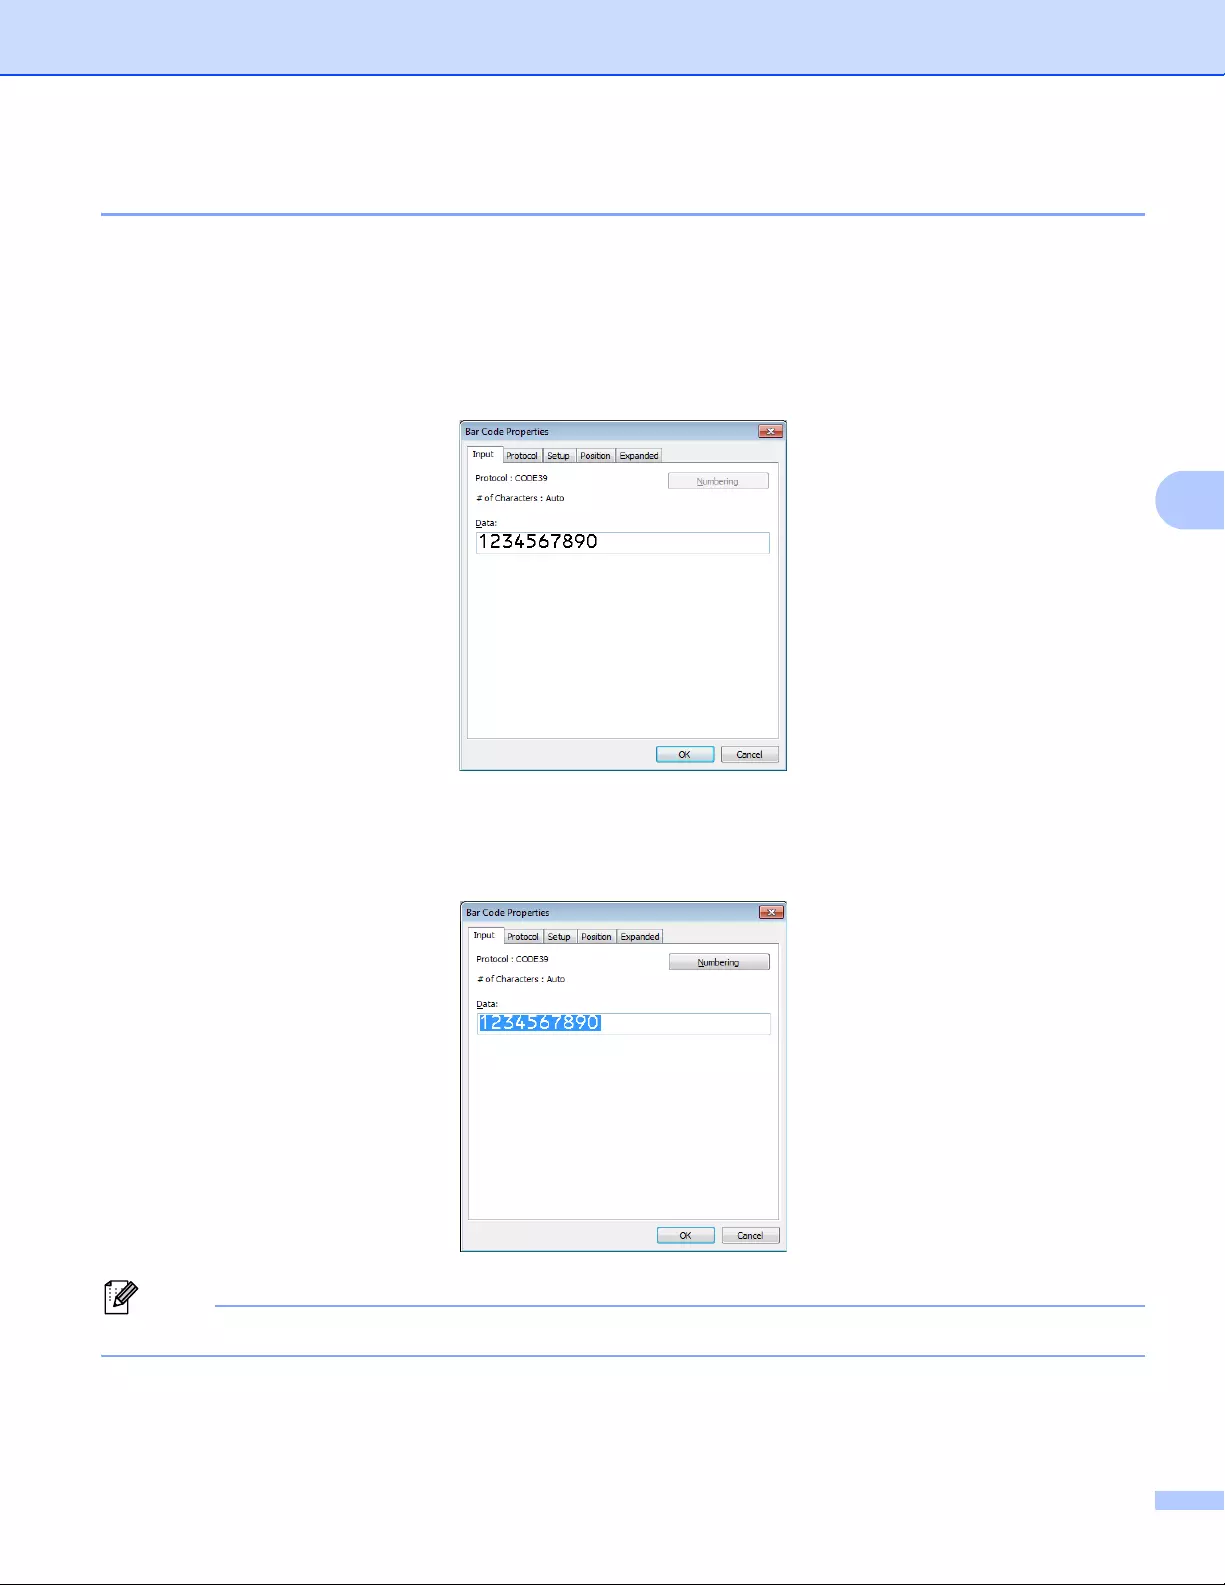
Printing Labels Using P-touch Template
82
5
Barcode Numbering (Serializing) 5
Procedure
aUse P-touch Editor to create or open a template and select a barcode object that you want to
automatically increment while printing.
bWith the cursor over a selected barcode object, right-click and select [Properties].
Example:
cClick the Input tab and highlight or drag the cursor over a group of numbers and letters within the
barcode object that you want to increment (Numbering field).
Example:
The [Numbering] button is enabled after a group of numbers and letters are highlighted.
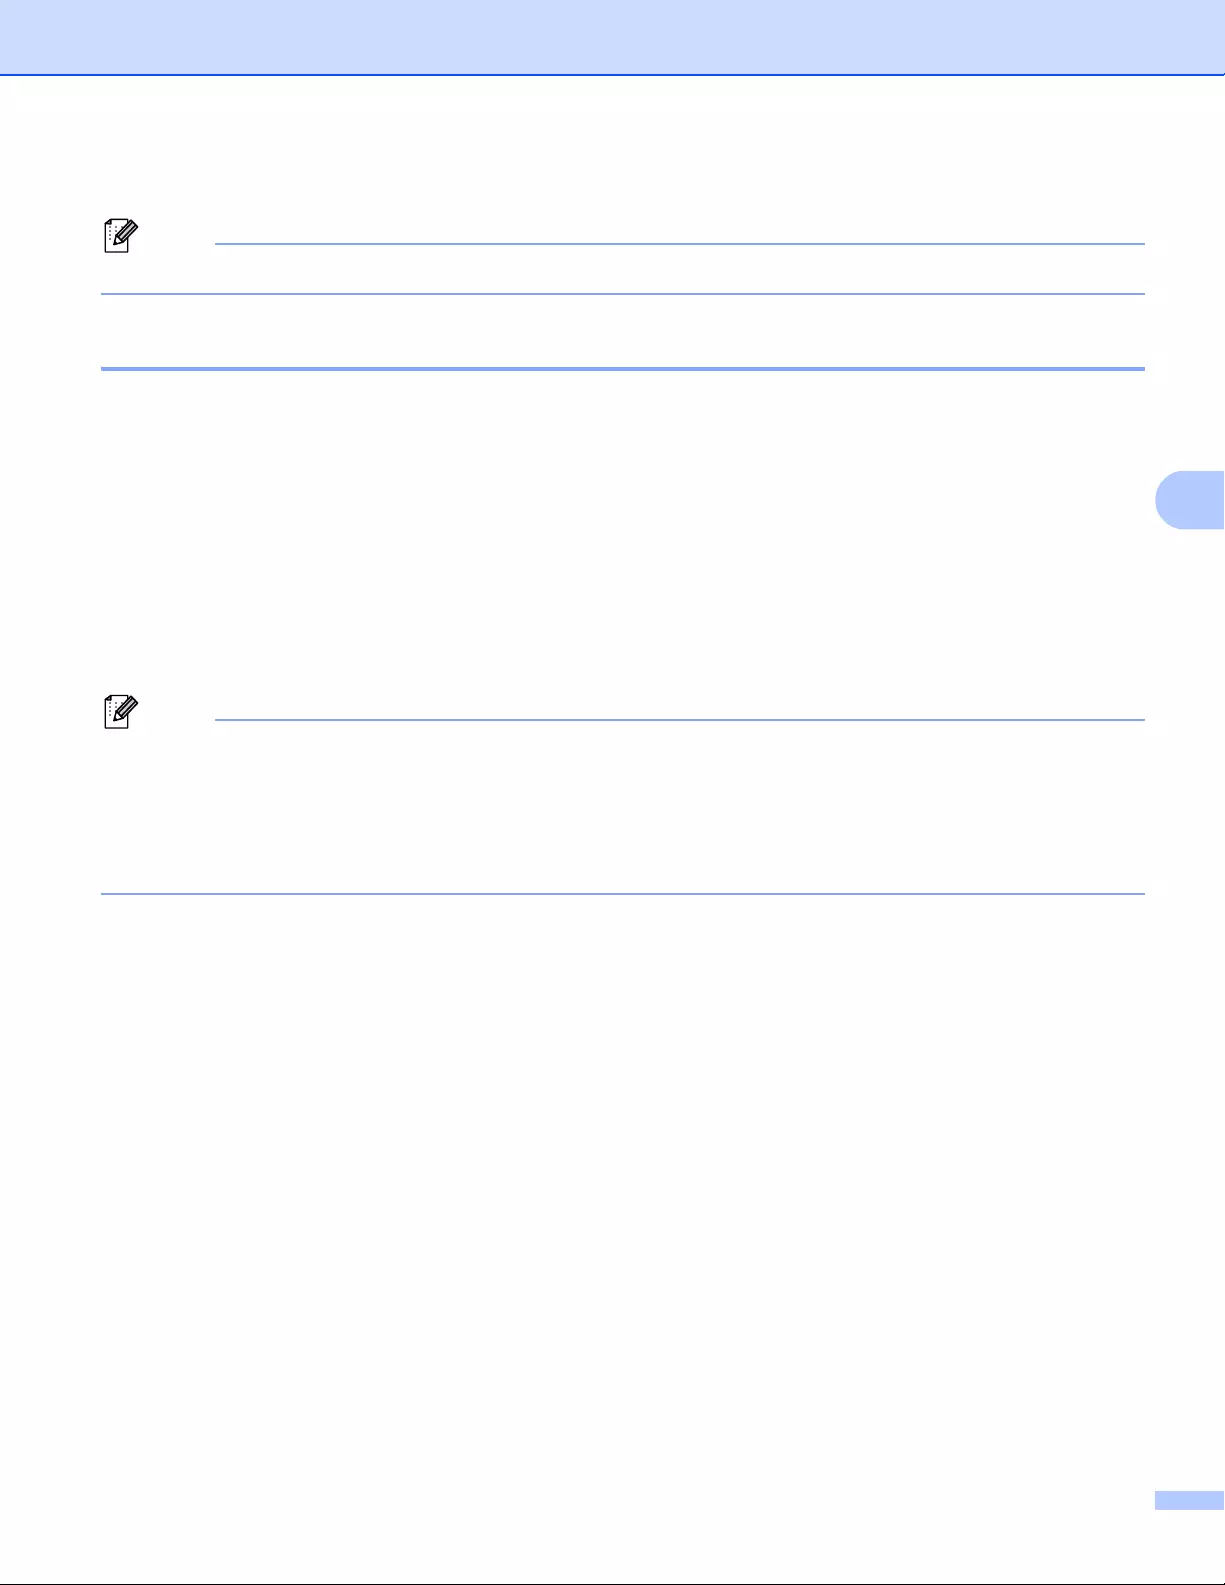
Printing Labels Using P-touch Template
83
5
dClick [Numbering], and then click [OK].
A maximum of 15 numbers and letters can be selected in each Numbering field.
Printing with Numbering (Serializing) Advanced Operation 5
aUsing P-touch Transfer Manager, transfer (from P-touch Editor) a template (label layout) to the Label
Printer. For more information, see How to Use P-touch Transfer Manager and P-touch Library
(Windows® only) on page 121. A linked database file will also be transferred.
bNumbering (Serializing) advanced operation setting the Label Printer. See List of Barcodes for the
P-touch Template Function on page 194.
Scan the «Number of serialized copies» barcode and then scan the barcodes under «For entering
numbers» with the number of copies you want to print (three digits).
Example:
For five copies, specify the three digit numbers by scanning barcodes for [0][0][5]
• Follow the P-touch Template mode basic operation procedures to start printing. For further information,
see Standard Template Printing on page 73 to Database Lookup Printing on page 78.
• The Numbering field will increment by one number or letter with each label that is printed, and the count
is permanently saved in the Label Printer.
• To reset a text or barcode object back to the original value, scan the «Initialize template data» barcode.

84
6
6
Confirming the Label Printer Settings 6
You can print the settings report without connecting the Label Printer to a computer or mobile device.
The Label Printer report contains the following information: The firmware version, device settings
information, serial number, network settings information, and so on. (The printed information is different
depending on the model.)
aTurn on the Label Printer.
bFor QL-810W
Press and hold the Cutter ( ) Button for more than one second to print the report.
For QL-820NWB
1 Press the Menu, [▲], or [▼] Button to select the [Information] menu, and then press the [OK]
Button.
2Select [Print Configuration] using [▲] or [▼], and then press the [OK] Button.
3Select [All], [Usage Log], [Printer Setting] or [Transfer Data] using [▲] or [▼] Button, and
then press the [OK] Button to print the report.
• When you print this report, use 2.4″ (62 mm) DK Roll.
• This operation can also be performed using the Printer Setting Tool. For more information, see Changing
the Label Printer Settings on page 37.
Other Functions 6

Other Functions
85
6
2-color Printing Configuration with Other Applications 6
Follow the process below when carrying out 2-color printing from any other applications than P-touch Editor.
For Windows®
aOpen the Devices and Printers window, select the [QL-810W]/[QL-820NWB] and right-click it.
Click [Printer Properties].
bSelect the [General] tab, then click the [Preferences…] button.
cSelect [2-color [Black/Red]] from the [Color] section.
For Mac
aClick [File], and then select [Print].
The print screen appears.
bClick the [Show Details] button.
The other print screen appears.
Click the [Notes] pull down to select [Advanced].
cSelect [2-color [Black/Red]] from the [Color] section.
Mass Storage Mode (QL-820NWB only) 6
Description 6
The mass storage feature allows you to send a file to the Label Printer using the USB interface, without
installing a printer driver.
This feature is useful for:
Applying printer settings saved in a command file (.bin file format) or adding templates (.blf file format) into
the Label Printer distributed by the administrator without using any software tools.
Executing commands without installing the printer driver
Using a device with an Operating System (including non-Windows® operating systems) that has a USB
host feature to print and transmit data
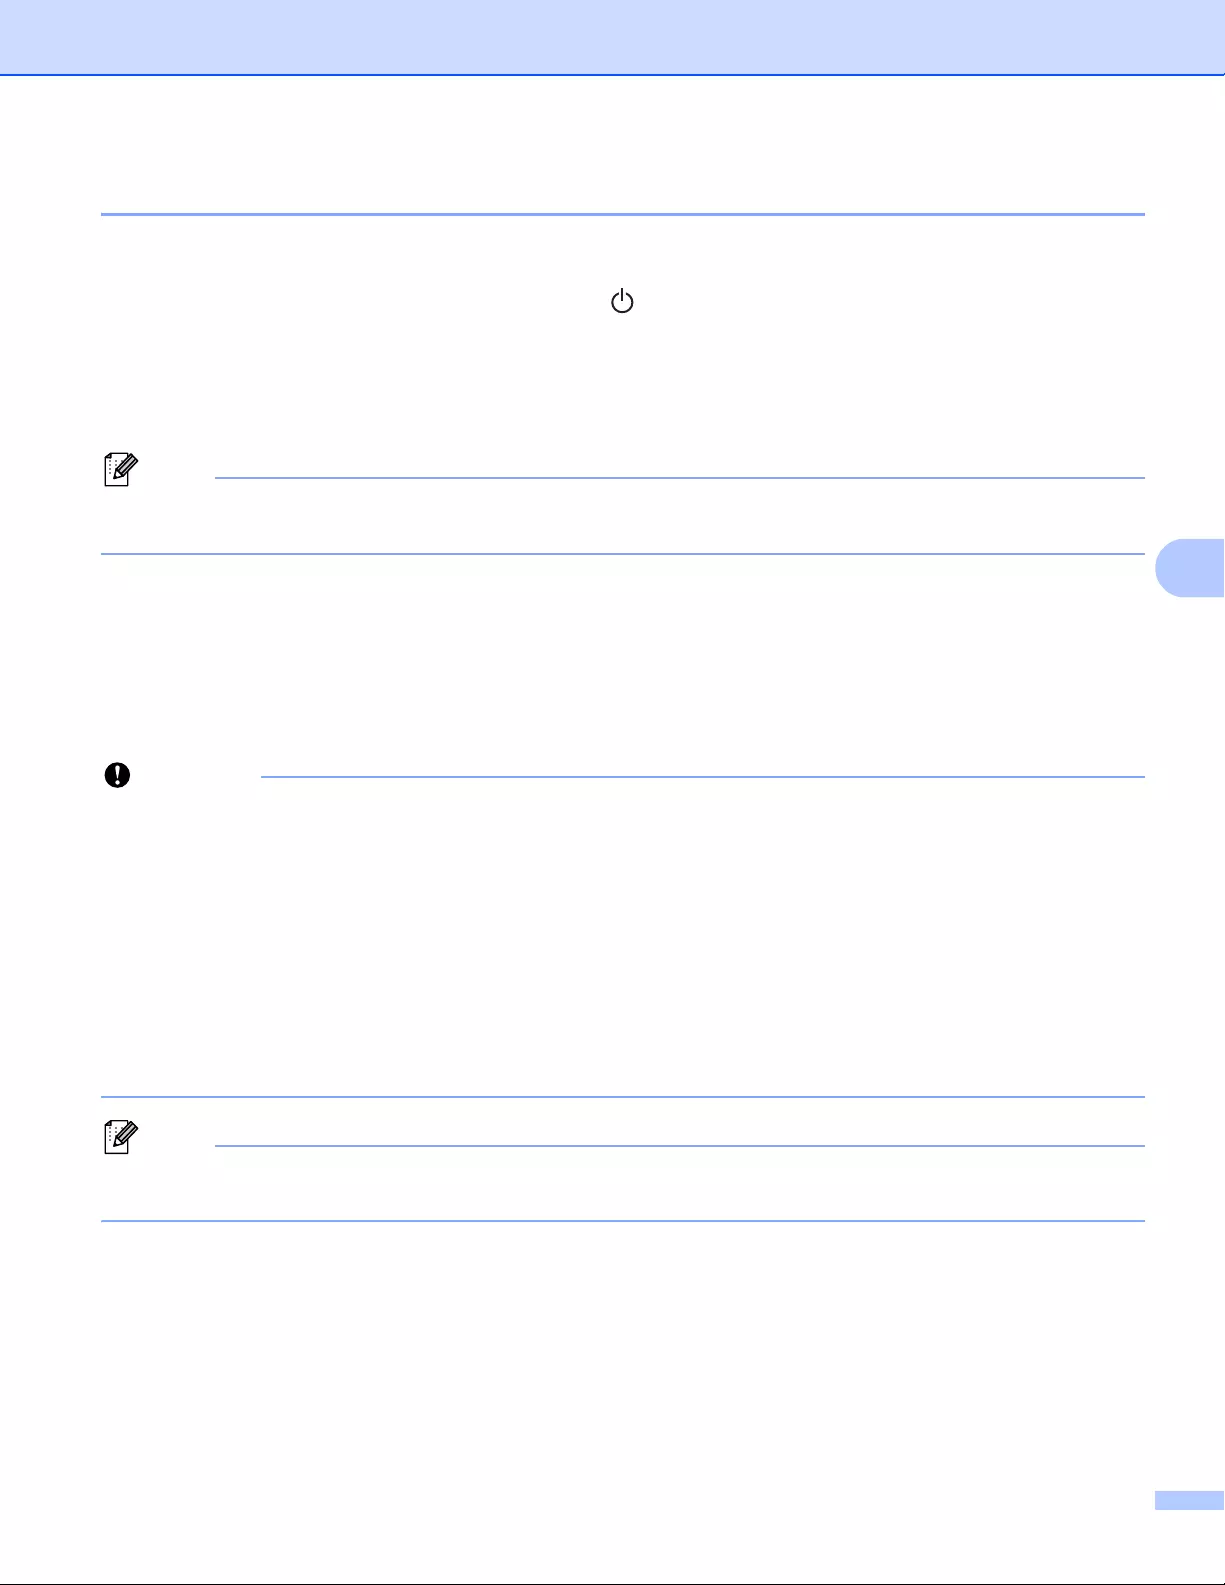
Other Functions
86
6
Using the Mass Storage Mode 6
aConfirm that the Label Printer is turned off.
bPress and hold the [OK] Button and the Power ( ) Button at the same time for several seconds.
The Label Printer starts up in mass storage mode, the Status LED lights in green and [Mass Storage
Mode] appears on the LCD.
cConnect the computer or device to the Label Printer via USB.
The Label Printer’s mass storage area appears as a folder on the computer or device’s screen.
If the mass storage area does not appear automatically, refer to the operating instructions for the computer
or device’s operating system for information about accessing the mass storage area.
dDrag and drop the file you want to copy to the mass storage area.
ePress the [OK] Button.
The commands in the command file are executed, and the Status LED flashes once in orange.
When finished, the Status LED lights in green.
fTo turn mass storage mode off, turn off the Label Printer.
• When the Label Printer is turned off, mass storage mode is deactivated and any files in the mass storage
area are deleted.
• This feature supports .bin, and .blf files. Other file formats are not supported.
• Do not create folders in the mass storage area. If a folder is created, files in the folder cannot be accessed.
• The capacity of the mass storage area is 2.5 MB. Files larger than 2 MB may not work correctly.
• If multiple files are copied, the order that the commands will be executed cannot be guaranteed.
• Wired LAN, Bluetooth (QL-820NWB only) and Wi-Fi are not available while the Label Printer is running in
mass storage mode.
• Do not access other files in the mass storage area when executing a copied file.
For more information on how to create a .blf file, see Creating Transfer Files and Transfer Package Files
on page 131.

Other Functions
87
6
JPEG Printing 6
Image data (JPEG) can be printed without using the printer driver.
• JPEG images can be printed using the mass storage feature.
• The Object Push Profile (OPP) is used for printing via a Bluetooth connection.
• The Label Printer will convert a color JPEG image to a ‘Black & White’ image using a dithering process.
• When sending a JPEG image that is already ‘Black & White’ this dithering process may make your printed
image fuzzy.
• To improve the image quality, try to turn off any preprocessing of the JPEG image.
Only JPEG images can be printed. (Limited to files with the .jpg extension.)
The maximum file size is 5 MB.
(2 MB when the mass storage feature is used.)
The maximum resolution is as follows:
Height Width = 8000 720 dots
If these limits are exceeded, the data received by the printer will be discarded and not printed.
Print is at 1 pixel = 1 dot.
The Label Printer performs binary processing (simple binary) to print the image.
The image is printed with the height-to-width proportion of the received data.
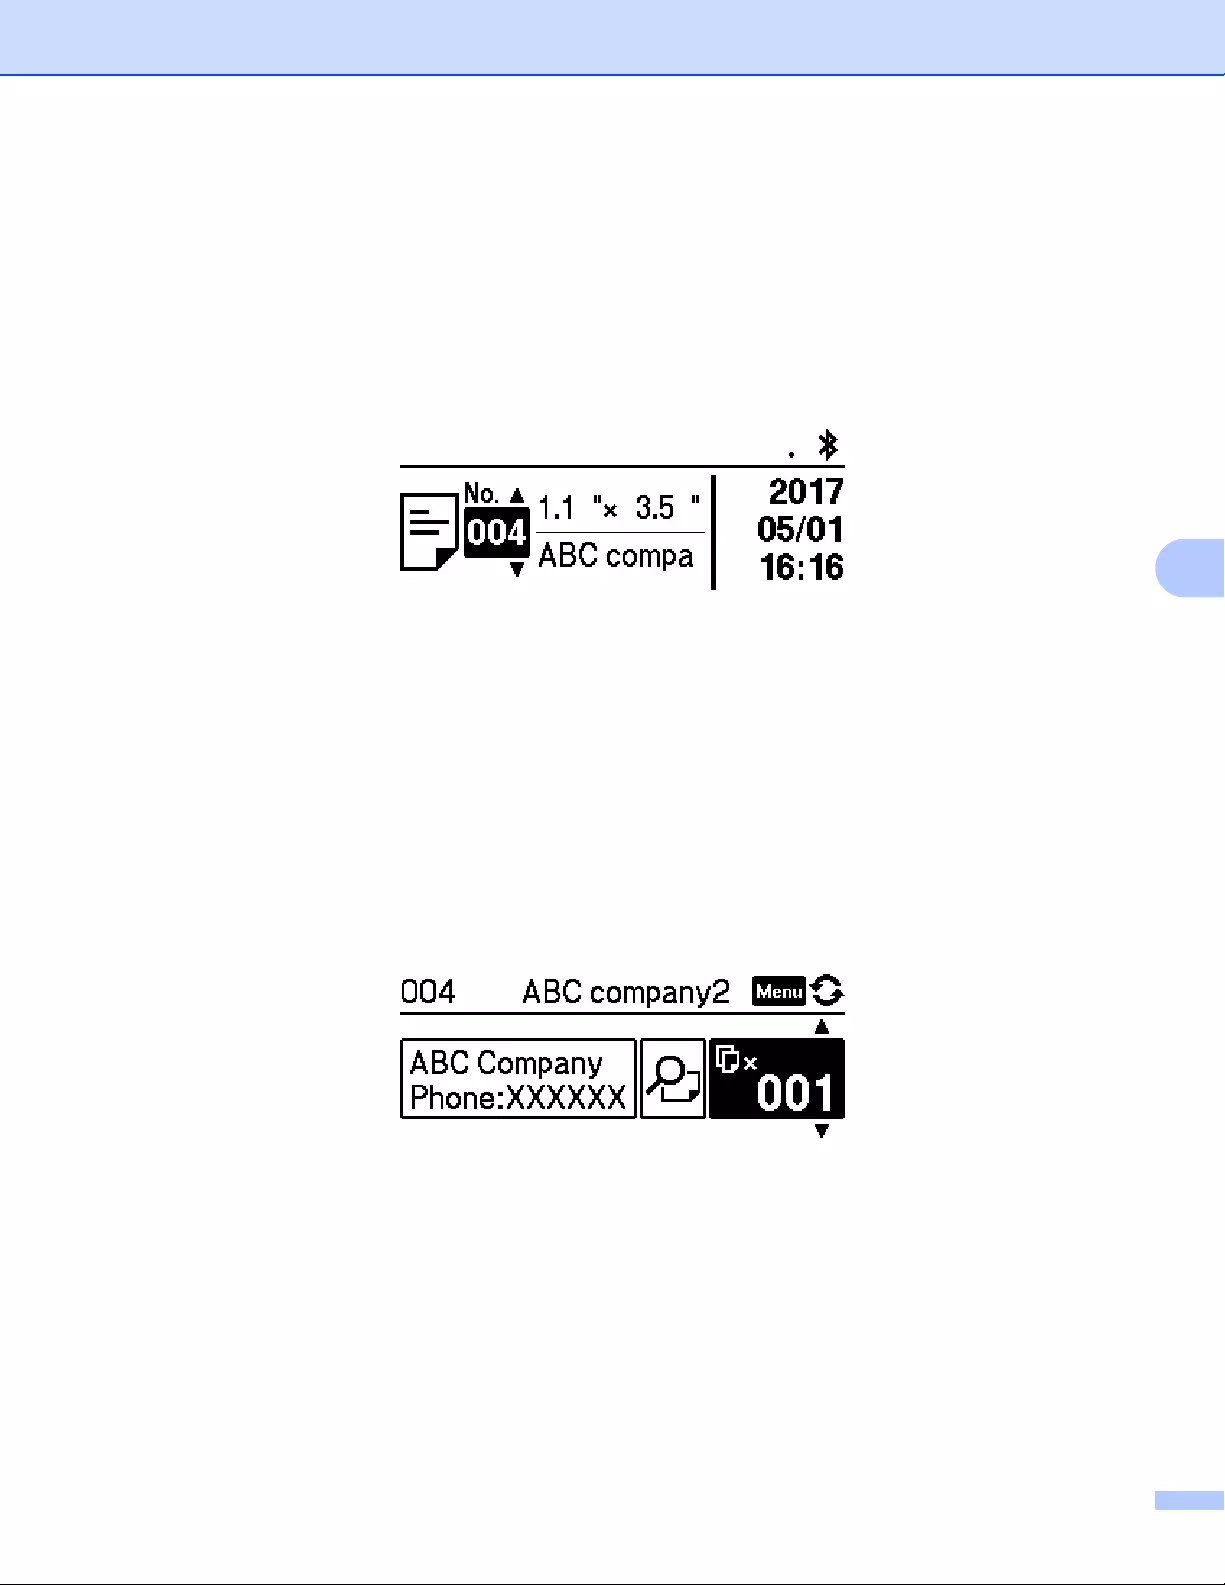
Other Functions
88
6
Template Printing from the Label Printer Using the LCD menu
(QL-820NWB only) 6
Transferred or preset templates can be printed only by the Label Printer using the LCD menu without
connecting to a computer or mobile device.
When you print a template that is not linked to a database
aMake sure the LCD is in the template mode as shown on the below.
If it is not, set to the template mode.
1 Press the Menu Button and [▼] Button to select the [Template Settings] menu, and then press
the [OK] Button.
2Set [Template Mode] to [On].
bPress [▲] or [▼] Button to select a template and press the [OK] Button.
When [Off] is selected on the [Confirm Print] in the [Template Setting] menu
A preset number of labels with the selected template is printed.
When [On] is selected on the [Confirm Print] in the [Template Setting] menu
1 The number of printing setting screen is displayed. Press [▲] or [▼] Button to select the number
of labels for printing.
2 Press [OK] Button. The set number of labels with the selected template is printed.
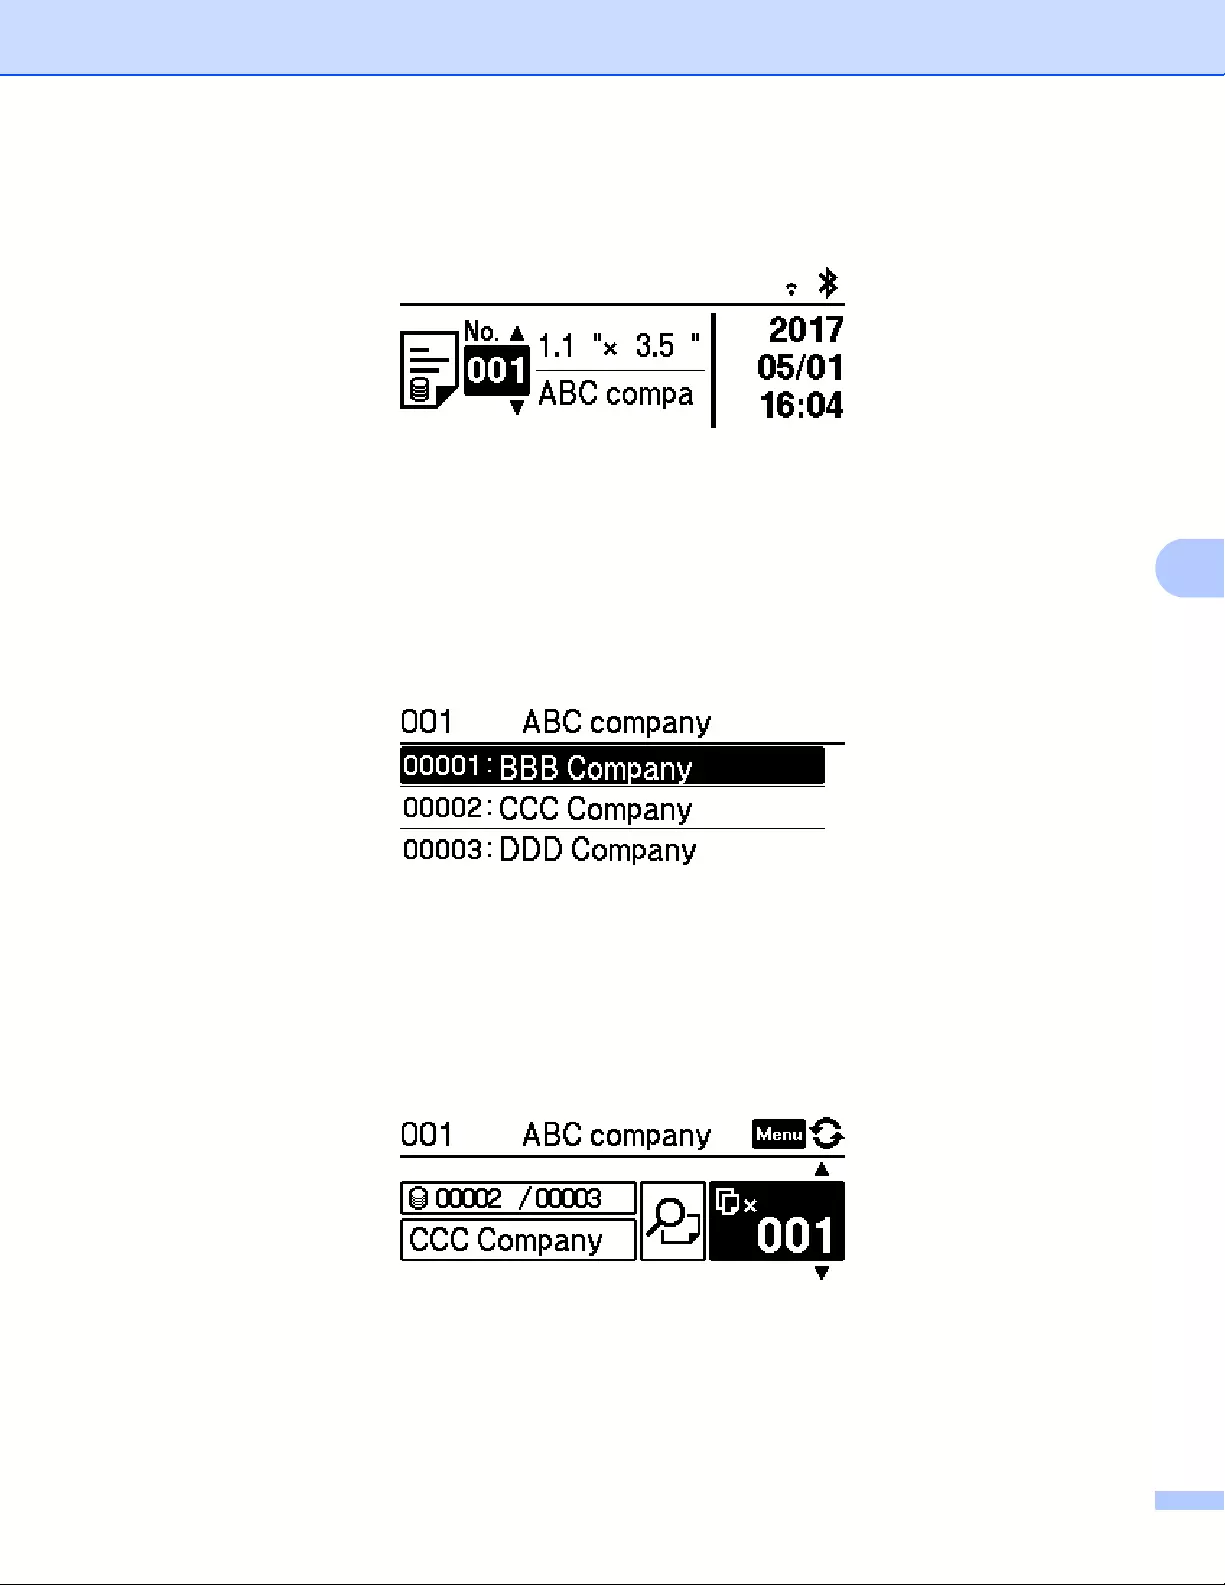
Other Functions
89
6
When you print a template that is linked to a database
aMake sure the LCD is in the template mode as shown on the below.
If it is not, set to the template mode.
1 Press the Menu Button and [▼] Button to select the [Template Settings] menu, and then press
the [OK] Button.
2Set [Template Mode] to [On].
bPress [▲] or [▼] Button to select a template and press the [OK] Button.
cThe database selecting screen is displayed. Press [▲] or [▼] Button to select the database and press
the [OK] Button.
dThe LCD back to the template mode screen.
When [Off] is selected on the [Confirm Print] in the [Template Setting] menu
A preset number of labels with the selected template is printed.
When [On] is selected on the [Confirm Print] in the [Template Setting] menu
1 The number of printing setting screen is displayed. Press [▲] or [▼] Button to select the number
of labels for printing.
2 Press [OK] Button. The set number of labels with the selected template is printed.

Other Functions
90
6
• When you press the Menu Button once on the number of printing setting screen and then press the [OK]
Button, you can check the Object in the Template. To return to the number of printing setting screen, press
the Cancel Button or the [OK] Button.
• When you press the Menu Button two times on the number of printing setting screen and then press the
[OK] Button, a print preview is displayed. You can scroll the screen with [▲] or [▼] Button. To return to the
number of printing setting screen, press the Cancel Button or the [OK] Button.
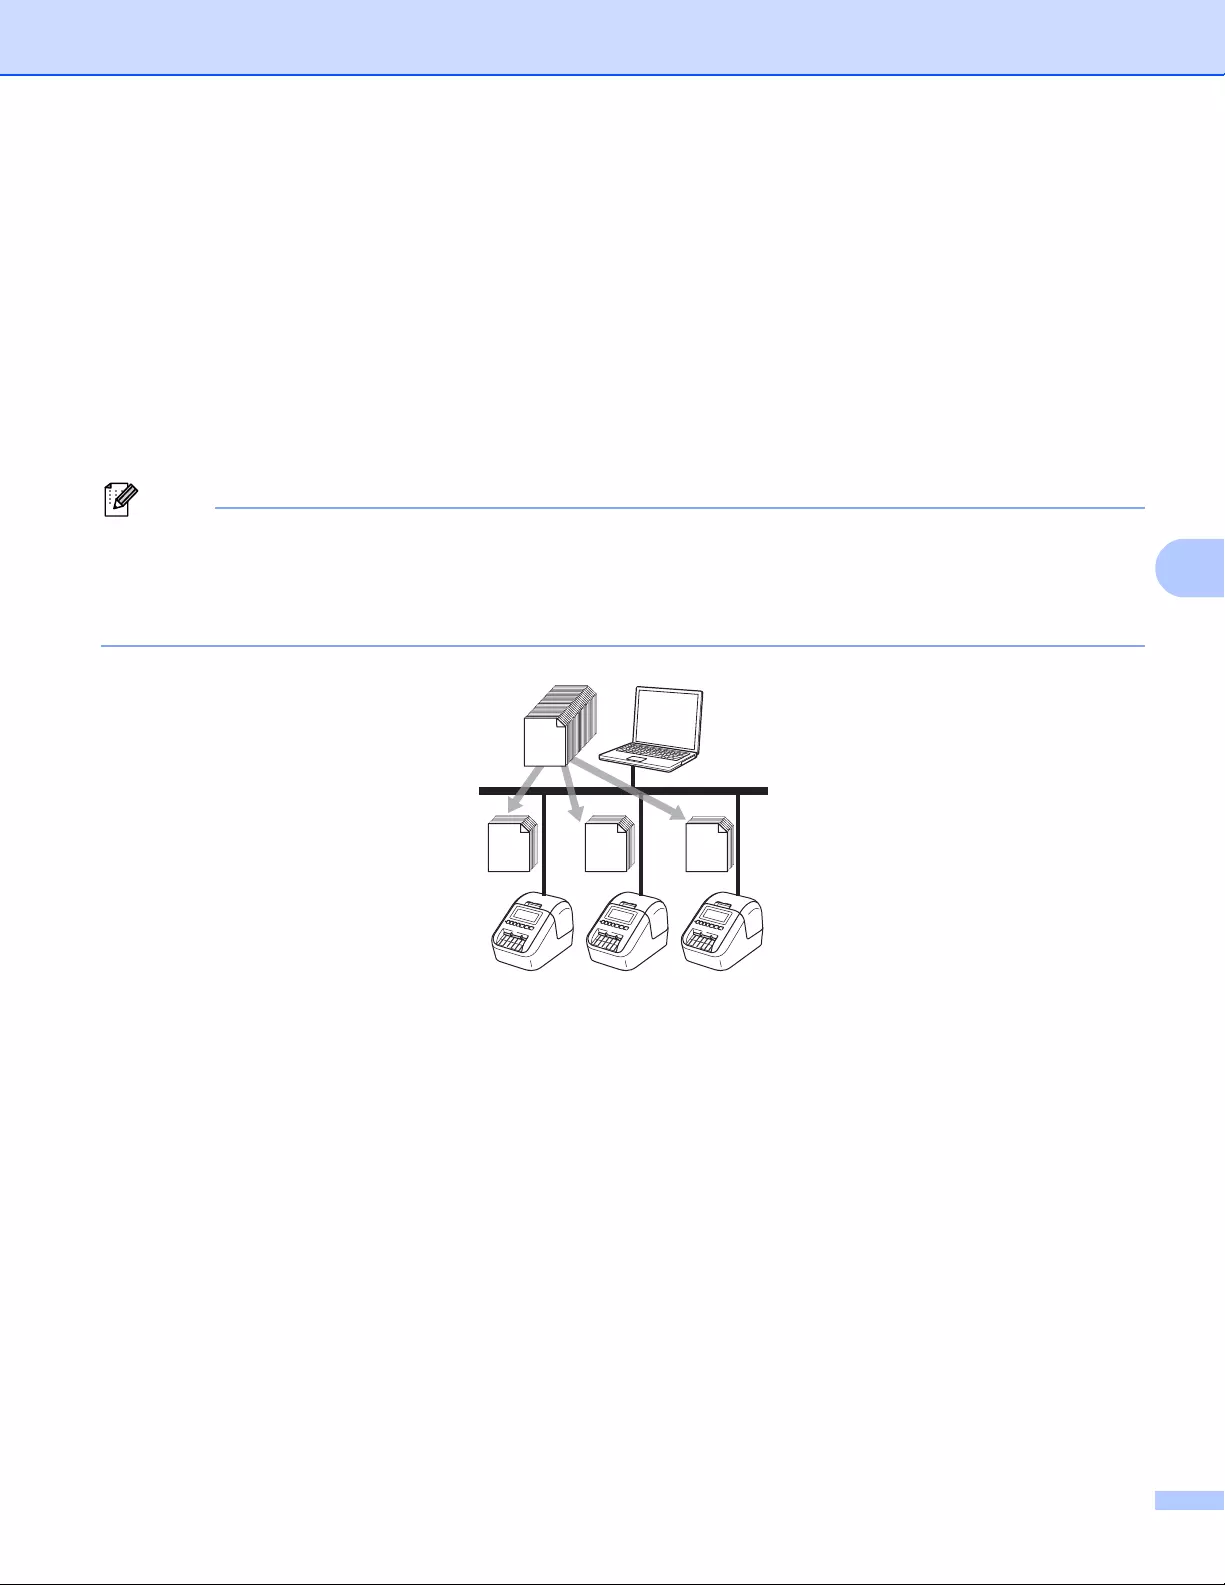
Other Functions
91
6
Remote Update 6
Remote Update is a Label Printer feature that facilitates the semi-automatic update of the printer’s settings
with a simple connection to a network folder where the update files reside. For more information about
Remote Update, see Remote Update on page 20.
Distributed Printing (Windows® only) 6
When printing a large number of labels, printing can be distributed among multiple Label Printers.
Because printing is performed at the same time, the total printing time can be reduced.
• Printing can be distributed to Label Printers connected via a USB or network connection.
• The number of pages is automatically divided among the selected Label Printers. If the specified number
of pages cannot be evenly divided among the Label Printers, it will be divided in the order of the Label
Printers listed in the dialog box when the print settings are specified in step d.
aFrom the [File] menu in P-touch Editor, click [Print].
bClick [Properties…].
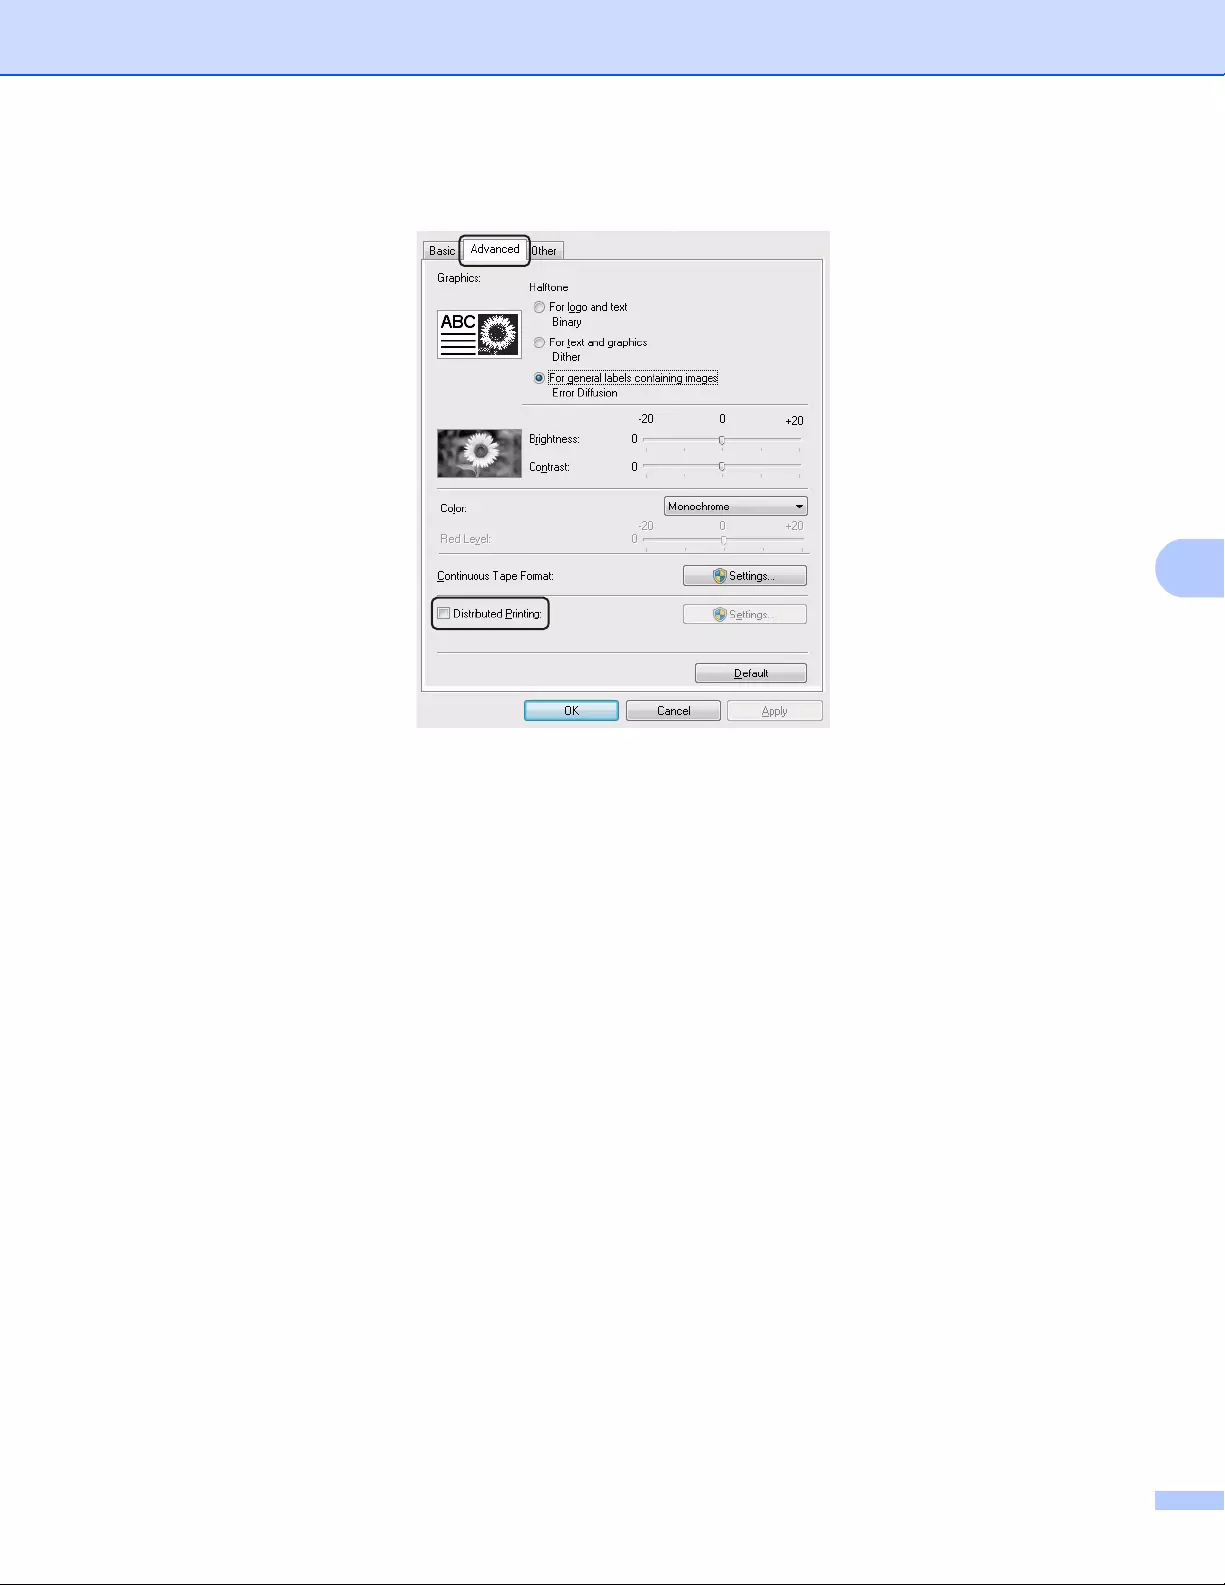
Other Functions
92
6
cClick the [Advanced] tab, select the [Distributed Printing] check box, and then click [Settings].
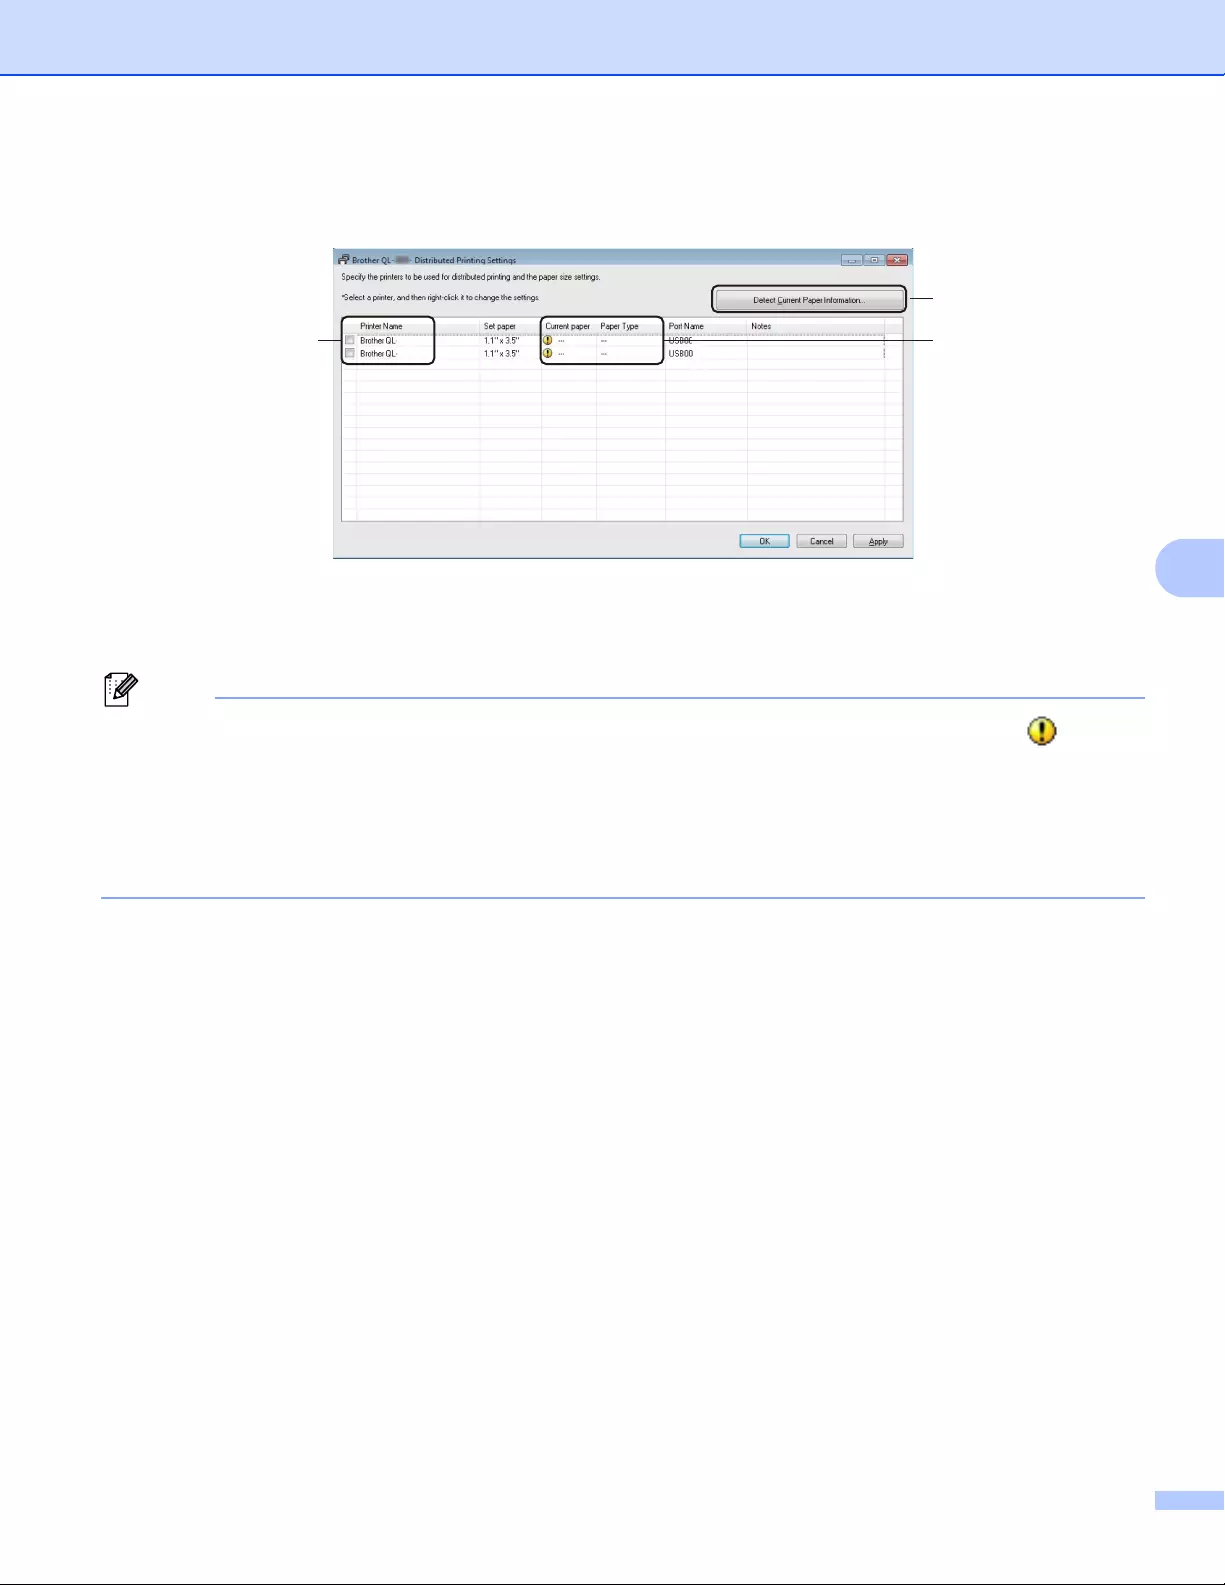
Other Functions
93
6
dIn the Distributed Printing Settings dialog box, select the Label Printers you want to use for distributed
printing.
a). Click [Detect Current Paper Information…] (1).
b). The current Label Printer information detected appears below [Current Paper] and [Paper Type] (2).
c). Select the check box next to the [Printer Name] you want (3).
• If the selected label width is different from that displayed in the [Current Paper] column, the icon
appears. Load the Label Printer with the label width specified in [Set Width].
• If multiple Label Printers are connected, you can find the Label Printer you want using its port name. The
xxxxxxxxxxxx in BRNxxxxxxxxxxxx in the port name indicates the MAC address/Ethernet address of the
Label Printer. The MAC address/Ethernet address can be checked by printing the Label Printer set-up
information. For more information, see Confirming the Label Printer Settings on page 84.
Other Functions
94
6
eSpecify the label size.
A. If only one Label Printer has been selected.
In the Distributed Printing Settings dialog box from step d, select the Label Printer whose setting you
want to specify, and then either double-click it or right-click it, and then click [Settings]. From the [Set
Width] drop-down list, select the label size.
Information displayed in the Distributed Printing Settings dialog box from step d can be entered in the
[Notes] text box.
B. If multiple Label Printers have been selected.
In the Distributed Printing Settings dialog box from step d, select the Label Printers whose settings
you want to specify, right-click them, and then click [Settings]. From the [Set Width] drop-down list,
select the label size. The same label size setting is applied to all selected Label Printers.
The settings below [Printer Settings] and [Notes] are not available.
fClick [OK] to close the label size setting window.
gClick [OK] to close the Distributed Printing Settings window.
Setup is completed.
hClick [OK] to start distributed printing.
• It may not be possible to detect information for a Label Printer connected using a USB hub or print server.
Before printing, enter the settings manually, and check if the Label Printer can be used for printing.
• Depending on whether a router is used and the security features in use, such as a firewall, it may not be
possible to use this function.
• We recommend performing a connection test for your operating environment. Contact your information
technology manager or administrator for assistance.

Section II
Application II
How to Use P-touch Editor 96
How to use P-touch Editor Lite (Windows® only) 112
How to Use P-touch Transfer Manager and P-touch Library
(Windows® only) 121
Transferring Templates with P-touch Transfer Express
(Windows® only) 138
How to Update P-touch Software 146

96
7
7
To use your Label Printer with your computer, install P-touch Editor and the printer driver.
To download the latest driver and software, visit the Brother Solutions Center at support.brother.com
[Select your region/country.] — [Downloads] — [Choose your product]
For Windows®
7
Starting P-touch Editor 7
aStart the P-touch Editor.
For Windows Vista® / Windows® 7 / Windows Server® 2008 / Windows Server® 2008 R2:
From the Start button, click [All Programs] — [Brother P-touch] — [P-touch Editor 5.1], or double-click
[P-touch Editor 5.1] shortcut icon on the desktop.
For Windows® 8/ Windows® 8.1 / Windows Server® 2012 / Windows Server® 2012 R2:
Click [P-touch Editor 5.1] on the [Apps] screen or double-click [P-touch Editor 5.1] on the desktop.
For Windows® 10:
From the Start button, click [P-touch Editor 5.1] under [Brother P-touch], or double-click [P-touch
Editor 5.1] on the desktop.
bWhen P-touch Editor starts, select whether you want to create a new layout or open an existing layout.
To change how P-touch Editor functions when it starts, click [Tools] — [Options] in the P-touch Editor menu
bar to display the Options dialog box. On the left side, select the [General] heading, and then the setting
you want in the [Operations] list box under [Startup Settings]. The factory setting is [Display New View].
How to Use P-touch Editor 7
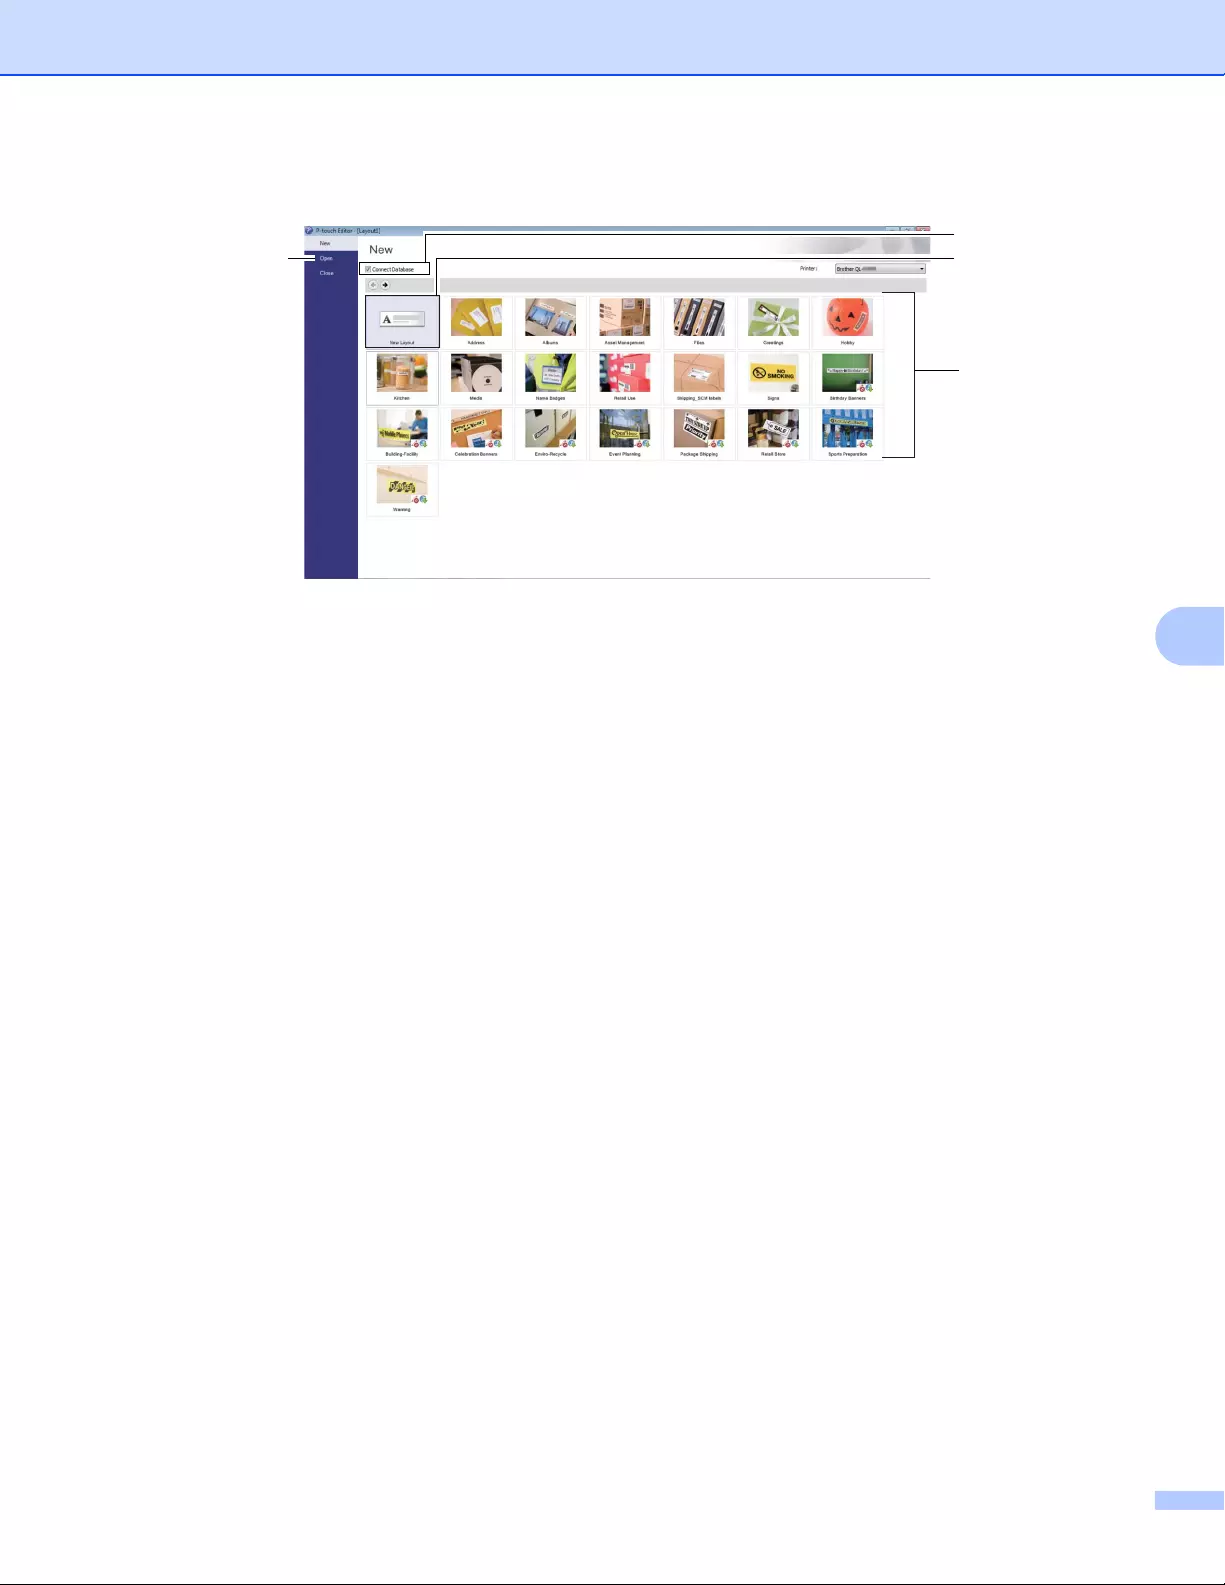
How to Use P-touch Editor
97
7
cSelect one of the displayed options:
1 To create a new layout, double-click [New Layout], or click [New Layout] and then click [→] .
2 To create a new layout using a preset layout, double-click a category button, or select a category
button and then click [→].
3 To connect a preset layout to a database, select the check box next to [Connect Database].
4 To open an existing layout, click [Open].
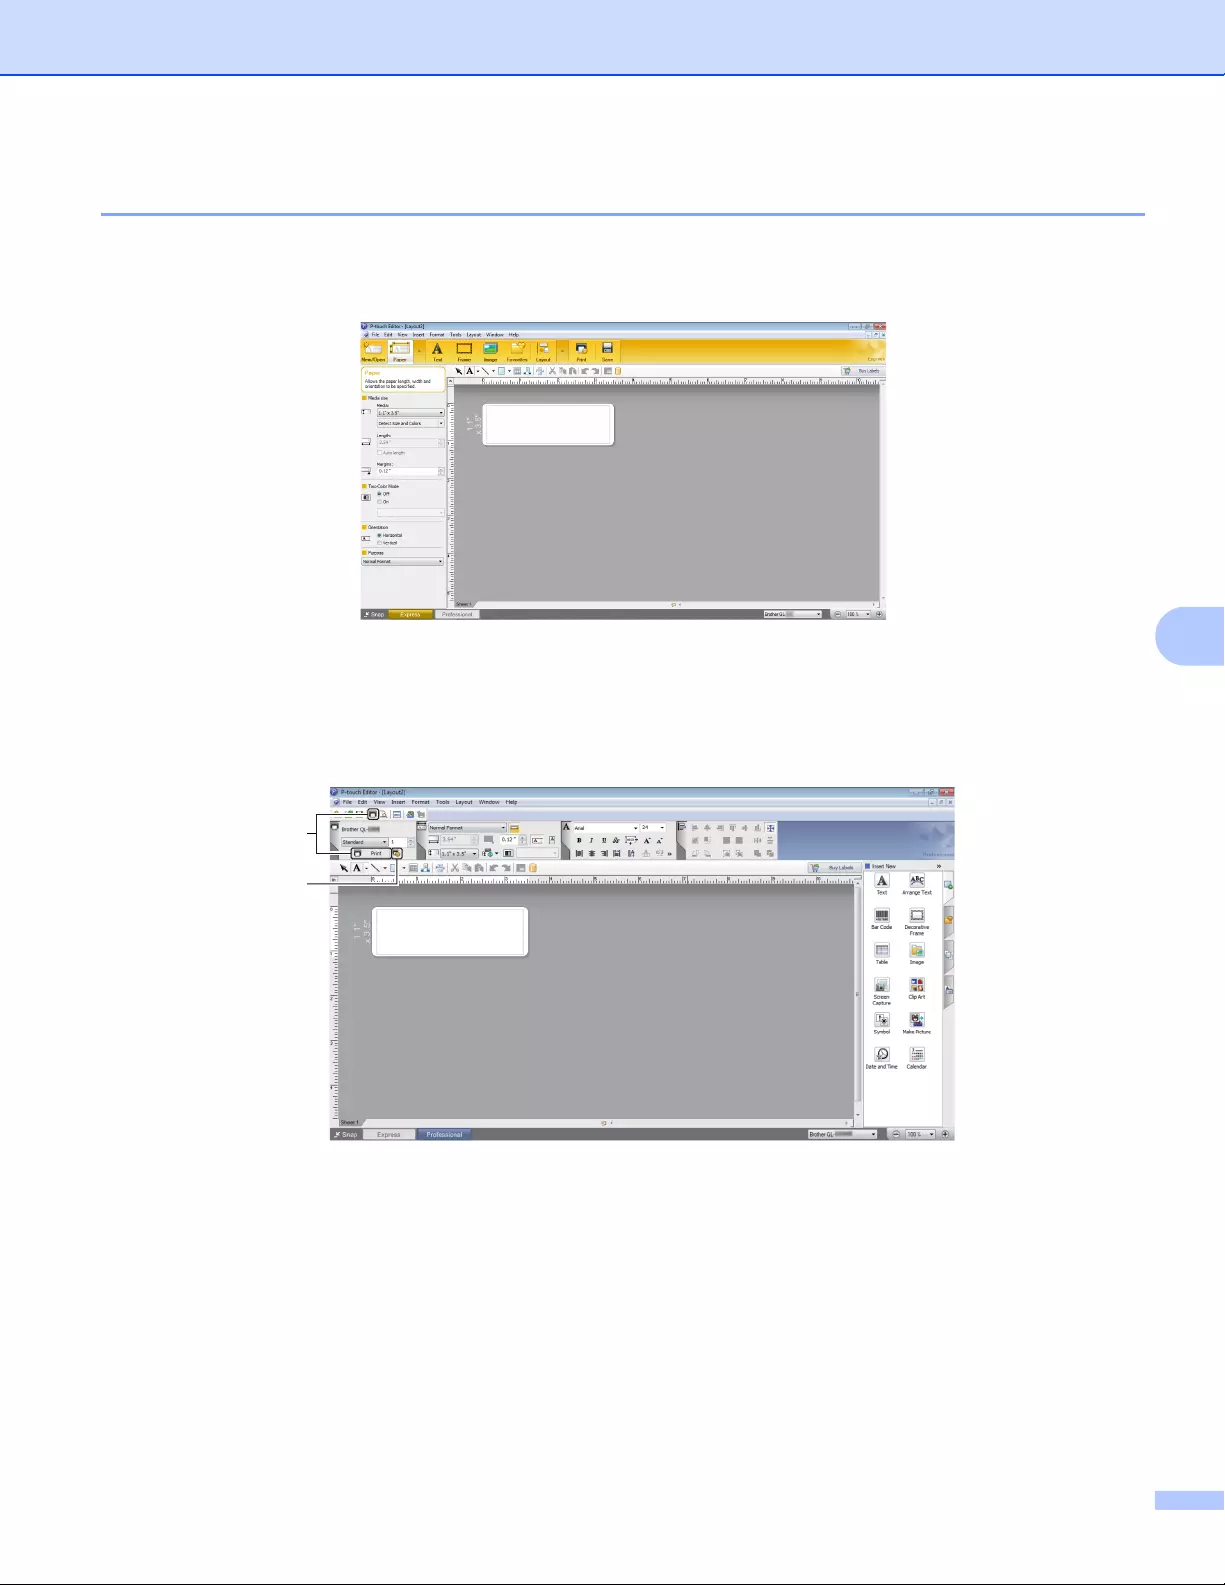
How to Use P-touch Editor
98
7
Printing with P-touch Editor 7
Express mode
This mode allows you to quickly create layouts that include text and images.
To print, click [File] — [Print] from the menu bar or click the [Print] icon. Before printing, configure the print
settings in the Print screen.
Professional mode
This mode allows you to create layouts using a wide-range of advanced tools and options.
To print, click [File] — [Print] from the menu bar or click the [Print] icon (A). Before printing, configure the
print settings in the Print screen.
In addition, you can click the [Print] icon (B) to start printing without changing the printing settings.
B
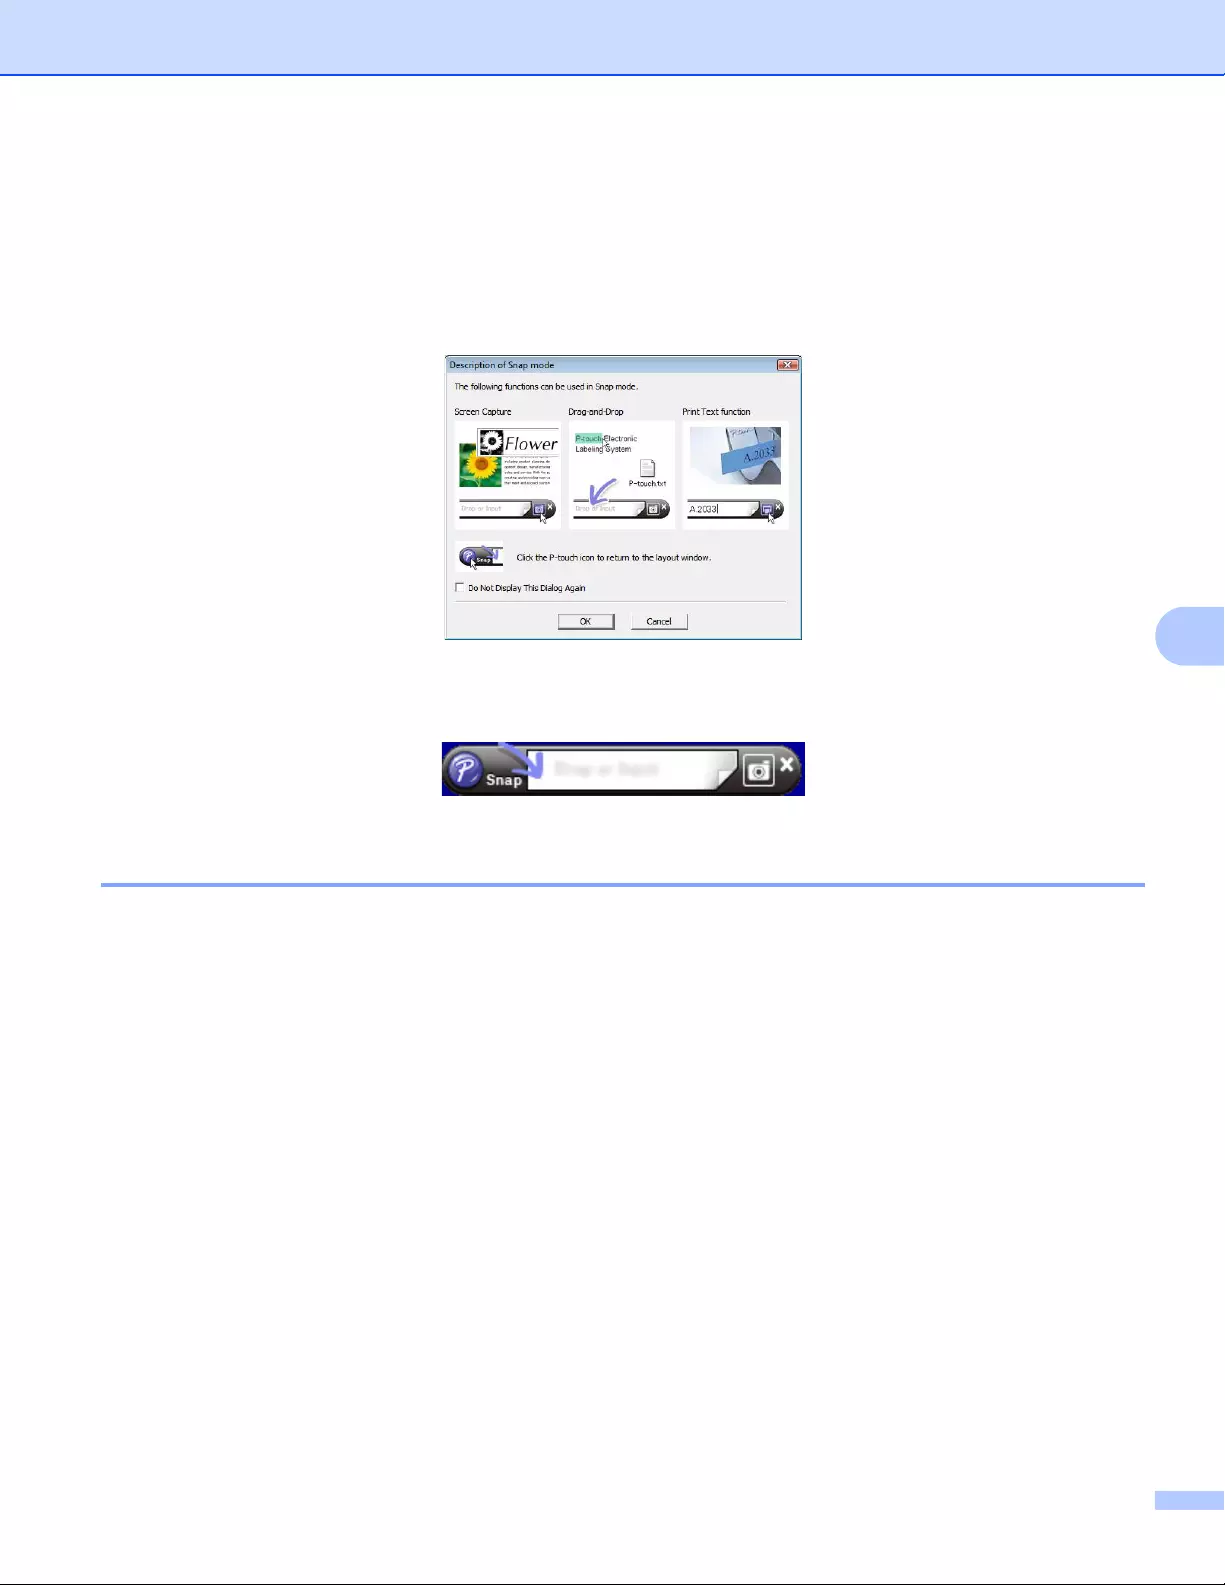
How to Use P-touch Editor
99
7
Snap mode
This mode allows you to capture all or a portion of your computer screen display, print it as an image, and
save it for future use.
aClick the [Snap] mode selection button.
The Description of Snap mode dialog box appears.
bClick [OK].
The Snap mode palette appears.
Transferring Data to the Label Printer 7
To transfer data to the Label Printer, you must use P-touch Transfer Manager. For more information, see
P-touch Transfer Manager on page 121.
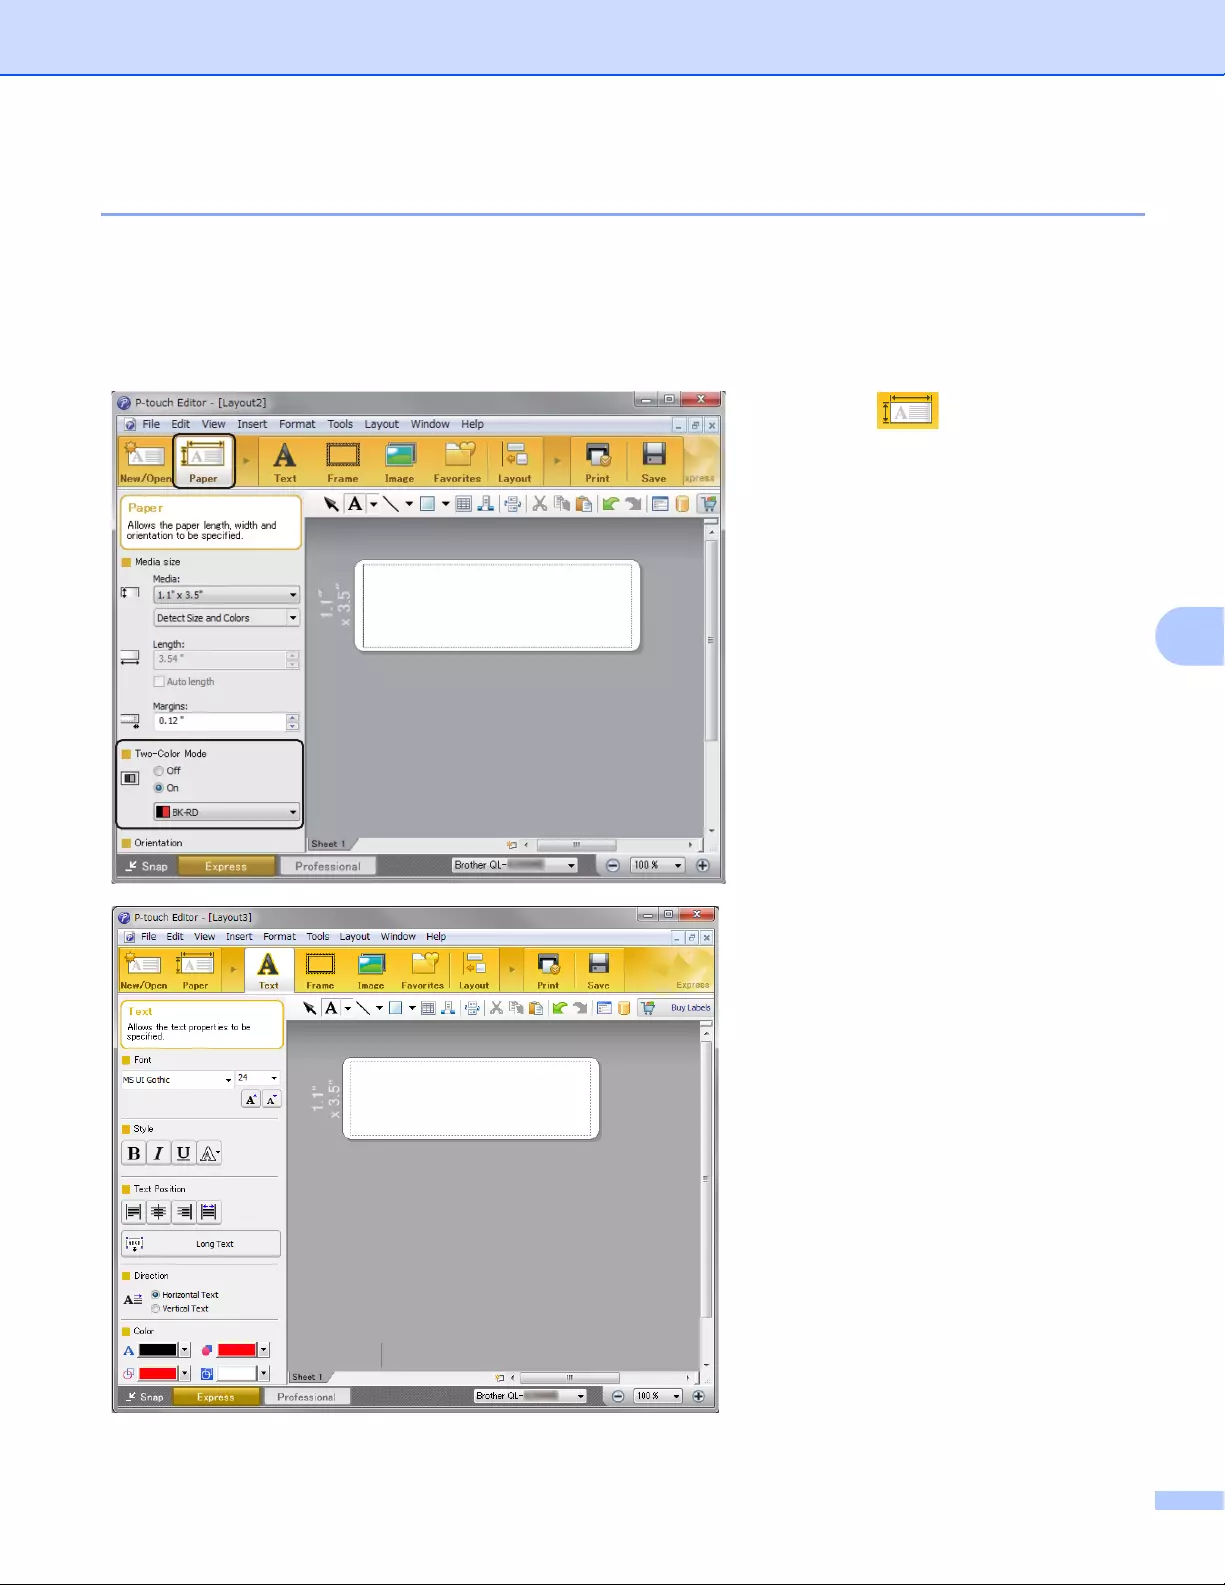
How to Use P-touch Editor
100
7
2-color Printing Configuration 7
The Label Printer is capable of 2-color printing.
Configuring using P-touch Editor
Express mode 7
aSelect [Paper] then the
Two-Color Mode appears.
bSelect [On] for [Two-Color
Mode].
cSelect [Text] to edit the color of
the text.
dSelect [Frame] to edit the color of
the frame.
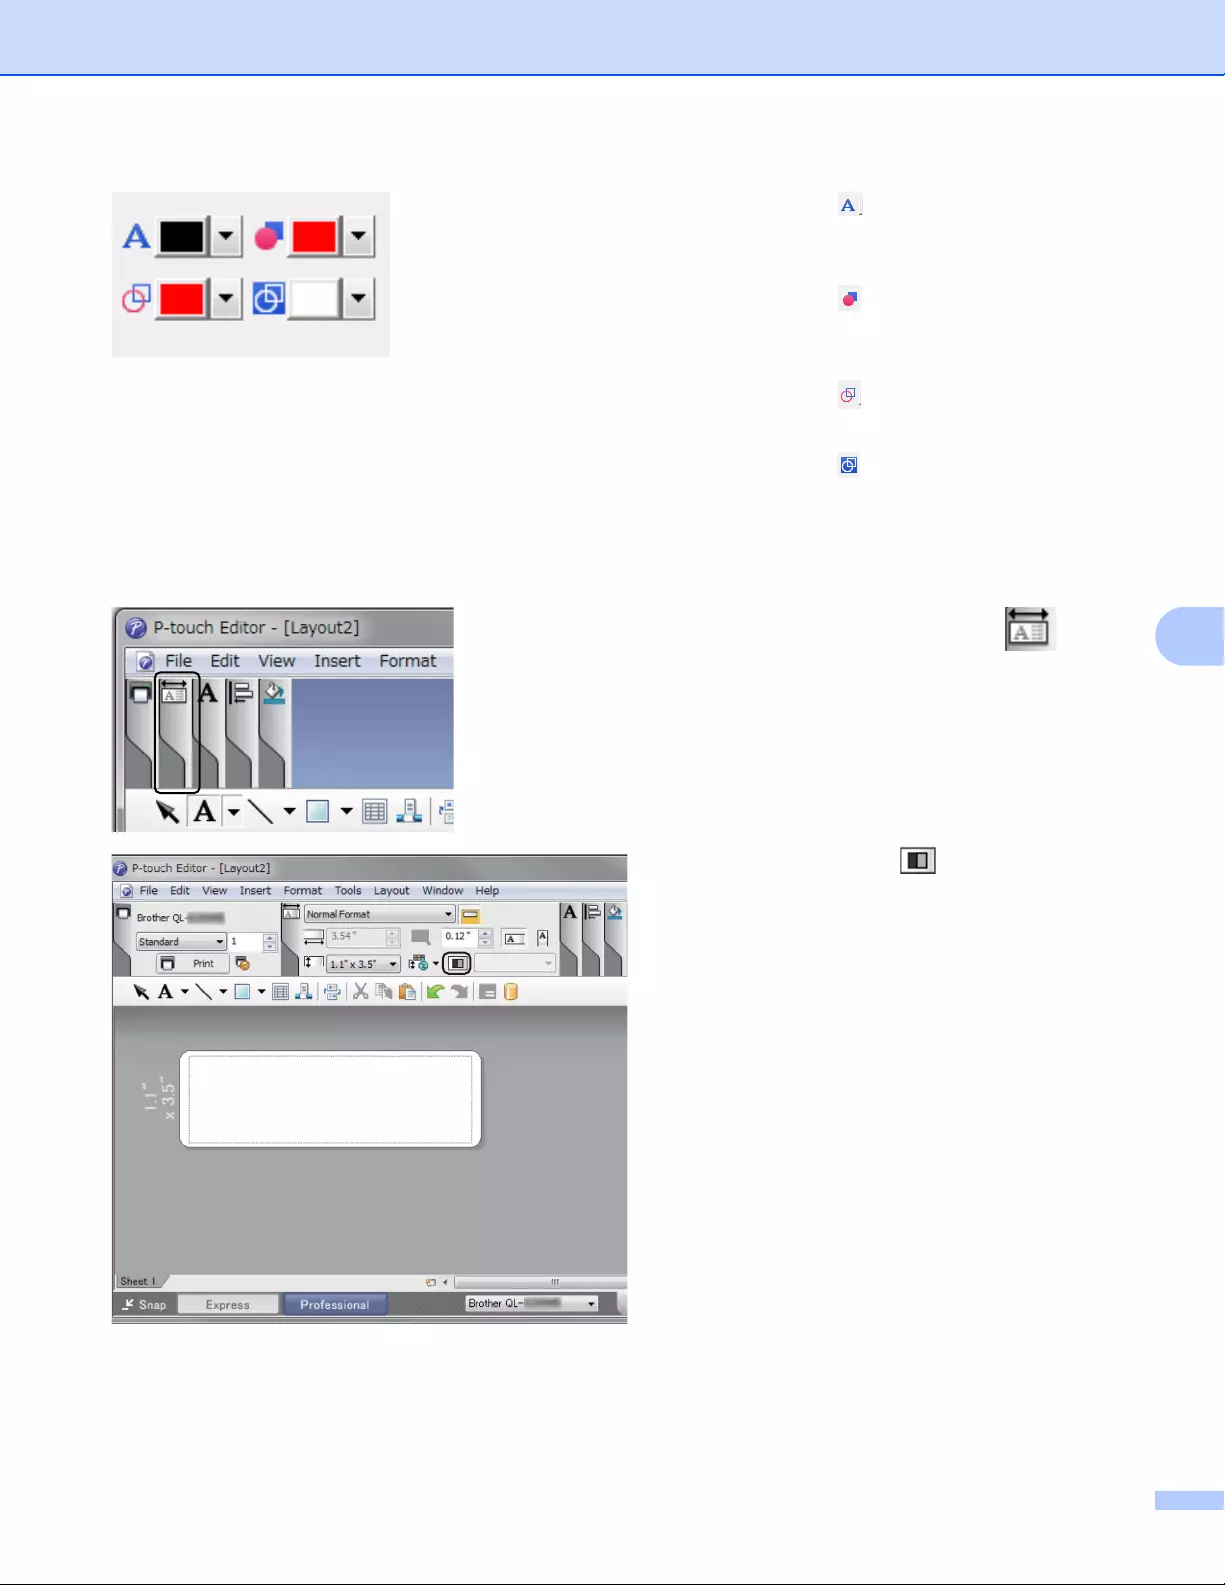
How to Use P-touch Editor
101
7
Professional mode 7
•Use [Sets Text Color for
Selected Text] to edit the color of
the text.
•Use [Changes the fill color] to
edit the color to fill an enclosed area
with.
•Use [Changes the color of the
line] to edit the color of the line.
•Use [Changes the background
color of the object] to edit the
background color of the object.
aClick the illustration , then
the detailed item will appear.
bClick the icon, then [Two-
color media was selected.
Switching to «Print Color
Display»] appears. Click [OK].
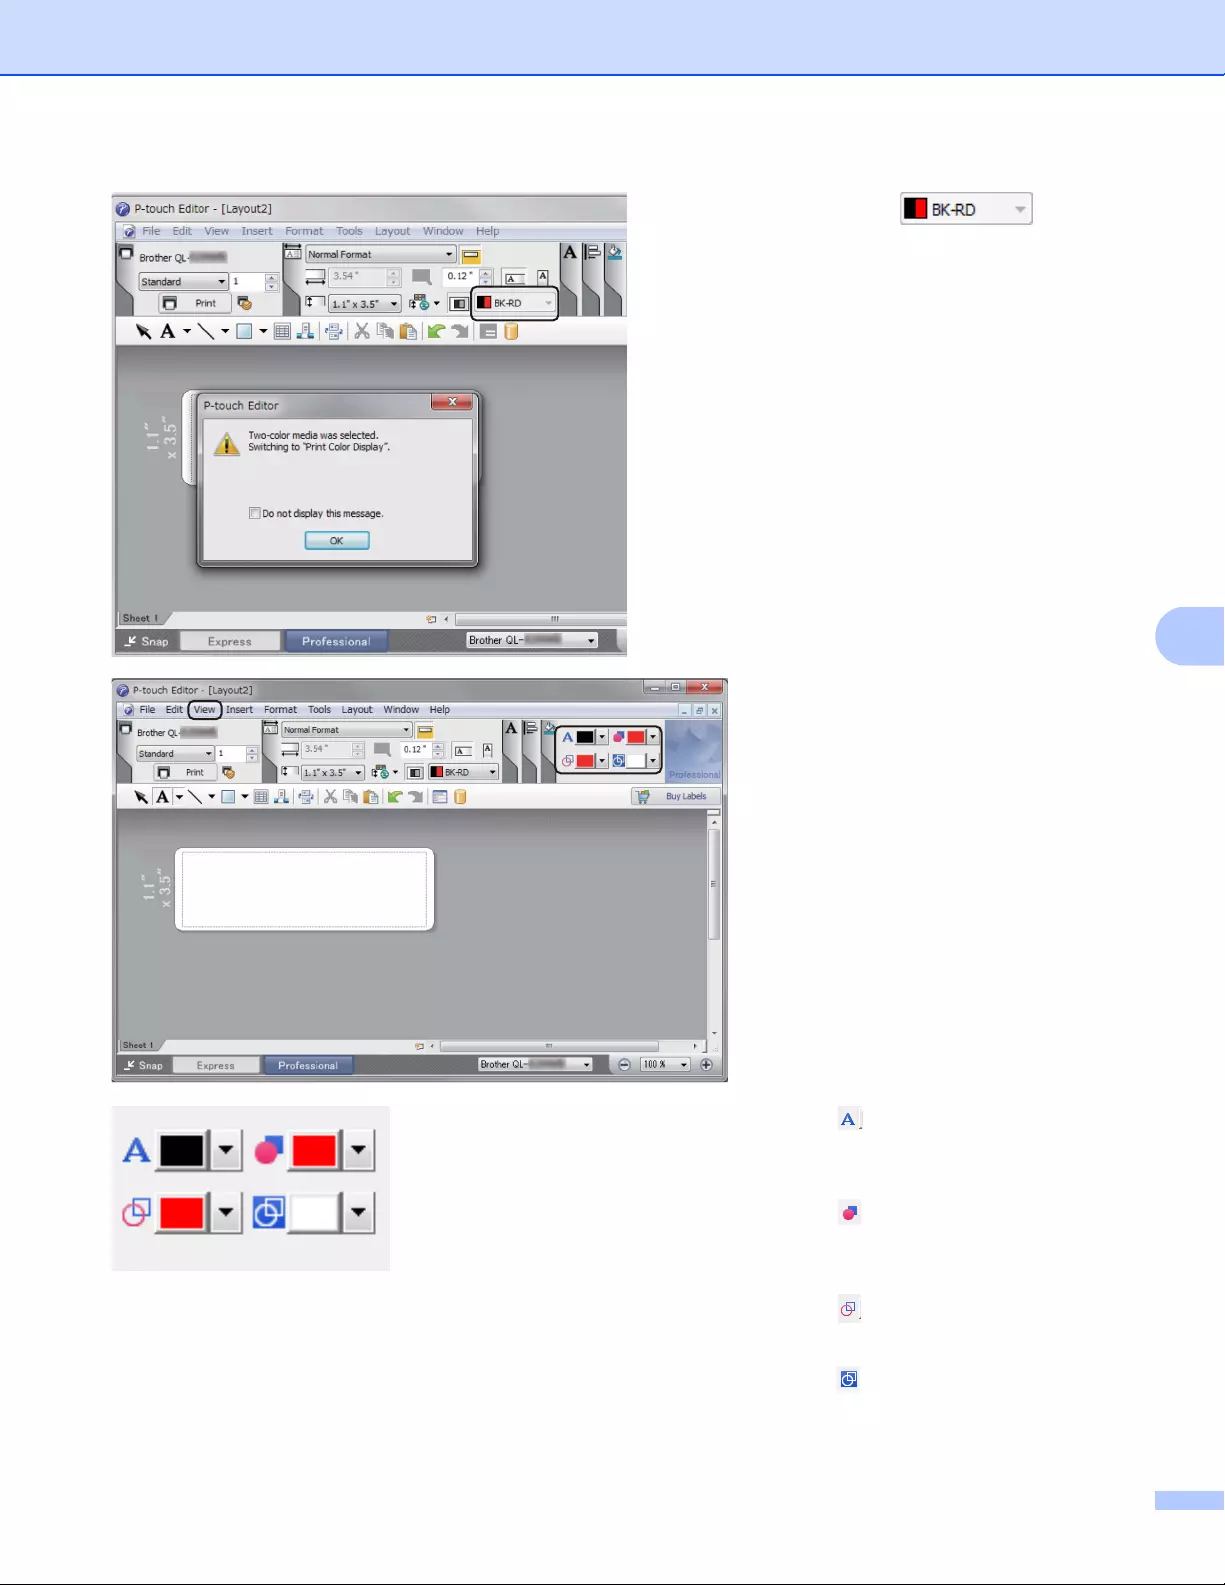
How to Use P-touch Editor
102
7
cClick the drop-
down list on the left, and select
[BK-RD].
dClick [View], then select
[Property Palette], and click
[Color]. The Color Editing Tool
appears.
•Use [Sets Text Color for
Selected Text] to edit the color of
the text.
•Use [Changes the fill color] to
edit the color to fill an enclosed area
with.
•Use [Changes the color of the
line] to edit the color of the line.
•Use [Changes the background
color of the object] to edit the
background color of the object.

How to Use P-touch Editor
103
7
• The brightness, contrast and threshold (range of red) can be adjusted through the driver Settings.
• The Black/Red Print density can be adjusted through the Printer Setting Tool.
• You cannot select High Resolution mode when using 2-color printing.

How to Use P-touch Editor
104
7
For Mac 7
Starting P-touch Editor 7
To start P-touch Editor, double-click [P-touch Editor] icon on the desktop.
• The following method can also be used to start the P-touch Editor:
Double-click [Macintosh HD] — [Applications] — [P-touch Editor 5.1], and then double-click the [P-touch
Editor] application icon.
• When using a Mac, you cannot transfer label data created using P-touch Editor to the Label Printer.
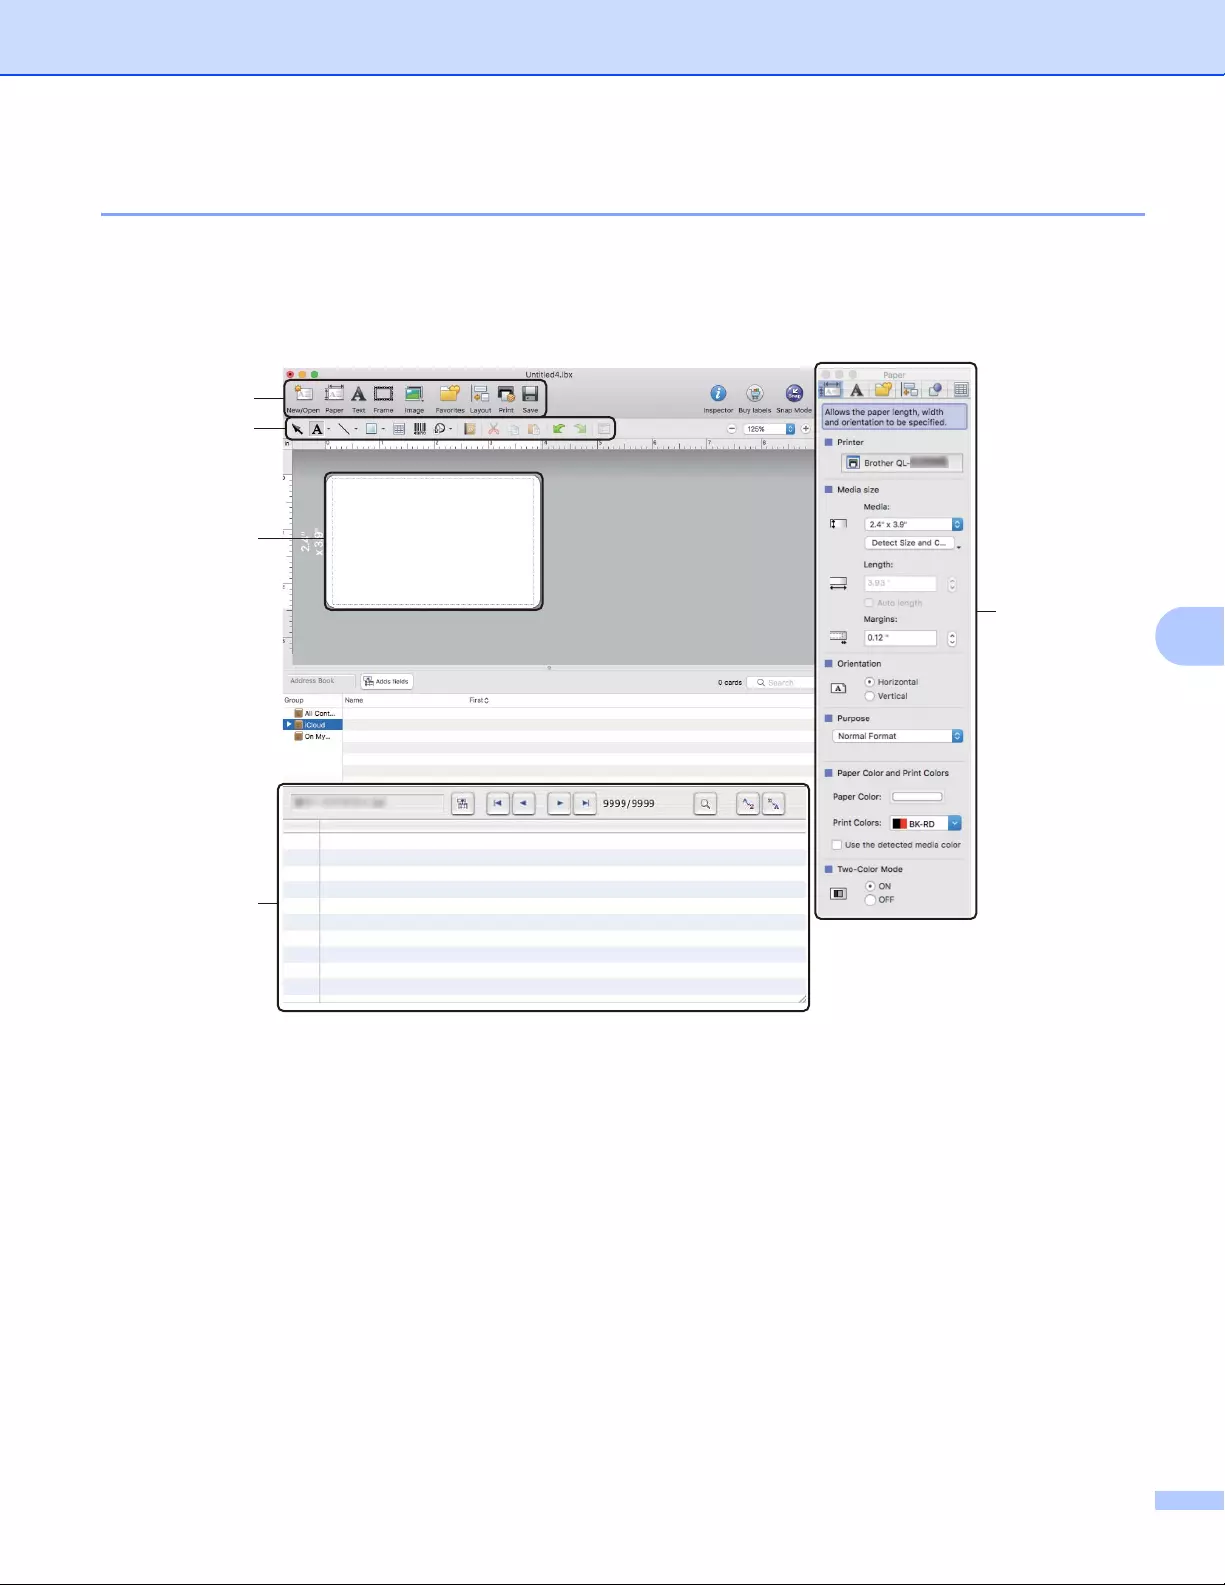
How to Use P-touch Editor
105
7
Operation modes 7
Standard Mode
This mode allows you to create labels with text and images.
The Layout Window consists of the following sections:
1 Command Bar
2 Draw/Edit Toolbar
3 Inspector
4 Layout Window
5 Database Window
1
2
4
5
3
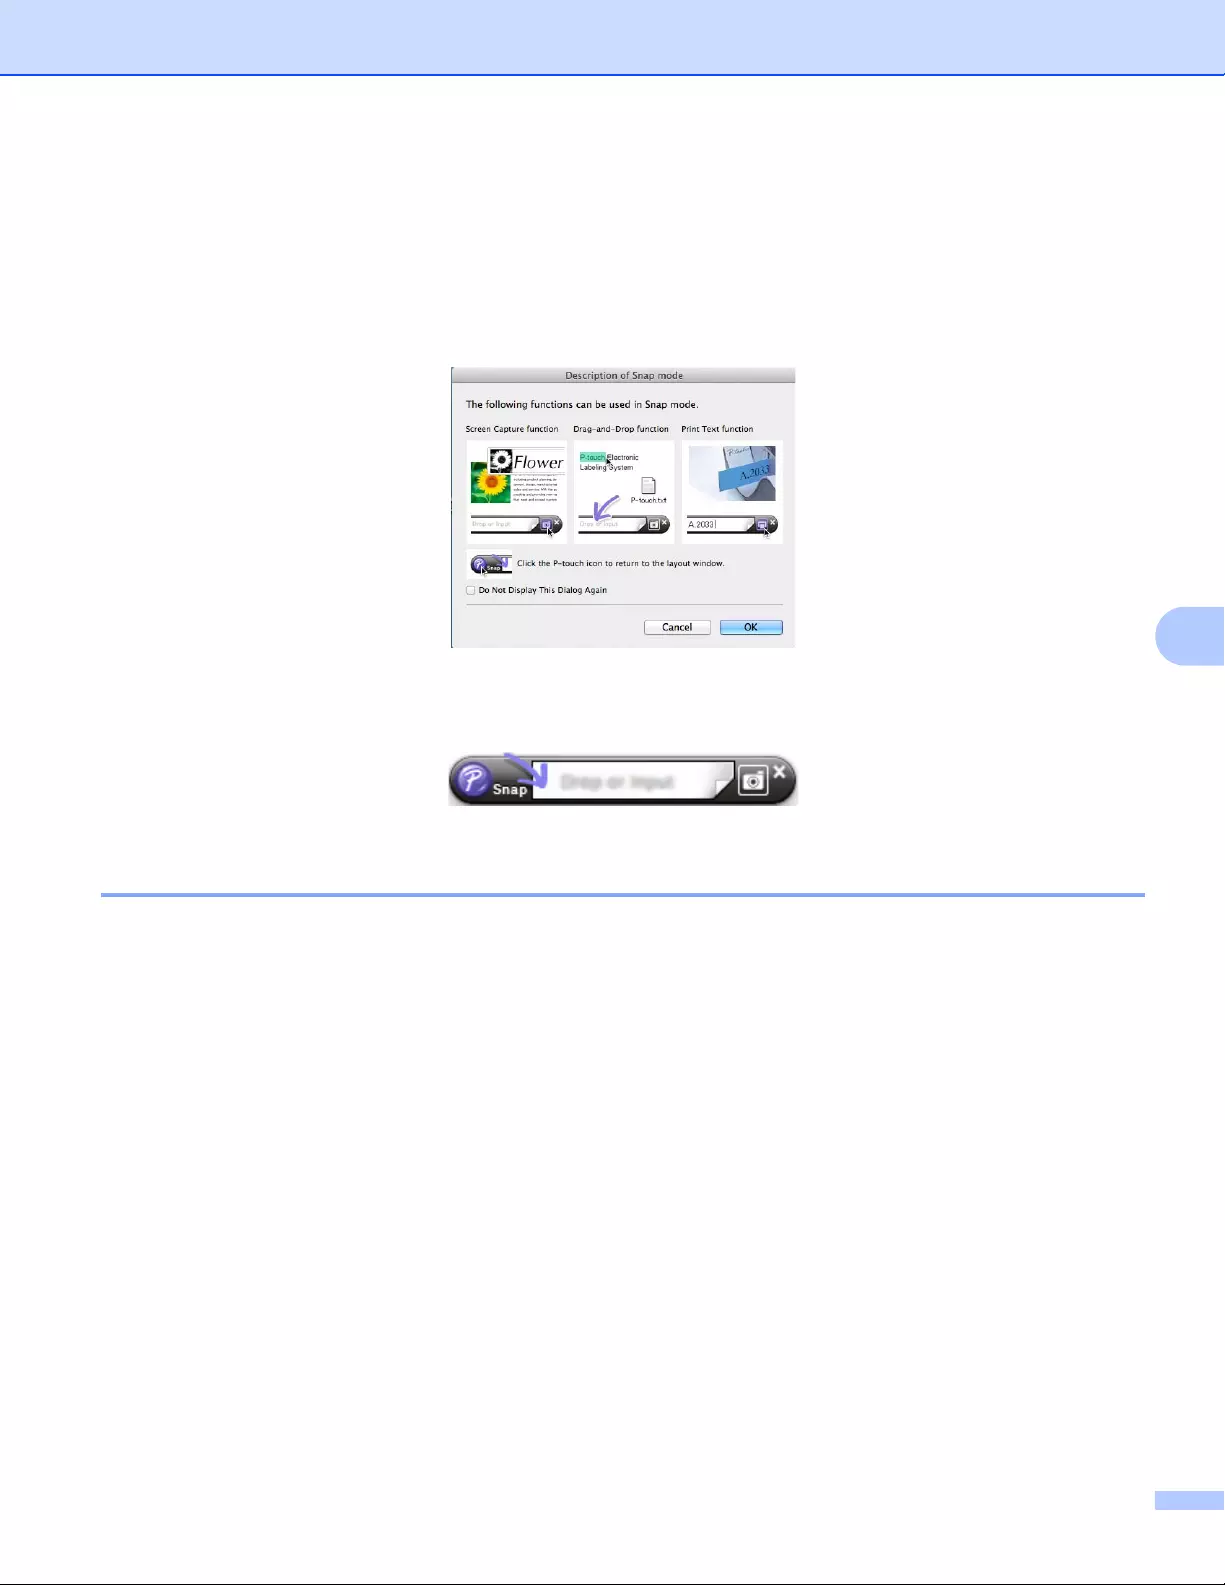
How to Use P-touch Editor
106
7
Snap mode
This mode allows you to capture the screen, print it as an image, and save it for future use.
To start the Snap mode, follow the steps below:
aClick the [Snap] mode selection button.
The Description of Snap mode dialog box appears.
bClick [OK].
The Snap mode palette appears.
Transferring Data to the Label Printer 7
To transfer data to the Label Printer, you must use a Windows® computer. For more information, see P-touch
Transfer Manager on page 121.
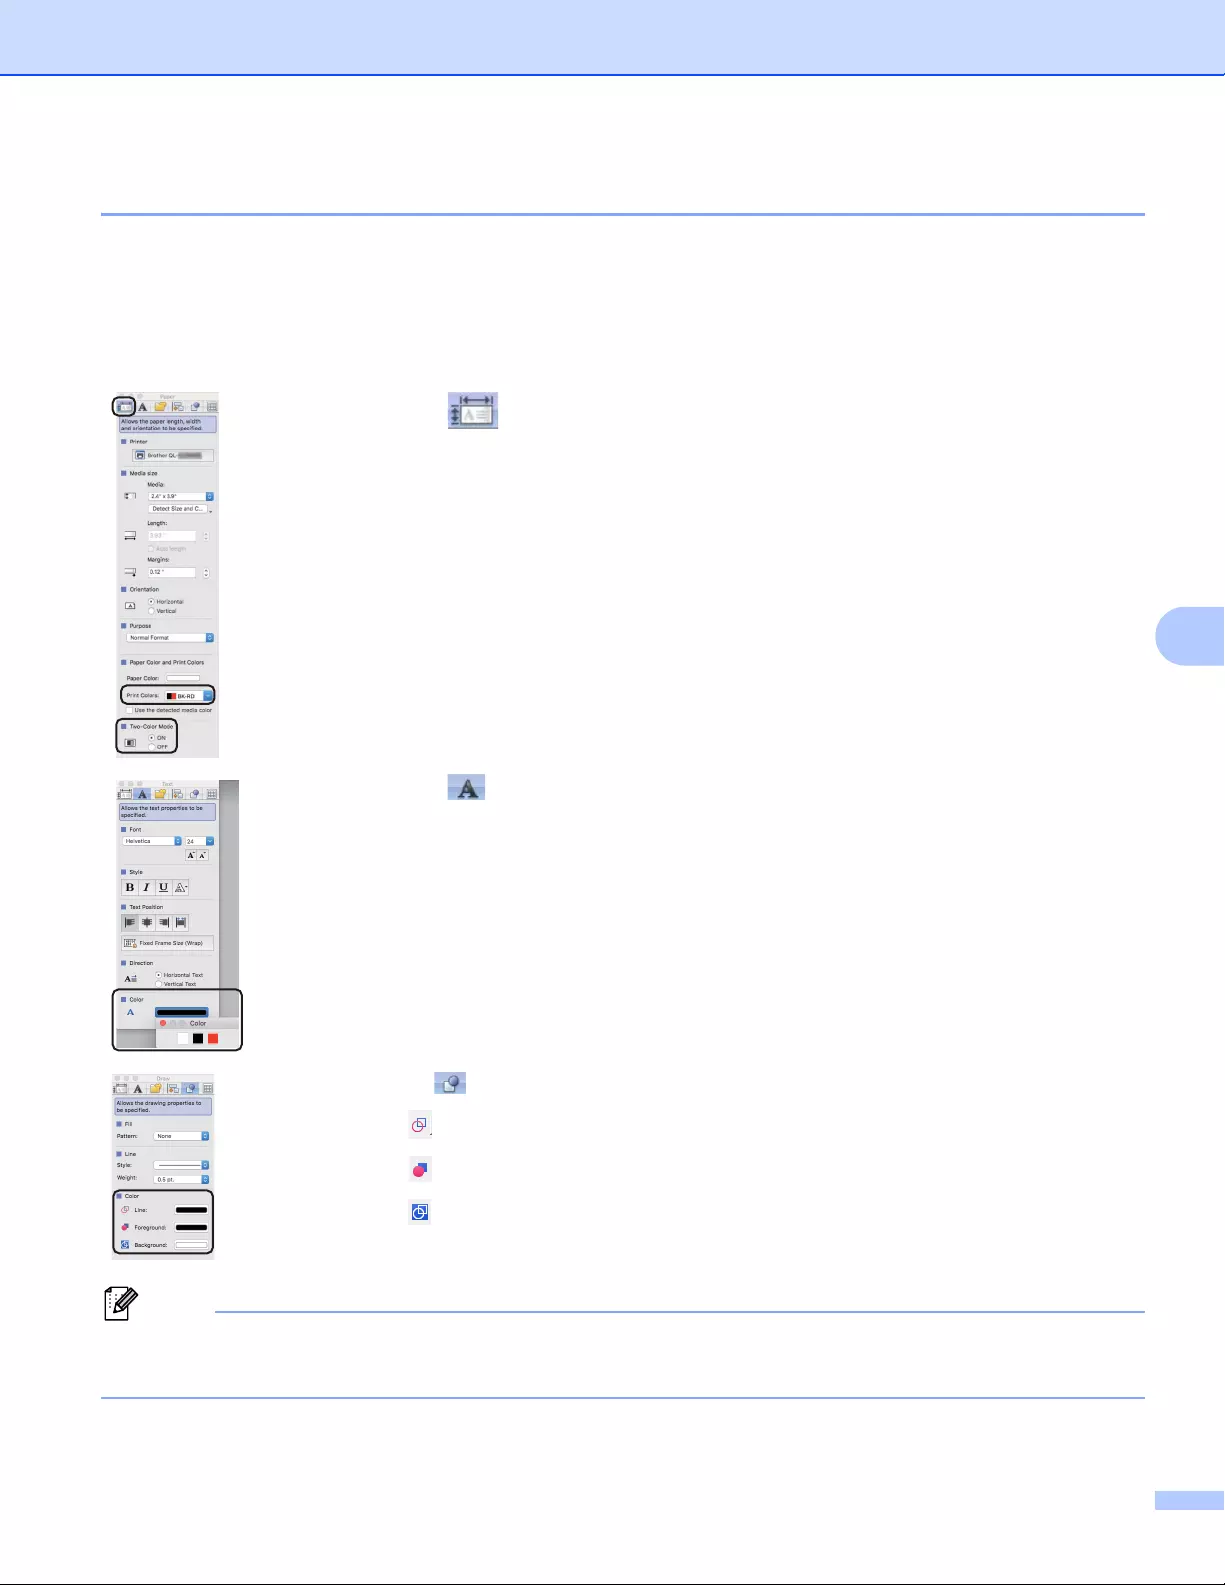
How to Use P-touch Editor
107
7
2-color Printing Configuration 7
The Label Printer is capable of 2-color printing.
Configuring using P-touch Editor
Standard mode 7
• The brightness, contrast and threshold (range of red) can be adjusted through the driver setting.
• The Black/Red Print density can be adjusted through the Printer Setting Tool.
aSelect [Paper], then the Two-Color Mode appears.
bSelect [BK-RD] for [Print Colors] and [ON] for [Two-Color Mode].
cSelect [Text] to edit the text.
dSelect [Color] to edit the color of the text.
eClick , then the edit tools below appear.
•Use [Changes the color of the line] to edit the color of the line.
•Use [Changes the fill color] to edit the color to fill an enclosed area with.
•Use [Changes the background color of the object] to edit the background
color of the object.
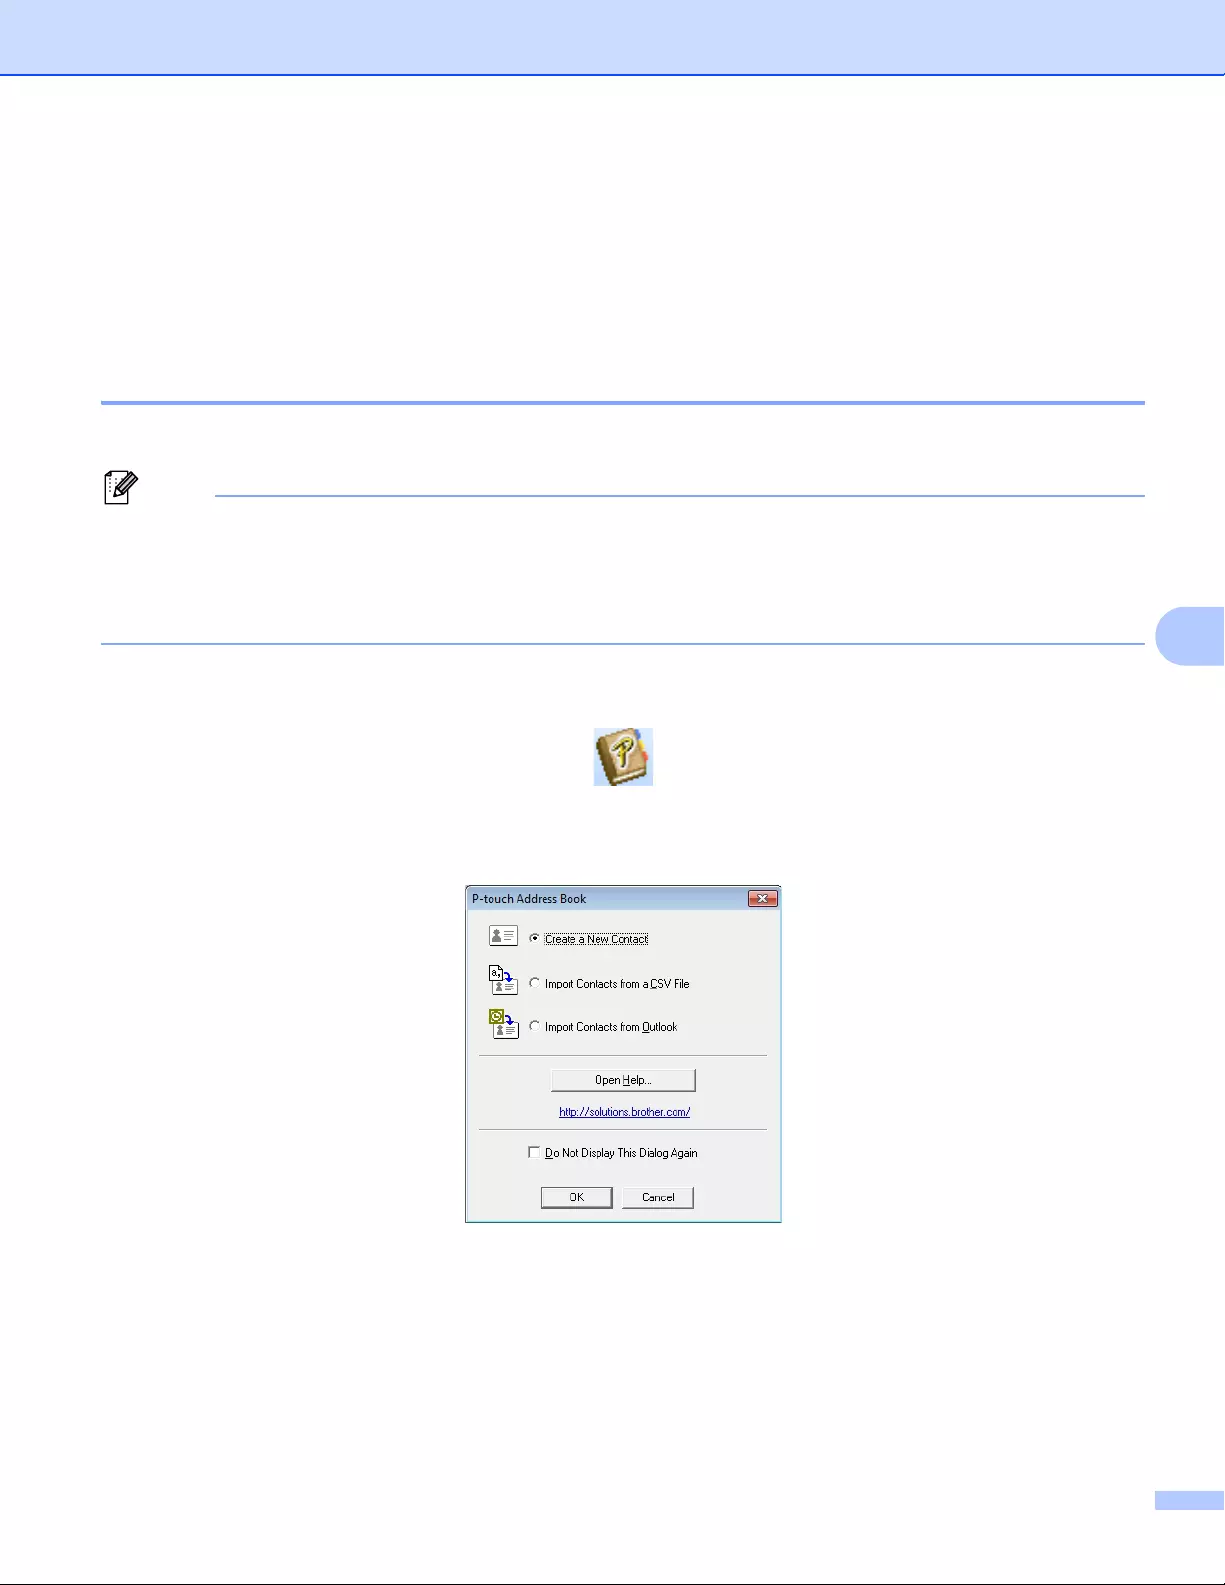
How to Use P-touch Editor
108
7
How to use the P-touch Address Book (Windows® only) 7
This section describes how to efficiently create labels from contacts using the P-touch Address Book. The
screens may differ depending on your operating system.
(P-touch Address Book is not supported in some languages.)
Starting the P-touch Address Book 7
aClick [Start] — [All Programs] — [Brother P-touch] — [P-touch Address Book 1.2].
You can also start the P-touch Address Book using the following methods (only if you created the shortcut
during installation):
• Double-click the Shortcut icon on the desktop.
• Click the Shortcut icon on the Quick Launch bar.
When the P-touch Address Book is launched, the Startup dialog box appears, which allows you to create
new contacts, import CSV format data, or Outlook contacts.
bIn the Startup dialog box, specify the P-touch Address Book operation you want to perform and click the
[OK] button.
When [Create a New Contact] is selected, the Layout Window appears.
When [Import Contacts from a CSV File] or [Import Contacts from Outlook] is selected, you can
import contacts in other formats.
Click the [Open Help…] button to open the P-touch Address Book Help files.
The P-touch Address Book Help offers detailed information on available features and explains how
to use the P-touch Address Book.
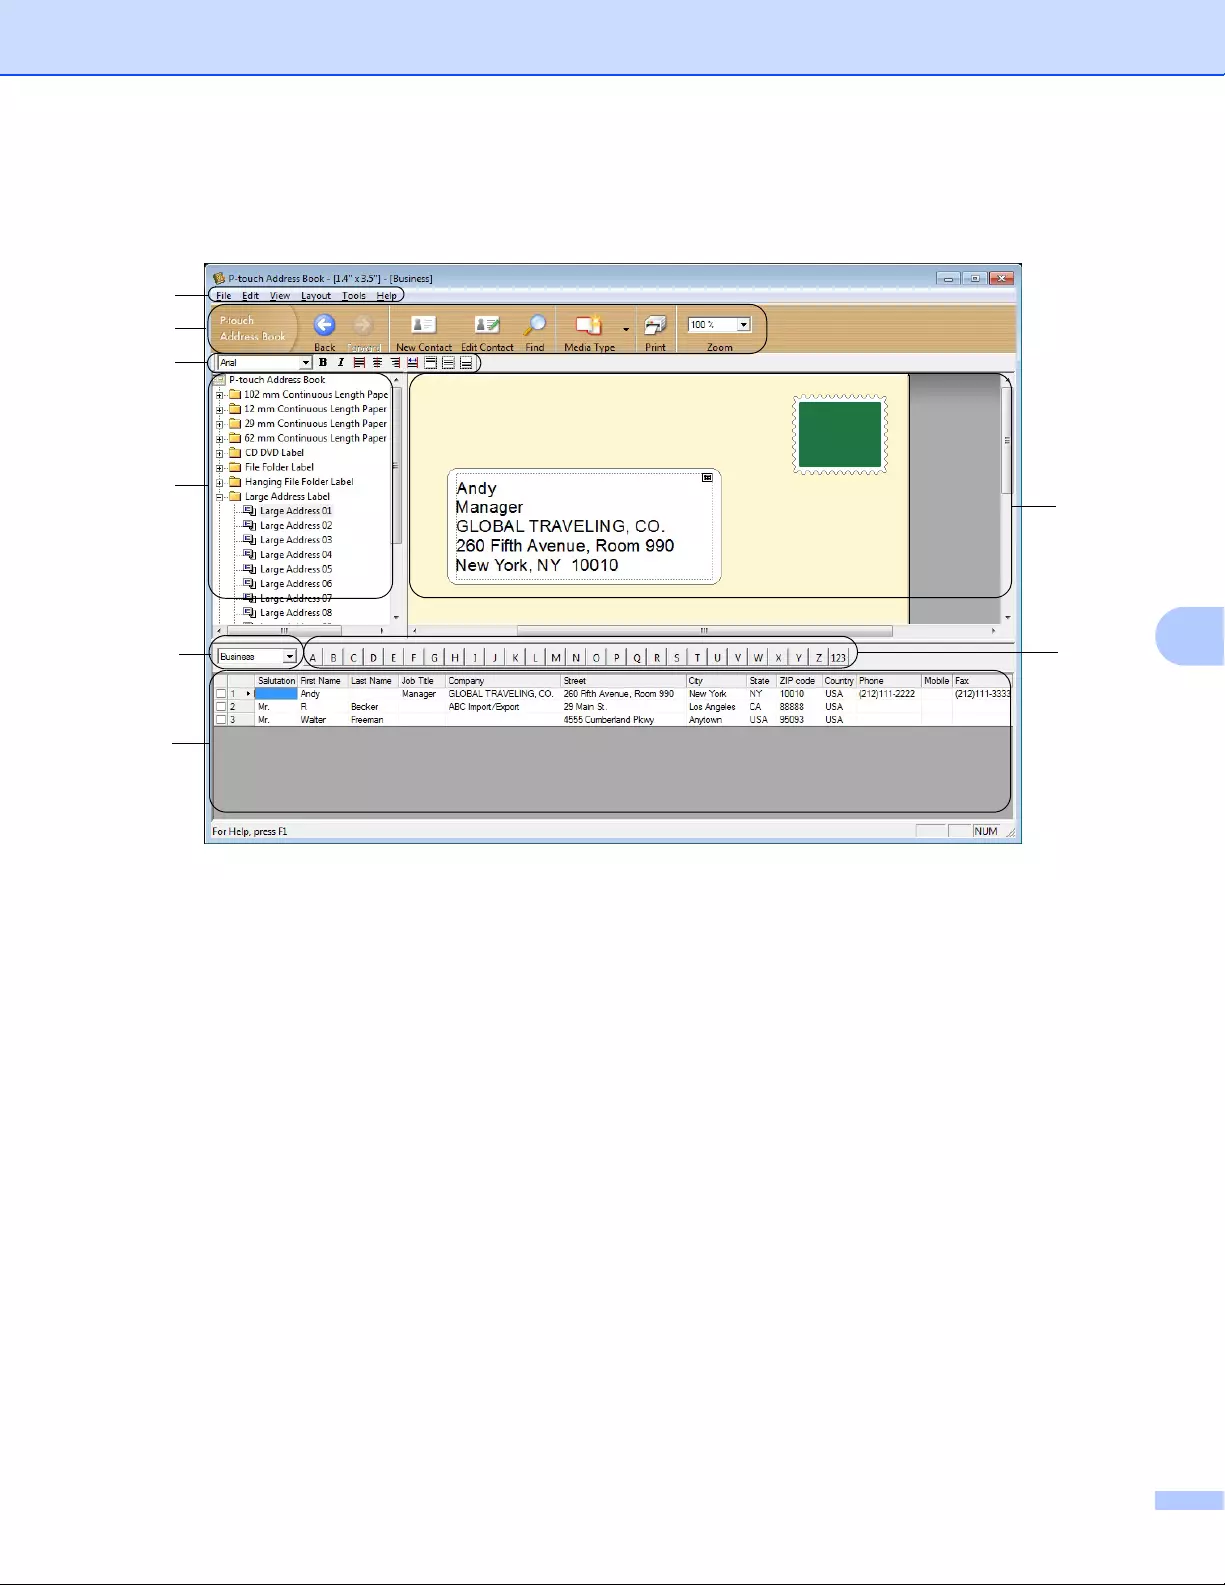
How to Use P-touch Editor
109
7
Layout Window
The Layout Window consists of the following eight sections:
1 Menu Bar
Commands are categorized under each menu (File, Edit, View, Layout and Tools) according to their
functions.
2 Standard Toolbar
Provides a group of frequently used commands (such as New Contact, Edit Contact, Find or Print).
3 Text Toolbar
Used to adjust text attributes such as font size and alignment for text formatting.
4 Layout Style Selection View
Displays layout styles stored in the folder.
5 Layout Work Area
Used to display or edit a layout that uses the layout style in the Layout Style Selection view.
6 Contact List Combo Box
Displays the contact list that is currently specified. You can choose from [Personal], [Business],
[Other1], [Other2] and [Other3].
7 Index Tab
You can search within the field in Record View. Click [Tools] — [Sort] to open the Sort dialog box, and
specify the field you want using [Key1].
8 Record View
Displays the contact data in each field. The data can also be edited (added, deleted or modified).
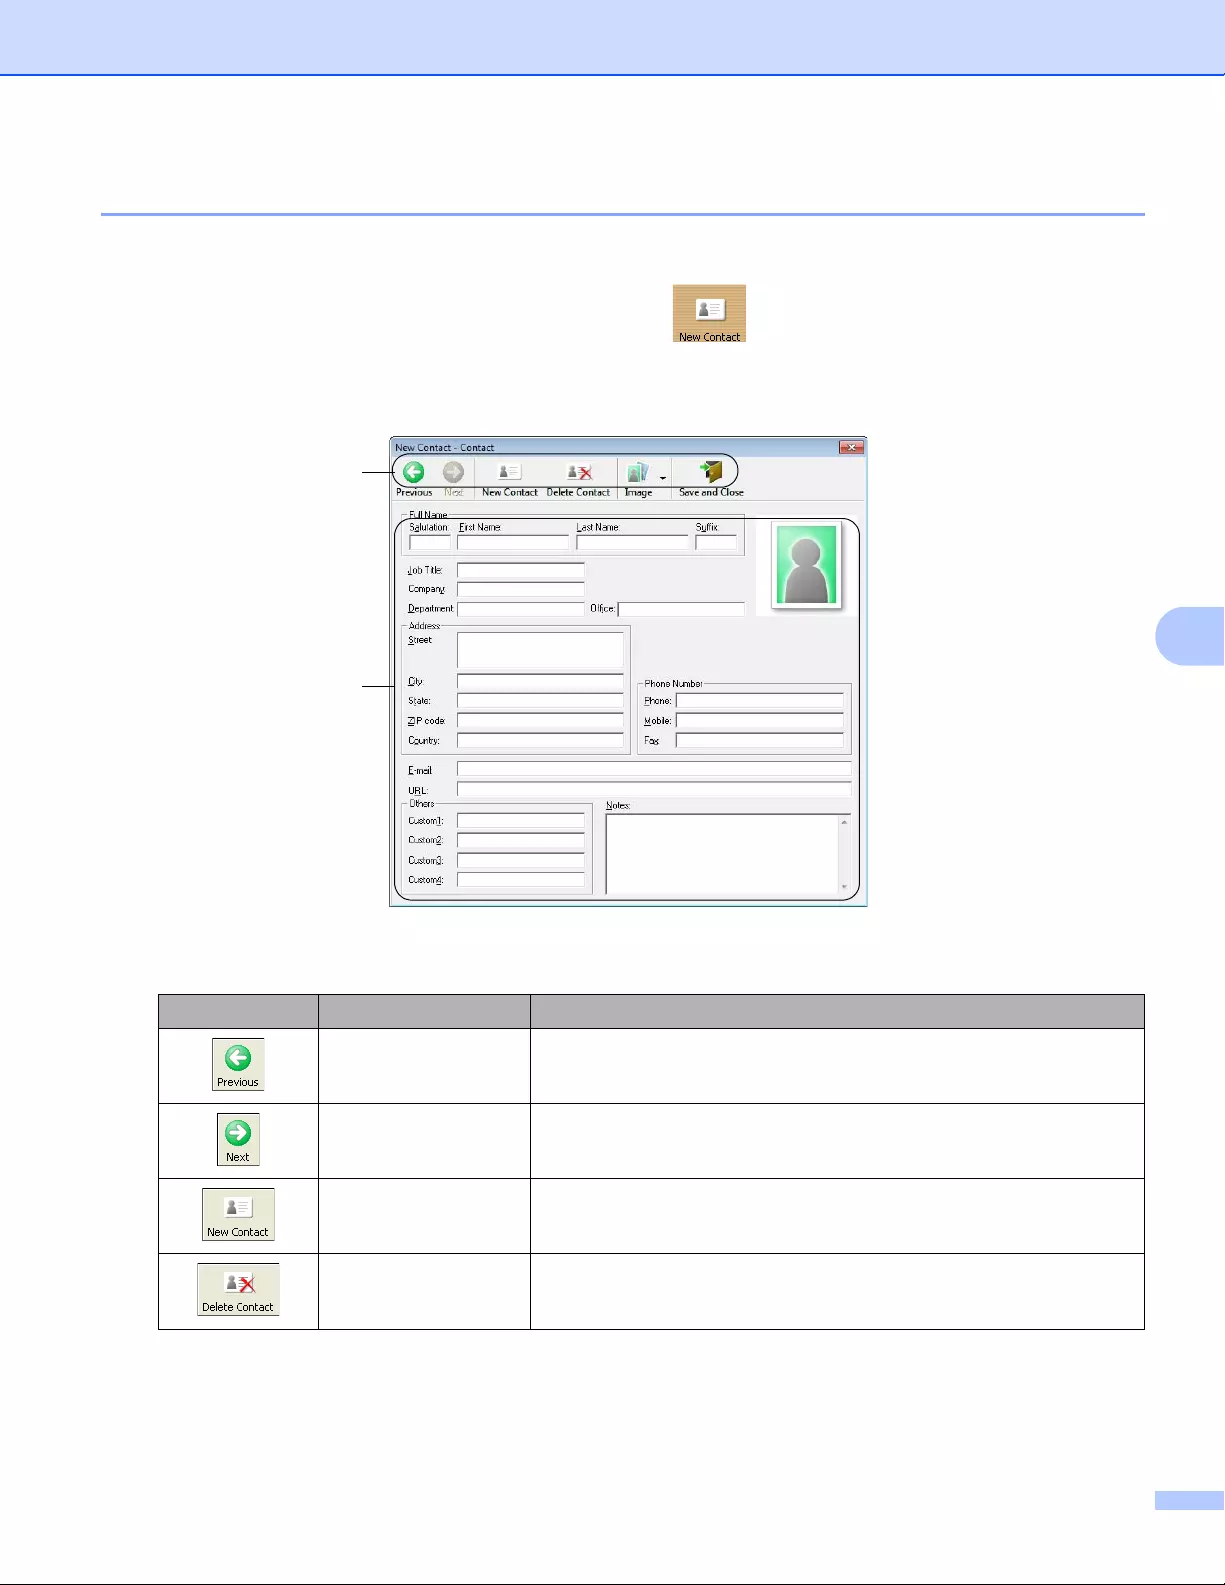
How to Use P-touch Editor
110
7
Creating a new contact 7
This section explains how to create a new contact.
aClick [File] — [New Contact], or click the New Contact button.
The New Contact dialog box appears.
bEnter the new contact information.
1 New Contact Form Toolbar
The following commands are categorized in the menu:
Icon Button name Function
Previous Displays the previous contact.
Next Displays the next contact.
New Contact Displays the form window for a new contact.
Delete Contact Deletes the contact that is currently selected.
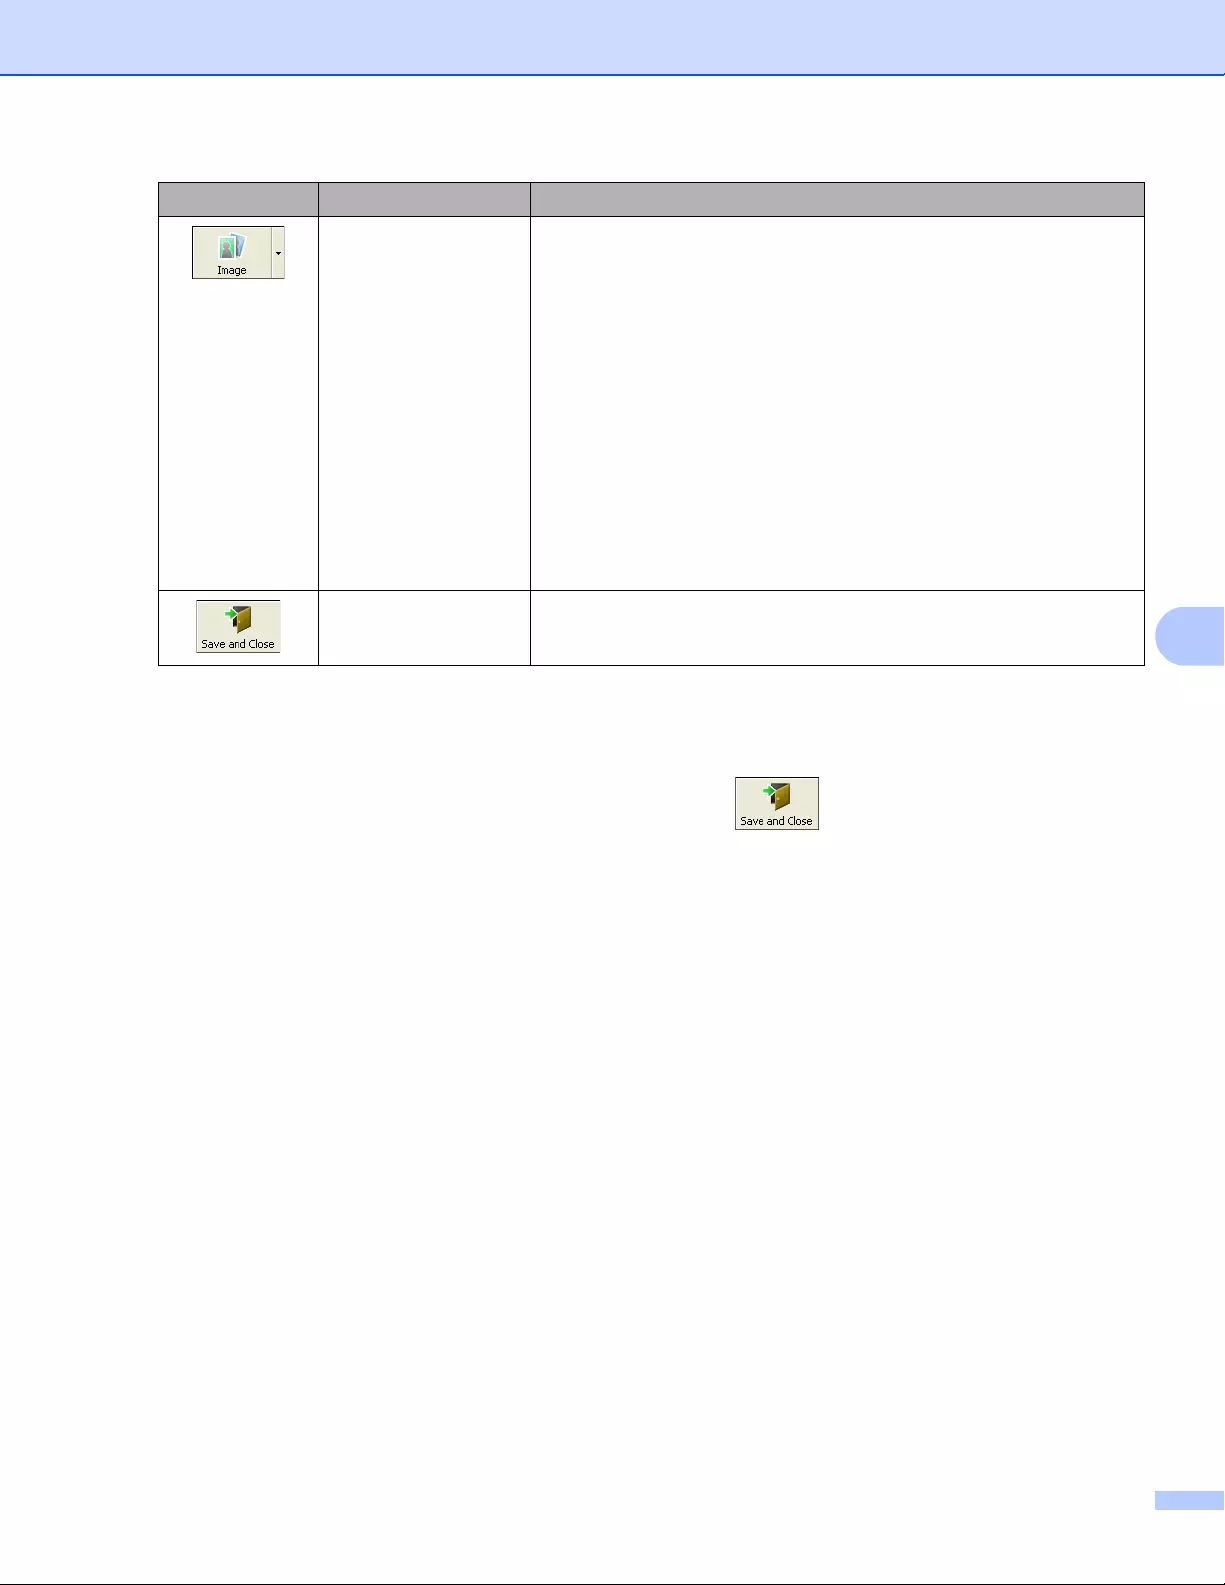
How to Use P-touch Editor
111
7
2 Contact Form
Used to enter each item, such as name, address, phone number, company information, and email
address for the new contact.
cWhen you finish entering the data, click the Save and Close button to store.
Image Allows you to insert an image for a contact from a file or a
camera currently connected to the computer.
The following file types are supported:
• Bitmap (*.bmp, *.dib)
• JPEG file (*.jpg, *.jpeg)
• TIFF file (uncompressed) (*.tif)
• GIF file (*.gif)
• Icon (*.ico)
• Windows Meta File (*.wmf, *.emf) (Image adjustment is not
allowed.)
• PNG file (*.webp)
Save and Close Saves the contact and closes the New Contact dialog box.
Icon Button name Function
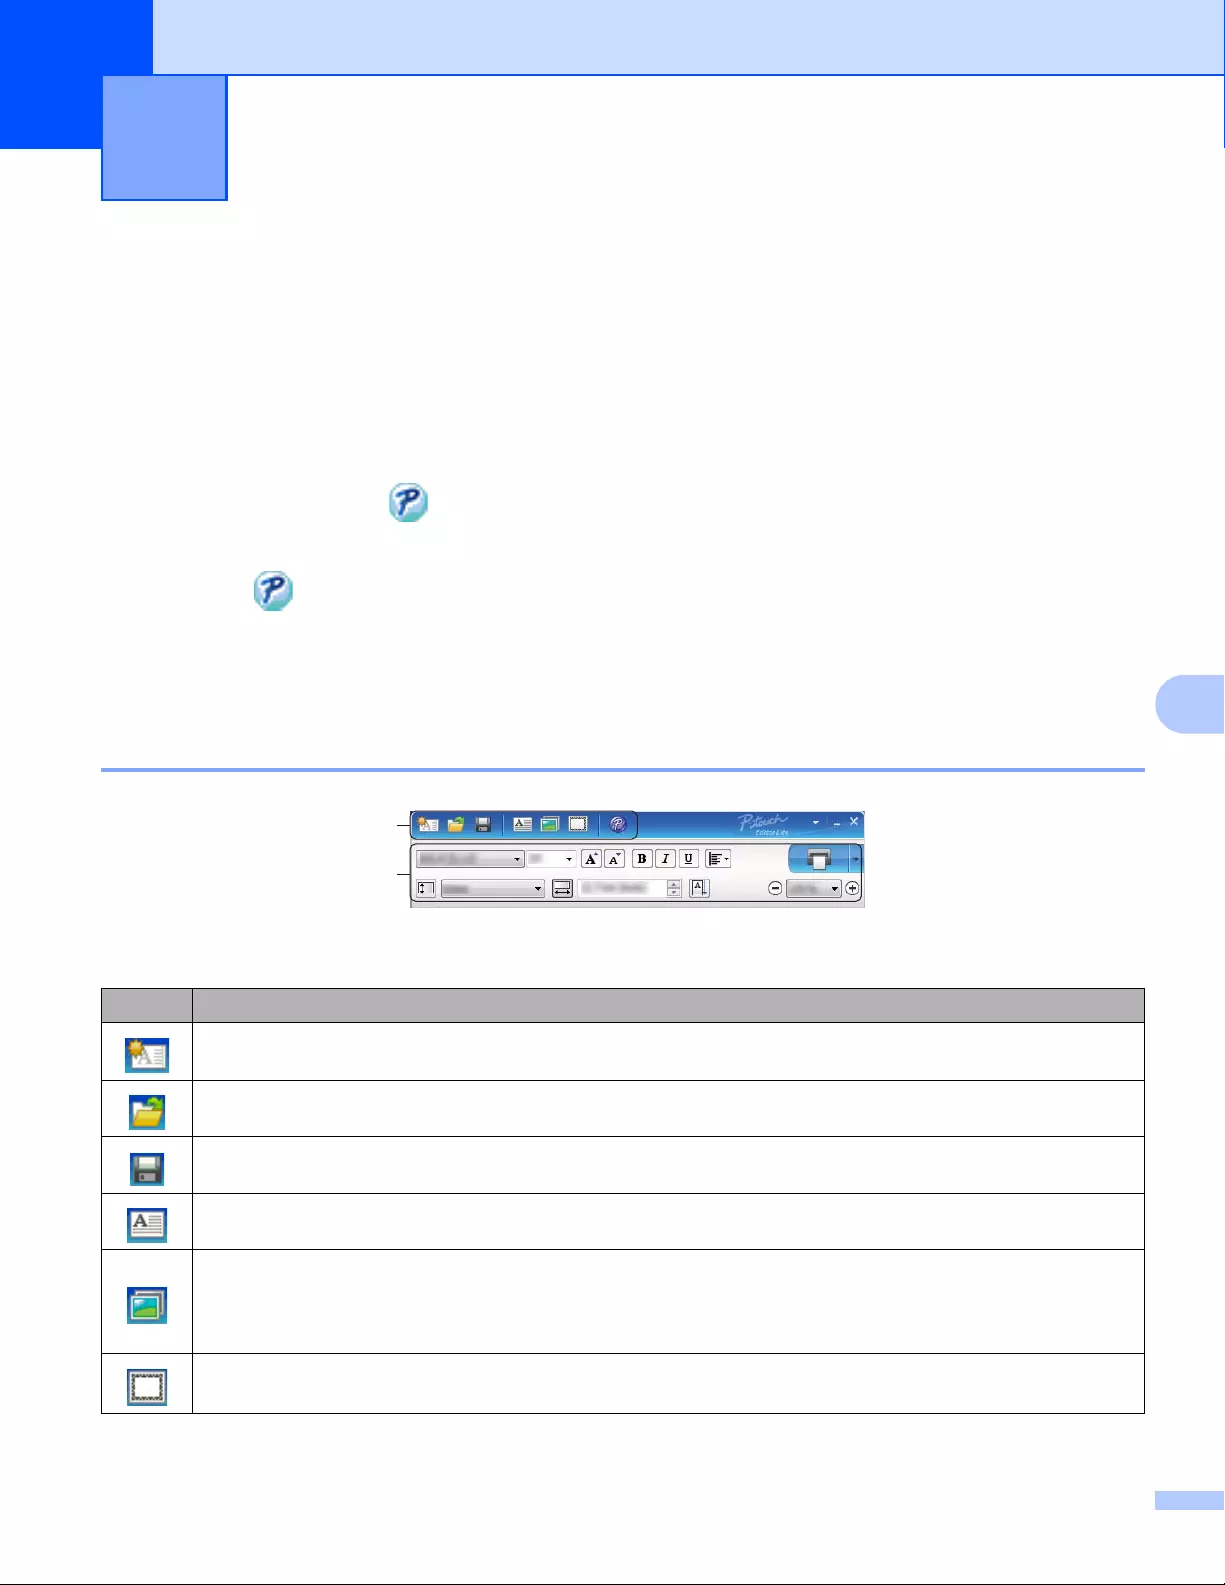
112
8
8
How to use P-touch Editor Lite (QL-810W only) (Windows®
only) 8
With P-touch Editor Lite, you can quickly create various simple label layouts without installing any drivers or
software.
P-touch Editor Lite is only supported when the Label Printer is connected using a USB cable.
After the USB cable is connected, a dialog box appears on the computer screen.
• For Windows Vista®, click (P-touch Editor Lite).
• For Windows®7 / Windows®8 / Windows®8.1 / Windows®10, click «Open folder to view files» and then
double-click (PTLITE10).
P-touch Editor Lite starts.
* The Label Printer must be set to P-touch Editor Lite mode. Press and hold the Editor Lite Button until
the Editor Lite LED turns on.
Layout Window
1 Command Toolbar
How to use P-touch Editor Lite
(Windows® only) 8
Icon Function
Displays the new label creation screen.
Opens a saved file with P-touch Editor Lite.
Saves the data to your computer, but not to the Label Printer.
Inserts a new text box (useful when creating labels containing both single and multiple lines of text).
Inserts an image into your label.
From file: Inserts an image stored on your computer.
Screen capture: Inserts the selected area of the computer screen as a graphic.
Symbol: Inserts one of your computer’s built-in symbols.
Inserts a frame.
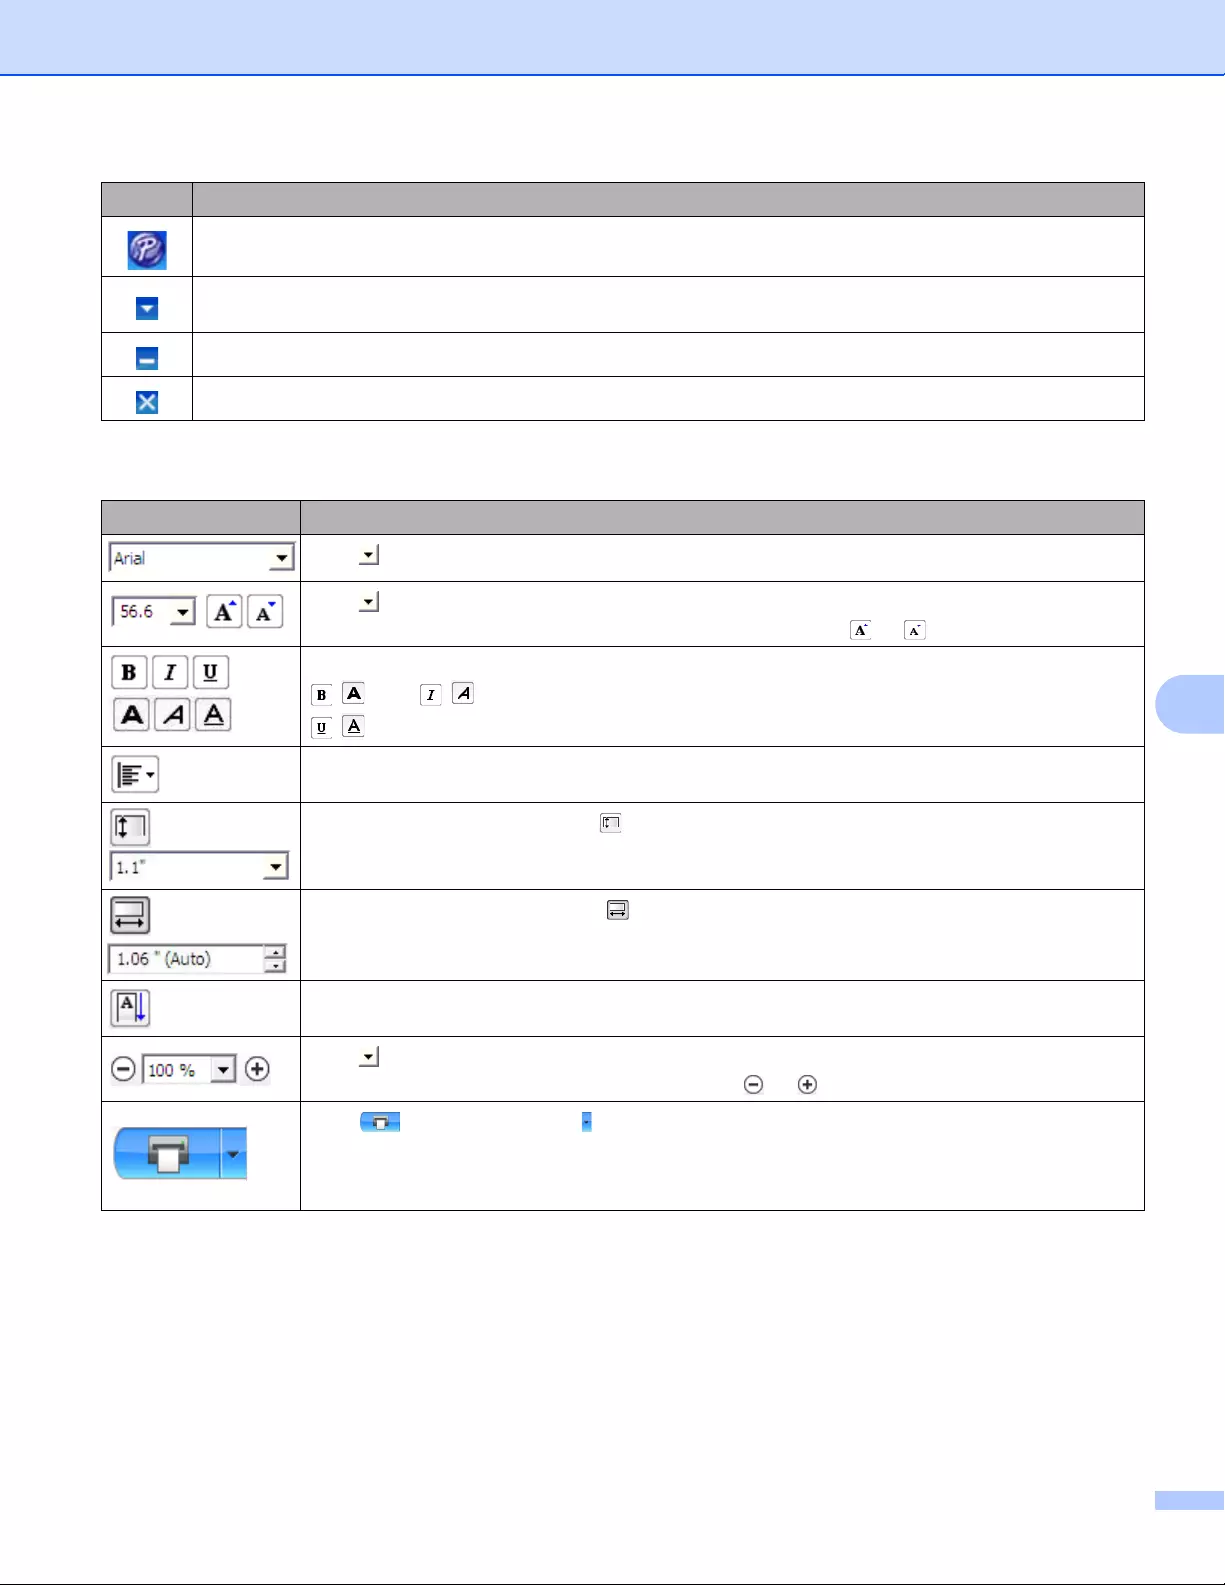
How to use P-touch Editor Lite (Windows® only)
113
8
2 Property Toolbar
Exits P-touch Editor Lite and starts up P-touch Editor.
Displays the menu.
The menu includes all P-touch Editor Lite functions.
Minimizes P-touch Editor Lite.
Exits P-touch Editor Lite.
Icon Function
Click to change the font.
Click to specify the font size.
You can adjust the font size up or down one level by clicking or .
/Specifies the font style:
/ Bold / Italic
/ Underline
Specifies the alignment of text in a text box.
Sets the width of the label. Click to automatically detect the width of the inserted label.
Sets the length of the label. Click to automatically adjust the length of the label to
accommodate the entered text.
Sets/cancels the label direction to vertical.
Click to set the zoom factor for the Label View.
You can also change the zoom factor by clicking or .
Click to print normally or to print with options.
Auto Cut: Each label is automatically cut after printing.
Cut at end: Cuts labels after the last label is printed.
Copies: Prints multiple copies of a label.
Icon Function
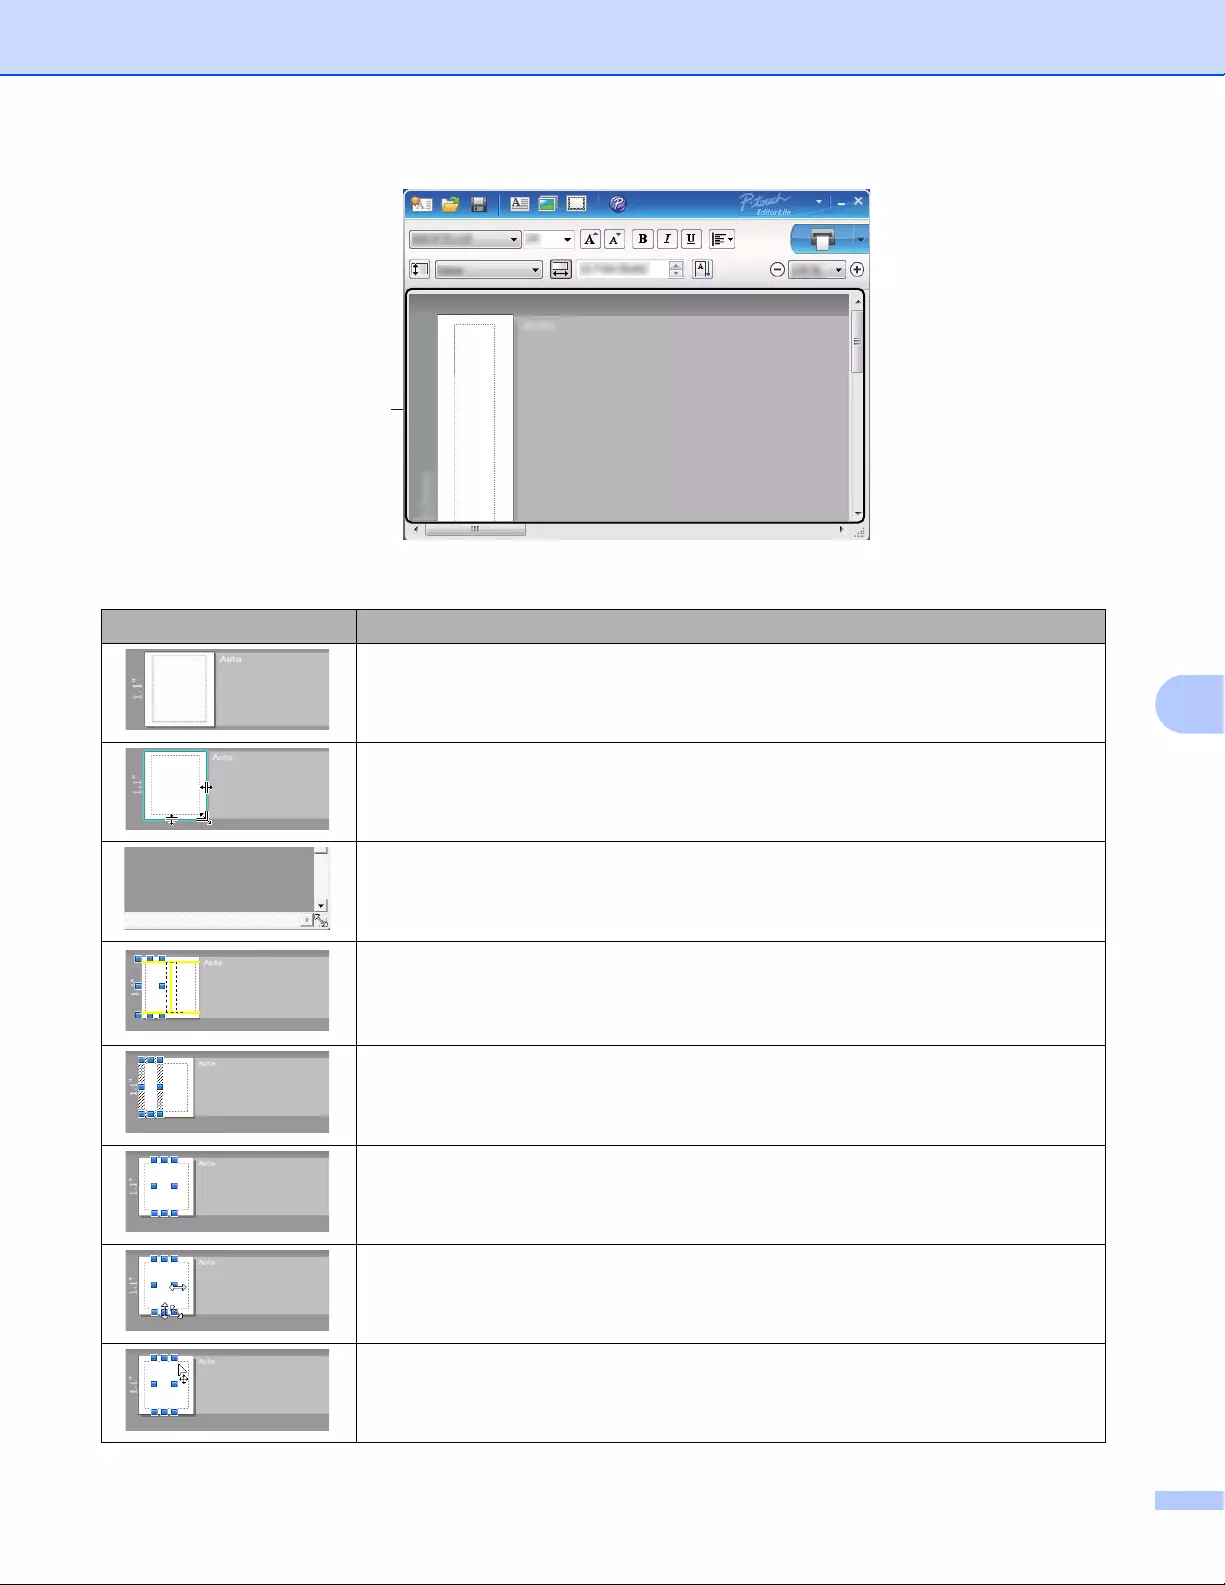
How to use P-touch Editor Lite (Windows® only)
114
8
3 Label View
Display Function
This label view is displayed when the software is started. The width of label currently
set is displayed on the left of the label image. When «Auto» is shown on the right, the
length of label is automatically adjusted to the length of text.
To manually change the length and width of the label, move the pointer to the label
area’s border, and then drag it when the blue line appears.
To adjust the size of the P-touch Editor Lite window, move the pointer over an edge
of the window and drag it when the pointer changes to an arrow.
Guidelines are sometimes displayed when moving objects. They are shown when
the object is aligned at the left, right, top, or bottom edge of the Printable area, or in
the center. In the illustration on the left, the guidelines indicate that the object is
centered at the top edge of the label.
Inserted text boxes, images, and frames are treated as objects. Objects are
surrounded by handles (indicated by eight blue points).
Indicates that an object is selected.
The pointer changes to an arrow when moved over a handle. Drag the handles to
change the object’s size.
To move objects, drag them when the pointer changes to a crosshair. For text
objects, the pointer only changes to a crosshair over the border of the object.
3
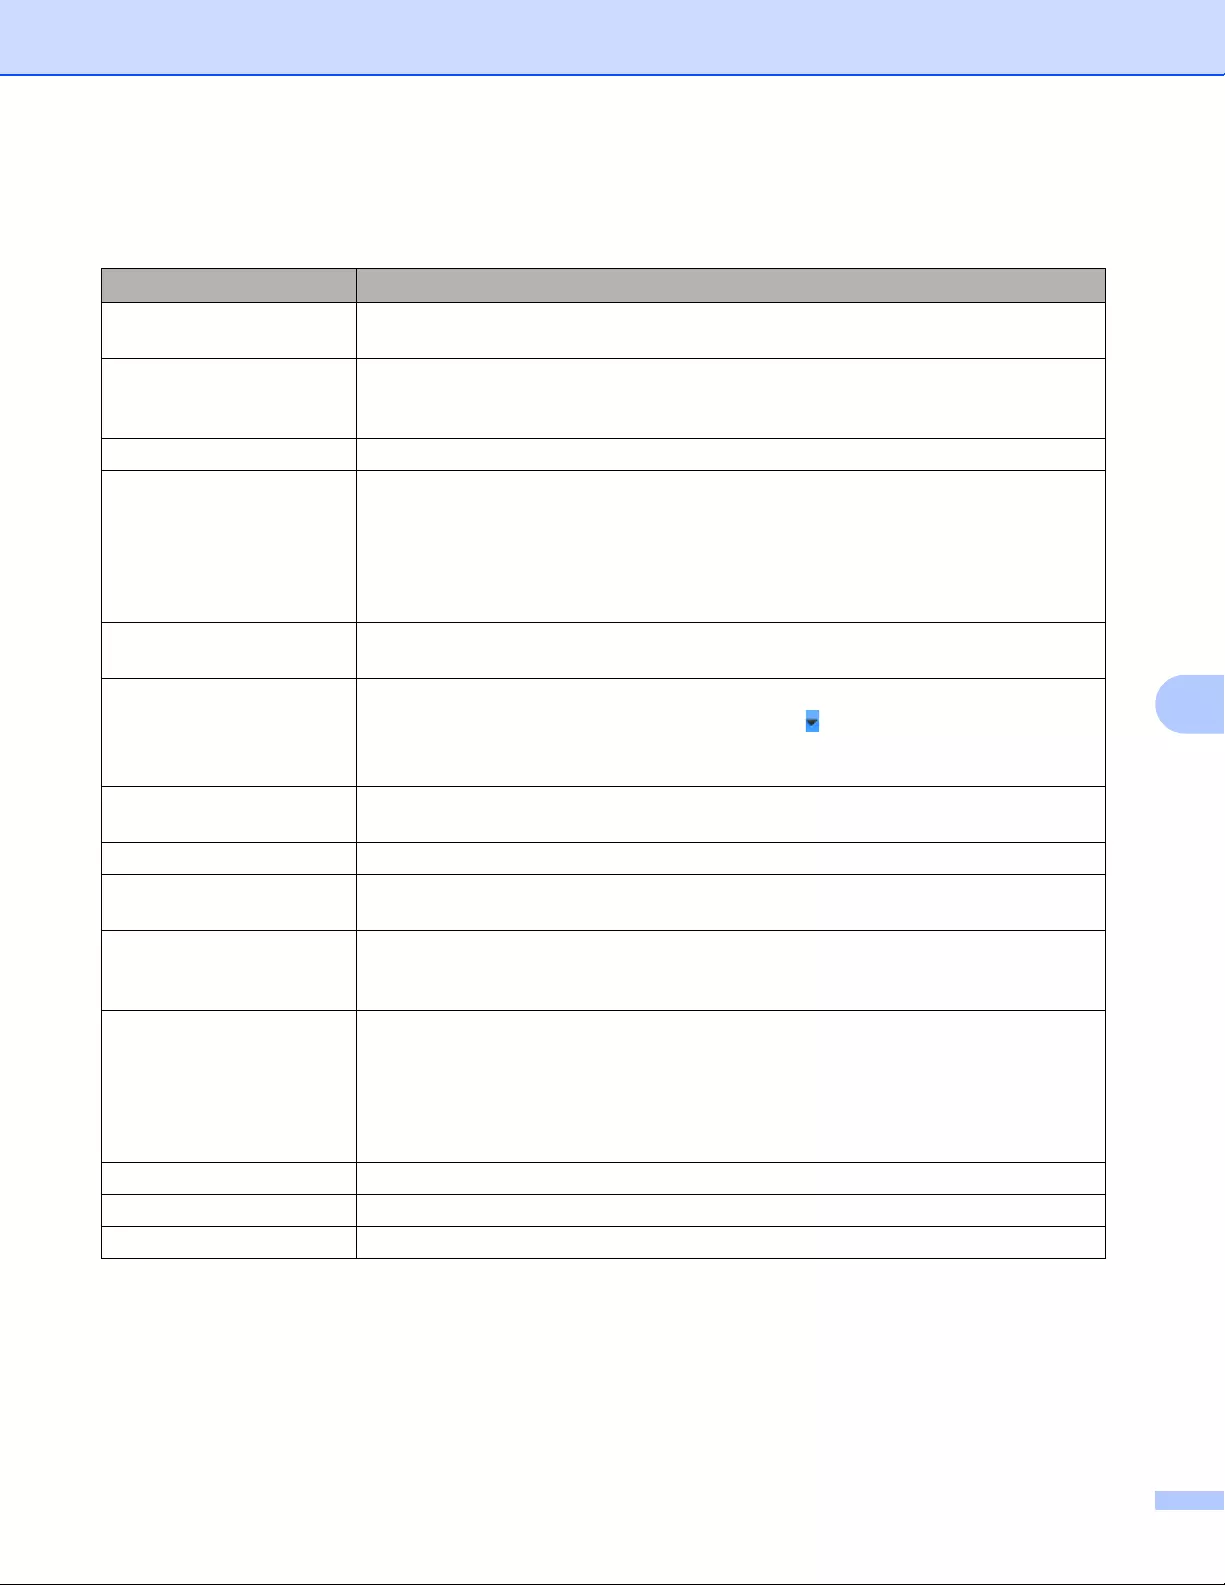
How to use P-touch Editor Lite (Windows® only)
115
8
Right-click in the layout view area to select and execute the following menu items.
Other Functions (right-click to view)
Menu Do this
Undo
Redo
Click Undo to undo the last operation.
Click Redo to redo the last operation.
Cut
Copy
Paste
Select the text area (or object) that you want to cut or copy and select Cut or Copy.
Click in the destination area and select Paste.
Margins The function is not available for Label Printer.
Insert Click Insert.
Select Text box to insert text into the label.
Select From File to insert an image stored on your computer.
Select Screen Capture to insert the selected area of the computer screen.
Select Symbol to insert one of your computer’s built-in symbols.
Select Frame to insert one of P-touch Editor Lite’s built-in frames.
Direction Select the text object and click either Horizontal Text or Vertical Text to change the
direction of the text.
Numbering Select the number or letter within your text and click Numbering to insert an
incremented number or letter on each label. Click to the right of the Print button
and click Print Options. Select the Numbering box and enter the number of labels
for printing in the Count field. Click the Print button.
Change Image Select the image and click Change Image to replace the current image with a
different image.
Rotate Rotate objects to 0°, 90°, 180° or 270°.
Order Select one of the objects and click Order, then select Bring to Front, Send to Back,
Bring Forward, or Send Backward to set the order of each object in the layer.
P-touch Editor… Click P-touch Editor to temporarily use P-touch Editor. For continuous use of
P-touch Editor, press and hold the Editor Lite Button until the Editor Lite LED turns
off.
Options Click Options.
Select either millimeters (mm) or inches (in) to set the measurement unit setting.
Select the P-touch Editor Lite language. Restart the application to apply the new
selected «Language«.
Select either Display New Value after Printing or Reset to Original Value after
Printing to set the numbering option.
Brother Solutions Center Click Brother Solutions Center to go to the website for assistance and information.
About… Click About to learn about the P-touch Editor Lite version.
Exit Click Exit to exit P-touch Editor Lite.

How to use P-touch Editor Lite (Windows® only)
116
8
How to use P-touch Editor Lite LAN (Windows® only) 8
With P-touch Editor Lite LAN you can quickly create various label layouts.
P-touch Editor Lite LAN is supported only when the machine is connected to a Network.
By downloading the installer from install.brother and installing it, the P-touch Editor Lite LAN program
package is created on the desktop. Open the program package and copy it to the shared folder on the server.
P-touch Editor Lite LAN on the server can be accessed by other network users to create labels, and print from
QL-810W/820NWB connected to the network.
How to share P-touch Editor Lite LAN
• Copy the folder containing P-touch Editor Lite LAN from the shared folder on the network to your computer.
• Start up P-touch Editor Lite LAN from the shared folder on the network.
aDouble-click the in the PteLiteLAN folder.
P-touch Editor Lite LAN starts.
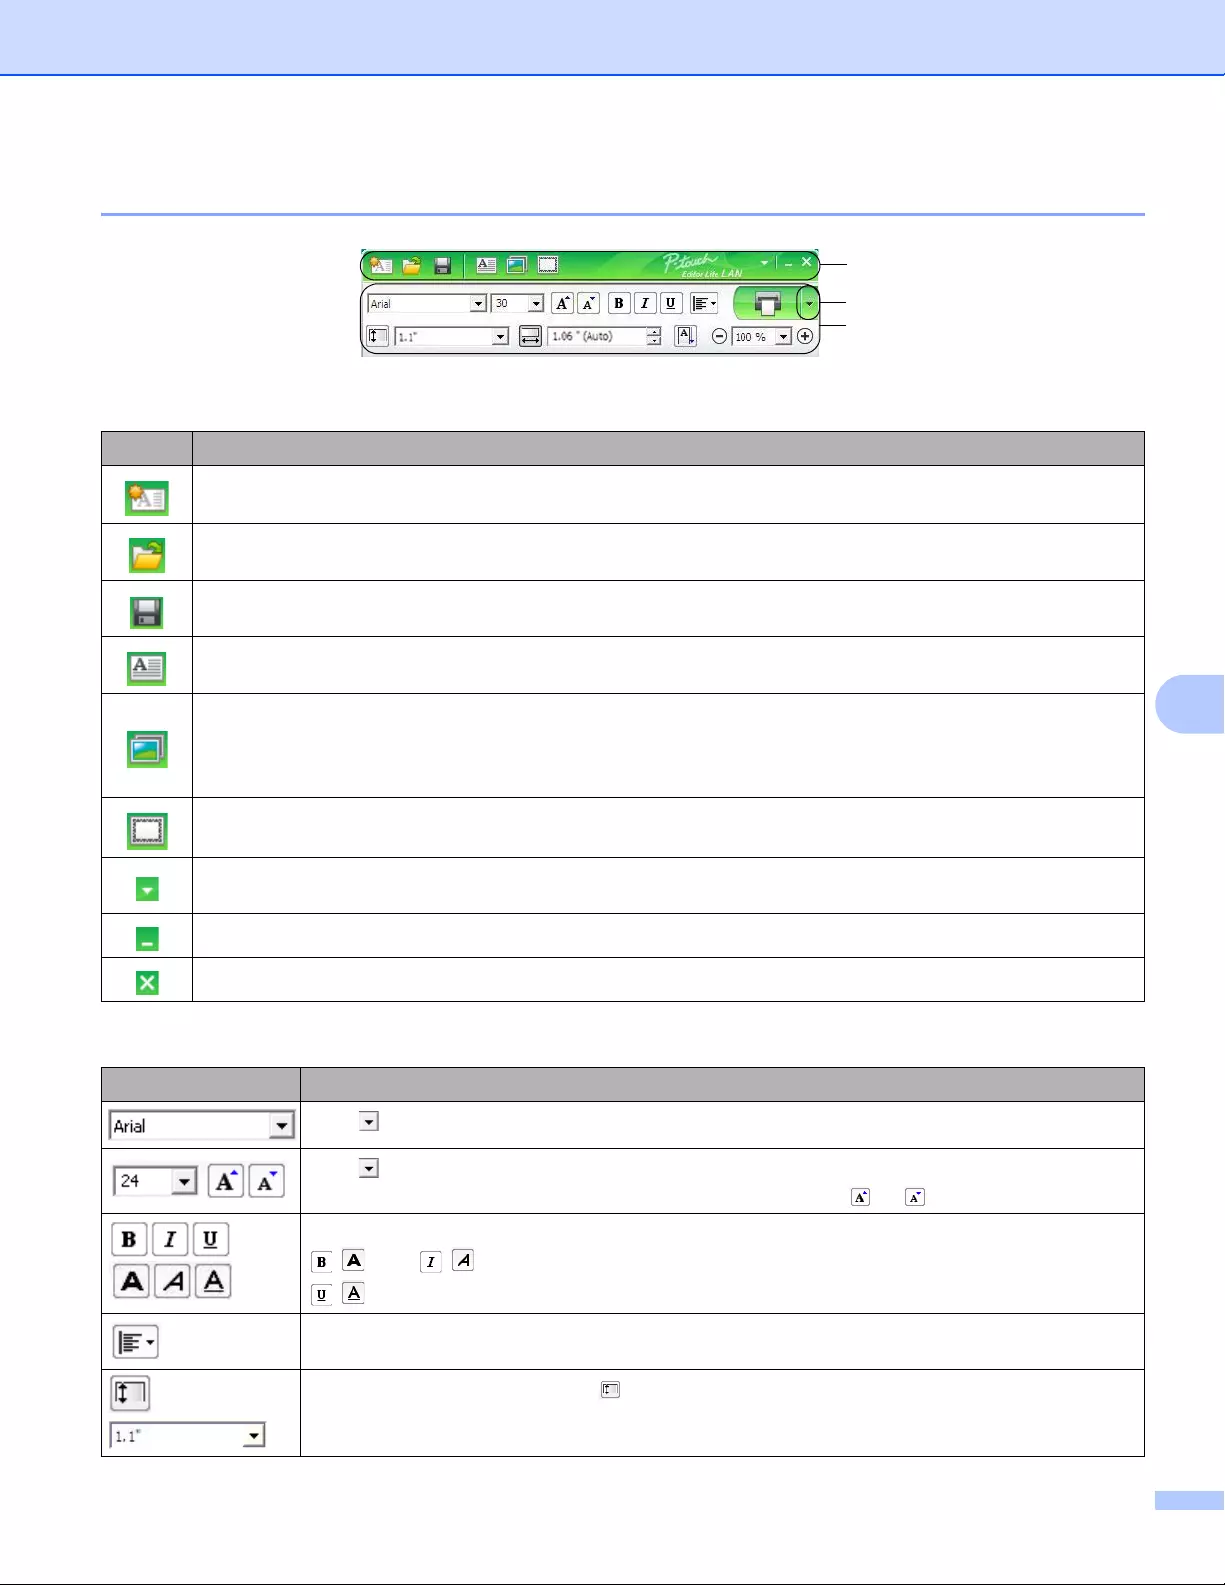
How to use P-touch Editor Lite (Windows® only)
117
8
Layout window
1 Command Toolbar
3 Property Toolbar
Icon Function
Displays the new label creation screen.
Opens a saved file with P-touch Editor Lite LAN.
Saves the data to your computer, but not to the Label Printer.
Inserts a new text box (convenient when creating labels containing both single and multiple lines of text).
Inserts an image into your label.
From file: Inserts an image stored on your computer.
Screen capture: Inserts the selected area of the computer screen as a graphic.
Symbol: Inserts one of your computer’s built-in symbols.
Inserts a frame.
Displays the menu.
The menu includes all P-touch Editor Lite LAN functionality.
Minimizes P-touch Editor Lite LAN.
Exits P-touch Editor Lite LAN.
Icon Function
Click to change the font.
Click to specify the font size.
You can adjust the font size up or down one level by clicking or .
/Specifies the font style:
/ Bold / Italic
/ Underline
Specifies the alignment of text in a text box.
Sets the width of the label. Click to automatically detect the width of the inserted label.
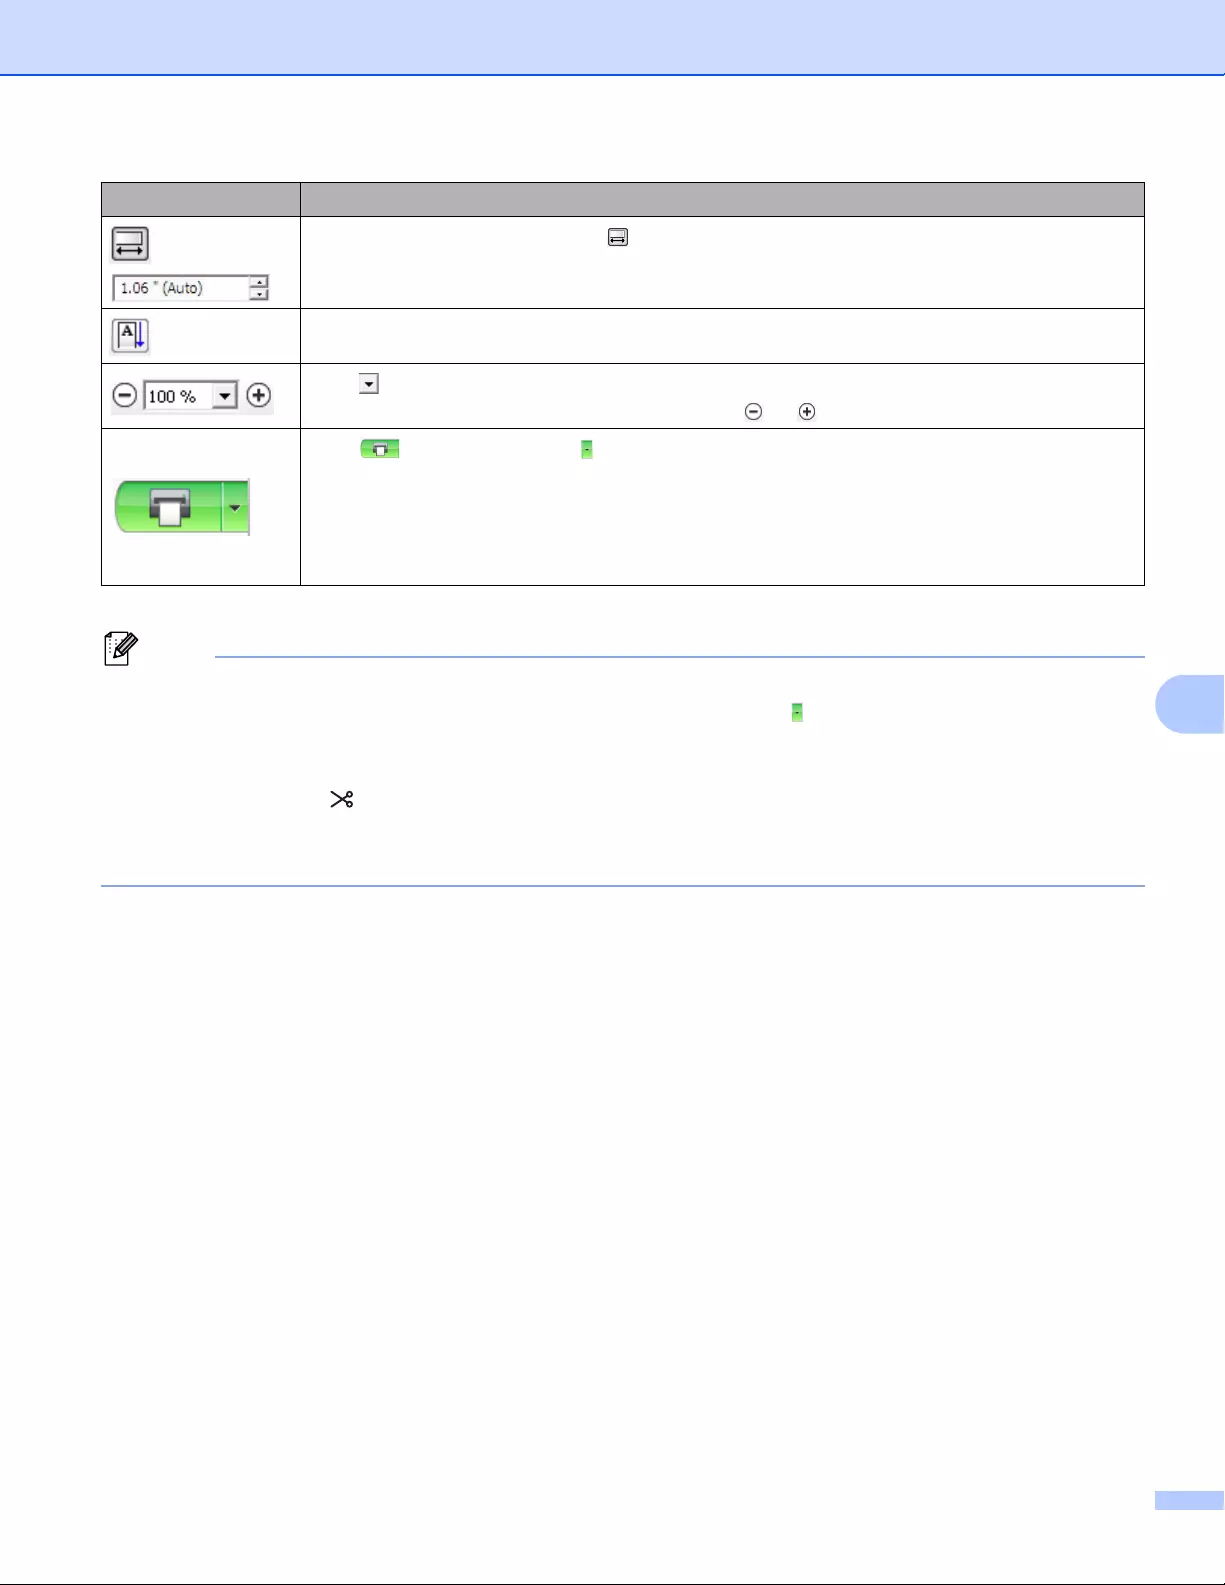
How to use P-touch Editor Lite (Windows® only)
118
8
• If multiple Label Printers are connected to the network, select the Label Printer to print with. A list of the
Label Printers connected to the network can be displayed by clicking and then clicking [Printer Setup…].
You can find the Label Printer you want in the list from its IP address.
• The IP address of Label Printers can be checked by printing the Label Printer set-up information. Press
and hold the Cutter ( ) Button when the power is on to print the Label Printer set-up information.
• We recommend that you set the Label Printer location using BRAdmin because it enables you to view the
Label Printer in the list.
Sets the length of the label. Click to automatically adjust the length of the label to
accommodate the entered text.
Changes the label direction to vertical.
Click to set the zoom factor for the Label View.
You can also change the zoom factor by clicking or .
Click to print normally or to print with options.
Print Options…: Auto Cut, Cut at end, Copies
Auto Cut: Each label is automatically cut after printing.
Cut at end: Cuts labels after the last label is printed.
Copies: Prints multiple copies of a label.
Printer Setup…: Displays a list of the connected Label Printers.
Icon Function
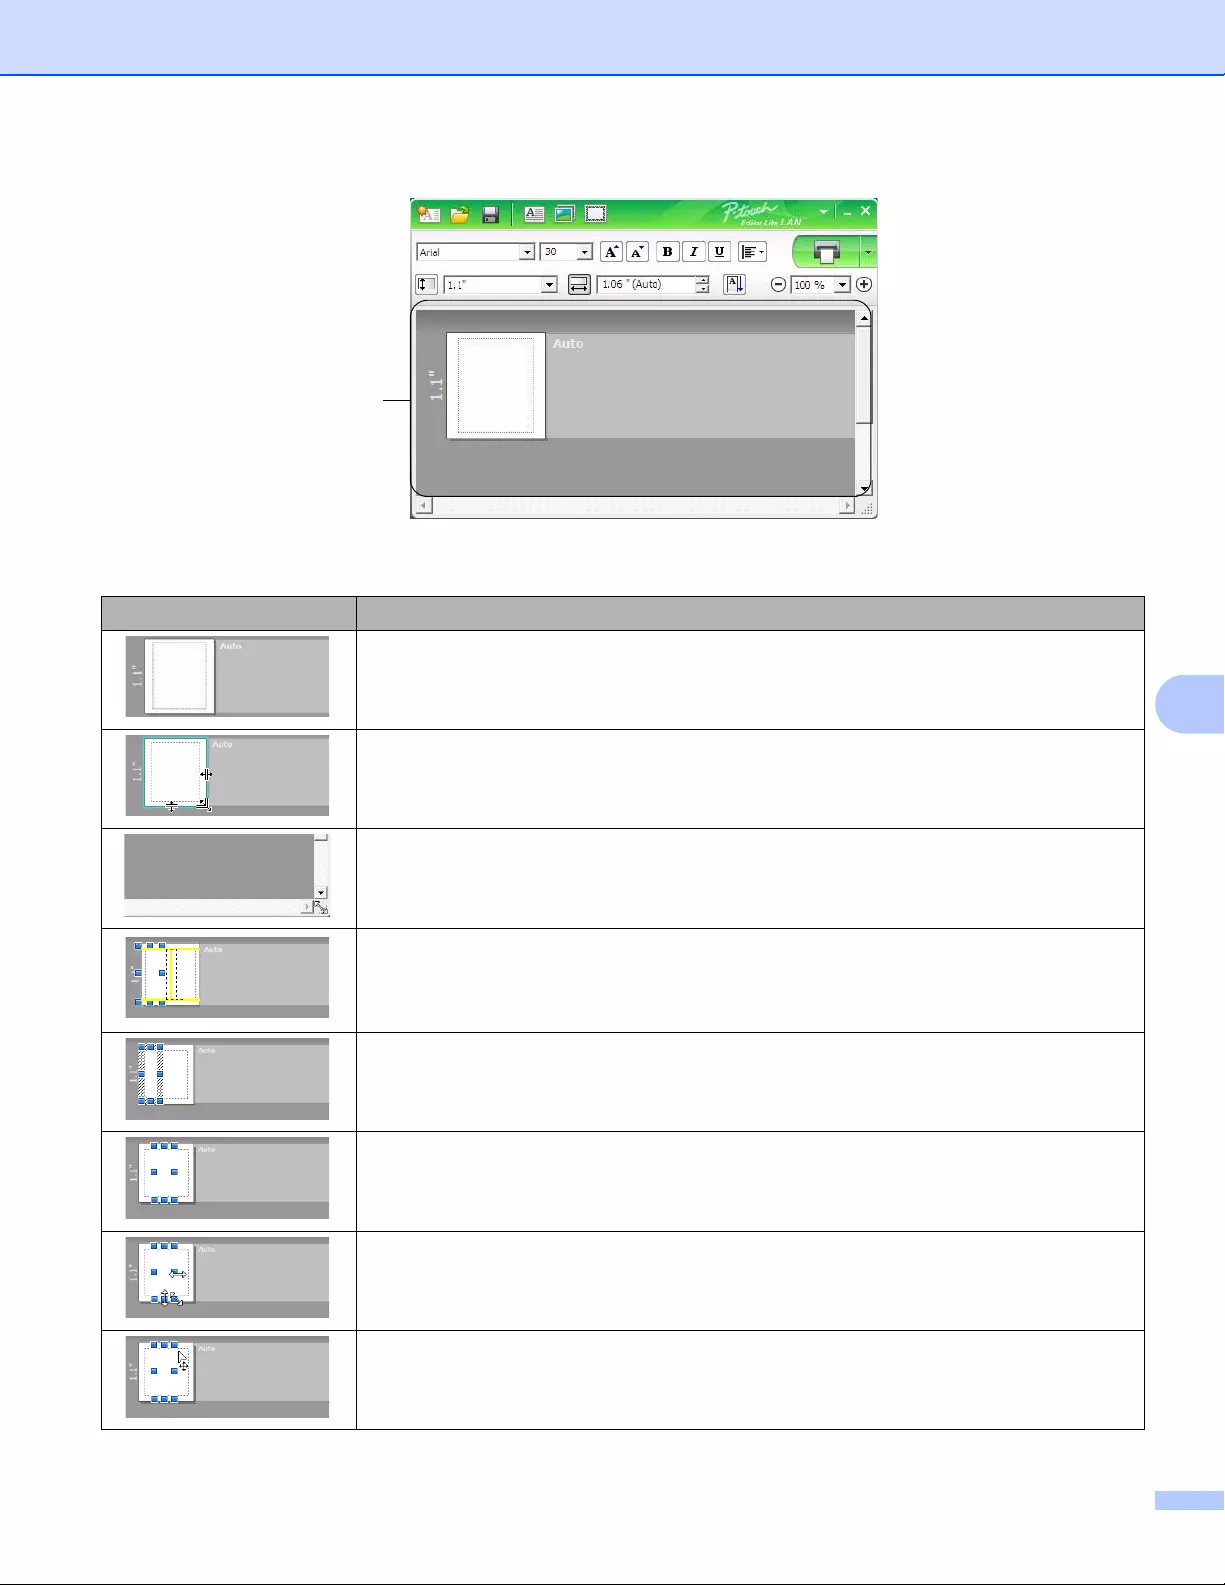
How to use P-touch Editor Lite (Windows® only)
119
8
4 Label View
Display Function
This label view is displayed when the software is started. The width of label currently set
is displayed on the left of label image. When «Auto» is shown on the right, the length of
label is automatically adjusted to the length of text.
To manually change the length and width of the label, move the pointer to the label area’s
border, and then drag it when the blue line appears.
To adjust the size of the P-touch Editor Lite LAN window, move the pointer over an edge
of the window and drag it when the pointer changes to an arrow.
Guidelines are sometimes displayed when moving objects. They are shown when the
object is aligned at the left, right, top, or bottom edge of Printable area, or in the center.
In the illustration to the left, the guidelines indicate that the object is centered at the top
edge of the label.
Inserted text boxes, images, and frames are treated as objects. Objects are surrounded
by handles (indicated by eight blue points).
Indicates that an object is selected.
The pointer changes to an arrow when moved over a handle. Drag the handles to change
the object’s size.
To move objects, drag them when the pointer changes to a crosshair. For text objects,
the pointer only changes to a crosshair over the border of the object.
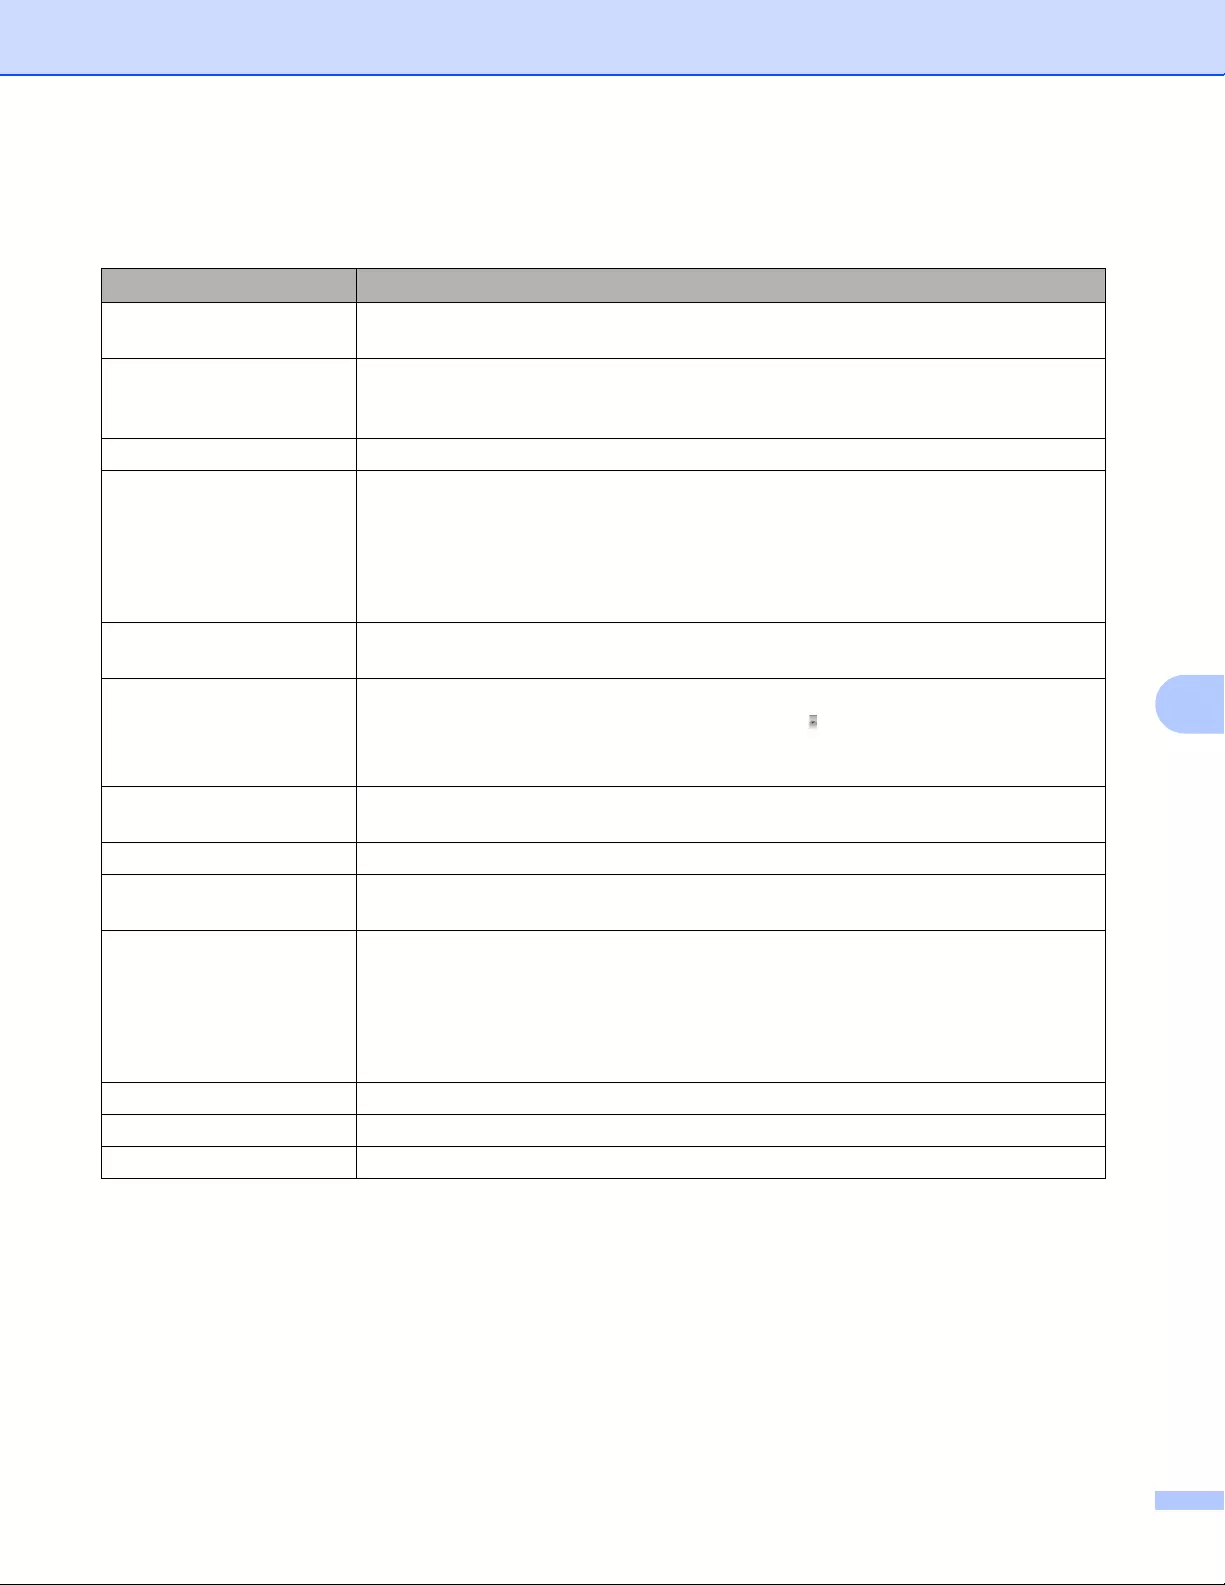
How to use P-touch Editor Lite (Windows® only)
120
8
Right-click in the layout view area to select and execute the following menu items.
Other Functions (right-click to view)
Menu Do this
Undo
Redo
Click Undo to undo the last operation.
Click Redo to redo the last operation.
Cut
Copy
Paste
Select the text area (or object) that you want to cut or copy and select Cut or Copy.
Click in the destination area and select Paste.
Margins The function is not available for Label Printer.
Insert Click Insert.
Select Text box to insert text into the label.
Select From File to insert an image stored on your computer.
Select Screen Capture to insert the selected area of the computer screen.
Select Symbol to insert one of your computer’s built-in symbols.
Select Frame to insert one of P-touch Editor Lite LAN built-in frames.
Direction Select the text object and click either Horizontal Text or Vertical Text to change the
direction of the text.
Numbering Select the number or letter within your text and click Numbering to insert an
incremented number or letter on each label. Click to the right of the Print button
and click Print Options. Check the Numbering box and enter the number of labels
for printing in the Count field. Click the Print button.
Change Image Select the image and click Change Image to replace the current image with a
different image.
Rotate Rotate objects to 0°, 90°, 180° or 270°.
Order Select one of the objects and click Order, then select Bring to Front, Send to Back,
Bring Forward, or Send Backward to set the order of each object in the layer.
Options Click Options.
Select either mm (millimeters) or inches (in) to set the measurement unit setting.
Select P-touch Editor Lite LAN language. Restart the application to apply the new
selected «Language«.
Select either Display New Value after Printing or Reset to Original Value after
Printing to set the numbering option.
Brother Solutions Center Click Brother Solutions Center to go to the website for assistance and information.
About Click About to learn about the P-touch Editor Lite LAN version.
Exit Click Exit to exit P-touch Editor Lite LAN.

121
9
9
P-touch Transfer Manager 9
This program allows you to transfer templates and other data to the Label Printer and save backups of your
data on the computer.
First P-touch Transfer Manager transfers data to the Label Printer, and then P-touch Template sends text
data that will be inserted into the template and printed. For more information on P-touch Template, download
the P-touch Template Manual/Command Reference (English only) from the Brother Solutions Center at
support.brother.com
[Select your region/country.] — [Manuals] — [Choose your product]
The transfer function is needed to use P-touch Template.
The template can also be transferred via the network.
Transferring the Template to P-touch Transfer Manager 9
To use P-touch Transfer Manager, you must first transfer templates created in P-touch Editor to P-touch
Transfer Manager.
aIn P-touch Editor, open the template you want.
bClick [File] — [Transfer Template] — [Transfer].
When P-touch Transfer Manager starts, the Main window appears.
The following method can also be used to start the P-touch Transfer Manager:
•For Windows Vista® / Windows®7 / Windows Server®2008 / Windows Server®2008 R2:
From the Start button, click [All Programs] — [Brother P-touch] — [P-touch Tools] — [P-touch Transfer
Manager 2.2].
•For Windows®8 / Windows®8.1 / Windows Server®2012 / Windows Server®2012 R2:
Click [P-touch Transfer Manager 2.2] on the [Apps] screen.
•For Windows® 10:
From the Start button, click [P-touch Transfer Manager 2.2] under [Brother P-touch].
How to Use P-touch Transfer Manager
and P-touch Library (Windows® only) 9
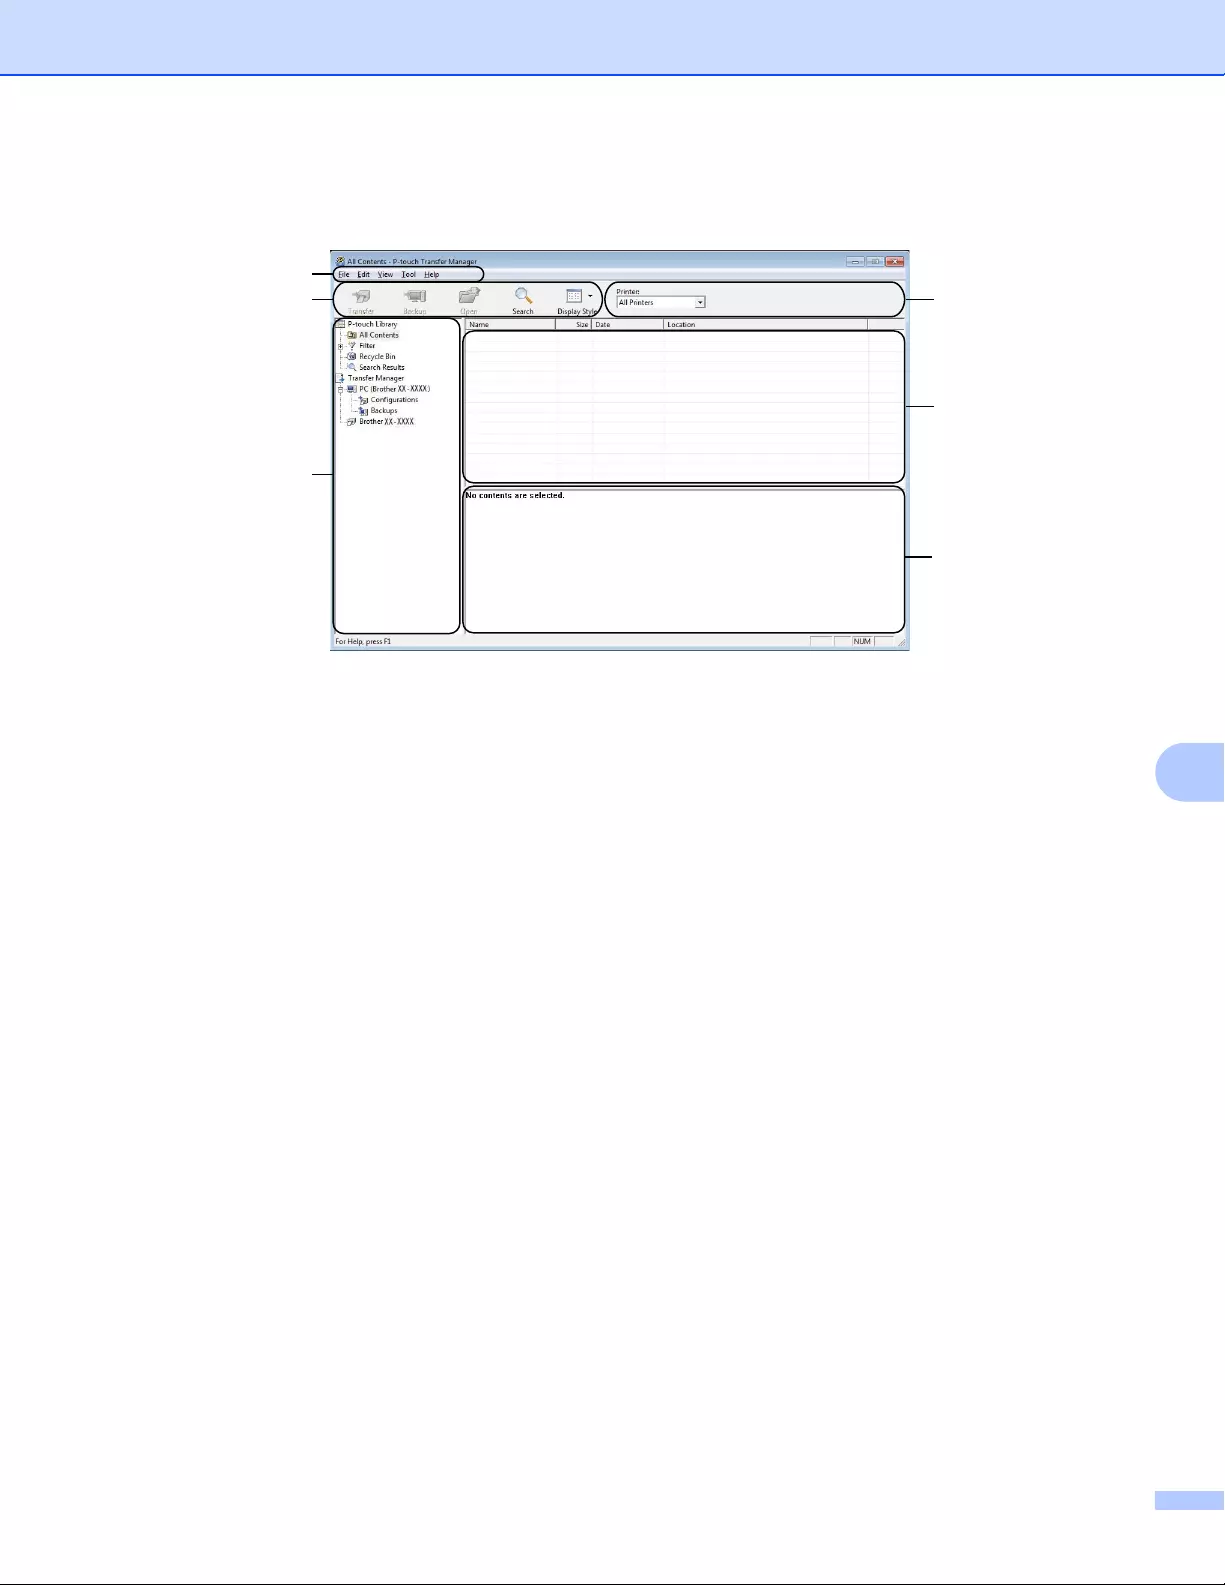
How to Use P-touch Transfer Manager and P-touch Library (Windows® only)
122
9
Main window 9
1 Menu Bar
Provides access to various commands, which are grouped under each menu title ([File], [Edit], [View],
[Tool], and [Help]) according to their functions.
2 Toolbar
Provides access to frequently used commands.
3 Printer Selector
Allows you to select which Label Printer the data will be transferred to. When you select a Label Printer,
only the data that can be sent to the selected Label Printer appears in the data list.
4 Folder List
Displays a list of folders and Label Printers. When you select a folder, the templates in the selected folder
appear in the template list.
If you select a Label Printer, the current templates and other data stored in the Label Printer appear.
5 Template List
Displays a list of templates in the selected folder.
6Preview
Displays a preview of the templates in the templates list.
2
4
1
3
5
6
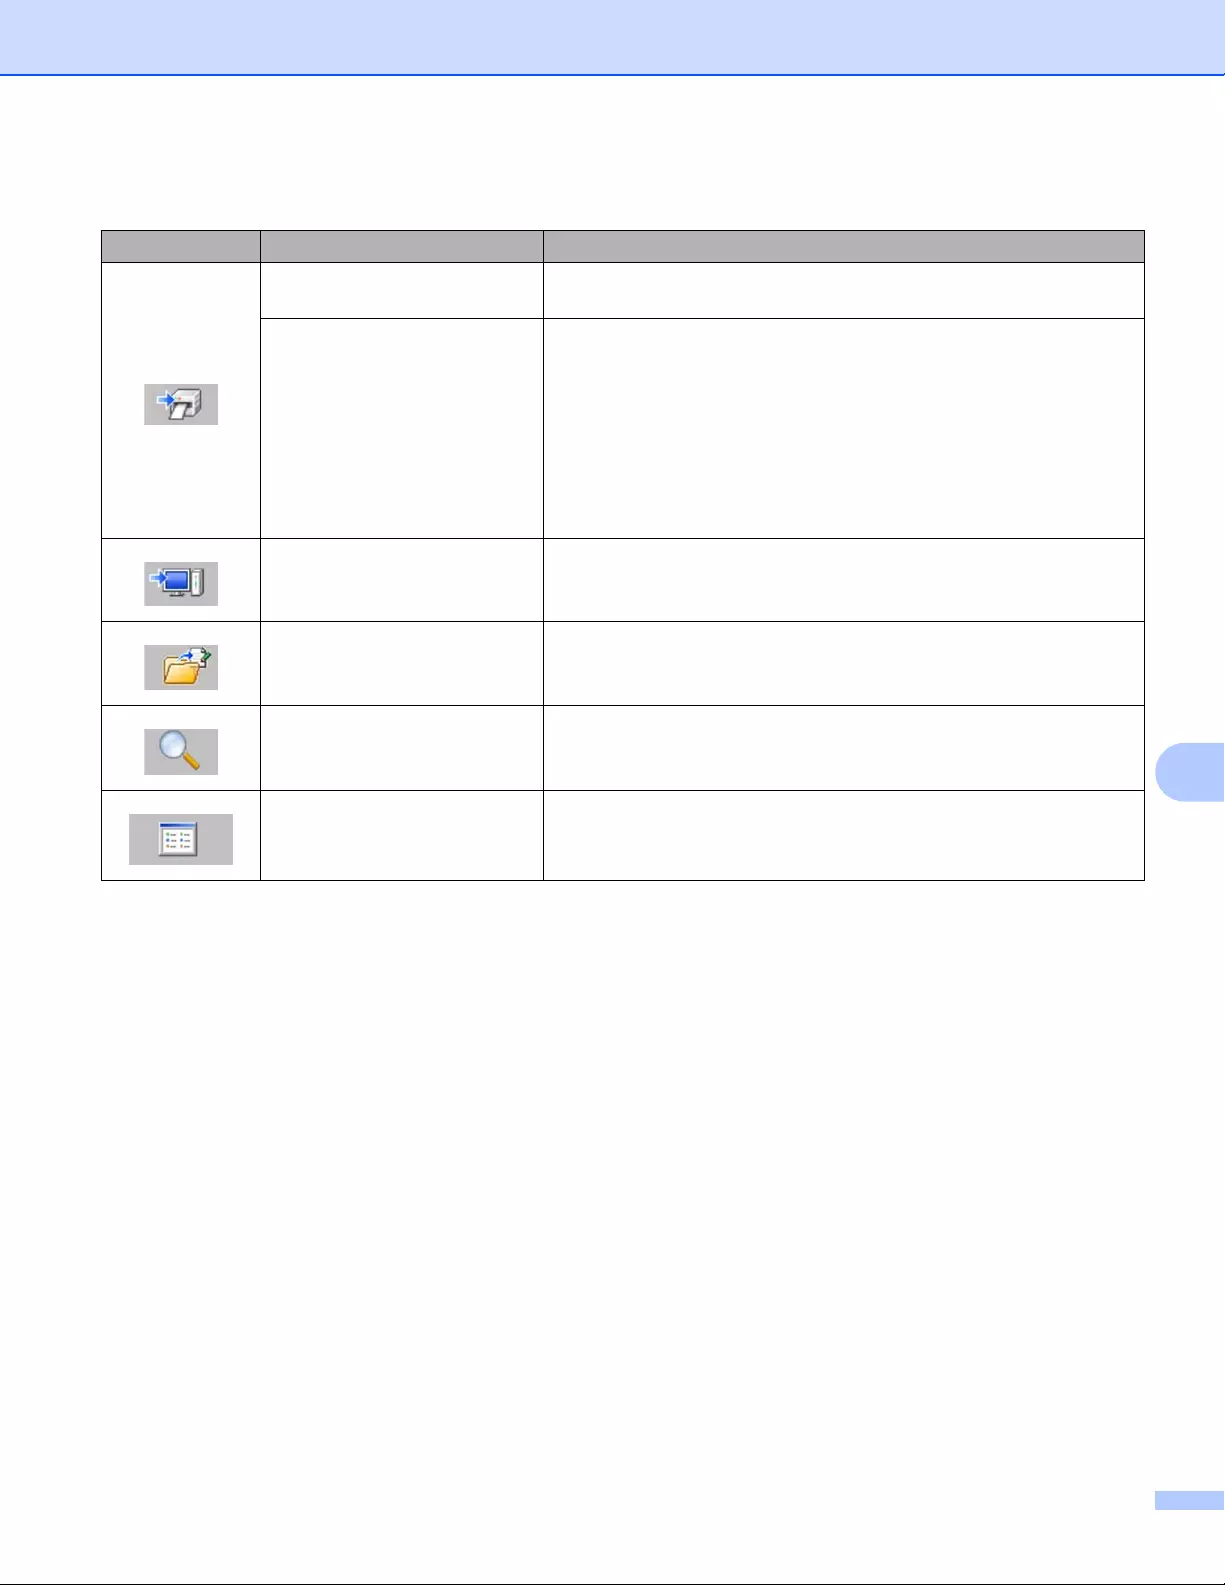
How to Use P-touch Transfer Manager and P-touch Library (Windows® only)
123
9
Explanations of the Toolbar Icons
Icon Button name Function
Transfer Transfers templates and other data from the computer to the Label
Printer.
Save Transfer File
(When not connected to a
Label Printer)
Changes the file type of the data to be transferred to other
applications.
Select «BLF» for the filename extension when printing the label
using Mass Storage Mode (USB), or when transferring the data
using BRAdmin Professional (LAN or Wi-Fi) or Mobile Transfer
Express (Wi-Fi). Select «PDZ» when transferring the data using
Transfer Express (USB).
The available interfaces differ depending on your model.
Backup Retrieves the templates and other data saved in the Label Printer
and saves it on the computer.
Open Opens the selected template.
Search Allows you to search for templates or other data registered to
P-touch Library.
Display Style Changes the file display style.
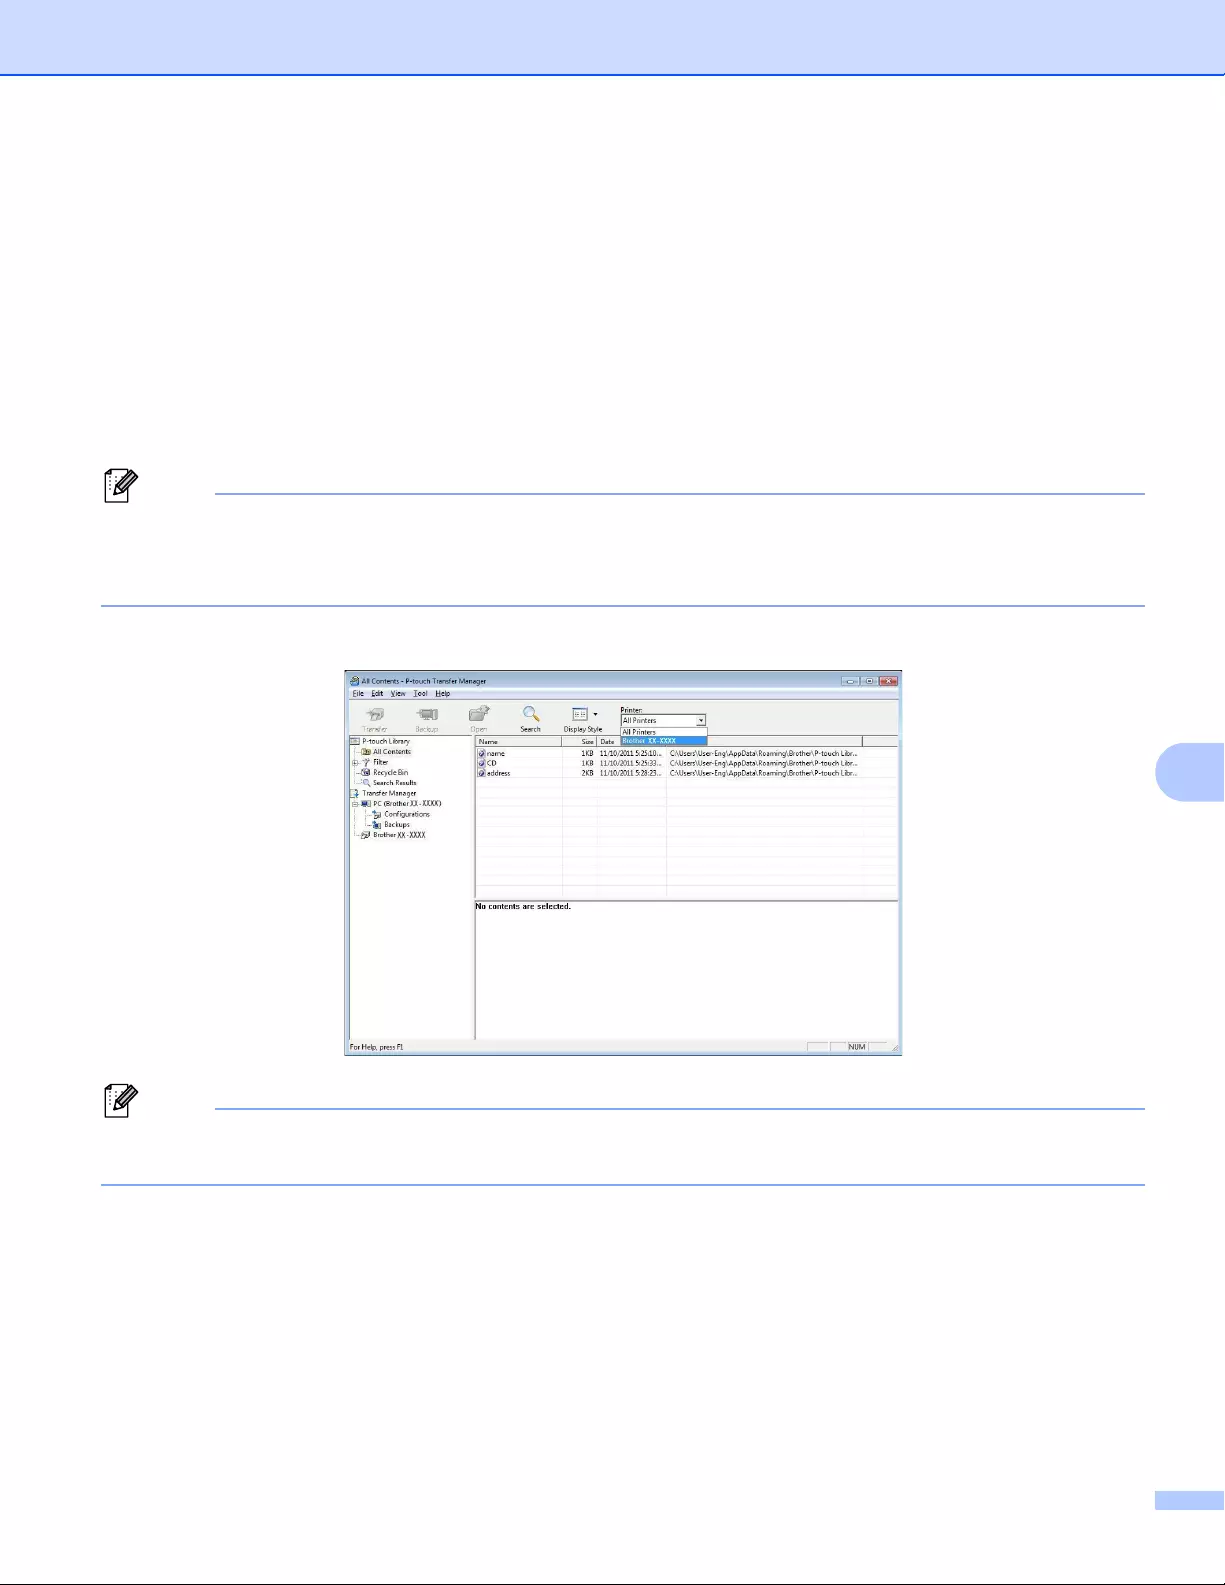
How to Use P-touch Transfer Manager and P-touch Library (Windows® only)
124
9
Transferring Templates or Other Data from the Computer to
the Label Printer 9
Use the following procedure to transfer templates, databases and images from the computer to the Label
Printer.
aConnect the computer and the Label Printer via USB and turn on the Label Printer.
The Label Printer model name appears next to a printer icon in the folder view.
If you select the Label Printer in the folder view, the current templates and other data stored in the Label
Printer appear.
• If a Label Printer is disconnected or offline, it does not appear in the folder view.
• Before transferring data, check that the computer and the Label Printer are correctly connected using a
USB cable or a wireless connection, and that the Label Printer is on.
bSelect the Label Printer that you want to transfer the template or other data to.
Before transferring data, check that the computer and the Label Printer are correctly connected with a USB
cable or a wireless connection, and that the Label Printer is on.

How to Use P-touch Transfer Manager and P-touch Library (Windows® only)
125
9
cRight-click the [Configurations] folder, select [New], and then create a new folder.
dDrag the template or other data that you want to transfer and place it in the new folder.
Transfer Function Specification
Data type Maximum number of
transferable items Restriction details
Template QL-810W: 99
QL-820NWB: 255
Each template can contain a maximum of 50 objects.
Each object can contain a maximum of 17 lines.
Database QL-810W: 99
QL-820NWB: 255
Only *.csv files can be transferred.
Each *.csv file can contain a maximum of 65000 records.
Image
(transferred symbols)
QL-810W: 99
QL-820NWB: 255
Only *.bmp files can be transferred.
Monochrome *.bmp files are recommended.
The size limit is 2048 2048 pixels.
Wide images may be cropped.
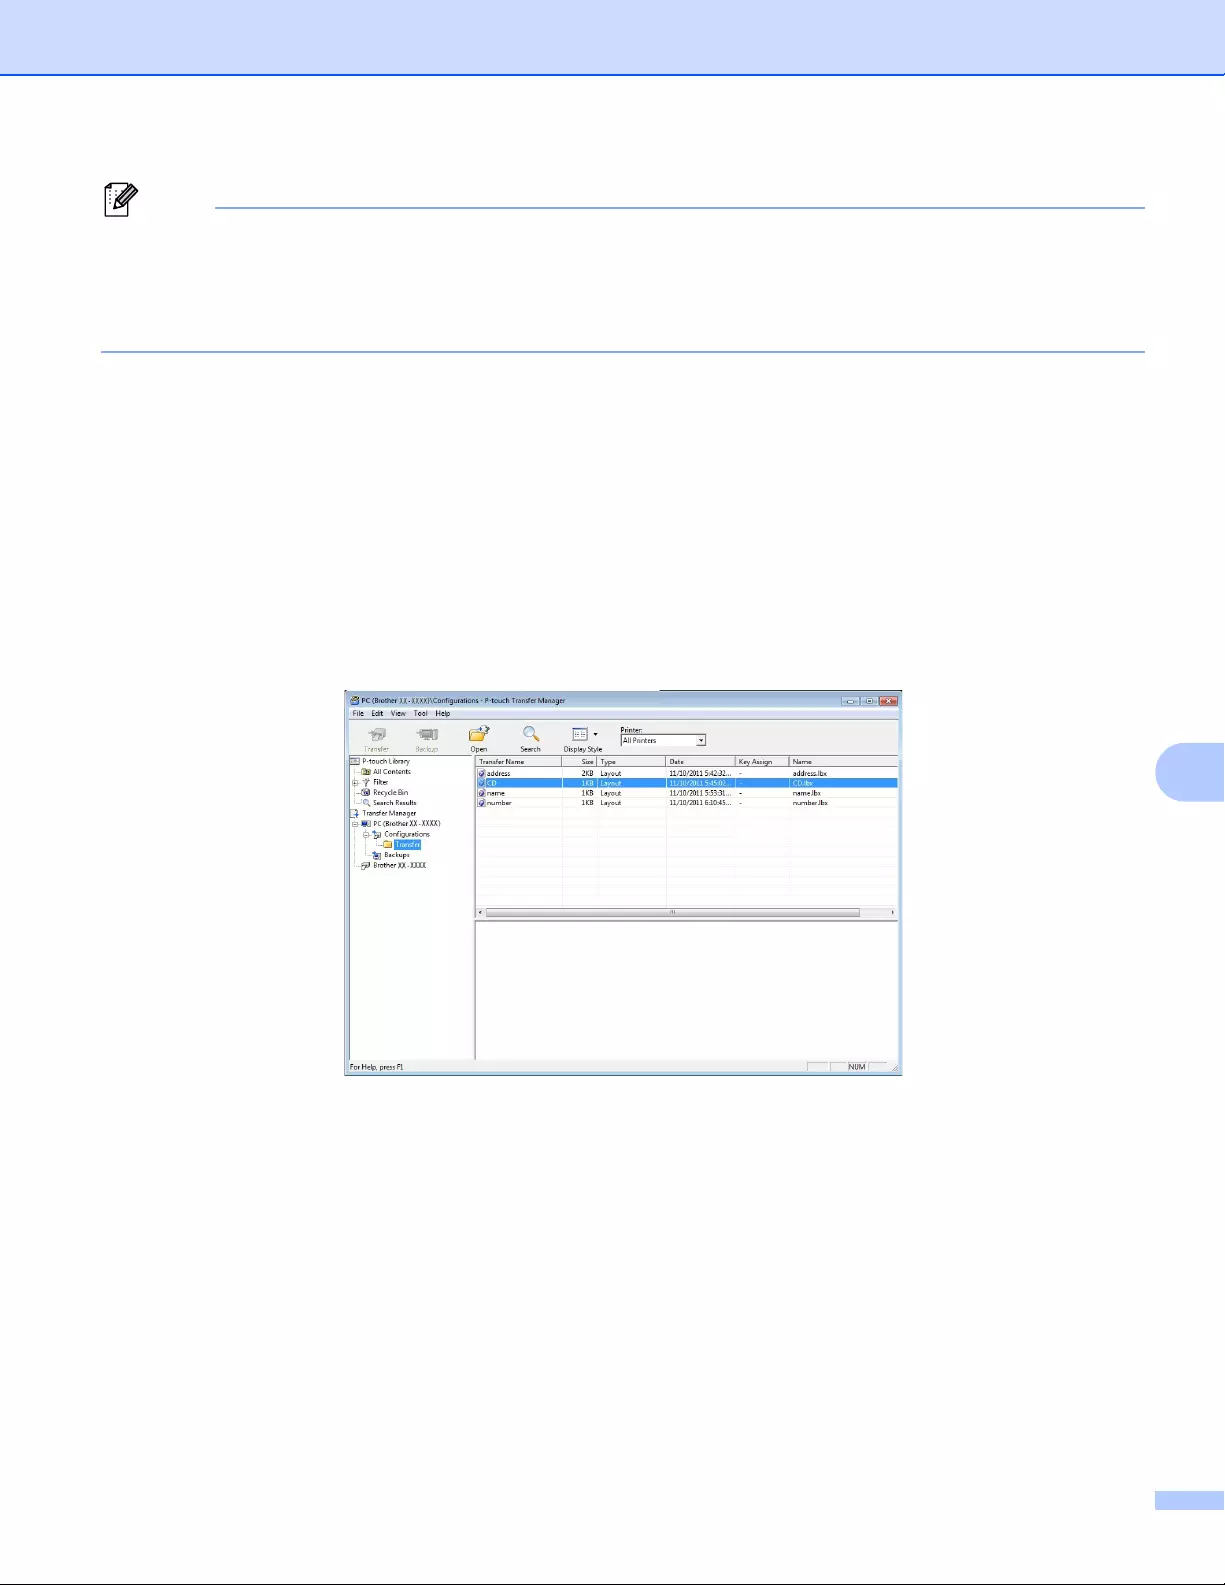
How to Use P-touch Transfer Manager and P-touch Library (Windows® only)
126
9
You can confirm the available space in the transfer file memory by printing the Printer Setting Report. For
more information, see Confirming the Label Printer Settings on page 84.
See [ROM FREE] in the report for the available space 1.
1The available space that appears in «ROM FREE: ******* byte» may be different from the actual available space.
You can view the templates and other data by selecting:
The folder in the [Configurations] folder
[All Contents]
One of the categories under [Filter], such as [Layouts].
When transferring multiple templates or other data, drag all files you want to transfer and place them in
the new folder.
Each file is assigned a key number (memory location in the Label Printer) when it is placed in the new
folder.
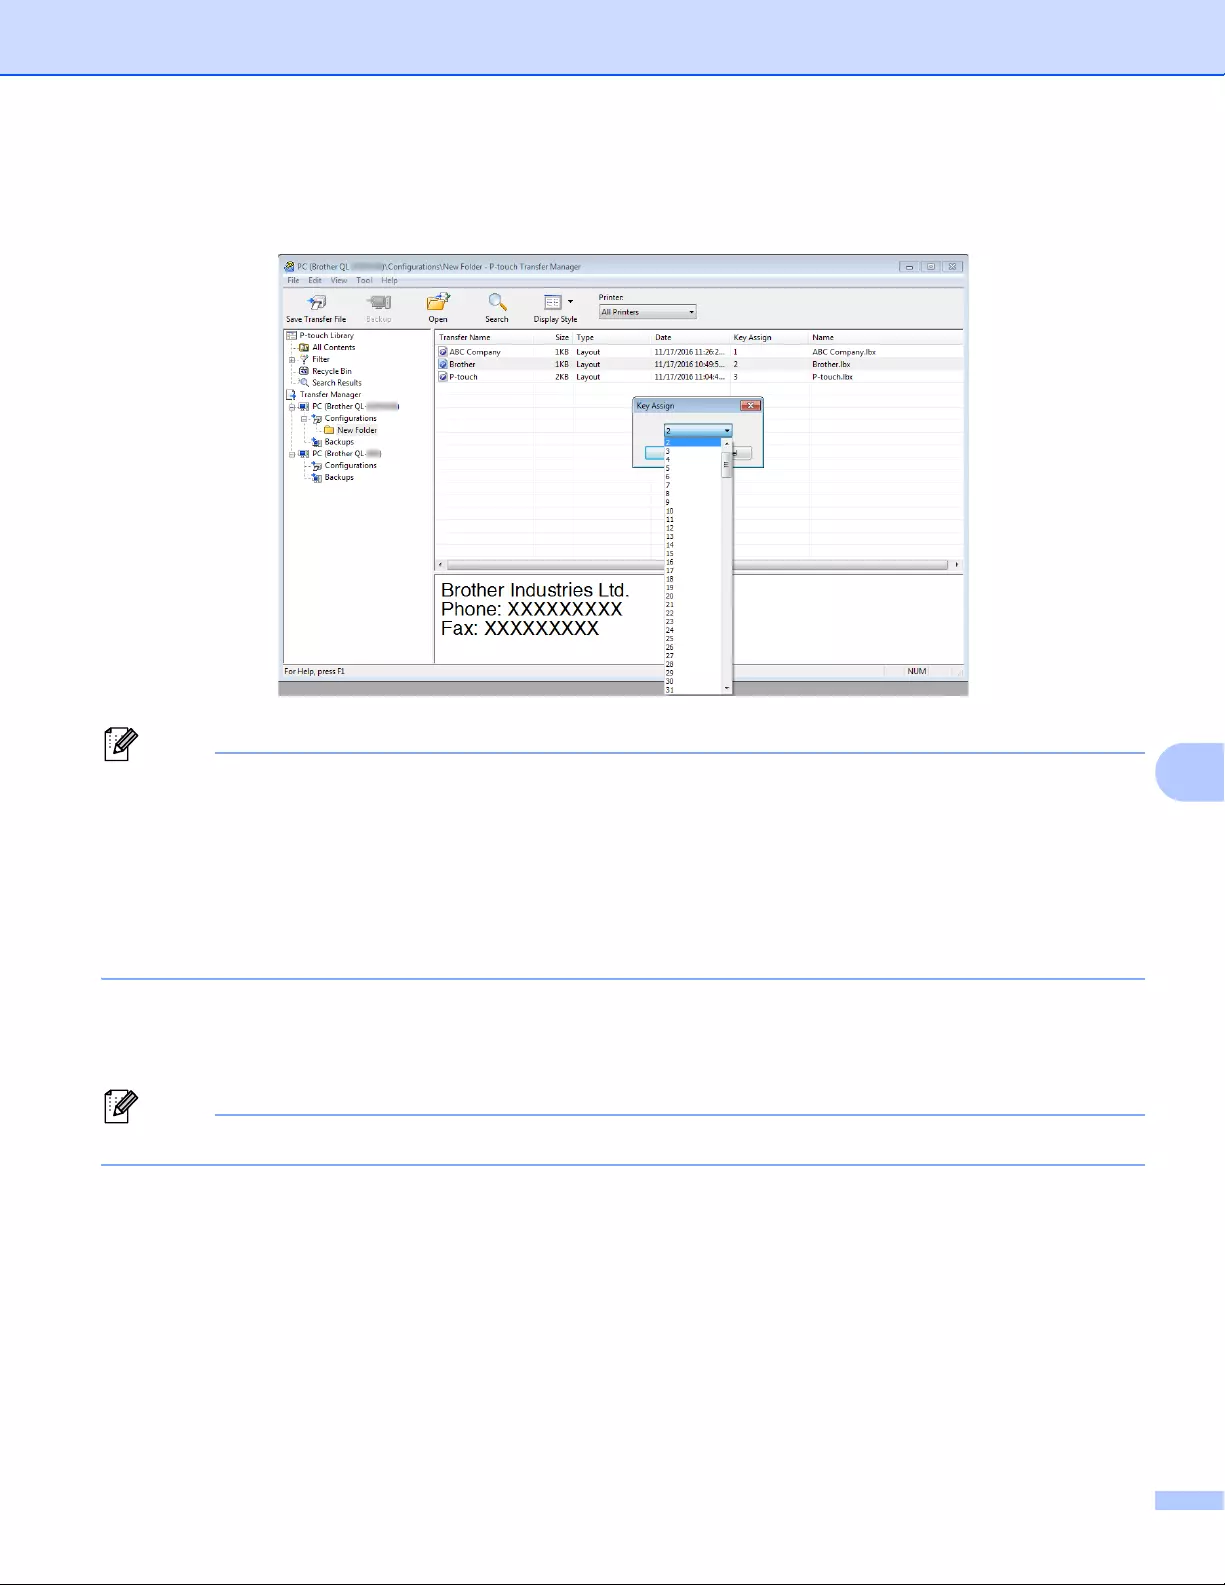
How to Use P-touch Transfer Manager and P-touch Library (Windows® only)
127
9
eTo change the key number assigned to an item, right-click the item, select [Key Assign], and then select
the key number you want.
• Except for the data in databases, all data transferred to the Label Printer is assigned a key number.
• If the template or other data transferred to the Label Printer has the same key number as another template
already saved in the Label Printer, the new template will overwrite the old one. You can confirm the
templates key number assignments saved in the Label Printer by backing up the templates or other data.
For more information, see Backing up Templates or Other Data Saved in the Label Printer on page 129.
• If the Label Printer memory is full, remove one or more templates from the Label Printer’s memory. For
more information, see Backing up Templates or Other Data Saved in the Label Printer on page 129.
fTo change the names of templates or other data that you want to transfer, click the item you want, and
then type the new name. The number of characters used for the template names may be limited
depending on the Label Printer model.
The LCD (QL-820NWB only) displays the first 9 characters of the template file name.
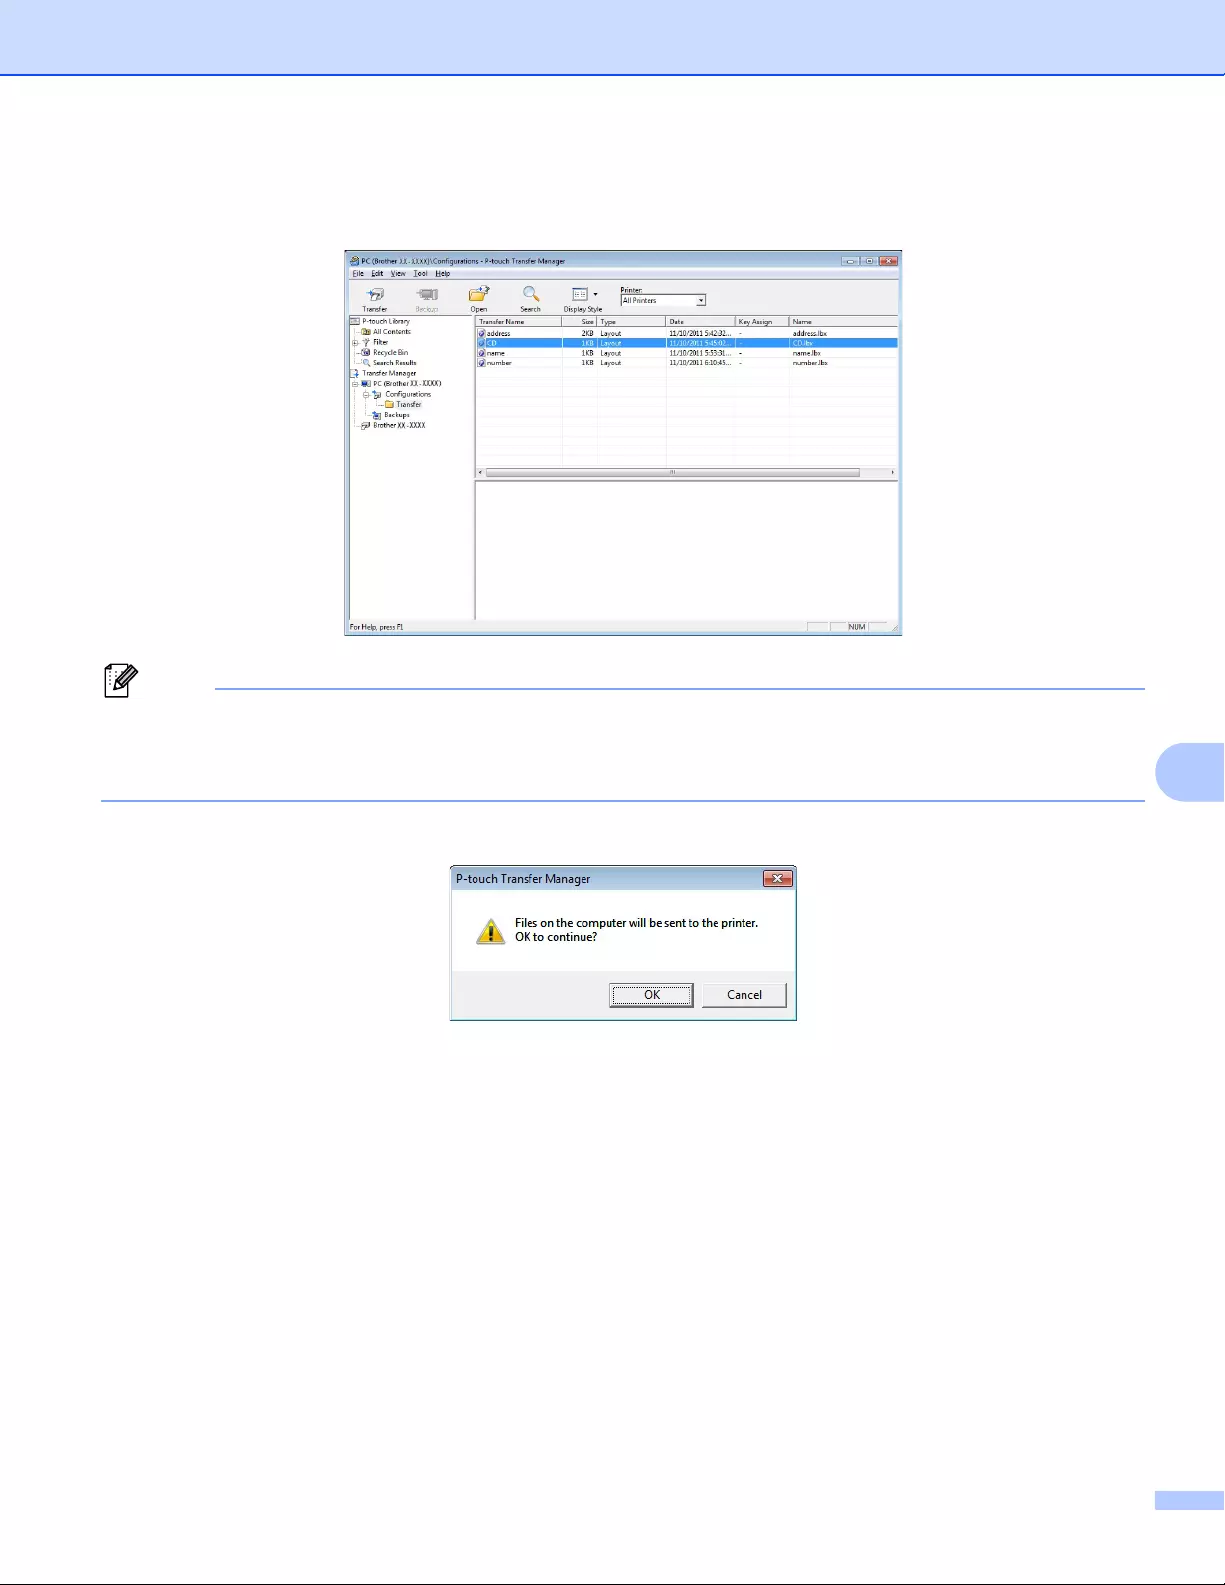
How to Use P-touch Transfer Manager and P-touch Library (Windows® only)
128
9
gSelect the folder containing the templates or other data that you want to transfer, and then click
[Transfer]. A confirmation message appears.
• You can also transfer individual items to the Label Printer without adding them to a folder. Select the
template or other data that you want to transfer, and then click [Transfer].
• Multiple items and folders can be selected and transferred in one operation.
hClick [OK].
The selected items are transferred to the Label Printer.

How to Use P-touch Transfer Manager and P-touch Library (Windows® only)
129
9
Backing up Templates or Other Data Saved in the Label
Printer 9
Use the following procedure to retrieve templates or other data saved in the Label Printer and save it on the
computer.
• Backed up templates or other data cannot be edited on the computer.
• Depending on the Label Printer model, backed up templates or data may not be transferable between
different models.
aConnect the computer and the Label Printer and turn on the Label Printer.
The Label Printer model name appears next to a printer icon in the folder view.
If you select the Label Printer in the folder view, the current templates and other data stored in the Label
Printer appear.
bSelect the Label Printer to back up from, and then click [Backup].
A confirmation message appears.
cClick [OK].
A new folder is created under the Label Printer in the folder view. The folder name is based on the date
and time of the backup. All of the Label Printer’s templates and other data are transferred to the new
folder and saved on the computer.
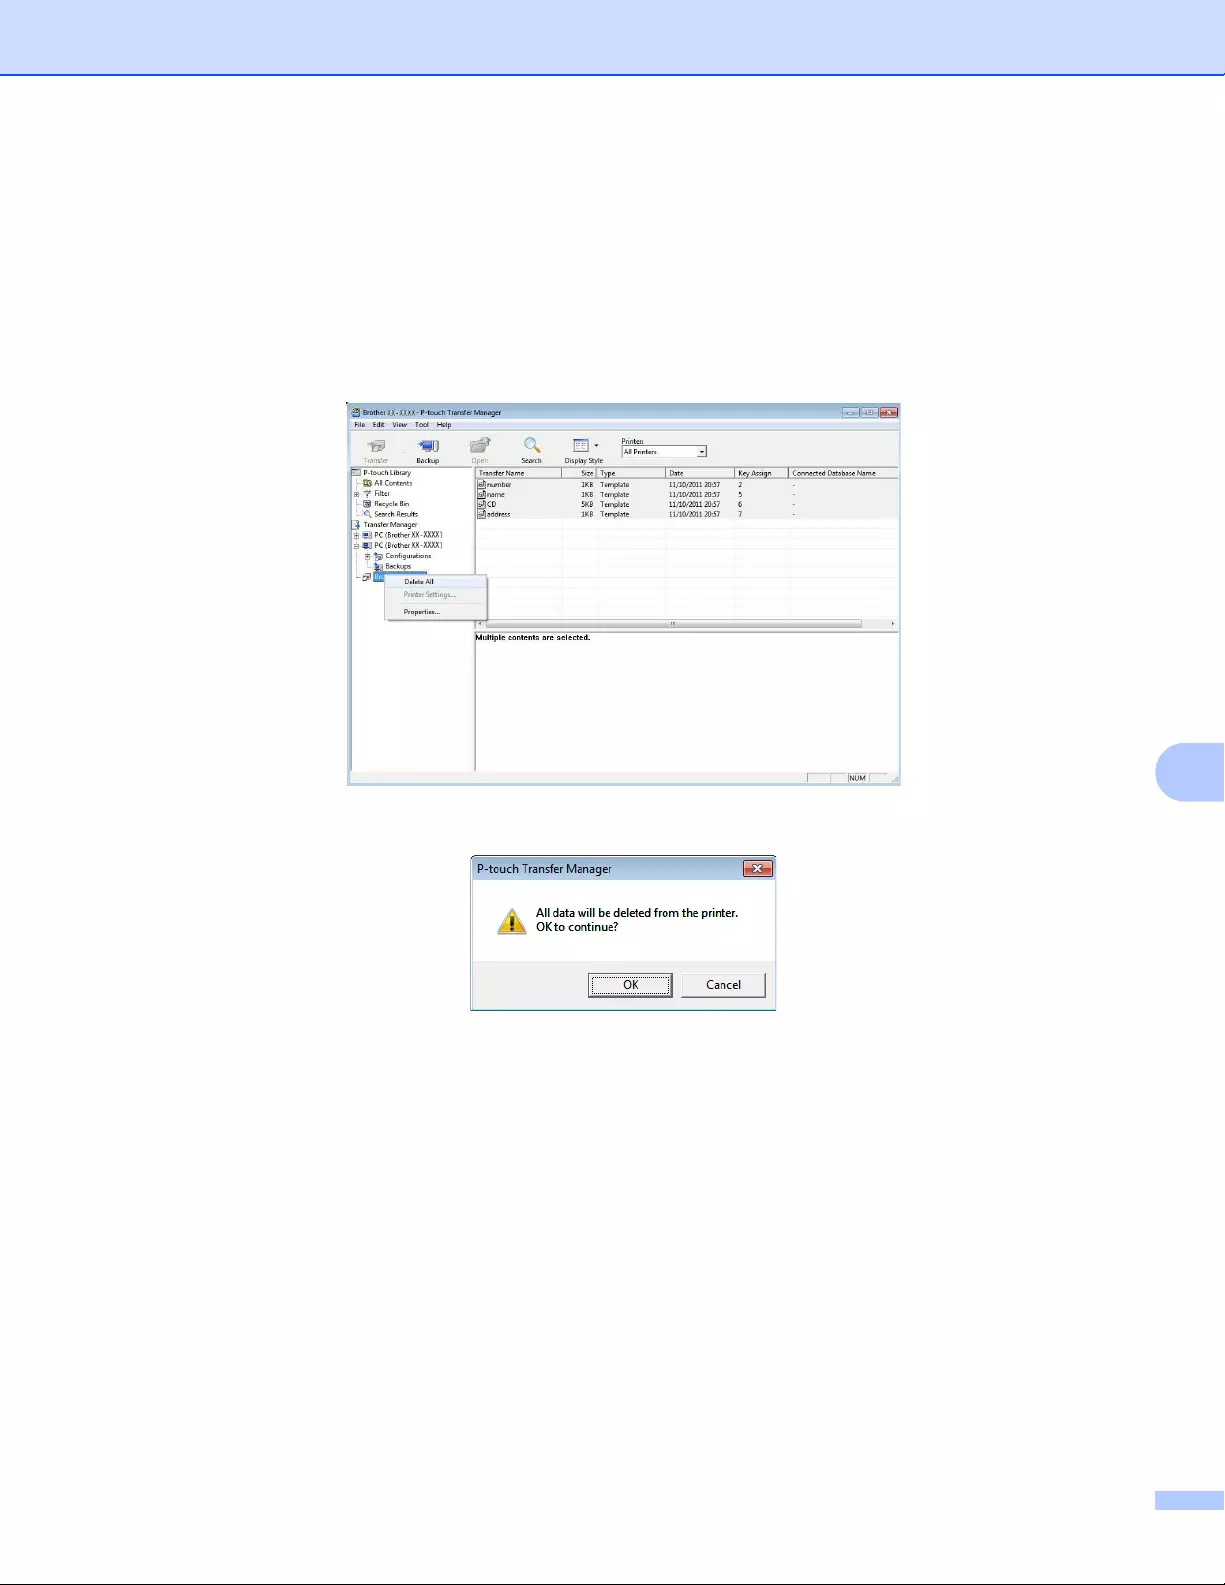
How to Use P-touch Transfer Manager and P-touch Library (Windows® only)
130
9
Deleting Label Printer Data 9
Use the following procedure to delete all templates or other data saved on the Label Printer.
aConnect the computer and the Label Printer and turn on the Label Printer.
The Label Printer model name appears next to a printer icon in the folder view.
bRight-click the Label Printer, and then select [Delete All].
A confirmation message appears.
cClick [OK].
All templates and other data saved in the Label Printer is deleted.
How to Use P-touch Transfer Manager and P-touch Library (Windows® only)
131
9
Creating Transfer Files and Transfer Package Files 9
You can use P-touch Transfer Manager to save template data, which was created using P-touch Editor, in
the BLF or PDZ format. You can transfer these files in this format to a Label Printer over a network, from a
computer or mobile device. You can also print files in BLF format from mass storage mode.
aCreate the template using P-touch Editor, and then transfer it to P-touch Transfer Manager.
For more information, see Transferring the Template to P-touch Transfer Manager on page 121.
bWithout connecting the Label Printer to the computer, select [Configurations] in the P-touch Transfer
Manager window, and then select the template to save.
You can select multiple templates at the same time.
cClick [File] — [Save Transfer File].
The [Save Transfer File] button appears only if the Label Printer is disconnected from the computer or
offline.
• If you click [Save Transfer File] after selecting [Configurations], all templates in the folder are saved as
the Transfer file (.blf) or Transfer Package file (.pdz).
• You can combine multiple templates into a single Transfer file (.blf) or Transfer Package file (.pdz).
dIn [Save as type], select the template format you want, and then type in the name and save the template.
Select the BLF format when printing using the mass storage mode or connecting your mobile device to
the Label Printer using Wireless Direct or Wi-Fi, and select the PDZ format when connecting using
Bluetooth.
The templates are saved as a Transfer file (.blf) or Transfer Package file (.pdz).
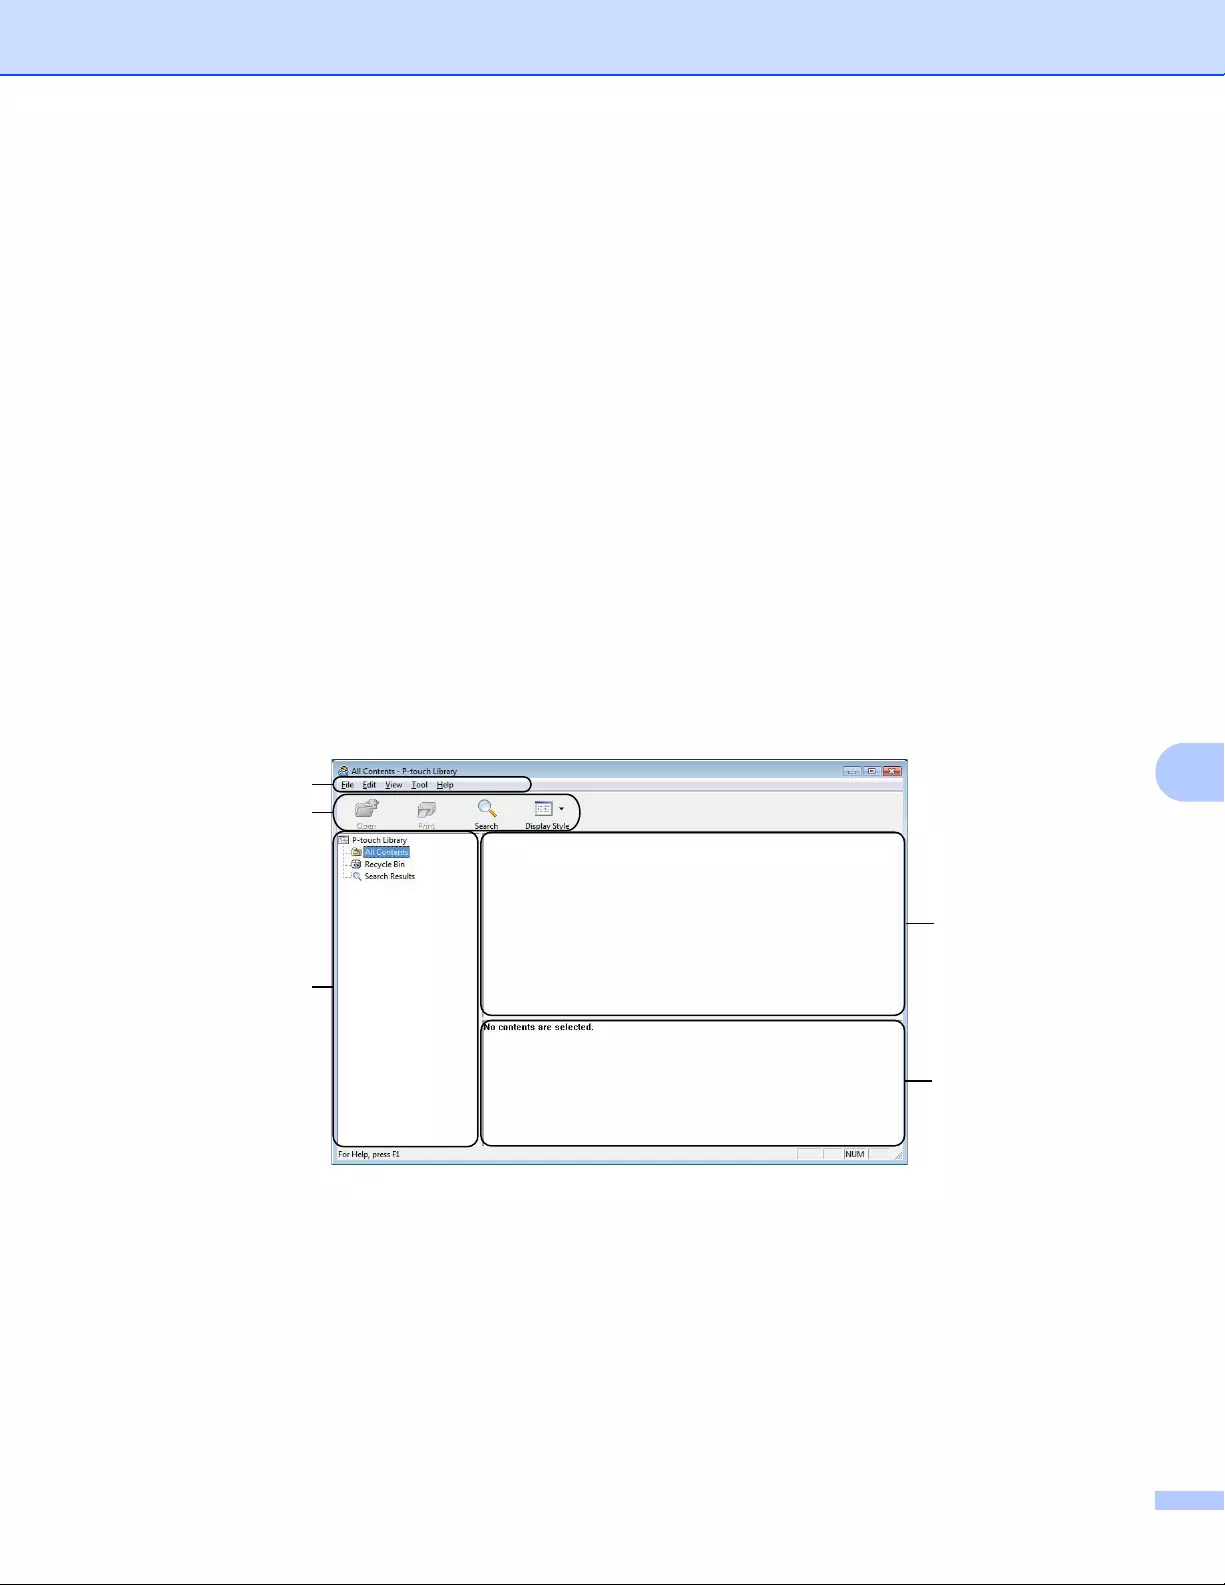
How to Use P-touch Transfer Manager and P-touch Library (Windows® only)
132
9
P-touch Library 9
This program allows you to manage and print P-touch Editor templates.
Starting P-touch Library 9
For Windows Vista® / Windows®7 / Windows Server® 2008 / Windows Server® 2008 R2:
From the Start button, click [All Programs] — [Brother P-touch] — [P-touch Tools] — [P-touch Library 2.2].
For Windows®8 / Windows®8.1 / Windows Server® 2012 / Windows Server® 2012 R2:
Click [P-touch Library 2.2] on the [Apps] screen.
For Windows® 10:
From the Start button, click [P-touch Library 2.2] under [Brother P-touch].
When P-touch Library starts, the Main window appears.
Main window 9
1 Menu Bar
Provides access to all available commands, which are grouped under each menu title ([File], [Edit],
[View], [Tool], and [Help]) according to their functions.
2 Toolbar
Provides access to frequently used commands.
3 Folder List
Displays a list of folders. When you select a folder, the templates in the selected folder appear in the
templates list.
2
3
1
4
5
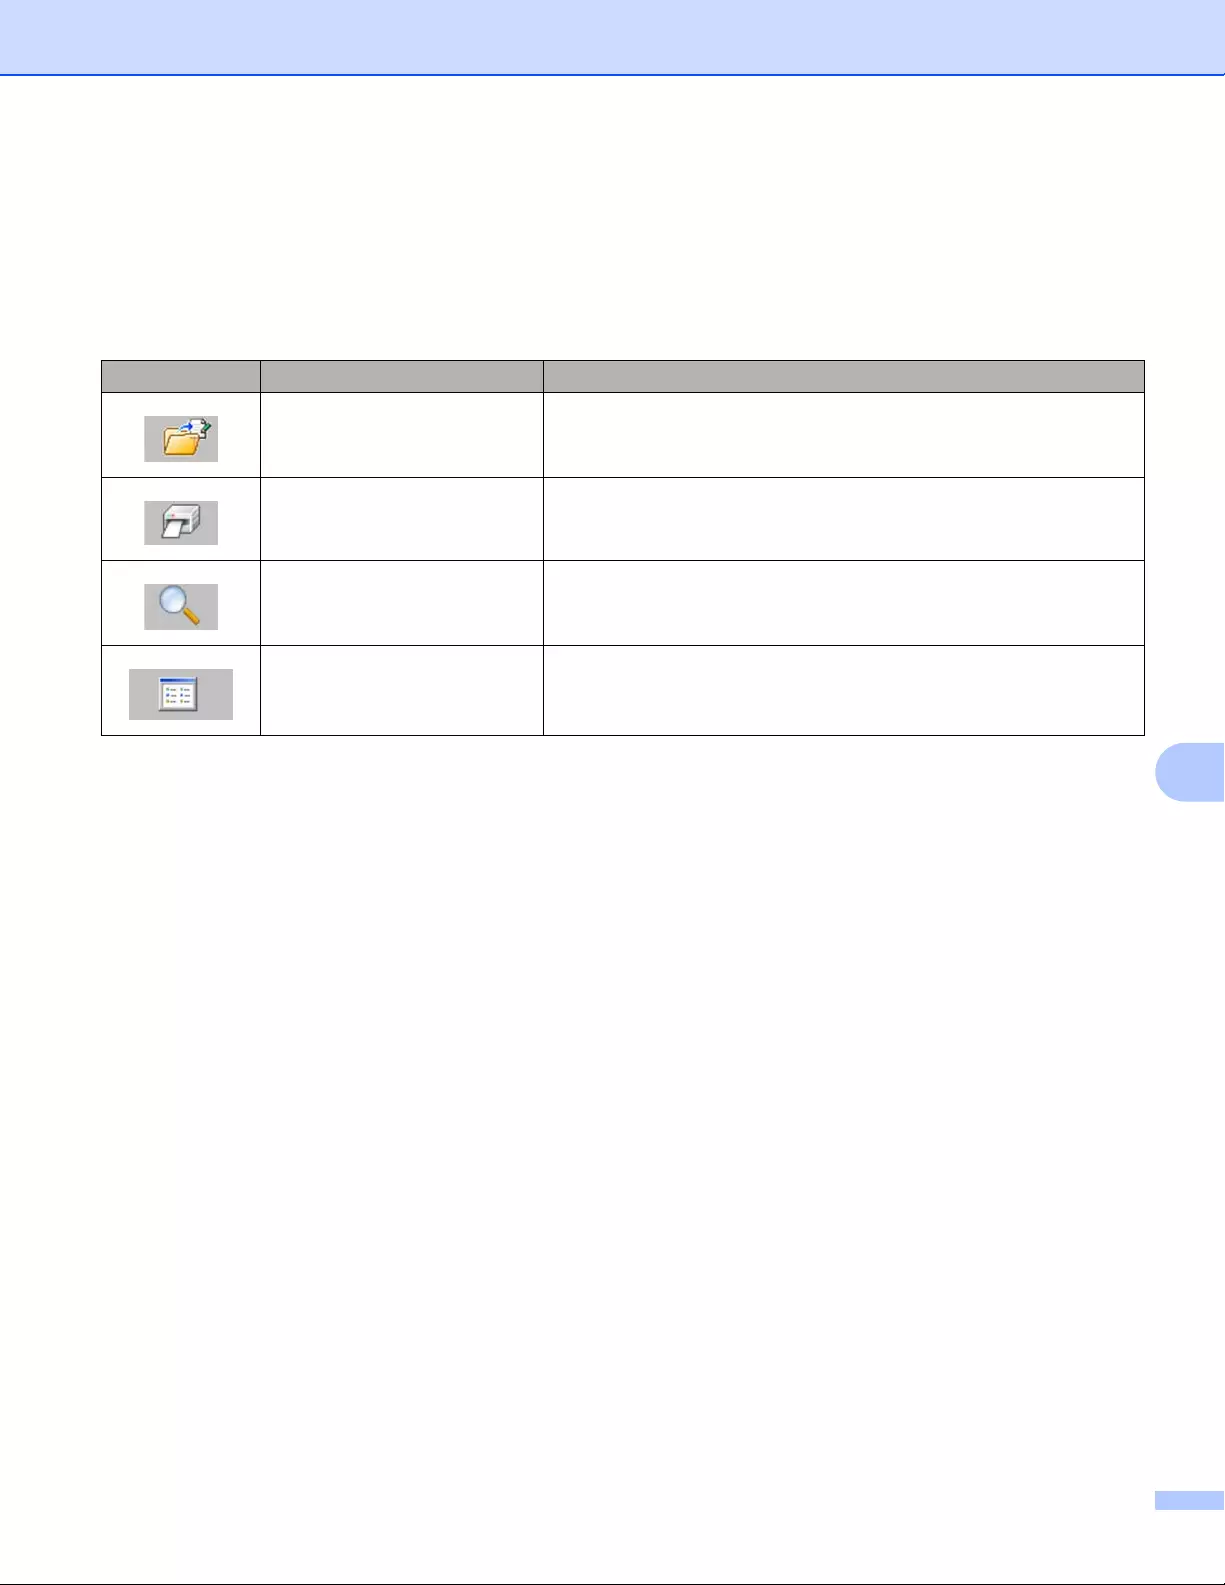
How to Use P-touch Transfer Manager and P-touch Library (Windows® only)
133
9
4 Templates List
Displays a list of the templates in the selected folder.
5Preview
Displays a preview of the templates selected in the templates list.
Explanations of the Toolbar Icons
Icon Button name Function
Open Opens the selected template.
Print Prints the selected template with the Label Printer.
Search Allows you to search for templates registered to P-touch Library.
Display Style Changes the file display style.

How to Use P-touch Transfer Manager and P-touch Library (Windows® only)
134
9
Opening and Editing Templates 9
Select the template you want to open or edit, and then click [Open].
The program associated with the template starts so that you can edit the template.
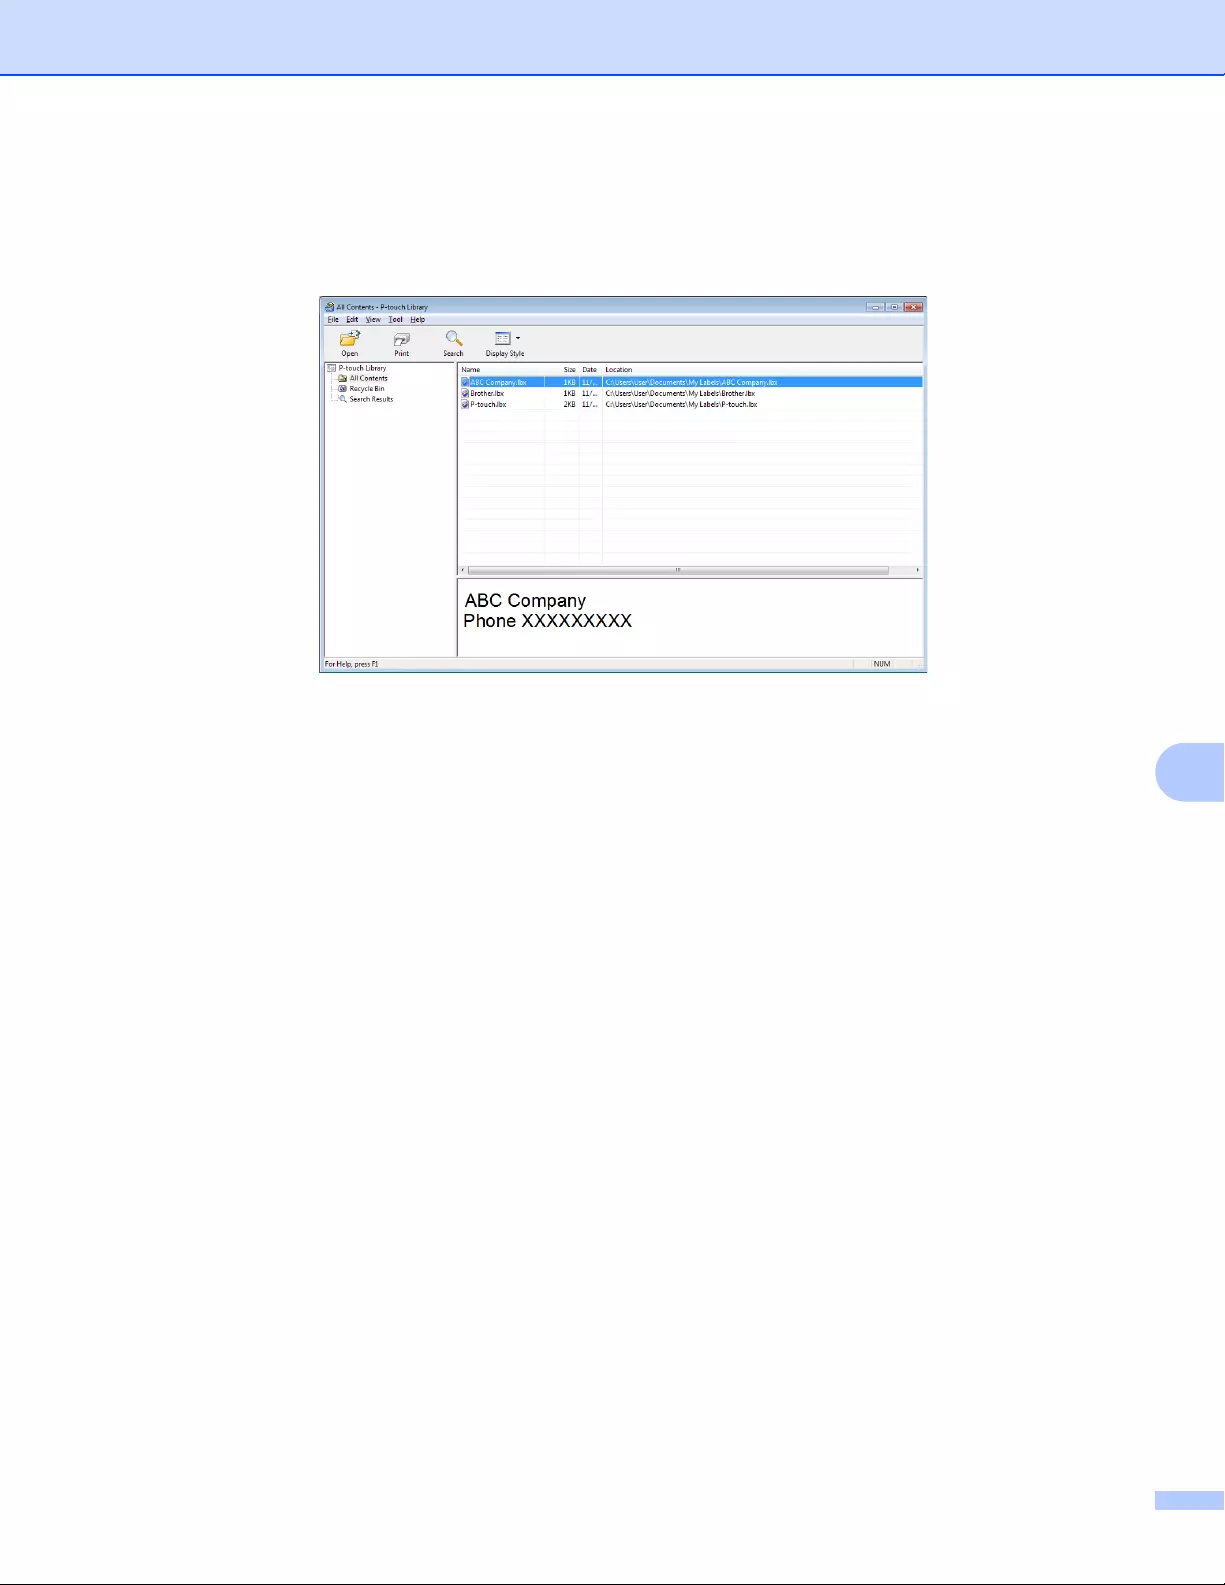
How to Use P-touch Transfer Manager and P-touch Library (Windows® only)
135
9
Printing Templates 9
Select the template you want to print, and then click [Print].
The connected Label Printer prints the template.

How to Use P-touch Transfer Manager and P-touch Library (Windows® only)
136
9
Searching for Templates 9
You can search for templates registered to P-touch Library.
aClick [Search].
The Search dialog box appears.
bSpecify the search criteria.
The following search criteria are available:
cClick [Begin Search].
The search begins.
The search result is displayed on the screen.
Settings Details
Multiple Parameters Determines how the program searches when multiple criteria are specified. If you select
[AND], the program searches for files that satisfy all of the criteria.
If you select [OR], the program searches for files that satisfy any of the criteria.
Name Search for a template by specifying the file name.
Type Search for a template by specifying the file type.
Size Search for a template by specifying the file size.
Date Search for a template by specifying the file date.

How to Use P-touch Transfer Manager and P-touch Library (Windows® only)
137
9
dClose the Search dialog box.
To confirm the search results, click [Search Results] in the folder view.
You can register templates to P-touch Library by dragging and dropping them into the [All Contents] folder
or to the folder list. You can also configure P-touch Editor to register templates to P-touch Library
automatically, using the following procedure:
1 From the P-touch Editor menu, select [Tools] — [Options].
2 In the Options dialog box, click [Registration Settings] in the [General] tab.
3 Select the timing for registering templates created with P-touch Editor, and then click [OK].
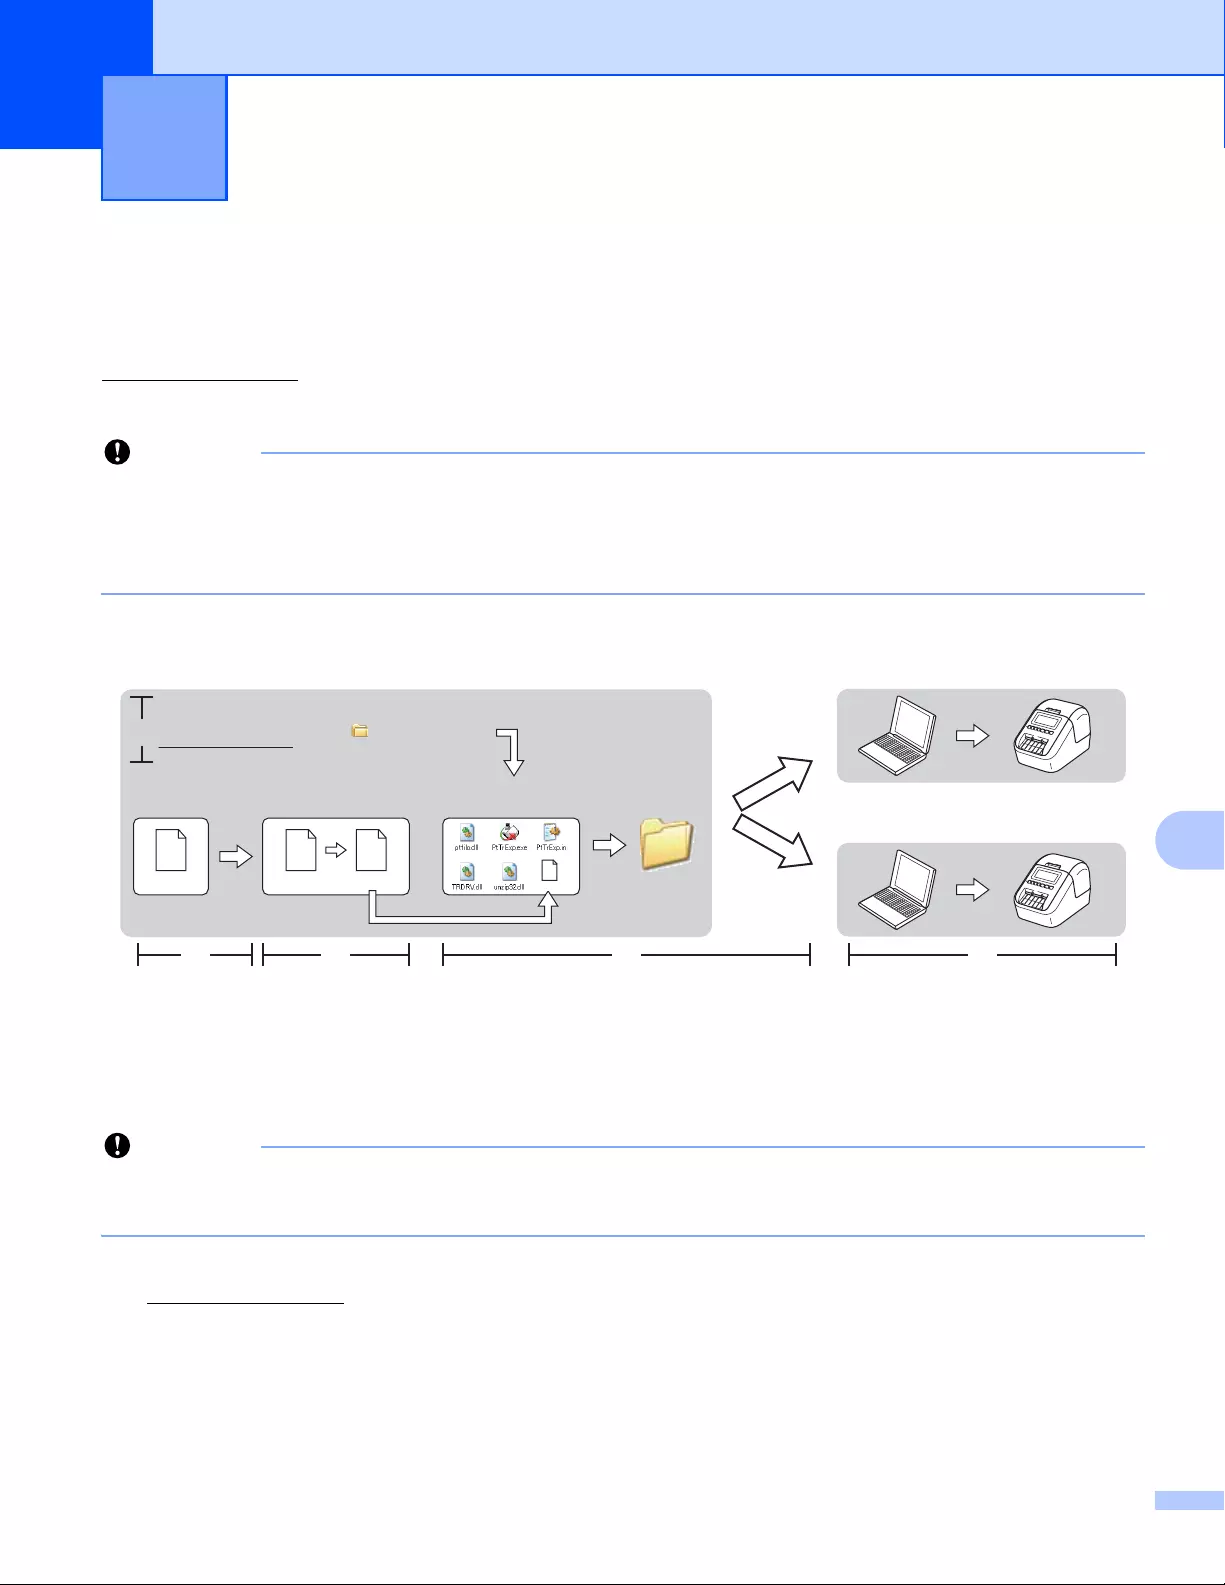
138
10
10
You can transfer templates to the Label Printer using P-touch Transfer Express. First, the administrator
creates a template, and then distributes it together with P-touch Transfer Express. You can then use P-touch
Transfer Express to transfer the template directly to your Label Printer.
You can download the latest P-touch Transfer Express from the Brother Solutions Center at
support.brother.com
[Select your region/country.] — [Downloads] — [Choose your product]
• If you want to transfer a new template, make sure you specify a [Key Assign] number (in P-touch Transfer
Manager) that is not currently used. If the specified [Key Assign] number is already being used, the
existing template will be overwritten with the new one.
• This function requires a USB connection.
Preparing P-touch Transfer Express 10
The user must prepare P-touch Transfer Express for transferring templates to a Label Printer.
• The printer driver must be installed before using Transfer Express.
• P-touch Transfer Express is available only in English.
aYou can download the latest P-touch Transfer Express from the Brother Solutions Center at
support.brother.com
[Select your region/country.] — [Downloads] — [Choose your product]
bDownload Transfer Express to any location on the computer.
cDecompress the downloaded file (.zip).
Transferring Templates with P-touch
Transfer Express (Windows® only) 10
Administrator Users
Brother Solutions Center
support.brother.com
P-touch
Editor
P-touch
Transfer Manager
Transfer Express
xxx.lbx xxx.lbx xxx.pdz
1.
2. 3. 4. 5.
P-touch
Transfer Express
xxx.pdz
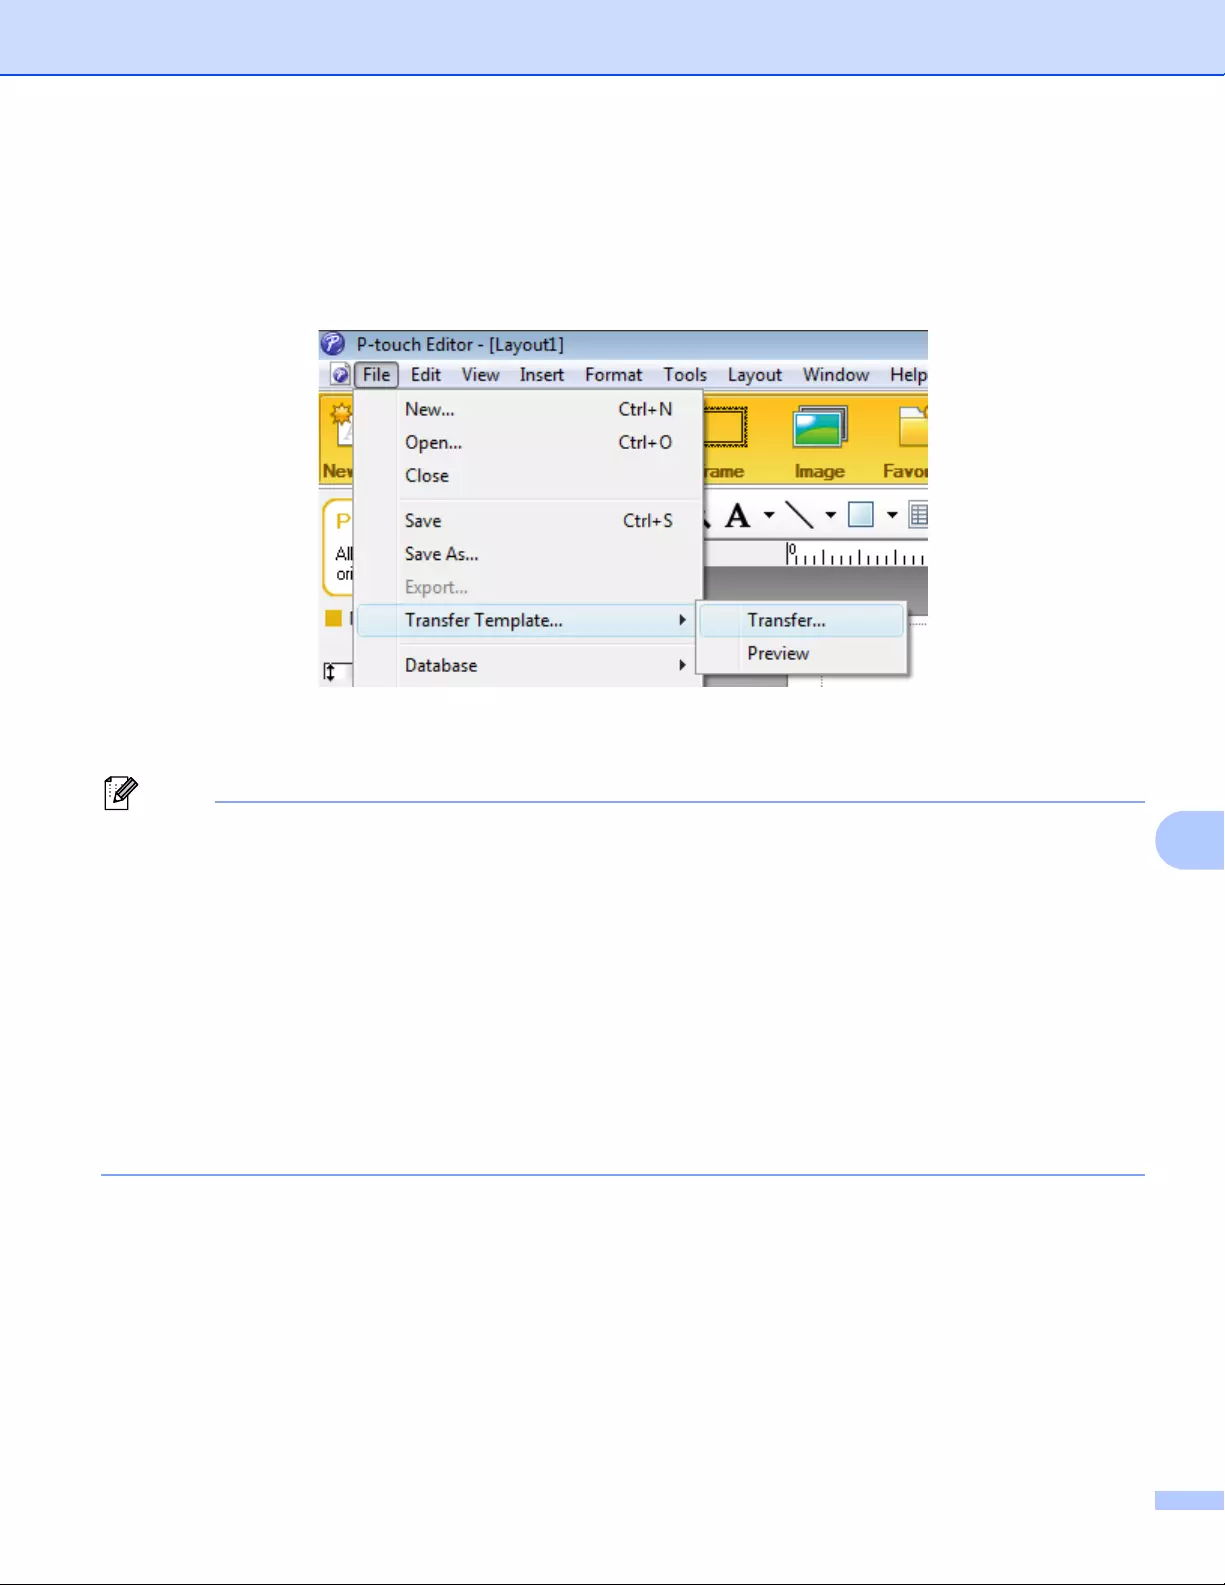
Transferring Templates with P-touch Transfer Express (Windows® only)
139
10
Transferring the Template to P-touch Transfer Manager 10
aIn P-touch Editor, open the template you want.
bClick [File] — [Transfer Template] — [Transfer].
The template is transferred to P-touch Transfer Manager.
P-touch Transfer Manager automatically starts up.
•For Windows Vista® / Windows®7 / Windows Server® 2008 / Windows Server® 2008 R2:
The template can also be transferred to P-touch Transfer Manager by clicking the Start button — [All
Programs] — [Brother P-touch] — [P-touch Tools] — [P-touch Transfer Manager 2.2] to start P-touch
Transfer Manager, and then dragging the .lbx file to the P-touch Transfer Manager window.
•For Windows®8 / Windows®8.1 / Windows Server® 2012 / Windows Server® 2012 R2:
The template can also be transferred to P-touch Transfer Manager by clicking [P-touch Transfer
Manager 2.2] on the [Apps] screen to start P-touch Transfer Manager, and then dragging the .lbx file to
the P-touch Transfer Manager window.
•For Windows® 10:
The template can also be transferred to P-touch Transfer Manager by clicking the Start button, then click
[Brother P-touch] — [P-touch Transfer Manager 2.2] to start P-touch Transfer Manager, and then
dragging the .lbx file to the P-touch Transfer Manager window.
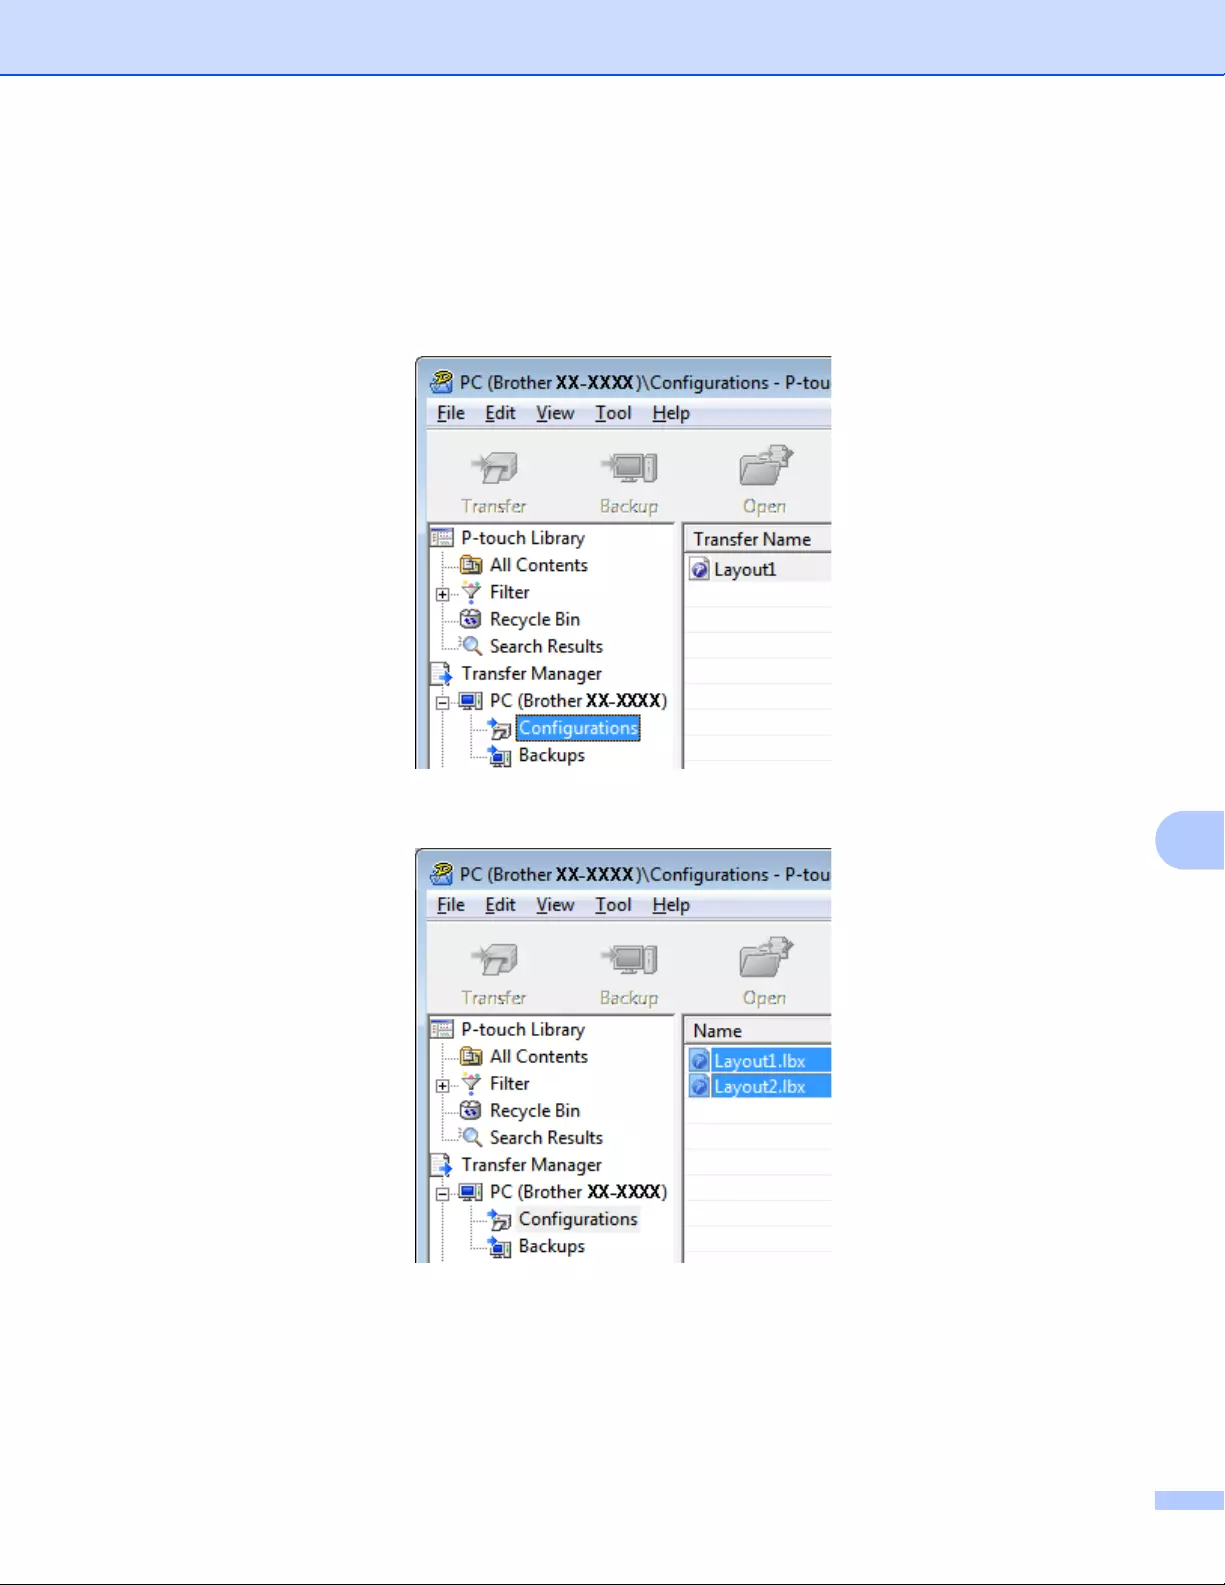
Transferring Templates with P-touch Transfer Express (Windows® only)
140
10
Saving the Template as a Transfer Package File (.pdz) 10
To create a file in a format that can be used by P-touch Transfer Express, save the template as a Transfer
Package file (.pdz).
aIn the folder view, select [Configurations].
bSelect the templates you want to distribute.
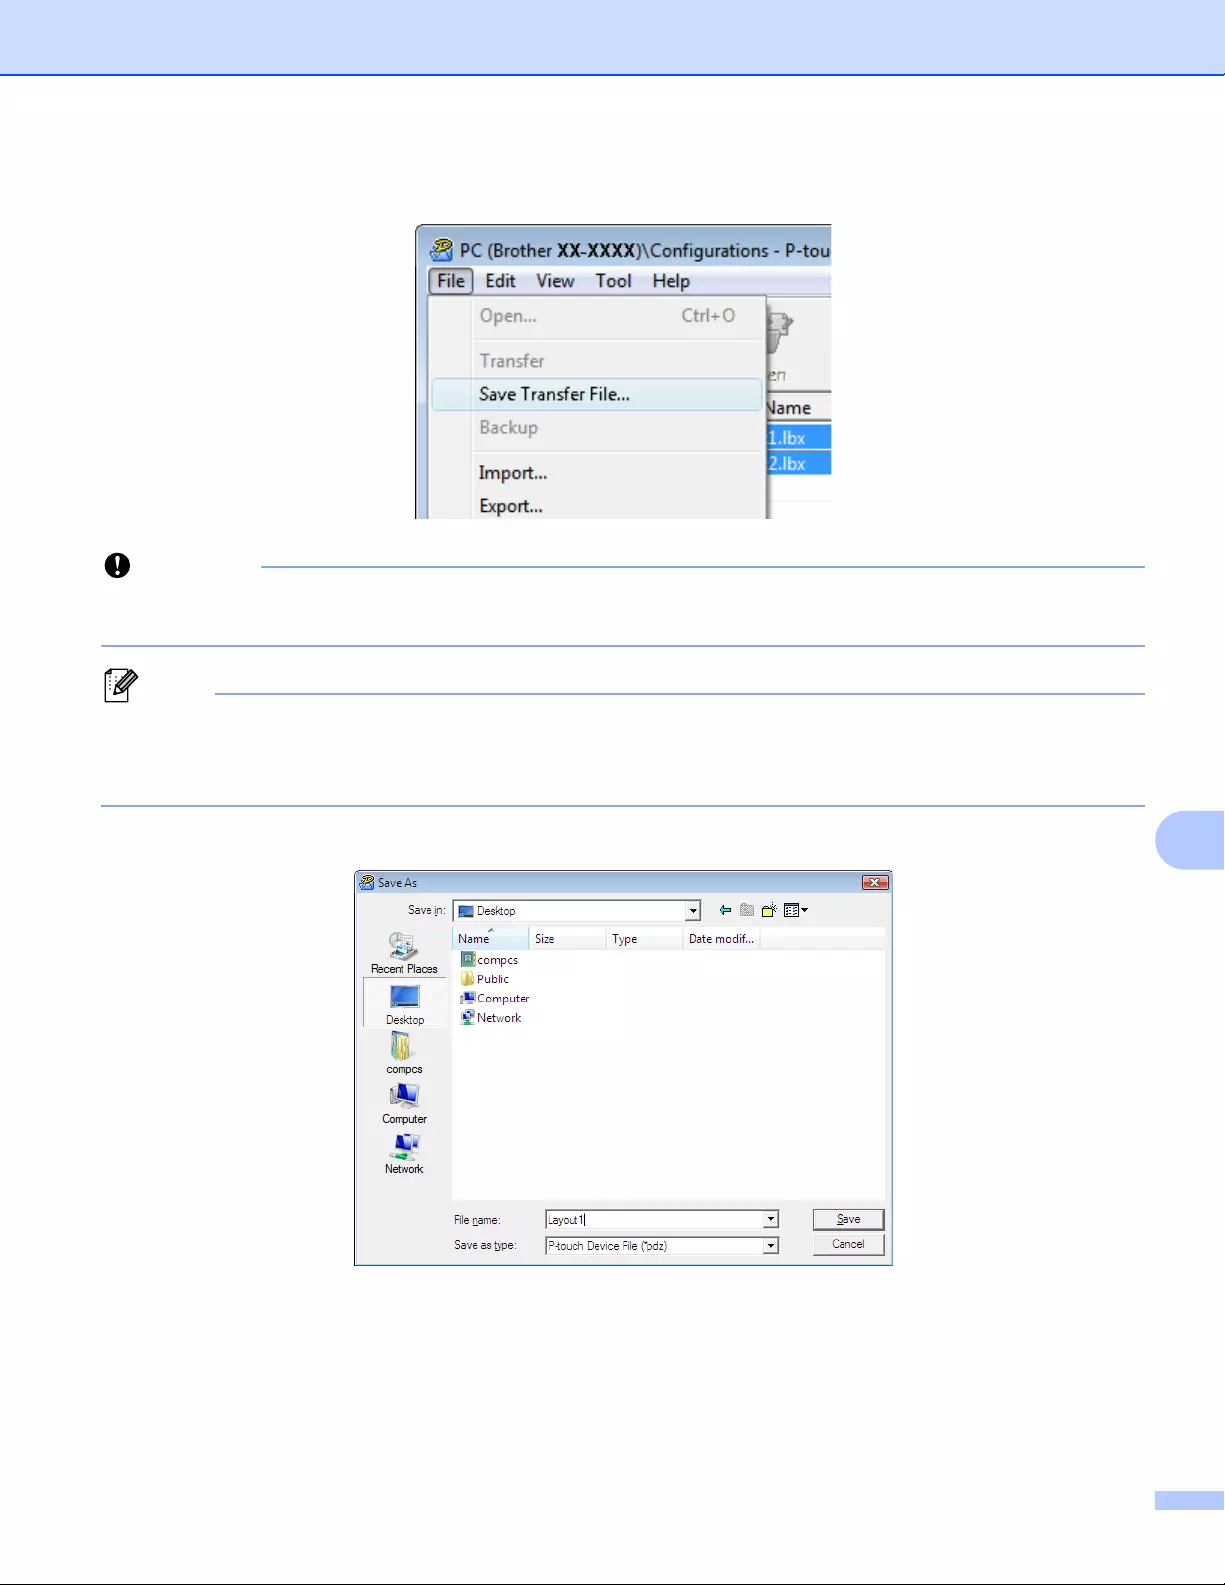
Transferring Templates with P-touch Transfer Express (Windows® only)
141
10
cClick [File] — [Save Transfer File].
The [Save Transfer File] button appears only if the Label Printer is disconnected from the computer or
offline.
• If you click [Save Transfer File] after selecting [Configurations] or a created folder, all templates in the
folder are saved as the Transfer Package file (.pdz).
• You can combine multiple templates into a single Transfer Package file (.pdz).
dType in the name, and then click [Save].
The template is saved as a Transfer Package file (.pdz).
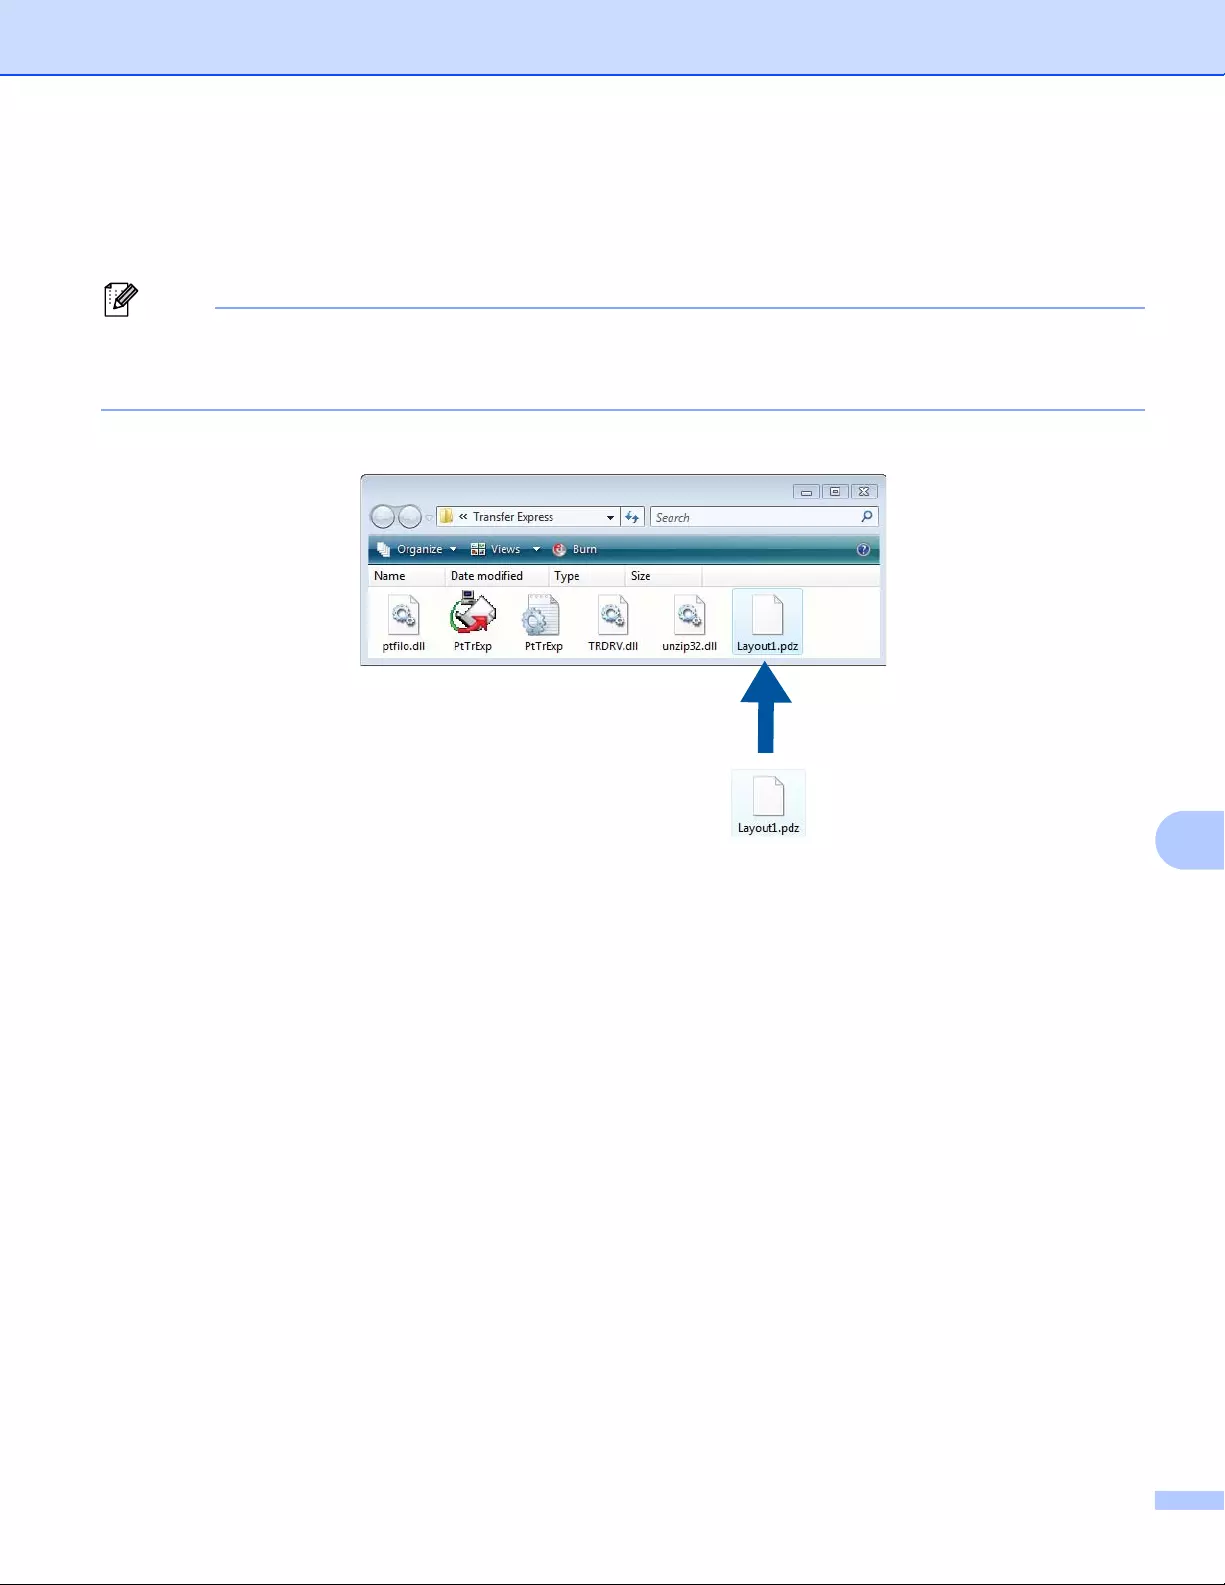
Transferring Templates with P-touch Transfer Express (Windows® only)
142
10
Distributing the Transfer Package File (.pdz) and P-touch
Transfer Express to the User 10
If the user already has P-touch Transfer Express downloaded, it is not necessary for the administrator to
send the Transfer Express folder to the user. In this case, the user can simply move the distributed
Transfer Package file to the downloaded folder, and then double-click [PtTrExp.exe].
aMove the Transfer Package file (.pdz) to the downloads folder.
bDistribute all files in the downloads folder to the user.
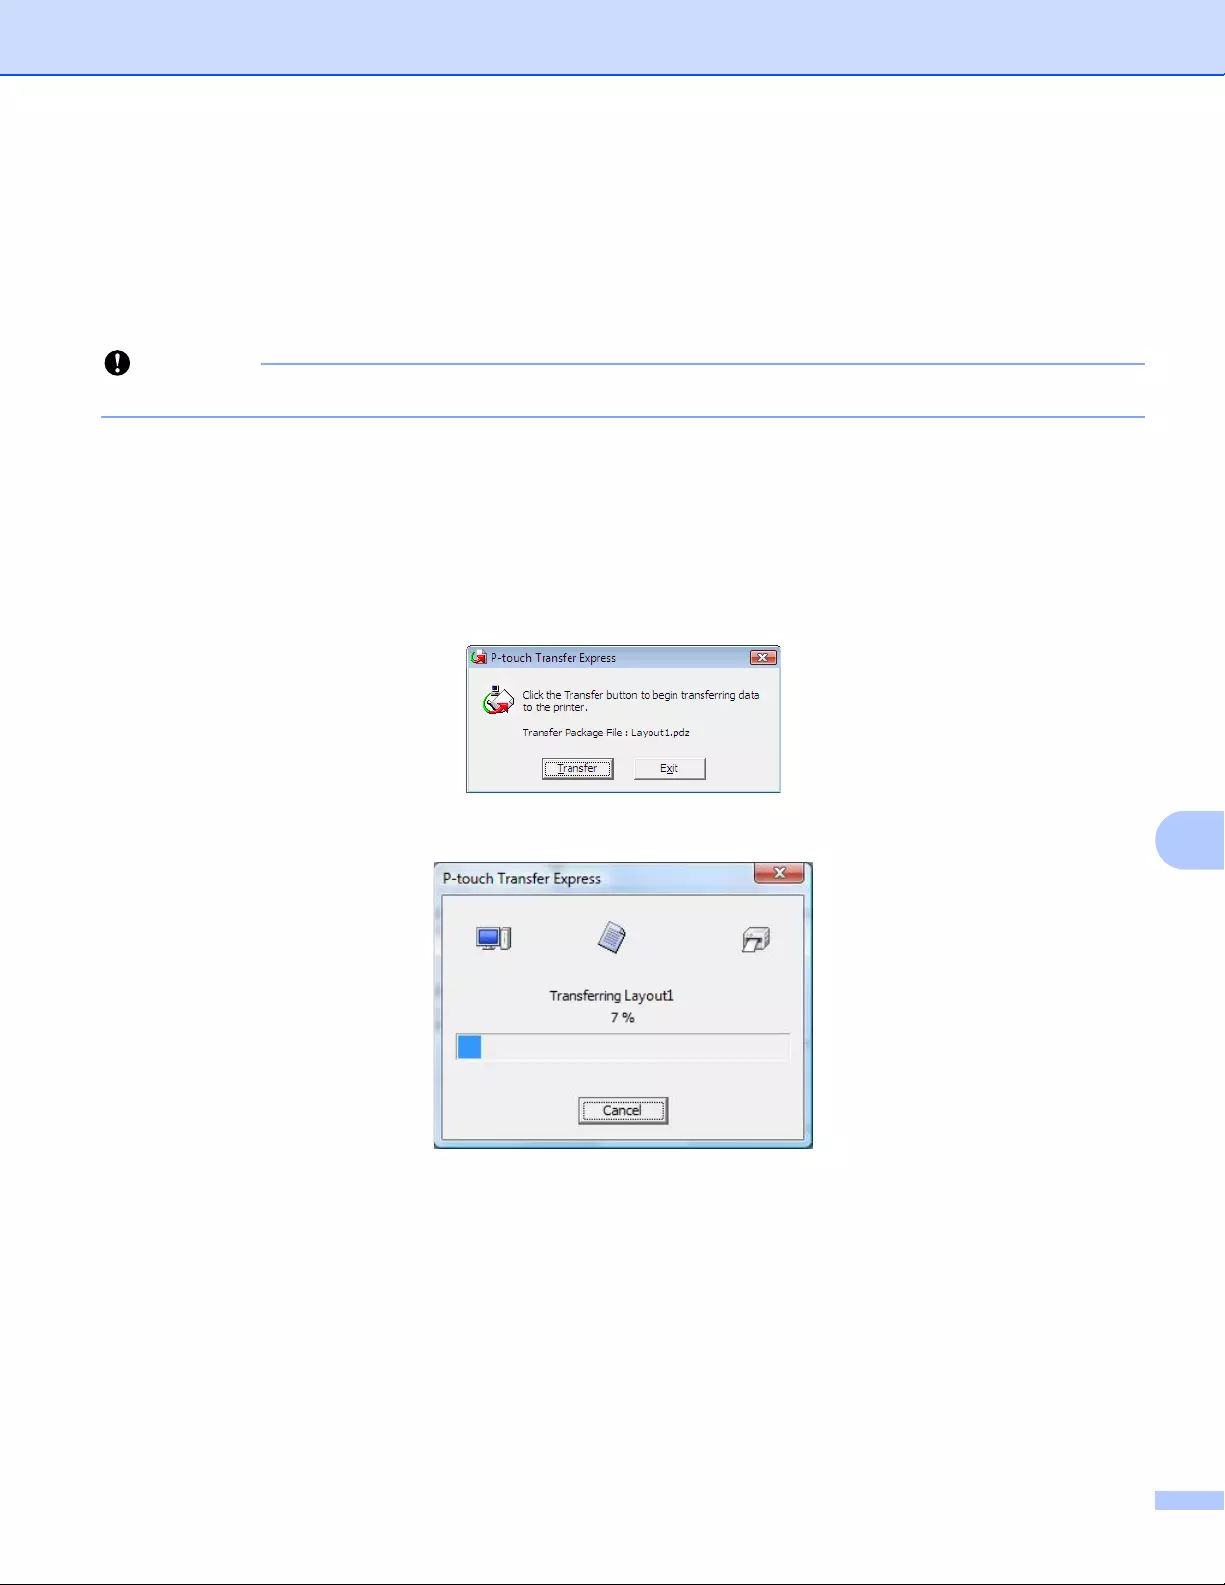
Transferring Templates with P-touch Transfer Express (Windows® only)
143
10
Transferring the Transfer Package File (.pdz) to Your Label
Printer 10
Using the P-touch Transfer Express application received from the administrator, the user can transfer the
Transfer Package file (.pdz) to the Label Printer.
Do not turn off the power when transferring templates.
aTurn on the Label Printer.
bUsing a USB cable, connect the Label Printer to the computer.
cDouble-click [PtTrExp.exe], which was received from the administrator.
d1 When there is a single Transfer Package file (.pdz) within the folder containing [PtTrExp.exe], click
[Transfer].
The transfer of the Transfer Package file begins.
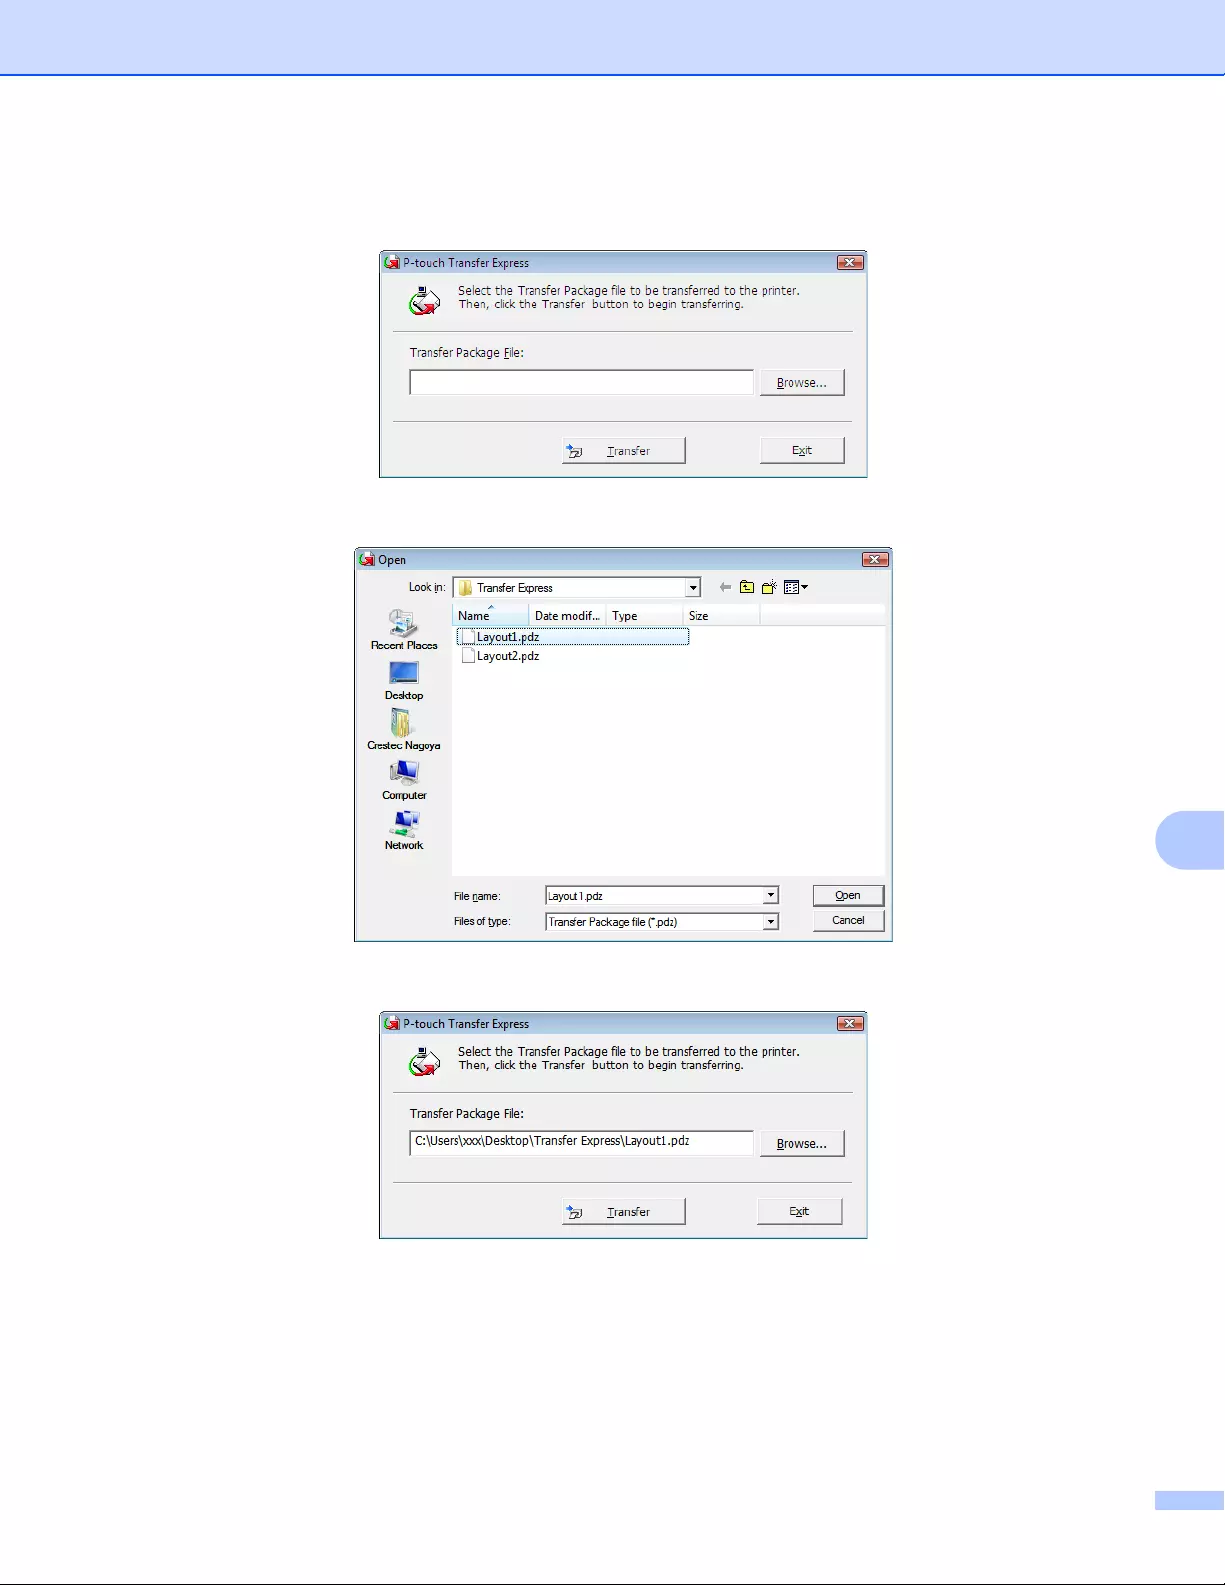
Transferring Templates with P-touch Transfer Express (Windows® only)
144
10
2 When there are either multiple or no Transfer Package files (.pdz) within the folder containing
[PtTrExp.exe], click [Browse].
Select the Transfer Package file you want to transfer, and then click [Open].
Click [Transfer].
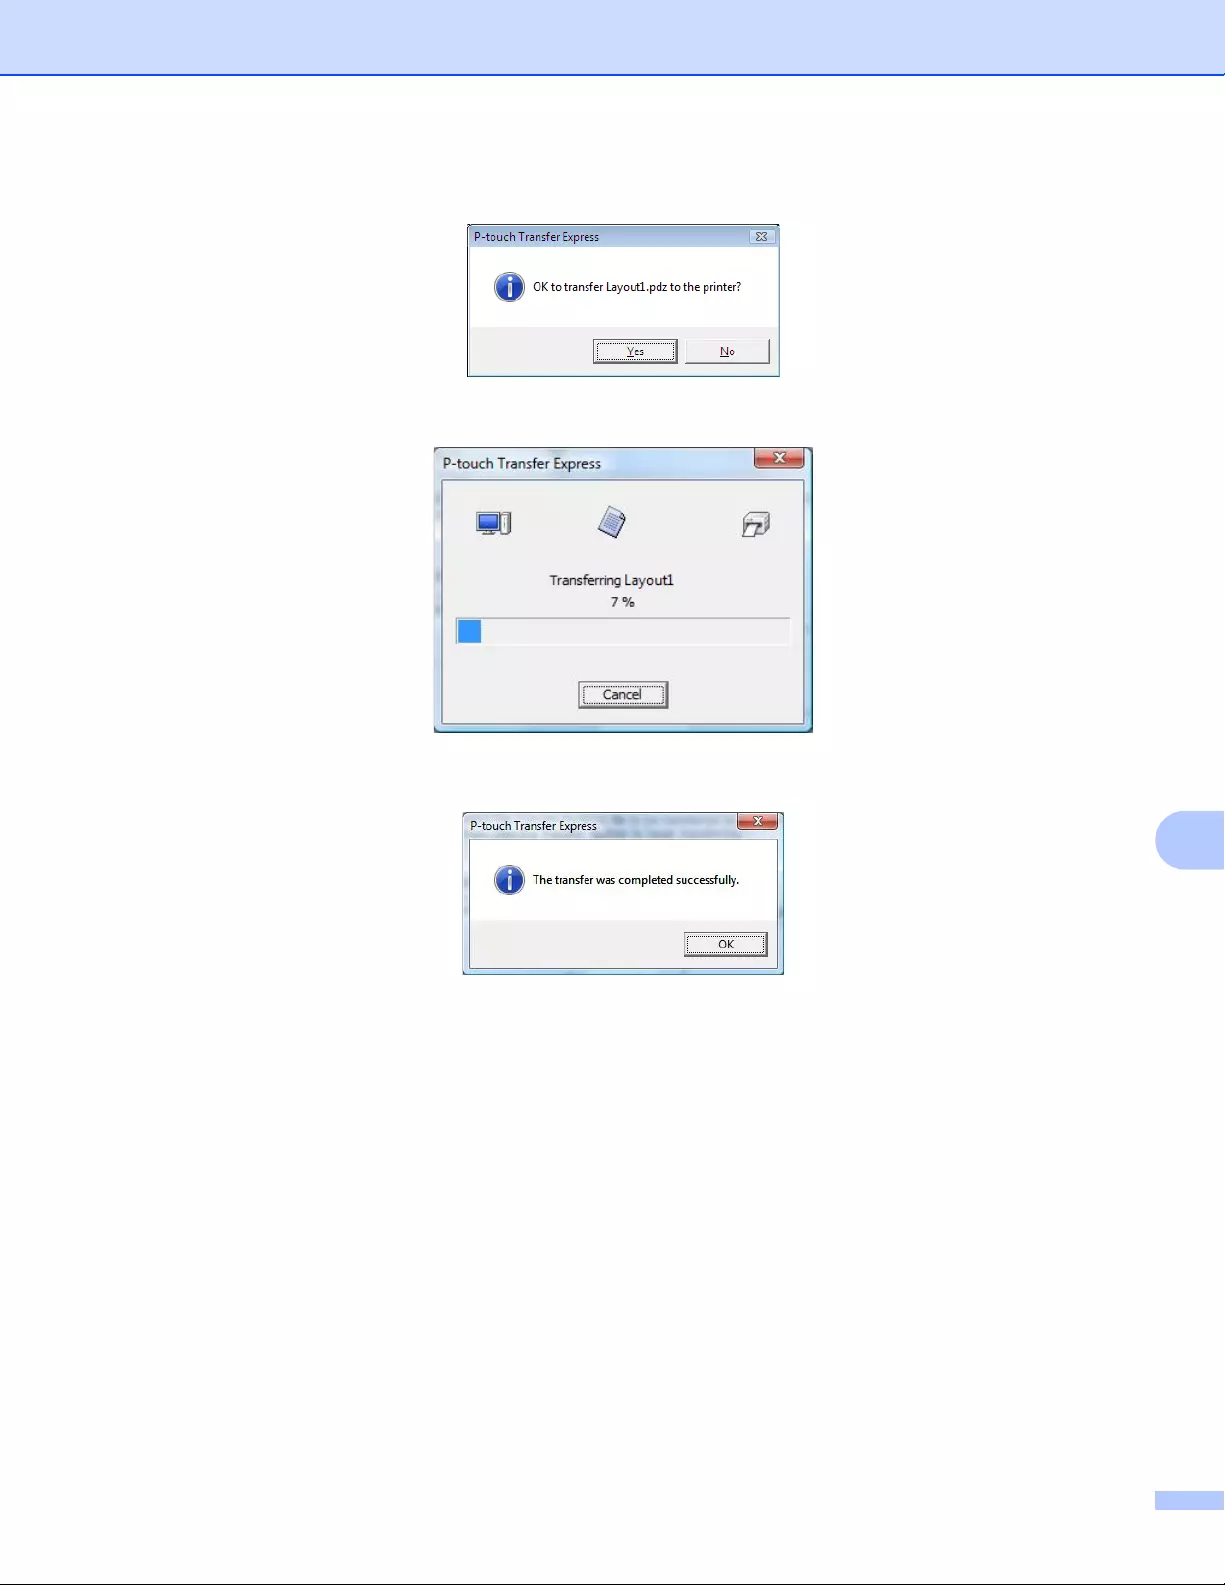
Transferring Templates with P-touch Transfer Express (Windows® only)
145
10
Click [Yes].
The transfer of the Transfer Package file begins.
eClick [OK].
The transfer of the Transfer Package file is completed.
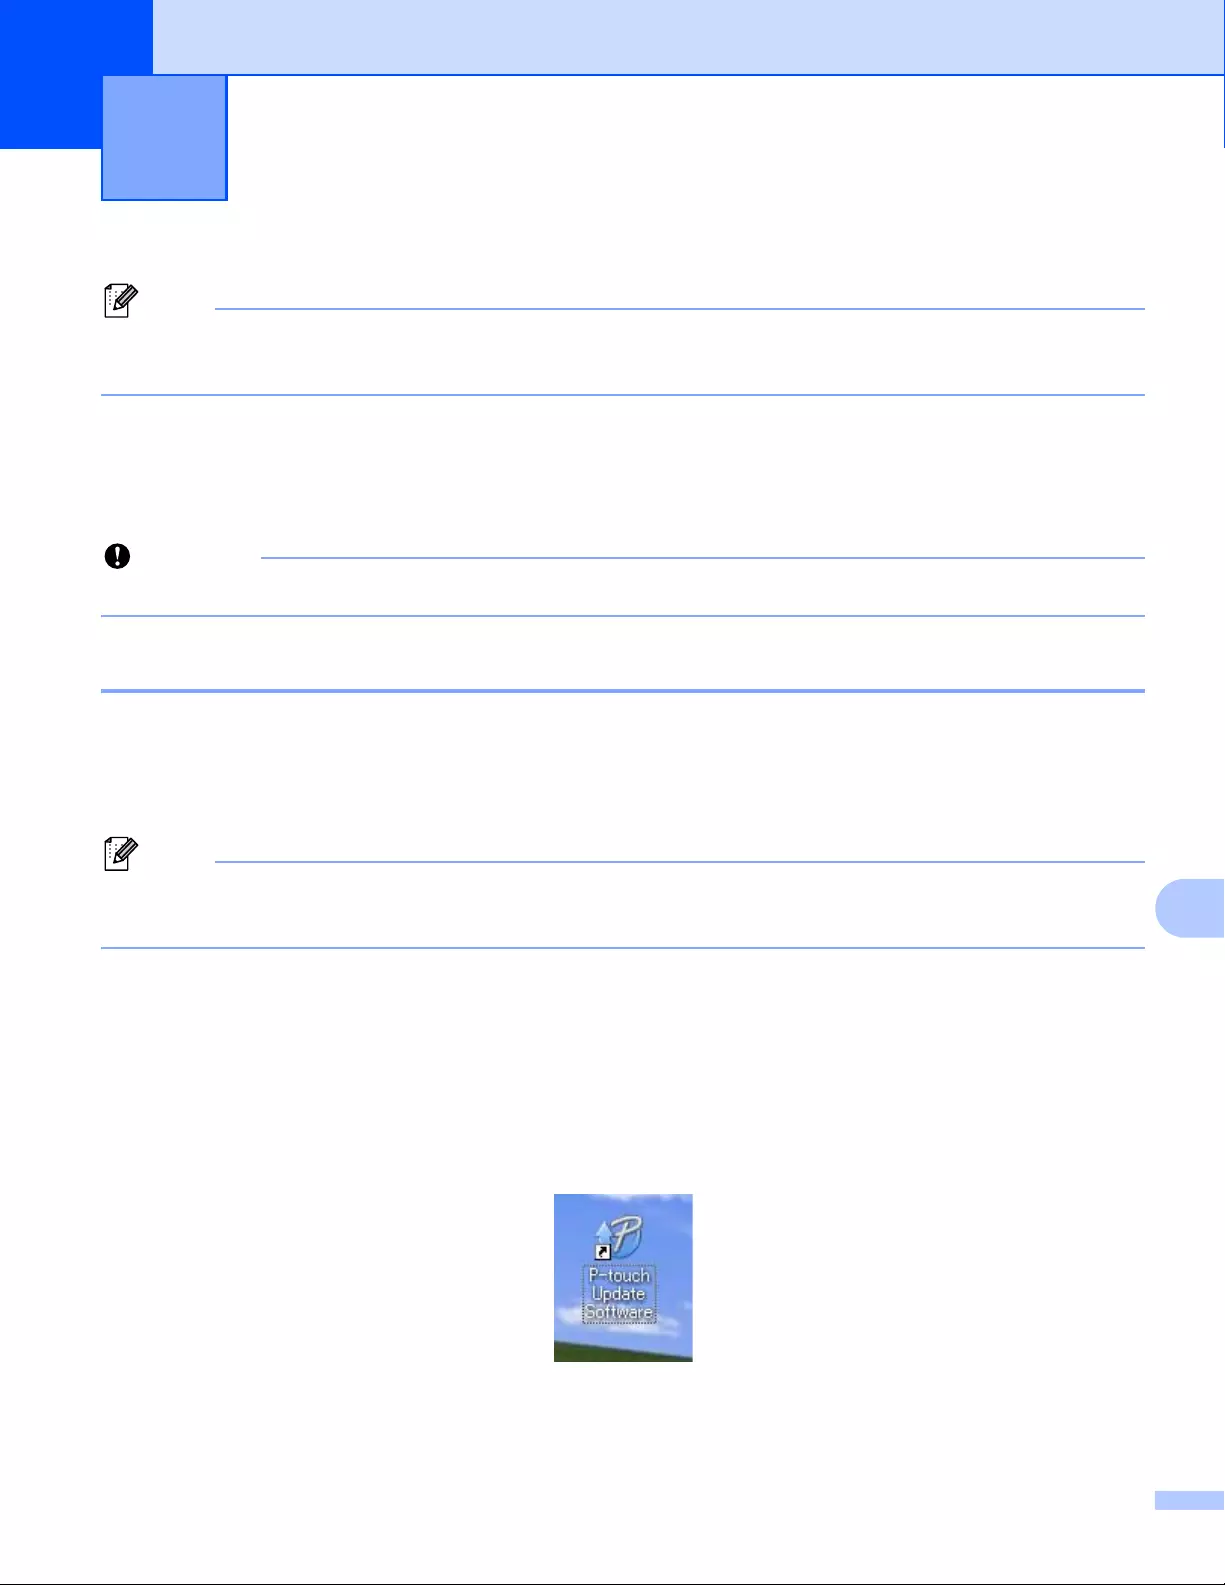
146
11
11
The software can be upgraded to the latest available version using the P-touch Update Software.
• The actual software and the contents of this manual may differ.
• Do not turn off the power when transferring data or updating firmware.
Updating P-touch Editor and P-touch Address Book
(Windows® only) 11
(Windows® only) Before updating P-touch Editor and P-touch Address Book, install the printer driver.
For Windows®
11
aStart the P-touch Update Software.
For Windows Vista® / Windows®7 / Windows Server® 2008 / Windows Server® 2008 R2:
Double-click the [P-touch Update Software] icon.
The following method can also be used to start P-touch Update Software:
Click the Start button, and then select [All Programs] — [Brother P-touch] — [P-touch Update Software].
For Windows®8 / Windows®8.1 / Windows Server® 2012 / Windows Server® 2012 R2:
Click [P-touch Update Software] on the [Apps] screen or double-click [P-touch Update Software]
on the desktop.
For Windows® 10:
From the Start button, click [Brother P-touch] — [P-touch Update Software], or double-click [P-touch
Update Software] on the desktop.
How to Update P-touch Software 11
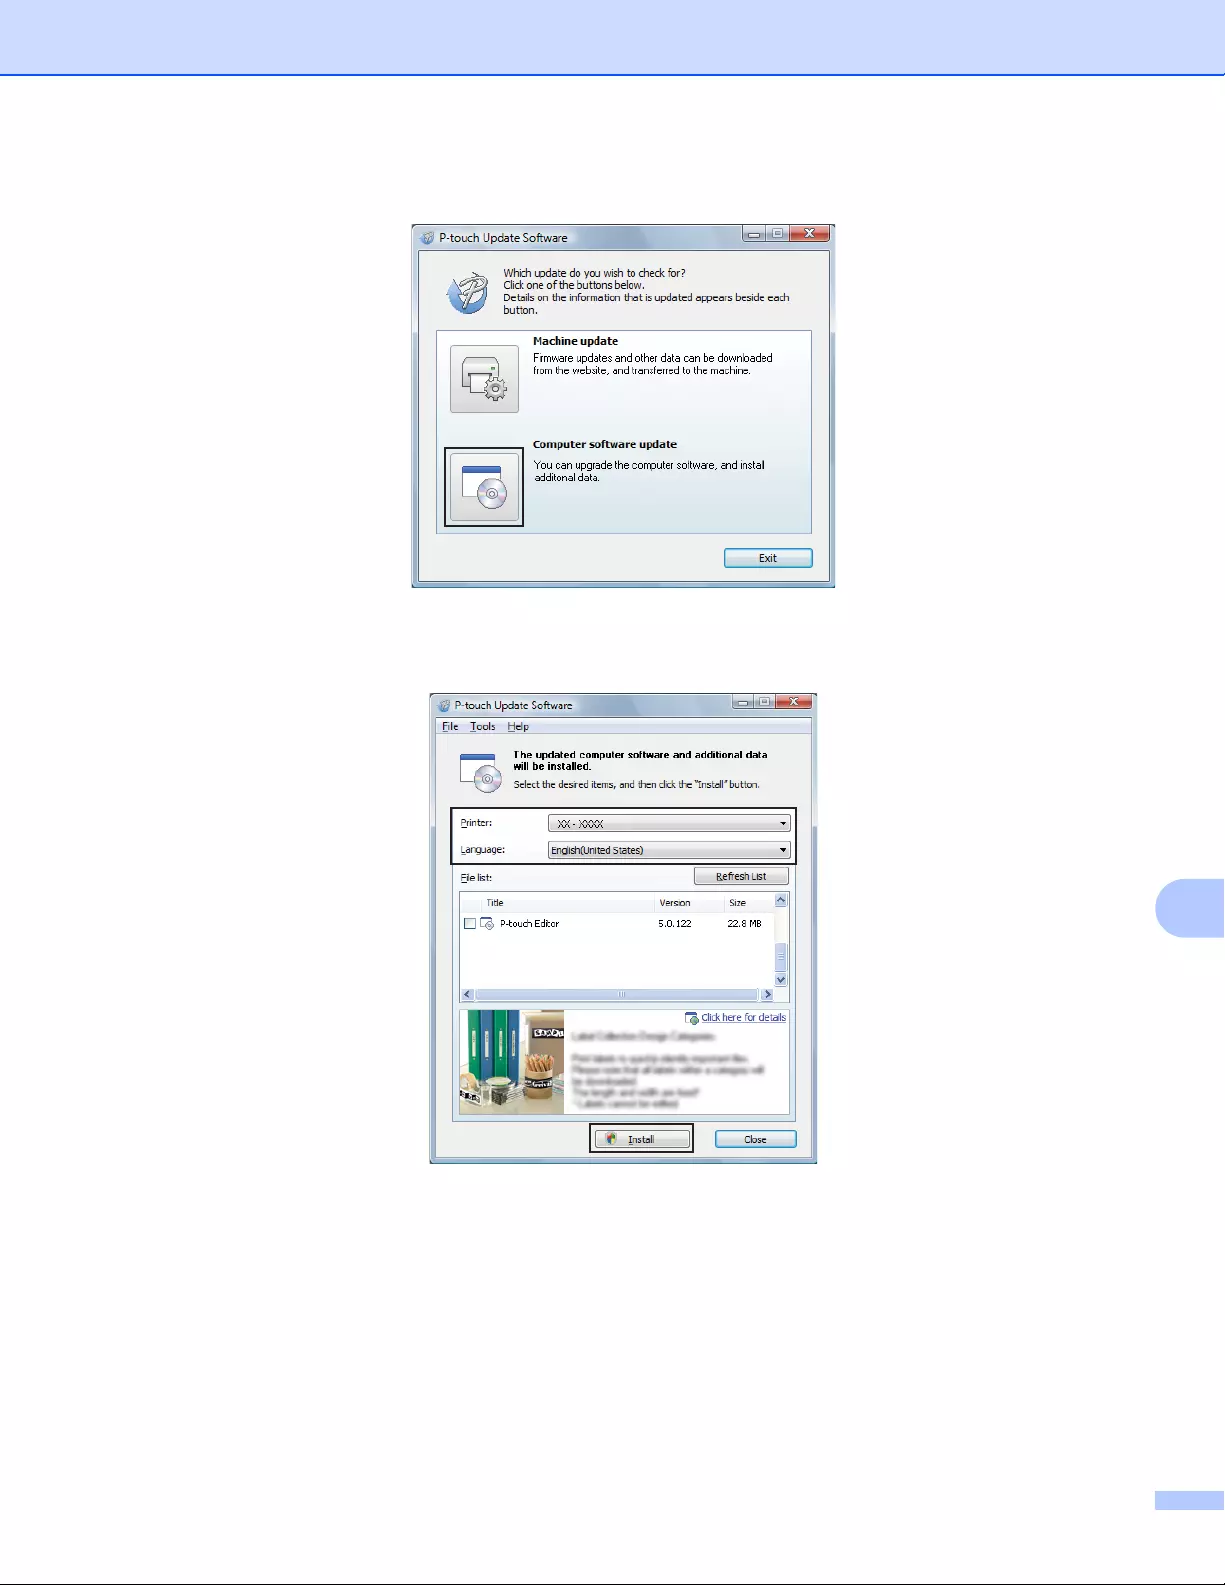
How to Update P-touch Software
147
11
bClick the [Computer software update] icon.
cSelect the [Printer] and [Language], select the check boxes next to Cable Label Tool and P-touch
Editor, and then click [Install].
dA message appears indicating that the installation has finished.
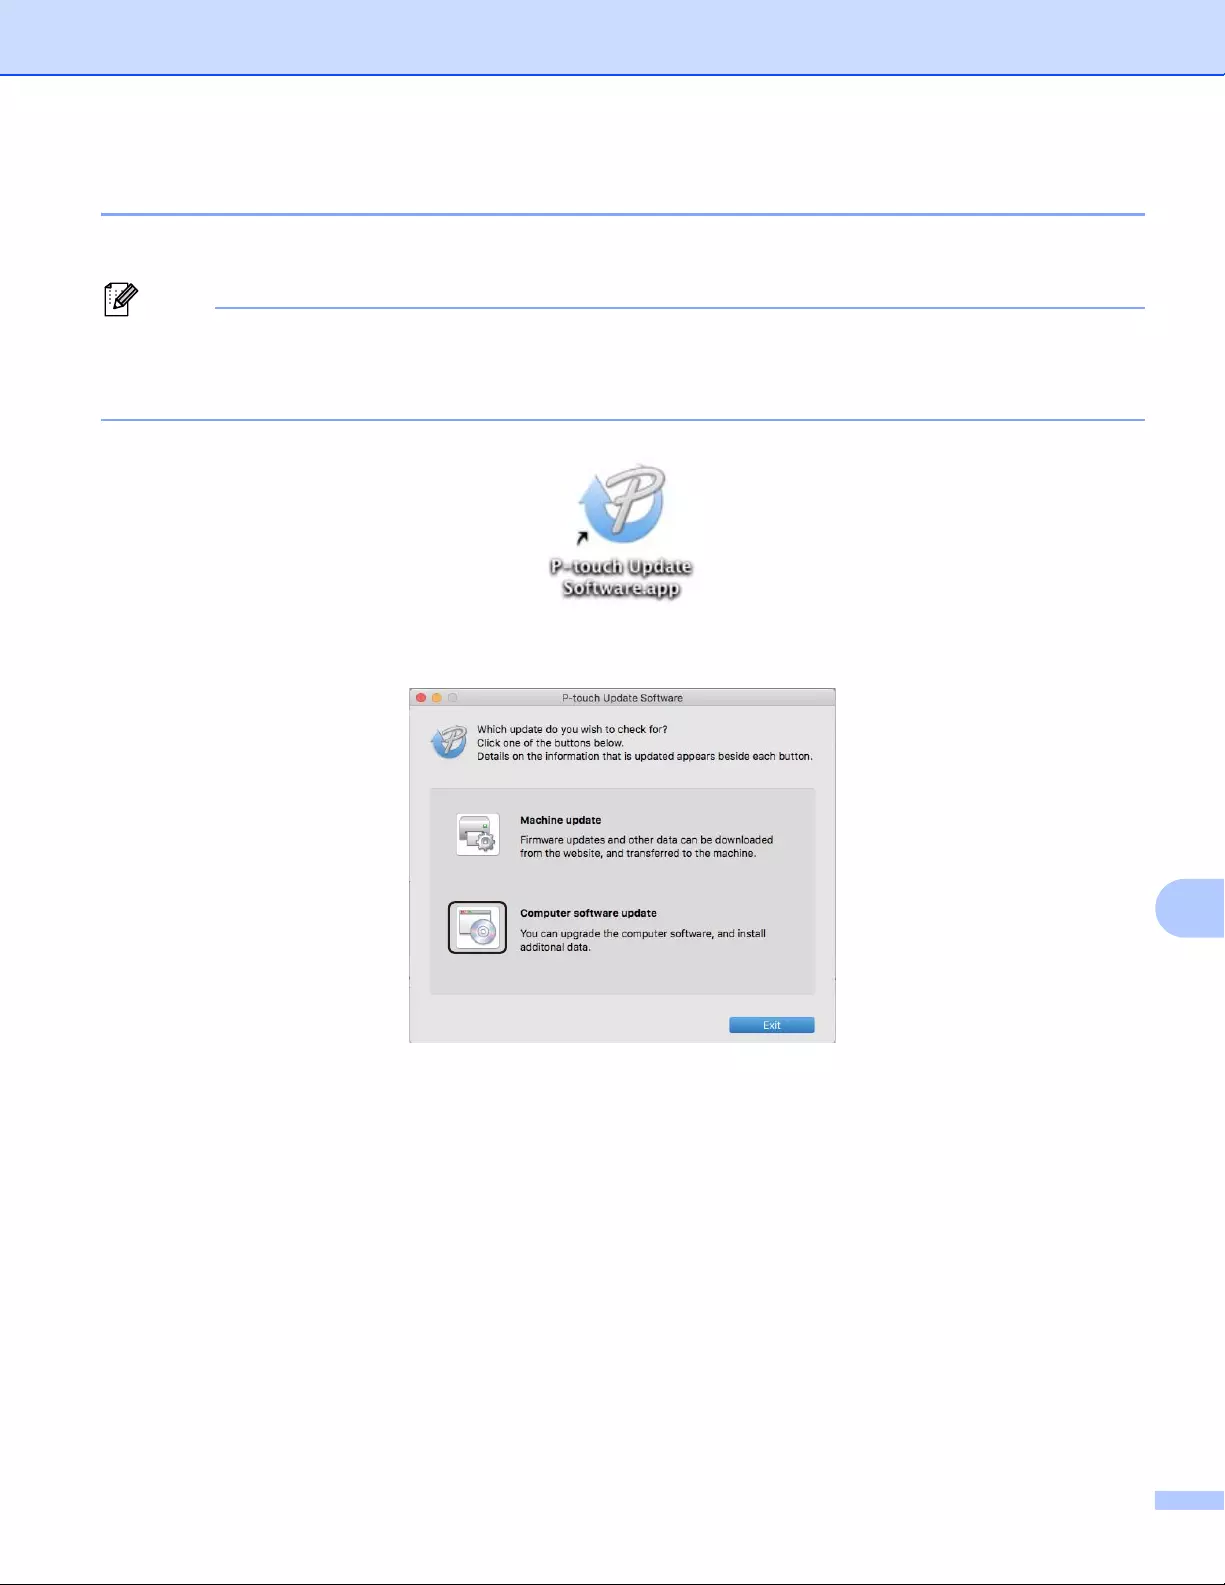
How to Update P-touch Software
148
11
For Mac 11
aDouble-click the [P-touch Update Software] icon on the desktop.
The following method can also be used to start P-touch Update Software:
Double-click [Macintosh HD] — [Applications] — [P-touch Update Software], and then double-click the
[P-touch Update Software] application icon.
bClick the [Computer software update] icon.
cSelect the [Printer] and [Language], select the check box next to P-touch Editor, and then click [Install].
dA message appears indicating that the installation has finished.

How to Update P-touch Software
149
11
Updating P-touch Editor Lite (Windows® only) and the
Firmware 11
• Before updating the firmware you must install the printer driver.
• Do not turn off the power when transferring data or updating firmware.
• If another application is running, exit the application.
For Windows®
11
aTurn on the Label Printer and connect the USB cable.
bStart the P-touch Update Software.
For Windows Vista® / Windows®7 / Windows Server® 2008 / Windows Server® 2008 R2:
Double-click the [P-touch Update Software] icon.
The following method can also be used to start P-touch Update Software:
Click the Start button, and then select [All Programs] — [Brother P-touch] — [P-touch Update Software].
For Windows®8 / Windows®8.1 / Windows Server® 2012 / Windows Server® 2012 R2:
Click [P-touch Update Software] on the [Apps] screen or double-click [P-touch Update Software]
on the desktop.
For Windows® 10:
From the Start button, click [Brother P-touch] — [P-touch Update Software], or double-click [P-touch
Update Software] on the desktop.
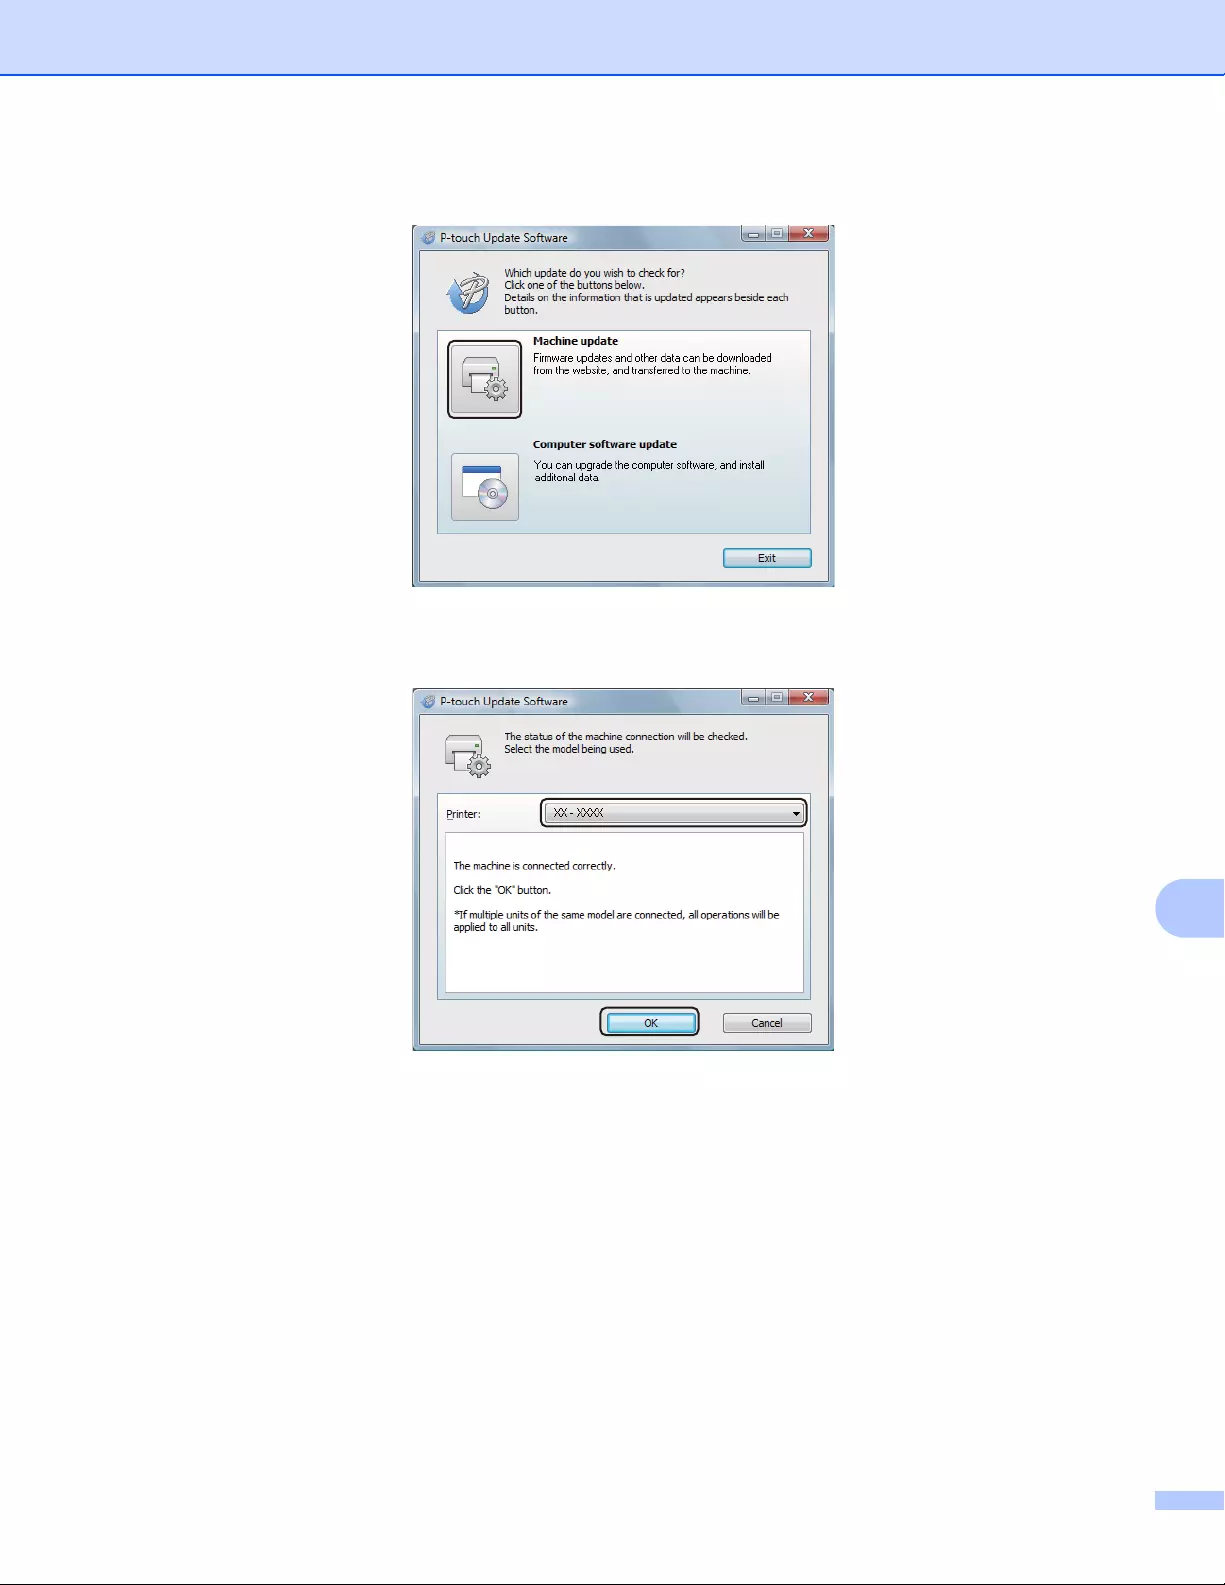
How to Update P-touch Software
150
11
cClick the [Machine update] icon.
dSelect the [Printer], make sure that The machine is connected correctly. message appears, and then
click [OK].
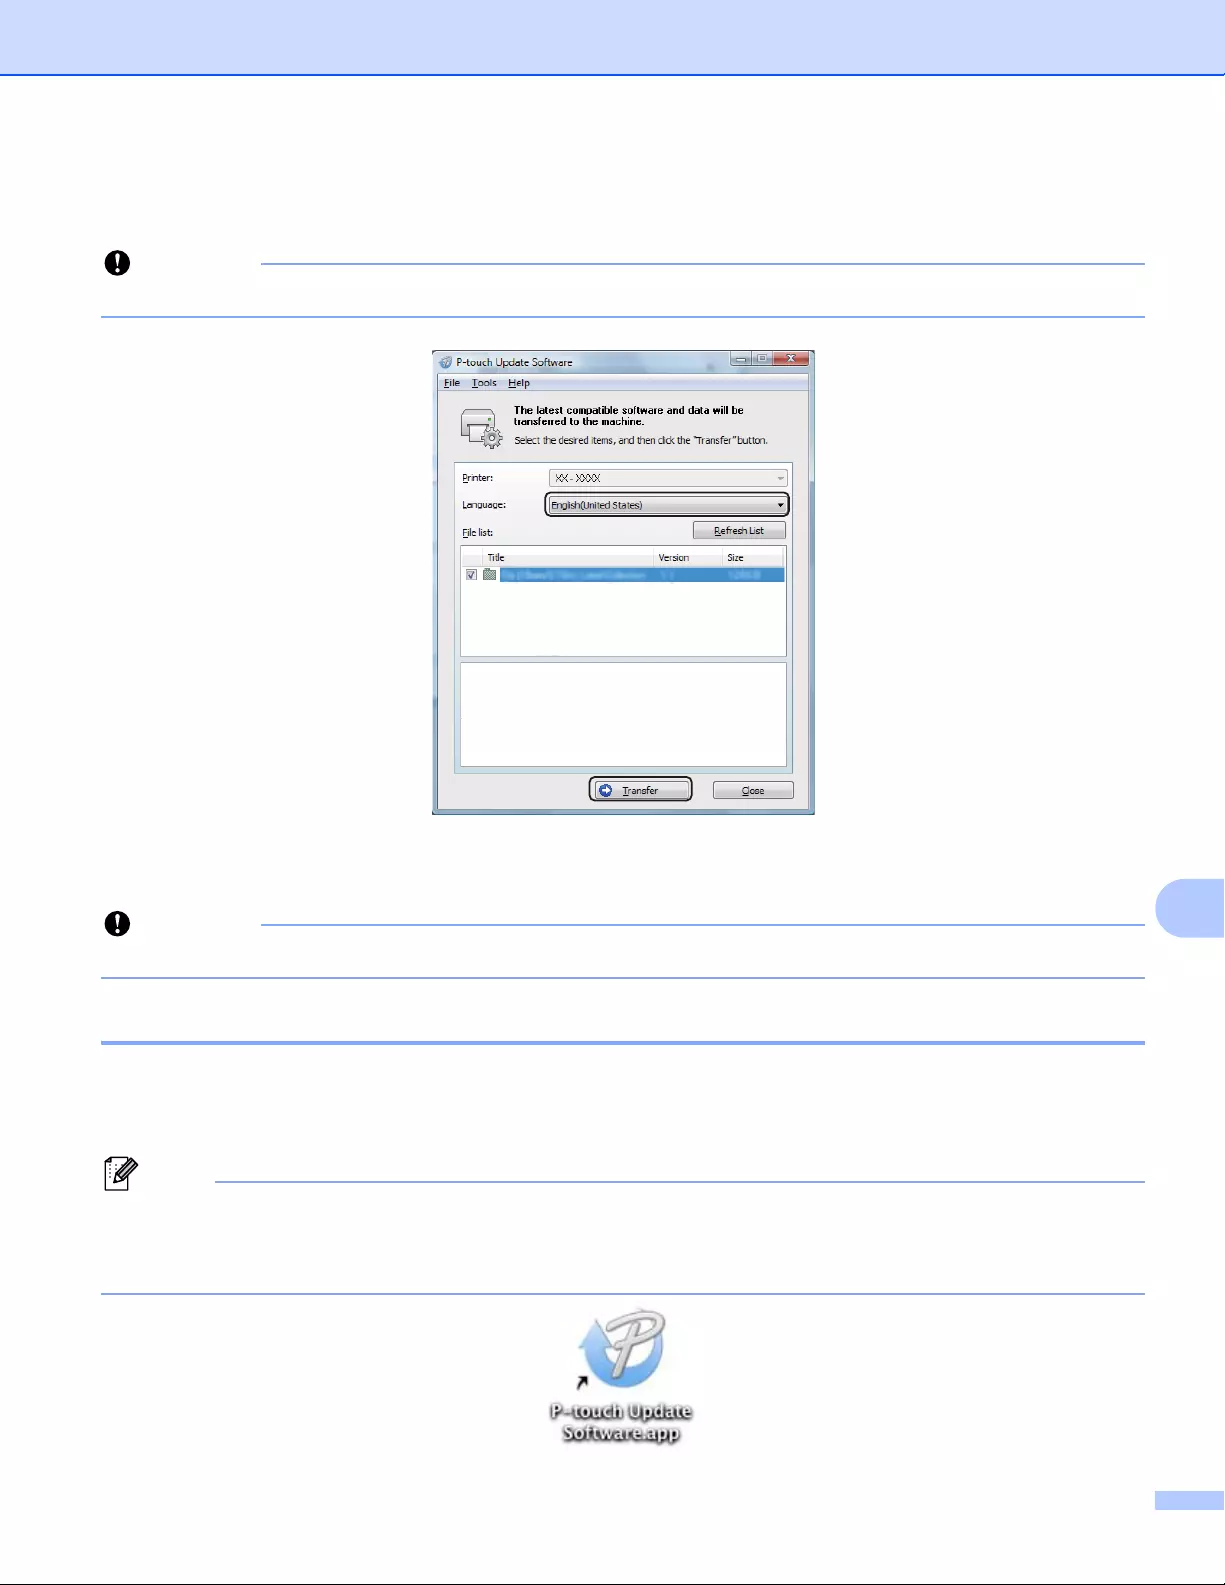
How to Update P-touch Software
151
11
eSelect the [Language], select the check box next to the firmware you want to update to, and then click
[Transfer].
Do not turn off the Label Printer or disconnect the cable during data transfer.
fCheck the content to be updated, and then click [Start] to begin the update.
The firmware update begins.
Do not turn off the Label Printer or disconnect the cable during the update process.
For Mac 11
aTurn on the Label Printer and connect the USB cable.
bDouble-click the [P-touch Update Software] icon on the desktop.
The following method can also be used to start P-touch Update Software:
Double-click [Macintosh HD] — [Applications] — [P-touch Update Software], and then double-click the
[P-touch Update Software] application icon.
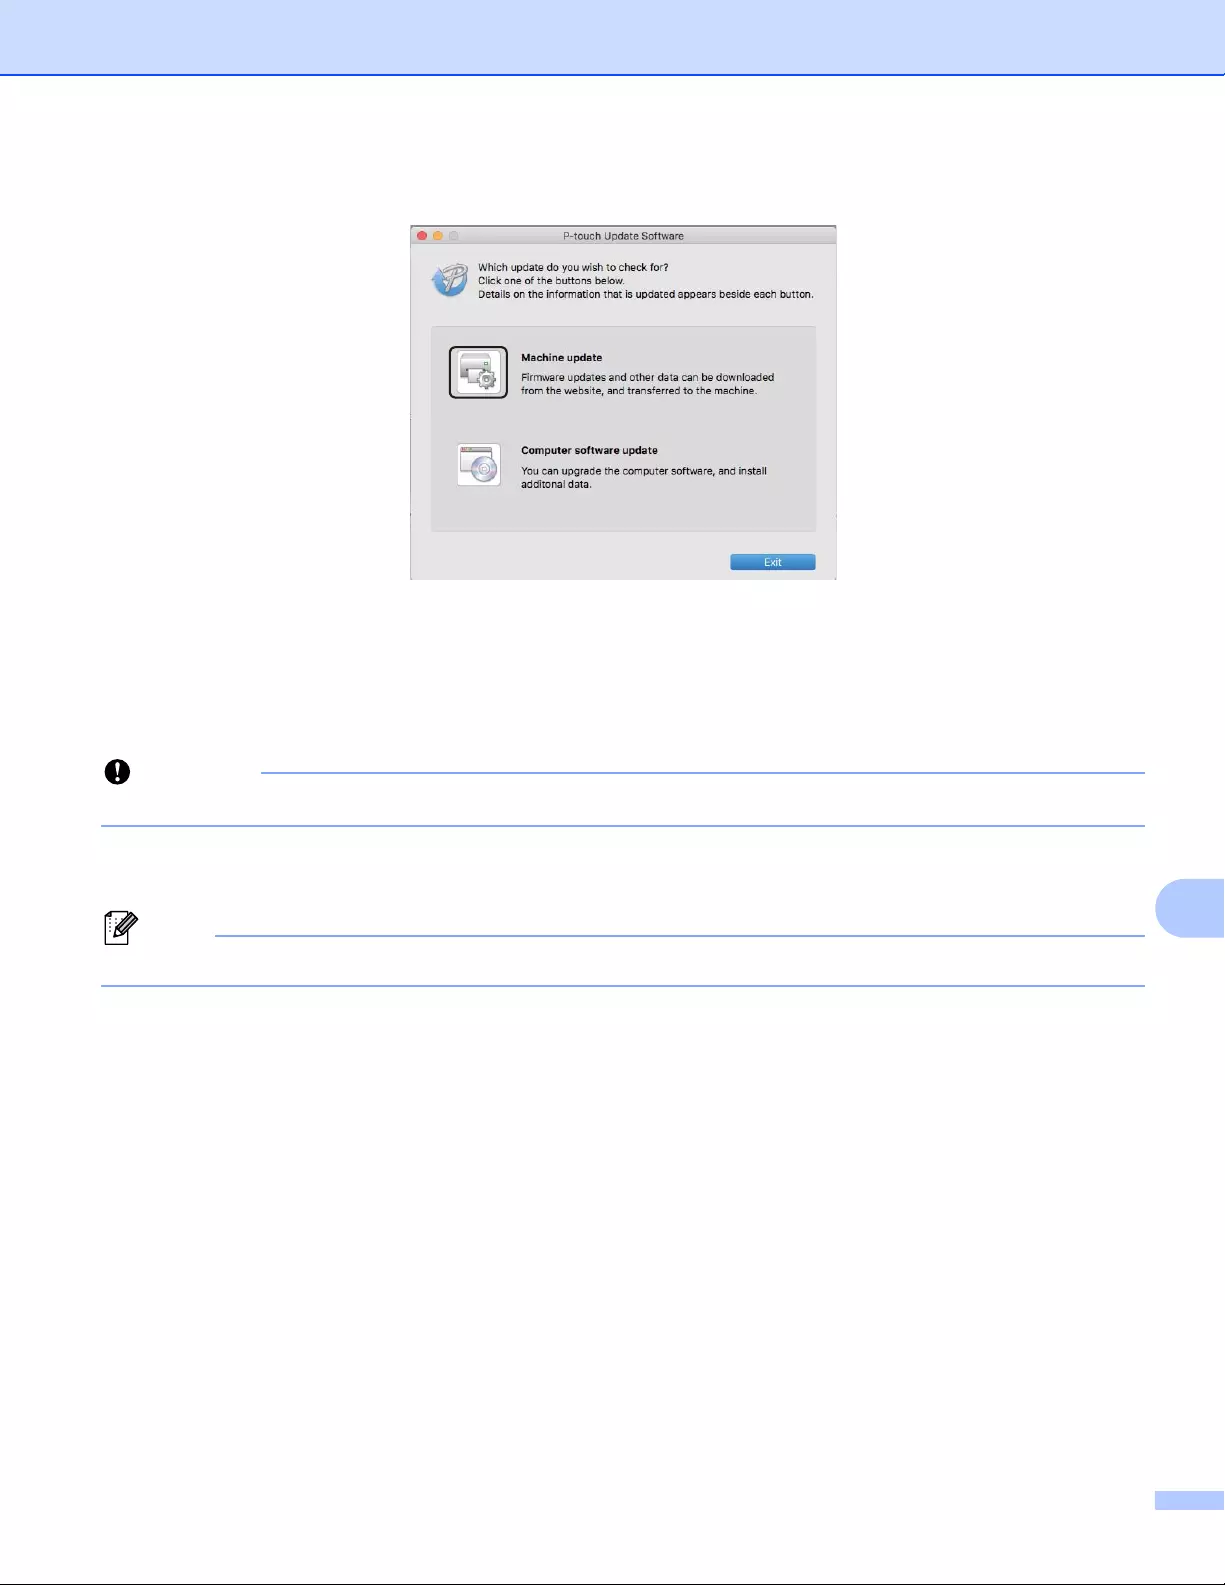
How to Update P-touch Software
152
11
cClick the [Machine update] icon.
dSelect the [Printer], make sure that [The machine is connected correctly.] message appears, and
then click [OK].
eSelect the [Language], select the check box next to the firmware you want to update to, and then click
[Transfer].
Do not turn off the Label Printer or disconnect the cable during data transfer.
fCheck the content you want to update, and then click [Start] to begin the update.
The firmware update begins.
Do not turn off the Label Printer during the update process.

Section III
Network III
Introduction 154
Changing Your Label Printer Network Settings 155
Web Based Management 158

154
12
12
Network Features 12
Your Label Printer can be shared on an IEEE 802.11b/g/n wireless network or Ethernet 10BASE-T/100BASE-
TX Auto Negotiation wired network (QL-820NWB only) using the internal network print server. The print
server supports various functions and methods of connection on a network supporting TCP/IP, depending on
the operating system you are running.
Introduction 12

155
13
13
Changing Your Label Printer’s Network Settings
(IP Address, Subnet Mask and Gateway) 13
Using the BRAdmin Light Utility (Windows® only) 13
The BRAdmin Light utility is designed for the initial setup of Brother network connectable devices. It can also
search for Brother products in a TCP/IP environment, display the status, and configure basic network
settings, such as the IP address.
Installing BRAdmin Light 13
aVisit the Brother Solutions Center at support.brother.com and download the installer for the software and
documents.
bDouble-click the downloaded file and follow the on-screen instructions to proceed with the installation. In
the dialog box for selecting which items to install, select BRAdmin Light.
• For more advanced Label Printer management, use the latest version of the Brother BRAdmin
Professional utility available as a download from the Brother Solutions Center at support.brother.com.
• If using firewall, anti-spyware, or antivirus software, temporarily disable them. When you are sure that you
can print, re-enable them.
• The node name appears in the current BRAdmin Light window. The default node name of the print server
in the Label Printer is “BRWxxxxxxxxxxxx” or «BRNxxxxxxxxxxxx». (“xxxxxxxxxxxx” is based on Label
Printer’s MAC Address / Ethernet Address.)
Setting the IP address, Subnet Mask and Gateway using BRAdmin Light 13
aStart the BRAdmin Light utility.
Windows Vista® / Windows® 7 / Windows Server® 2008 / Windows Server® 2008 R2
Click [Start] — [All Programs] — [Brother] — [BRAdmin Light] — [BRAdmin Light].
Windows® 8 / Windows® 8.1 / Windows Server® 2012 / Windows Server® 2012 R2
Click the [BRAdmin Light] icon on the [Apps] screen.
Windows® 10
From the Start button, click [BRAdmin Light] under [Brother].
bBRAdmin Light will search for new devices automatically.
Changing Your Label Printer Network
Settings 13
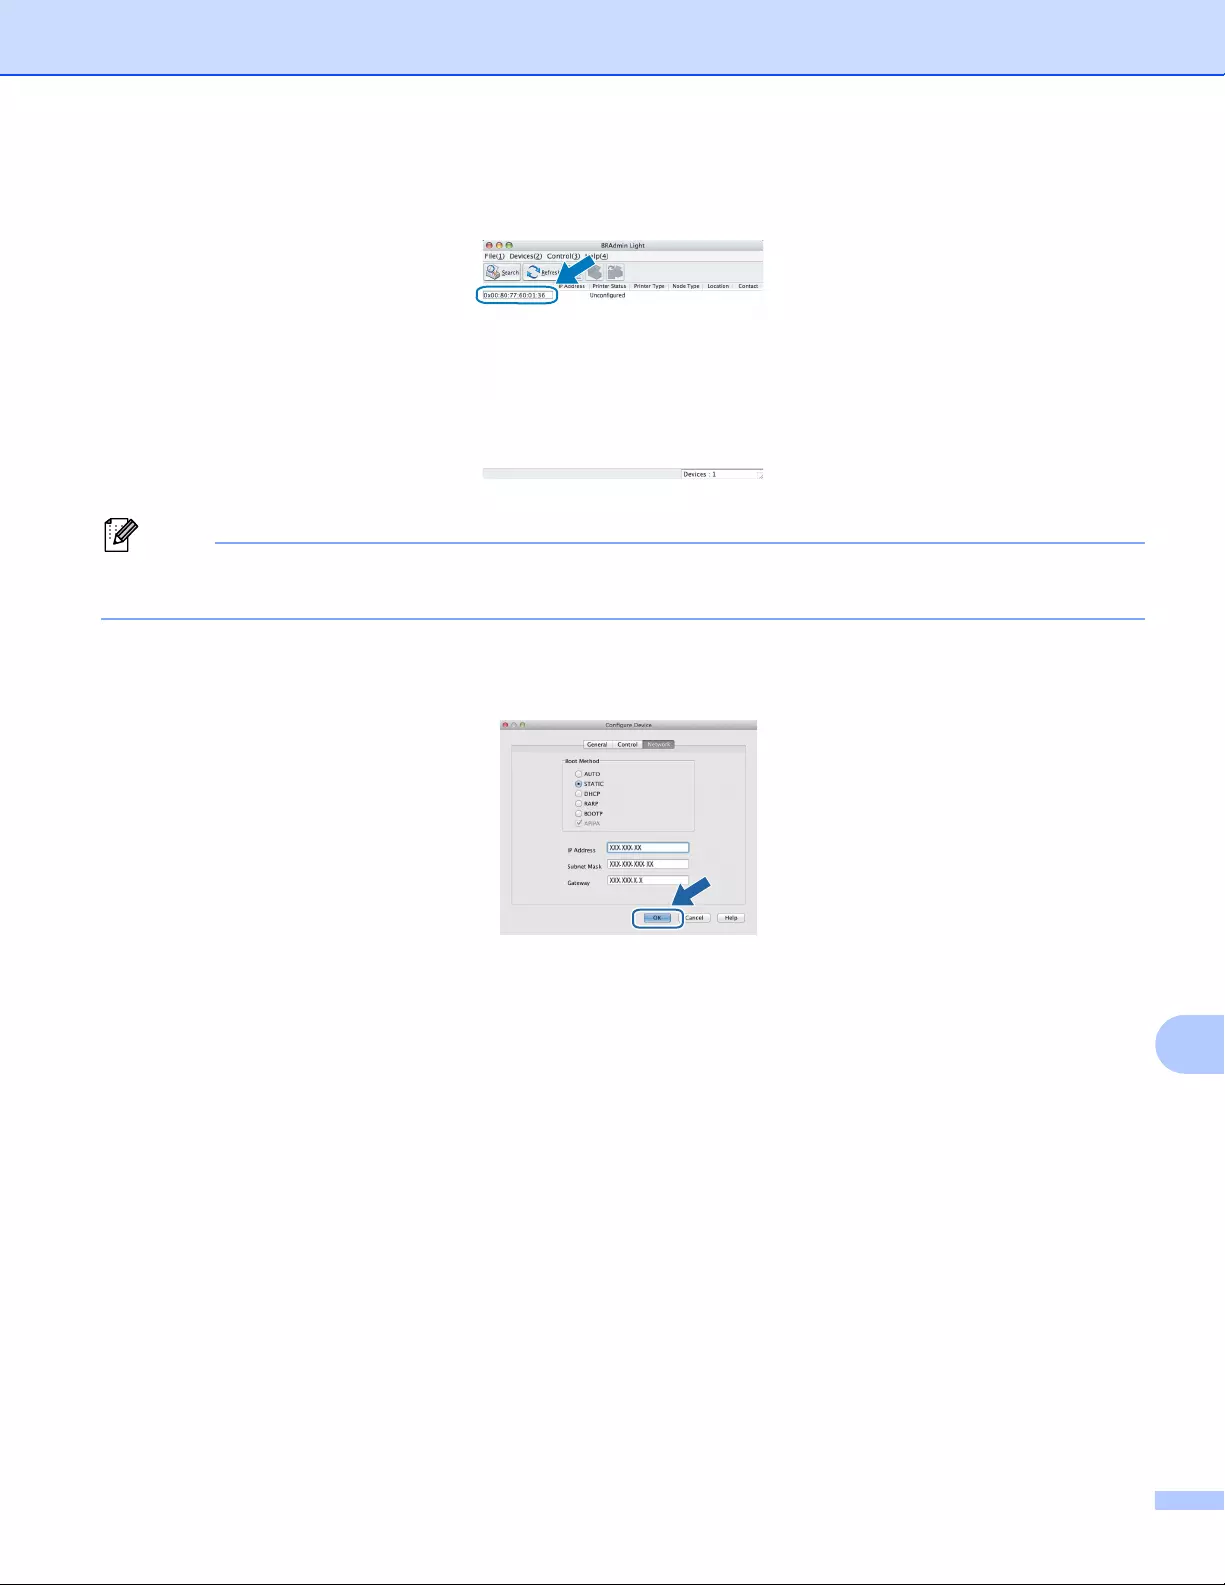
Changing Your Label Printer Network Settings
156
13
cDouble-click the unconfigured device.
If you do not use a DHCP/BOOTP/RARP server, the device appears as [Unconfigured] in the BRAdmin
Light utility screen.
dSelect [STATIC] for [Boot Method]. Type the [IP Address], [Subnet Mask], and [Gateway] settings (if
needed) for your print server.
eClick [OK].
fIf you have set the IP address up correctly, the Brother print server appears in the device list.
Changing Your Label Printer Network Settings
157
13
Other Management Utilities 13
Your Label Printer can be used with the following management utilities in addition to the BRAdmin Light utility.
You can change your network settings using these utilities.
Using Web Based Management (Web Browser) 13
A standard web browser can be used to change your print server settings using the HTTP (Hyper Text
Transfer Protocol). For more information, see Configuring the Printer Settings Using Web Based
Management (Web Browser) on page 159.
Using the BRAdmin Professional Utility (Windows® only) 13
BRAdmin Professional is a utility for more advanced management of network connected Brother devices.
This utility can search for Brother products on your network, and display the device status from a simple
Explorer style window that changes color to represent the status of each device. You can configure network
and device settings along with the ability to update device firmware from a Windows® computer on your Local
Area Network (LAN). BRAdmin Professional can also log activity of Brother devices on your network and
export the log data.
For more information and downloads, visit the Brother Solutions Center at support.brother.com.
• Use the latest version of the BRAdmin Professional utility available as a download from the Brother
Solutions Center at support.brother.com.
• If using firewall, anti-spyware, or antivirus software, temporarily disable them. When you are sure that you
can print, re-enable them.
• The node name appears in the current BRAdmin Professional window. The default node name is
“BRWxxxxxxxxxxxx” or «BRNxxxxxxxxxxxx». (“xxxxxxxxxxxx” is based on Label Printer’s MAC Address /
Ethernet Address.)
158
14
14
Overview 14
You can use a standard web browser to manage a Label Printer on your network using HTTP. When using
Web Based Management, the following operations are available:
Displaying your Label Printer status information
Changing network settings, such as TCP/IP information
Displaying software version information of the Label Printer and print server
Changing network and Label Printer configuration details
We recommend Microsoft® Internet Explorer® 9/10/11 for Windows®, Safari® 8 or later for Mac.
Make sure JavaScript and cookies are always enabled in the browser you use.
To use Web Based Management, your network must use TCP/IP, and the Label Printer and computer must
have a valid IP address.
Web Based Management 14
Web Based Management
159
14
Configuring the Printer Settings Using Web Based
Management (Web Browser) 14
A standard web browser can be used to change your print server settings using the HTTP (Hyper Text
Transfer Protocol).
aIn your browser’s address bar, type the IP address of your Label Printer (or print server name).
For example: http://192.168.1.2
If you have edited the hosts file on your computer or are using a Domain Name System, you can also type
the DNS name of the print server. As the print server supports TCP/IP and NetBIOS, you can also type
the NetBIOS name of the print server. The NetBIOS name is displayed on the printer settings page. The
NetBIOS name assigned is the first 15 characters of the node name and by default it appears as
«BRNxxxxxxxxxxxx» where “xxxxxxxxxxxx” is the Ethernet address.
bYou can now change the print server settings.
Setting a password
We recommend setting a logon password to prevent unauthorized access to Web Based Management.
aClick [Administrator].
bType the password you want to use (up to 32 characters).
cRe-type the password in the [Confirm new password] field.
dClick [Submit].
The next time you access Web Based Management, type a password in the [Login] field, and then
click .
After configuring the settings, log off by clicking .
You can also set a password by clicking [Please configure the password.] on the printer’s web page if
you are not setting a logon password.

Section IV
Appendix IV
Resetting the Label Printer 161
Maintenance 163
Troubleshooting 166
Product Specifications 181
Notes on Using P-touch Transfer Manager 183
Network Terms and Information 185
List of Barcodes for the P-touch Template Function 194
Using the Battery Unit (Optional: PA-BU-001) 198
Using the Brother Barcode Scanner (Optional: PA-BR-001)
(QL-820NWB only) 201

161
15
15
Reset the internal memory of your Label Printer to clear all saved label files, or if the Label Printer is not
operating correctly.
Resetting All Settings to the Factory Settings Using the Label
Printer Buttons (QL-810W only) 15
To reset the Label Printer, perform the following procedure.
aConfirm that the Label Printer is turned off.
bPress and hold the Power ( ) and Cutter ( ) Buttons for more than three seconds. The Status LED
lights in green.
cContinue holding down the Power ( ) Button, then the Status LED lights in orange, and meanwhile the
Editor Lite LED flashes green at 0.5 second intervals, the Wi-Fi ( ) LED flashes blue at 0.5 second
intervals.
• Press the Cutter ( ) Button once to reset the network settings, the Status LED lights in orange.
• Press the Cutter ( ) Button twice to reset the user data, the Wi-Fi ( ) LED lights in blue.
• Press the Cutter ( ) three times to reset all the settings and device settings to the factory settings,
the Editor Lite LED lights in green.
dRelease the Power ( ) Button. The Status LED flashes orange for four times and lights in orange, the
Wi-Fi ( ) LED flashes blue for four times and lights in blue, meanwhile the Editor Lite LED flashes green
for four times and lights in green.
Resetting Data Using the LCD menu (QL-820NWB only) 15
You can reset the following settings using the LCD menu:
Printer settings
User setting
Network settings
For more information, see LCD Settings on page 12.
Resetting the Label Printer 15

Resetting the Label Printer
162
15
Resetting Data Using the Printer Setting Tool 15
You can use the Printer Setting Tool from a computer to perform the following operations for the Label Printer:
Deleting the templates and databases
Resetting communication settings
Resetting printer settings to factory settings
For more information, see Changing the Label Printer Settings on page 37.
163
16
16
We recommend cleaning your Label Printer on a regular basis to maintain its correct performance.
Always disconnect the AC Adapter before cleaning the Label Printer.
Cleaning the Exterior of the Unit 16
Wipe any dust and marks from the main unit using a soft, dry cloth.
Use a cloth slightly damp with water on difficult to remove marks.
Do not use paint thinner, benzene, alcohol or any other organic solvent.
These may deform or damage the case of your Label Printer.
Cleaning the Print Head 16
The DK Roll (thermal recording paper type) used with the machine is designed to clean the print head
automatically. When the DK Roll passes the print head during printing and label feeding, the print head is
cleaned.
Cleaning the Roller 16
Clean the roller using the Cleaning Sheet (available separately).
The Label Printer contains only one Cleaning Sheet.
When cleaning the roller, be sure to use the Cleaning Sheet supplied exclusively for this Label Printer.
If using other Cleaning Sheets, the surface of the roller may be damaged and may cause a malfunction.
aTurn off the power to the Label Printer.
bHold the DK Roll Compartment Cover at the sides near the front of the Label Printer and firmly lift up to
open the DK Roll Compartment Cover.
Maintenance 16
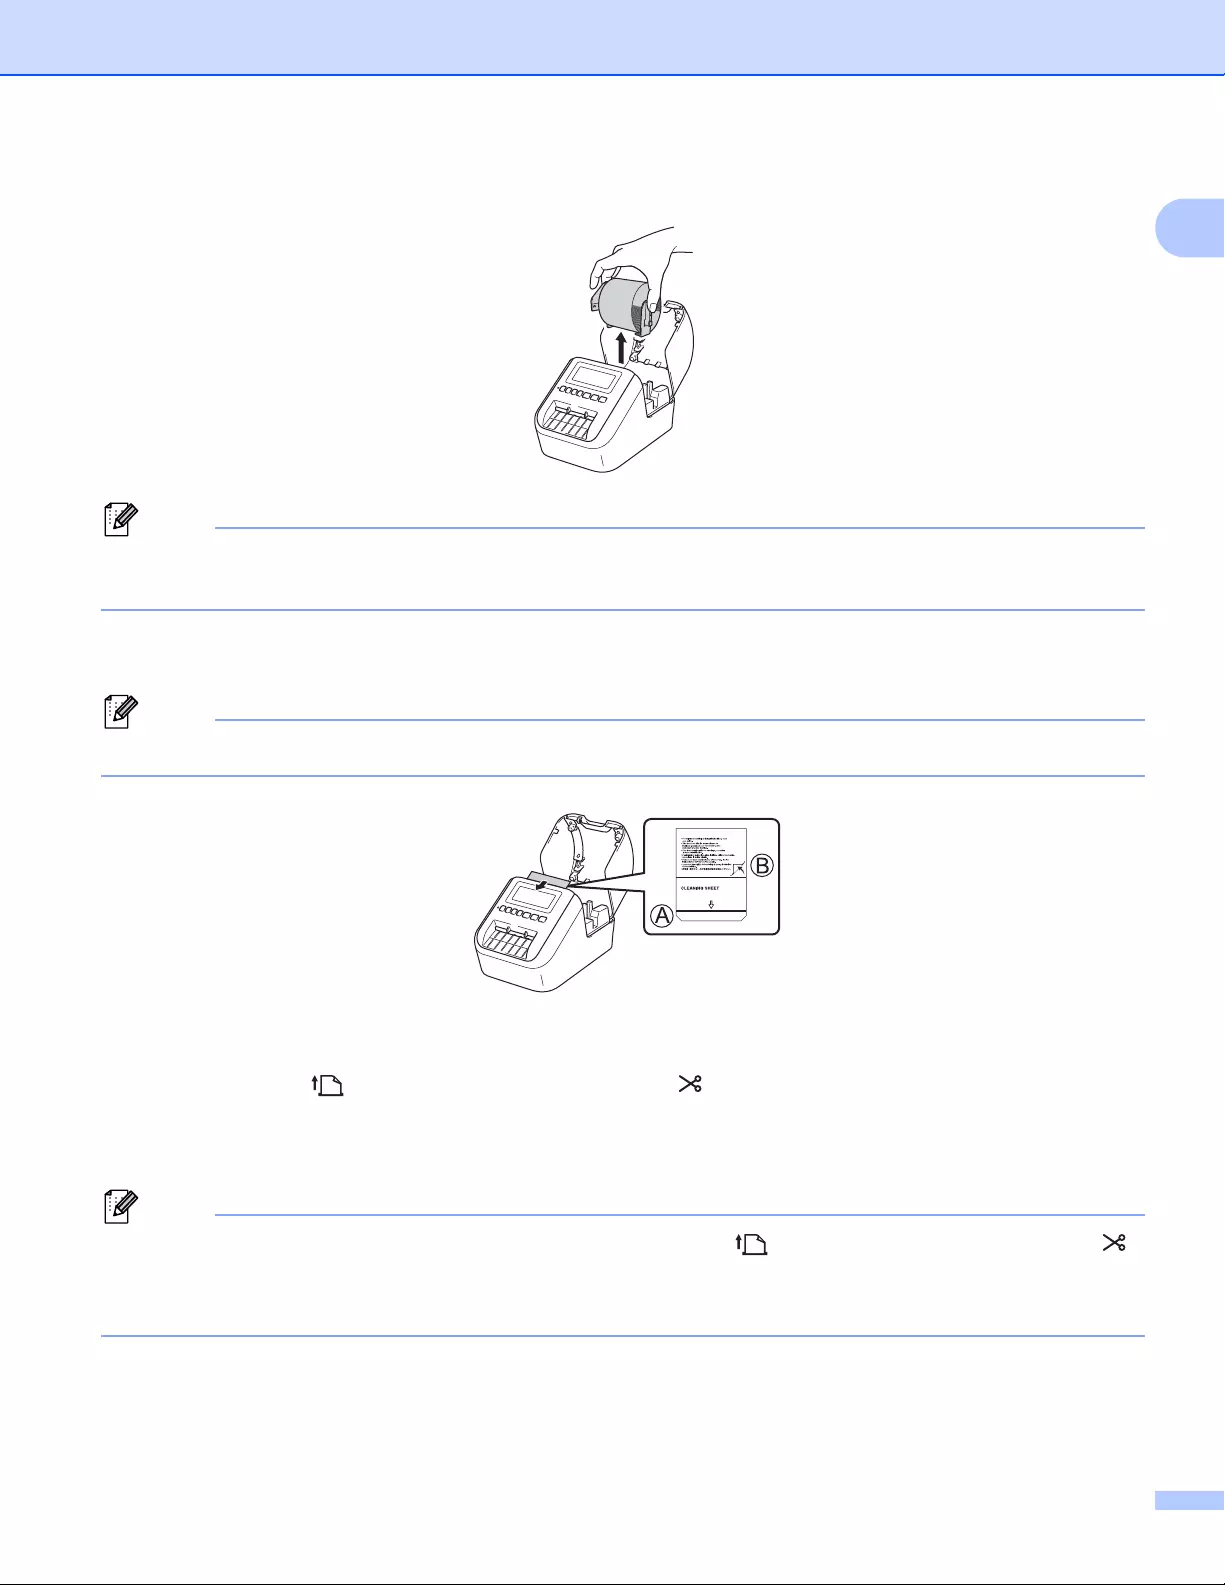
Maintenance
164
16
cRemove the DK Roll.
Be sure to remove the DK Roll before cleaning the roller. The roller cleaning function will not operate
correctly if the DK Roll is not removed.
dRemove Part (B) of the Cleaning Sheet.
Insert edge (A) of the Cleaning Sheet into the printing unit.
The printed side of the Cleaning Sheet should be facing upwards.
eClose the DK Roll Compartment Cover and turn on the Label Printer.
fPress the Feed ( ) Button (QL-810W) or the Cutter ( ) Button (QL-820NWB) for more than one
second.
The Cleaning Sheet is ejected.
The adhesive face of the Cleaning Sheet removes any stains or dust on the roller.
• If the Cleaning Sheet is not ejected, press and hold the Feed ( ) Button (QL-810W) or the Cutter ( )
Button (QL-820NWB) until the Cleaning Sheet is ejected.
• Dispose of the Cleaning Sheet after use.

Maintenance
165
16
Cleaning the Label Outlet 16
If a label causes the machine to jam due to adhesive residue attached to the label outlet, clean the label outlet
with a cloth.
Use a slightly damp cloth on difficult to remove adhesive, if necessary.

166
17
17
Overview 17
This chapter explains how to resolve typical problems you may encounter when using the Label Printer. If you
have any problems with the Label Printer, first make sure you have performed the following tasks correctly:
Connect the Label Printer to an AC power outlet or install the battery. For more information, see
Connecting the AC Adapter on page 7.
Remove all protective packaging from the Label Printer.
Install and select the correct printer driver. For more information, see Installing the Software and Printer
Drivers to a Computer on page 22.
Connect the Label Printer to a computer or mobile device. For more information, see Connecting the Label
Printer to a Computer on page 23.
Close the DK Roll Compartment Cover completely.
Insert a DK Roll correctly. For more information, see Loading the DK Roll on page 5.
If you still have problems, read the troubleshooting tips in this chapter for help. If, after reading this chapter,
you are unable to resolve your problem, visit the Brother Solutions Center at support.brother.com.
Troubleshooting 17
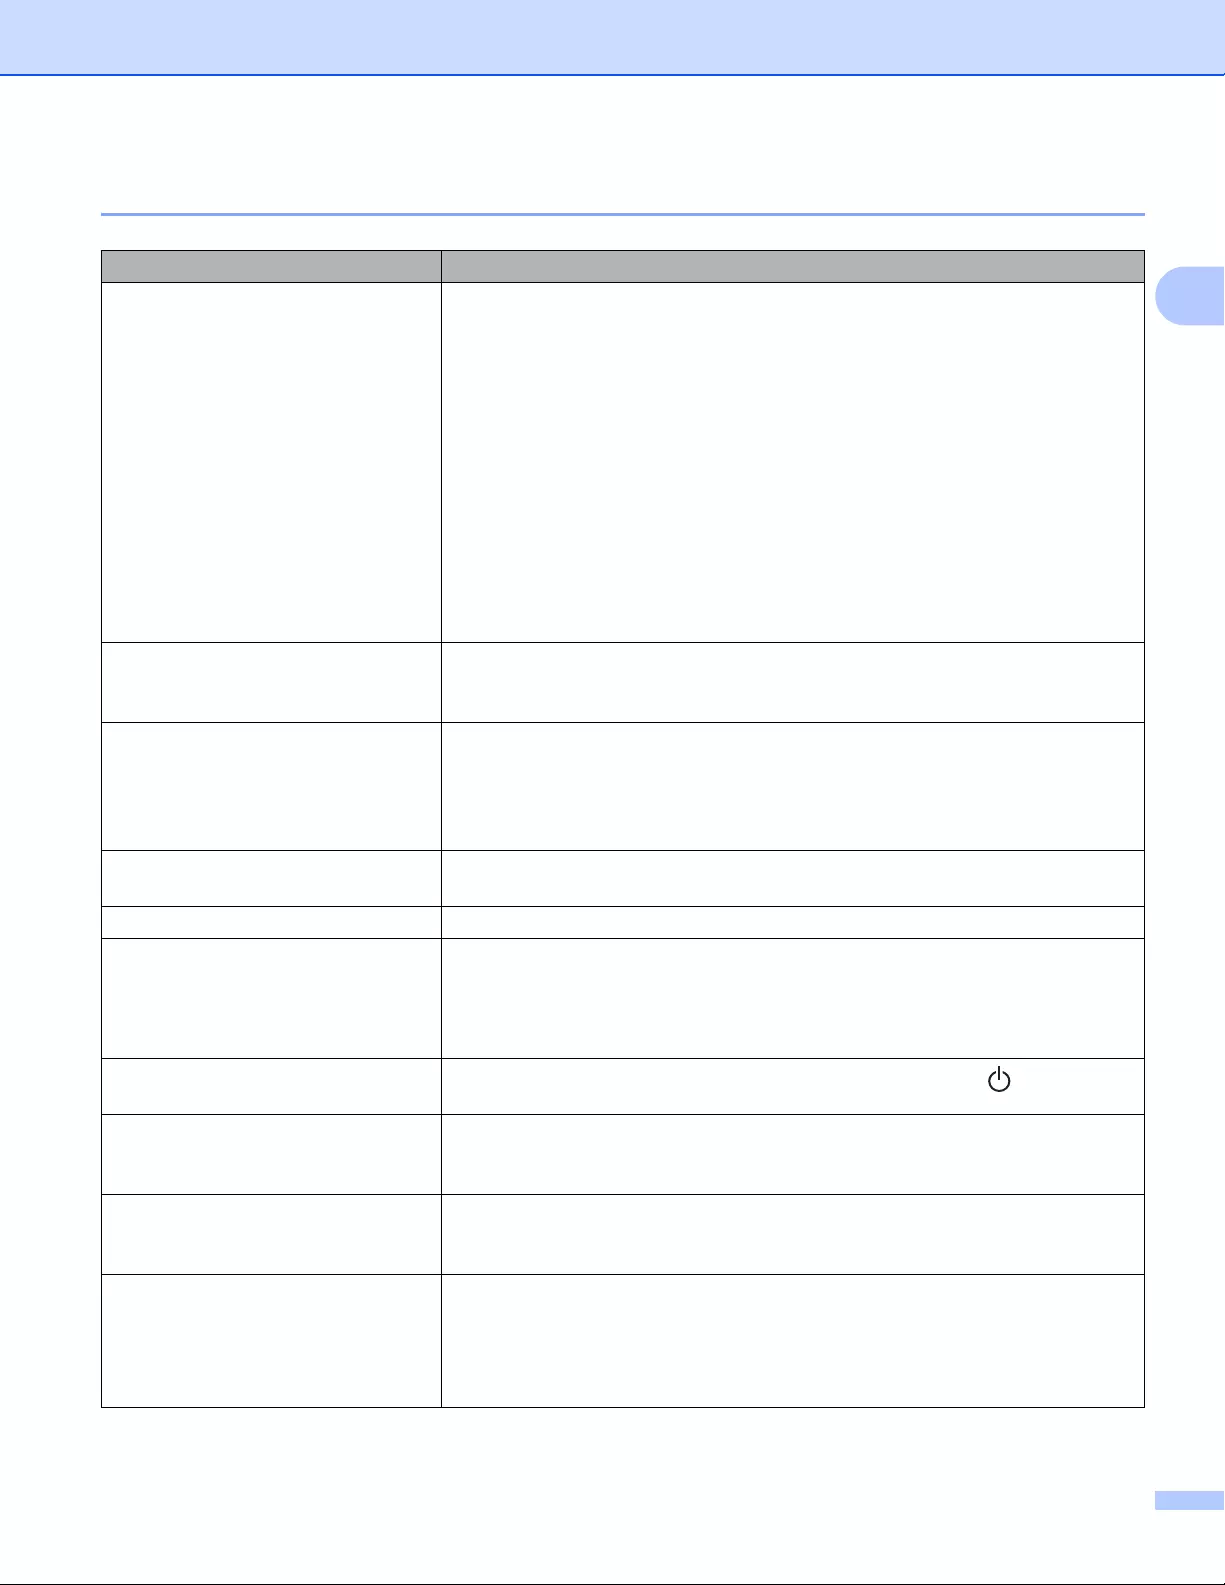
Troubleshooting
167
17
Printing Problems 17
Problem Solution
The Label Printer does not print, or a
printing error is received.
• Is the cable loose?
Check that the cable is connected securely.
• Is the DK Roll installed correctly?
If not, remove the DK Roll and reinstall it.
• Is there enough roll remaining?
Check that there is enough roll remaining.
• Is the DK Roll Compartment Cover open?
Check that the DK Roll Compartment Cover is closed.
• Has a print error or transmission error occurred?
Turn off the Label Printer and then turn it on again. If there is still a problem,
contact your Brother dealer.
• If the Label Printer is connected via a USB hub, try connecting it directly to
the computer. If not, try connecting it to another USB port.
The Status LED is not lit. • Is the AC Adapter inserted correctly?
Check that the AC Adapter is inserted. If it is inserted correctly, try plugging
it into another AC power outlet.
The printed label contains streaks or
poor quality characters, or the label is
not fed correctly.
• Is the print head or roller dirty?
While the print head generally remains clean under normal use, lint or dirt
from the roller may become stuck on the printer head.
If this occurs, clean the roller.
For more information, see Cleaning the Roller on page 163.
A data transmission error appears on
the computer.
• Is the Label Printer in cooling mode (the Status LED is flashing in orange)?
Wait until the Status LED stops flashing and then try printing again.
Labels are jammed in the cutter. • Contact Brother Customer Service.
The label is not ejected correctly after
printing.
• Check that the Label Output Slot is not blocked.
• Check that the DK Roll is set correctly by removing the DK Roll and
reinstalling it.
• Ensure that the DK Roll Compartment Cover is closed correctly.
I want to cancel the current printing
job. • Make sure that the Label Printer is On, and press Power ( ) Button.
The print quality is poor. • Is there dirt or lint on the roller preventing it from rolling freely?
Clean the roller using the Cleaning Sheet available separately.
For more information, see Cleaning the Roller on page 163.
After replacing the Roll while the
Add-In feature was activated, the
layout style was not updated.
• Close P-touch Editor to exit the Add-In, and then reactivate the Add-In.
The P-touch Add-In icon is not
displayed in Microsoft® Word.
• Is Microsoft® Word started up from Microsoft® Outlook®?
• Is Microsoft® Word chosen as the default editor for Microsoft® Outlook®?
Due to program limitations, the Microsoft® Word Add-In does not work with
the above settings. Quit Microsoft® Outlook®, and restart Microsoft® Word.

Troubleshooting
168
17
Cutter error If a cutter error occurs, keep the DK Roll Compartment Cover closed and press
the Power ( ) Button. The cutter moves back to the normal position and the
Label Printer turns off automatically.
After the Label Printer is Off, check the label outlet and remove any jammed
labels. Contact Brother Customer Service.
I want to reset the Label Printer. You can reset the Label Printer using the Printer Setting Tool from a computer.
For more information, see Changing the Label Printer Settings on page 37.
For QL-810W
You can reset the Label Printer using the Printer Buttons.
For more information, see Resetting All Settings to the Factory Settings Using
the Label Printer Buttons (QL-810W only) on page 161.
For QL-820NWB
You can reset the Label Printer using the LCD menu.
For more information, see LCD (QL-820NWB only) on page 11.
Problem Solution
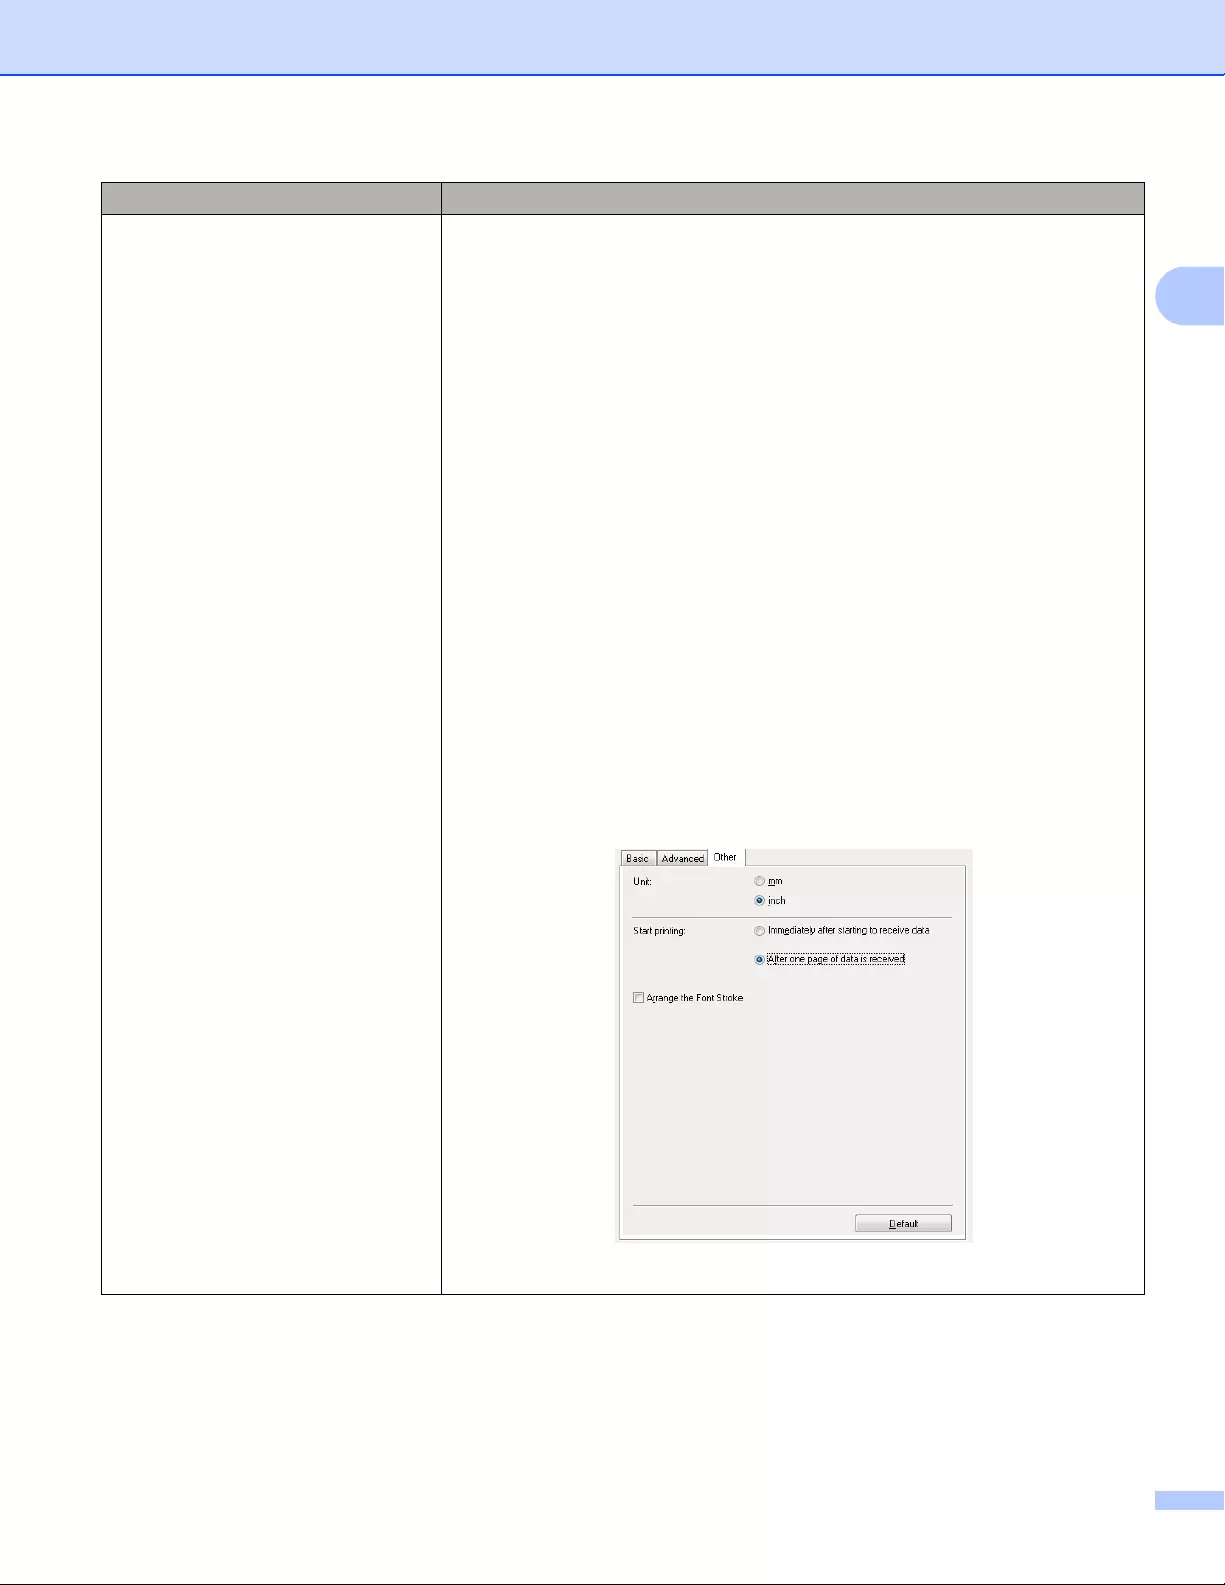
Troubleshooting
169
17
When printing via the USB cable, the
Label Printer repeatedly pauses and
then continues printing.
• Is the Label Printer set for sequential printing?
If so, set print mode to buffered printing.
For Windows Vista® / Windows Server® 2008:
Open printer properties from [Control Panel] — [Hardware and Sound] —
[Printers], click the Label Printer you want, and select [Select printing
preferences].
Click the [Other] tab and select the option [After one page of data is
received].
For Windows® 7 / Windows® 8 / Windows® 8.1 / Windows Server® 2008
R2 / Windows Server® 2012 / Windows Server® 2012 R2:
Open printer properties from [Devices and Printers], right-click the Label
Printer you want, and select [Printing Preference]. Click the [Other] tab
and select the option [After one page of data is received].
For Windows® 10:
Open printer properties from [Control Panel] — [Hardware and Sound] —
[Devices and Printers], right-click the Label Printer you want, and select
[Printing Preference].
Click the [Other] tab and select the option [After one page of data is
received].
• An alternative solution is to disconnect the LAN cable until USB printing is
completed. (QL-820NWB only)
For Windows®
Problem Solution
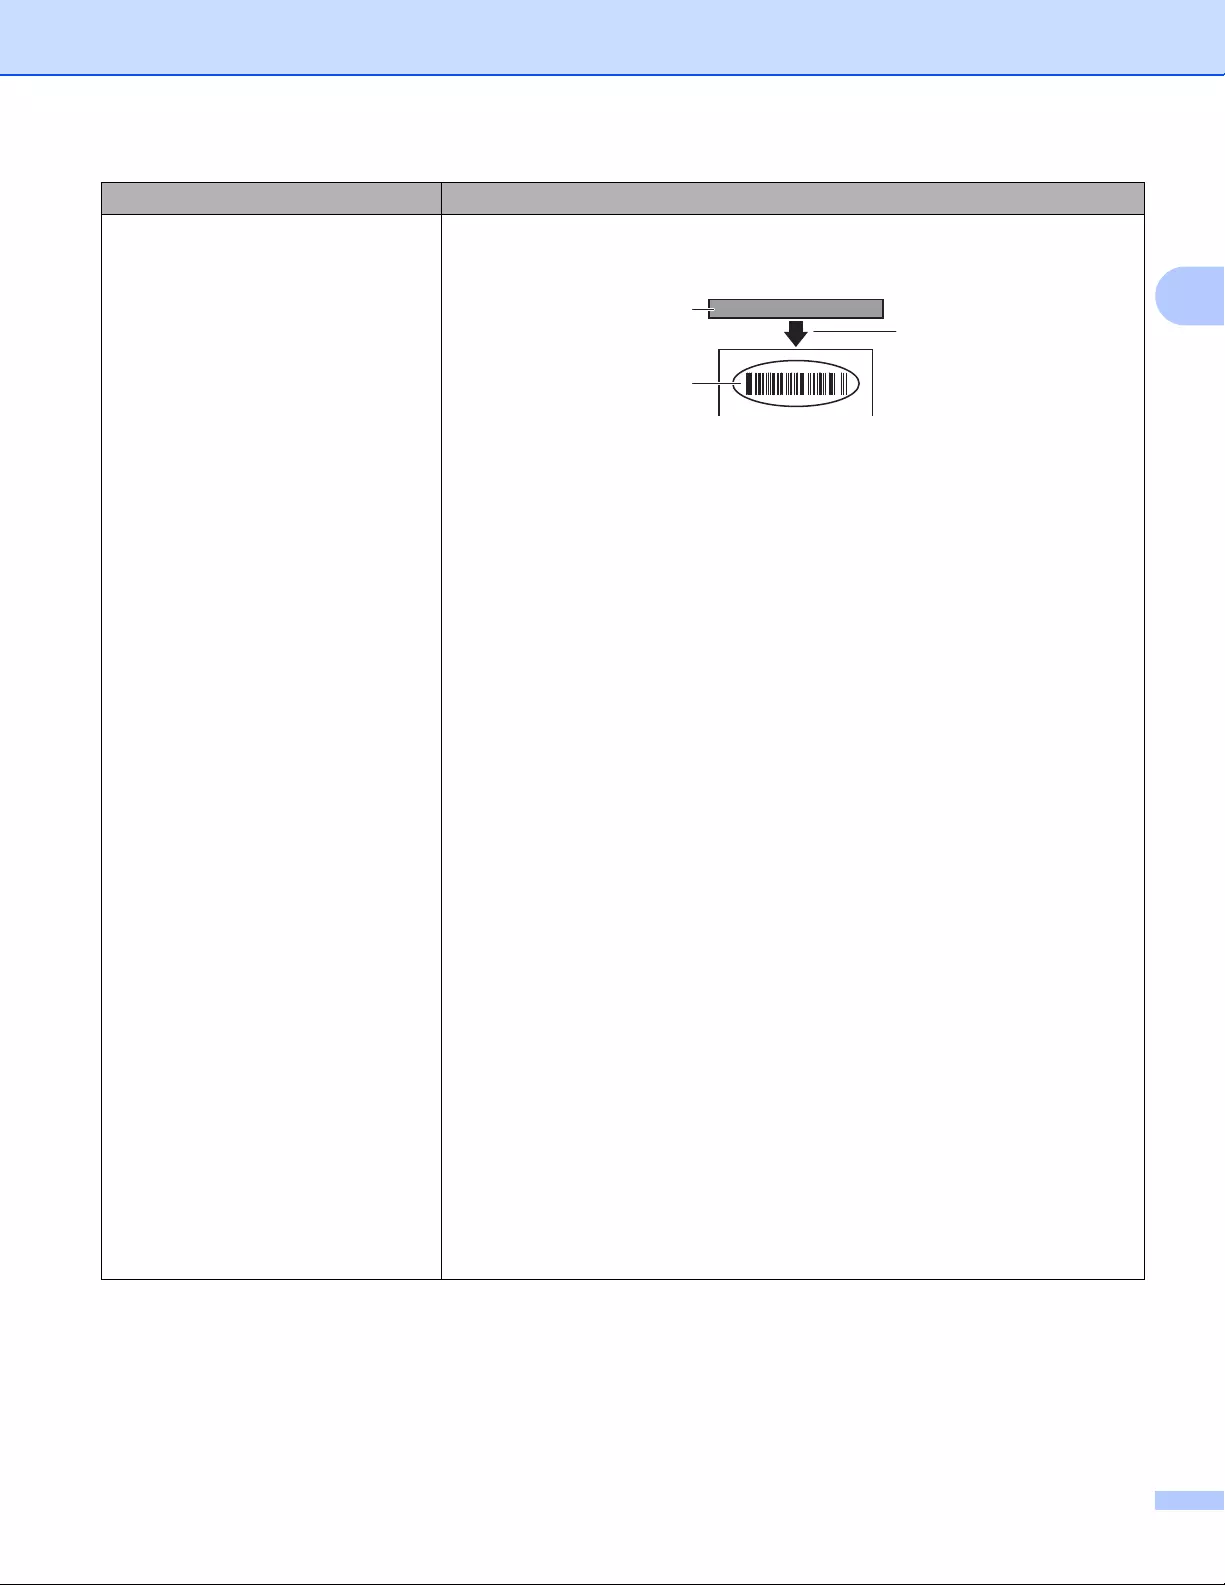
Troubleshooting
170
17
Printed barcodes cannot be read. Print labels so that barcodes are aligned with the print head as shown
below:
1 Print head
2 Barcodes
3 Printing orientation
Try using another scanner.
We recommend printing the Barcode with Print Quality options set to [Give
priority to print quality].
For Windows Vista®
To display the [Quality] options, open the printer properties by clicking the
Start button — [Control Panel] — [Hardware and Sound] — [Printers],
right-clicking the Label Printer you want to set up, and then clicking [Printing
Preferences].
For Windows® 7
To display the [Quality] options, open the printer properties by clicking the
Start button — [Devices and Printers], right-clicking the Label Printer you want
to set up, and then clicking [Printing Preferences].
For Windows® 8 / Windows® 8.1
To display the [Quality] options, open the printer properties by clicking
[Control Panel] in the [Apps] screen — [Hardware and Sound] — [Devices and
Printers], right-clicking the Label Printer you want to set up, and then clicking
[Printing Preferences].
For Windows® 10
To display the [Quality] options, open the printer properties by clicking the
Start button — [Settings] — [Devices] — [Printers & scanners] — [Devices and
Printers], right-clicking the Label Printer you want to set up, and then clicking
[Printing Preferences].
For Mac
To change the Print Quality options, open the Print dialog box and choose
[Basic] from the print options pop-up menu.
Problem Solution
1
2
3
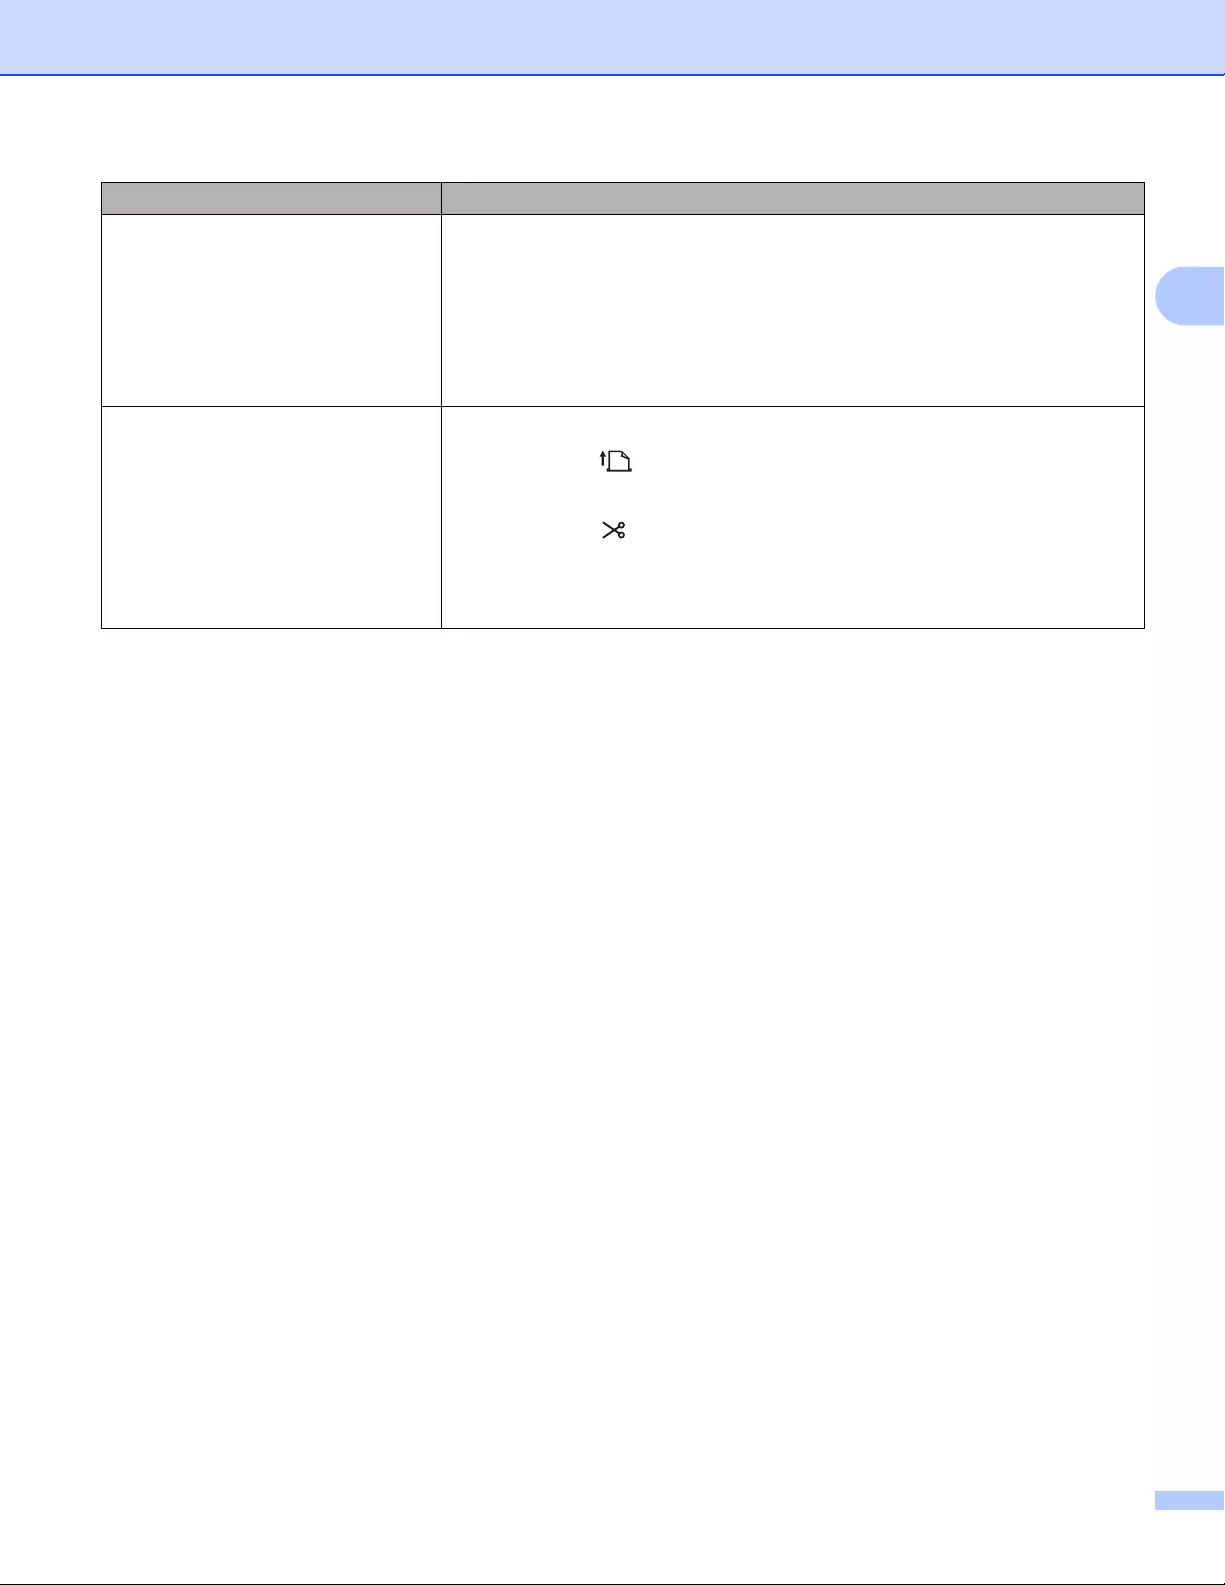
Troubleshooting
171
17
Lines appear in areas with a high red
density level.
1 Remove the DK Roll from the Label Printer.
2 Close the DK Roll Compartment Cover completely.
3 Press and hold the Editor Lite Button (QL-810W) or Cancel Button (QL-
820NWB) for more than five seconds. Wait while the platen roller rotates.
4 When the platen roller stops rotating, load the DK Roll.
The roller will rotate for about 40 seconds.
I want to feed the label. For QL-810W
Press the Feed ( ) Button for one second.
For QL-820NWB
Press the Cutter ( ) Button for one second, or press the Menu Button to select
[Feed Start] from [Feed] menu.
[Die-Cut Feed Setting] from [Feed] menu sets the length of fed label
when using a die-cut label.
Problem Solution
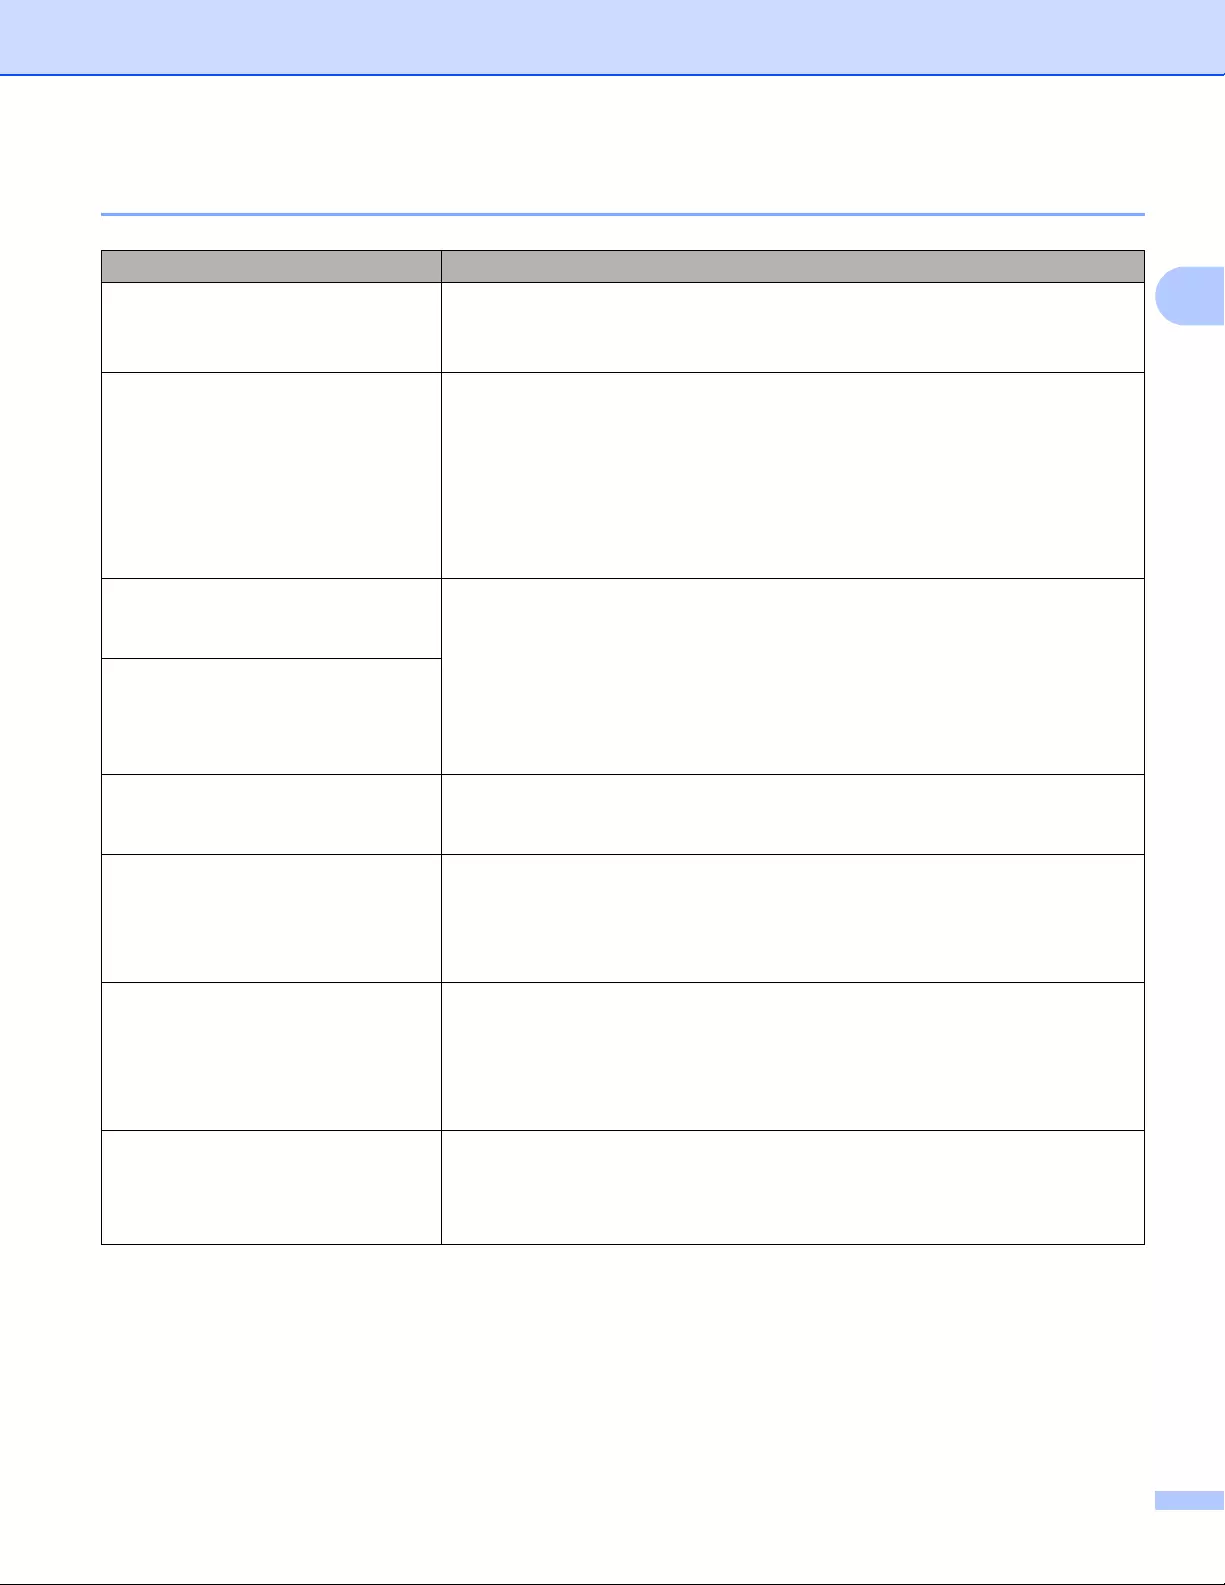
Troubleshooting
172
17
Network Setup Problems 17
Problem Solution
You are using security software Confirm your settings in the installation dialog box.
Allow access when the security software alert message appears during the
Label Printer installation.
Your security settings
(SSID/Network Key) are incorrect
Recheck and select the correct security settings.
The manufacturer’s name or model number of the wireless access
point/router may be used as the default security settings.
See the instructions supplied with your wireless access point/router for
information on how to find the security settings.
Ask the wireless access point/router manufacturer or ask your Internet
provider or network administrator.
Your Label Printer cannot connect to
the host device using Wi-Fi or
Bluetooth.
Move your Label Printer within about 3.3 feet (one meter) of the mobile
device when you configure the Wi-Fi network settings.
Move your Label Printer to an obstruction-free area.
If a wireless computer, Bluetooth-equipped device, microwave oven, digital
cordless phone, or other device is near your Label Printer or the wireless
access point/router, move the device away from your Label Printer or
wireless access point/router.
Your Label Printer cannot print using
Wi-Fi or Bluetooth.
There are obstructions (walls or
furniture, for example) between your
Label Printer and the mobile device
Move your Label Printer to an obstruction-free area.
A wireless computer, Bluetooth
supported device, microwave oven
or digital cordless phone is near the
Label Printer or the wireless access
point/router
Move other devices away from the Label Printer.
You are using MAC Address filtering You can confirm the MAC address by printing the Printer Settings Report.
For more information, see Confirming the Label Printer Settings on page 84.
You can confirm the MAC address by confirming the [Infrastructure
Mode] on the LCD (QL-820NWB only). For more information, see WLAN Status
on page 19.
Your wireless access point/router is
in stealth mode (not broadcasting the
SSID)
You must type the correct SSID name during the installation or when using
the Printer Setting Tool.
Check the SSID name in the instructions supplied with your wireless access
point/router and reconfigure the Wi-Fi settings.

Troubleshooting
173
17
Your Label Printer is not connected
correctly to the network
Check that the Label Printer is in the mode you want to connect to.
If the Label Printer is still not connected, please try the following.
• For Wi-Fi connection
For QL-810W
(flashes once every three seconds): The network is connected
incorrectly, and the Wi-Fi settings must be reconfigured.
For QL-820NWB
: Your Label Printer is searching for the network.
• For Wireless Direct
For QL-810W
Search the Label Printer from the Wi-Fi device.
For QL-820NWB
If the Wireless Direct icon is displayed on the LCD, search the Label Printer
from the device you want to connect.
• For Wired LAN (QL-820NWB only)
Check that the LAN cable is connected correctly.
• For Bluetooth (QL-820NWB only)
If the Bluetooth icon is displayed on the LCD, search the Label Printer from the
device you want to connect.
I have checked and tried all of the
above, but still cannot complete the
Wi-Fi/Bluetooth settings
Turn off the Label Printer, and then turn it on again. Then, try and configure the
Wi-Fi and Bluetooth settings again.
Your Label Printer is not connected if
the Bluetooth connection with an
Apple device (iPad, iPhone, or iPod
touch) (QL-820NWB only) is lost.
Turn On the Auto Reconnect function.
You can set it from the Printer Setting Tool or the Menu Button. For more
information, see Bluetooth on page 19 or Changing the Label Printer Settings
on page 37.
Problem Solution
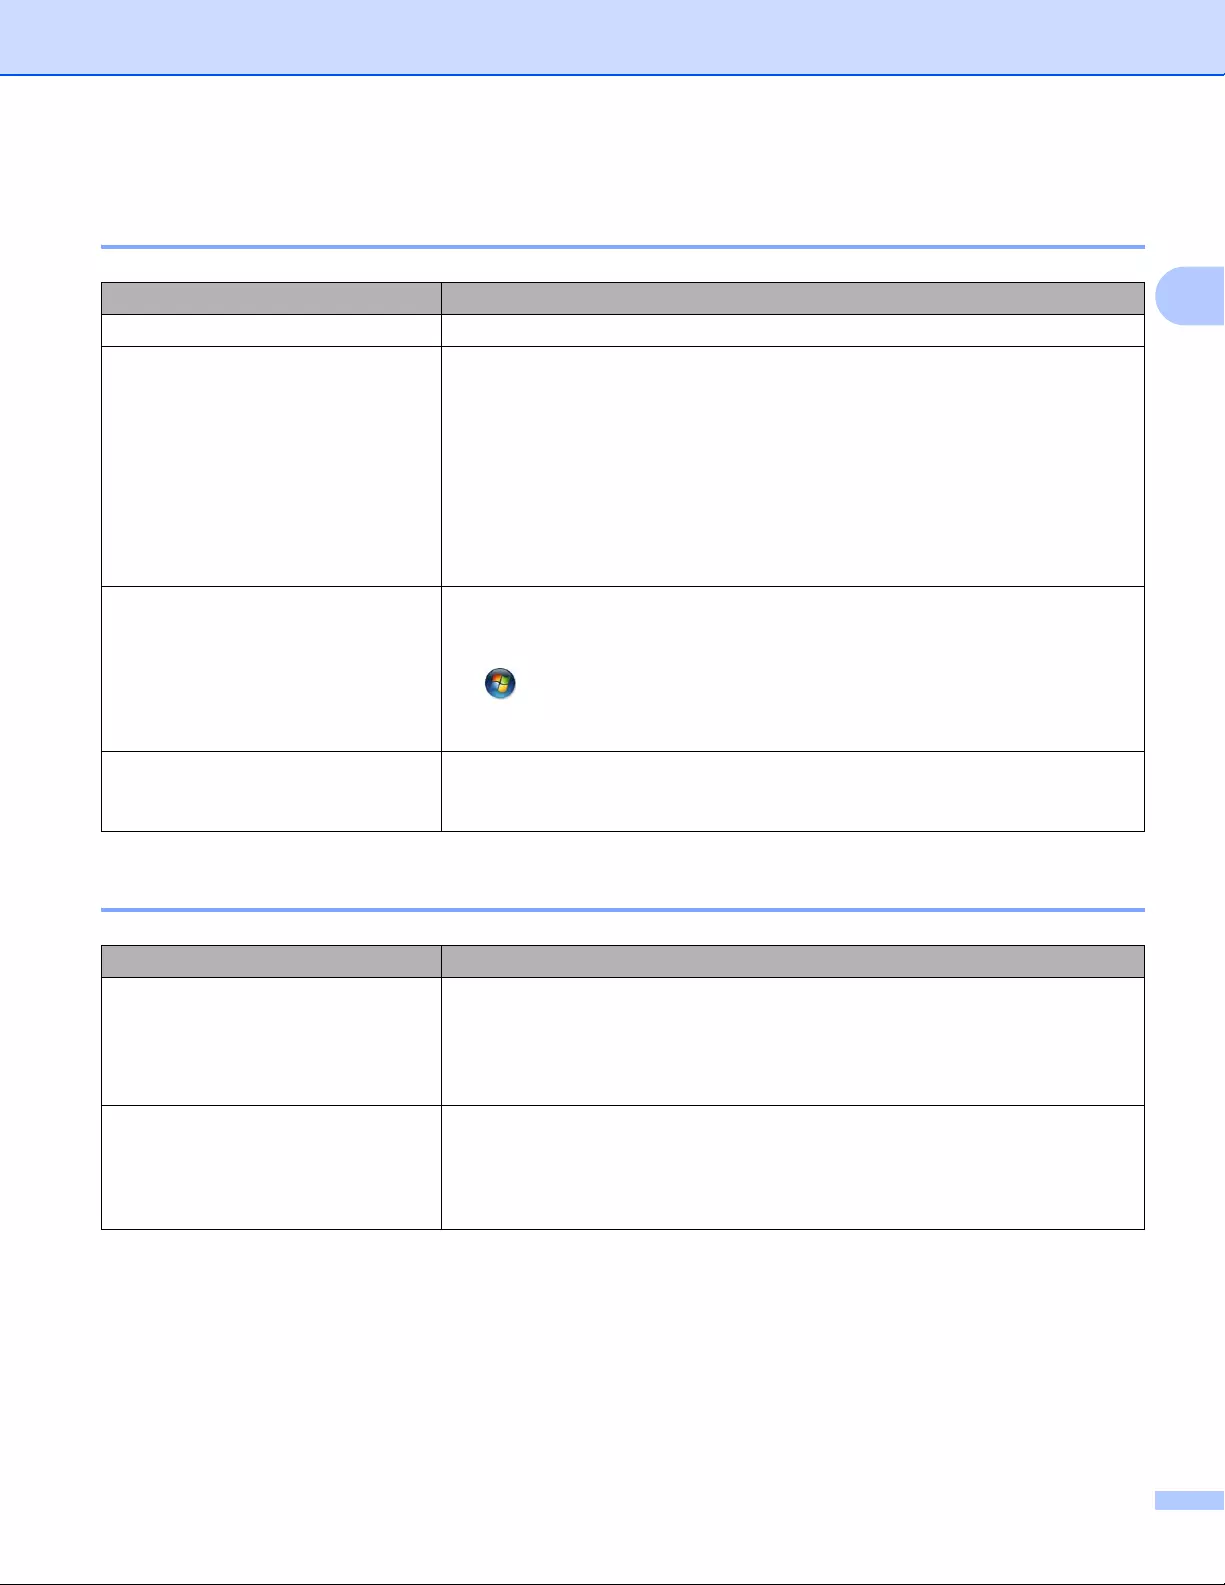
Troubleshooting
174
17
Label Printer Cannot Print over the Network
Label Printer Is Not Found on the Network Even after Successful Installation 17
Security Software Problems 17
Problem Solution
You are using security software See Security Software Problems on page 174.
Your Label Printer is not assigned
with an available IP address
Confirm the IP address and the Subnet Mask.
Verify that both the IP addresses and Subnet Masks of your computer and
your Label Printer are correct and located on the same network.
For more information on how to verify the IP address and the Subnet Mask,
ask the network administrator.
Confirm your IP address, Subnet Mask and other network settings using the
Printer Setting Tool.
For more information, see Changing the Label Printer Settings on page 37.
Your previous printing job failed If the failed printing job is still in your computer’s print queue, delete it.
For example, when using Windows® 7:
, [Devices and Printers] and select the Label Printer from [Printers
and Faxes]. Double-click the Label Printer’s icon, and then select [Cancel
All Documents] in the [Printer] menu.
I have checked and tried all of the
above, but my Label Printer does not
Uninstall the printer driver and the software, and then reinstall them.
Problem Solution
You did not select to allow access
when the Security Alert dialog box
appeared during either the standard
installation, BRAdmin Light
installation, or when printing
If you did not select to allow access when the Security Alert dialog box
appeared, the firewall function of your security software may be blocking
access. Some security software may block access without displaying a
Security Alert dialog box. To allow access, refer to your security software
instructions or ask the manufacturer.
Incorrect port numbers are being
used for the Brother network features
The following port numbers are used for Brother network features:
BRAdmin Light i Port number 161 / Protocol UDP
For more information on how to open the port, refer to your security software
instructions or ask the manufacturer.
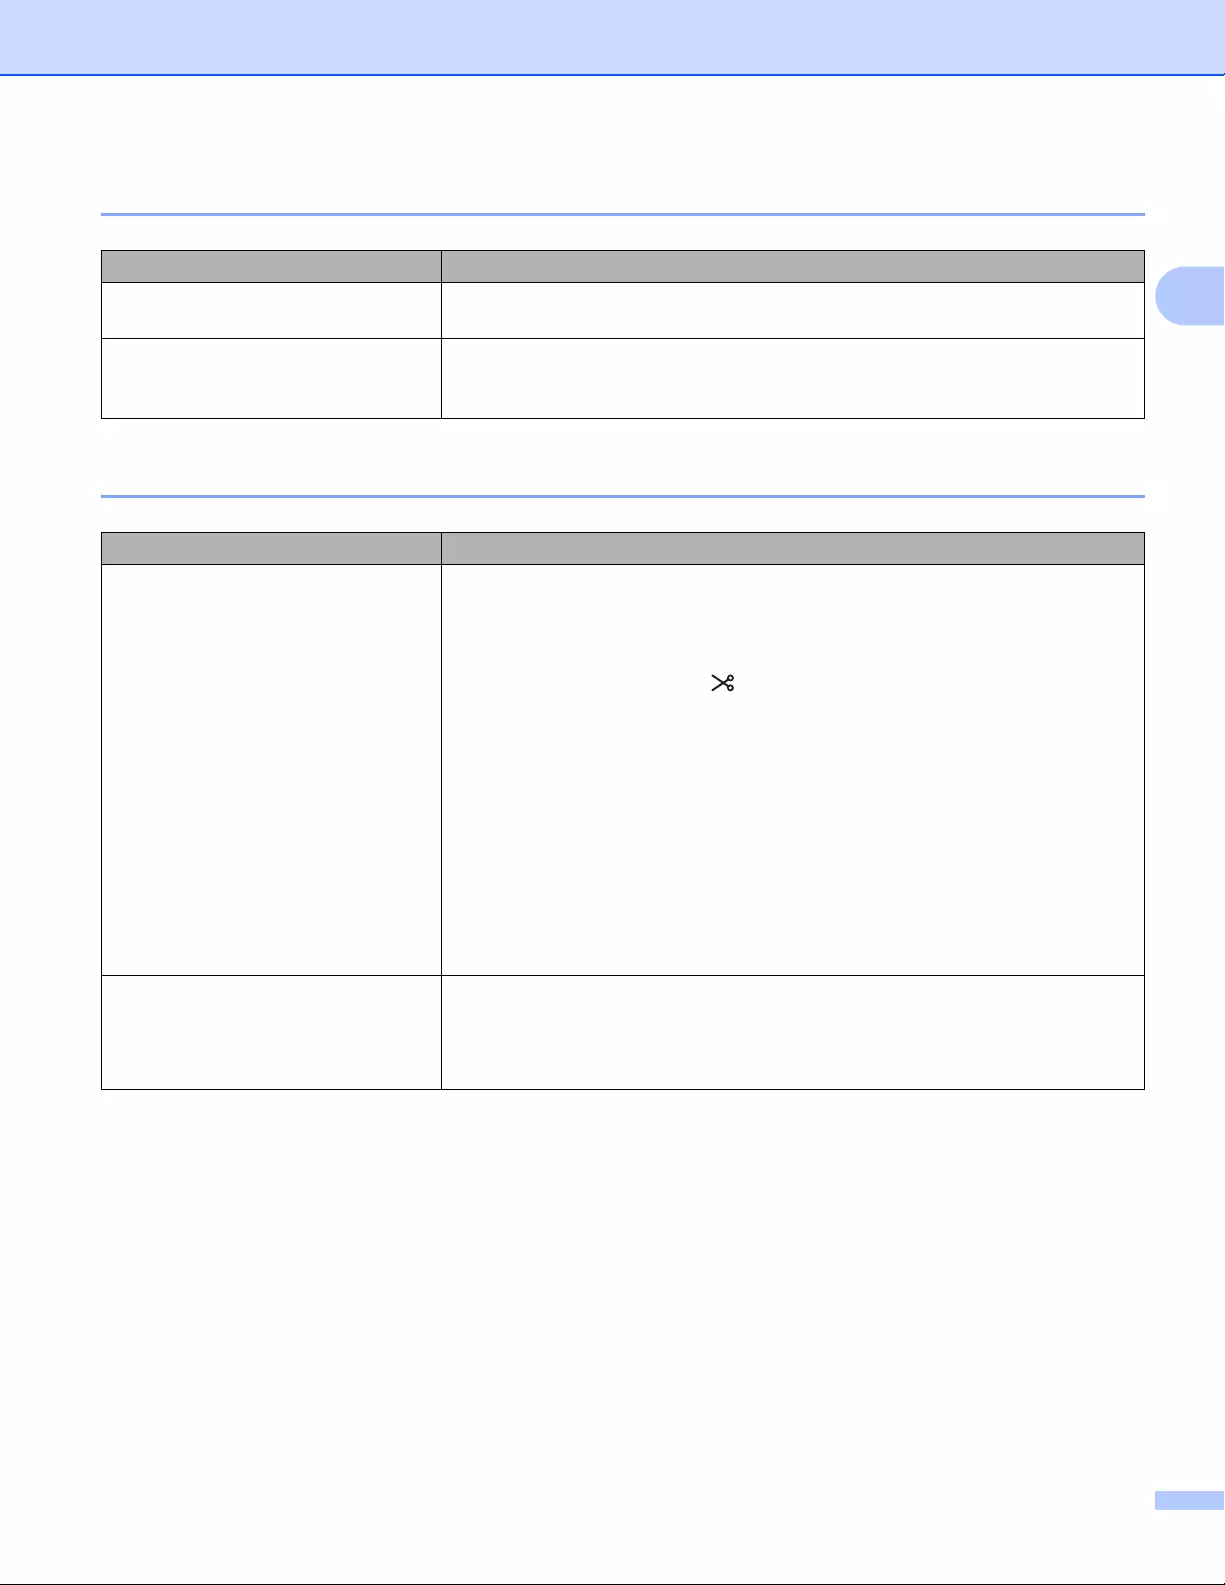
Troubleshooting
175
17
Checking the Operation of Network Devices 17
Version Information 17
Problem Solution
Your Label Printer and wireless
access point/router are not turned on
Make sure you have performed all of the tasks on page 166.
I do not know my Label Printer
network settings, such as the IP
address
Check the Printer Setting Tool. For more information, see Changing the Label
Printer Settings on page 37.
Problem Solution
I do not know the version number of
the firmware for the Label Printer.
You can use the following procedure.
For QL-810W
1 Turn your Label Printer on.
2 Press and hold the Cutter ( ) Button for several seconds to print the report.
(Use 2.4″ (62 mm) DK Roll)
For QL-820NWB
1 Turn your Label Printer on.
2 Press the Menu, [▲], or [▼] Button to select the [Information] menu, and
then press the [OK] Button.
3Select [Print Configuration] using [▲] or [▼], and then press the [OK]
Button.
4Select [All], [Usage Log], [Printer Setting] or [Transfer Data]
using [▲] or [▼] Button, and then press the [OK] Button to print the report.
I want to confirm whether I am using
the latest version of the software.
Use the P-touch Update Software to confirm whether you have the latest
version.
For more information about the P-touch Update Software, see How to Update
P-touch Software on page 146.
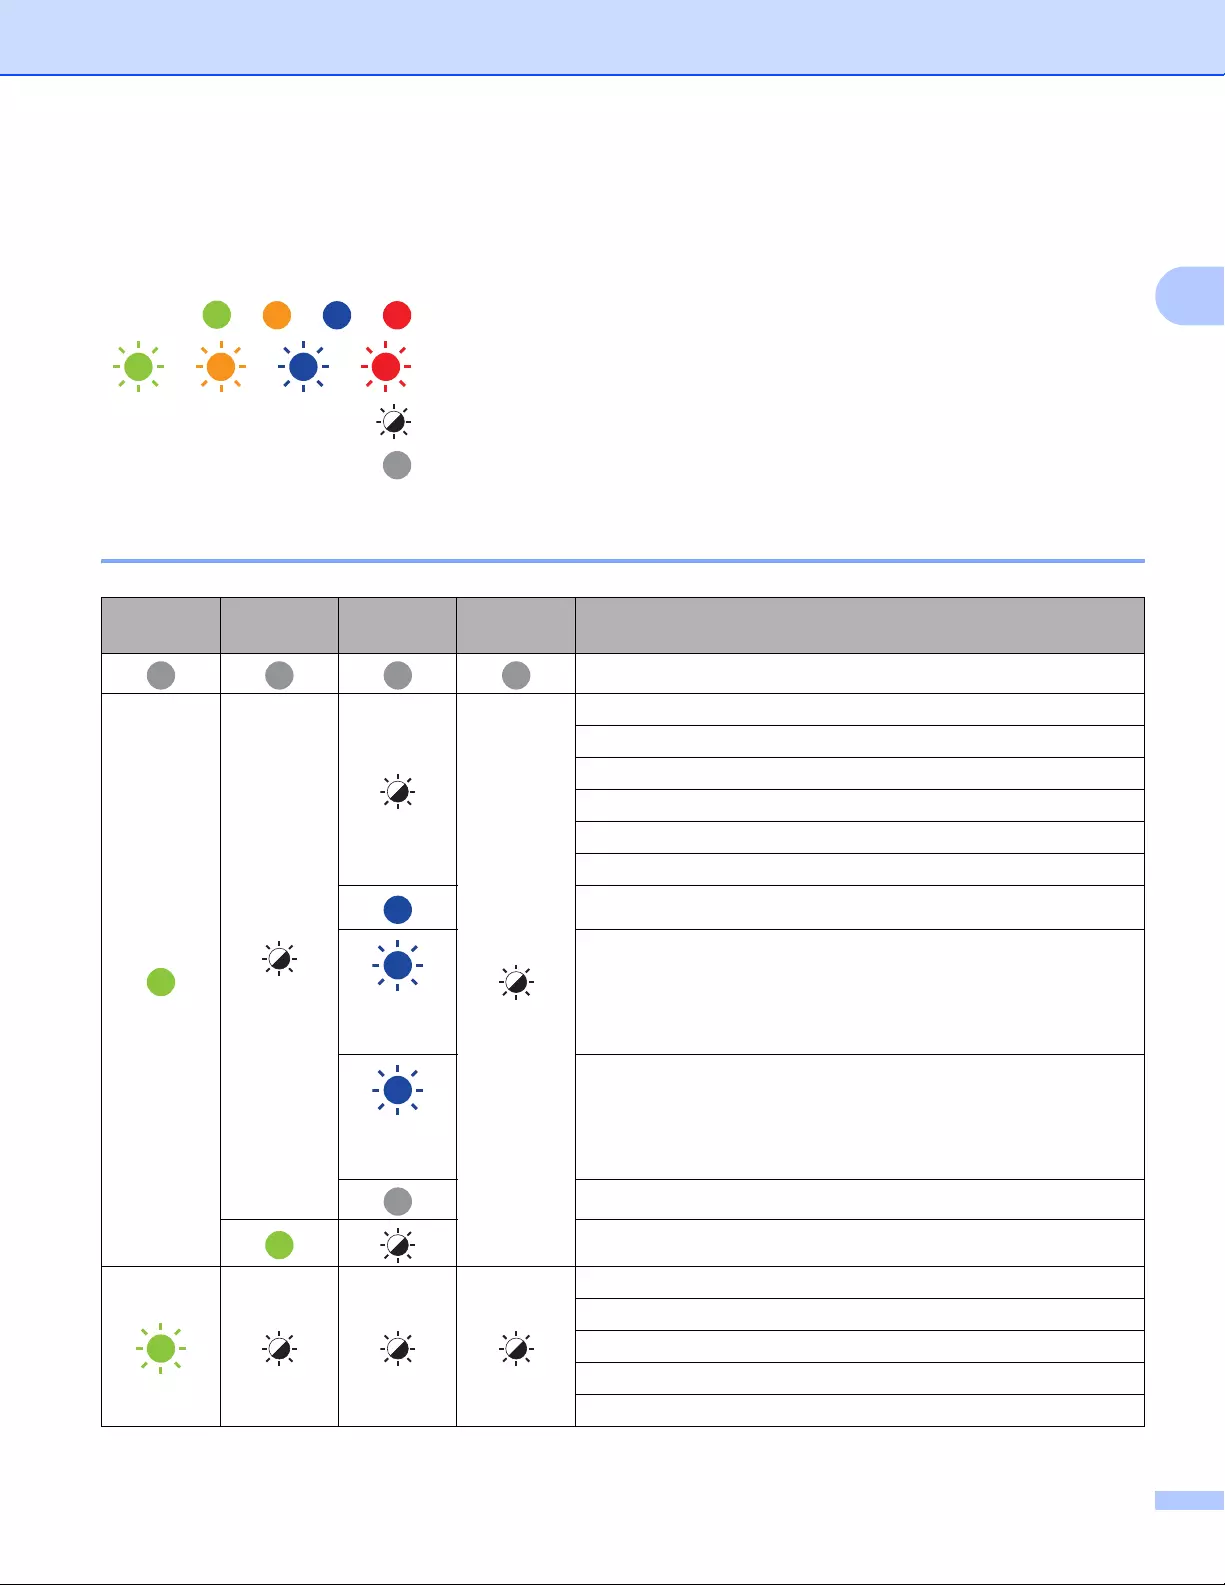
Troubleshooting
176
17
LED Indicators 17
The indicators light and flash to indicate the Label Printer status.
QL-810W 17
or or or Indicator is lit in the color shown
or or or Indicator is flashing in the color shown
Indicator can be off, lit or flashing in any color
Indicator is off
Status
LED
Editor Lite
LED Wi-Fi LED Battery
LED Condition
Power Off
Power On
Feeding mode
Printing mode
Forward/reverse roller rotation mode
Cutting mode
Cleaning mode
WLAN is on and connected.
(Once for
1 second)
WPS setting mode
(Once for
3 seconds)
WLAN is on, but not connected.
WLAN Off
P-touch Editor Lite mode
Print preparation mode
Canceling job
Receiving data from the computer
Transferring data
Searching for Label Printers
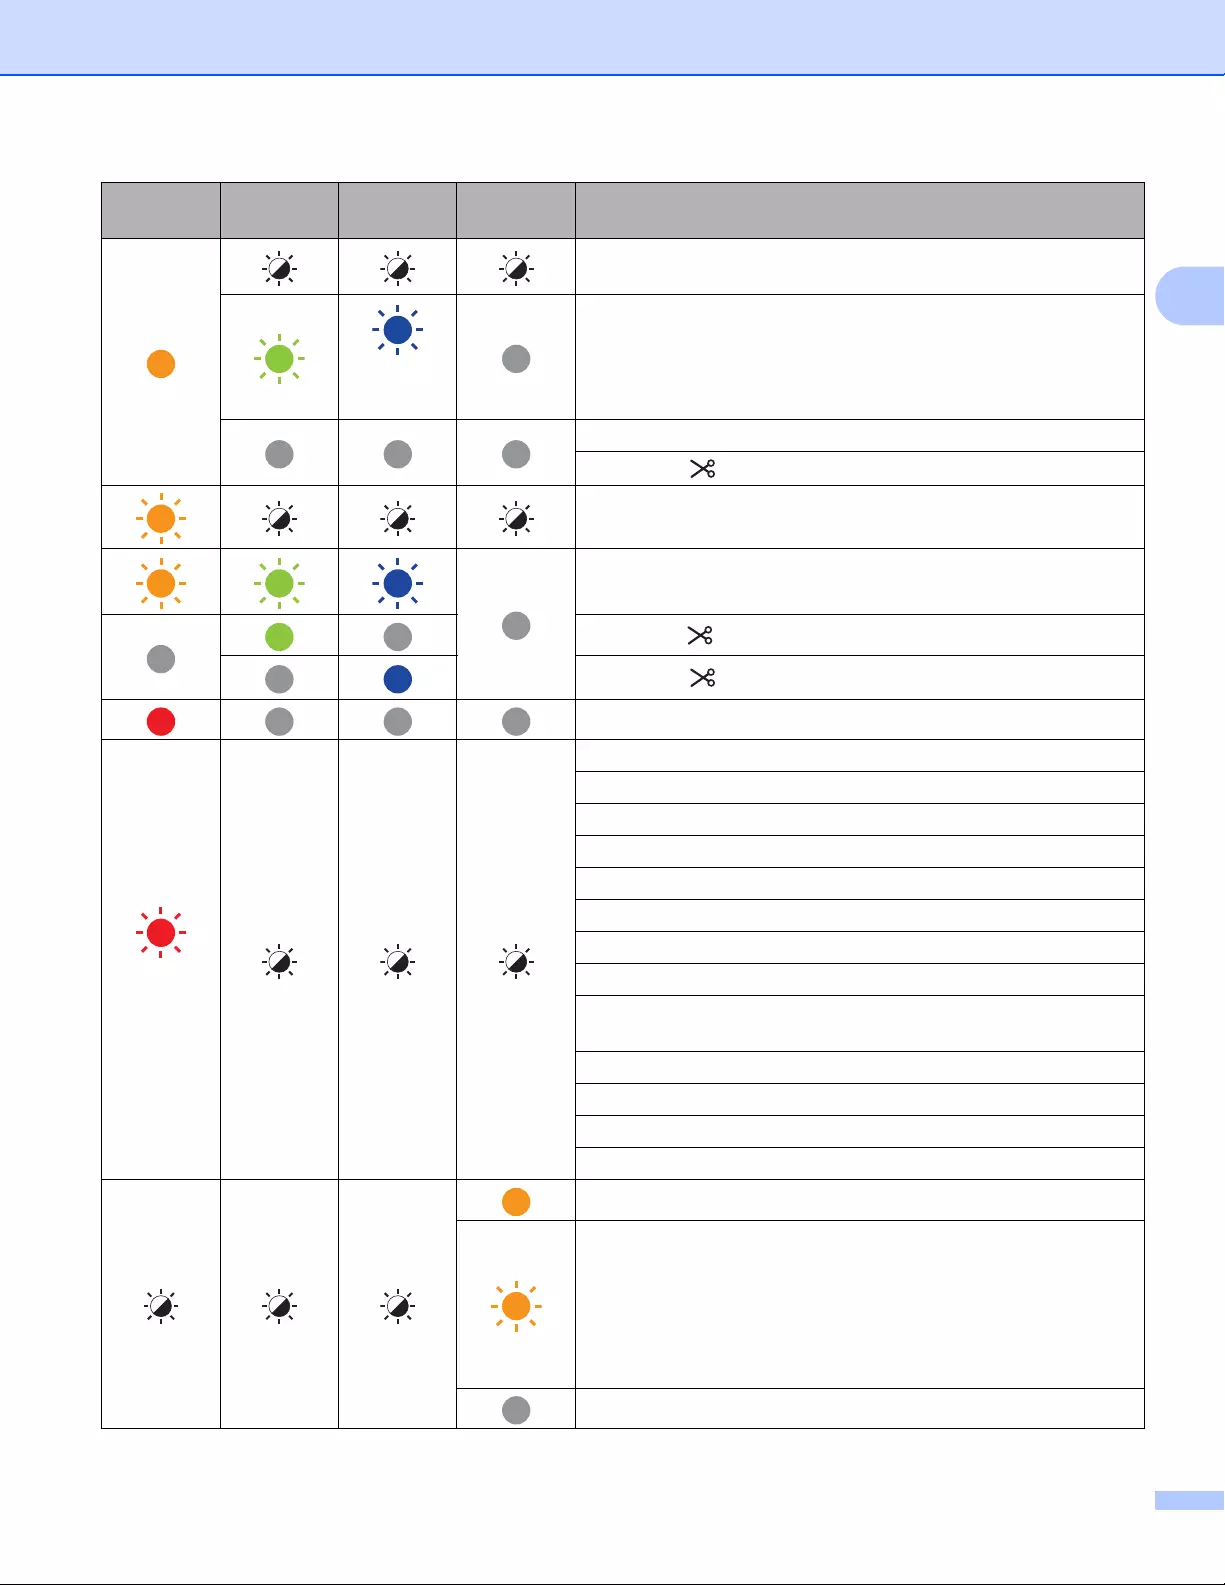
Troubleshooting
177
17
The DK Roll Compartment Cover is open. Close the DK Roll
Compartment Cover correctly.
(Once for
1 second)
Resetting mode
System OFF mode
The Cutter ( ) Button is pressed once in resetting mode.
Cooling mode
Data overwrite mode
The Cutter ( ) Button is pressed three times in resetting mode.
The Cutter ( ) Button is pressed twice in resetting mode.
Boot mode
(Once for
2 seconds)
End of DK Roll
Feed error
Transmission error
Database search error
Access point search error
Access point connection error
Security error
No template selected
The DK Roll Compartment Cover is opened while the Label
Printer is in use.
No media error
Incorrect media error
Communication command error
Two-color media high resolution printing error
The battery is charging.
• If the orange light flashes once every second, the battery
needs recharging.
• If the orange light flashes twice every 4 seconds, the battery
power is low.
• If the orange light flashes once every 4 seconds, the battery
power is half.
The battery is fully charged.
Status
LED
Editor Lite
LED Wi-Fi LED Battery
LED Condition
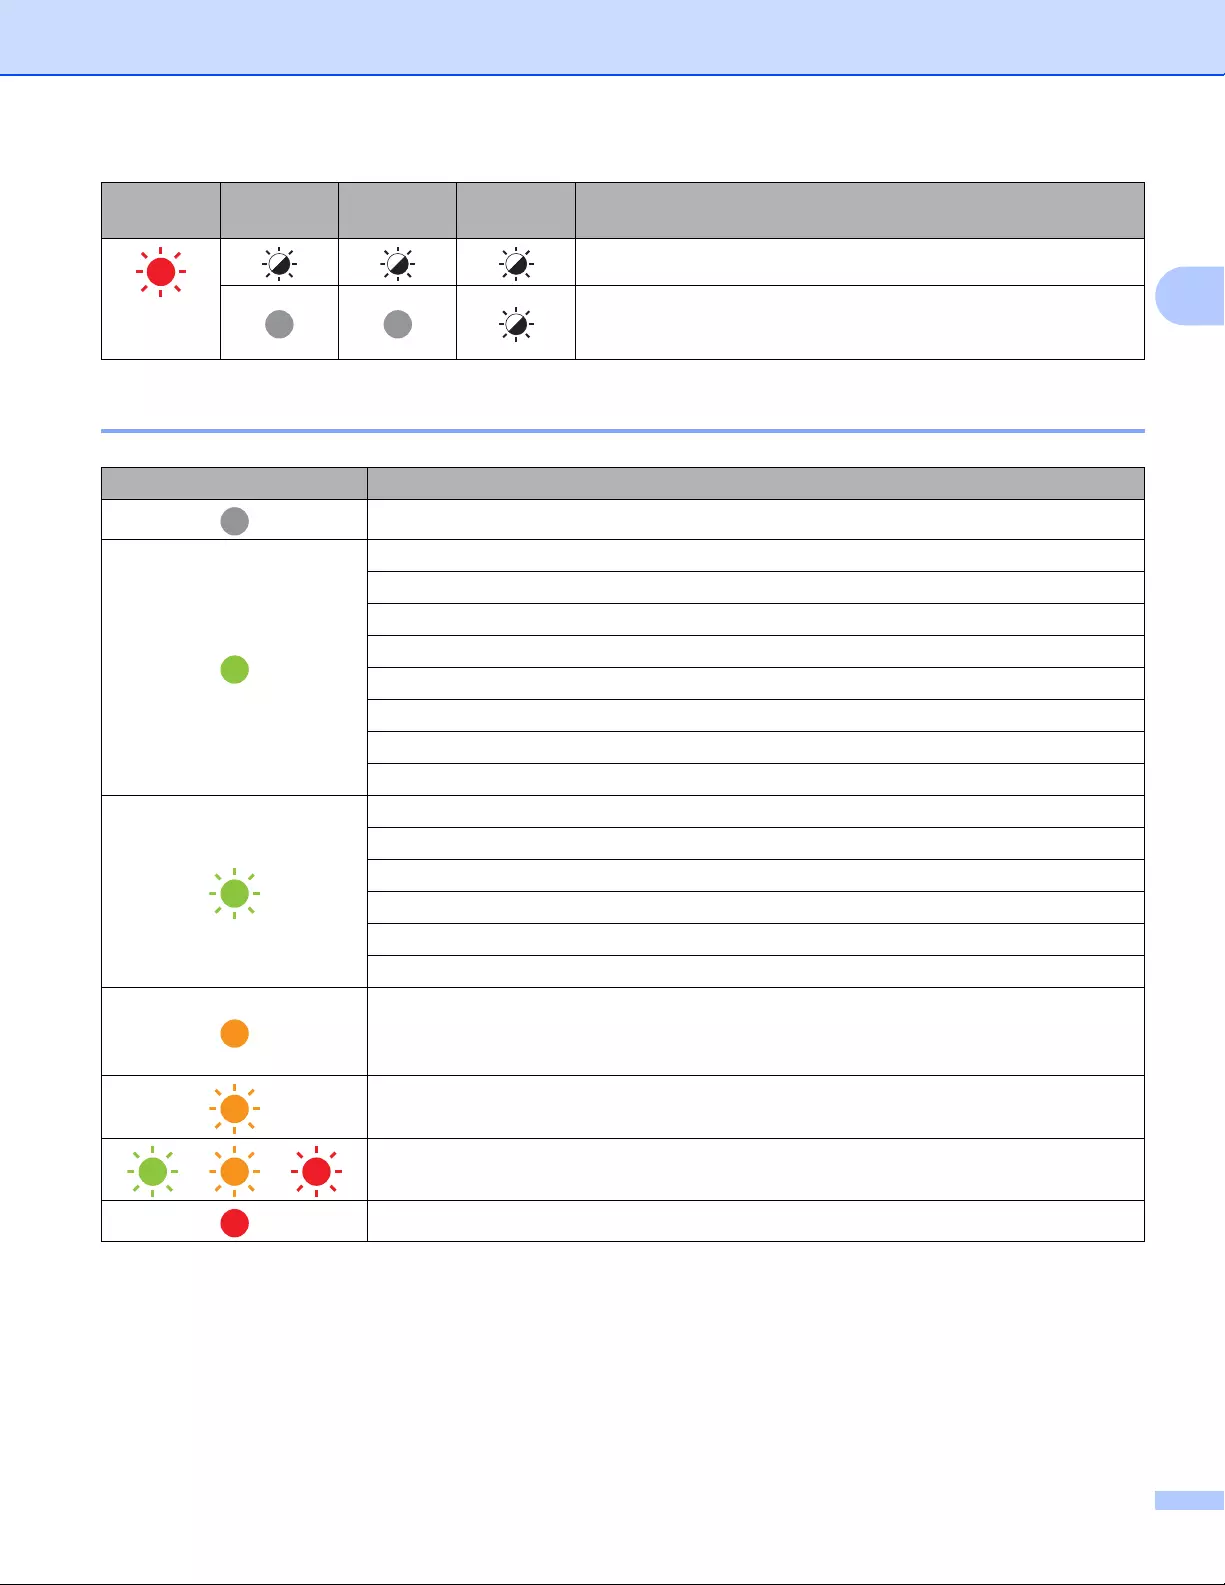
Troubleshooting
178
17
QL-820NWB 17
(Twice for
2 seconds)
Cutter error
System error
Status LED Condition
Power Off
Power On
Feeding Mode
Printing Mode
Mass storage mode
Forward/reverse roller rotation mode
Cutting Mode
Cleaning Mode
Initializing mode
Print preparation mode
Canceling job
Receiving data from the computer
Transferring data
Searching for Label Printers
Data overwrite mode
• The DK Roll Compartment Cover is open. Close the DK Roll Compartment Cover
correctly.
• System OFF mode
Cooling mode
→ → Fixing IP address mode
Boot mode
Status
LED
Editor Lite
LED Wi-Fi LED Battery
LED Condition
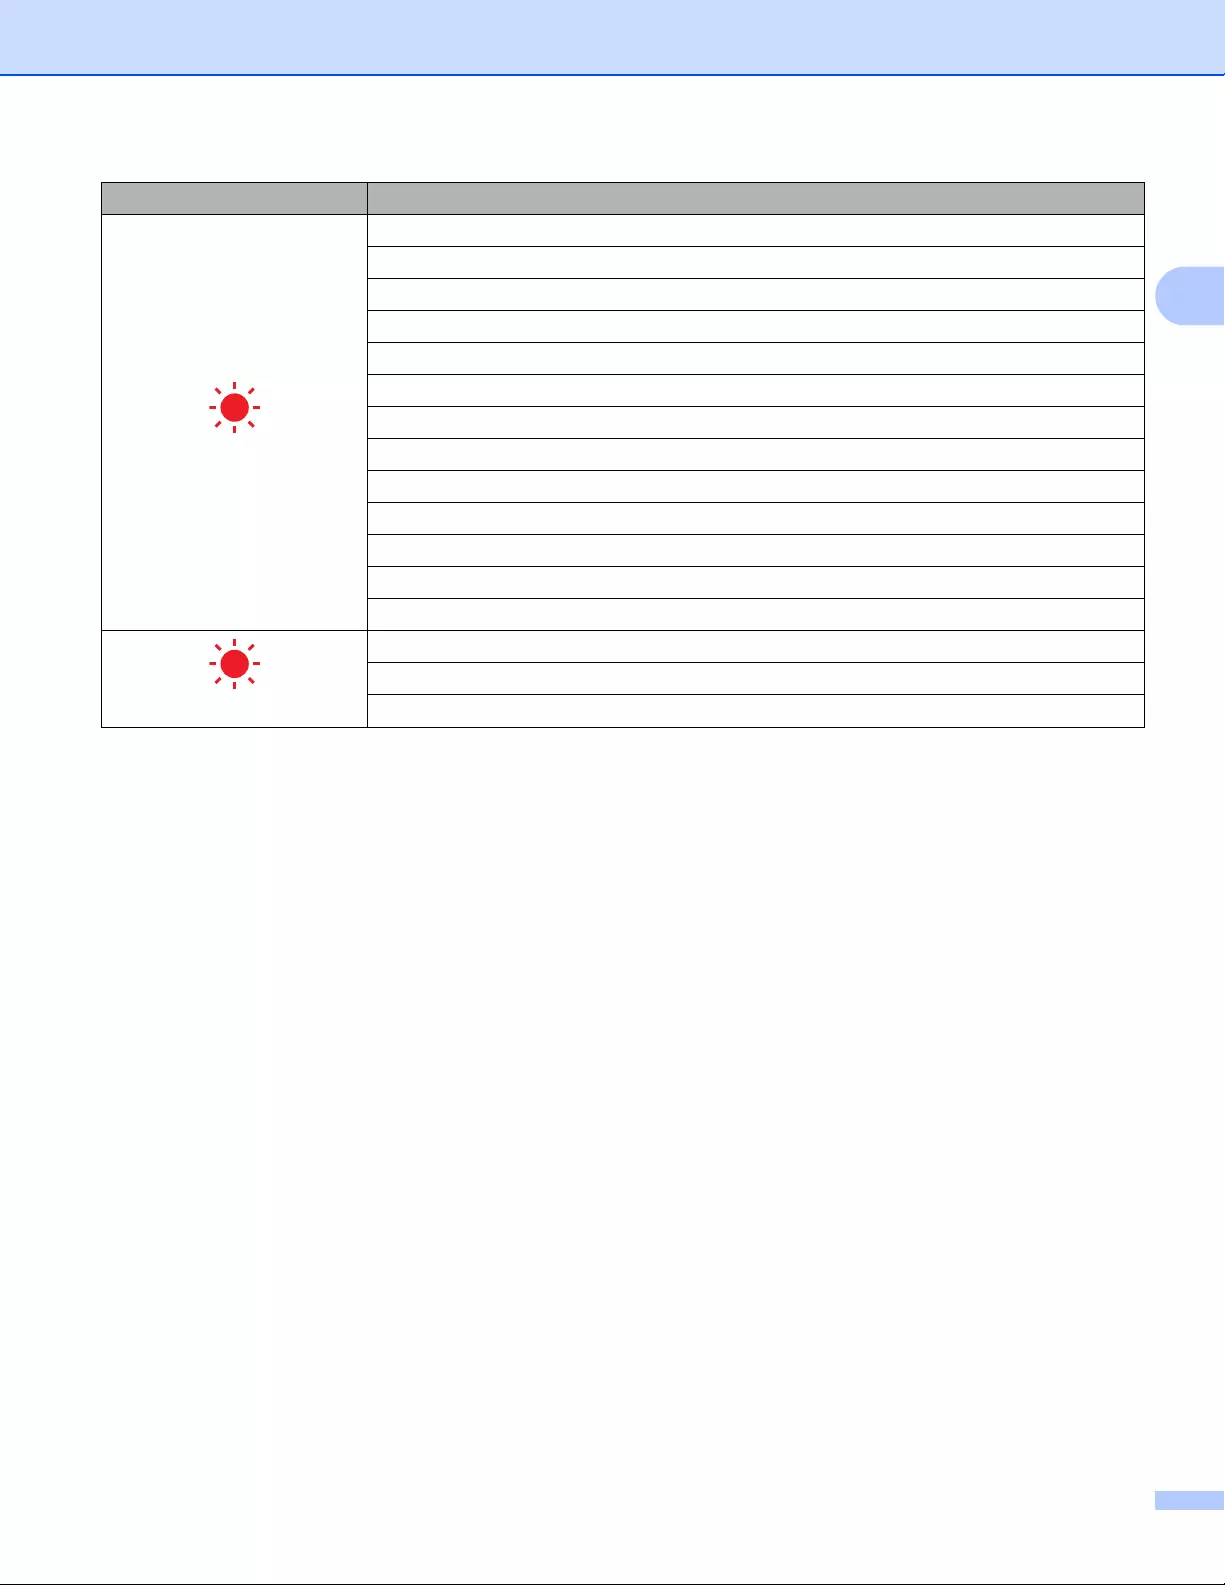
Troubleshooting
179
17
(Once for 2 seconds)
End of DK Roll
Feed error
Transmission error
Database search error
Access point search error
Access point connection error
Security error
No template selected
The DK Roll Compartment Cover is opened while the Label Printer is in use.
No media error
Incorrect media error
Communication command error
Two-color media high resolution printing error
(Twice for 2 seconds)
Cutter error
Mass storage error
System error
Status LED Condition
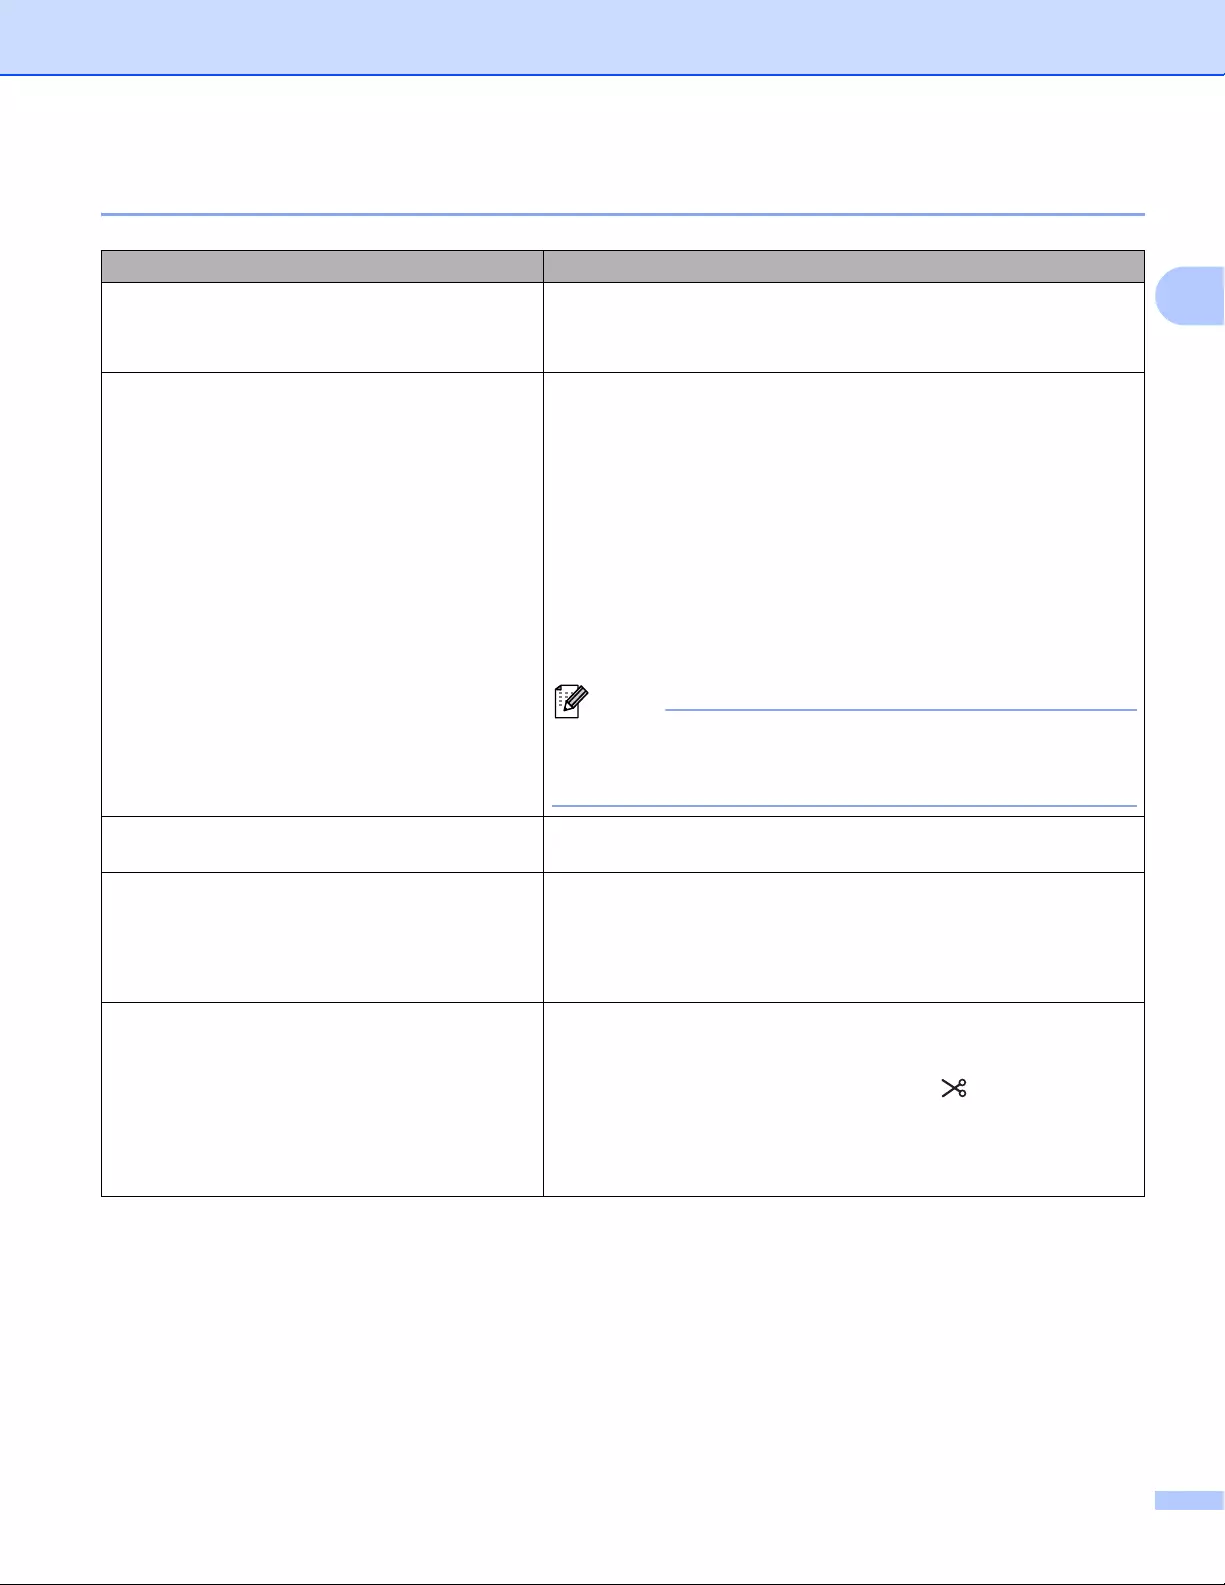
Troubleshooting
180
17
Troubleshooting 17
Problem Solution
Received data in buffer Print data is saved in the buffer. If the Label Printer has not received
the complete data, printing will not start.
Turn off the Label Printer, and then turn it on again.
Head is cooling down The thermal head is too hot.
The Label Printer stops and resumes printing only after the thermal
head has cooled down. The head may become too hot if you are
printing a large number of labels.
When the thermal head becomes too hot, it may produce imaging
outside the print area. To avoid or delay overheating, make sure the
Label Printer has adequate ventilation and is not located in an
enclosed space.
If the Label Printer must cool down because it overheated due to
the type of DK Roll you are using or the contents of the label,
printing may take longer than usual.
This condition may occur more often when the Label Printer is
used at high altitude (more than 10,000 ft (3,048 m)) due to a
lower air density available to cool the Label Printer.
Label Printer is in boot mode To resolve the issue, contact your Brother dealer or Brother
Customer Service for assistance.
DK Roll errors Check the following:
• You are using the correct DK Roll.
• There are enough labels remaining.
• The DK Roll is installed correctly.
I want to reset an error To reset an error:
1 Open the DK Roll Compartment Cover, and then close it.
2 If the error is not reset, press the Cutter ( ) Button.
3 If the error is not reset, turn off the Label Printer, and then turn
it on again.
4 If the error is not reset, contact Brother Customer Service.
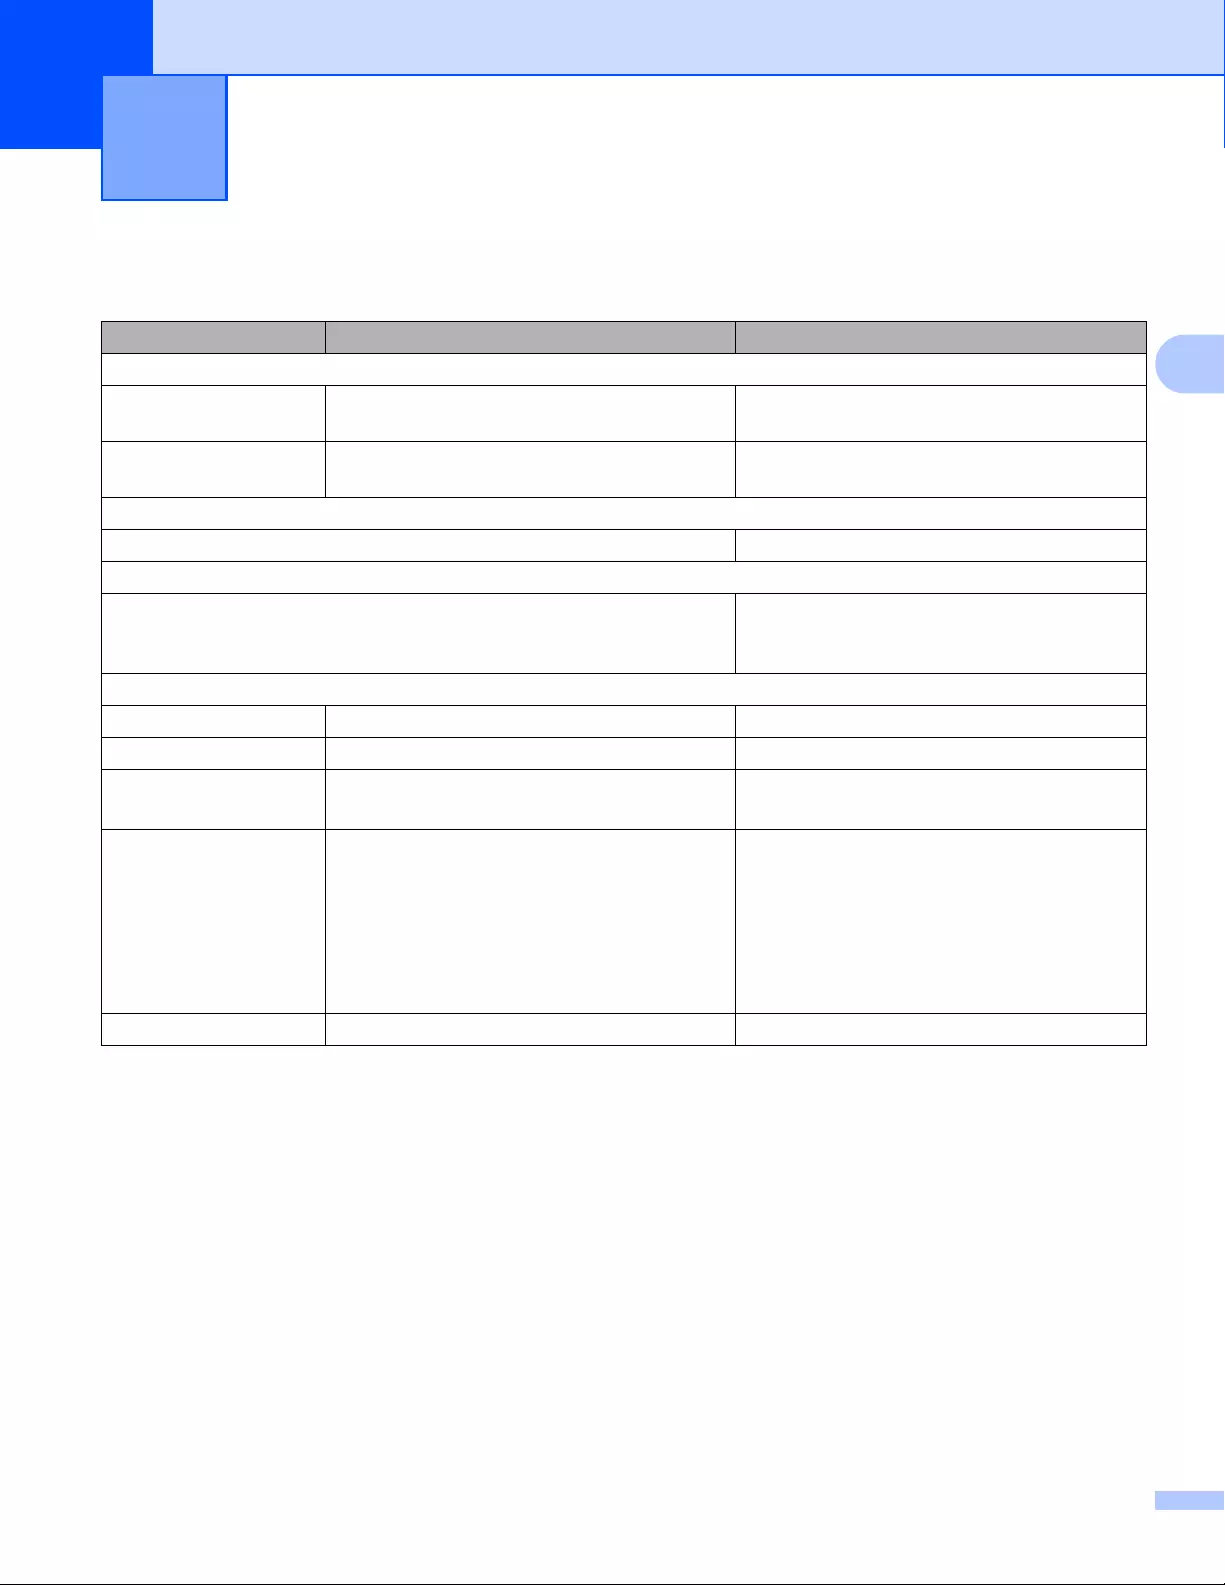
181
18
18
Label Printer Specifications 18
Product Specifications 18
Model Name QL-810W QL-820NWB
Size
Dimensions Approximately 4.9 (W) x 9.2 (D) x 5.7 (H) in./
125.3 (W) x 234 (D) x 145 (H) mm
Approximately 4.9 (W) x 9.2 (D) x 5.7 (H) in./
125.3 (W) x 234 (D) x 145 (H) mm
Weight Approximately 2.4 lb (1.12 kg) (without DK
Rolls)
Approximately 2.6 lb (1.16 kg) (without DK
Rolls)
LED Indicators
Editor Lite LED, Battery LED, Status LED, Wi-Fi LED Status LED
Buttons
Power Button, Feed Button, Cutter Button, WPS Button, Wi-Fi Button,
Editor Lite Button
Power Button, Cutter Button, Menu Button,
Cancel Button, Up Arrow Button, Down
Arrow Button, OK Button
Printing
Method Direct thermal printing via thermal head Direct thermal printing via thermal head
Print head 300 dpi / 720 dots 300 dpi / 720 dots
Print resolution Standard: 300 dpi × 300 dpi
High resolution mode: 300 dpi × 600 dpi
Standard: 300 dpi × 300 dpi
High resolution mode: 300 dpi × 600 dpi
Printing speed AC Adapter: max. 6.9″/sec (176 mm/sec) /
For 2-color printing, max. 0.9″/sec (24
mm/sec)
Battery: max. 6.9″/sec (176 mm/sec) / For
two color printing, max. 0.6″/sec (15 mm/sec)
Actual print speed varies depending on the
conditions.
AC Adapter: max. 6.9″/sec (176 mm/sec) /
For 2-color printing, max. 0.9″/sec (24
mm/sec)
Battery: max. 6.9″/sec (176 mm/sec) / For
two color printing, max. 0.6″/sec (15 mm/sec)
Actual print speed varies depending on the
conditions.
Maximum printing width 2.3″ (58 mm) 2.3″ (58 mm)
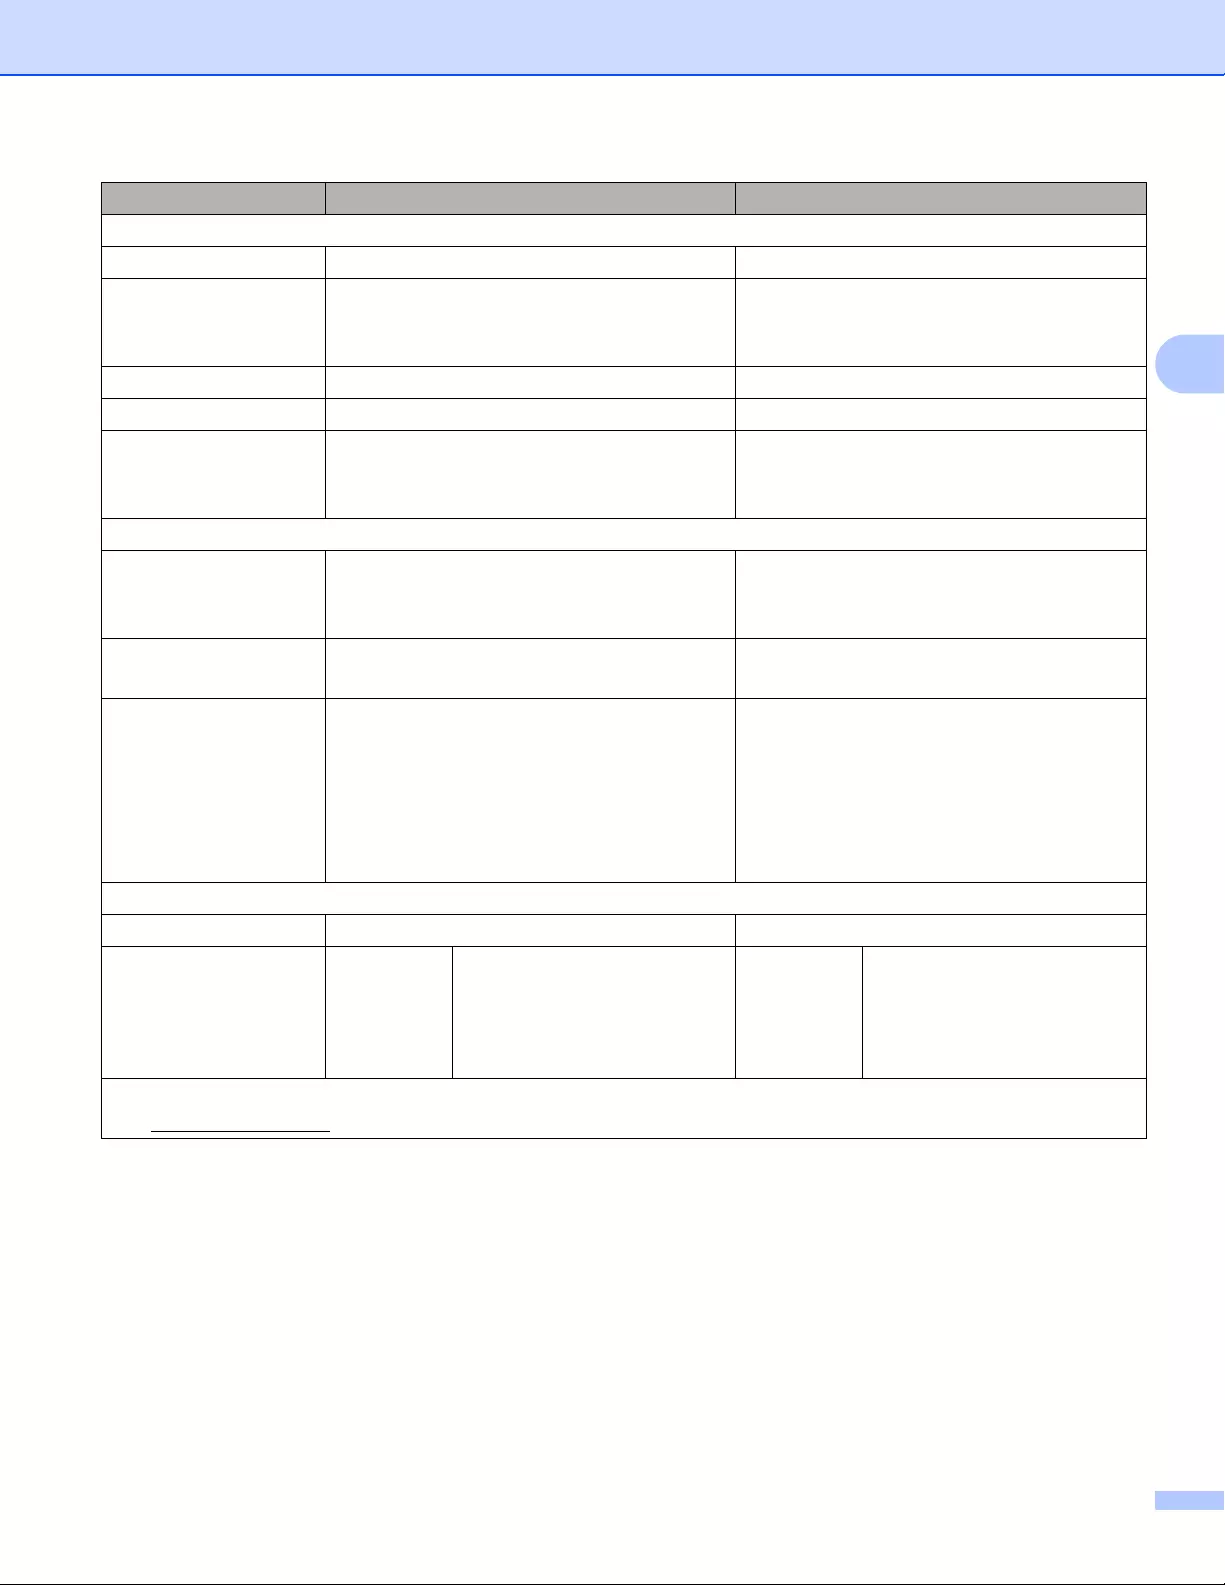
Product Specifications
182
18
Interface
USB port Version 2.0 Full Speed (Peripheral) Version 2.0 Full Speed (Peripheral)
Wi-Fi • Wireless Direct: IEEE 802.11g/n
• Infrastructure mode: IEEE 802.11b/g/n
• WPS 2.0
• Wireless Direct: IEEE 802.11g/n
• Infrastructure mode: IEEE 802.11b/g/n
• WPS 2.0
USB host — HID class
LAN port — 10BASE-T/100BASE-TX
Bluetooth — Ver 2.1 + EDR
Supported profiles: SPP, OPP, BIP, HCRP
Supported protocol: iAP
Power Supply
Adapter AC Adapter (PA-AD-001A):
INPUT AC 100-240 V 50/60 Hz
OUTPUT DC 25 V-3.6 A
AC Adapter (PA-AD-001A):
INPUT AC 100-240 V 50/60 Hz
OUTPUT DC 25 V-3.6 A
Battery (Optional) Battery Unit (Optional)
Li-ion Battery Unit (PA-BU-001): 14.4 V
Battery Unit (Optional)
Li-ion Battery Unit (PA-BU-001): 14.4 V
Auto Power-off Li-ion Battery Unit (PA-BU-001):
Off/10/20/30/40/50/60 Minutes
AC Adapter (PA-AD-001A):
Off/10/20/30/40/50/60 Minutes
(To change the Auto Power-off setting, see
Changing the Label Printer Settings
on page 37.)
Li-ion Battery Unit (PA-BU-001):
Off/10/20/30/40/50/60 Minutes
AC Adapter (PA-AD-001A):
Off/10/20/30/40/50/60 Minutes
(To change the Auto Power-off setting, see
Changing the Label Printer Settings
on page 37.)
Other
Cutter Durable automatic cutter Durable automatic cutter
Environment Operating
temperature
/humidity
When running: between 50°F
(10°C) and 95°F (35°C) /
between 20% and 80%
The maximum wet bulb
temperature: 80.6°F (27°C)
Operating
temperature
/humidity
When running: between 50°F
(10°C) and 95°F (35°C) /
between 20% and 80%
The maximum wet bulb
temperature: 80.6°F (27°C)
Compatible operating systems
See support.brother.com for a complete and updated list of software.
Model Name QL-810W QL-820NWB

183
19
19
Because some P-touch Editor functions are not available with the Label Printer, keep the following points in
mind when using P-touch Editor to create templates.
You can check a preview of the printed template before the created template is transferred to the Label
Printer. For more information, see Transferring the Template to P-touch Transfer Manager on page 121.
Notes on Creating Templates 19
Some of the text in the template that is transferred to the Label Printer will be printed using similar fonts
and character sizes that are loaded in the Label Printer. As a result, the printed label may differ from the
image of the template created in P-touch Editor.
Depending on the text object setting, the character size may be automatically reduced or some of the text
may not be printed. If this occurs, change the text object setting.
Although character styles can be applied to individual characters with P-touch Editor, styles can be applied
to a block of text only with the Label Printer. In addition, some character styles are not available on the
Label Printer.
Backgrounds specified with P-touch Editor are not compatible with the Label Printer.
A P-touch Editor layout that uses the split printing function (enlarging the label and printing it on two or
more labels) cannot be transferred.
Only the portion of the label within the printable area is printed.
Fields that overflow the print area may not be printed completely.
Notes on Transferring Templates 19
The printed label may differ from the image that appears in the preview area of P-touch Transfer Manager.
If a barcode not loaded on the Label Printer is transferred to the Label Printer, the barcode will be
converted into an image if it is a 2-dimensional barcode. The image of the converted barcode cannot be
edited.
All transferred objects that cannot be edited by the Label Printer are converted into images.
Grouped objects will be converted into a single bitmap.
Notes on Using P-touch Transfer Manager
19

Notes on Using P-touch Transfer Manager
184
19
Notes on Transferring Data Other Than Templates 19
If the number or order of fields in a database is changed and only the database (.csv file) is transferred to
update it, the database may not link correctly with the template. In addition, the first line of data in the
transferred file must be recognized by the Label Printer as «field names».
Logos, symbols, and graphics downloaded to the Label Printer will automatically be scaled like the
resident font or any of the resident symbol in the library.

185
20
20
Supported Protocols and Security Features 20
Network Terms and Information 20
Interface Wireless IEEE 802.11b/g/n (Infrastructure Mode)
IEEE 802.11g/n (Wireless Direct Mode)
Ethernet
(QL-820NWB
only)
Ethernet 10BASE-T/100BASE-TX Auto Negotiation
Network
(Common)
Protocol (IPv4) ARP, RARP, BOOTP, DHCP, APIPA (Auto IP), mDNS, WINS,
NetBIOS name resolution, DNS Resolver, LPR/LPD, Custom Raw
Port/Port9100, FTP Server, TFTP client and server, SNTP client,
ICMP, LLMNR responder, SNMPv1/v2c
Protocol (IPv6) NDP, RA, DNS Resolver, LPR/LPD, mDNS, Custom Raw
Port/Port9100, FTP Server, TFTP client and server, ICMP, LLMNR
responder, SNMPv1/v2c
Network
(Security)
Wireless WEP 64/128 bit, WPA/WPA2-PSK, LEAP, EAP-FAST, PEAP,
EAP-TTLS, EAP-TLS
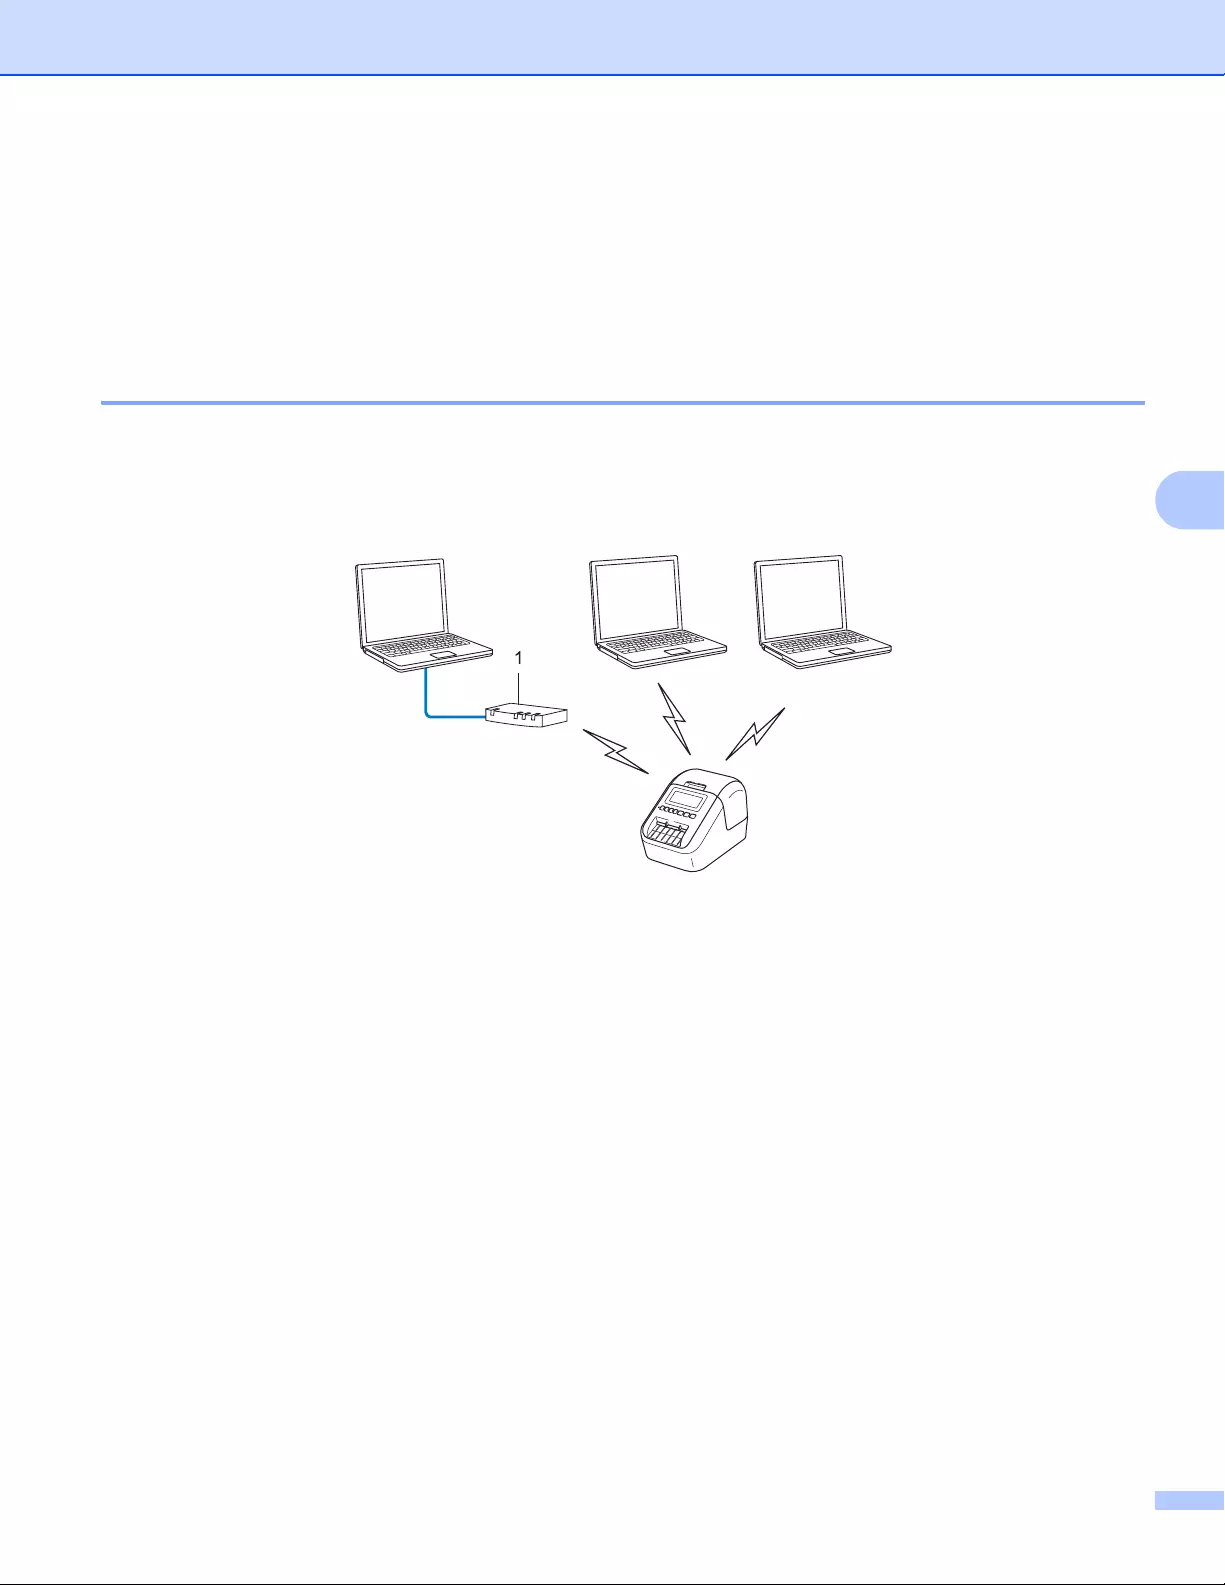
Network Terms and Information
186
20
Types of Network Connections and Protocols 20
You will find basic information about the advanced network features of the Label Printer, along with general
networking and common terms.
The supported protocols and network features differ depending on the model you are using.
Types of Network Connections 20
Peer-to-Peer printing using TCP/IP 20
In a Peer-to-Peer environment, each computer directly sends and receives data to each device. There is no
central server controlling file access or Label Printer sharing.
1Router
In a smaller network of two or three computers, we recommend the Peer-to-Peer printing method as it is
easier to configure than the Network Shared printing method. See Network Shared printing on page 187.
Each computer must use the TCP/IP Protocol.
Your Label Printer needs an appropriate IP address configuration.
If using a router, you must configure the Gateway address on the computers and your Label Printer.
TCP/IP
TCP/IP
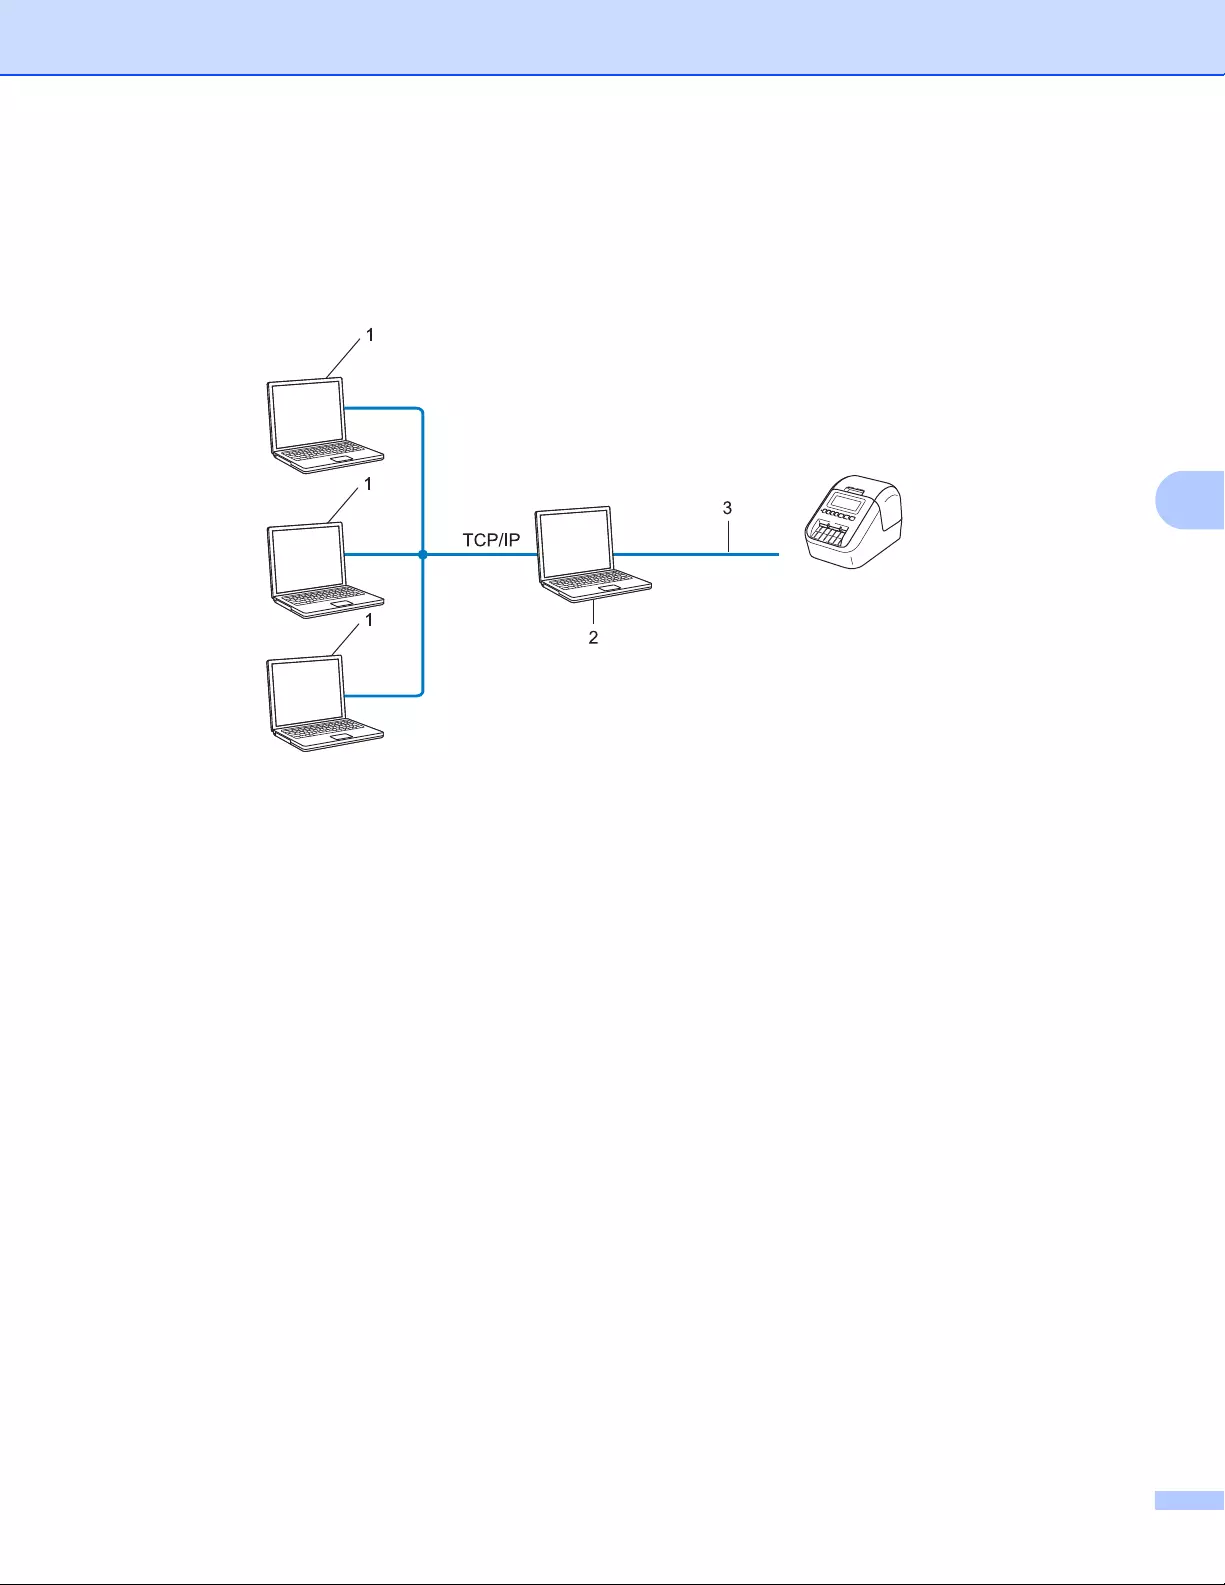
Network Terms and Information
187
20
Network Shared printing 20
In a Network Shared environment, each computer sends data via a centrally controlled computer. This type
of computer is often called a “Server” or a “Print Server”. Its job is to control the printing of all print jobs.
In a larger network, we recommend using a Network Shared printing environment.
The “server” or the “print server” must use the TCP/IP print protocol.
Your Label Printer needs to have an appropriate IP address configuration, except when the Label Printer
is connected via the USB interface to the server.
1 Client computers
2 Also known as “Server” or “Print server”
3 TCP/IP or USB
Network printer
(your Label Printer)
Network Terms and Information
188
20
Configuring Your Label Printer for a Network 20
IP Addresses, Subnet Masks and Gateways 20
To use the Label Printer in a networked TCP/IP environment, you must configure its IP address and subnet
mask. The IP address you assign to the print server must be on the same logical network as your host
computers. If it is not, you must correctly configure the subnet mask and the gateway address.
IP address 20
An IP address is a series of numbers that identifies each device connected to a network. An IP address
consists of four numbers separated by dots. Each number is between 0 and 254.
For example in a small network, you would normally change the final number:
•192.168.1.1
•192.168.1.2
•192.168.1.3
How the IP address is assigned to your print server: 20
If you have a DHCP/BOOTP/RARP server on your network, the print server will automatically obtain its IP
address from that server.
On smaller networks, the DHCP server may also be the router.
If you do not have a DHCP/BOOTP/RARP server, the Automatic Private IP Addressing (APIPA) protocol will
automatically assign an IP address from the range 169.254.0.1 to 169.254.254.254. The subnet mask is
automatically set to 255.255.0.0 and the gateway address is set to 0.0.0.0.
By default, the APIPA protocol is enabled. To disable the APIPA protocol, use BRAdmin Light or Web Based
Management (web browser).

Network Terms and Information
189
20
Subnet mask 20
Subnet masks restrict network communication.
For example, Computer 1 can communicate with Computer 2
• Computer 1
IP Address: 192.168.1.2
Subnet Mask: 255.255.255.0
• Computer 2
IP Address: 192.168.1.3
Subnet Mask: 255.255.255.0
The 0 in the Subnet mask signifies that there is no limit to communication at this part of the address. In the
example above, this means that you can communicate with any device with an IP address that begins with
192.168.1.x. (where x is a number between 0 and 254).
Gateway (and router) 20
A gateway is a network point that acts as an entrance to another network and sends data transmitted via the
network to an exact destination. The router knows where to direct data that arrives at the gateway. If a
destination is located on an external network, the router transmits data to the external network. If your network
communicates with other networks, you may need to configure the Gateway IP address. If you do not know
the Gateway IP address, contact your network administrator.

Network Terms and Information
190
20
Wireless Network Terms and Concepts 20
Security Terms 20
Authentication and encryption 20
Most wireless networks use some kind of security settings. These security settings define the authentication
(how the device identifies itself to the network) and encryption (how the data is encrypted as it is sent on the
network). If you do not correctly specify these options when you are configuring your Brother wireless
printer, it will not be able to connect to the wireless network. Make sure you configure these options
carefully.
Authentication and Encryption methods for a personal wireless network 20
A personal wireless network is a small network, for example using your Label Printer in a wireless network at
home, without IEEE 802.1x support.
To use your Label Printer in an IEEE 802.1x supported wireless network, see Authentication and Encryption
methods for an enterprise wireless network on page 191.
Authentication methods 20
Open system
Wireless devices are allowed to access the network without any authentication.
Shared key
A secret pre-determined key is shared by all devices that will access the wireless network.
The Brother wireless printer uses a WEP key as the pre-determined key.
WPA-PSK
Enables a Wi-Fi Protected Access Pre-shared key (WPA-PSK), which enables the Brother wireless printer
to associate with access points using TKIP for WPA-PSK.
WPA2-PSK
Enables a Wi-Fi Protected Access Pre-shared key (WPA2-PSK), which enables the Brother wireless
printer to associate with access points using AES for WPA2-PSK (WPA-Personal).
WPA/WPA2-PSK
Enables a Wireless Protected Access Pre-shared key (WPA-PSK/WPA2-PSK), which enables the Brother
wireless printer to associate with access points using TKIP for WPA-PSK or AES for WPA-PSK and
WPA2-PSK (WPA-Personal).
Encryption methods 20
None
No encryption method is used.
WEP
When using WEP (Wired Equivalent Privacy), the data is transmitted and received with a secure key.
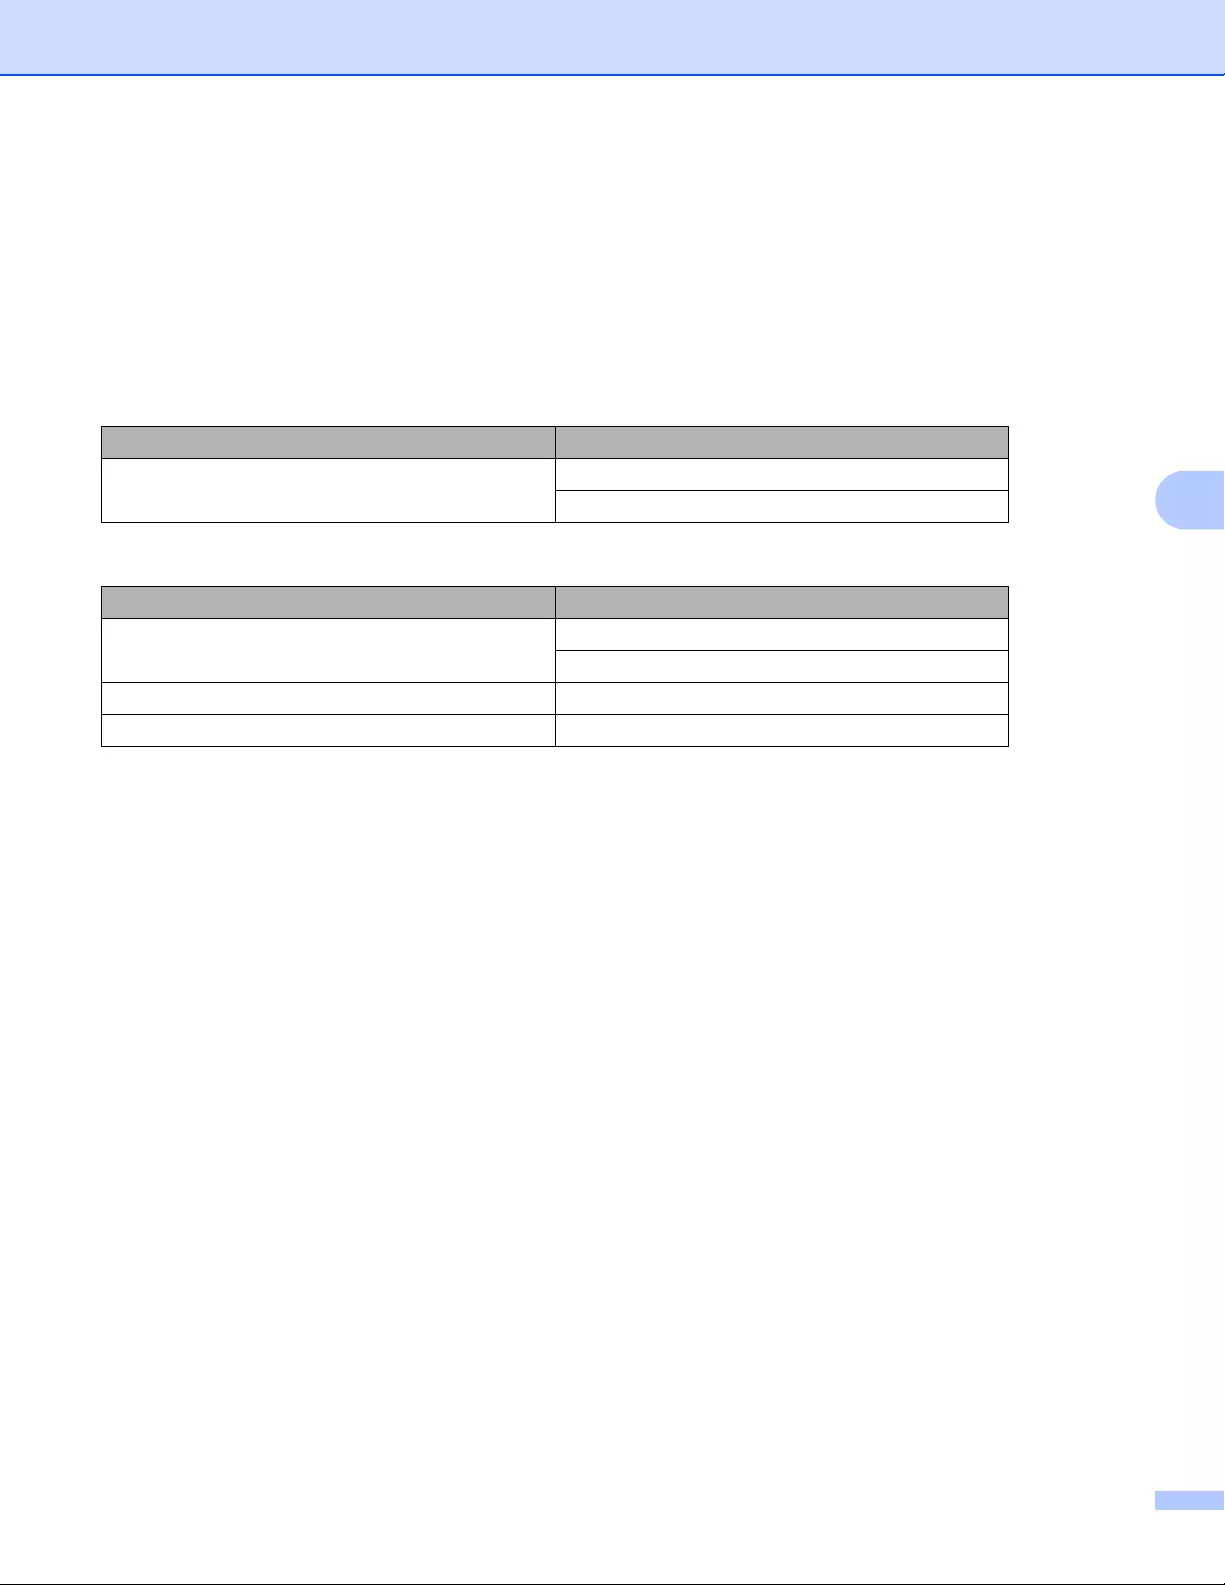
Network Terms and Information
191
20
TKIP
TKIP (Temporal Key Integrity Protocol) provides per-packet key mixing, a message integrity check and
rekeying mechanism.
AES
Advanced Encryption Standard (AES) provides stronger data protection using a symmetric-key
encryption.
Network key 20
Open system/Shared key with WEP
This key is a 64-bit or 128-bit value that must be entered in an ASCII or hexadecimal format.
• 64 (40) bit ASCII:
Uses five text characters. For example, “WSLAN” (case-sensitive)
• 64 (40) bit hexadecimal:
Uses 10 digits of hexadecimal data. For example, “71f2234aba”
• 128 (104) bit ASCII:
Uses 13 text characters. For example, “Wirelesscomms” (case-sensitive)
• 128 (104) bit hexadecimal:
Uses 26 digits of hexadecimal data. For example, “71f2234ab56cd709e5412aa2ba”
WPA/WPA2-PSK and TKIP with AES
Uses a Pre-Shared Key (PSK) that is eight or more characters in length, up to a maximum of 63
characters.
Authentication and Encryption methods for an enterprise wireless network 20
An enterprise wireless network is a large network with IEEE 802.1x support. If you configure your printer in
an IEEE 802.1x supported wireless network, you can use the following authentication and encryption
methods:
When [Communication Mode] is set to [Ad-hoc]
Authentication Method Encryption Mode
Open System None
WEP
When [Communication Mode] is set to [Infrastructure]
Authentication Method Encryption Mode
Open System None
WEP
Public Key Authentication WEP
WPA/WPA2-PSK TKIP+AES

Network Terms and Information
192
20
Authentication methods 20
LEAP (For wireless network)
Cisco LEAP (Light Extensible Authentication Protocol) has been developed by Cisco Systems, Inc. and
uses a user ID and password for authentication.
EAP-FAST
EAP-FAST (Extensible Authentication Protocol-Flexible Authentication via Secured Tunnel) has been
developed by Cisco Systems, Inc. and uses a user ID and password for authentication, and symmetric key
algorithms to achieve a tunnelled authentication process.
The printer supports the following inner authentication methods:
• EAP-FAST/NONE
• EAP-FAST/MS-CHAPv2
• EAP-FAST/GTC
PEAP
PEAP (Protected Extensible Authentication Protocol) has been developed by Microsoft Corporation, Cisco
Systems and RSA Security. PEAP creates an encrypted SSL (Secure Sockets Layer)/TLS (Transport
Layer Security) tunnel between a client and an authentication server, for sending a user ID and password.
PEAP provides mutual authentication between the server and the client.
The printer supports the following inner authentication methods:
• PEAP/MS-CHAPv2
• PEAP/GTC
EAP-TTLS
EAP-TTLS (Extensible Authentication Protocol Tunnelled Transport Layer Security) has been developed
by Funk Software and Certicom. EAP-TTLS creates a similar encrypt SSL tunnel to PEAP, between a
client and an authentication server, for sending a user ID and password. EAP-TTLS provides mutual
authentication between the server and the client.
The printer supports the following inner authentication methods:
• EAP-TTLS/CHAP
• EAP-TTLS/MS-CHAP
• EAP-TTLS/MS-CHAPv2
• EAP-TTLS/PAP
EAP-TLS
EAP-TLS (Extensible Authentication Protocol Transport Layer Security) requires digital certificate
authentication both at a client and an authentication server.
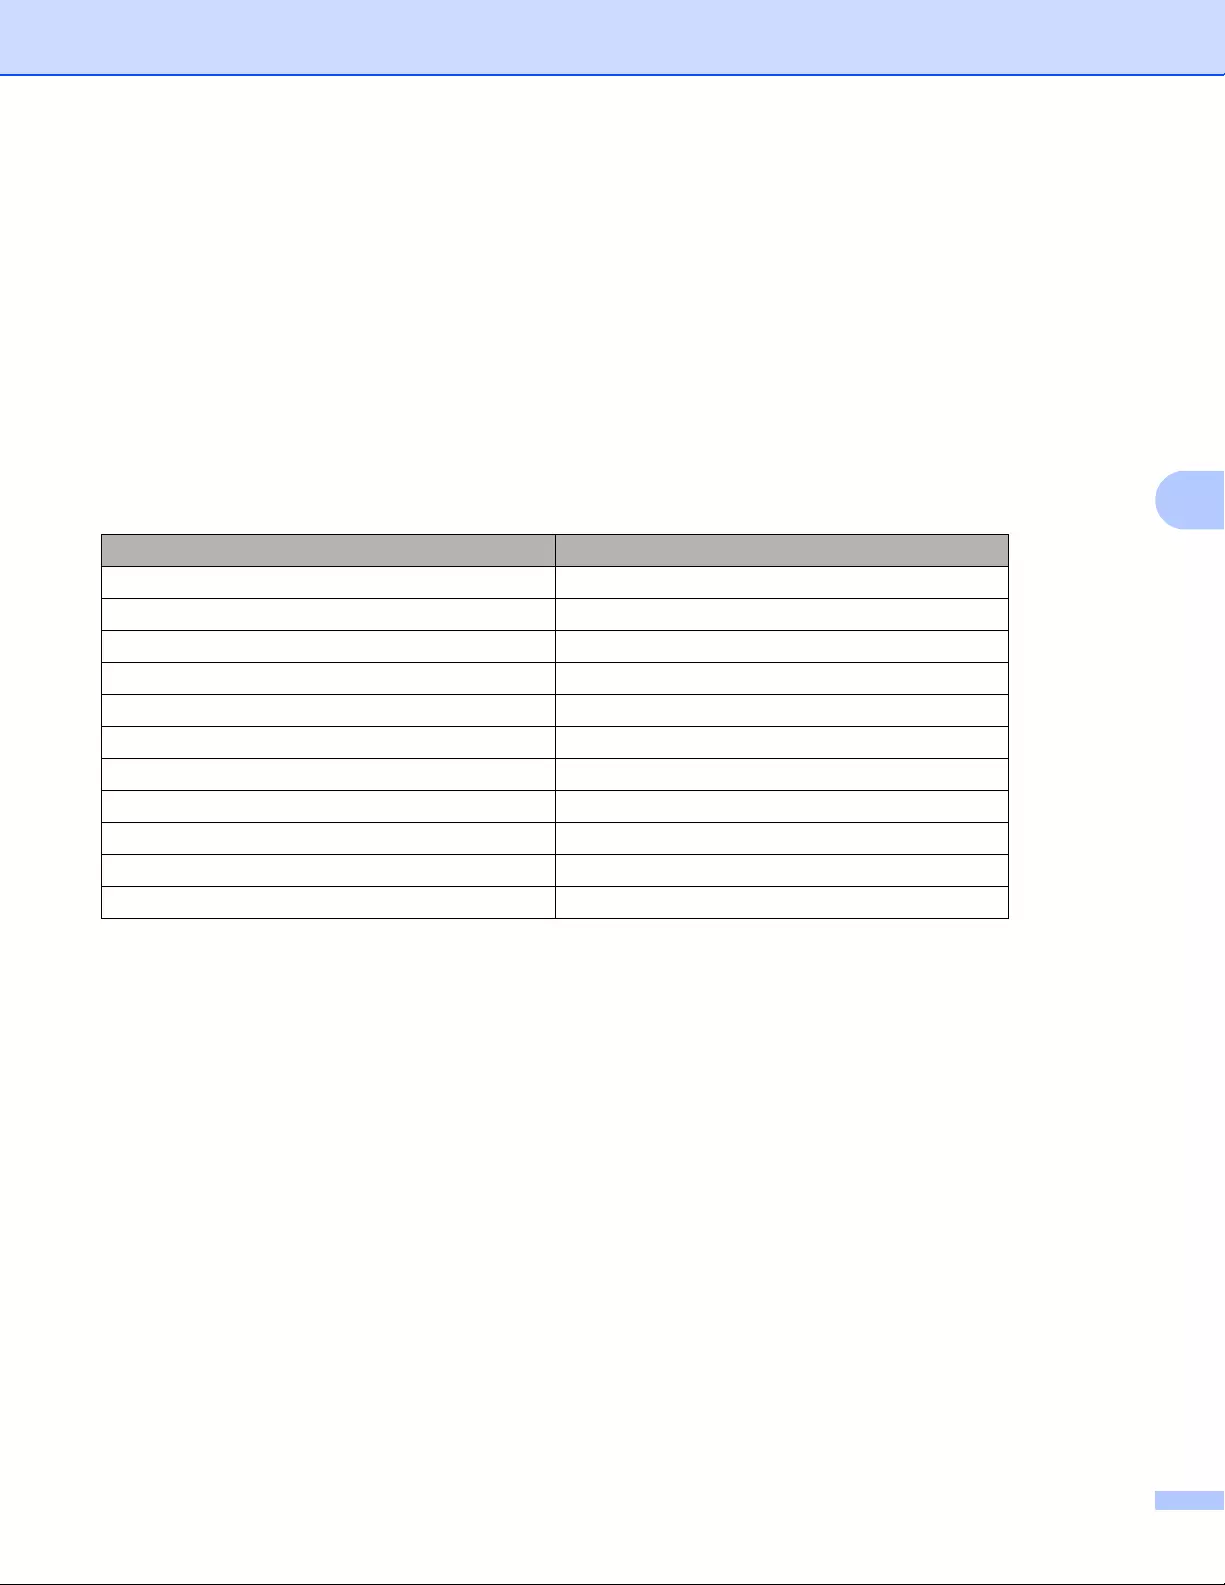
Network Terms and Information
193
20
Encryption methods 20
TKIP
TKIP (Temporal Key Integrity Protocol) provides a per-packet key mixing a message integrity check and
rekeying mechanism.
AES
Advanced Encryption Standard (AES) provides stronger data protection using a symmetric-key
encryption.
CKIP
The original Key Integrity Protocol for LEAP by Cisco Systems, Inc.
User ID and password 20
The following security methods support a user ID less than 64 characters and a password less than 32
characters in length:
LEAP
EAP-FAST
PEAP
EAP-TTLS
EAP-TLS (For user ID)
When [Communication Mode] is set to [Infrastructure]
Authentication Method Encryption Mode
LEAP CKIP
EAP-FAST/NONE TKIP+AES
EAP-FAST/MS-CHAPv2 TKIP+AES
EAP-FAST/GTC TKIP+AES
PEAP/MS-CHAPv2 TKIP+AES
PEAP/GTC TKIP+AES
EAP-TTLS/CHAP TKIP+AES
EAP-TTLS/MS-CHAP TKIP+AES
EAP-TTLS/MS-CHAPv2 TKIP+AES
EAP-TTLS/PAP TKIP+AES
EAP-TLS TKIP+AES

194
21
21
General Procedure for the P-touch Template Function 21
The general procedure for using the P-touch Template function is described below.
For more information on specifying the various settings, see Printing Labels Using P-touch Template
on page 69.
Before connecting the Barcode Scanner to this Label Printer, make sure that the Barcode Scanner settings
match the settings in the P-touch Template Settings tool that is specified during preparation. For more
information, see Preparation on page 70.
aUse P-touch Editor to create a template and then transfer it to the Label Printer.
bConnect the Barcode Scanner to the Label Printer.
cScan the “P-touch template command” barcode to specify new settings or clear the previous settings.
dScan the “Basic settings” barcode to specify the number of copies.
eSpecify the appropriate settings (A, B, or C).
A. Standard Template Printing 21
i. Scan the “Preset template number” barcode.
B. Advanced Template Printing 21
i. Scan the “Select template” barcode, and then scan the barcodes under “For entering numbers”.
ii. Scan the barcode whose data you want to use or copy.
iii. Scan the “Begin printing” barcode.
C. Database Lookup Printing 21
i. Scan the “Select template” barcode, and then scan the barcodes under “For entering numbers”.
ii. Scan the key barcode for the database data.
iii. Scan the “Delimiter” barcode.
iv. Scan the “Begin printing” barcode.
fThe specified label is printed.
List of Barcodes for the P-touch Template
Function 21
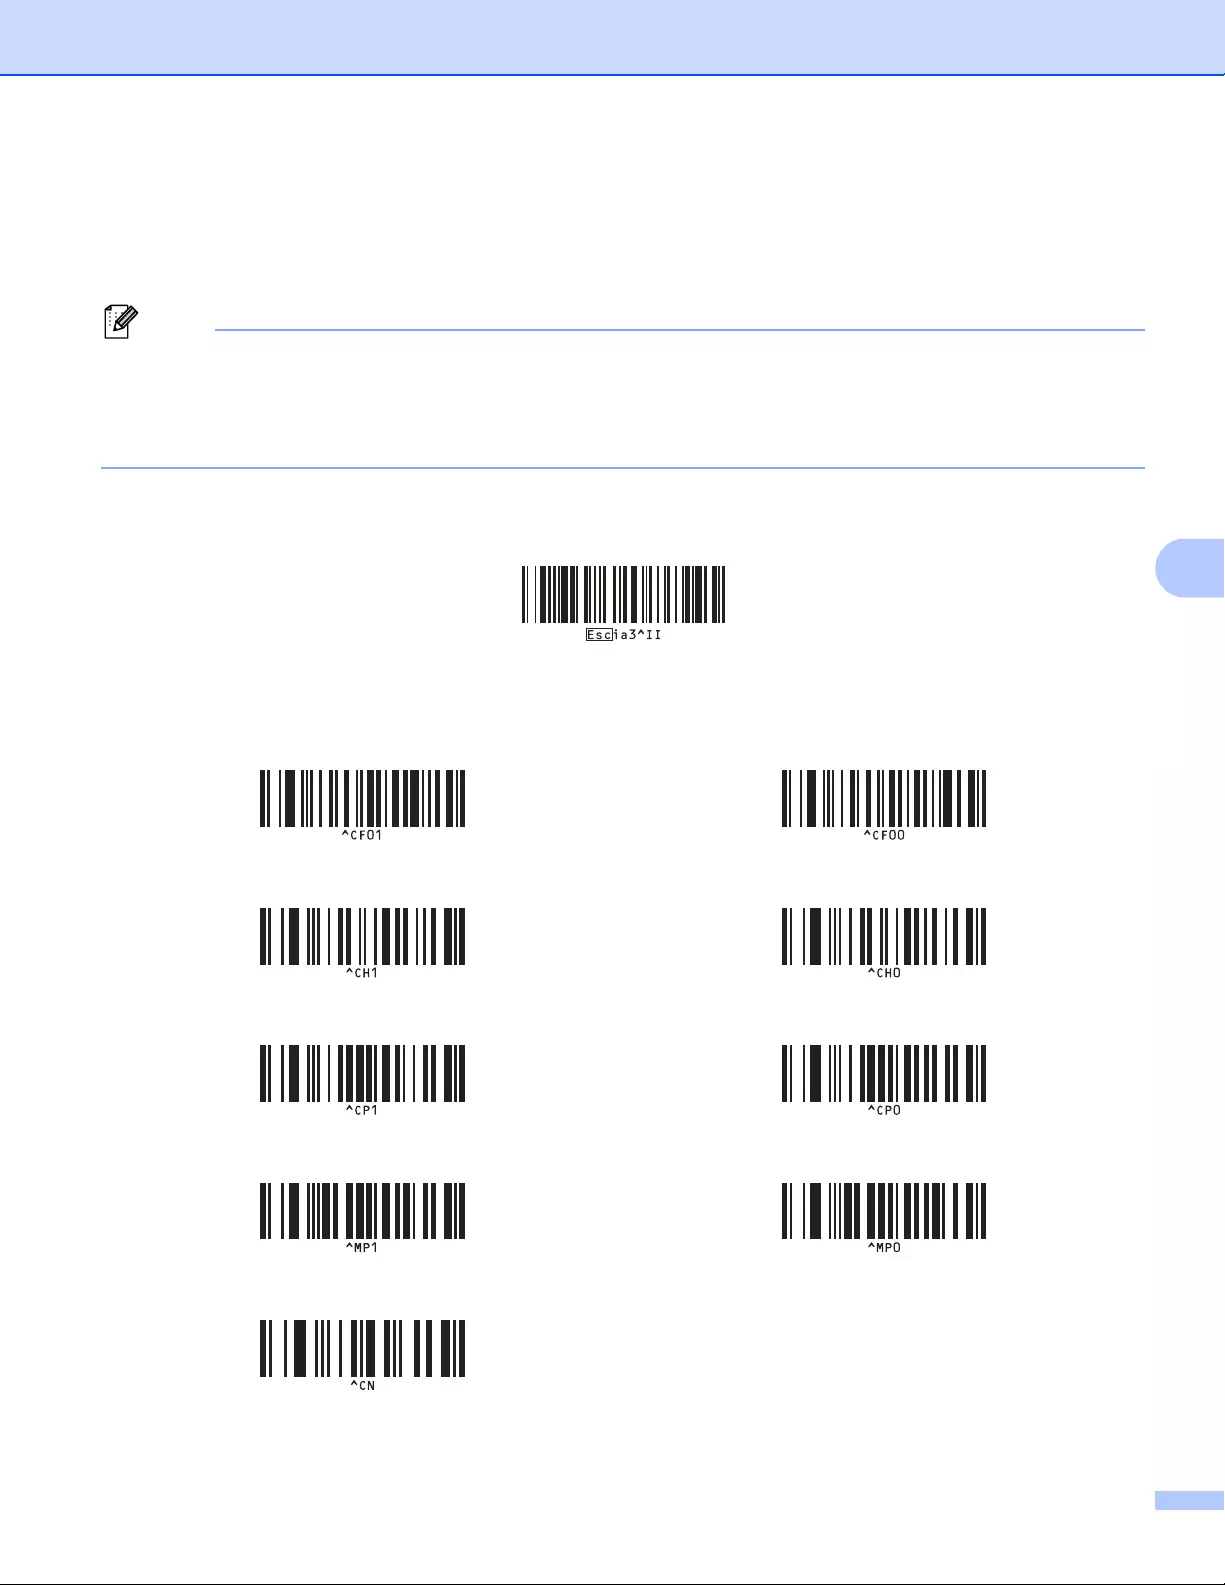
List of Barcodes for the P-touch Template Function
195
21
List of Barcodes for Specifying Settings 21
For more information about using these barcodes for specifying the Label Printer settings, see Printing Labels
Using P-touch Template on page 69.
• When using the barcodes in this list, set “Trigger for P-touch Template Printing” and “Command Prefix
Character” to the factory settings in the P-touch Template Settings tool.
• Make sure you print the barcodes at a high resolution so that the barcode scanner can read them correctly
to print the labels you want.
P-touch template command (initialize + begin specifying settings)
Basic settings
Auto cut on 21 Auto cut off 21
Half cut on 21 Half cut off 21
Chain printing on 21 Chain printing off 21
Mirror printing on 21 Mirror printing off 21
Number of copies 21
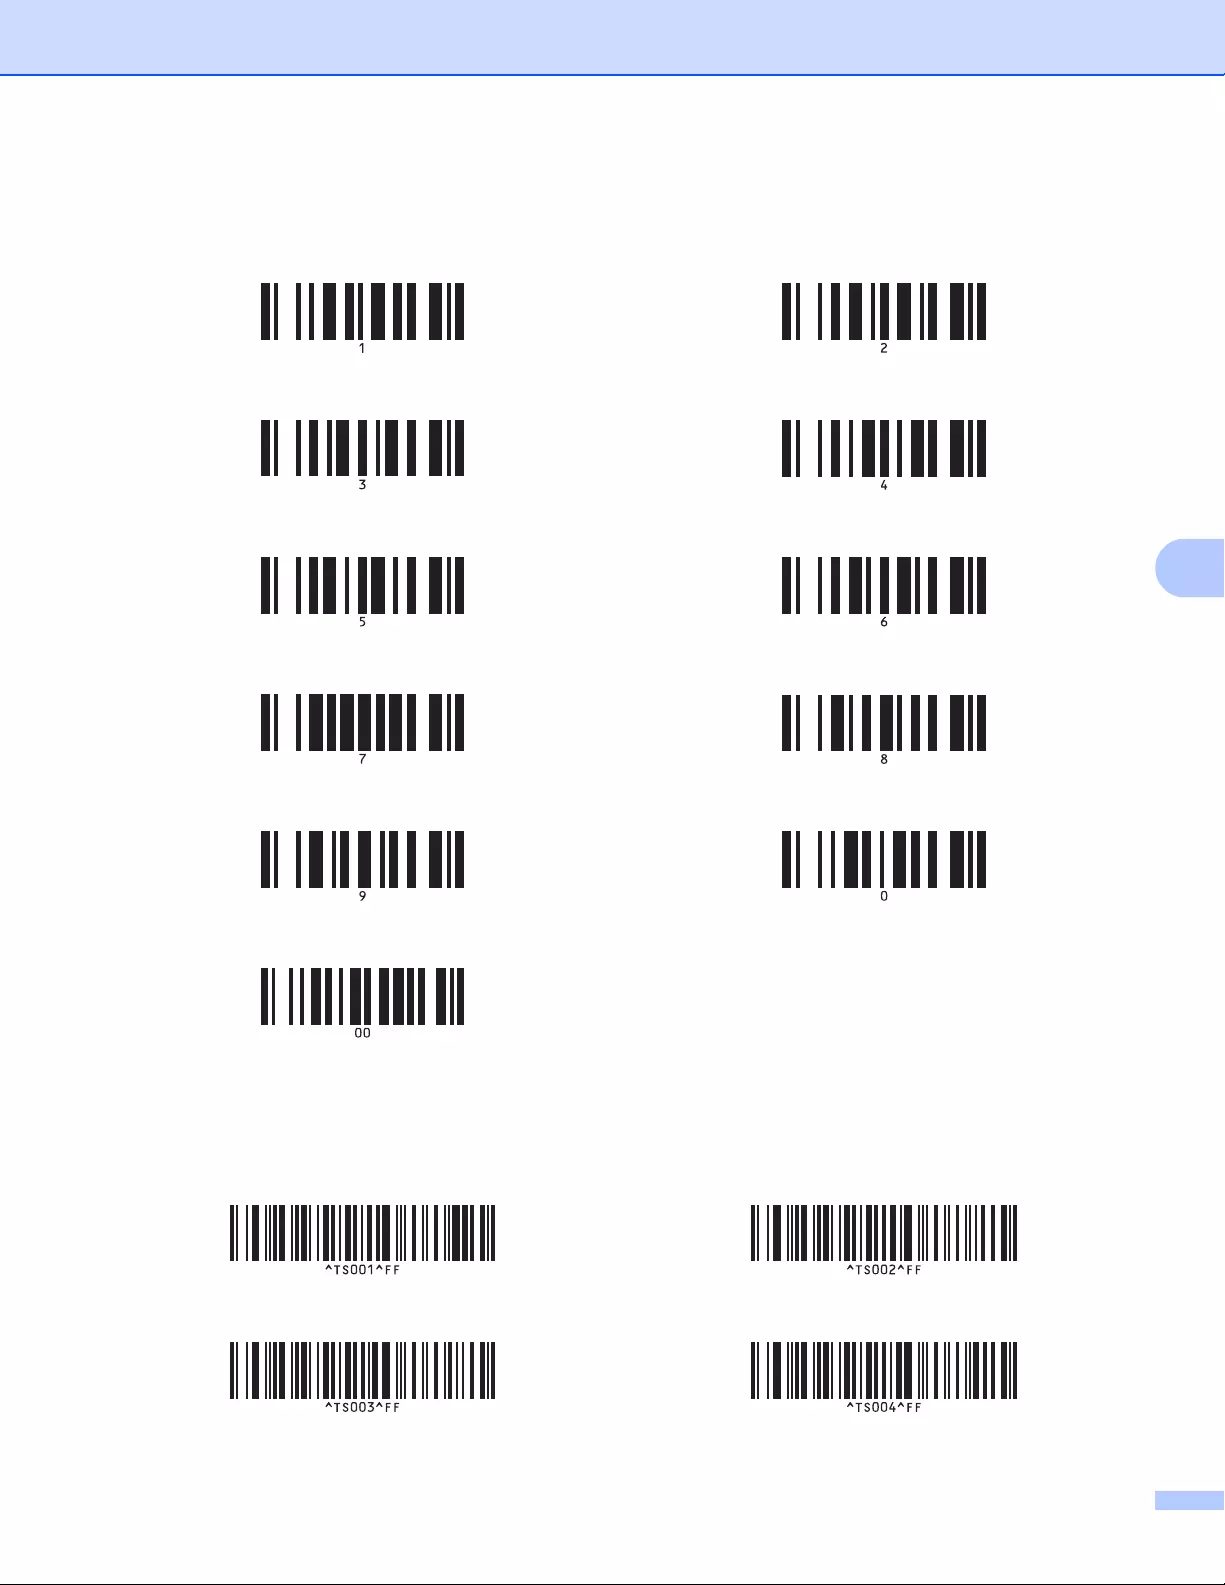
List of Barcodes for the P-touch Template Function
196
21
For entering numbers 1
Preset template number
1 21 2 21
3 21 4 21
5 21 6 21
7 21 8 21
9 21 0 21
00 21
Preset template 1 21 Preset template 2 21
Preset template 3 21 Preset template 4 21
List of Barcodes for the P-touch Template Function
197
21
1These are used when specifying the number of copies printed and when selecting a template number.
Scan barcodes to specify a three-digit number, such as [0][0][7] or [0][1][5]. The setting is automatically applied when three digits have been
specified.
To change settings, scan the “Number of copies” barcode again when changing the number of copies or scan the “Select template” barcode again
when changing the template number, and then scan the barcodes for the new three-digit number.
Preset template 5 21 Preset template 6 21
Preset template 7 21 Preset template 8 21
Preset template 9 21 Preset template 10 21
Select template Number of serialized copies
Delimiter Initialize template data
Begin printing
^NN
^ID
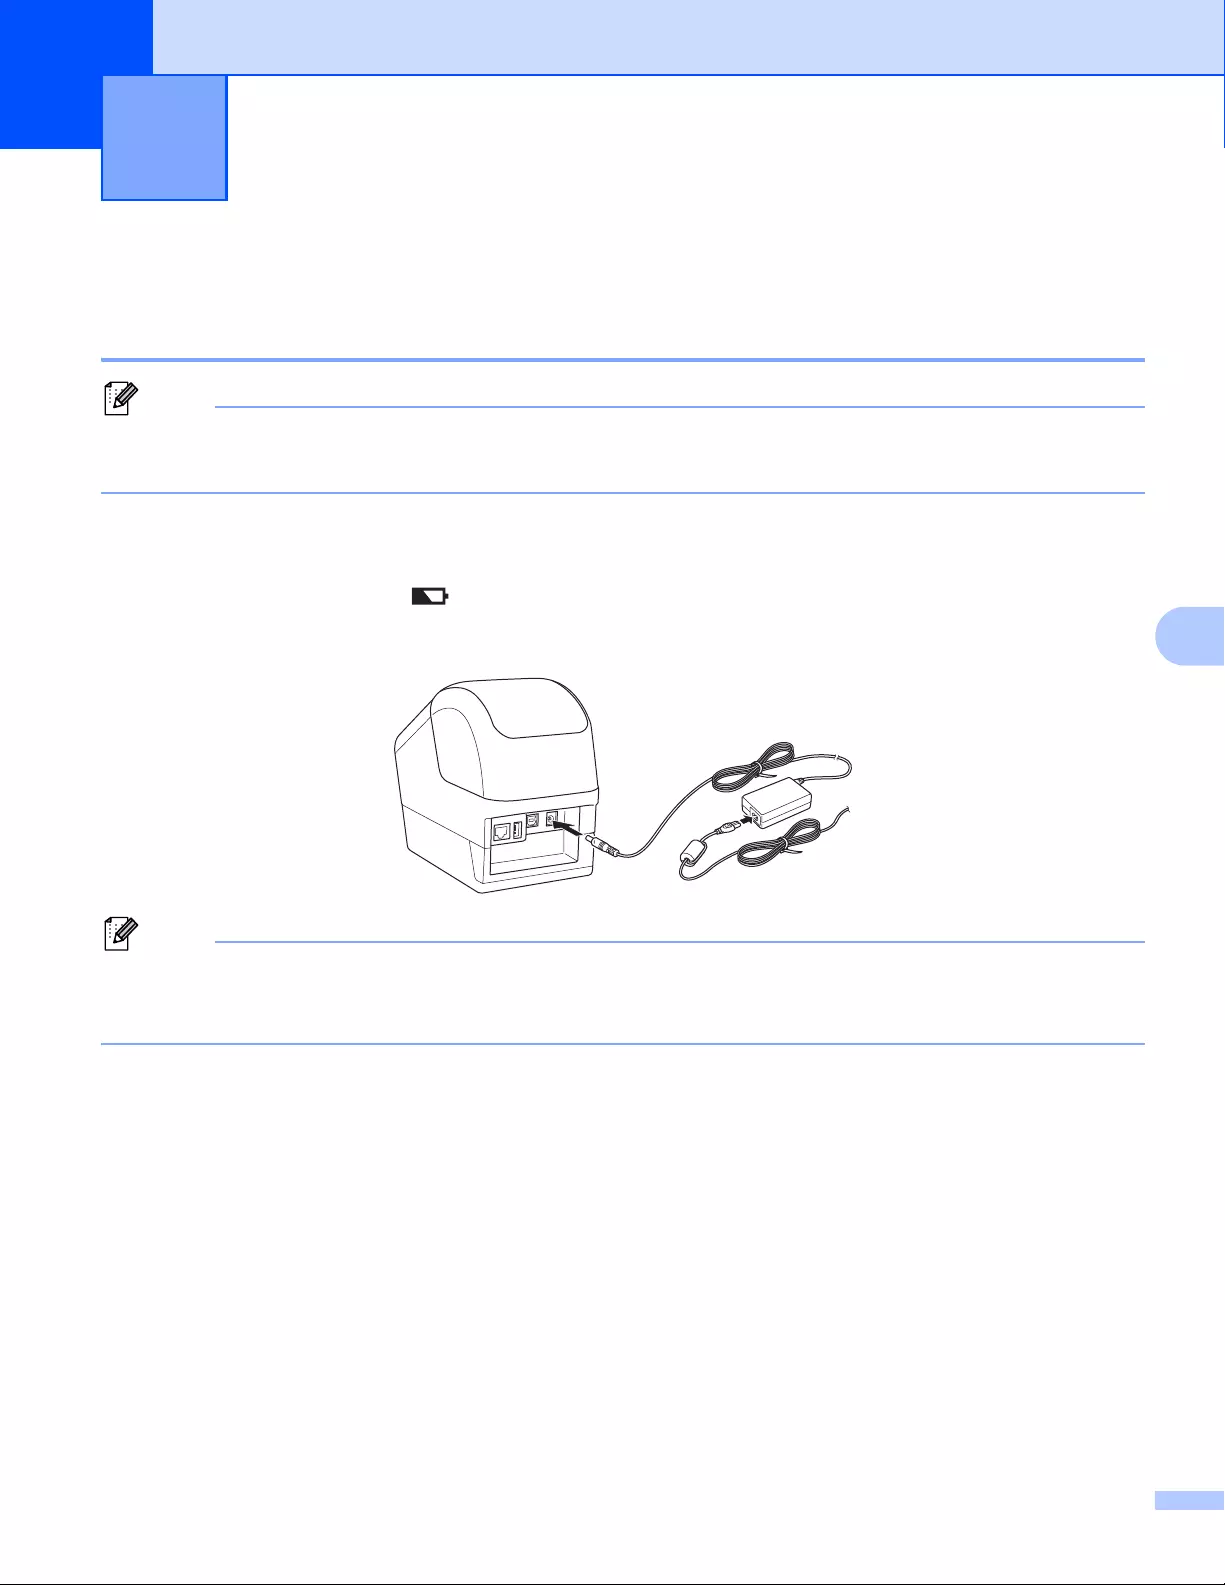
198
22
22
Using the Battery Unit (Rechargeable Li-ion Battery included)22
Charging the Battery Unit
• Before use, you must charge the Battery Unit.
• To fully charge the Battery Unit, charge for approximately 2.5 hours.
aMake sure the Battery Unit is installed in the Label Printer.
bUse the AC Adapter and AC Power Cord to connect the Label Printer to an AC power outlet.
For QL-810W, the Battery ( ) LED lights in orange during charging, and it turns off when the Battery
Unit is fully charged.
For QL-820NWB, the Battery Power is shown on the LCD.
If the Battery Unit is not fully charged and you use the Label Printer to print, feed, or perform another
operation, the Battery Unit temporarily stops charging, and continues automatically after the operation is
completed.
Using the Battery Unit
(Optional: PA-BU-001) 22

Using the Battery Unit (Optional: PA-BU-001)
199
22
Stopping Battery Unit Charging
To stop charging the Battery Unit, disconnect the AC Adapter.
Notes on Using the Battery Unit
• Before use, fully charge the Battery Unit. Do not use it until it is fully charged.
• Charge the Battery Unit in environments between 50°F and 95°F (10°C and 35°C), otherwise the Battery
Unit will not charge. If the charging stops because the environment temperature is too low or too high,
place the Label Printer in environment between 50°F and 95°F (10°C and 35°C) and try charging again.
• If the Label Printer is used to print, feed, or perform another operation when both the battery is installed
and the AC Adapter is connected, the charging may stop even if the battery is not fully charged. When
the operation to the printer stops, the battery continue to charge.
• For QL-820NWB, the condition of Battery Unit can be checked from the LCD.
Battery Unit Characteristics
To ensure the best performance and longest life from the Battery Unit:
• Do not use or store the Battery Unit in a location exposed to extreme high or low temperatures as it may
discharge more quickly. This may happen when using a Battery Unit with a high charge (90% charged
or more) in a location exposed to high temperatures.
• Remove the Battery Unit when storing the Label Printer for a long period of time.
• Store a Battery Unit with a less than 50% charge in a cool dry place out of direct sunlight.
• Recharge the Battery Unit every six months if it is stored for a long period of time.
• If you touch a part of the Label Printer while the Battery Unit is charging, that part of the Label Printer
may feel warm. This is normal, and the Label Printer may be used safely; however, if the Label Printer
becomes extremely hot, discontinue use and allow to cool.

Using the Battery Unit (Optional: PA-BU-001)
200
22
Product Specifications 22
Rechargeable Li-ion Battery Unit 22
Size: approx. 4.92″ (W) x 7.76″ (D) x 2.72″ (H) (125 mm (W) x 197 mm (D) x 69 mm (H))
Weight: approx. 1.31 lb (0.59 kg)
Voltage: 14.4 V
Capacity: 1750 mAh
Charging/discharging cycle: approx. 300 times
Charging time: approx. 2.5 hours

201
23
23
P-touch template mode provides operations for inserting data into text and barcode objects in a downloaded
template from a Barcode Scanner to the connected Label Printer.
Because the Brother Barcode Scanner (optional: PA-BR-001) has been set according to the [P-touch
Template Settings] in the Printer Setting Tool, you can quickly use this Barcode Scanner without changing its
settings.
For information about using the Brother Barcode Scanner, see the instruction manual included with the
Barcode Scanner.
Using the Brother Barcode Scanner
(Optional: PA-BR-001) (QL-820NWB only)23

View the manual for the Brother QL-810W here, for free. This manual comes under the category label printers and has been rated by 1 people with an average of a 9.8.
This manual is available in the following languages: English. Do you have a question about the Brother QL-810W or do you need help?
Ask your question here
Brother QL-810W specifications
Below you will find the product specifications and the manual specifications of the Brother QL-810W.
The Brother QL-810W label printer is an ENERGY STAR certified device that utilizes direct thermal print technology. With a maximum label width of 62 millimeters, it offers ample space for printing various types of labels. The printer has 6 MB of flash memory and can store up to 99 labels in its label memory.
Designed for versatility, the QL-810W is compatible with DK tape, allowing users to create high-quality labels. It also supports Apple AirPrint, enabling convenient printing from mobile devices. The printer features one USB 2.0 port for wired connectivity and is equipped with Wi-Fi capabilities for wireless printing. Additionally, it supports Wi-Fi Direct, providing a direct connection between the printer and compatible devices.
Measuring 125 millimeters in width, the QL-810W incorporates a compact design that makes it suitable for various workspaces. While it does not have an Ethernet LAN port, its wired and wireless connectivity options offer flexibility.
Overall, the Brother QL-810W label printer is a reliable and durable device, constructed with premium materials. Its ENERGY STAR certification indicates its energy efficiency, reducing environmental impact. With its direct thermal print technology, ample label width, and compatibility with Apple AirPrint, this label printer offers convenient and versatile printing options for individuals and businesses.
Print technology
Direct thermal
Connectivity technology
Wired & Wireless
Product color
Black, White
Battery technology
Lithium-Ion (Li-Ion)
General
| Brand | Brother |
| Model | QL-810W | QL-810W |
| Product | label printer |
| EAN | 4977766771344, 4977766827072, 4977766827119, 0012502646334, 4977766769204, 4977766771382, 0012502672371, 4977766775090, 4977766827058 |
| Language | English |
| Filetype | User manual (PDF), Datasheet (PDF) |
Printing
| Print technology | Direct thermal |
| Color | Yes |
| Maximum resolution | 300 x 600 DPI |
| Print speed | 176 mm/sec |
| Print speed | 110 lpm |
| Maximum printing width | 58 mm |
| Vertical printing | Yes |
| Rotated printing | Yes |
| Printing colors | Black, Red |
| Maximum print height | — mm |
| Text alignment | Center, Left |
| Minimum print length | 1000 mm |
Paper handling
| Autocutter | Yes |
| Maximum label width | 62 mm |
| Maximum label length | 4 m |
Ports & interfaces
| Connectivity technology | Wired & Wireless |
| Ethernet LAN | — |
| Wi-Fi | Yes |
| Wi-Fi standards | 802.11b, 802.11g, Wi-Fi 4 (802.11n) |
| USB port | Yes |
| USB 2.0 ports quantity | 1 |
| Wi-Fi Direct | Yes |
| Mobile printing technologies | Apple AirPrint |
Performance
| Flash memory | 6 MB |
| Number of fonts | 5 |
| Tape type | DK |
| Tape size detection | Yes |
| Built-in barcodes | CODABAR (NW-7), Code 128 (A/B/C), Code 39, Code 93, Data Matrix, EAN128, EAN13, EAN8, GS1 DataBar, GS1 DataBar Expanded, GS1 DataBar Limited, GS1-128, ISBN-2, ISBN-5, ITF-25, MaxiCode, Micro QR Code, MicroPDF417, PDF417, POSTNET, QR Code, UPC-A, UPC-E |
| Page description languages | ESC P, Raster_P |
| Security algorithms | AES, EAP-FAST, EAP-TLS, EAP-TTLS, LEAP, PEAP, TKIP, WEP, WPA-PSK, WPA2-PSK |
| Number of styles | 8 |
Design
| Product color | Black, White |
| Display | — |
| Housing material | Plastic |
Power
| Battery technology | Lithium-Ion (Li-Ion) |
| Auto power off | Yes |
| Rechargeable | Yes |
Weight & dimensions
| Width | 125 mm |
| Depth | 234 mm |
| Height | 145 mm |
| Weight | 1120 g |
Packaging content
| AC adapter included | Yes |
| Manual | Yes |
| Quick start guide | Yes |
| Warranty card | Yes |
| Bundled software | P-touch Editor Lite\nP-touch Editor 5\nP-touch Editor Lite LAN\nP-touch Address Book\nBR Admin Light |
| Cables included | AC, USB |
| Batteries included | Yes |
| Drivers included | Yes |
Other features
| Label memory | 99 label(s) |
| Date & time printing | Yes |
| Languages support | CHI (SIMPL), CZE, DAN, DEU, DUT, ENG, ESP, FIN, FRE, HUN, ITA, JPN, NOR, POL, POR, RUS, SWE, TUR |
| Number of languages | 18 |
| Number of frames | 126 |
Logistics data
| Harmonized System (HS) code | 84433210 |
Technical details
| Sustainability certificates | ENERGY STAR |
Packaging data
| Package weight | 2660 g |
| Package depth | 184 mm |
| Package height | 232 mm |
| Package width | 298 mm |
System requirements
| Windows operating systems supported | Yes |
| Mac operating systems supported | Yes |
| Linux operating systems supported | Yes |
show more
Frequently Asked Questions
Can’t find the answer to your question in the manual? You may find the answer to your question in the FAQs about the Brother QL-810W below.
Does the Brother QL-810W have ENERGY STAR sustainability certificates?
Yes, the Brother QL-810W has ENERGY STAR sustainability certificates. This means it meets energy efficiency standards and is environmentally friendly.
What is the print technology used in the Brother QL-810W?
The Brother QL-810W uses direct thermal print technology, which means no ink or toner is required. This can save the user money and is more convenient.
How much flash memory does the Brother QL-810W have?
The Brother QL-810W has 6 MB of flash memory. This allows for storing and printing a large number of labels without needing to constantly transfer data.
How many labels can the Brother QL-810W store in its label memory?
The Brother QL-810W can store up to 99 labels in its label memory. This provides ample space for organizing and printing various types of labels.
Can the Brother QL-810W be connected to Wi-Fi?
Yes, the Brother QL-810W can be connected to Wi-Fi. This allows for wireless printing from compatible devices, providing convenience and flexibility for the user.
How do I troubleshoot if I am unable to install the applications for use with mobile devices for the Brother QL-810W label printer?
To troubleshoot if you are unable to install the applications for use with mobile devices for the Brother QL-810W label printer, follow these steps:
1. Confirm the Wireless Direct settings of the Label Printer and connect the Label Printer to your computer using a USB cable.
2. Make sure you have purchased a USB cable to connect your printer and Android mobile device.
3. Check the security software settings on your computer. Confirm your settings in the installation dialog box and allow access when the security software alert message appears during the Label Printer installation.
4. Verify that the security settings (SSID/Network Key) you entered are correct. If needed, refer to the instructions supplied with your wireless access point/router to find the correct security settings.
5. Ensure that your Label Printer is within about 3.3 feet (one meter) of the mobile device when configuring the Wi-Fi network settings. Also, move your Label Printer to an obstruction-free area.
6. If there are obstructions such as walls or furniture between your Label Printer and the mobile device, move your Label Printer to an obstruction-free area.
7. Check if any wireless devices, Bluetooth-equipped devices, microwave ovens, digital cordless phones, or other devices are near your Label Printer or the wireless access point/router. If so, move those devices away from your Label Printer or wireless access point/router.
8. If you are using MAC Address filtering, confirm the MAC address by printing the Printer Settings Report or checking the Infrastructure Mode on the LCD (QL-820NWB only).
9. If your wireless access point/router is in stealth mode (not broadcasting the SSID), make sure you type the correct SSID name during the installation or when using the Printer Setting Tool.
By following these troubleshooting steps, you should be able to resolve any issues with installing the applications for use with mobile devices for the Brother QL-810W label printer.
What should I do if I am unable to connect the Brother QL-810W label printer to my mobile device using a USB cable?
To troubleshoot if you are unable to connect the Brother QL-810W label printer to your mobile device using a USB cable, follow these steps:
1. Confirm that the Wireless Direct settings of the Label Printer are properly configured.
2. Connect the Label Printer to your computer using a USB cable.
3. Install the necessary applications for use with mobile devices. These applications can be downloaded for free from the App Store (for Apple devices) or Google Play (for Android devices).
4. Launch the Printer Setting Tool on your computer and navigate to the Communication Settings.
5. Select the appropriate interface (Infrastructure and Wireless Direct or Wireless Direct) in the Communication Settings.
6. On your mobile device, go to the Wi-Fi settings screen and select the SSID of the Label Printer.
7. Enter the password for the Label Printer, which can be found on the product serial number label in the DK Roll Compartment of the Label Printer.
8. Once connected, you should be able to use the applications to print directly from your mobile device to the Label Printer.
By following these steps, you should be able to troubleshoot and resolve any issues with connecting the Brother QL-810W label printer to your mobile device using a USB cable.
How can I troubleshoot if the Wireless Direct settings are not working properly on the Brother QL-810W label printer?
To troubleshoot if the Wireless Direct settings are not working properly on the Brother QL-810W label printer, follow these steps:
1. Check the Wireless Direct settings on the Label Printer. Press the Power button to turn off the Label Printer, then press and hold the Power button to turn it back on.
2. Make sure the SSID (Network Name) and Network Key (password) entered for the Wireless Direct mode are correct. The default SSID is «DIRECT-*****_QL-810W» or «DIRECT-*****_QL-820NWB» (where ***** is the last five digits of the product serial number). The default password is «810*****/820*****» (where ***** is the last five digits of the product serial number).
3. Verify that the Label Printer is within range of your mobile device or computer. Move the Label Printer closer to the device if necessary.
4. Check for any obstructions that may interfere with the wireless signal, such as walls or other electronic devices. Remove any obstructions or move the Label Printer to a different location.
5. Restart your mobile device or computer and try connecting to the Label Printer again.
6. If the issue persists, reset the Wi-Fi settings of the Label Printer and reconfigure the Wireless Direct settings.
By following these troubleshooting steps, you should be able to resolve any issues with the Wireless Direct settings on the Brother QL-810W label printer.
What should I check if I am experiencing communication issues between the Brother QL-810W label printer and my Windows computer?
To troubleshoot communication issues between the Brother QL-810W label printer and your Windows computer, follow these steps:
1. Ensure that the Label Printer is connected to your computer using a USB cable or via a Bluetooth connection (QL-820NWB only).
2. Check the communication settings in the Printer Setting Tool. Open the Printer Setting Tool on your computer and navigate to the Communication Settings.
3. Verify that the communication settings are correctly specified for the Label Printer. You can change the communication information in the Communication Settings.
4. Make sure that the communication settings are not disabled. If the «Disable these settings» checkbox is selected, the settings cannot be specified or changed. Clear the checkbox to enable the settings.
5. Check the current status of the settings in the Communication Settings. Select «Current Status» to view the current settings.
6. Ensure that the correct Label Printer is selected in the Printer list. The connected Label Printers are listed in the Printer section of the Communication Settings.
By following these steps, you can check and troubleshoot the communication settings between the Brother QL-810W label printer and your Windows computer.
How do I troubleshoot if I am unable to create and print labels using the Brother iPrint&Label application on my smartphone or tablet with the Brother QL-810W label printer?
To troubleshoot if you are unable to create and print labels using the Brother iPrint&Label application on your smartphone or tablet with the Brother QL-810W label printer, follow these steps:
1. Check the cable connection between your mobile device and the Label Printer. Ensure that the USB cable is securely connected to both devices.
2. Verify that the Brother iPrint&Label application is installed on your mobile device. If not, download and install the application from the App Store (for Apple devices) or Google Play (for Android devices).
3. Make sure that the Label Printer is turned on and within range of your mobile device. Ensure that the Label Printer is connected to the same Wi-Fi network as your mobile device.
4. Open the Brother iPrint&Label application on your mobile device and select the label template you want to use.
5. Customize the label design by adding text, images, or barcode data as needed.
6. Preview the label to ensure it appears as desired.
7. Select the Brother QL-810W label printer as the printing device within the Brother iPrint&Label application.
8. Adjust any printing settings, such as label size or print quality, if necessary.
9. Tap the «Print» button to send the label to the Brother QL-810W label printer for printing.
By following these troubleshooting steps, you should be able to resolve any issues with creating and printing labels using the Brother iPrint&Label application on your smartphone or tablet with the Brother QL-810W label printer.
How do I troubleshoot if I am unable to install the applications for use with mobile devices for the Brother QL-810W label printer?
To troubleshoot if you are unable to install the applications for use with mobile devices for the Brother QL-810W label printer, follow these steps:
1. Confirm the Wireless Direct settings of the Label Printer and connect the Label Printer to your computer using a USB cable.
2. Make sure you have purchased a USB cable to connect your printer and Android mobile device.
3. Check the security software settings on your computer. Confirm your settings in the installation dialog box and allow access when the security software alert message appears during the Label Printer installation.
4. Verify that the security settings (SSID/Network Key) you entered are correct. If necessary, refer to the instructions supplied with your wireless access point/router to find the correct security settings.
5. Ensure that your Label Printer is within about 3.3 feet (one meter) of the mobile device when configuring the Wi-Fi network settings. Also, move your Label Printer to an obstruction-free area.
6. If there are obstructions such as walls or furniture between your Label Printer and the mobile device, move your Label Printer to an obstruction-free area.
7. Check if any wireless devices, Bluetooth-equipped devices, microwave ovens, digital cordless phones, or other devices are near your Label Printer or the wireless access point/router. If so, move these devices away from your Label Printer or wireless access point/router.
8. If you are using MAC Address filtering, confirm the MAC address by printing the Printer Settings Report or checking the [Infrastructure Mode] on the LCD (QL-820NWB only).
9. If your wireless access point/router is in stealth mode (not broadcasting the SSID), make sure you type the correct SSID name during the installation or when using the Printer Setting Tool.
By following these troubleshooting steps, you should be able to resolve any issues with installing the applications for use with mobile devices for the Brother QL-810W label printer.
What should I do if I am unable to connect the Brother QL-810W label printer to my mobile device using a USB cable?
To connect the Brother QL-810W label printer to your mobile device using a USB cable, follow these steps:
1. Ensure that the Label Printer is turned on and the USB cable is securely connected to both the Label Printer and your mobile device.
2. On your mobile device, go to the settings and enable USB debugging mode. This option is usually found in the developer options or developer settings.
3. Install the necessary printer driver software on your mobile device. You can usually find the driver software on the Brother website or in the app store for your specific mobile operating system.
4. Once the driver software is installed, open the printing application on your mobile device.
5. In the printing application, select the Brother QL-810W label printer as the default printer.
6. Choose the label size and layout settings according to your requirements.
7. Select the document or image you want to print and click on the print button.
8. The Brother QL-810W label printer should now be connected to your mobile device and ready to print.
By following these steps, you should be able to connect the Brother QL-810W label printer to your mobile device using a USB cable.
How can I troubleshoot if the Wireless Direct settings are not working properly on the Brother QL-810W label printer?
To troubleshoot if the Wireless Direct settings are not working properly on the Brother QL-810W label printer, follow these steps:
1. Check the Wireless Direct settings on the label printer. Press the Power button to turn off the label printer, then press and hold the Power button to turn it back on.
2. Verify that the SSID (Network Name) and Network Key (password) entered for the Wireless Direct mode are correct. The default SSID for the QL-810W label printer is «DIRECT-*****_QL-810W» (where ***** represents the last five digits of the product serial number). The default password is «810*****» (where ***** represents the last five digits of the product serial number).
3. Ensure that the label printer is within range of the mobile device or computer you are trying to connect to. Move the label printer closer to the device if necessary.
4. Check for any obstructions, such as walls or furniture, that may interfere with the wireless signal. Remove any obstructions or move the label printer to a different location.
5. Restart both the label printer and the mobile device or computer you are trying to connect to. Turn off the label printer, then turn it back on. Restart the mobile device or computer.
6. If the issue persists, reset the Wi-Fi settings of the label printer. Refer to the manual for instructions on how to reset the Wi-Fi settings.
By following these troubleshooting steps, you should be able to resolve any issues with the Wireless Direct settings on the Brother QL-810W label printer.
What should I check if I am experiencing communication issues between the Brother QL-810W label printer and my Windows computer?
To troubleshoot communication issues between the Brother QL-810W label printer and your Windows computer, follow these steps:
1. Check the compatibility of your Windows operating system with the Brother QL-810W label printer. Ensure that your Windows version is supported by the printer.
2. Verify that the USB cable is securely connected between the label printer and your computer. Try using a different USB cable if the issue persists.
3. Install the necessary printer driver software on your Windows computer. You can usually find the driver software on the Brother website or in the provided installation CD.
4. Ensure that the printer driver is correctly installed and up to date. You can check for driver updates on the Brother website or through the Windows Device Manager.
5. Restart both the label printer and your Windows computer. Sometimes, a simple restart can resolve communication issues.
6. Disable any firewall or antivirus software temporarily to check if they are blocking the communication between the label printer and your computer.
7. If you are using a wireless connection, ensure that both the label printer and your computer are connected to the same Wi-Fi network.
By following these troubleshooting steps, you should be able to resolve communication issues between the Brother QL-810W label printer and your Windows computer.
How do I troubleshoot if I am unable to create and print labels using the Brother iPrint&Label application on my smartphone or tablet with the Brother QL-810W label printer?
To troubleshoot if you are unable to create and print labels using the Brother iPrint&Label application on your smartphone or tablet with the Brother QL-810W label printer, follow these steps:
1. Ensure that your smartphone or tablet is connected to the same Wi-Fi network as the Brother QL-810W label printer.
2. Check if the Brother iPrint&Label application is installed and up to date on your smartphone or tablet. If not, download and install the latest version from the app store.
3. Verify that the label printer is turned on and connected to the Wi-Fi network. Check the Wi-Fi indicator on the label printer to ensure it is connected.
4. Open the Brother iPrint&Label application on your smartphone or tablet and select the QL-810W label printer as the printing device.
5. Make sure the label roll is properly loaded in the label printer and the correct label size is selected in the application.
6. Check the label design and content in the Brother iPrint&Label application. Ensure that the label design is within the printable area and the content is correctly entered.
7. If the issue persists, try restarting both the label printer and your smartphone or tablet. Sometimes, a simple restart can resolve connectivity issues.
By following these troubleshooting steps, you should be able to resolve any issues with creating and printing labels using the Brother iPrint&Label application on your smartphone or tablet with the Brother QL-810W label printer.
What is the weight of the Brother QL-810W?
The Brother QL-810W has a weight of 1120 g.
What is the height of the Brother QL-810W?
The Brother QL-810W has a height of 145 mm.
What is the width of the Brother QL-810W?
The Brother QL-810W has a width of 125 mm.
What is the depth of the Brother QL-810W?
The Brother QL-810W has a depth of 234 mm.
What does DPI stand for?
DPI stands for Dots Per Inch and is the number of ink droplets (per inch) that end up on the paper when printing.
Is the manual of the Brother QL-810W available in English?
Yes, the manual of the Brother QL-810W is available in English .
Is your question not listed? Ask your question here