
Инструкции
bro-D-cat2.pdf
bronica-s.pdf
Bronica s (2).pdf
bronica bellows.pdf
Notice Bronica S2 (réduit).pdf
Bronica etrsi брошюра.pdf
bronica-etr-c.pdf
Bronica ETR Motor Drive E.pdf
Bronica ETRS Polaroid Back Instructions.pdf
bronica sq-a sq-am.pdf
bronica-sq-am.pdf
bronica-gs-1.pdf
bronica_gs1_bellows_g.pdf
Congratulations on your choice of the Zenza Bronica SQ-Ai single lens reflex camera; based
on the technology and experience gained with the Zenza Bronica SQ-A. Developed for the
professional photographer, the Zenza Bronica SQ-Ai also retains the full System of
Photography of the earlier SQ-A, as well as having extensive interchangeability with the full
range of accessories available for the SQ-A.
Among the many professional features of the Zenza Bronica SQ-Ai is flash synchronization
at all shutter speeds, up to the fastest 1/500 second, which is one of the chief features of the
lens shutter single lens reflex camera. But, at the same time, the SQ-Ai also has full auto-flash
control, based on TTL-direct light measurements at the film plane, with an exclusive SCA
386 System Adapter (optional), plus a compatible SCA 300 System electronic flash unit.
Although instructions following are based on a standard combination consisting of the SQ-
Ai main camera body with standard Zenzanon-PS 80mm F2.8 lens, Film Back SQ-I 120 and
Waist-Level Finder S, the actual choice of lens, film back and finder is left to the discretion of
the photographer, who should choose what is suitable for the type of assignment contem-
plated. To obtain best results from your Zenza Bronica SQ-Ai, we suggest that you read this
instruction manual carefully, before you even touch the camera. Thoroughly familiarize
yourself with its working parts, before loading your first roll of film, and your pleasure in
using the camera will be even greater.
1
Congratulations on your choice of the Zenza Bronica SQ-Ai single lens reflex camera; based
on the technology and experience gained with the Zenza Bronica SQ-A. Developed for the
professional photographer, the Zenza Bronica SQ-Ai also retains the full System of
Photography of the earlier SQ-A, as well as having extensive interchangeability with the full
range of accessories available for the SQ-A.
Among the many professional features of the Zenza Bronica SQ-Ai is flash synchronization
at all shutter speeds, up to the fastest 1/500 second, which is one of the chief features of the
lens shutter single lens reflex camera. But, at the same time, the SQ-Ai also has full auto-flash
control, based on TTL-direct light measurements at the film plane, with an exclusive SCA
386 System Adapter (optional), plus a compatible SCA 300 System electronic flash unit.
Although instructions following are based on a standard combination consisting of the SQAi main camera body with standard Zenzanon-PS 80mm F2.8 lens, Film Back SQ-I 120 and
Waist-Level Finder S, the actual choice of lens, film back and finder is left to the discretion of
the photographer, who should choose what is suitable for the type of assignment contemplated. To obtain best results from your Zenza Bronica SQ-Ai, we suggest that you read this
instruction manual carefully, before you even touch the camera. Thoroughly familiarize
yourself with its working parts, before loading your first roll of film, and your pleasure in
using the camera will be even greater.
1
SQ-Ai

2
Contents Page
Specifications of the ZENZA BRONICA SQ-Ai
Parts of the ZENZA BRONICA SQ-Ai
1. Loading the Battery
2. Battery Checking
3. Attachment and Removal of Film Backs
4. Construction of Film Back
5. Film Loading
6. Film Speed Dial
7. Exposure Compensation Dial
8. Film Type Indicator Frame
9. Film Advance and Shutter Cocking
10. Exposure Counter
11. Film Unloading
12. Setting the Shutter Speed Dial
13. Shutter Release Button
14. Time (T) Exposure
15. Exchanging Lenses
16. Interchanging Finders
17. Waist-Level Finder and Interchanging Magnifiers
18. Setting the Aperture
19. Focusing Adjustments
20. Distance Scale and Depth of Field Scale
21. Infrared Photography
22. Flash Photography
23. Multiple Exposures
24. Mirror Lock-Up
25. Interchanging Focusing Screens
26. Removal and Attachment of the Film Winding Crank Assembly
27. Attachment of the Neck Strap
28. Facts About the Battery
29. Pointers on Shooting
30. Care of the SQ-Ai
31. Depth of Field Table
32. Interchanging Lenses
33. Accessories for Increasing the Versatility
3, 4
5
6
6, 7
7, 8
8
9, 10
11
11
11
11
12
12
12, 13
13, 14
14
14, 15
15
15, 16
16, 17
17
17, 18
18
18, 19
19, 20
20, 21,22
22
22, 23
23, 24
24
25
25, 26
27
28
29

3
Specifications of the ZENZA BRONICA SQ-Ai
Type 6 x 6 cm format lens shutter single lens reflex
camera, with interchangeable lens, film back,
finder and focusing screen systems.
Frame Size 55.6mm x 55.6mm
Film 120/220/135 roll film and Polaroid Land pack
film, with exclusive film backs.
Lens Interchangeable type. Standard lens
Zenzanon-PS 80mm F2.8; 6 elements in 5
groups; multi-layer anti-reflection coated;
50.7° angle of view; F22 minimum aperture;
intermediate aperture settings; helical focusing from infinity to 80cm.
Filter Sizes 67mm diameter on Zenzanon-S/PS 40mm
and Zenzanon-S 500mm lenses; 77mm diameter on Zenzanon-PS 50mm lens; and 122mm
diameter on Zenzanon-PS 500mm lens.
Lens Mount Exclusive four-claw Bronica SQ bayonet
mount.
Focusing Helical focusing system built into each lens;
angle of focusing 171° for standard lens.
Shutter Electronic control SEIKO #0 between-lens leaf
shutter; shutter speeds 16 sec. to 1/500 sec.; T
(time exposure); B (bulb exposure); with shutter release lock.
One step settings with Waist-Level Finder S
and Prism Finder S.
Lens Diaphragm Fully automatic instant reopening lens
diaphragm action; equal-distant aperture
scale graduations; half-stops possible; depth
of field previewing.
Film Winding Film winding crank; one complete forward
revolution or ratcheted winding action.
Multiple Exposure Multiple exposure possible with lever on
camera main body; multiple exposure warning indication in finder.
Mirror Lock-Up Mirror lock-up possible with switch lever on
the camera main body; single or continuous
mirror lock-up shooting possible.

4
Flash Synchronization X-setting (up to 1/500 sec.); auto-flash control
based on direct light measurements at the
film plane with optional SCA System Adapter
and SCA 300 System compatible electronic
flash units.
Film Back Daylight loading interchangeable type; exclu-
sive film backs for 120, 220, and 135 roll films
and Polaroid Land pack films; with film speed
dial and exposure compensation dial; couples
to finders with built-in exposure meter, when
attached.
Finder Interchangeable finder system; 94% of actual
field of view (remains unchanged when finder is exchanged.)
Focusing Screen Interchangeable type; standard
microprism/split-image screen; optional
screens are split-image, microprism, matte,
grid-lines, microprism/split-image (for 135
film) and matte (for 135 film.)
Battery Checking Red-colored LED lights up in front center
area, outside screen area, when battery check
button is depressed; LED also doubles as
shutter closing signal.
Battery Four 1.5 volt alkaline-manganese batteries
(LR44)
Dimensions 92mm wide x 109mm high x 179mm long
(with standard lens, Film Back SQ-I 120 and
Waist-Level Finder S.)
Weight 1,515 grams (with standard lens, Film Back
SQ-I 120 and Waist-Level Finder S.)
Specifications are subject to change without prior notice.
Specifications of the ZENZA BRONICA SQ-Ai (con’t)
5
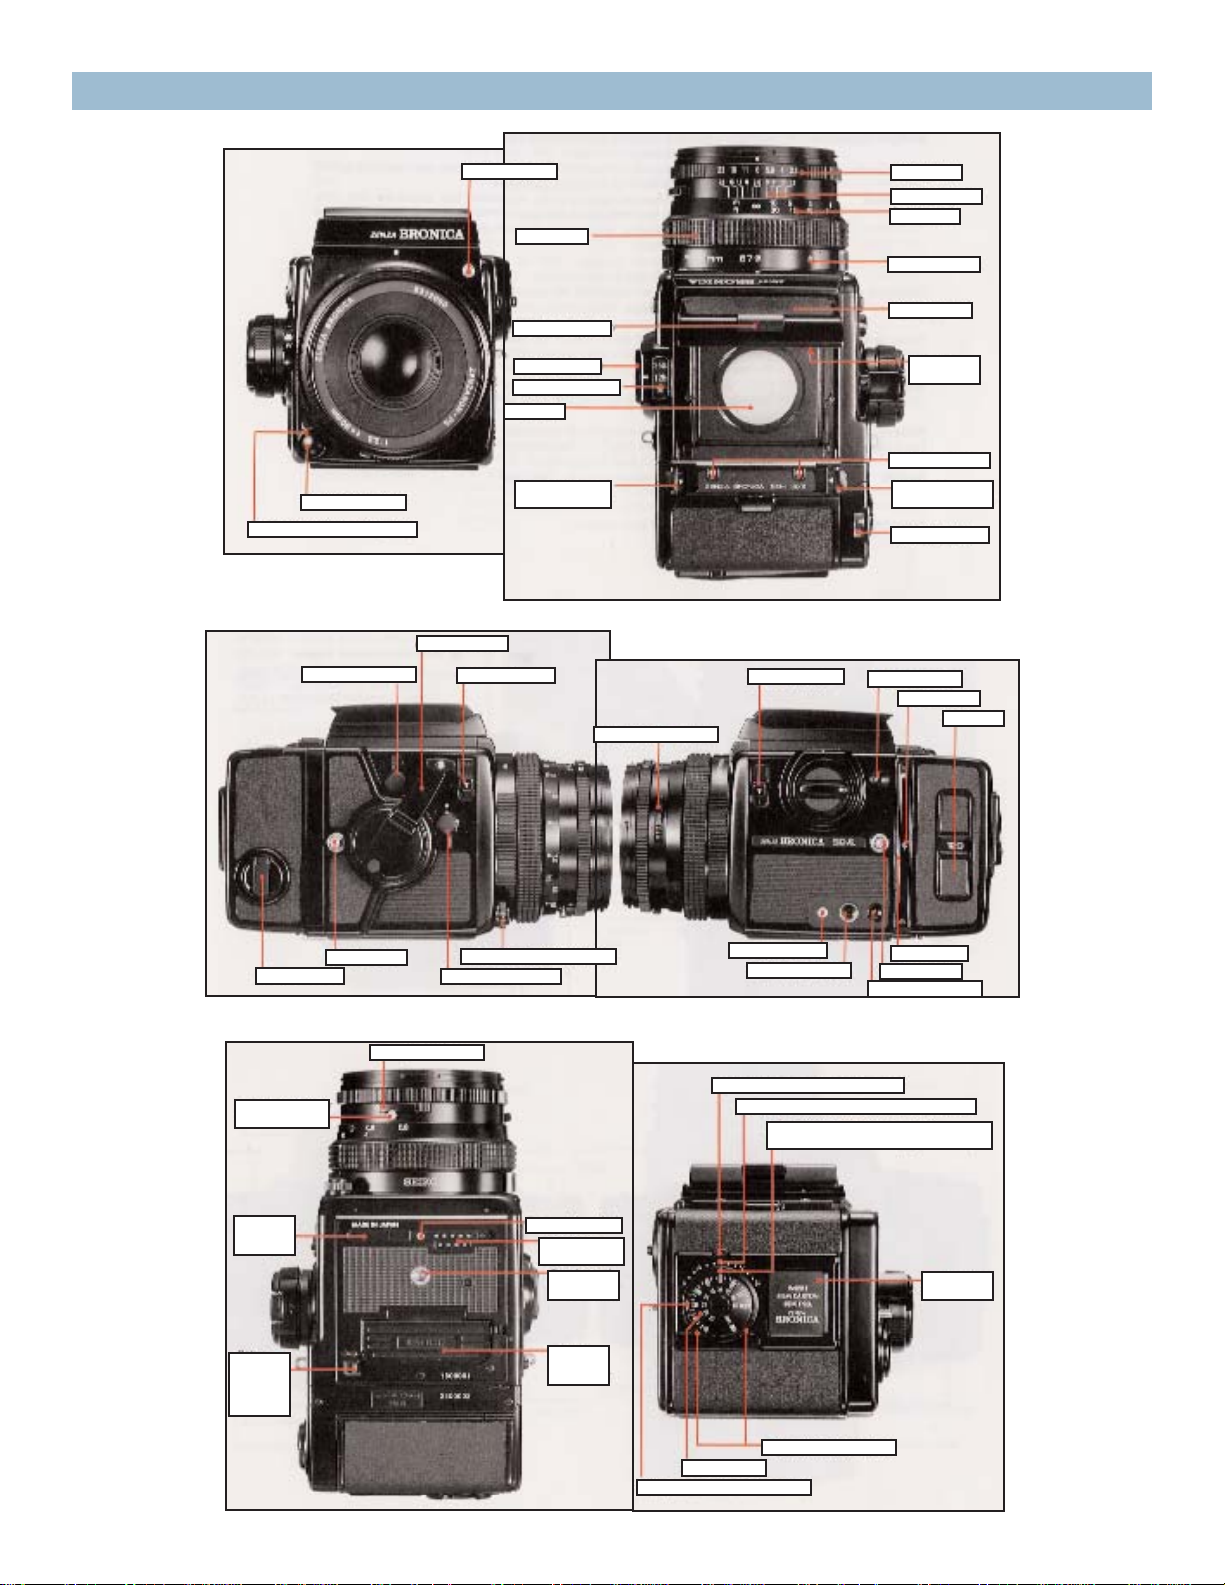
Parts of the ZENZA BRONICA SQ-Ai
Aperture ring
Depth of field scale
Distance scale
Lens alignment dot
Waist-level finder
Magnifier
release lever
Film speed contact
Back cover
release button (right)
Exposure counter
Battery check button
Film plane mark
Spool holder
Depth of field preview lever
Dark slide slit
Neck strap eyelet
Film back release button
SCA adapter connector
Cable release socket
Exposure compensation dial lock button
Exposure compensation dial scale (green-colored)
Exposure ccompensation dial index
(green-colored)
Film type
indicator frame
Exposure compensation dial
Film speed dial
Film speed dial index (white-colored)
Battery
chamber
cover
Battery
chamber
cover
release
button
Tripod socket
(1/4” screw)
Accessory
mounting
guide
Flash synch contact
Motor drive
contacts
Time exposure lever
set screw
Time exposure lever
Mirror lock-up switch lever
Shutter release button locking ring
Neck strap eyelet
Manual film winder
Multiple exposure lever
Finder release button
Film winding crank
Back cover release
button (left)
Shutter release button
Shutter release button locking ring
Magnifier
Shutter speed scale
Shutter speed dial
Focusing hood catch
Flash synch socket
Focusing ring
Lens release button

6
B. A battery holder inside the battery chamber will spring up when
the battery chamber cover is opened fully. Insert the four batteries
into the battery holder,with polarities coincided to the plus (+) indications on the battery holder. Load all four batteries in the same
direction.
C. Upon loading the batteries into the battery holder, insert the battery holder into the battery chamber of the camera main body and
close the battery chamber cover with your finger.
* The battery holder can only be inserted one way because of its
shape.
If a red-colored battery check LED lights up outside the focusing
screen area (in the central front part of the finder), when the battery
check button is pressed, the batteries are loaded properly and there is
sufficient power for operations.
* If the LED does not light up, (1) the batteries are not loaded properly or (2) the batteries are used and should be exchanged for fresh
ones.
A. Push the battery chamber cover release button on the base of the
camera main body in the arrow-indicated direction and the battery
chamber cover will spring open.
1. Loading the Battery
The electronically controlled leaf shutter and the electro-magnetic shutter release system
will not work without loading the batteries. Four 1.5-volt alkaline-manganese (LR44) batteries must be used.
* The batteries may be obtained at any photographic equipment or electrical appliance
dealer.
2. Battery Checking

7
Thus, it will not be possible to check the battery status (four LR44) loaded in the main camera body with the motor drive attached. In this case, the motor drive must be detached to
check the batteries in the main camera body.
* When using the AE prism Finder S, always check battery condition before attaching the
finder, as the LED-illuminated shutter speed may be displayed, even when the battery check
LED does not light up. Since correct AE operations will not be possible, in this case,
exchange for fresh batteries.
The film back is a film chamber that can be attached or detached at any time, permitting
rapid change of film types even during shooting sessions. The main camera body and film
back are fully coupled, upon connection. Therefore, always turn the film-winding crank
completely one time, upon attaching the film back. If winding is not possible, all preparations for taking the picture have been completed. But, if winding is possible, rotating the
film winding crank until it stops will automatically take care of the incomplete action,
whether it is an uncocked shutter or the film has not advanced. Thus, it is always possible to
choose the film type most suited for the shot, even midway in the roll. A film speed dial is
available on the film backs and can be used for setting the film speed of the film loaded in
the film back, which will, furthermore, automatically couple when any finder with a built-in
exposure meter is attached to the camera main body. This should be very convenient when
using films of different sensitivities in various film backs.The film speed dial is calibrated for
ISO/DIN film speeds. An exposure compensation dial is also available around the film speed
dial. Additional film backs are available optionally in 6 x 6, 6 x 4.5 and 35mm formats.
* See the instructions supplied with Film Back SQ 135 for proper use.
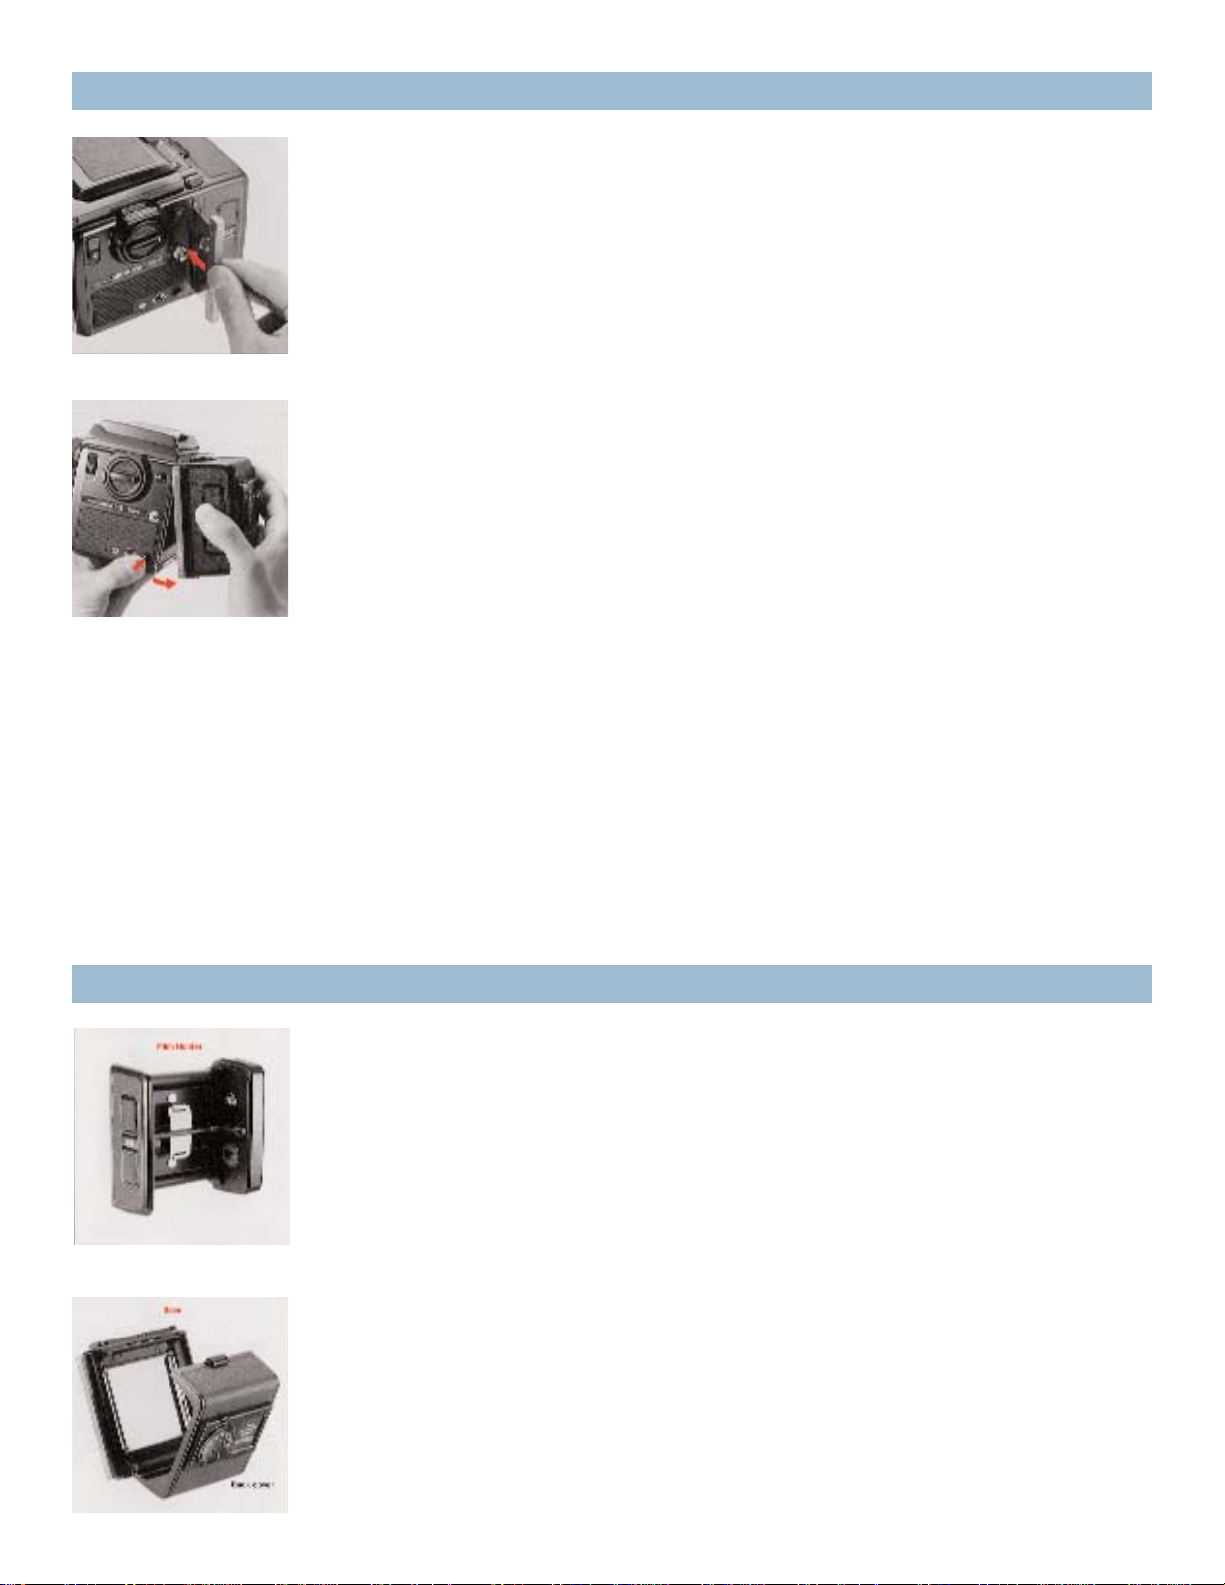
A. To attach the film back to the main camera body, simply insert the
latches at the upper end of the film back into the attachment openings at the upper end of the camera main body. Then, press the lower
end of the film back against the main body until it locks securely.
2. Battery Checking (con’t)
* When the Motor Drive SQ-I is attached to the SQ-Ai main camera body, battery power for
the main camera body is supplied from the Motor Drive SQ-I. In other words, the electrical
circuit is switched so that the batteries of the motor drive operate the main camera body.
3. Attachment and Removal of Film Backs
8
C. Depress the film back release button and the lower end of the film
back can be removed, as illustrated. Simply shift the film back up
slightly and pull it away.
* The dark slide cannot be withdrawn from the film back when the
film back is detached from the main camera body.
* The dark slide must be withdrawn from its slit, upon attachment of
the film back to the main body, otherwise the shutter cannot be
released. Furthermore, there is danger of the film back accidentally
becoming detached from the main body, should the dark slide be left
in its slit while the camera is being carried.Therefore, make it a rule to
withdraw the dark slide promptly upon attaching the film back to the
main body.
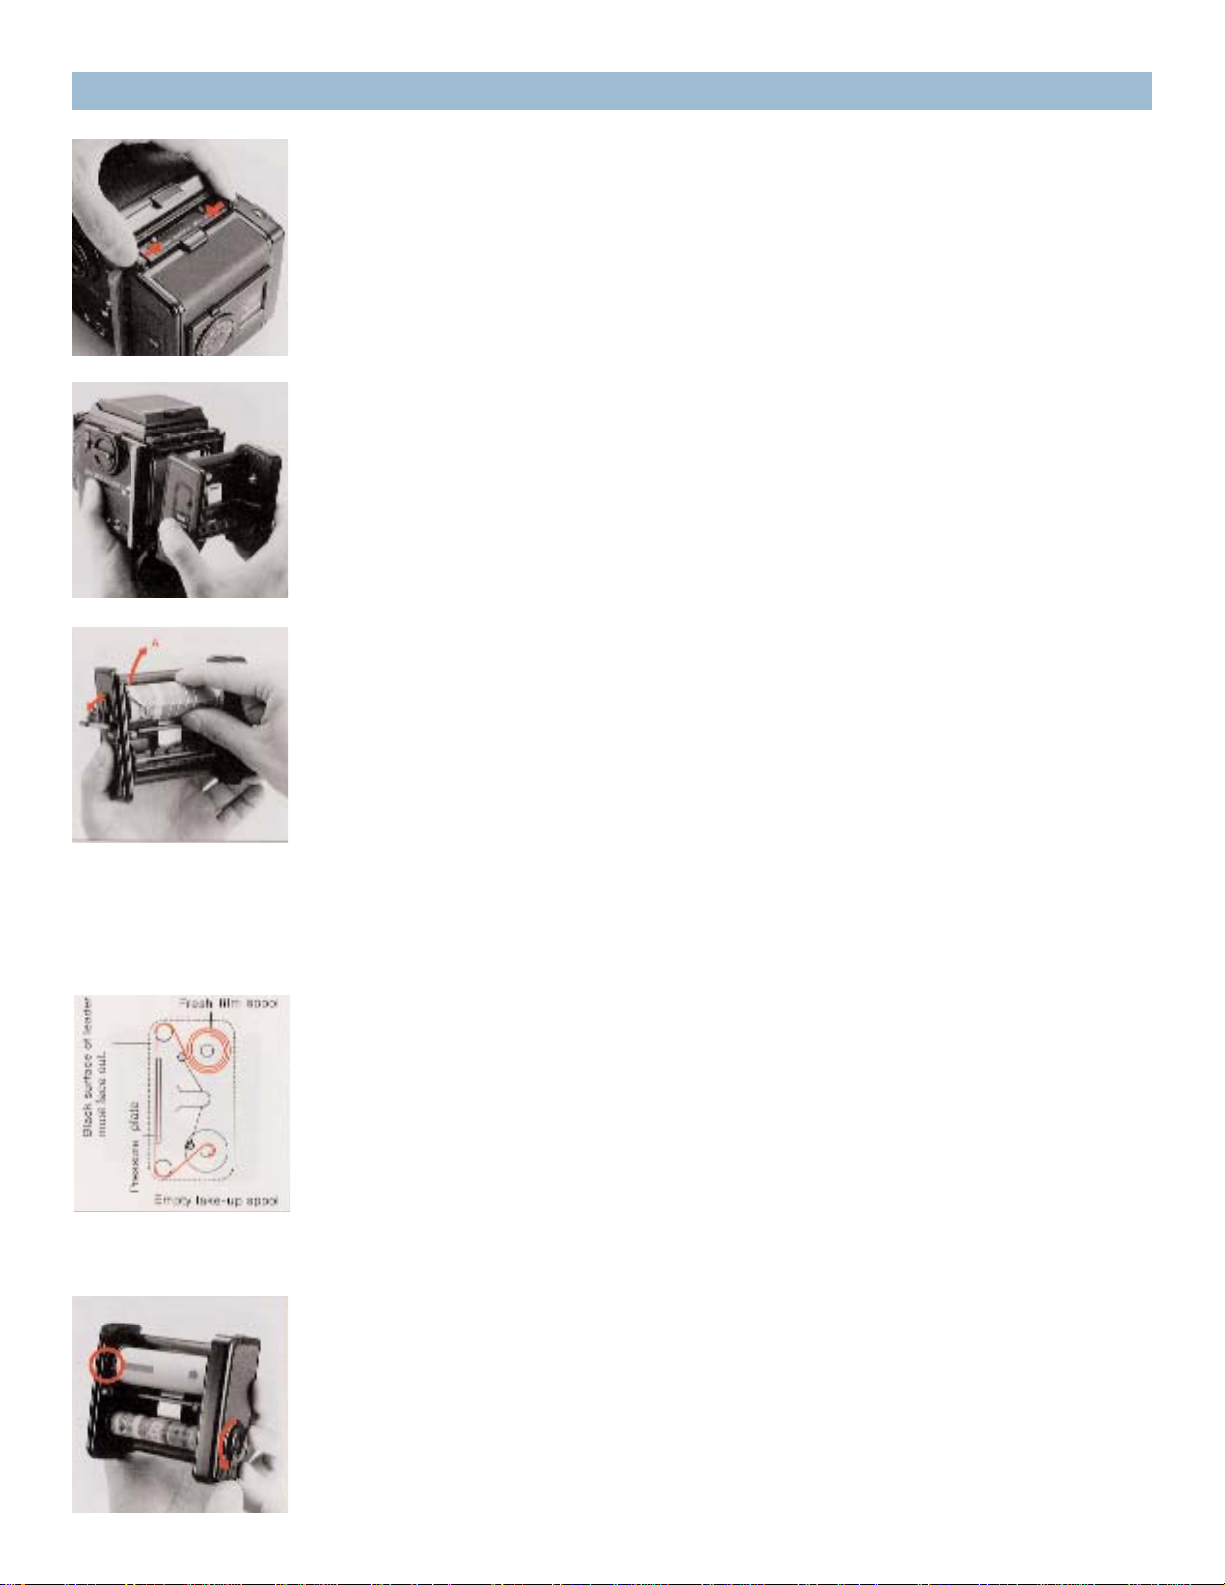
A. The film back consists of a film holder and a film back frame, with
exclusive film backs available for 120 and 220 roll films in 6 x 6 & 6 x
4.5 formats.The film holder has an insert on the frame for loading
film, and has a built-in film winding mechanism.
B. The film back frame has a base with a dark slide slit and a back
cover with an ISO/DIN film speed dial, an exposure compensation dial
and a film type indicator frame. The film back frame completely
encloses the film insert and shields it from outside light, as well as
connecting it to the camera main body and also coupling with any
finder having a built-in exposure meter.
3. Attachment and Removal of Film Backs (con’t)
B. To remove the film back from the main camera body, insert the
dark slide into the dark slide slit, as illustrated, with the mark on the
dark slide at the top end. Push it all the way in.
4. Construction of Film Back
9
B. The film holder can be taken out for film loading upon opening
the back cover.
C. There are two spool holders on the film holder. The top one is for
the fresh film spool while the bottom one is for the empty take-up
spool. The left-side shaft of the spool holder can be opened by pushing the fresh film spool outward in the arrow-indicated «A» direction.
Then, insert the right end of the spool on to the right-side shaft,
which is fixed, and then close the left-side holder (shaft), which will
engage the spool.
* The spool holders on the left side will be locked securely when the
back cover is closed.
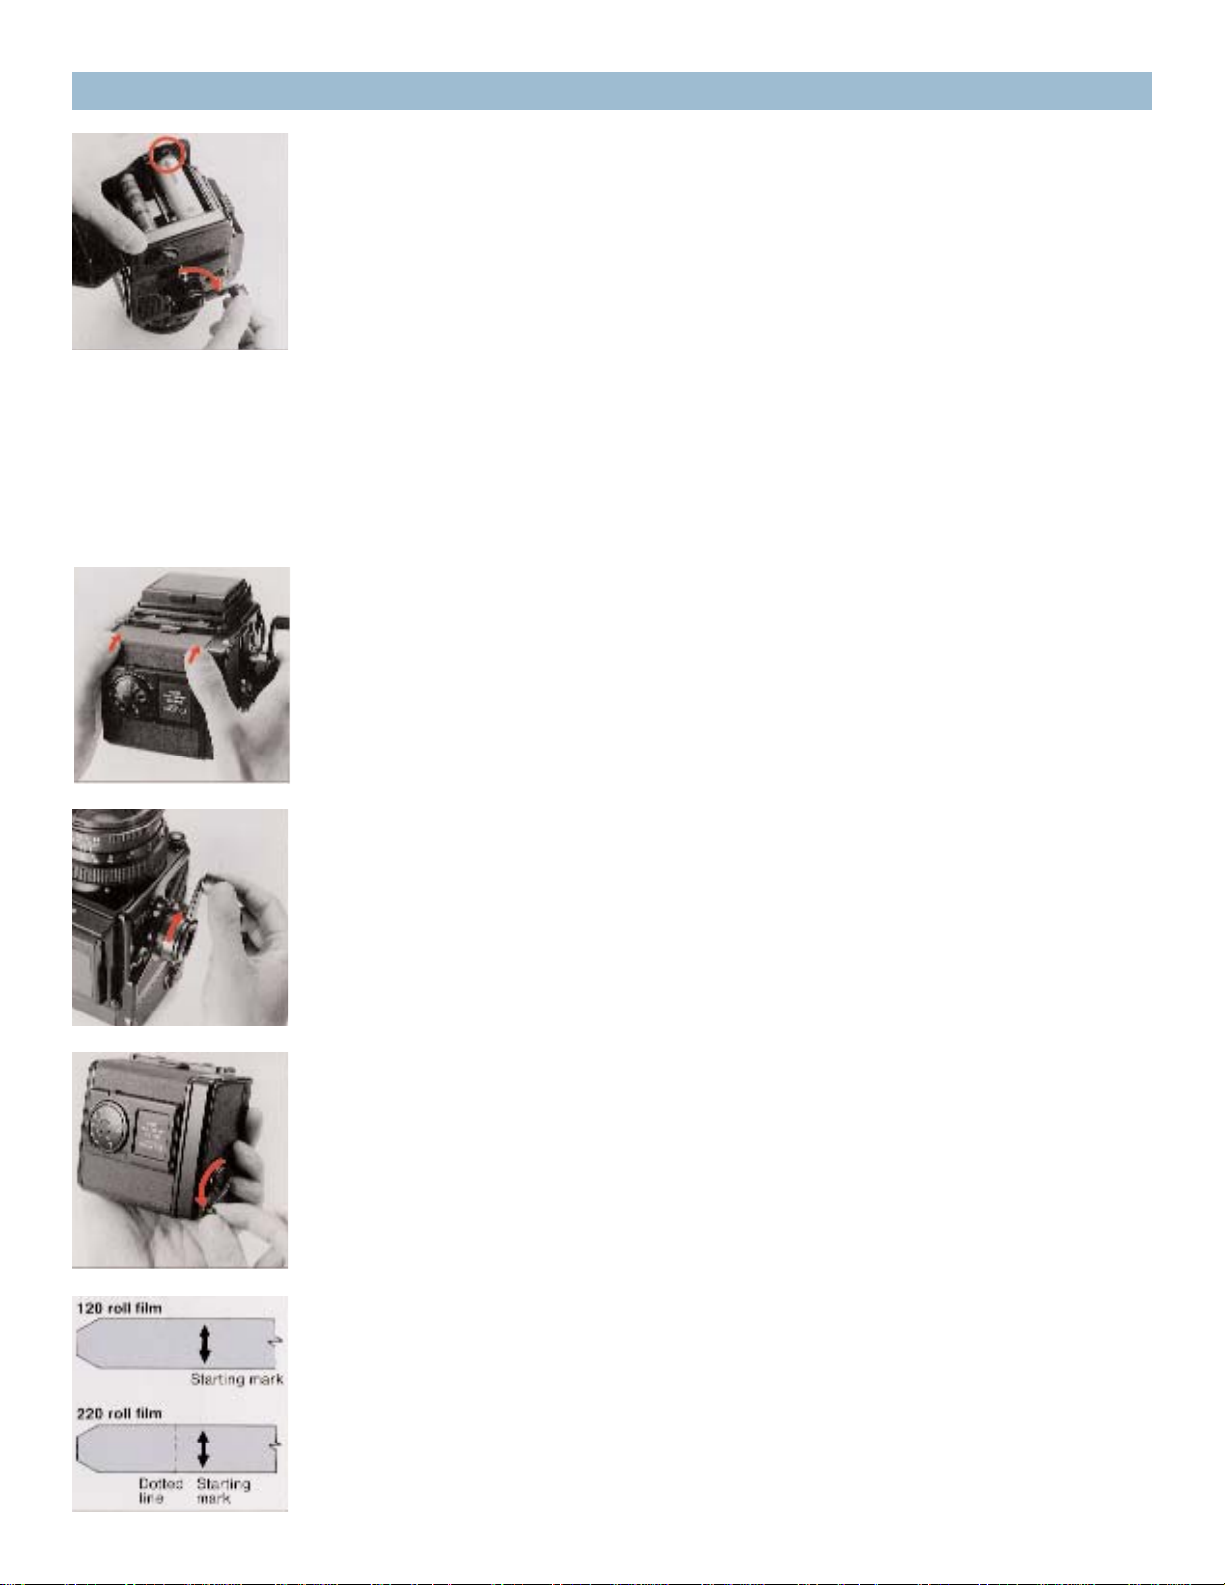
D. After loading the fresh film spool properly, draw out the leading
end of the film and turn it across the film pressure plate (as illustrated). Run it down and turn it over to the take-up spool. Insert the leading end into the slit of the take-up spool and wind slightly until
securely engaged.
* The inside black surface of the leader must face out when running
across the pressure plate.
E. Rotate the film back winding crank on the right side of the film
insert in the direction indicated by the arrow, while checking the
advancing film. When the starting point, or arrow mark, is aligned
with the triangular start-mark on the top left side of the film insert,
stop rotation.
5. Film Loading
A. To open the back cover, squeeze the left and right back cover
release buttons, in the arrow-indicated directions, at the same time
and the back cover will open.
10
* If the film is not advanced when the film-winding crank is rotated,
the film holder is not inserted properly and/or the main camera body
may be set for multiple exposures. In the latter case, return the multiple exposure lever to an upright or vertical position. (See 23. Multiple
Exposures.)
G. Close the back cover, by pressing it firmly against the base of the
film back, as illustrated. The back cover will automatically close and
lock. The same operation will close the back cover when the film
back is detached from the main body.
H. Upon loading the film, rotate the film-winding crank until it stops
to place the first frame into place for taking the picture. The exposure
counter will also change from «S» to «1», while the shutter will also be
cocked.
I. The manual film winder is used for advancing the film, when the
film back is detached from the main body for film loading. The manual film winder can continue to rotate, even when the film is set for the
first exposure. It should be rotated 2 or 3 times more, in order to take
up any slack in the loaded film.
* When loading 220 roll film in the Film Back SQ-I 220, do not mistake
the dotted line before the arrow mark for the starting mark.
F. The starting point, or arrow mark, of the unexposed film, can also
be aligned with the start-mark, with the film insert loaded in the film
back. Simply rotate the film-winding crank on the main camera body.
This method is preferred since there will be coupling with the main
camera body mechanism, from the beginning.
5. Film Loading (con’t)
Loading…
Congratulations on your choice of the Zenza Bronica SQ-Ai single lens reflex camera; based
on the technology and experience gained with the Zenza Bronica SQ-A. Developed for the
professional photographer, the Zenza Bronica SQ-Ai also retains the full System of
Photography of the earlier SQ-A, as well as having extensive interchangeability with the full
range of accessories available for the SQ-A.
Among the many professional features of the Zenza Bronica SQ-Ai is flash synchronization
at all shutter speeds, up to the fastest 1/500 second, which is one of the chief features of the
lens shutter single lens reflex camera. But, at the same time, the SQ-Ai also has full auto-flash
control, based on TTL-direct light measurements at the film plane, with an exclusive SCA
386 System Adapter (optional), plus a compatible SCA 300 System electronic flash unit.
Although instructions following are based on a standard combination consisting of the SQ-
Ai main camera body with standard Zenzanon-PS 80mm F2.8 lens, Film Back SQ-I 120 and
Waist-Level Finder S, the actual choice of lens, film back and finder is left to the discretion of
the photographer, who should choose what is suitable for the type of assignment contem-
plated. To obtain best results from your Zenza Bronica SQ-Ai, we suggest that you read this
instruction manual carefully, before you even touch the camera. Thoroughly familiarize
yourself with its working parts, before loading your first roll of film, and your pleasure in
using the camera will be even greater.
1
SQ-Ai
- About
- Blog
- Projects
- Help
-
Donate
Donate icon
An illustration of a heart shape - Contact
- Jobs
- Volunteer
- People
Bookreader Item Preview
texts
Zenza Bronica SQ-Ai, GS-1 User manual
- Addeddate
- 2021-02-08 12:00:49
- Identifier
- manualzz-id-1223398
- Identifier-ark
- ark:/13960/t6d32g322
- Ocr
- tesseract 5.0.0-alpha-20201231-10-g1236
- Ocr_autonomous
- true
- Ocr_detected_lang
- en
- Ocr_detected_lang_conf
- 1.0000
- Ocr_detected_script
- Latin
- Ocr_detected_script_conf
- 1.0000
- Ocr_module_version
- 0.0.12
- Ocr_parameters
- -l eng+por+Latin
- Page_number_confidence
- 70.97
comment
Reviews
There are no reviews yet. Be the first one to
write a review.
103
Views
DOWNLOAD OPTIONS
Temporarily Unavailable
DAISY
For users with print-disabilities
Temporarily Unavailable
EPUB
Uploaded by
chris85
on
SIMILAR ITEMS (based on metadata)