
English
1
Русский
2
English
1
Русский
2
Scanner
Quick Guide
82-092-00070
4
Web Link
Settings
Help
Stop/
Cancel
2
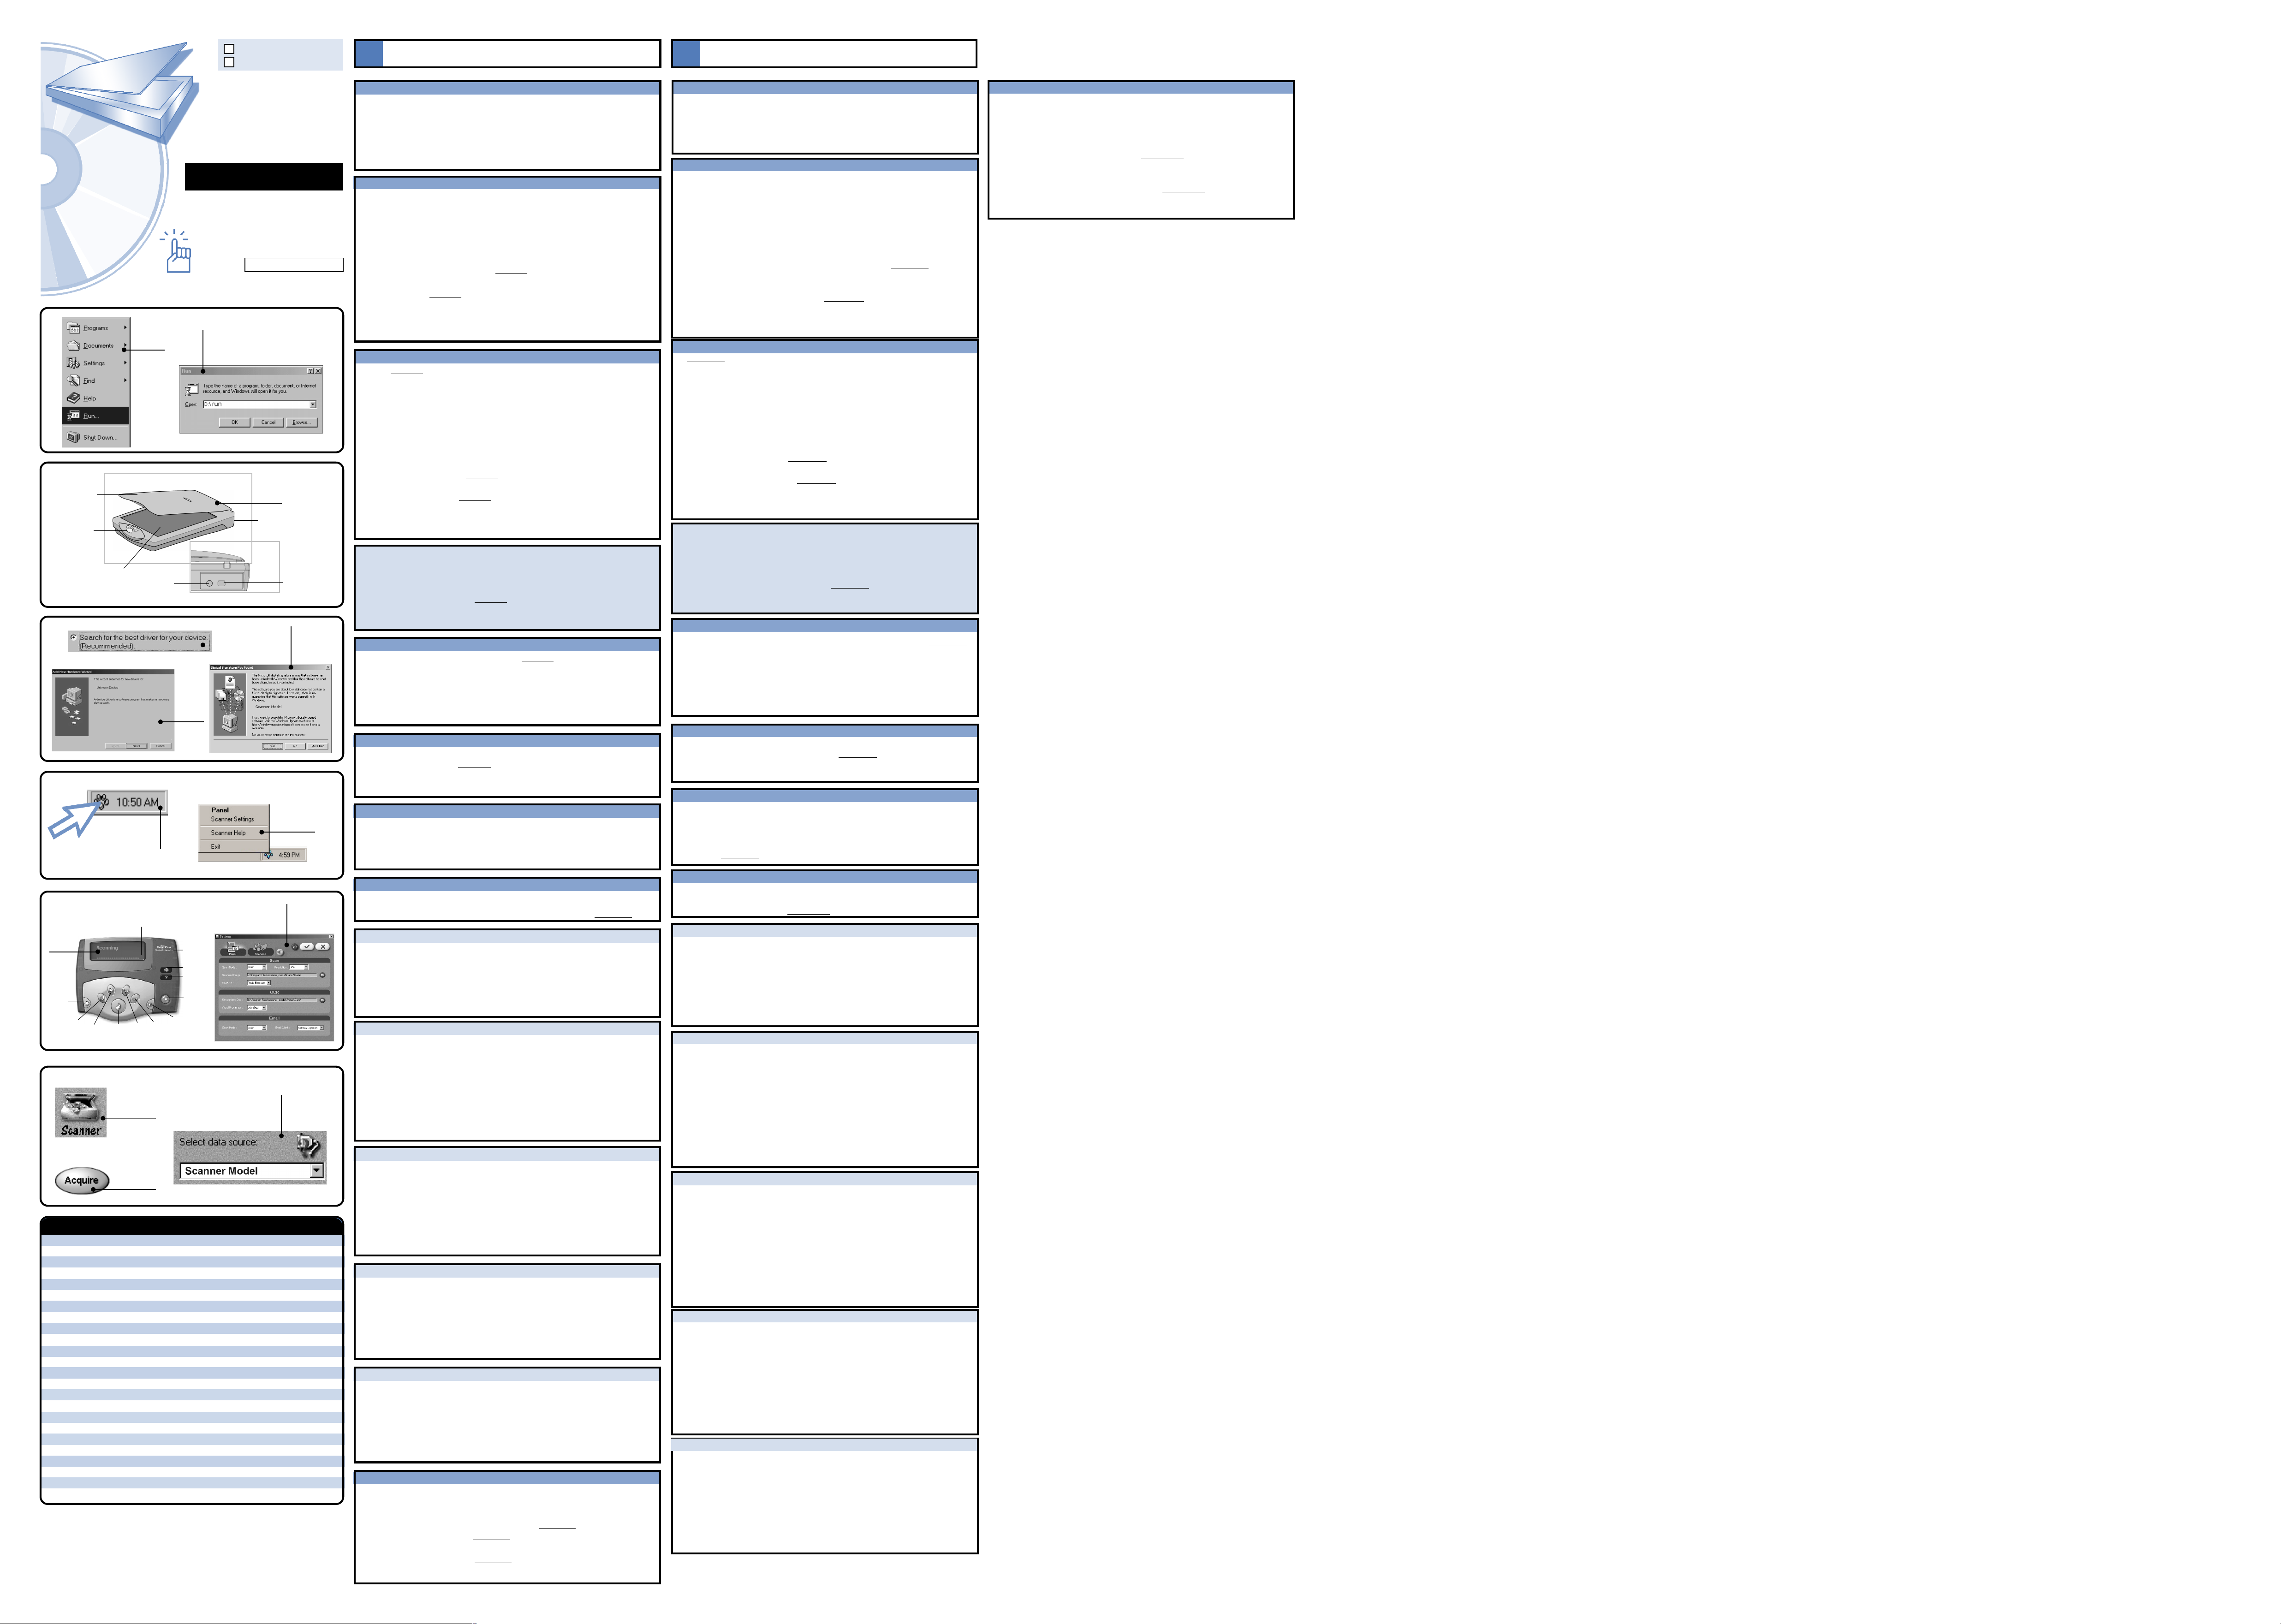
Back of the scanner
5
3
USB cable outlet
(unpluggable in
certain models)
6
7
10
12
1
Document
cover
Control panel
Scan window glass
Power Outlet
8
Status and
Progress Bar
9
Personal
Style
Copy
Scan
E-mailFax
OCR
Link
11
13
Specifications
Scanner Type Color Flatbed
Scan Area 8.5 x 11.7 (21.6 cm x 29.7 cm) maximum
Scan Modes:
True Color 48-bit (Internal) / 48-bit (External)
2400 Scanner: (36-bit: 1200dpi Scan Width >= 6.6)
Gray Mode 16-bit (Internal) / 16-bit (External)
2400 Scanner: (12-bit: 1200dpi Scan Width >= 6.6)
Text/Line Art 1 bit/pixel (2 levels)
Scan Method Single Pass Scanning
Resolution Control:
Optical 600dpi (H) x 1200dpi (V) — 1200 Scanner
1200dpi (H) x 2400dpi (V) — 2400 Scanner
Enhanced 19200dpi x 19200dpi (software controlled)
Scanning Data Buffer 16KB (maximum)
Interface USB 1.1 (Universal Serial Bus)
Driver Windows 98/2000
Power Consumption 15 W (12V, 1.25A)
Operating Temperature 10°C ~ 40°C (50°F ~ 104°F)
Operating Humidity 35% ~ 80% RH, Non-Condensing
Storage Temperature -10°C ~ 60°C (14°F ~ 140°F)
Storage Humidity 20% ~ 80% RH, Non-Condensing
Dimensions: 17.2 x 10.3 x 2.7 (436 x 261 x 70 mm) (L x W x H)
Weight: 2.3 Kg (5 lbs) — 1200 Scanner
2.2 Kg (4.8 lbs) — 2400 Scanner
© Copyright 2001. All rights reserved.
All trademarks mentioned in this installation guide are mentioned for identification purposes only.
Product names appearing in this installation guide may or may not be registered trademarks or
copyrights of their respective companies.
Specifications are subject to change without notice. This installation guide is provided as is
without warranty of any kind, either express or implied.
Unpacking the Scanner
Unpack the package and inspect the items closely to make sure no item is
damaged. The package should include:
+ The Scanner
+ Power Adapter
+ Installation CD
+ User Guide
Installing Drivers
NOTE: Please complete the driver installation before installing the Scanner.
Do not connect the power adapter while installing the Driver.
1. Insert the Driver Installation CD into your disk drive.
2. Follow all on screen instructions.
If after inserting the Driver Installation CD into your disk drive, the Driver
Installation Welcome screen does not appear, do the following.
1. Click on “Start” and select “Run” (
2. In the “Run” dialog box, type “drive:\run” where drive is your CD-ROM drive
and click “OK.” (
3. Follow all on-screen instructions.
NOTE: When you are presented with the option of whether to restart Windows
after completing the driver installation, please choose “Yes”.
Figure 2)
Installing Hardware
Refer to Figure 3 for the scanner parts.
1. With the power to your PC on, connect the scanner’s USB cable to the USB
port of your PC.
2. Connect the power adapter to the scanner and plug it into an appropriate
power outlet.
Upon connecting the scanner’s USB cable, the Windows operating system
would automatically detect your scanner and update your system configuration.
If the Add New Hardware Wizard dialog box appears upon installing the soft-
ware drivers and connecting the scanner, follow these steps:
1. Click on the Next button. (
2. On the next screen select the following option and go into the Win98 directory
of your installation CD. (
3. Click on the OK button and on the next screen the Windows® will confirm that
it has found the driver for your scanner.
4. Click the Finish button to exit.
Note: To Microsoft® Windows® 2000 users:
After a successful software installation, you are required to reboot your computer.
The Windows® 2000 Hardware Manager will then try to detect your newly installed hardware. You may be asked if you would like to continue the installation.
Please click “Yes” to continue (
Windows®-compatible products. Our driver is so new. It is still undergoing tests
by Microsoft. Please check our web site for latest update.
Figure 4)
Figure 5)
Using the Scanner Buttons on the Control Panel
Make sure that the Direct Scan is enabled ( Figure 7) on your Windows® taskbar
in order for the scanner buttons to work. If Direct Scan is disabled and you want
to enable it, perform the following:
1. Click on Start on your Windows® taskbar.
2. Click on Programs and select your Scanner Model.
3. Click on Direct Scan.
Scanner Hardware Buttons Settings
Upon right-clicking the Direct Scan icon located on your Windows® taskbar, the
following menu appears: ( Figure 8)
Click on Scanner Settings and the following appears allowing you to make
changes to your scanner’s control panel buttons’ settings.
Using the Software Panel
1. Click on Start on your Windows® taskbar.
2. Click on Programs and select your Scanner Model.
3. Click on Panel.To use the Panel, press PANEL and the Panel will appear on
screen. (
Figure 9)
Panel Settings
Clicking on the Settings button located on the Panel will show the following
screen allowing you to make changes to your Panel settings. (
Scan
To perform a scan, do the following:
1. Place the document with the image you want to scan face down on your
scanner window glass.
2. Click on the Scan button. Status and Progress Bar area will show scanning
progress. Upon completion, your system will automatically load the assigned compatible graphics program.
Copy
To perform a copy, do the following:
1. Place the document with the image you want to copy face down on your
scanner window glass.
2. Click on the Copy button and the following will appear on screen.
3. Make any necessary selection under Mode, Scaling, and Number of Copies
(printout).
4. Click on the Copy button and Status and Progress Area will show copying
progress. Upon completion, your system will automatically send your image
to your printer for printing.
Fax
To perform a fax, do the following:
1. Place the document with the image you want to fax face down on your scanner
window glass.
2. Click on the Fax button. After scanning, fax console will appear on screen.
3. Click on the number you want to dial or click on the phone book icon to open
your telephone directory to select the number to dial.
4. Click on the dial button. In case the number is busy, fax software will redial and
the LED panel will show the current status.
To perform an E-mail, do the following:
1. Place the document with the image you want to E-mail as an attachment
face down on your scanner window glass.
2. Click on the E-mail button. Status and Progress Bar area will show E-
mailing progress. Upon completion, your system will automatically load your
default E-mail client and place your scanned image as a JPEG file format
attachment.
OCR
To perform an OCR (Optical Character Recognition), do the following:
1. Place the document with the images/characters you want recognized face
down on your scanner window glass.
2. Click on the OCR button and the Status and Progress Bar area will show
OCR progress. Upon completion, your system will automatically load your
default word processing program and place your scanned document on
screen with a DOC file format.
Using the TWAIN Dialog Box
To access the TWAIN Dialog box, you can do the following:
1. Launch the TWAIN-compliant program (e.g. Photo Express
2. Under the File menu open the Acquire command and choose Scanner OR
click on the Get button then the Scanner icon (
Source dialog box appears (
3. Choose your scanner model from the list.
4. Click on the Acquire button (
closes. The TWAIN Dialog box appears.
Figure 1).
Figure 6) Microsoft’s digital signature is issued to
Figure 10)
TM
).
Figure 11). The Select Data
Figure 12).
Figure 13). The Select Data Source dialog box
Распаковка сканера
Откройте упаковку сканера и внимательно осмотрите ее содержимое, чтобы
убедиться, что ни один из компонентов не поврежден. В упаковке должны
находиться:
n Сканер n Установочный компакт-диск
n Адаптер питания n Руководство пользователя
становка драйверов
Примечание: Перед установкой сканера необходимо выполнить
установку драйверов. Не подключайте адаптер питания во время
установки драйвера.
1.
Поместите установочный компакт-диск в привод для чтения компакт-дисков.
2. Следуйте указаниям, появляющимся на экране.
Если поле того, как вы поместите компакт-диск в привод, окно программы
установки драйверов Installation Welcome не появится на экране
автоматически, выполните следующее:
1. Щелкните на кнопке Ïóñê и выберите пункт Выполнить (
2. В диалоговом окне Запуск программы наберите Имя_устройства/run, где
Имя_устройства — имя привода для чтения компакт-дисков в вашем
компьютере. Щелкните на кнопке OK. (
3. Следуйте указаниям, появляющимся на экране.
Примечание: Если в процессе установки вам будет предложено выбрать перезагрузку Windows после завершения установки драйверов, выберите ответ Äà.
Рисунок 2)
Рисунок 1).
Установка сканера
Íà Рисунке 3 изображены компоненты сканера.
1. Включив питание компьютера, подсоедините USB-кабель сканера к разъему USB
вашего компьютера.
2. Подключите адаптер питания к сканеру и вставьте вилку в розетку сети
электропитания.
После подключения к компьютеру USB-кабеля Windows автоматически обнаружит
сканер и изменит настройки системы.
Если после установки драйверов и подключения сканера откроется диалоговое
окно Мастер установки нового оборудования, выполните следующие шаги.
1. Щелкните на кнопке Далее. (
2. В следующем окне выберите следующую опцию и перейдите в директорию Win98
установочного компакт-диска. (
3. Щелкните на кнопке OK. В следующем окне вы получите подтверждение, что
драйвер сканера найден.
4. Чтобы завершить установку, щелкните на кнопке Готово.
Примечание: Примечание для пользователей Microsoft® Windows® 2000:
После успешной установки программного обеспечения необходимо перезагрузить
компьютер. Затем мастер оборудования Windows® 2000 выполнит обнаружение
нового оборудования. Вам может быть задан вопрос о продолжении установки.
Щелкните на кнопке Yes (Да), чтобы подтвердить, что цифровая подпись Microsoft
выдана Windows-совместимому продукту (
недавно и проходит тестирование в Microsoft. На нашей Web-странице вы найдете
самые новые версии драйверов.
Рисунок 4)
Рисунок 5)
Рисунок 6). Наш драйвер выпущен
Кнопки сканера на панели управления
Убедитесь, что опция Direct Scan находится в состоянии включено (Рисунок 7)
на панели задач Windows®, чтобы обеспечить функционирование кнопок сканера.
Если опция Direct Scan в состоянии отключено, и вы хотите перевести ее в
состояние включено, выполните следующие действиия:
1. Щелки на кнопке Пуск на панели задач Windows
2. Выберите пункт Программы и выберите название модели вашего сканера.
3. Выберите команду Direct Scan.
®.
Настройка кнопок сканера
После того, как вы щелкните правой кнопкой мыши на значке Direct Scan в панели
задач Windows, откроется следующее меню (
становки сканера, откроется следующее окно, в котором вы можете изменить
установки кнопок панели управления сканера.
Рисунок 8). Выберите команду
Работа с программной панелью управления сканера
1. Щелки на кнопке Ïóñê на панели задач Windows.
2. Выберите пункт Программы и выберите название модели вашего сканера.
3. Щелкните на кнопке Panel. Чтобы воспользоваться программной панелью
управления, нажмите кнопку PAN EL, после чего на экране появится диалоговое
îêíî Panel. (
Рисунок 9)
Настройки панели
Щелкните на кнопке Настройка, расположенной на панели, как это показано на
следующем рисунке, после чего вы сможете выполнить изменения настроек
панели управления сканером. (
Рисунок 10)
Сканирование
Чтобы отсканировать изображение, выполите следующие действия:
1. Положите документ, стороной, содержащий сканируемое изображение, на стекло
сканера.
2. Щелкните на кнопке Сканировать. На экране появится окно индикатора
состояния и выполнения задания, в котором будет отражен ход выполнения
процесса сканирования. По завершении сканирования система автоматически
загрузит изображение в выбранную графическую программу, поддерживающую
работу с изображениями соответствующего формата.
Копирование
Чтобы создать копию изображения, выполите следующие действия:
1. Положите документ, стороной, содержащий копируемое изображение, на стекло
сканера.
2. Щелкните на кнопке Копировать, после чего на экране появится следующее
диалоговое окно.
3. Установите необходимые значения параметров Режим, Масштаб, число копий
(для печати).
4. Щелкните на кнопке Копировать. На экране появится окно индикатора
состояния и выполнения задания Status and Progress Area, в котором будет
отражен ход выполнения процесса сканирования. По завершении процесса
система автоматически отправит изображение на печать.
Ôàêñ
Чтобы отправить копию изображения по факсу, выполите следующие действия:
1. Положите документ, стороной, содержащий изображение, которое вы хотите
отравить по факсу, на стекло сканера.
2. Щелкните на кнопке Ôàêñ. По завершении процесса сканирования на экране
откроется консоль отправки факсимильных сообщений.
3. Выберите щелчком мыши номер, с которым вы хотите соединиться, либо
щелкните на значке телефонной книжке, чтобы выбрать телефонный номер из
списка.
4. Щелкните на кнопке набрать номер. Если номер занят, программа отправки
факсов наберет номер повторно, индикатор на панели сканер будет
отображать текущее состояние.
Электронная почта
Чтобы отправить изображение по электронной почте, выполите следующие
действия:
1. Положите документ, стороной, содержащий изображение, которое вы хотите
отравить по электронной почте, на стекло сканера.
2. Щелкните на кнопке Электронная почта. На экране появится окно индикатора
состояния и выполнения задания Status and Progress Bar, в котором будет
отражен ход выполнения процесса отправки сообщения по электронной почте.
По завершении система автоматически загрузит программу-клиент электронной
почты и поместит новое изображение в сообщение в виде вложения в формате
JPEG.
Распознавание текста
Чтобы выполнить распознавание текста (OCR, Optical Character Recognition),
выполите следующие действия:
1. Положите документ, стороной, содержащий изображения и текст, которые вы
хотите распознать, на стекло сканера.
2. Щелкните на кнопке OCR (Распознавание текста). На экране появится окно
индикатора состояния и выполнения задания Status and Progress Area, â
котором будет отражен ход выполнения процесса распознавания. По
завершении система автоматически загрузит редактор текстов по умолчанию и
поместит отсканированный документ в редактор в формате DOC.
Диалоговое окно TWAIN
Чтобы получить доступ к диалоговому окну TWAIN, выполните следующие
ействия:
1. Запустите TWAIN-совместимую программу (например, Photo Express).
2. Â ìåíþ File (Файл) выберите команду Acquire (Сканировать), затем выберите
пункт Scanner (Сканер) или выберите команду Get (Получить), а затем
щелкните на значке Scanner (Сканер) (
Select Data Source (Выбор источника данных) (
3. Выберите из списка название модели вашего сканера.
4. Щелкните на кнопке Acquire (Сканировать) (
Select Data Source (Выбор источника данных) закроется. Откроется диалоговое
окно TWAIN.
Рисунок 11). Откроется диалоговое окно
Рисунок 12).
Рисунок 13). Диалоговое окно
Быстрый сканер для домашнего использования с современным slim дизайном (толщина корпуса 37 мм), оптическим разрешением 1200х2400 и интерфейсом USB 2.0. Кнопки прямого управления предельно сократят время сканирования и передачи информации. В устройстве используется CIS-матрица (Contact Image Sensor), с помощью которой значительно уменьшаются размеры и одновременно с этим решаются вопросы с питанием, путем использования энергии от USB – порта. Такое решение значительно экономит электроэнергию, а также снижает габариты устройства ввиду отсутствия в нем встроенного блока снижения напряжения с 220 В.
| Модель | Mustek Be@rPaw 2448 CU PRO II |
| Тип сканера | Цветной планшетный |
| Интерфейс | USB 2.0 |
| Технология приема изображения | CIS |
| Слайд-адаптер | Нет |
| Размер области сканирования | 216 x 297 мм |
| Оптическое разрешение, dpi | 1200 x 2400 dpi |
| Максимальное разрешение, dpi | 19200 x 19200 dpi |
| Глубина цвета | 48 бит |
| Потребляемая мощность | 2.5 Вт по шине USB |
| Габаритные размеры | 405×281,5×37 мм |
| Вес | 1.9 кг |
| Комплектация | USB-кабель, ПО для обработки текста и изображений, руководство для быстрого старта, гарантийный талон |
| Поддерживаемые операционные системы | Windows XP / Vista / 7 / 8 /10; Mac OS X 10.7~10.11 |

1-2
1-3
1-1
2-1
Specifi cations are subject to change without
notice. This installation guide is provided «as is«
without warranty of any kind, either express or
implied.
1
2
3
4
5
English
Deutsch
Français
Italiano
Español
6
9
10
8
7
Portugués
Český
Türkçe
Polski
Ελληνικά
13
14
Română
11
12
Українська
82-091-00271
Scanner Quick Guide
Con il PC acceso, collegare il
cavo USB dello scanner alla
porta USB del PC (2-1). In
seguito al collegamento del
cavo di alimentazione,Il sistema
operativo Windows
®
rileverà
automaticamente lo scanner e
aggiornerà la
confi gurazione del sistema.
Con el ordenador en funcion-
amiento, conecte el cable USB
del escáner al puerto USB del
PC (2-1). Windows
®
detectará
y confi gurará automáticamente
el escáner y actualizará la
confi guración del sistema.
Mettez votre ordinateur sous
tension, puis connectez le
câble USB du scanner auport
USB du PC (2-1). Le système
d‘exploitation Windows
®
doit
détecter automatiquement la
présence d’un nouveau péri-
phérique (votre scanner) et
mettre à jour la confi guration
de votre ordinateur.
With the power to your PC
on, connect the scanner’s
USB cable to the USB port
of your PC (2-1). The
Windows® operating system
automatically detects your
scanner and updates your
system confi guration.
Schalten Sie Ihren Computer
ein, und verbinden Sie das
USB-Scannerkabel mit dem
USB-Anschluß des Computers
(2-1). Nach dem Anschließen
des Netzteils erkennt.
Windows
®
erkennt automatisch
den neuen Scanner und aktual-
isiert die Systemkonfi guration.
2
Instalar o
hardware
Hardware
installieren
2 2
Instalación del
hardware
Installazione
dell’hardware
22
Installation du
matériel
2
Installing
Hardware
Com o computador ligado,
ligue o cabo USB do scanner
na porta USB do computador
(2-1). Depois de ligar o
transformador, o sistema
operativo do Windows
®
detectará automaticamente o
scanner e actualizará a con-
fi guração do sistema.
Zapněte počítač a připojte
kabelu USB skeneru k portu
USB počítače (2-1).
Operační systém Windows
®
automaticky rozpozná skener
a zaktualizuje konfi guraci
systému.
2
Instalace
hardwaru
NOTA: Instale los
controladores antes de
conectar el escáner al PC.
1. Inserte el CD-ROM de
instalación en su unidad de
CDs.
2. Siga las instrucciones que
aparecen en pantalla.
Si al introducir el CD-ROM de
instalación en la unidad de
CDs no aparece
automáticamente la pantalla
de bienvenida del programa
de instalación del controla-
dor del escáner, realice los
siguientes pasos:
1. Haga clic en Inicio y
seleccione Ejecutar (1-1).
2. En el cuadro de diálogo Eje-
cutar, teclee drive:\autorun,
siendo unidad la letra que
designa a la unidad de CD-
ROM de su ordenador. Pulse
Aceptar (1-2).
Cuando el sistema le pida con-
fi rmación para reiniciar el orde-
nador tras instalar los
controladores, seleccione
“Aceptar” (1-3).
Completare l’installazione
dei driver prima di installa-
re lo scanner.
1. Inserire il CD di
installazione nell’unità CD-
ROM.
2. Seguire le istruzioni
visualizzate sullo schermo.
Se, dopo aver inserito il
CD di installazione dei
driver nell’unità CD-ROM,
non compare la schermata
iniziale del programma di
installazione, effettuare le
seguenti operazioni:
1.Fare clic su Avvio e
scegliere Esegui (1-1).
2.Nella fi nestra di dialogo
Esegui digitare drive:\
autorun, dove unità è l’
unità CD-ROM e scegliere
OK (1-2).
Nella fi nestra di messaggio
che chiede all’utente se
riavviare Windows dopo aver
concluso l’installazione dei
driver scegliere OK (1-3).
Vous devez installer les pilo-
tes logiciels avant d’installer
le scanner.
1. Insérez le CD-ROM d’instal-
lation du pilote de numérisa-
tion dans son lecteur.
2. Suivez les instructions qui
apparaissent à l’écran.
Si, après l’insertion du CD-
ROM d’installation du pilote
dans son lecteur, l’écran d’
accueil d’installation n’ap-
paraît pas, procédez comme
suit :
1. Cliquez sur le bouton Dé-
marrer, puis sur Exécuter.
(1-1).
2. Dans la boîte de dialogue
Exécuter tapez drive:\au-
torun où lecteur représente
la lettre de votre lecteur de
CD-ROM, puis cliquez sur
OK (1-2).
Lorsqu’il vous est demandé si
vous désirez redémarrer Win-
dows® après la fi n de
l’installation des pilotes
logiciels, cliquez sur le bouton
OK (1-3).
NOTE: Please complete the
driver installation before
installing the scanner.
1. Insert the driver Instal-
lation CD into your disk
drive.
2. Follow all on screen in-
structions.
If after inserting the driver
Installation CD into your
disk drive, the driver
Installation Welcome
screen does not appear,
do the following.
1. Click on “Start” and select
“Run” (1-1).
2. In the “Run” dialog box,
type “drive:\autorun”
where drive is your CD-
ROM drive and click “OK.
(1-2)”
NOTE: When you are pre-
sented with the option of
whether to restart Windows
after completing the driver
installation, please choose
“OK” (1-3).
Führen Sie die Treiberin-
stallation durch, bevor Sie
den Scanner installieren.
1. Legen Sie die
Treiberinstallations-CD in
Ihr CD-ROM-Laufwerk ein.
2. Folgen Sie den
Bildschirmanweisungen.
Sollte das Installationspro-
gramm nach dem Einlegen
der Treiberinstallations-CD
nicht automatisch gestartet
werden, gehen Sie
folgendermaßen vor:
1. Klicken Sie im Menü
Start
auf den Befehl Ausführen
(1-1).
2.
Im daraufhin erscheinen-
den Dialogfeld Ausführen
geben Sie drive:\autorun
ein, wobei laufwerk die
Bezeichnung für Ihr CD-
ROM-Laufwerk ist (1-2).
Wenn Sie nach Beenden der
Softwareinstallation in ei-
nem Dialogfeld vor die Wahl
gestellt werden, ob Sie Win-
dows® neu starten möchten,
klicken Sie auf OK (1-3).
Conclua a instalação dos
controladores do software,
antes de instalar o scanner.
1. Insira o CD de instalação
do controlador na unidade
de disquetes.
2. Siga todas as instruções
que aparecem no ecrã.
Se após ter inserido o CD de
instalação do controlador na
unidade de CD, não aparecer
o ecrã de boas-vindas da
instalação do controlador,
faça o seguinte:
1. Clique em Iniciar e
seleccione Executar
(1-1)
.
2. Na caixa de diálogo
Executar, escreva drive:\
autorun, onde unidad
ecorrespondente à letra
da unidade de CD-ROM e
clique em OK (1-2).
Quando lhe for perguntado
se pretende ou não reiniciar
o Windows® depois de
concluir a instalação dos
controladores, escolha OK
(1-3).
POZNÁMKA: Před instalací
skeneru proveďte instalaci
ovladače.
1. Vložte instalační disk CD s
ovladačem do diskové jed-
notky.
2. Postupujte podle
zobrazených pokynů.
Pokud se po vložení
instalačního disku CD s
ovladačem nezobrazí uvítací
obrazovka instalace,
postupujte podle následující-
ch pokynů.
1. Klepněte na tlačítko „Start“
a vyberte položku „Spustit“
(1-1).
2. Do dialogového okna „
Spustit zadejte „drive:\
autorun“ kde jednotka je
vaše jednotka CD-ROM a
klepněte na tlačítko„OK.
(1-2)”
POZNÁMKA: Když se po
zobrazí dotaz, zda se po
dokončeníinstalace ovladače
restartovat operační systém
Windows, zvolte „OK“ (1-3).
Español Italiano Français Deutsch English
1
Installing
Drivers
Installation
des pilotes
1 1
Instalación de los
controladores
1
Treiber
installieren
Installazione
dei driver
1
1
Instalar os
controladores
Portugués
1
Instalace
ovladačů
Český
È possibile ottenere in
diversi modi un aiuto per la
soluzione dei problemi e le
informazioni sull’assistenza
clienti.
1. Fare clic su Avvio nella
barra delle applicazioni di
Windows
®
e individuare il
nome dello scanner sotto
Programmi.
Fare clic su Guida, oppure
2. Fare clic sul pulsante
Guida del pannello
scanner.
Hay varias formas de obtener
soluciones a problemas e infor-
mación de atención al cliente.
1. En la barra de tareas de
Windows
®
, acceda a Inicio,
Programas y busque el grupo
de programas del escáner.
Haga clic en Sistema de
ayuda, o bien
2. haga clic en el botón Ayuda
ubicado en el panel.
Vous pouvez obtenir des infor-
mations sur le dépannage et
de maintenance de plusieurs
façons.
1. Cliquez sur le bouton Dé-
marrer dans la Barre des
tâches de Windows
®
, puis
sur Programmes pour sé-
lectionner votre modèle de
scanner.
Cliquez sur Système d’Aide
en ligne, ou
2. Cliquez sur le bouton d’Aide
situé sur le Panneau.
There are various ways of
obtaining trouble-shooting and
customer care information.
1. Click on Start on your
Windows
®
taskbar, then
Programs to select your
scanner model. Click on
Help System, or
2. Click on the Help button
found in the Panel.
Sie können auftretende
Probleme und
Kundendienstinformationen
auf verschiedene Art und
Weise abrufen.
1. Klicken Sie in der
Windows
®
-Taskleiste auf
“Start”, und wählen Sie im
Menü “Programme” den
Eintrag, der dem Namen
Ihres Scanners entspricht.
Klicken Sie auf Hilfe, oder
2. Klicken Sie auf die
Schaltfl äche Hilfe im
Bedienfeld.
?
Hilfe zu
Vorgehensweisen
?
Nápověda k
postupu
?
Ajuda nos
procedimentos
?
Aide pour les
procédures
Guida per le
procedure
?
?
Help on
procedures
Há diversas formas de obter
informações sobre resolução
de problemas e preocupações
dos clientes.
1. Clique em Iniciar na barra
de tarefas do Windows
®
e
depois em Programas, para
seleccionar o modelo do
seu scanner.
Clique no botão Ajuda, ou
2. Clique no botão Ajuda loca-
lizado no painel.
Existují různé způsoby
získávání pokynů pro
odstraňování problémů a
informací zákaznické podpory.
1. Klepněte na tlačítko Start na
hlavním panelu
Windows
®
,potom přejděte
na část Programy a vyberte
váš typ skeneru. Klepněte
na položku Systém
nápovědy nebo.
2. Klepněte na tlačítko
Nápověda na panelu.
Ayuda con
procedimientos
?
Скачать
2448TA Pro
2448TA Pro
Features
1200 dpi high resolution for professional quality images
True 48-bit color provides superior color
Built-in transparency adapter for positive & negative scanning
Mustek Personal Assistant League for Image System (M-Pal) software offers superior
image quality
5 single-touch buttons for handy functional operations
Built-in
Transparency Adapter
• Support 4 x 35mm negative and 3 x 35mm positive films scanning

High Speed Flatbed ScannerBearPaw 2448CU Pro features five easy touch buttons for Scan, Email, Copy, FAX, and Panel settings. It offers high quality 1200 x 2400 dpi optical resolution with true 48-bit color scanning. Slim style and USB power design makes it convenient to use with computer and laptop. |
Specifications
| Scanner Type | Color CIS Flatbed |
| Scan Modes | Color: 48-bit & 24-bit Gray: 16-bit & 8-bit Line art: 1-bit |
| Scan Area (Max.) | 216 mm x 297 mm (8.5″ x 11.7″) |
| Resolution | Optical: 1200dpi x 2400dpi Software Interpolation: 19200 dpi x 19200 dpi |
| Interface | USB 2.0 |
| Light Source | LED |
| Dimension (L x W x H) | 405 mm x 281.5 mm x 37 mm (15.9″ x 11.1″ x 1.5″) |
| Weight | Approx. 1.9 kgs (4.2 lbs) |
| Power Consumption | 2.5W (Bus power 500mA x 5V DC) |
| System Requirements | Windows® 7 / Vista / XP |