

Using Avaya J159 SIP IP Phone in Avaya
Aura
®
Release 4.0.9
Issue 1
April 2021

©
2020-2021, Avaya Inc.
All Rights Reserved.
Note
Using a cell, mobile, or GSM phone, or a two-way radio in close
proximity to an Avaya IP telephone might cause interference.
Documentation disclaimer
“Documentation” means information published in varying mediums
which may include product information, operating instructions and
performance specifications that are generally made available to users
of products. Documentation does not include marketing materials.
Avaya shall not be responsible for any modifications, additions, or
deletions to the original published version of Documentation unless
such modifications, additions, or deletions were performed by or on
the express behalf of Avaya. End User agrees to indemnify and hold
harmless Avaya, Avaya’s agents, servants and employees against all
claims, lawsuits, demands and judgments arising out of, or in
connection with, subsequent modifications, additions or deletions to
this documentation, to the extent made by End User.
Link disclaimer
Avaya is not responsible for the contents or reliability of any linked
websites referenced within this site or Documentation provided by
Avaya. Avaya is not responsible for the accuracy of any information,
statement or content provided on these sites and does not
necessarily endorse the products, services, or information described
or offered within them. Avaya does not guarantee that these links will
work all the time and has no control over the availability of the linked
pages.
Warranty
Avaya provides a limited warranty on Avaya hardware and software.
Refer to your sales agreement to establish the terms of the limited
warranty. In addition, Avaya’s standard warranty language, as well as
information regarding support for this product while under warranty is
available to Avaya customers and other parties through the Avaya
Support website:
https://support.avaya.com/helpcenter/
getGenericDetails?detailId=C20091120112456651010 under the link
“Warranty & Product Lifecycle” or such successor site as designated
by Avaya. Please note that if You acquired the product(s) from an
authorized Avaya Channel Partner outside of the United States and
Canada, the warranty is provided to You by said Avaya Channel
Partner and not by Avaya.
“Hosted Service” means an Avaya hosted service subscription that
You acquire from either Avaya or an authorized Avaya Channel
Partner (as applicable) and which is described further in Hosted SAS
or other service description documentation regarding the applicable
hosted service. If You purchase a Hosted Service subscription, the
foregoing limited warranty may not apply but You may be entitled to
support services in connection with the Hosted Service as described
further in your service description documents for the applicable
Hosted Service. Contact Avaya or Avaya Channel Partner (as
applicable) for more information.
Hosted Service
THE FOLLOWING APPLIES ONLY IF YOU PURCHASE AN AVAYA
HOSTED SERVICE SUBSCRIPTION FROM AVAYA OR AN AVAYA
CHANNEL PARTNER (AS APPLICABLE), THE TERMS OF USE
FOR HOSTED SERVICES ARE AVAILABLE ON THE AVAYA
WEBSITE,
HTTPS://SUPPORT.AVAYA.COM/LICENSEINFO UNDER
THE LINK “Avaya Terms of Use for Hosted Services” OR SUCH
SUCCESSOR SITE AS DESIGNATED BY AVAYA, AND ARE
APPLICABLE TO ANYONE WHO ACCESSES OR USES THE
HOSTED SERVICE. BY ACCESSING OR USING THE HOSTED
SERVICE, OR AUTHORIZING OTHERS TO DO SO, YOU, ON
BEHALF OF YOURSELF AND THE ENTITY FOR WHOM YOU ARE
DOING SO (HEREINAFTER REFERRED TO INTERCHANGEABLY
AS “YOU” AND “END USER”), AGREE TO THE TERMS OF USE. IF
YOU ARE ACCEPTING THE TERMS OF USE ON BEHALF A
COMPANY OR OTHER LEGAL ENTITY, YOU REPRESENT THAT
YOU HAVE THE AUTHORITY TO BIND SUCH ENTITY TO THESE
TERMS OF USE. IF YOU DO NOT HAVE SUCH AUTHORITY, OR IF
YOU DO NOT WISH TO ACCEPT THESE TERMS OF USE, YOU
MUST NOT ACCESS OR USE THE HOSTED SERVICE OR
AUTHORIZE ANYONE TO ACCESS OR USE THE HOSTED
SERVICE.
Licenses
THE SOFTWARE LICENSE TERMS AVAILABLE ON THE AVAYA
WEBSITE, HTTPS://SUPPORT.AVAYA.COM/LICENSEINFO,
UNDER THE LINK “AVAYA SOFTWARE LICENSE TERMS (Avaya
Products)” OR SUCH SUCCESSOR SITE AS DESIGNATED BY
AVAYA, ARE APPLICABLE TO ANYONE WHO DOWNLOADS,
USES AND/OR INSTALLS AVAYA SOFTWARE, PURCHASED
FROM AVAYA INC., ANY AVAYA AFFILIATE, OR AN AVAYA
CHANNEL PARTNER (AS APPLICABLE) UNDER A COMMERCIAL
AGREEMENT WITH AVAYA OR AN AVAYA CHANNEL PARTNER.
UNLESS OTHERWISE AGREED TO BY AVAYA IN WRITING,
AVAYA DOES NOT EXTEND THIS LICENSE IF THE SOFTWARE
WAS OBTAINED FROM ANYONE OTHER THAN AVAYA, AN AVAYA
AFFILIATE OR AN AVAYA CHANNEL PARTNER; AVAYA
RESERVES THE RIGHT TO TAKE LEGAL ACTION AGAINST YOU
AND ANYONE ELSE USING OR SELLING THE SOFTWARE
WITHOUT A LICENSE. BY INSTALLING, DOWNLOADING OR
USING THE SOFTWARE, OR AUTHORIZING OTHERS TO DO SO,
YOU, ON BEHALF OF YOURSELF AND THE ENTITY FOR WHOM
YOU ARE INSTALLING, DOWNLOADING OR USING THE
SOFTWARE (HEREINAFTER REFERRED TO
INTERCHANGEABLY AS “YOU” AND “END USER”), AGREE TO
THESE TERMS AND CONDITIONS AND CREATE A BINDING
CONTRACT BETWEEN YOU AND AVAYA INC. OR THE
APPLICABLE AVAYA AFFILIATE (“AVAYA”).
Avaya grants You a license within the scope of the license types
described below, with the exception of Heritage Nortel Software, for
which the scope of the license is detailed below. Where the order
documentation does not expressly identify a license type, the
applicable license will be a Designated System License as set forth
below in the Designated System(s) License (DS) section as
applicable. The applicable number of licenses and units of capacity
for which the license is granted will be one (1), unless a different
number of licenses or units of capacity is specified in the
documentation or other materials available to You. “Software” means
computer programs in object code, provided by Avaya or an Avaya
Channel Partner, whether as stand-alone products, pre-installed on
hardware products, and any upgrades, updates, patches, bug fixes,
or modified versions thereto. “Designated Processor” means a single
stand-alone computing device. “Server” means a set of Designated
Processors that hosts (physically or virtually) a software application
to be accessed by multiple users. “Instance” means a single copy of
the Software executing at a particular time: (i) on one physical
machine; or (ii) on one deployed software virtual machine (“VM”) or
similar deployment.
License types
Designated System(s) License (DS). End User may install and use
each copy or an Instance of the Software only: 1) on a number of
Designated Processors up to the number indicated in the order; or 2)
up to the number of Instances of the Software as indicated in the
order, Documentation, or as authorized by Avaya in writing. Avaya
may require the Designated Processor(s) to be identified in the order
by type, serial number, feature key, Instance, location or other
specific designation, or to be provided by End User to Avaya through
electronic means established by Avaya specifically for this purpose.
Shrinkwrap License (SR). End User may install and use the Software
in accordance with the terms and conditions of the applicable license
agreements, such as “shrinkwrap” or “clickthrough” license
accompanying or applicable to the Software (“Shrinkwrap License”)
as indicated in the order, Documentation, or as authorized by Avaya
in writing.
Heritage Nortel Software
“Heritage Nortel Software” means the software that was acquired by
Avaya as part of its purchase of the Nortel Enterprise Solutions
Business in December 2009. The Heritage Nortel Software is the
software contained within the list of Heritage Nortel Products located
https://support.avaya.com/LicenseInfo under the link “Heritage
at
Nortel Products” or such successor site as designated by Avaya. For
Heritage Nortel Software, Avaya grants Customer a license to use
Heritage Nortel Software provided hereunder solely to the extent of
the authorized activation or authorized usage level, solely for the
purpose specified in the Documentation, and solely as embedded in,
for execution on, or for communication with Avaya equipment.
Charges for Heritage Nortel Software may be based on extent of
activation or use authorized as specified in an order or invoice.

Copyright
Except where expressly stated otherwise, no use should be made of
materials on this site, the Documentation, Software, Hosted Service,
or hardware provided by Avaya. All content on this site, the
documentation, Hosted Service, and the product provided by Avaya
including the selection, arrangement and design of the content is
owned either by Avaya or its licensors and is protected by copyright
and other intellectual property laws including the sui generis rights
relating to the protection of databases. You may not modify, copy,
reproduce, republish, upload, post, transmit or distribute in any way
any content, in whole or in part, including any code and software
unless expressly authorized by Avaya. Unauthorized reproduction,
transmission, dissemination, storage, and or use without the express
written consent of Avaya can be a criminal, as well as a civil offense
under the applicable law.
Virtualization
The following applies if the product is deployed on a virtual machine.
Each product has its own ordering code and license types. Unless
otherwise stated, each Instance of a product must be separately
licensed and ordered. For example, if the end user customer or
Avaya Channel Partner would like to install two Instances of the
same type of products, then two products of that type must be
ordered.
Third Party Components
“Third Party Components” mean certain software programs or
portions thereof included in the Software or Hosted Service may
contain software (including open source software) distributed under
third party agreements (“Third Party Components”), which contain
terms regarding the rights to use certain portions of the Software
(“Third Party Terms”). As required, information regarding distributed
Linux OS source code (for those products that have distributed Linux
OS source code) and identifying the copyright holders of the Third
Party Components and the Third Party Terms that apply is available
in the products, Documentation or on Avaya’s website at:
support.avaya.com/Copyright or such successor site as designated
by Avaya. The open source software license terms provided as Third
Party Terms are consistent with the license rights granted in these
Software License Terms, and may contain additional rights benefiting
You, such as modification and distribution of the open source
software. The Third Party Terms shall take precedence over these
Software License Terms, solely with respect to the applicable Third
Party Components to the extent that these Software License Terms
impose greater restrictions on You than the applicable Third Party
Terms.
The following applies only if the H.264 (AVC) codec is distributed with
the product. THIS PRODUCT IS LICENSED UNDER THE AVC
PATENT PORTFOLIO LICENSE FOR THE PERSONAL USE OF A
CONSUMER OR OTHER USES IN WHICH IT DOES NOT RECEIVE
REMUNERATION TO (i) ENCODE VIDEO IN COMPLIANCE WITH
THE AVC STANDARD (“AVC VIDEO”) AND/OR (ii) DECODE AVC
VIDEO THAT WAS ENCODED BY A CONSUMER ENGAGED IN A
PERSONAL ACTIVITY AND/OR WAS OBTAINED FROM A VIDEO
PROVIDER LICENSED TO PROVIDE AVC VIDEO. NO LICENSE IS
GRANTED OR SHALL BE IMPLIED FOR ANY OTHER USE.
ADDITIONAL INFORMATION MAY BE OBTAINED FROM MPEG LA,
L.L.C. SEE
Service Provider
THE FOLLOWING APPLIES TO AVAYA CHANNEL PARTNER’S
HOSTING OF AVAYA PRODUCTS OR SERVICES. THE PRODUCT
OR HOSTED SERVICE MAY USE THIRD PARTY COMPONENTS
SUBJECT TO THIRD PARTY TERMS AND REQUIRE A SERVICE
PROVIDER TO BE INDEPENDENTLY LICENSED DIRECTLY FROM
THE THIRD PARTY SUPPLIER. AN AVAYA CHANNEL PARTNER’S
HOSTING OF AVAYA PRODUCTS MUST BE AUTHORIZED IN
WRITING BY AVAYA AND IF THOSE HOSTED PRODUCTS USE
OR EMBED CERTAIN THIRD PARTY SOFTWARE, INCLUDING
BUT NOT LIMITED TO MICROSOFT SOFTWARE OR CODECS,
THE AVAYA CHANNEL PARTNER IS REQUIRED TO
INDEPENDENTLY OBTAIN ANY APPLICABLE LICENSE
AGREEMENTS, AT THE AVAYA CHANNEL PARTNER’S EXPENSE,
DIRECTLY FROM THE APPLICABLE THIRD PARTY SUPPLIER.
WITH RESPECT TO CODECS, IF THE AVAYA CHANNEL
PARTNER IS HOSTING ANY PRODUCTS THAT USE OR EMBED
THE H.264 CODEC OR H.265 CODEC, THE AVAYA CHANNEL
HTTP://WWW.MPEGLA.COM.
https://
PARTNER ACKNOWLEDGES AND AGREES THE AVAYA
CHANNEL PARTNER IS RESPONSIBLE FOR ANY AND ALL
RELATED FEES AND/OR ROYALTIES. THE H.264 (AVC) CODEC
IS LICENSED UNDER THE AVC PATENT PORTFOLIO LICENSE
FOR THE PERSONAL USE OF A CONSUMER OR OTHER USES
IN WHICH IT DOES NOT RECEIVE REMUNERATION TO: (I)
ENCODE VIDEO IN COMPLIANCE WITH THE AVC STANDARD
(“AVC VIDEO”) AND/OR (II) DECODE AVC VIDEO THAT WAS
ENCODED BY A CONSUMER ENGAGED IN A PERSONAL
ACTIVITY AND/OR WAS OBTAINED FROM A VIDEO PROVIDER
LICENSED TO PROVIDE AVC VIDEO. NO LICENSE IS GRANTED
OR SHALL BE IMPLIED FOR ANY OTHER USE. ADDITIONAL
INFORMATION FOR H.264 (AVC) AND H.265 (HEVC) CODECS
MAY BE OBTAINED FROM MPEG LA, L.L.C. SEE
WWW.MPEGLA.COM.
Compliance with Laws
You acknowledge and agree that it is Your responsibility for
complying with any applicable laws and regulations, including, but not
limited to laws and regulations related to call recording, data privacy,
intellectual property, trade secret, fraud, and music performance
rights, in the country or territory where the Avaya product is used.
Preventing Toll Fraud
“Toll Fraud” is the unauthorized use of your telecommunications
system by an unauthorized party (for example, a person who is not a
corporate employee, agent, subcontractor, or is not working on your
company’s behalf). Be aware that there can be a risk of Toll Fraud
associated with your system and that, if Toll Fraud occurs, it can
result in substantial additional charges for your telecommunications
services.
Avaya Toll Fraud intervention
If You suspect that You are being victimized by Toll Fraud and You
need technical assistance or support, call Technical Service Center
Toll Fraud Intervention Hotline at +1-800-643-2353 for the United
States and Canada. For additional support telephone numbers, see
the Avaya Support website:
successor site as designated by Avaya.
Security Vulnerabilities
Information about Avaya’s security support policies can be found in
the Security Policies and Support section of
support.avaya.com/security.
Suspected Avaya product security vulnerabilities are handled per the
Avaya Product Security Support Flow (https://
support.avaya.com/css/P8/documents/100161515).
Downloading Documentation
For the most current versions of Documentation, see the Avaya
Support website:
as designated by Avaya.
Contact Avaya Support
See the Avaya Support website:
product or Hosted Service notices and articles, or to report a problem
with your Avaya product or Hosted Service. For a list of support
telephone numbers and contact addresses, go to the Avaya Support
website:
designated by Avaya), scroll to the bottom of the page, and select
Contact Avaya Support.
Regulatory Statements
Australia Statements
Handset Magnets Statement:
Industry Canada (IC) Statements
RSS Standards Statement
https://support.avaya.com (or such successor site as
Danger:
The handset receiver contains magnetic devices that can
attract small metallic objects. Care should be taken to avoid
personal injury.
https://support.avaya.com, or such successor site
https://support.avaya.com or such
https://support.avaya.com for
HTTP://
https://

This device complies with Industry Canada licence-exempt RSS
standard(s). Operation is subject to the following two conditions:
1. This device may not cause interference, and
2. This device must accept any interference, including
interference that may cause undesired operation of the
device.
Le présent appareil est conforme aux CNR d’Industrie Canada
applicables aux appareils radio exempts de licence. L’exploitation est
autorisée aux deux conditions suivantes:
1. L’appareil ne doit pas produire de brouillage, et
2. L’utilisateur de l’appareil doit accepter tout brouillage
radioélectrique subi, même si le brouillage est susceptible
d’en compromettre le fonctionnement.
Radio Transmitter Statement
Under Industry Canada regulations, this radio transmitter may only
operate using an antenna of a type and maximum (or lesser) gain
approved for the transmitter by Industry Canada. To reduce potential
radio interference to other users, the antenna type and its gain
should be so chosen that the equivalent isotropically radiated power
(EIRP) is not more than that necessary for successful
communication.
Conformément à la réglementation d’Industrie Canada, le présent
émetteur radio peut fonctionner avec une antenne d’un type et d’un
gain maximal (ou inférieur) approuvé pour l’émetteur par Industrie
Canada. Dans le but de réduire les risques de brouillage
radioélectrique à l’intention des autres utilisateurs, il faut choisir le
type d’antenne et son gain de sorte que la puissance isotrope
rayonnée équivalente ne dépasse pas l’intensité nécessaire à
l’établissement d’une communication satisfaisante.
This Class B digital apparatus complies with Canadian ICES-003.
Cet appareil numérique de la classe B est conforme à la norme
NMB-003 du Canada.
Radiation Exposure Statement
This equipment complies with FCC & IC RSS102 radiation exposure
limits set forth for an uncontrolled environment. This equipment
should be installed and operated with minimum distance 20cm
between the radiator & your body. This transmitter must not be colocated or operating in conjunction with any other antenna or
transmitter.
Cet équipement est conforme aux limites d’exposition aux
rayonnements ISEDétablies pour un environnement non contrôlé.
Cet équipement doit être installé et utilisé avec un minimum de 20
cm de distance entre la source de rayonnement et votre corps.
This product meets the applicable Innovation, Science and Economic
Development Canada technical specifications.
Japan Statements
Class B Statement
This is a Class B product based on the standard of the VCCI Council.
If this is used near a radio or television receiver in a domestic
environment, it may cause radio interference. Install and use the
equipment according to the instruction manual.
Denan Power Cord Statement
Danger:
Please be careful of the following while installing the
equipment:
• Please only use the connecting cables, power cord, and
AC adapters shipped with the equipment or specified by
Avaya to be used with the equipment. If you use any
other equipment, it may cause failures, malfunctioning,
or fire.
• Power cords shipped with this equipment must not be
used with any other equipment. In case the above
guidelines are not followed, it may lead to death or
severe injury.
本製品を安全にご使用頂くため、以下のことにご注意ください。
• 接続ケーブル、電源コード、AC アダプタなどの部品は、必ず
製品に同梱されております添付品または指定品をご使用くだ
さい。添付品指定品以外の部品をご使用になると故障や動作
不良、火災の原因となることがあります。
• 同梱されております付属の電源コードを他の機器には使用し
ないでください。上記注意事項を守らないと、死亡や大怪我
など人身事故の原因となることがあります。
México Statement
The operation of this equipment is subject to the following two
conditions:
1. It is possible that this equipment or device may not cause
harmful interference, and
2. This equipment or device must accept any interference,
including interference that may cause undesired operation.
La operación de este equipo está sujeta a las siguientes dos
condiciones:
1. Es posible que este equipo o dispositivo no cause
interferencia perjudicial y
2. Este equipo o dispositivo debe aceptar cualquier
interferencia, incluyendo la que pueda causar su operación
no deseada.
Brazil Statement
Este equipamento não tem direito à proteção contra interferência
prejudicial e não pode causar interferência em sistemas devidamente
autorizados
Power over Ethernet (PoE) Statement
This equipment must be connected to PoE networks without routing
to the outside plant.
Taiwan Low Power Radio Waves Radiated Devices Statement
取得審驗證明之低功率射頻器材,非經核准,公司、商號或使 用者均
不得擅自變更頻率、加大功率或變更原設計之特性及功能。低功率射
頻器材之使用不得影響飛航安全及干擾合法通信;經發現有干擾現象
時,應 立即停用,並改善至無干擾時方得繼續使用。前述合法通信,
指依電信管理 法規定作業之無線電通信。低功率射頻器材須忍受合法
通信或工業、科學及 醫療用電波輻射性電機設備之干擾。
U.S. Federal Communications Commission (FCC) Statements
Compliance Statement
The changes or modifications not expressly approved by the party
responsible for compliance could void the user’s authority to operate
the equipment.
To comply with the FCC RF exposure compliance requirements, this
device and its antenna must not be co-located or operating to
conjunction with any other antenna or transmitter.
This device complies with part 15 of the FCC Rules. Operation is
subject to the following two conditions:
1. This device may not cause harmful interference, and
2. This device must accept any interference received,
including interferences that may cause undesired
operation.
This equipment has been tested and found to comply with the limits
for a Class B digital device, pursuant to Part 15 of the FCC Rules.
These limits are designated to provide reasonable protection against
harmful interferences in a residential installation. This equipment
generates, uses and can radiate radio frequency energy and, if not
installed and used in accordance with the instructions, may cause

harmful interference to radio communications. However, there is no
guarantee that interference will not occur in a particular installation. If
this equipment does cause harmful interferences to radio or
television reception, which can be determined by turning the
equipment off and on, the user is encouraged to try to correct the
interference by one or more of the following measures:
• Reorient or relocate the receiving antenna.
• Increase the separation between the equipment and receiver.
• Connect the equipment into an outlet on a circuit different from
that to which the receiver is connected.
• Consult the dealer or an experienced radio/TV technician for
help.
Radiation Exposure Statement
This equipment complies with FCC radiation exposure limits set forth
for an uncontrolled environment . This equipment should be installed
and operated with minimum distance of 8 in or 20 cm between the
radiator and your body. This transmitter must not be co-located or
operating in conjunction with any other antenna or transmitter.
ENERGY STAR® compliance statement
As an ENERGY STAR partner, Avaya Inc. has determined that this
product meets the ENERGY STAR guidelines for energy efficiency.
Information on the ENERGY STAR program can be found at
www.energystar.gov. ENERGY STAR and the ENERGY STAR mark
are registered trademarks owned by the U.S. Environmental
Protection Agency.
EU Countries
This device when installed complies with the essential requirements
and other relevant provisions of the EMC Directive 2014/30/EU,
Safety LV Directive 2014/35/EU, and Radio Equipment Directive
2014/53/EU. A copy of the Declaration may be obtained from
support.avaya.com or Avaya Inc., 2605 Meridian Parkway Suite 200.
Durham, NC 27713 USA.
WiFi transmitter
• Frequencies for 2412-2472 MHz, transmit power: < 20 dBm
• Frequencies for 5180-5240 MHz, transmit power: < 20 dBm
BT transmitter
• Frequencies for 2402-2480 MHz, transmit power: < 6.0 dBm
General Safety Warning
• Use only the Avaya approved Limited Power Source power
supplies specified for this product.
• Ensure that you:
— Do not operate the device near water.
— Do not use the device during a lightning storm.
— Do not report a gas leak while in the vicinity of the leak.
— For Accessory Power Supply in Avaya J100 Series IP
Phones– Use Only Limited Power Supply Phihong
Technology Co. Ltd. Model: PSAC12R-050, Output: 5VDC,
2.4A.
Trademarks
The trademarks, logos and service marks (“Marks”) displayed in this
site, the Documentation, Hosted Service(s), and product(s) provided
by Avaya are the registered or unregistered Marks of Avaya, its
affiliates, its licensors, its suppliers, or other third parties. Users are
not permitted to use such Marks without prior written consent from
Avaya or such third party which may own the Mark. Nothing
contained in this site, the Documentation, Hosted Service(s) and
https://
product(s) should be construed as granting, by implication, estoppel,
or otherwise, any license or right in and to the Marks without the
express written permission of Avaya or the applicable third party.
Avaya is a registered trademark of Avaya Inc.
All non-Avaya trademarks are the property of their respective owners.
The Bluetooth™ word mark and logos are registered trademarks
owned by Bluetooth SIG, Inc. and any use of such marks by Avaya
Inc. is under license.
Device Usage Consent
By using the Avaya device you agree that Avaya, from time to time,
may collect network and device data from your device and may use
such data in order to validate your eligibility to use the device.

Contents
Chapter 1: Introduction……………………………………………………………………………………………. 12
Purpose……………………………………………………………………………………………………………….. 12
Chapter 2: Phone overview………………………………………………………………………………………. 13
Physical layout of a J159 IP Phone…………………………………………………………………………….. 15
Connection jacks of a J159 IP Phone………………………………………………………………………….. 17
Secondary display………………………………………………………………………………………………….. 19
Optional components………………………………………………………………………………………………. 19
Chapter 3: Getting started………………………………………………………………………………………… 20
Entering the provisioning details………………………………………………………………………………… 20
Identifying the device type during phone boot-up……………………………………………………………. 21
Logging in to your phone………………………………………………………………………………………….. 21
Logging out of your phone………………………………………………………………………………………… 22
Locking your phone………………………………………………………………………………………………… 22
Unlocking your phone …………………………………………………………………………………………….. 23
Setting the network mode…………………………………………………………………………………………. 23
Setting the network configuration………………………………………………………………………….. 24
Connecting to a Wi-Fi network……………………………………………………………………………… 25
Chapter 4: Navigation………………………………………………………………………………………………. 27
Cursor navigation…………………………………………………………………………………………………… 27
Navigation cluster……………………………………………………………………………………………… 27
Text input……………………………………………………………………………………………………………… 28
Line keys……………………………………………………………………………………………………………… 29
Main menu……………………………………………………………………………………………………………. 29
General phone icons………………………………………………………………………………………………. 30
Presence icons……………………………………………………………………………………………………… 31
Multiple Level Precedence and Preemption icons………………………………………………………….. 32
Bluetooth icons……………………………………………………………………………………………………… 33
Wi-Fi icons……………………………………………………………………………………………………………. 33
Chapter 5: Handling incoming calls………………………………………………………………………….. 34
Answering a call…………………………………………………………………………………………………….. 34
Answering a call when on another call…………………………………………………………………………. 34
Ignoring a call……………………………………………………………………………………………………….. 35
Chapter 6: Handling outgoing calls………………………………………………………………………….. 36
Making a call by using the manual dial mode………………………………………………………………… 36
Making a call by using the auto-dial mode……………………………………………………………………. 36
Redialing a number………………………………………………………………………………………………… 37
Making a call by using speed dial……………………………………………………………………………….. 37
Making a call from the local Сontacts list……………………………………………………………………… 38
Making a call from the corporate database Сontacts list………………………………………………….. 38
April 2021 Using Avaya J159 SIP IP Phone in Avaya Aura
Comments on this document? infodev@avaya.com
®
6

Contents
Making an international call………………………………………………………………………………………. 38
Emergency call……………………………………………………………………………………………………… 39
Making an emergency call…………………………………………………………………………………… 39
Chapter 7: Call-related features………………………………………………………………………………… 40
Muting and unmuting a call……………………………………………………………………………………….. 40
Placing a call on hold and resuming the call…………………………………………………………………. 40
Chapter 8: Managing Contacts…………………………………………………………………………………. 41
Adding a new contact……………………………………………………………………………………………… 41
Adding a contact from the Recents list………………………………………………………………………… 42
Editing a contact…………………………………………………………………………………………………….. 42
Doing a quick search for a contact……………………………………………………………………………… 42
Viewing the contact details……………………………………………………………………………………….. 43
Searching for a contact……………………………………………………………………………………………. 44
Combining contacts………………………………………………………………………………………………… 44
Deleting a contact…………………………………………………………………………………………………… 45
Creating a local Сontacts group…………………………………………………………………………………. 45
Adding a contact to the local group…………………………………………………………………………….. 46
Removing a contact from the local group……………………………………………………………………… 46
Assigning a ringtone to a contact……………………………………………………………………………….. 47
LDAP Directory……………………………………………………………………………………………………… 47
Setting LDAP Directory as the contact search source………………………………………………… 48
Searching LDAP contacts…………………………………………………………………………………… 48
Chapter 9: Presence………………………………………………………………………………………………… 50
Viewing the Presence status of your contacts……………………………………………………………….. 50
Changing your Presence status…………………………………………………………………………………. 50
Redirecting calls when Do Not Disturb is active……………………………………………………………… 51
Chapter 10: Do not Disturb and Call Forwarding……………………………………………………….. 53
Do not disturb……………………………………………………………………………………………………….. 53
Activating and deactivating Do not disturb………………………………………………………………. 53
Call forwarding………………………………………………………………………………………………………. 54
Forwarding a call to another extension…………………………………………………………………… 54
Setting enhanced call forwarding………………………………………………………………………….. 55
Call forwarding to your cell phone using EC500…………………………………………………………….. 57
Extending a call to your cell phone……………………………………………………………………………… 57
Chapter 11: Managing Recents…………………………………………………………………………………. 58
Call log………………………………………………………………………………………………………………… 58
Making a call from Recents………………………………………………………………………………………. 58
Viewing the Recents details……………………………………………………………………………………… 58
Deleting a call record from Recents……………………………………………………………………………. 59
Clearing the Recents list………………………………………………………………………………………….. 60
Chapter 12: Managing conference calls……………………………………………………………………. 61
Adding a person to an active call……………………………………………………………………………….. 61
April 2021 Using Avaya J159 SIP IP Phone in Avaya Aura
Comments on this document? infodev@avaya.com
®
7

Contents
Adding a person to an active call by using conference button……………………………………………. 61
Adding a person on hold to a conference call………………………………………………………………… 62
Adding a person on hold to a conference call by using conference button……………………………. 62
Putting a conference call on hold and resuming a call……………………………………………………… 63
Dropping or Disconnecting the last participant from a conference call…………………………………. 63
Viewing the details of a conference…………………………………………………………………………….. 63
Chapter 13: Team Button…………………………………………………………………………………………. 65
Answering an active call on a monitored extension…………………………………………………………. 66
Viewing the status of monitored stations………………………………………………………………………. 66
Speed dialing to a monitored extension……………………………………………………………………….. 66
Transferring a call to a monitored phone………………………………………………………………………. 67
Monitoring other extensions at a glance………………………………………………………………………. 67
Chapter 14: Advanced features………………………………………………………………………………… 69
Accessing the Features screen………………………………………………………………………………….. 69
Active call shortcut keys…………………………………………………………………………………………… 69
Making a call transfer with a shortcut key……………………………………………………………….. 70
Making a conference call with a shortcut key…………………………………………………………… 70
Activating the screen saver………………………………………………………………………………………. 71
Automatic Callback…………………………………………………………………………………………………. 71
Setting up Automatic Callback……………………………………………………………………………… 71
Blocking your extension from displaying during calls………………………………………………………. 72
Bridged Call Appearance…………………………………………………………………………………………. 72
Making a call on a bridged line…………………………………………………………………………….. 72
Answering a bridged line call……………………………………………………………………………….. 73
Joining a call on a bridged line …………………………………………………………………………….. 73
Busy Indicator……………………………………………………………………………………………………….. 73
Busy Indicator icons and LED indication…………………………………………………………………. 74
Busy Indicator call operations………………………………………………………………………………. 74
Call Transfer to a monitored user………………………………………………………………………….. 75
Calendar………………………………………………………………………………………………………………. 76
Accessing calendar…………………………………………………………………………………………… 76
Configuring the Microsoft® Exchange Server calendar……………………………………………….. 77
Reviewing your Calendar event……………………………………………………………………………. 77
Call Parking………………………………………………………………………………………………………….. 78
Parking a call…………………………………………………………………………………………………… 78
Unparking a call……………………………………………………………………………………………….. 79
Call Pickup…………………………………………………………………………………………………………… 79
Answering a call for a Call Pickup group member……………………………………………………… 80
Answering a call in the same Call Pickup group……………………………………………………….. 80
Answering a call using the extension number………………………………………………………….. 81
Call recording………………………………………………………………………………………………………… 81
Recording a call……………………………………………………………………………………………….. 81
Call Transfer…………………………………………………………………………………………………………. 82
April 2021 Using Avaya J159 SIP IP Phone in Avaya Aura
Comments on this document? infodev@avaya.com
®
8

Contents
Making a consultative transfer……………………………………………………………………………… 82
Making a blind transfer……………………………………………………………………………………….. 83
Calling in your intercom group…………………………………………………………………………………… 83
Crisis alert station…………………………………………………………………………………………………… 84
Acknowledging the crisis alert……………………………………………………………………………… 84
Emergency caller information………………………………………………………………………………. 85
Stopping the crisis alert………………………………………………………………………………………. 85
Acknowledging the crisis alert after an error in the first acknowledgment………………………… 86
Displaying your extension on outgoing calls………………………………………………………………….. 86
Excluding others from bridging on to your call……………………………………………………………….. 87
Hunt Group Busy……………………………………………………………………………………………………. 87
Using Hunt Group Busy……………………………………………………………………………………… 87
Interrupting a call with a whisper page…………………………………………………………………………. 88
Limit Incoming Calls……………………………………………………………………………………………….. 88
Activating Limit Incoming Calls…………………………………………………………………………….. 88
Deactivating Limit Incoming Calls…………………………………………………………………………. 89
Long-term acoustic exposure protection………………………………………………………………………. 89
Configuring Long term acoustic protection………………………………………………………………. 90
Making a priority call……………………………………………………………………………………………….. 91
Using URI dialing to make a call………………………………………………………………………………… 91
Multiple Device Access……………………………………………………………………………………………. 91
Handling calls and conferences using Multiple Device Access…………………………………….. 92
Multicast Paging…………………………………………………………………………………………………….. 92
No Hold Conference……………………………………………………………………………………………….. 93
Adding a participant to no hold conference……………………………………………………………… 93
Pre-configuration of keys…………………………………………………………………………………………. 94
Precedence call…………………………………………………………………………………………………….. 94
Making a precedence call by using the Main menu……………………………………………………. 94
Making a precedence call by using dial plan configuration………………………………………….. 95
Retrieving a voice message……………………………………………………………………………………… 95
Shared control………………………………………………………………………………………………………. 96
SLA Mon™ …………………………………………………………………………………………………………… 96
Tracing a malicious call……………………………………………………………………………………………. 97
Using a Guest Login……………………………………………………………………………………………….. 98
Chapter 15: Using USB devices……………………………………………………………………………….. 99
Viewing USB menu…………………………………………………………………………………………………. 99
Connecting USB keyboard……………………………………………………………………………………… 100
Entering text using USB keyboard……………………………………………………………………………. 100
Navigating using USB keyboard………………………………………………………………………………. 101
Chapter 16: Customization…………………………………………………………………………………….. 102
Phone……………………………………………………………………………………………………………….. 102
Setting the dialing mode……………………………………………………………………………………. 102
Displaying сall timers……………………………………………………………………………………….. 102
April 2021 Using Avaya J159 SIP IP Phone in Avaya Aura
Comments on this document? infodev@avaya.com
®
9

Contents
Setting key repeat delay……………………………………………………………………………………. 103
Setting redial options……………………………………………………………………………………….. 103
Assigning speed dial entries………………………………………………………………………………. 104
Setting Mute alert……………………………………………………………………………………………. 105
Visual alerting………………………………………………………………………………………………… 105
Customizing phone keys…………………………………………………………………………………… 106
Restoring customized keys to default…………………………………………………………………… 107
Applications………………………………………………………………………………………………………… 107
Enabling the Away timer…………………………………………………………………………………… 107
Enabling phone auto-lock………………………………………………………………………………….. 108
Turning call history on and off…………………………………………………………………………….. 108
Microsoft® Exchange account integration………………………………………………………………. 109
Entering Microsoft® Exchange credentials for basic authentication………………………………. 109
Entering Microsoft® Exchange credentials for OAuth authentication…………………………….. 110
Enabling and disabling Microsoft® Exchange contact integration…………………………………. 111
Calendar settings…………………………………………………………………………………………….. 111
Audio…………………………………………………………………………………………………………………. 114
Turning automatic gain control on or off………………………………………………………………… 114
Setting audio path……………………………………………………………………………………………. 115
Enabling and disabling Bluetooth………………………………………………………………………… 115
Pairing a Bluetooth enabled headset with your phone………………………………………………. 116
Turning button clicks on and off…………………………………………………………………………… 116
Turning error tones on and off…………………………………………………………………………….. 117
Enabling wireless headset bidirectional signaling……………………………………………………. 117
Setting headset mic level…………………………………………………………………………………… 118
Configuring hearing aid compatibility……………………………………………………………………. 118
Setting a headset profile……………………………………………………………………………………. 119
Setting a personalized ringtone………………………………………………………………………….. 120
Display………………………………………………………………………………………………………………. 120
Changing the background image………………………………………………………………………… 120
Changing the background image for the secondary display……………………………………….. 121
Changing the screen saver………………………………………………………………………………… 121
Changing the screen saver for the secondary display………………………………………………. 122
Setting the screen saver details………………………………………………………………………….. 122
Setting the screen saver details………………………………………………………………………….. 123
Adjusting the brightness of a phone screen…………………………………………………………… 123
Adjusting the brightness of the secondary screen……………………………………………………. 123
Setting the display language……………………………………………………………………………… 124
Setting the backlight timer…………………………………………………………………………………. 124
Setting the time format……………………………………………………………………………………… 124
Setting the date format……………………………………………………………………………………… 125
Setting the time zone……………………………………………………………………………………….. 125
Setting the text size…………………………………………………………………………………………. 126
April 2021 Using Avaya J159 SIP IP Phone in Avaya Aura
Comments on this document? infodev@avaya.com
®
10

Contents
Setting the text size of the secondary screen…………………………………………………………. 126
Setting the phone screen width…………………………………………………………………………… 127
Customizing keys of the secondary display…………………………………………………………………. 127
Adding a labeled key……………………………………………………………………………………….. 127
Moving a key………………………………………………………………………………………………….. 129
Deleting a key………………………………………………………………………………………………… 129
Restoring customized keys to default…………………………………………………………………… 129
Chapter 17: Phone update……………………………………………………………………………………… 131
Updating your phone…………………………………………………………………………………………….. 131
Checking your phone periodic automatic update………………………………………………………….. 131
Chapter 18: Maintenance……………………………………………………………………………………….. 133
Limited access during failover…………………………………………………………………………………. 133
Recording audio parameters ………………………………………………………………………………….. 134
Viewing the Product ID………………………………………………………………………………………….. 134
Viewing the Device type…………………………………………………………………………………………. 135
Viewing the Server type…………………………………………………………………………………………. 135
Chapter 19: Resources…………………………………………………………………………………………… 136
Documentation…………………………………………………………………………………………………….. 136
Finding documents on the Avaya Support website………………………………………………….. 138
Avaya Documentation Center navigation………………………………………………………………. 138
Viewing Avaya Mentor videos………………………………………………………………………………….. 139
Support……………………………………………………………………………………………………………… 140
April 2021 Using Avaya J159 SIP IP Phone in Avaya Aura
Comments on this document? infodev@avaya.com
®
11

Chapter 1: Introduction
Purpose
This document describes the features of the Avaya J159 IP Phone and also provides instructions
on how to use this phone.
This document is for end users.
April 2021 Using Avaya J159 SIP IP Phone in Avaya Aura
Comments on this document? infodev@avaya.com
®
12

Chapter 2: Phone overview
Avaya J159 IP Phone is intended to be used in business communications. The phone supports up
to four call appearances with two lines of call display.
Avaya J159 IP Phone has two color displays.
Physical specifications
• 4 buttons on Primary display and 6 buttons on Secondary display with red and green dual
LEDs
• Primary display- 320 x 240 pixels, Secondary display- 240 x 320 pixels
• Dual-position stand, optional wall mount
• Gigabit Ethernet (10/100/1000 Mpbs) line interface
• Secondary Gigabit Ethernet (10/100/1000 Mpbs) interface
• PoE Class 1, supports 802.3az, optional AC to 5V adapter
• Wideband audio in handset and headset
• Full duplex speakerphone
• Ergonomic hearing aid compatible handset supports TTD acoustic coupler
• Two call appearances in Full Screen mode and Four call appearances in Half Screen mode
• Four soft keys and two page keys for the secondary display
• Single Type A USB support
• Hard Buttons:
— Phone
— Messages
— Contacts
— History
— Home
— Navigation cluster
— Headset
— Speaker
— Volume
— Mute
April 2021 Using Avaya J159 SIP IP Phone in Avaya Aura
Comments on this document? infodev@avaya.com
®
13

Phone overview
— Hold
— Transfer
— Conference
— Redial
• LEDs:
— Speaker
— Mute
— Headset
— Message
— Recents
Related links
Physical layout of a J159 IP Phone on page 15
Connection jacks of a J159 IP Phone on page 17
Secondary display on page 19
Optional components on page 19
April 2021 Using Avaya J159 SIP IP Phone in Avaya Aura
Comments on this document? infodev@avaya.com
®
14
Physical layout of a J159 IP Phone
1
2
3
4
5
6
7
8
9
10
11
12
13
14
15
16
17
18
19
20
21
22
23
24
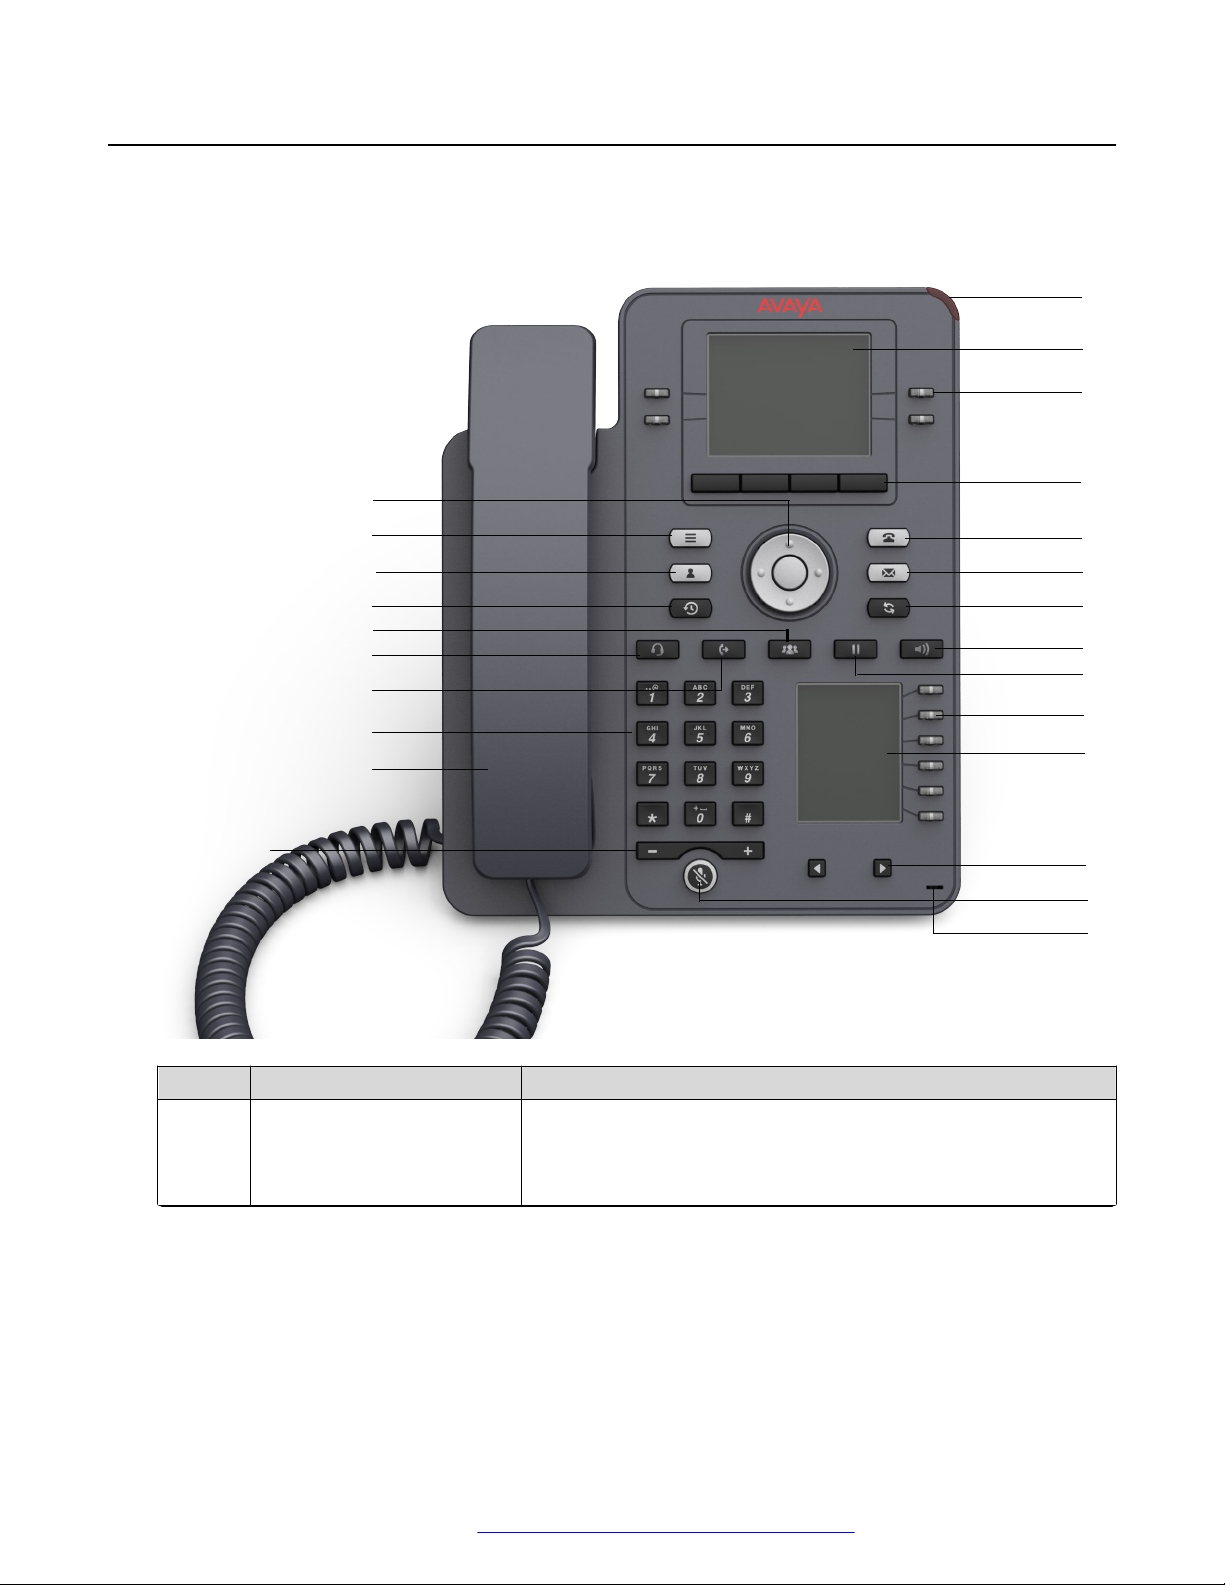
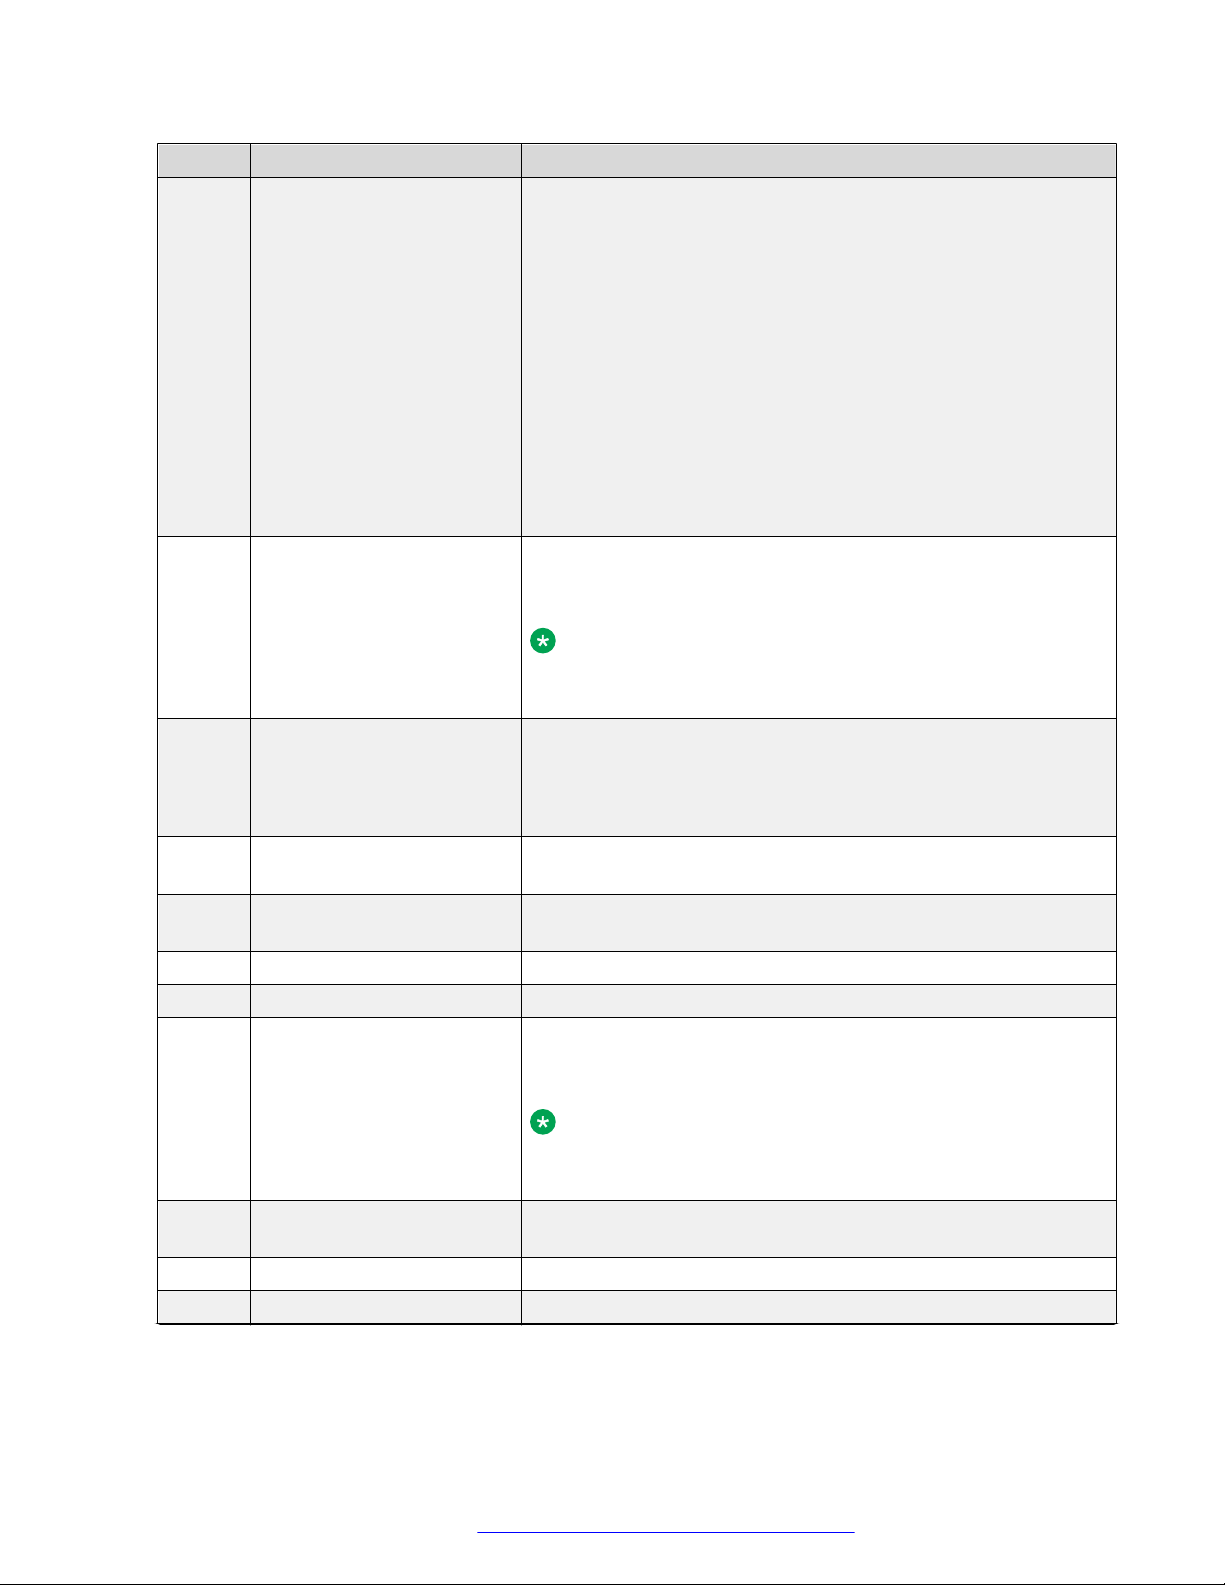
Physical layout of a J159 IP Phone
No. Name Description
1 Beacon LED Provides visual alerts for the following:
• Incoming call
• Voice mail
Table continues…
April 2021 Using Avaya J159 SIP IP Phone in Avaya Aura
Comments on this document? infodev@avaya.com
®
15
Phone overview
No. Name Description
2 Phone display Displays two areas:
1. Top Bar: It is always visible, and displays communication
status, time and date, and device status.
2. Application area displays the following:
• Application header: It displays the context specific
application title, and one or more subtitles. Depending on
the appearance type and the call state, the header
displays details of the call.
• Application content area: It displays menus, lists, pop-up
windows, images, and other application content.
• Soft key labels area: It displays labels with information
about the state of the soft key button.
3 Line keys Used to select the corresponding line or feature. Each line key
has a combination of red and green LEDs that provide call or
feature specific visual alert.
Note:
The default action depends on the application and the
context.
4 Soft keys Used to select the corresponding label of context-specific
actions.
With the Help soft key, you can view a short description of the
features available on your phone.
6 Voicemail Used to dial the configured voice mail number to receive a voice
message.
7 Redial Used to redial the most recently dialed number from any screen
of the phone.
8 Speaker Used to turn on the speaker.
9 Hold Used to put an active call on hold and resume a held call.
10 Line keys Used to select the corresponding line or feature. Each line key
has a combination of red and green LEDs that provide call or
feature specific visual alert.
Note:
The default action depends on the application and the
context.
11 Secondary display Provides quick access to line appearances, features, and phone
menus.
12 Left, Right keys Used to navigate on the Secondary Display screen.
13 Mute Used to mute and unmute the outgoing audio.
April 2021 Using Avaya J159 SIP IP Phone in Avaya Aura
Comments on this document? infodev@avaya.com
Table continues…
®
16

Connection jacks of a J159 IP Phone
No. Name Description
14 Navigation cluster Used to navigate on the phone screen.
• Up and Down arrow keys: To scroll up and down.
• Right and Left arrow keys: To move cursor in the text input
field, and to toggle values in the selection fields.
• OK button: To select the action assigned to the first soft key.
18 Conference Used to initiate a conference call and also to add a participant to
a conference call.
19 Headset Used to turn on headset, and also to toggle your call from the
speaker to headset.
20 Transfer Used to transfer a call.
21 Dialpad keys Used to dial the phone extensions or enter alphanumeric
characters and special symbols.
22 Handset Used to receive and make calls.
23 Volume Used to adjust volume of a handset, speaker, or ringtone.
• (+): To increase the volume.
• (-): To decrease the volume.
24 Mic The Mic of the phone.
Application keys provide direct access to the corresponding applications:
No.
5 Phone key Displays the Phone screen.
15 Main Menu Displays the list of options, such as Features, Applications,
16 Contacts Displays the entries in your Contact list.
17 Recents Displays the list of all calls.
Application keys Description
Settings, and Network Information.
Related links
Phone overview on page 13
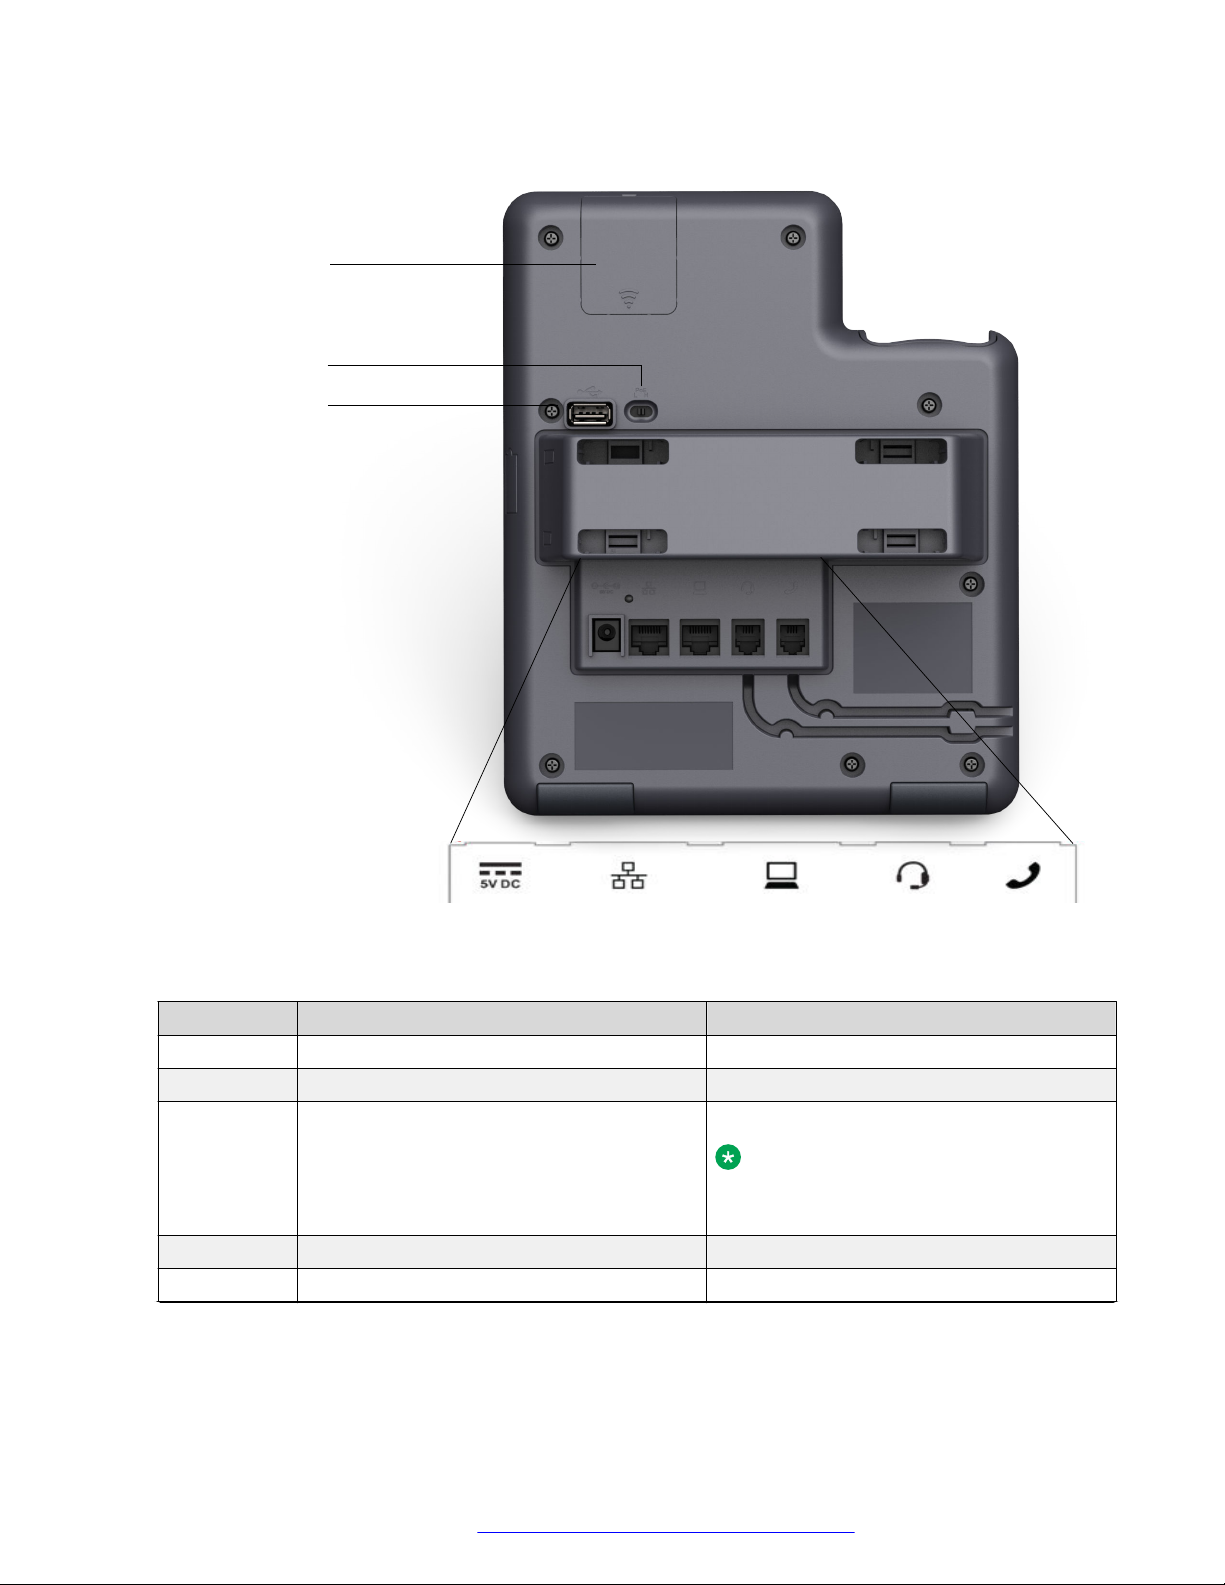
Connection jacks of a J159 IP Phone
The following image illustrates the connection jacks that are present on the back panel of Avaya
J159 IP Phone.
The image schematically describes which device to connect to which jack.
April 2021 Using Avaya J159 SIP IP Phone in Avaya Aura
Comments on this document? infodev@avaya.com
®
17
Phone overview
No. Name Description
1 5V DC Jack To connect the power supply.
2 Network port To connect the Ethernet cable.
3 PC port To connect the computer.
Note:
PC port is disabled when a Wi-Fi
network is used.
4 Headset Jack To connect the headset.
5 Handset Jack To connect the handset.
Table continues…
April 2021 Using Avaya J159 SIP IP Phone in Avaya Aura
Comments on this document? infodev@avaya.com
®
18

Secondary display
No. Name Description
6 WLAN Module Panel To integrate the wireless module for Wi-Fi
and Bluetooth support.
7 PoE Slide Switch To set the PoE value to one of the following:
• L: Class 1
• H: Class 2
8 USB Port To connect the USB device.
Related links
Phone overview on page 13
Secondary display
The secondary display of the phone provides additional call appearances and feature or
application display.
It has six lines of four-page display that provides 24 additional lines for incoming calls, outgoing
calls, auto-dialing, and calling features. It displays the dedicated view for keys 25 — 48. You can
switch between the pages using the left and right keys.
Related links
Phone overview on page 13
Optional components
You can use the following components to your phone. These components are not a part of your
phone package and needs to ordered separately. You might need assistance of your system
administrator to install few of these items:
• PSAC12R–050 – 5V DC Power adapter
• PoE power supply
• Avaya J100 Wireless Module (Wi-Fi Module)
• USB devices such as USB Flash drive and keyboard
Note:
Avaya does not supply the USB devices.
Related links
Phone overview on page 13
April 2021 Using Avaya J159 SIP IP Phone in Avaya Aura
Comments on this document? infodev@avaya.com
®
19

Chapter 3: Getting started
Entering the provisioning details
About this task
Enter the provisioning server address if the phone prompts, for example, when you connect to the
network for the first time.
Before you begin
Obtain the provisioning server address from the system administrator.
Procedure
1. When you boot the phone for the first time, the Auto Provisioning screen displays Do you
want to activate Auto Provisioning now?, press one of the following:
• Yes: To connect to the Device Enrollment Services server to obtain the provisioning
server address and ignore the provisioning server address from the DHCP.
• No: To obtain the provisioning server address from the DHCP server.
In case of a time out, and the DHCP does not provide the provisioning server address, the
phone selects Yes.
If the connection to Device Enrollment Services is successful, and the phone receives the
provisioning server address, the phone continues to boot and not prompt you for the
provisioning server address.
If the connection to Device Enrollment Services is successful, and the phone does not
receive the provisioning server address from Device Enrollment Services, the phone
prompts you for a Numeric Enrollment code. Contact your administrator for a numeric
enrollment code. When you enter the valid numeric enrollment code, the phone continues
to boot and not prompt you for the provisioning server address.
If you do not have a numeric enrollment code, press Cancel. The phone continues to boot
using the DHCP.
The phone displays the Starting message. If the phone does not receive the
provisioning server address from the Device Enrollment Services or the DHCP server, the
phone displays the Enter provisioning details screen.
2. On Enter provisioning details screen, press one of the following:
• Config: To enter the provisioning server address.
April 2021 Using Avaya J159 SIP IP Phone in Avaya Aura
Comments on this document? infodev@avaya.com
®
20

Identifying the device type during phone boot-up
• Never: To never prompt for the provisioning server address.
• Cancel: To cancel the prompt and display the Login screen.
3. After you have pressed Config, enter the provisioning server address in the Address field.
The address is an alphanumeric URL like http://myfileserver.com/j100/.
Tip:
To enter the dot symbol (.) in the field, press the alphanumeric soft key to toggle to the
ABC mode.
To enter the forward slash symbol (/) in the field, press the / soft key.
4. (Optional) Enter the Group number.
Obtain the Group number from your system administrator. The value ranges from 0 to 999.
0 is the default value. If you do not enter any value in this field, the phone uses the default
value.
5. Press Save.
The phone continues to boot and connect to the provisioning server address for
provisioning configuration.
Identifying the device type during phone boot-up
About this task
Avaya J100 Series IP Phones screen displays the device type during the phone boot-up. This
feature is supported only in the phone software version 4.0.3 and later.
Procedure
1. Set up the phone hardware.
2. Plug the Ethernet cable to the phone.
The phone powers up and starts to initialize.
The phone primary screen displays one of the following as the backsplash screen:
• A screen with Avaya text for Avaya SIP phones
• A screen with Open SIP text for Open SIP phones
Logging in to your phone
Before you begin
Your extension and password are provided by your administrator.
April 2021 Using Avaya J159 SIP IP Phone in Avaya Aura
Comments on this document? infodev@avaya.com
®
21

Getting started
Procedure
1. On the Login screen in the Username field, type your extension.
2. Press Enter.
3. In the Password field, type your password.
4. Press Enter.
Logging out of your phone
About this task
Use this procedure to log out of your primary or guest user extension.
Note:
After a guest user logs out, the primary user will be logged in.
Procedure
1. Press the Main menu.
2. Scroll to Applications and press Select.
3. Scroll to Log out, and press Select.
4. In the confirmation window, press Log out.
Related links
Using a Guest Login on page 98
Locking your phone
About this task
You can lock your phone to prevent unauthorized use of the phone when you are away. Locking
your phone does not log you out, you can still receive all calls and make calls to emergency
numbers.
To lock the phone, press Main menu, and select Applications > Lock.
April 2021 Using Avaya J159 SIP IP Phone in Avaya Aura
Comments on this document? infodev@avaya.com
®
22

Unlocking your phone
Unlocking your phone
About this task
You can unlock your phone using a PIN or a password. Depending on the configuration made by
your administrator, the phone screen displays the field for entering either a PIN or a password. A
PIN is a digit-only value whereas a password can be an alphanumeric value.
If you do not know or remember your PIN or password, contact your administrator.
You cannot unlock the phone if you enter an incorrect PIN or password.
Your administrator sets a limit to the number of incorrect attempts. If you exceed the limit, the
phone temporarily blocks you from attempting to unlock the phone for a period that your
administrator specifies.
To unlock the phone, press Unlock and enter the PIN or password.
Setting the network mode
About this task
You can set the network mode to Ethernet or Wi-Fi. You do not need to perform this procedure if
your phone is configured to connect to Ethernet or a specific Wi-Fi network.
Before you begin
Ensure that the system administrator gave you access to perform this task.
Procedure
1. Press the Main menu.
2. Scroll to Settings and press Select.
3. Scroll to Network and press Select.
4. Scroll to Network mode.
The Network mode setting shows the following options:
• Ethernet: To connect to an Ethernet network.
• Wi-Fi: To connect phone to a Wi-Fi network.
5. Press one of the following:
• Toggle
• Right Arrow key
• Left Arrow key
6. When Network mode displays Wi-Fi, the following lines are shown on the Phone screen:
• SSID: The name of the Wi-Fi network that the phone is either currently connected to, or
will attempt to connect to if you start the connection process.
April 2021 Using Avaya J159 SIP IP Phone in Avaya Aura
Comments on this document? infodev@avaya.com
®
23

Getting started
• Wi-Fi network: Scroll to this line and press Select to view the list of Wi-Fi networks.
7. After selecting the network mode, press Save.
8. When you switch Network mode from Ethernet to Wi-Fi, see Connecting to a Wi-Fi
network section.
9. When you switch Network mode from Wi-Fi to Ethernet, press Save.
10. When the phone prompts for permission to restart, press OK.
Press Cancel to go back to previous step.
Related links
Setting the network configuration on page 24
Connecting to a Wi-Fi network on page 25
Setting the network configuration
About this task
To set the network configuration to Auto or Manual. You do not need to perform this procedure if
your phone is configured to connect to Ethernet or a specific Wi-Fi network.
When network configuration is Auto, every time the phone restarts, it will connect to the preconfigured network that your administrator has set up.
When network configuration is Manual, every time the phone restarts, it will connect to the network
that you manually configured by
Setting the network mode on page 23 or Connecting to a Wi-Fi
network on page 25, irrespective of the pre-configured network that your administrator has set
up.
Note:
Any time you manually change the connected network, the phone will automatically set
Network config to Manual.
Procedure
1. Press the Main menu.
2. Scroll to Settings and press Select.
3. Scroll to Network and press Select.
4. Scroll to Network config.
The Network configuration shows following two options:
• Auto: To automatically connect a network.
• Manual: To manually connect to a network.
5. Press one of the following:
• Toggle
April 2021 Using Avaya J159 SIP IP Phone in Avaya Aura
Comments on this document? infodev@avaya.com
®
24

• Right arrow key
• Left arrow key
6. Press one of the following:
• Save
• OK
Note:
If you do not want your phone to restart and stay in the Manual mode when you switch
Network config from Auto to Manual, press Save.
If you switch Network config from Manual to Auto, press Save and then do either of
the following:
• If the currently-connected network is the same as the pre-configured network that
your administrator has set up, the phone will not restart and stay in the Auto mode.
• If the currently-connected network is not the same as the pre-configured network
that your administrator has set up, the phone will prompt you for permission to
restart before connecting to the pre-configured network.
Setting the network mode
Related links
Setting the network mode on page 23
Connecting to a Wi-Fi network
About this task
Use this procedure if your phone is not configured to connect to a specific Wi-Fi network
Before you begin
• Ensure that the system administrator gave you access to perform this task.
• Select Wi-Fi as your network mode.
• When you set the network mode, note the SSID, as this is the name of the Wi-Fi network that
the phone will attempt to connect to.
• Depending on the type of security in the Wi-Fi network, obtain the required credentials.
Contact your system administrator for more details.
Procedure
1. Press the Main menu.
2. Scroll to Settings and press Select.
3. Scroll to Network and press Select.
4. To access the list of available Wi-Fi networks, scroll to Wi-Fi network, and press Select.
5. Scroll to the required Wi-Fi network, and press Connect to start the connection process.
April 2021 Using Avaya J159 SIP IP Phone in Avaya Aura
Comments on this document? infodev@avaya.com
®
25

Getting started
6. Press OK to restart the phone.
7. If the security is WEP or WPA/WPA2 PSK, in Password, enter the password for the Wi-Fi
network.
8. If the security is 802.1x EAP, enter the following:
• Identity: Either your personal user ID or the shared user ID provided by your system
administrator.
• Anonymous Identity: Leave blank or use the shared Anonymous Identity provided by
your system administrator.
• Password: Either your personal password or the shared password provided by your
system administrator.
Result
If the credentials are authenticated successfully, the phone automatically restarts to complete the
connection.
Related links
Setting the network mode on page 23
April 2021 Using Avaya J159 SIP IP Phone in Avaya Aura
Comments on this document? infodev@avaya.com
®
26

Chapter 4: Navigation
Cursor navigation
You can use the navigation cluster for cursor movement or selection of options on the Phone
screen or in other menus. The navigation cluster has the following keys on the phone:
• Left Arrow
• Right Arrow
• Up Arrow
• Down Arrow
• OK
Related links
Navigation cluster on page 27
Navigation cluster
The effect of pressing a navigation key depends on the current application and context.
Key name
Left Arrow and Right Arrow Use these keys in:
Up Arrow and Down Arrow Use these keys to scroll vertically in lists, menus, and pop-
Description
• Text input fields to move the cursor position.
• Selection fields to toggle field values and select options in
lists and menus.
• Half-width displays to move the selection left or right.
• Scrolling between pages when navigating the phone
screen, provided that page scrolling mode is switched on
by your administrator.
The directional keys are context-sensitive.
up windows.
Table continues…
April 2021 Using Avaya J159 SIP IP Phone in Avaya Aura
Comments on this document? infodev@avaya.com
®
27

Navigation
Key name Description
OK, center button of the navigation cluster. Unless otherwise specified, use this key for the first or left-
most soft key action.
If there are two or more pages of soft keys, the OK key is
active only when the phone screen displays the first page of
soft keys.
Related links
Cursor navigation on page 27
Text input
You can use the dial pad or the text input soft keys to edit and enter text in the text input fields of
the phone.
Input field
Depending on the application and context, a text input field is a text box with a label. The user
interface displays labels on the left side of the text box or in the line preceding the text box. An
input field can be blank or display a current value that can be modified. The user interface displays
input cursors on the right side of the current value or, if the input field is blank, on the left side of
the text box.
Hint text
Depending on the application and context, a text box contains hint text. The user interface
displays hint text on the left side of the text box in grey, italic font. The interface replaces the hint
text with the actual text that you enter. The interface displays the hint text again when you clear
the entered text. The interface does not display the hint text if the field contains a value.
Text truncation
When the space in the input area cannot display the full current value, the user interface truncates
the text. The interface truncates the text from the left side and displays a blank space with a cursor
on the right side of the input field for a new entry. When you enter a new character, the interface
truncates the existing character from the left side of the display.
Active language text direction
When the text direction of the active language is right-to-left, the text entry rules are reversed. The
user interface:
• Displays the hint text on the right side of the text box.
• Displays the input cursor on the left side of the current character or, if the input field is blank,
on the right side.
• Displays the new character on the left side of the current character.
• Deletes the character on the right side of the cursor when you press Backspace.
April 2021 Using Avaya J159 SIP IP Phone in Avaya Aura
Comments on this document? infodev@avaya.com
®
28
Line keys
The line keys are context-sensitive. When you press a line key:
• In full-width lists, the user interface selects the corresponding line or the object.
• In half-width lists, the interface selects the list item adjacent to the key.
• In page scroll mode and then scroll on to the next or previous page, the selected item
remains highlighted.
Input line
The following actions take place when you press the line key against the input lines.
• Selects the corresponding line for the line which accepts user input.
• Displays the cursor after the last character of the existing content if the line is an input line. If
an input line is selected, the interface performs no action even if the cursor is in the middle of
the line.
• Performs the action of the first soft key for the line which does not accept user input even if
the line is already selected.
For example, when you press a line key in Contacts, the interface initiates a call to the
contact because the first soft key represents the Call key.
Line keys
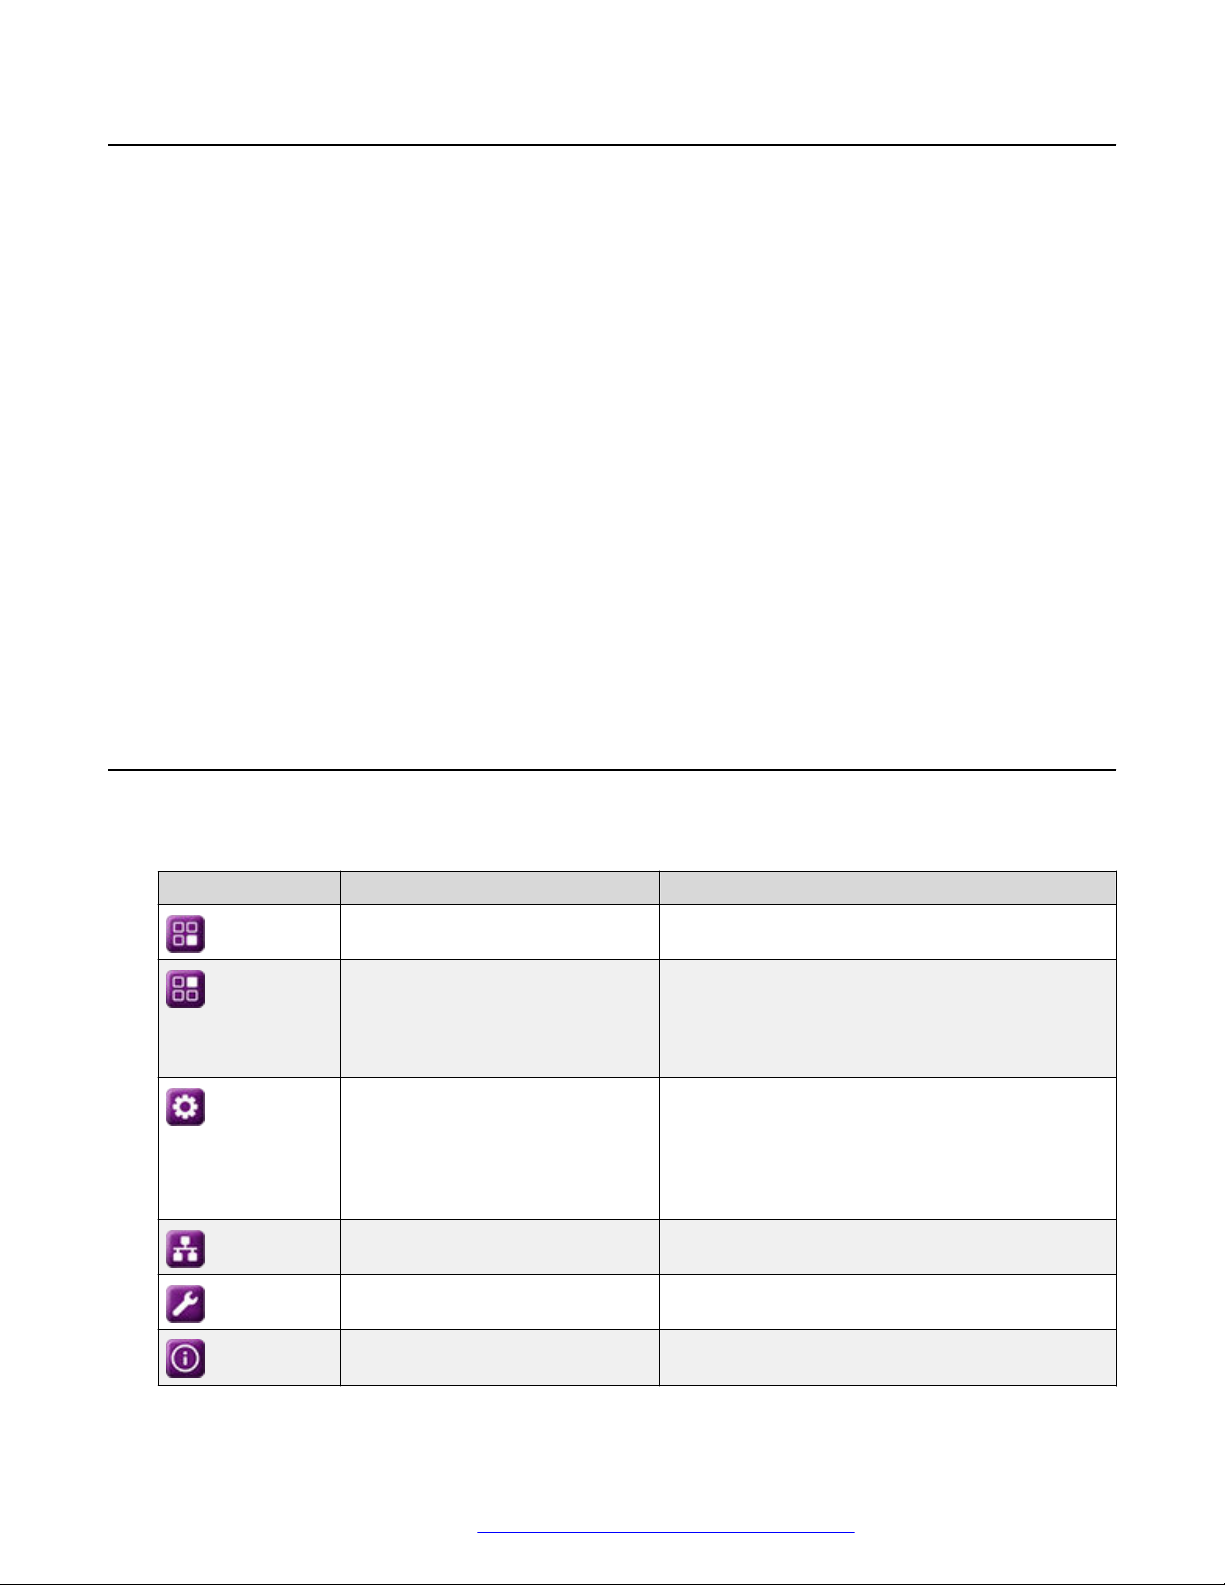
Main menu
The following table lists the Main menu icons used in Avaya J159 IP Phone:
Icons
Name Description
Features To access administrator activated features.
Applications • To access phone applications such as
Contacts, Recents, and Activate screen saver.
• To sign off the phone, to protect your settings,
or to let another user log in.
Settings To change your phone settings, customize button
labels, adjust brightness, audio settings, assign
speed dial entries, etc.
Used to view the connected USB devices such
as USB stick and keyboard.
Network information To check network settings.
Administration To access administration settings.
About To view the phone model, software version,
default device type, and the default server type.
April 2021 Using Avaya J159 SIP IP Phone in Avaya Aura
Comments on this document? infodev@avaya.com
®
29
Navigation
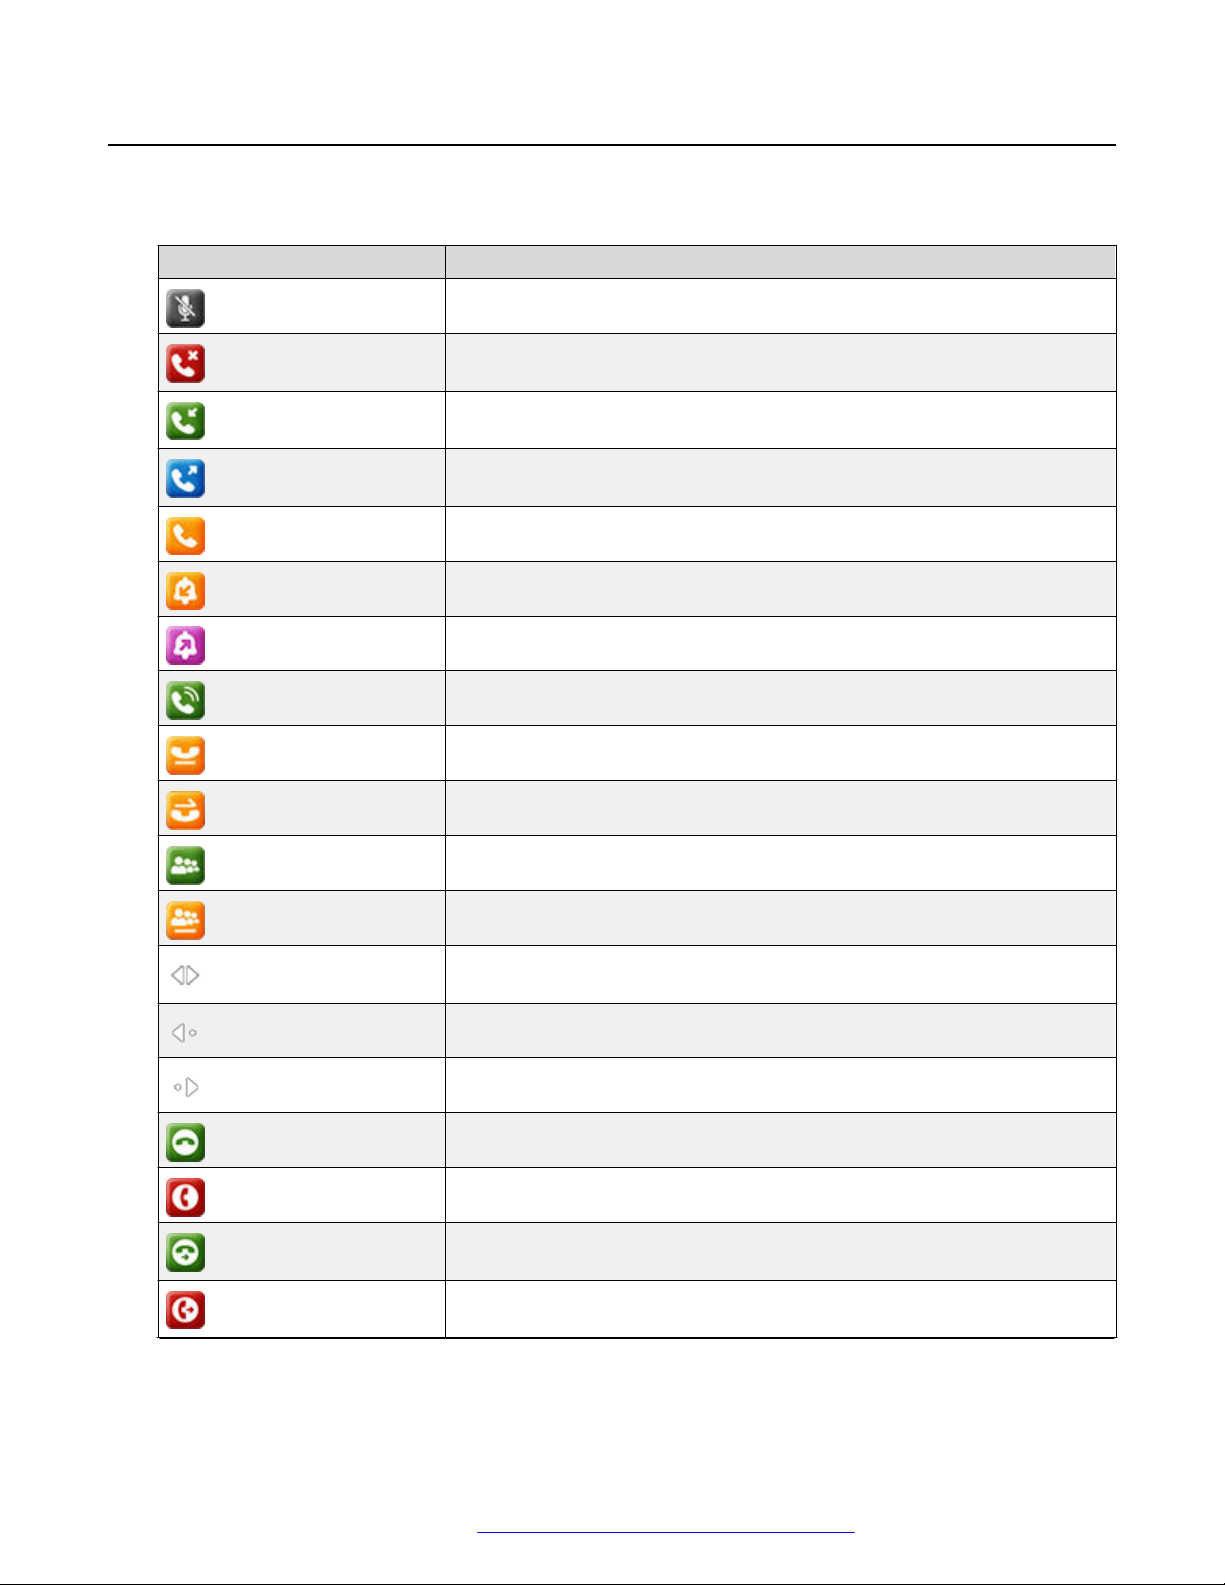
General phone icons
The following table lists the icons used in Avaya J159 IP Phone:
Icon Description
Microphone is muted.
Missed call on your phone. You can see this icon in the Recents
application.
Incoming call; indicates you have answered this call. You can see this
icon in the Recents application.
Outgoing call; indicates you have made this call. You can see this icon in
the Recents application.
Bridged call; indicates this line is being used for a call on another phone.
Incoming call is alerting.
Outgoing call; indicates you have made this call.
Call is active.
Call is on hold.
Call is on hold during a conference or transfer call setup.
Conference is active.
Conference is on hold.
Use the Right or Left navigation arrow to see more pages / screens /
options.
Scroll left for other options.
Scroll right for other options.
Team icon indicating this team member is available.
Team icon indicating this team member is busy on a call and unavailable.
Team icon indicating this team member is not on a call, but is forwarding
incoming calls.
Team icon indicating this team member is busy on a call and is forwarding
incoming calls.
April 2021 Using Avaya J159 SIP IP Phone in Avaya Aura
Comments on this document? infodev@avaya.com
Table continues…
®
30
Loading…
- Manuals
- Brands
- Avaya Manuals
- IP Phone
- J159
- Using manual
-
Contents
-
Table of Contents
-
Troubleshooting
-
Bookmarks
Quick Links
Using Avaya J159 IP Phone H.323
Release 6.8.5
Issue 1
November 2020
Related Manuals for Avaya J159
Summary of Contents for Avaya J159
-
Page 1
Using Avaya J159 IP Phone H.323 Release 6.8.5 Issue 1 November 2020… -
Page 2
RESERVES THE RIGHT TO TAKE LEGAL ACTION AGAINST YOU the express behalf of Avaya. End User agrees to indemnify and hold AND ANYONE ELSE USING OR SELLING THE SOFTWARE harmless Avaya, Avaya’s agents, servants and employees against all WITHOUT A LICENSE. -
Page 3
MAY BE OBTAINED FROM MPEG LA, L.L.C. SEE HTTP:// written consent of Avaya can be a criminal, as well as a civil offense WWW.MPEGLA.COM. under the applicable law. Compliance with Laws… -
Page 4
• Please only use the connecting cables, power cord, and U.S. Federal Communications Commission (FCC) Statements AC adapters shipped with the equipment or specified by Compliance Statement Avaya to be used with the equipment. If you use any other equipment, it may cause failures, malfunctioning, or fire. -
Page 5
Device Usage Consent interference by one or more of the following measures: By using the Avaya device you agree that Avaya, from time to time, • Reorient or relocate the receiving antenna. may collect network and device data from your device and may use such data in order to validate your eligibility to use the device. -
Page 6: Table Of Contents
Deleting a contact …………………. 28 Editing a contact ……………….. 28 Viewing the contact details ……………….. 28 Searching for a contact ……………………… 29 Call History ……………….. 29 Viewing the call history November 2020 Using Avaya J159 IP Phone H.323 Comments on this document? infodev@avaya.com…
-
Page 7
…………………. 51 Administrative messages Chapter 8: Troubleshooting……………….. 52 ……………….. 52 Limited access during failover Chapter 9: Resources…………………. 54 …………………… 54 Documentation ……………….. 54 Viewing Avaya Mentor videos …………………….. 55 Support November 2020 Using Avaya J159 IP Phone H.323 Comments on this document? infodev@avaya.com… -
Page 8: Chapter 1: Purpose
Chapter 1: Purpose This document describes the features of the Avaya J159 IP Phone and provides instructions on how to use this phone. It is intended for the end user. November 2020 Using Avaya J159 IP Phone H.323 Comments on this document? infodev@avaya.com…
-
Page 9: Chapter 2: Phone Overview
Chapter 2: Phone overview Avaya J159 IP Phone is intended to be used in business communications. The phone supports up to four call appearances with two lines of call display. Avaya J159 IP Phone has two color display. Physical specifications •…
-
Page 10
— Headset — Message — Recents Related links Physical layout on page 11 Connection jacks on page 13 Secondary display on page 15 Optional components on page 15 November 2020 Using Avaya J159 IP Phone H.323 Comments on this document? infodev@avaya.com… -
Page 11: Physical Layout
Physical layout Physical layout Figure 1: J159 IP Phone Following table lists the physical layout of Avaya J159 IP Phone. 5, 15, 16, and 17 are application keys which provides direct access to the corresponding applications. Name Description Beacon LED Provides visual alerts for the following: •…
-
Page 12
Left, Right keys Used to navigate on the Secondary Display screen towards Right and Left. Mute Button Used to mute and unmute the outgoing audio. Table continues… November 2020 Using Avaya J159 IP Phone H.323 Comments on this document? infodev@avaya.com… -
Page 13: Connection Jacks
Phone overview on page 9 Connection jacks The following image illustrates the connection jacks on the back panel of Avaya J159 IP Phone. It describes which device to connect to which jack. Back panel of J159 IP Phone: November 2020 Using Avaya J159 IP Phone H.323…
-
Page 14
Headset Jack Connect to your headset. Handset Jack Connect to your handset. Wi-Fi card Reserved for Wi-Fi card. H.323 release 6.8.5 firmware does not support Wi-Fi. Table continues… November 2020 Using Avaya J159 IP Phone H.323 Comments on this document? infodev@avaya.com… -
Page 15: Secondary Display
9 Secondary display Avaya J159 IP Phone has a secondary display that is located at the lower right corner. It provides additional call appearances and feature or application display. Secondary display has four pages with six lines per page, displaying 24 additional lines of information for incoming calls, outgoing calls, auto-dialing, and calling features.
-
Page 16: Chapter 3: Getting Started
Identifying the device type during phone boot-up About this task Avaya J100 Series IP Phones displays the device type on the primary screen while the phone boots up. You can configure your phone according to the device type while the phone boots up.
-
Page 17: Unlocking Your Phone
To unlock the phone, press Unlock and enter the PIN or password. November 2020 Using Avaya J159 IP Phone H.323 Comments on this document? infodev@avaya.com…
-
Page 18: Chapter 4: Navigation
Menu options The following image shows the menu options that are available to view the current settings and configure the required parameters on the Avaya J159 IP Phone: November 2020 Using Avaya J159 IP Phone H.323…
-
Page 19: Main Menu
Note: The options displayed on your deskphone are determined by the options configured for your extension by your administrator. Main menu The following table lists the Main menu icons used in Avaya J159 IP Phone: Name Description Options & Settings…
-
Page 20: Accessing The Features Screen
On the Phone screen, use the right navigation button to gain access to the Features screen. To return to the main Phone screen, press Phone or scroll to the left. November 2020 Using Avaya J159 IP Phone H.323 Comments on this document? infodev@avaya.com…
-
Page 21: Chapter 5: Call Operations
This will move the call appearance list to the top of your screen. Note: Set the Phone Screen on Ringing option to Yes to automatically display the phone screen when you receive a call. November 2020 Using Avaya J159 IP Phone H.323 Comments on this document? infodev@avaya.com…
-
Page 22: Making Calls
Use the dialpad keys to enter the first few letters of the name, and the screen displays the first match in your list. Procedure 1. Press Contacts. November 2020 Using Avaya J159 IP Phone H.323 Comments on this document? infodev@avaya.com…
-
Page 23: Calling A Person From The Call History
1. On the Phone screen, enter the number you want to call. 2. To edit the number, press Bksp to erase one character at a time. 3. To remove the entire number, press Clear 4. Press Call. November 2020 Using Avaya J159 IP Phone H.323 Comments on this document? infodev@avaya.com…
-
Page 24: Calling A Person From The Directory
Press Clear to erase all dialed digits and enter a new number. Note: You can clear a number by using the backspace button only if you have enabled the Edit Dialing feature on your deskphone. November 2020 Using Avaya J159 IP Phone H.323 Comments on this document? infodev@avaya.com…
-
Page 25: Transferring A Call
1. Press Phone to view the main Phone screen. 2. Select the active line you want to put on hold. 3. Press Hold soft key or Hold button. November 2020 Using Avaya J159 IP Phone H.323 Comments on this document? infodev@avaya.com…
-
Page 26: Contacts
• If the characters are on the same key, pause before entering the next character. • To enter a space, press 0. • Enter remaining letters or numbers. • To delete the last character, press the Bksp softkey. November 2020 Using Avaya J159 IP Phone H.323 Comments on this document? infodev@avaya.com…
-
Page 27: Deleting A Contact
1. Press Contacts. 2. Select the contact you want to delete. 3. Press one of the following: • Delete: To delete the contact. • Cancel: To cancel the action. November 2020 Using Avaya J159 IP Phone H.323 Comments on this document? infodev@avaya.com…
-
Page 28: Editing A Contact
D, E, F or 3 depending on how you set up your contacts and how many times you press 3 in succession. Procedure 1. Press Contacts. 2. Using the dial pad, start typing the name which you want to search. November 2020 Using Avaya J159 IP Phone H.323 Comments on this document? infodev@avaya.com…
-
Page 29: Call History
CALL FOR: (calls made to the bridged line) or CALLED FROM: (calls made from the bridged line) preceding the applicable number. 4. To return to the list view, press Back . November 2020 Using Avaya J159 IP Phone H.323 Comments on this document? infodev@avaya.com…
-
Page 30: Adding An Entry From The Call History To Your Contacts List
Use this task to turn History on or off. If you have bridged call appearances on your phone, you can choose whether or not to include calls to your bridged lines in your call history log. Procedure 1. Press Home. November 2020 Using Avaya J159 IP Phone H.323 Comments on this document? infodev@avaya.com…
-
Page 31: Conferences
• Redial the last dialed number by using the Redial softkey or Redial button. 3. When the third participant answers the call, press the Join softkey. 4. To add another person, press Add and repeat Step 2 and 3. November 2020 Using Avaya J159 IP Phone H.323 Comments on this document? infodev@avaya.com…
-
Page 32: Adding A Person On Hold To A Conference Call
You will see the More soft key. 2. Press End Call when the conference is active. Result The participant who was added last gets disconnected from the conference. November 2020 Using Avaya J159 IP Phone H.323 Comments on this document? infodev@avaya.com…
-
Page 33: Putting A Conference Call On Hold And Resuming A Call
The Message button and the Message Wait indicator at the upper right corner glows red to indicate that you have a message. Procedure Press the Message button to access your voice messages. November 2020 Using Avaya J159 IP Phone H.323 Comments on this document? infodev@avaya.com…
-
Page 34
Use this procedure to listen to your voicemail messages.. Few voicemail configuration has the web interface to access it, please contact your administrator for more information. For more details on using your voicemail services see, Avaya OneCloud-ReadyNow Messaging Service User Guide. -
Page 35: Chapter 6: Advance Features
When Send All Calls (SAC) feature is on, your incoming calls go directly to a predefined coverage number, typically your voice mail. Incoming calls ring once at your extension and then go directly November 2020 Using Avaya J159 IP Phone H.323 Comments on this document? infodev@avaya.com…
-
Page 36: Activating Ec500 For Simultaneous Ringing On Multiple Phones
The system administrator has to add your cell phone number and program the desk phone. Procedure 1. From the Phone screen, go to the Features screen. 2. Scroll to EC500, and press Select. November 2020 Using Avaya J159 IP Phone H.323 Comments on this document? infodev@avaya.com…
-
Page 37: Bridged Call Appearances
Recents list or select the Redial softkey or Redial button. Joining a call on a bridged line About this task Use this task to join an existing call on a bridged line. November 2020 Using Avaya J159 IP Phone H.323 Comments on this document? infodev@avaya.com…
-
Page 38
• Abbreviated: The phone plays a single beep to indicate a call on the bridged appearance. Note: For multiple call appearance alerting, the phone highlights the call appearance with the most recent incoming call. November 2020 Using Avaya J159 IP Phone H.323 Comments on this document? infodev@avaya.com… -
Page 39: Chapter 7: Customization
You can configure the Go to Phone Screen on Calling option to Yes to automatically display the Phone screen when you make a call. Procedure 1. Press Main menu > Options & Settings. 2. Press Select or OK. 3. Select Call Settings. November 2020 Using Avaya J159 IP Phone H.323 Comments on this document? infodev@avaya.com…
-
Page 40
4. Press Select or OK. 5. Select Go to Phone Screen on Answer. 6. Press Change or OK to set the option to Yes or No, depending on the current setting. November 2020 Using Avaya J159 IP Phone H.323 Comments on this document? infodev@avaya.com… -
Page 41
Use this task to cause the LED in the top right corner of the phone to flash when the phone gets incoming calls. Procedure 1. Press Main Menu. November 2020 Using Avaya J159 IP Phone H.323 Comments on this document? infodev@avaya.com… -
Page 42
7. Select Pair Contacts to Calls. 8. Press Change or OK to change the setting to On or Off. 9. Press Save. Related links Options & Settings on page 39 November 2020 Using Avaya J159 IP Phone H.323 Comments on this document? infodev@avaya.com… -
Page 43
• Switchhook only: The phone does not send the ringing tone to the headset. The headset switch-hook button is non functional. 5. Press Save. Related links Options & Settings on page 39 November 2020 Using Avaya J159 IP Phone H.323 Comments on this document? infodev@avaya.com… -
Page 44: Application Settings
The phones sets the option to No by default. Press Change to change the setting to Yes. 6. Press Save to save the change. Related links Options & Settings on page 39 November 2020 Using Avaya J159 IP Phone H.323 Comments on this document? infodev@avaya.com…
-
Page 45: Screen And Sound Options
Related links Options & Settings on page 39 Screen and Sound Options Adjusting the brightness of the display Procedure 1. Press Main menu. 2. Select Options & Settings. November 2020 Using Avaya J159 IP Phone H.323 Comments on this document? infodev@avaya.com…
-
Page 46
2. Press Select to select Options & Settings > Screen & Sound Options > Error Tones. 3. Press Change to turn error tones on or off. 4. Press Save. Related links Options & Settings on page 39 November 2020 Using Avaya J159 IP Phone H.323 Comments on this document? infodev@avaya.com… -
Page 47
The phone plays the ring tones once through the speaker as you scroll through the list. 6. Press Save to save your selection. The phone takes you to the Call Settings menu. November 2020 Using Avaya J159 IP Phone H.323 Comments on this document? infodev@avaya.com… -
Page 48: Advanced Options
When the restore is in progress, the phone displays Retrieval in progress. When the restore is complete, the phone displays either Retrieval successful or Retrieval failed. Related links Options & Settings on page 39 November 2020 Using Avaya J159 IP Phone H.323 Comments on this document? infodev@avaya.com…
-
Page 49
• HAC Opt.— Setting delivers “Hearing Aid Compatibility” performance. • Amplified— Setting allows users to reset the volume level to nominal between calls. 7. Press Save. Related links Options & Settings on page 39 November 2020 Using Avaya J159 IP Phone H.323 Comments on this document? infodev@avaya.com… -
Page 50
Customization Acoustic Protection Avaya J100 Series IP Phones have the acoustic exposure protection, to protect the user’s ears from the acoustic shocks. This feature reduces the loud volume of the conversations on the phone call to permissible acoustic limit. The user can set the permissible acoustic limit to dynamic or predefined static values. -
Page 51: Administrative Messages
While receiving an audible alert, you can change between the speaker, handset, and headset, can stop the transmission of pushed audio content by going on-hook, and can adjust the volume, as you normally do during a call. November 2020 Using Avaya J159 IP Phone H.323 Comments on this document? infodev@avaya.com…
-
Page 52: Chapter 8: Troubleshooting
Incoming calls might not reach you and can go to voice mail. • Emergency calls might or might not work, depending on the stage of failover and the functionality available on the alternate server. November 2020 Using Avaya J159 IP Phone H.323 Comments on this document? infodev@avaya.com…
-
Page 53
• The Message Waiting Indicator is cleared, but voice mail might still be available if the voice mail server to which calls are being sent is not in failover. Transitions back to the normal server will restore all original functionality. November 2020 Using Avaya J159 IP Phone H.323 Comments on this document? infodev@avaya.com… -
Page 54: Chapter 9: Resources
Avaya Mentor videos provide technical content on how to install, configure, and troubleshoot Avaya products. About this task Videos are available on the Avaya Support website, listed under the video document type, and on the Avaya-run channel on YouTube. • To find videos on the Avaya Support website, go to https://support.avaya.com/…
-
Page 55: Support
For example, Contact Centers. Note: Videos are not available for all products. Support Go to the Avaya Support website at https://support.avaya.com for the most up-to-date documentation, product notices, and knowledge articles. You can also search for release notes, downloads, and resolutions to issues. Use the online service request system to create a service request.
-
Page 56
Conference Calls Go to Phone Screen Options on ringing adding a person on hold ……….setting …………….dropping a person …………32 configuring …………..18, connection jacks …………..contacts November 2020 Using Avaya J159 IP Phone H.323 Comments on this document? infodev@avaya.com… -
Page 57
Ring Pattern changing …………… navigation arrows right and left …………..18 screen width ……………..47 up and down …………..SENDALL …………….navigation tips …………..18 settings screen width …………..Speaker …………….November 2020 Using Avaya J159 IP Phone H.323 Comments on this document? infodev@avaya.com… -
Page 58
Index support ……………..55 Transfer …………….25 unlockPIN password …………..videos ……………… Visual Alerts configuring …………..November 2020 Using Avaya J159 IP Phone H.323 Comments on this document? infodev@avaya.com…
Посмотреть инструкция для Avaya J159 бесплатно. Руководство относится к категории телефоны, 1 человек(а) дали ему среднюю оценку 7.4. Руководство доступно на следующих языках: английский. У вас есть вопрос о Avaya J159 или вам нужна помощь? Задайте свой вопрос здесь
Не можете найти ответ на свой вопрос в руководстве? Вы можете найти ответ на свой вопрос ниже, в разделе часто задаваемых вопросов о Avaya J159.
Какой размер экрана Avaya J159?
Размер экрана Avaya J159 составляет 3.5 «.
Какое разрешение экрана дисплея Avaya J159?
Разрешение экрана Avaya J159 следующее 320 x 240 пикселей.
Инструкция Avaya J159 доступно в русский?
К сожалению, у нас нет руководства для Avaya J159, доступного в русский. Это руководство доступно в английский.
Не нашли свой вопрос? Задайте свой вопрос здесь
Обновлено: 25.04.2023
— отмена выполнения команды
F2 — E[12
— обновление содержимого экрана
F3 — E[13
— выполнение команды
F4 — E[14
— очистка поля
F5 — E[15
— справка по полю или команде
F6 — E[17
— переход к странице с заданным номером
F7 — E[18
— следующая страница
F8 — E[19
— предыдущая страница
F9 — E[20
Учётные записи
- init — 1шт. — логин высшего уровня для техподдержки AVAYA
- inads — 1шт. — логин высшего уровня для техподдержки AVAYA
- dadmin — 1шт. — используется дистрибьютором. Может администрировать станцию удалённо. Пароль для dadmin — dadmnpw (R8),dadmin1 (R9, R10), partner111 (R10 — R13)
- craft — 2шт. — используется установщиком системы. Пароль для классических систем — crftpw, для новых — craft01.
- superuser
- non-superuser
add login <login>
change login
change password
change permissions <login>
- users
- susers — могут создавать пользователей.
- prof 0 — init
- prof 1 — inads
- prof 2 — dadmin
- prof 3 — craft
- .
- prof 18 — superuser
- prof 19 — non superuser
- .
- prof 69
Управление учётными записями можно осуществлять через Maintenance Web Interface.
Про команды
- Action (дейтвие) — display
- Object (объект) — port
- Qualifier (определитель) — 02A0521
Адресация портов в кабинетах G650
- 02 — PN — сеть портов. Их может быть от 1 до 64. Если PN единственный, то можно опускать это поле.
- A — Carrier — полка (кабинет). Кабинеты нумеруются от А до Е. Литерное обозначение задаётся перемычками на задней панели кабинета.
- 05 — Slot — платоместо в кабинете
- 21 — Port — порт на плате
- 001 — Media Gateway — порядковый номер в системе. Максимум 250. Если MG единственный, то можно опустить это поле.
- v5 — Media Module — модуль в кабинете. От v1 до v8.
- 21 — Port — порт в модуле
-
добавляем кабинет на станцию
— change ipserver-interface
— IP control = Y
— IP address = ip адрес платы IPSI
— IP Gateway = шлюз по умолчанию
- Logins and passwords — рекомендуется сразу сменить стандартные логины и пароли
- System parameters — основные настройки и таймеры
- Dial plan — план нумерации
- Feature Access Codes — коды доступа к функциям
- Class of Service и Class of Restriction — уровни обслуживания и уровни ограничений прав пользователей
- Voice Terminals — цифровые и аналоговые телефоны
- Groups (hunt, pickup, coverage-answer, paging) — группы пользователей
- Trunk groups, route patterns — транковые группы и шаблоны маршрутов
- ARS (Automatic Route Selection) и AAR (Automatic Alternative Routing) — автоматический выбор маршрута и автоматический подтверждённый маршрут.
Сохранение настроек и файлы конфигурации
Трансляция (translation) — база данных, содержащая настройки станции и лицензии. В системах CSI и SI она хранится на PCMCIA flash-карте (8МБ или 16МБ). В системах R она хранится на жёстком диске. В медиа-серверах две копии хранятся на жёстком диске. После загрузки станции процессор работает с трансляцией, записанной в оперативную память.
Трансляцию необходимо сохранять после больших изменений (которые проверены и работоспособноть подтверждена), перед сомнительными изменениями и перед выключением станции. Трансляции также сохраняется во время ночного обслуживания.
В классических системах Flash-карта не содержит ПО станции и её нельзя вынимать во время чтения/записи (мигает оранжевый светодиод). Существуют специальные upgrade-карты раземером 48МБ.
В медиа-серверах можно делать backup настроек сервера и трансляции через ftp, scp, sftp или на CF-карточку.
Существует два файла трансляции XLN1 и XLN2 — они идентичны. Система во время загрузки проверяет их на идентичность и если они не совпадают, то это обозначает нарушение целосности конфигурации и система зажигает alarm.
— change system-parameters maintenance
— scheduled maintenance
— save translation
— daily
Завершение работы с системой
Перед отключением необходимо сохранить внесённые изменения на энергонезависимом носителе ( save translation ) и дождаться окончания выполнения команды и статуса выполнения Success . Сеанс SAT можно завершить командой logoff . Перед выходом система может уведомить о наличии ошибок или особых ситуаций. Принять уведомление об отключении (Alarm Origination) можно нажав Yes . Выключить станцию можно нажав кнопку на передней панели S8300/S8400 и дождаться пока загорится соответствующий светодиод, или через Maintenance Web Interface -> Shutdown Server .
Обзор системы
- display system-parameters customer-options — открытые в станции лицензии
- display system-parameters spacial-applications — открытые в лицензии дополнительные функции (green features) — сторонние H.323 клиенты. Начиная с CM5.2.1 данные лицензии предоставляются бесплатно.
- display capacity — ресурсы системы и степень их использования
- list history — история команд. Сохраняются все команды , влияющие на конфигурацию станции. Их можно отфильтровать по action, object, qualifier, time/date.
- list configuration — информация о составе оборудования, свободных портах, версиях плат и прошивок
— all — все платы
— board — указанную плату
— ds1 — платы потока E1(ds1)
— stations — абоненские портовые платы
— trunks — транковые портовые платы
— software — версия ПО
Настройка параметров страны
- change system-parameters country-option
— Display Character Set: Cyrillic - change location-parameters
— Companding Mode: A-law (!)
— Analog Ringing Cadence — вид звонка на аналоговых аппаратах (длительность посылок и пауз)
— Flashhook Interval = Y
— Upper band = 1000 — верхняя граница реагирования на flash
— Lower Band = 200 — нижняя граница реагирования на flash
Flash — разрыв проводов для того, чтобы дать понять станции, что абонент хочет дополнительные функции. Если flash превысит верхнюю границу, то станция будет вешать трубку. Если flash будет слишком коротким, то станция не будет понимать что это был flash и ничего предпринимать не будет.
— Recall — повторное подключение тонового приёмника в процессе разговора с помощью flash.
— Loss Plan — затухание при коммутации портов друг на друга. ОЧЕНЬ НЕ РЕКОМЕНДУЕТСЯ изменять значения по умолчанию. - change tone-generation
— параметры страны — 1(!) Установка параметра страны в значение 15 влияет на некоторые таймеры системы. В этом случае рекомендует оставить параметр страны в значении 1 и подстроить тоны на страницах 2-23. Тоны для России отражены в документе РД 45.223-2001.
— Base Tone Generation Set — набор системных тонов
— Tone Generation Customized Tones — можно целиком пересоздать тоны.
— — Tone name — имя тона, который будем кастомизировать, например, busy.
— — Cadence step — последовательность выполнения. После выполнения последнего шага, тон начинает генерироваться с самого начала.
— — Tone — тональность сигнала. Может быть silence и goto.
— — Duration — длительность тона в милисекундах.
Настройка параметров системных функций
- page 1 — Trunk-to-Trunk transfer : разрешает передачу вызовов между транками. Можно выключить чтобы пользователи не могли переводить звонки за границу.
- page 1 — Music/Tone on Hold : настройка музыки при удержании
— music Port: настройка источника музыки
— music ext: настройка annoucement как MoH
— tone: настройка тона Hold — умельцы набирают тонами музыку - page 1 — Abbreviated Dial Programming by Assigned Lists? — автоматический набор номера после поднятия трубки
- page 1 — Auto Abbreviated/Delayed Transition Interver (rings) — через сколько гудков переходить к следующему номеру
- page 3 — PSA Associate Code (см. ниже)
- page 3 — PSA Dissociate Code (см. ниже)
- page 3 — TTI Merge Code (см. ниже)
- page 3 — TTI Separation Code (см. ниже)
- page 3 — TTI Enabled = Y (см. ниже)
- page 3 — TTI State: voice (см. ниже)
- page 3 — TTI Security Code (см. ниже)
- page 5 — Switch name : имя станции
- page 6 — Short Interdigit Timer : таймер ARS после набора минимального количества цифр. Если в диалплане нет однозначного срабатывания или пересечение в первых цифрах, после некоего количества цифр начинается отсчет.
- page 6 — Line Intercept Tone Timer : длинный таймер (ожидание набора). Если трубу не сняли, то через таймер даёт тишину.
- page 6 — Long Hold Recall Timer : возвращения вызова с Hold
- page 6 — Station Call Transfer Recall Timer : возвращение с трансфера
- page 6 — Distinctive Audible Alerting — количество звонков для внутренних, внешних и приоритетных вызовов.
- page 10 — Allow Conference via Flash : разрешает создание конференций аналоговому телефону через flash (n)
- page 10 — Station Tone Forward Disconnect : что будет слышать абонент, когда все участники отсоединились (busy)
- page 10 — Level of Tone Detection : способ определения наличия dialtone (medium)
- page 10 — Date Format : формат даты (dd/mm/yy)
- page 10 — On-hook Dialing : набор номера без поднятия трубки (y)
- page 10 — Repetitive Call Waiting — звуковое оповещение о том, что пришёл вызов по другой линии.
- page 10 — Repetitive Call Waiting Interval (sec) — с какой периодичностью осуществлять звуковое оповещение. ВАЖНО: на время передачи звукового оповещения разговорный тракт разрывается.
- page 11 VECTORING Prompting Timeout : ожидание команды в векторе (collect-digit). Сколько ждать донабора следующий цифры.
Номерной план
- ext — внутренний номер
- fac — код доступа к функции
- dac — код доступа к функции или код доступа к транку
- attd — оператор
- ars, aar — прямой выход на таблицы маршрутизации. Для этого необходима опция ARS Without FAC.
Справка по командам
- list configuration station — просмотр свободных портов. Вообще все абонентские платы
- add station — добавление номера
- duplicate station — скопировать. До 16 клонов за один раз.
- remove station — удаление
- list usage station — где используется
- list station — просмотр существующих абонентов
- status station — просмотр состояния телефона
- list trace station — протрассировать набор с телефона при помощи встроенного трассировщика.
- change extension-station — смена добавочного номера. Участие в группах подтягиваются.
Настройка аналогового телефона
Виртуальные объекты
- change circuit-packs [PN] — позволяет настраивать платы не подключив их физически. Пока на плате есть настройки, её нельзя удалить из списка плат.
- change media-gateway [MG] — всё тоже самое для media gateway.
Personal Station Access (PSA) и Terminal Translation Initialization (TTI)
Создаём абонента и в поле порта ставим не IP или номер порта, а «X». Далее берём телефонный апарат и идём к абоненту. Подкоючаем его и станция даёт тон. После этого вводим TTI Merge Code, Security Code и номер ext.
Я не знаю чем отличаются PSA и TTI, просто приведу инструкцию к работе с PSA:
Немного о кнопках
- Speaker — громкая связь
- Mute — отключить микрофон
- Hold — удержание звонка
- Redial — повторный набор
- Transfer — перевод звонка (transfer + номер + transfer)
- Conference — создание конференции (conference + номер + conference)
- использовать дополнительный блок питания
- в change station
— для 64хх, 46хх и 2420 в поле Expansion Module? = Y
— для 96хх, 16хх в поле Button Modules
- BUTTON ASSIGNMENT (лампочные)
- SOFTKEY (назначаемые)
- busy-ind TAC/Ext — доступ к транку или номеру и контроль занятия.
- autodial — быстрый набор (номер или код функции) до 16 знаков
- btn-view — просмотр назначений кнопок. По-умолчанию запрограммирована на SOFTKEY.
- team — просмотр занятости абонентов. Быстрый набор абонента. Перехват входящих звонков (первое нажатие — отображение номера и имени вызывающего абонента, второе нажатие — перехват вызова). До 15 кнопок team для одного абонента.
Работа с несколькими телефонными линиями
Допустим на телефоне настроены 3 телефонные линии. Вам приходит звонок по первой линии. Вы берёте трубку и начинаете разговор. В этот момент занимается 1-я выделенная Вам линия. Во время разговора Вам приходит второй вызов. Вы его не берёте, просто продолжая разговор по первой. При этом занято уже две Ваших линии. Если Вам после этого поступит третий вызов, то он займёт последнюю выделенную Вам линию, и Вы не сможете, не подвесить текущий разговор на Hold, чтобы поговорить со второй линией, ни перевести звонок на другой ext. Для этого есть возможность зарезервировать последнюю доступную линию на такой случай.
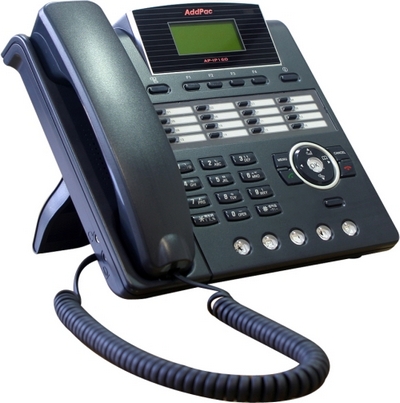
Рассмотрим типовые случаи настройки IP телефона на примере телефонного аппарата Addpac. Настройку IP телефона произведем для двух вариантов его подключения: к аппаратной IP-ATC AddPac IPNext и к программной системе IP-телефонии 3CX Phone System.
Настройка IP-телефона для работы с IP-ATC AddPac IPNext
Порядок настройки IP-телефона для работы с IP-ATC:
а) Подключите телефон через LAN разъем к сети, затем нажмите кнопку MENU и в интерфейсе телефона перейдите:
Menu => Network Setup => Internet Setup (далее выбираем тип: DHCP или статический IP)
Теперь необходимо указать адрес SSCP (адрес IPNext)
Menu => Network Setup => SSCP Setup => Use SSCP => Enable
Menu => Network Setup => SSCP Setup => CM Setup => Call Manager1 (вводим IP адрес АТС IPNext)
б) Те же самые настройки можно произвести через WEB-интерфейс телефона.
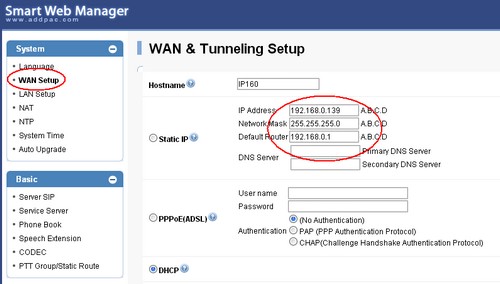
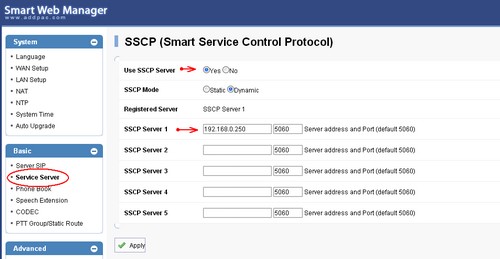
На этом настройка IP телефона закончена. Теперь телефон сообщается с IPNext по фирменному протоколу AddPac SSCP. Далее все настройки производим на IP-АТС через web-интерфейс.
Заходим на Smart Multimedia Manager IPNext
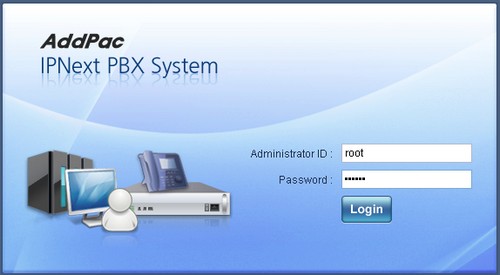
Выбираем меню Extensions, и подменю Terminals.
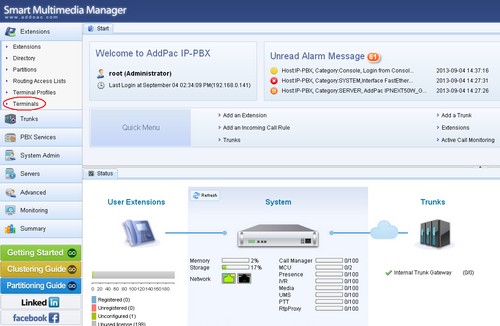
Здесь мы видим наш телефон, запросивший авторегистрацию (его модель, IP адрес, MAC адрес). Теперь нам нужно назначить ему номер. Нажимаем Modify.
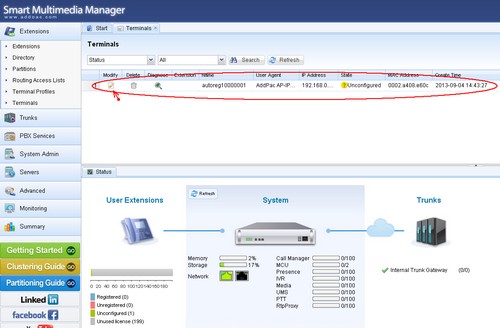
Заполняем поля отмеченные звездочкой:
Extension * -внутренний номер телефона. Обязательно нажимаем Check Extension для проверки доступности номера!
First Name * — Имя
Last Name * — Фамилия
User ID * — для идентификации на персональном портале
Voice Mail Password * — пароль для голосовой почты
SIP Username, SIP Password * — логин/пароль для возможности регистрации по SIP с софт-телефона
И нажимаем Apply.
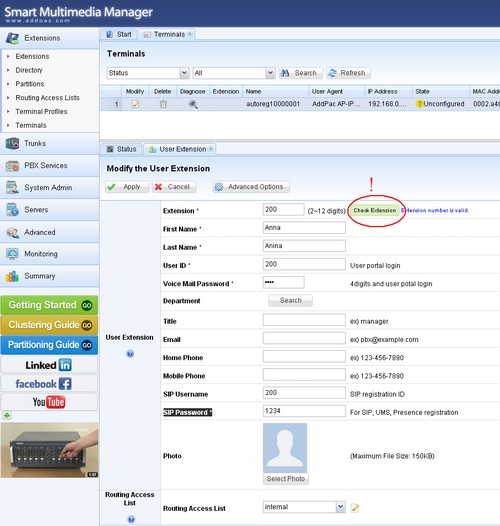
Теперь в меню Extensions мы можем наблюдать новый номер.
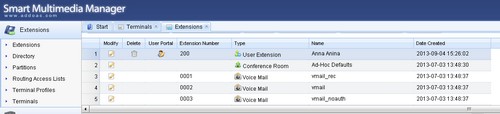

На самом аппарате должен высветится значок подключения ?и номер внутреннего абонента.
На этом настройка IP телефона для работы с IP-ATC AddPac IPNext успешно завершена.
Настройка IP-телефона для работы с 3CX Phone System
Настройка IP телефона (на примере Addpac AP-IP90) для работы с программной IP АТС 3CX начинается с регистрации внутреннего номера на сервере 3CX. Для этого перейдите во вкладку Внутренние номера и нажмите Добавить Номер.
Обращаем ваше внимание, что AddPac IP90 не понимает русский Caller Name, т.е. если на него приходит вызов с любого другого телефона, где имя-фамилия абонента на русском, разговор рвется через 30 секунд. С латиницей этого не происходит.
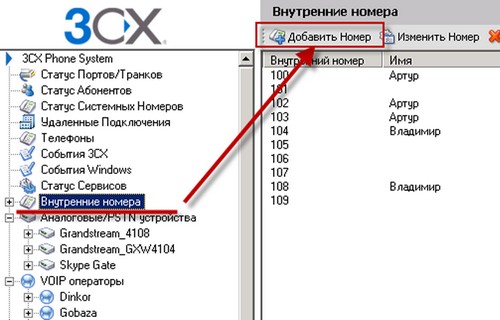
Затем задайте настройки внутреннего номера, в том числе и пароль.
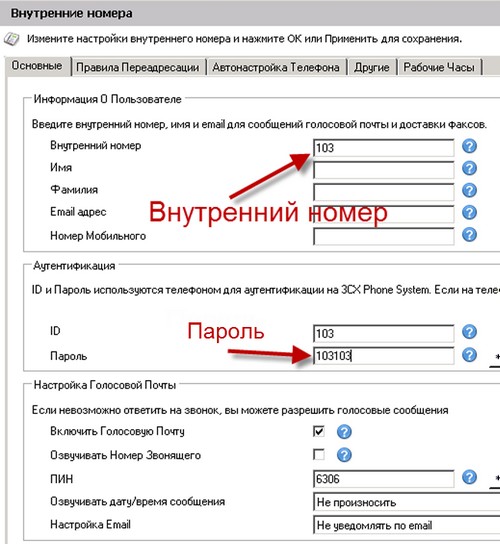
Настройки в сервере 3CX Phone System на этом окончены.
Далее подключите IP телефон к АТС, для этого используйте программу удаленного доступа Telnet. Чтобы общение с аппаратом стало возможно нужно включить Telnet на своем компьютере (для Windows 7: Пуск – Панель управления – Программы и компоненты – Включение и отключение компонентов Windows) и узнать IP адрес вашего телефона.
Подключите телефон через LAN разъем к сети, затем нажмите кнопку MENU и в интерфейсе телефона перейдите Сетевые настройки – Настройки LAN. Здесь либо включите DHCP (автоматическое получение IP адреса в сети) либо задайте статический адрес. Для примера, мы задали — 192.168.0.112. Этот адрес будет фигурировать в дальнейших настройках телефона
Запускаем командную строку cmd и вводим:
Если компьютер нашел устройство по telnet, то IP–телефон запросит у вас login – root password – router. Выглядит в командной строке все так:
Copyright (c) 1999-2010 AddPac Technology Co., Ltd.
User Access Verification
IP90> enable – нужно задать эту команду, что открыть доступ к телефону
Далее введите команду, которая показывает все настройки вашего телефона show run – и сравните с тем, какие настройки должны быть для корректной работы AP IP90. Работающие настройки телефона приведены ниже (шаблон).
Для корректировки настроек используйте команду conf t или configure terminal:
Здесь вы можете изменить настройки IP телефона. Например, при подключении телефона к 3CX Phone System (для регистрации внутреннего номера) важна команда sip – ua. Вводите эту команду и перепишите все настройки sip – ua, как показано в шаблоне. Чтобы отменить неверно введенную команду используйте no.
Также особое внимание нужно уделить настройкам dial-peer. Именно эти настройки позволяют вашему телефону совершать входящие и исходящие звонки. Внимание, если dial-peer не настроены, соединение установить не удастся.
Читайте также:
- Какие скорости имеют современные компьютеры кратко
- Игра где надо доить корову nintendo
- Как сделать электронный дневник на компьютере
- Чипсет z490 и z590 разница
- Как открыть it2 файл
SIP телефон Avaya J159 IP PHONE (700512394)
Код: 700512394
32 879 руб.
Avaya J159 – новинка серии J компании Avaya. Это многофункциональный высокопроизводительный SIP телефон с двумя цветными дисплеями высокого разрешения, персонализированным пользовательским интерфейсом и широким набором функций, отвечающим ежедневной потребности пользователей качественной голосовой связи.
Характеристики:
- 2 цветных дисплея: основной дисплей 2,8” (320 x 240 pixels); дополнительный дисплей 2,3” (160 x 240 pixels)
- 48 программируемых кнопок (всего для 2-х дисплеев). Возможные конфигурации для основного дисплея: 6 страниц по 4 (режим с двумя столбцами)/12 страниц по 2 (в режиме с одним столбцом). Конфигурация для дополнительного дисплея: 4 страницы по 6
- 4 софт-клавиши
- 16 кнопок с фиксированными командами: вызов, сообщения, контакты, история, дом, навигационный кластер, гарнитура, динамик, громкость, отключение звука, перевод вызова, конференц-связь, удержание, повторный набор.
- Двухдиодная индикация кнопок (10 зеленых/красных светодиодных индикаторов)
- Громкоговоритель Full Duplex
- Поддержка широкополосного звука высокой четкости
- Поддержка Wi-Fi (подключение при помощи дополнительного беспроводного модуля J100)
- Поддержка проводной гарнитуры (EHS)
- Поддержка протоколов SIP и H.323
- Поддержка платформ (минимальные требования): Avaya Aura Platform 6.2 FP4; Avaya IP Office 11.0.4.2; сторонние платформы, утвержденные Avaya
- PoE 802.3az (класс 1) с поддержкой спящего режима
- Gigabit Ethernet (10/100/1000) х2
- USB Тип A
- Персонализированный пользовательский интерфейс
- Встроенные и загружаемые мелодии
- Поддержка русского языка
- Подставка: 2 позиции; возможность крепления к стене
- Источник питания AC-DC 5 вольт (опционально)
- Цвет: черный кобальт
Смотреть руководство для Avaya J159 ниже. Все руководства на ManualsCat.com могут просматриваться абсолютно бесплатно. Нажав кнопку «Выбор языка» вы можете изменить язык руководства, которое хотите просмотреть.
MANUALSCAT | RU
Вопросы и ответы
У вас есть вопрос о Avaya J159, но вы не можете найти ответ в пользовательском руководстве? Возможно, пользователи ManualsCat.com смогут помочь вам и ответят на ваш вопрос. Заполните форму ниже — и ваш вопрос будет отображаться под руководством для Avaya J159. Пожалуйста, убедитесь, что вы опишите свои трудности с Avaya J159 как можно более детально. Чем более детальным является ваш вопрос, тем более высоки шансы, что другой пользователь быстро ответит на него. Вам будет автоматически отправлено электронное письмо, чтобы проинформировать вас, когда кто-то из пользователей ответит на ваш вопрос.
Задать вопрос о Avaya J159
- Бренд:
- Avaya
- Продукт:
- телефоны
- Модель/название:
- J159
- Тип файла:
- Доступные языки:
- английский
Сопутствующие товары Avaya J159
Quick Reference for Avaya J159 SIP IP Phone in Avaya Aura
Release 4.1.1 Issue 3
May 2023 2020-2023, Avaya Inc.
All Rights Reserved.
Main menu The following table lists the Main menu icons used in Avaya J159 IP Phone:
Icons Name Description Features To access administrator
activated features.
Applications To access phone applications such as Contacts, Recents, Calendar, My Presence, and Activate screen saver.
To sign off the phone, to protect your settings, or to let another user log in.
Settings To change your phone settings, customize button labels, adjust brightness, audio settings, assign speed dial entries, etc. Used to view the connected USB devices such as USB stick and keyboard.
Network information
To check network settings.
Administration To access administration settings.
Table continues
Icons Name Description About To view the phone model,
software version, default device type, and the default server type.
General phone icons The following table lists the icons used in Avaya J159 IP Phone:
Icon Description Microphone is muted.
Missed call on your phone. You can see the Missed Call icon in the Recents application. Incoming call indicates you answered this call. You can see the Incoming Call icon in the Recents application. Outgoing call indicates you made this call. You can see the Outgoing Call icon in the Recents application. The Bridged Call icon indicates the line is used for a call on another phone. Incoming call is alerting.
Outgoing call indicates you made this call.
Call is active.
Call is on hold.
Call is on hold during a conference or transfer call setup.
Conference is active.
Conference is on hold.
Use the Right or Left navigation arrow to see more pages, screens, or options. Scroll left for more options.
Table continues
Icon Description Scroll right for more options.
Team icon indicating the team member is available.
Team icon indicating the team member is busy on a call and unavailable.
Team icon indicating the team member is not on a call, but is forwarding incoming calls. Team icon indicating the team member is busy on a call and is forwarding incoming calls. Indicates that the phone is not connected to the call server and operates in Failover mode. Some features might not be available or work incorrectly. If the appearance line displays this icon, it indicates that the phone encountered a failure and preserved the media session until the user hangs up. This icon can also indicate that the phone is connected to the call server but the features are not available. The EC500 feature is on.
The Do not disturb feature is on.
The Send All Calls feature is on.
The Call forward feature is on.
Indicates that the call uses a wideband codec for excellent voice quality.
Indicates a low network performance or local network issues that might result in lower call quality. The Limit Number of Concurrent Calls (LNCC) feature is on.
Indicates that the SLA Mon agent took control of the phone.
Table continues
1
Icon Description Indicates that the call is recorded for SLA Mon.
Indicates that the audio of this call is secure.
Indicates that the audio alert for incoming calls is off.
Indicates the Bluetooth feature is on.
Indicates that you missed a call. The number in the icon indicates the number of missed calls. In the example icon, the agent missed 9 calls. Indicates that you missed a call. The plus sign (+) in the icon indicates that the number of missed calls is more than 9. Autodialing feature.
Toll call.
Toll-free call.
Wi-Fi icons The following table lists the Wi-Fi icons used in the Avaya J159 IP Phone:
Icon Description Non-secure Wi-Fi network is detected.
Secure Wi-Fi network is detected.
Wi-Fi network is out of range or offline.
Getting started Logging in to your phone Your extension and password are provided by your administrator.
1. On the Login screen in the Username field, type your extension.
2. Press Enter.
3. In the Password field, type your password. 4. Press Enter.
Single sign-on login With the Single sign-on (SSO) feature, you can log in to your Avaya J159 IP Phone with your corporate login credentials. Your administrator configures the SSO feature for your extension. To log in use a QR code or an URL link. The QR code and the URL link redirect you to the SSO login page of your organization. After the SSO authentication, your phone automatically enters your SIP credentials and logs you into the phone. If the SSO login feature is active on your extension, you or any other user cannot use the SIP credentials to log into the phone. When the SSO feature is active, the phone disables the guest login and the phone lock features. When the SSO and Multiple Device Access (MDA) features are active on your extension, use the SSO login for all the MDA devices.
Logging into your phone with the SSO QR code Use this procedure to log into your phone with your Single sign-on (SSO) credentials. Your administrator configures the SSO feature for your extension. After the SSO authentication, the phone automatically enters the SIP credentials and logs you into the phone. Ensure the following:
Your administrator configures the SSO feature. Your mobile device can scan a QR code.
1. On the Single Sign On screen, press Login. The phone screen displays the QR code and the timer. After the timer runs out, the QR code expires.
2. From your mobile device, Scan the QR code. 3. The QR code scan displays an URL link on your
mobile device. Tap the URL link. The screen displays the SSO login page of your organization.
4. On the SSO login screen, enter your corporate username and password. The phone screen displays the Successful authentication message.
5. Follow the screen prompts. You are logged into your phone.
Logging into your phone with the SSO URL Use this procedure to log into your phone with the Single sign-on (SSO) credentials. Your administrator configures the SSO feature for your extension. After the SSO authentication, the phone automatically enters the SIP credentials and logs you into the phone. Ensure that your administrator configures the SSO feature.
1. On the Single Sign On screen, press Login. 2. Press Link.
The phone screen displays the URL and a dynamically generated User code for verification.
3. Enter the URL in your computer browser and follow the prompts. The screen displays the SSO login page of your organization.
4. On the SSO login screen, enter your corporate username and password.
5. Follow the screen prompts. You are logged into your phone.
Logging out of your phone Use this procedure to log out of your primary extension when you log in through a Single sign-on (SSO) or SIP login. You can also log out of the SIP login as a guest user.
Note: After a guest user logs out, the phone logs back the primary user.
1. Press Main Menu. 2. Scroll to Applications and press Select. 3. Scroll to Log out and press Select. 4. In the confirmation window, press Log out.
Locking your phone Lock the phone to prevent unauthorized usage. Locking the phone does not log you out. You can still receive all incoming calls and make calls to emergency numbers.
1. Press Main menu. 2. Select Applications > Lock.
2
Operations Making a call by using speed dial Ensure you have speed dial numbers assigned to your contacts.
Press and hold the dial pad key assigned to the number you want to call.
Making an emergency call Ensure that the Emerg soft key is assigned by your administrator.
Do one of the following: On the Phone screen, press the Emerg soft key,
and again press Emerg when the phone prompts you for confirmation.
Dial the emergency number by using the dial pad.
Answering a call when on another call You can receive a call on a secondary call appearance only if the call appearance is free.
Press one of the following: The Answer soft key OK Button
The phone puts the first call on hold and moves to the second call.
Adding a person to an active call You can add participants to an active call to set up a conference call. Start a call.
1. During a call, on the Phone screen, press Conference button or press More > Conf. The phone puts the existing call on hold.
2. To make a call to a participant, do one of the following: Dial the phone extension by using the dial pad. Call the person from the Contacts list or the
Recents list. Redial the last dialed number by using the Redial
button. Highlight the extension on the phone screen, and
press Conference button. 3. When the third participant answers the call, press the
Join soft key or press Conference button. 4. To add another person, press Add and repeat Steps 2
and 3.
Contacts
Adding a contact from the Recents list Use this procedure to add a number to your Contacts list from your call history.
1. Press Recents. 2. Scroll to the required number and press +Contact. 3. In the First name and Last name fields, type the
relevant information. The phone assigns the extension number to Last name. You can remove the extension number from this field and add other information.
4. Press Save.
Combining contacts Use this procedure to merge the phone number of the current contact with the existing local contact. Ensure the Contacts list is not empty.
1. Press Contacts. 2. (Optional) To navigate through Main menu, do the
following: a. Scroll to Applications and press Select. b. Scroll to Contacts and press Select.
3. Scroll to the contact that you want to combine, and press Details > More > Combine. The select mode displays the Contacts list without the current content.
4. To combine the current contact, scroll to the existing contact, and press Select. The current contact will be deleted from the Contacts list and merged with the local contact.
Creating a local ontacts group 1. Press Contacts. 2. (Optional) To navigate through Main menu, do the
following: a. Scroll to Applications and press Select. b. Scroll to Contacts and press Select.
3. Press More. 4. Press Groups. 5. Press NewGroup. 6. In the Enter group name field, type your group name. 7. Press Save.
Advanced features
Avaya Spaces Calendar integration Avaya Spaces is a cloud-based team collaboration and meeting application. You can use it for instant messaging, voice and video communication, track communications, and manage tasks. For more information about Avaya Spaces, see Using Avaya Spaces guide.
With the Avaya Spaces Calendar integration feature, you can press the Call soft key on the calendar appointment of your phone and join a meeting hosted on Avaya Spaces. The phone dials into the meeting phone number and enters the Space ID and Space password automatically without any further user input.
The Avaya Spaces Calendar integration feature is optimized to work when meeting organizers use the Avaya Spaces Outlook plugin. For more information about the Outlook plugin, see the Microsoft Outlook Add-on section of the Avaya Spaces user guide.
Joining an Avaya Spaces meeting through a direct dial-in phone number You can use a direct dial-in phone number to connect to the Avaya Spaces audio-only meeting. If you choose to join the meeting through the direct number, enable the Prompt direct number feature. The phone displays the direct numbers from the meeting invitation. Choose the direct number of your country. If your country is not listed, you can select the direct phone number of the country that is most appropriate to your location. The phone dials in the number and enters the Space ID and optional password to join the meeting. Ensure that your administrator enables the Avaya Spaces feature and the option to select a direct number. Enable the Prompt direct number option.
1. Press Main Menu. 2. Scroll to Applications and press Select. 3. Scroll to Calendar and press Select.
The phone displays the appointments in the start-time order.
4. To scroll from one appointment to another, press one of the following: The Up Arrow key. The Down Arrow key.
5. Select an Avaya Spaces calendar event and press Call.
3
6. In the Country > Select direct number screen, press one of the following: Select: To call the direct number available for the
selected country. The phone dials in the number and enters the Space ID and optional password to join the meeting.
Country: To select the direct number of a different country. The Direct numbers > Select Country screen displays a list of countries for selection.
Details: To view the details of the selected direct number. The Direct number > Details screen displays the information.
Preventing duplicate audio streams on Avaya Spaces application For a smooth audio experience, prevent duplicate audio streams. You can establish an audio session to Avaya Spaces using Avaya J100 Series IP Phones and use the Avaya Spaces application on your computer to view the presentation. To prevent duplicate audio session on your Avaya Spaces application, use this procedure.
1. Log on to Avaya Spaces application on your computer.
2. On application screen, click on the display name. 3. Select User Preferences option. 4. On the left panel, select Meeting defaults. 5. Toggle to enable Show preview when joining. 6. Join a meeting on spaces from your computer. 7. On the Preview screen, click Other join options >
Join By Phone. 8. On the Join Presentation Mode, follow the screen
instructions. You join the Avaya Spaces meeting as a view-only participant on your computer without using an audio and video session. The audio session is established on your phone.
Call forwarding to your cell phone using EC500 Use this procedure to forward calls from your Avaya deskphone to your personal phone.
Ensure that your administrator enables the feature. Ensure that the system administrator sets your
personal phone number as your destination number. 1. Press the Main menu and scroll to Features. 2. Press Select.
3. Scroll to EC500 and press Select.
Making a priority call Use the Priority Calling feature to provide users with a special internal call alert. The called party hears a distinctive ringing when the calling party uses Priority Calling. The call rings even at an extension with Do not disturb enabled. Ensure that the administrator enabled the feature invocation target selection.
1. Press the Main menu. 2. Scroll to Features and press Select. 3. Scroll down to Priority Call, press OK, or press the
corresponding line button. You can see the Select a destination dialogue box.
4. Do one of the following to enter the number you want to set as a priority: Press the Dial soft key to use the dialpad and
manually enter the number. Press Contacts, Recents or Phone button to
select the number from the list. Press the Browser soft key to select the destination
number from the browser application. Press the Autodial, Busy indicator or Team line
key to select the number as destination target. The Priority feature is activated.
5. Press Enter or OK to activate the feature in case of manual dialling.
6. (Optional) To cancel the priority call, press the Cancel soft key.
Listening to your voicemail Use this procedure to listen to your voicemail on your phone.
Ensure that the system administrator configures the voicemail for your extension.
Obtain the user ID and password of your voicemail from your system administrator.
1. To log in to your voicemail, press the Message button. 2. Follow the voice prompts to playback your voice
messages.
Making a precedence call by using the Main menu 1. Press Main Menu.
2. Scroll to Applications and press Select. 3. Select Call Priority. 4. On the Precedence Selection screen, select the
precedence level. 5. Dial the extension from one of the following:
Contacts Recents The dial pad
Joining a call on a bridged line On the phone, do one of the following: Press the line button with the active call. Select an active bridge line number and press
Bridge.
Note: Do not use Headset, Handset or Speaker softkeys to join the call on a bridged line. Pressing Headset, Handset or Speaker opens the Dial screen. To cancel dialing and to press the required line button for joining a call, press the Headset, Handset or Speaker softkey again.
Using a Guest Login Use this procedure to log in as a guest on another phone to access your applications and call history for a limited time.
Note: You need to re-login if the phone reboots.
Ensure that your administrator enables the feature.
1. Press Main Menu. 2. Scroll to Applications and press Select. 3. Scroll to Guest login and press Select. 4. Enter your extension and password. 5. Press one of the following to set the duration in hours:
Right arrow key: To increase the value. Left arrow key: To decrease the value.
6. Press Enter.
Call Transfer With the Call Transfer feature, you can transfer your call to another destination number.
4
Depending on your requirement, your adminstrator configures the call trasfer type. The types of Call Transfer are:
Consultative transfer: Transferring a call by connecting a call with the transfer recipient.
Blind transfer: Transferring a call without connecting a call with the transfer recipient.
Making a consultative transfer Transfer a call by connecting a call with the transfer recipient. Ensure that your administrator enables the feature.
1. While on an active call, press Transfer soft key or Transfer button. The phone displays the Select a destination dialogue box. The first call is placed on hold.
2. Do one of the following and then press the Call soft key : Dial the number to transfer the call. Search for the number in Contacts or Recents. Press the Team line key to transfer the call to the
configured team button. Redial the last dialed number by using the Redial
button. Highlight the extension on the phone screen, and
press Transfer button. You must configure the team button to use as your target selection.
3. To initiate a consultative transfer, press Talk. The call transfer recipients phone starts ringing.
4. Do one of the following: Press Complete or Transfer button after the
recipient answers the call. The call transfer is complete. This is also called attended transfer.
Press Complete or Transfer button after the recipients number starts ringing. The call transfer is complete. This is also called unattended transfer.
Making a blind transfer Use this procedure to transfer an active call without connecting a call with the transfer recipient.
Ensure that your administrator enables the feature.
1. While on an active call, press Transfer or Transfer button. The phone displays the Enter Transfer Destination screen.
2. Do one of the following and then press the Call soft key: Dial the number to which you want to transfer the
call. Search for the number in the Contacts or Recents
list. Redial the last dialed number by using the Redial
button. Highlight the extension on the phone screen, and
press Transfer button. 3. To initiate a blind transfer, press Now or Transfer
button. The call transfer is complete.
Customization
Enabling and disabling Bluetooth You can use Bluetooth enabled devices with your phone. Ensure the wireless module is installed in your phone.
1. Press Main Menu. 2. Scroll to Settings and press Select. 3. Scroll down to Bluetooth and press Select. 4. Scroll to Bluetooth headset and press one of the
following: Toggle: To enable or disable Bluetooth. Right Arrow key: To enable Bluetooth. Left Arrow key: To disable Bluetooth.
Note: For some Bluetooth headsets, volume can be adjusted during the first call after rebooting the phone. Toggle the slider of the pop-up panel to the right to increase the volume, and to the left to decrease it.
Pairing a Bluetooth enabled headset with your phone You can pair a maximum of six Bluetooth-enabled headsets with the phone, but you can use only one
headset at a time. The phone displays the list of available devices and paired devices.
Ensure the wireless module is installed on your phone.
Ensure that your administrator enables the feature. Ensure your Bluetooth headset is in pairing mode.
1. Press Main Menu. 2. Scroll to Settings and press Select. 3. Scroll down to Bluetooth and press Select. 4. Scroll to Devices and press Select.
The phone scans and displays the list of Bluetooth- enabled devices.
5. To pair a device, scroll to the headset and press Pair. 6. To disconnect a paired headset, under Paired devices,
press Disconnect. 7. To unpair a paired headset, under Paired devices,
press Forget.
Customizing phone keys Use this procedure to add, relabel, move, or delete contacts, features, or applications from the Phone screen. Ensure that the administrator has set Full or Limited customization mode. You cannot customize phone keys in the Blocked mode and can only customize labels and Contact and Application favorites in the Limited mode.
1. Press Main Menu. 2. Scroll to Settings and press Select. 3. Scroll to Phone and press Select. 4. Scroll to Phone keys customization and press
Select. The customization menu is not available in the Blocked mode.
5. Press the Customize key. 6. Use the Navigation keys to select the line key. 7. (Optional) On the phone screen, if the selected line is
empty, press Add, and do the following: To add a contact, press Contact. To add a feature, press Feature.
The option is not available in the Limited mode. To add an application, press App.
You can use the Navigation keys to scroll to the required functionality and press Select.
8. To move the selected line key, do the following: a. Press Move. b. Use the Navigation keys to move the selected
line key.
5
c. (Optional) If the new location is empty, press Select.
d. (Optional) If the new location is already assigned a key, press Swap.
9. To set a new label, do the following: a. Press Relabel. b. Type the name of the label. c. If your native language uses extended Latin or
non-Latin symbols, press the More > Symbol soft key to open the Symbols menu and select the necessary symbols there. Press Insert > More > Save.
10. To delete a key, press Delete and confirm the deletion.
Enabling the Away timer 1. Press Main Menu. 2. Scroll to Settings and press Select. 3. Scroll to Applications and press Select. 4. Scroll down to Presence integration and press
Select. 5. Scroll down to Away timer. 6. To turn on the timer, press Toggle to turn on the timer. 7. Use the Down Arrow key to go to Away timer value. 8. Enter the time in seconds.
You can enter any value from 0 to 999. 9. Press Save.
Changing the background image Use this procedure to set the background image for the primary display of the phone.
1. Press Main Menu. 2. Scroll to Settings and press Select. 3. Scroll to Display and press Select. 4. Scroll to Background and press Select. 5. Scroll to Primary display and press Select. 6. Scroll down to the new image. 7. (Optional) To preview the image, press Preview and
then press Back. 8. Press Select. 9. Press Save.
Setting a personalized ringtone Use this procedure to set a ringtone for different uses.
1. Press Main Menu.
2. Scroll to Settings and press Select. 3. Scroll to Audio settings and press Select. 4. Scroll to Personalize ringing, and press Select. 5. Scroll to one of the following options:
Primary Team Key Bridged CA Call Pickup
6. Press Select. 7. Scroll to the ringtone, and press Select. 8. (Optional) To play the ringtone, press Play. 9. Press Save.
Setting the network mode You can set the network mode to Ethernet or Wi-Fi. You do not need to perform this procedure if your phone is configured to connect to Ethernet or a specific Wi-Fi network. Ensure that the system administrator gave you access to perform this task.
1. Press Main Menu. 2. Scroll to Settings and press Select. 3. Scroll to Network and press Select. 4. Scroll to Network mode.
The Network mode setting shows the following options: Ethernet: To connect to an Ethernet network. Wi-Fi: To connect phone to a Wi-Fi network.
5. Press one of the following: Toggle Right Arrow key Left Arrow key
6. When Network mode displays Wi-Fi, the following lines are shown on the Phone screen: SSID: The name of the Wi-Fi network that the
phone is either currently connected to, or will attempt to connect to if you start the connection process.
Wi-Fi network: Scroll to this line and press Select to view the list of Wi-Fi networks.
7. After selecting the network mode, press Save. 8. When you switch Network mode from Ethernet to
Wi-Fi, see Connecting to a Wi-Fi network section. 9. When you switch Network mode from Wi-Fi to
Ethernet, press Save. 10. When the phone prompts for permission to restart,
press OK.
Press Cancel to go back to previous step.
Connecting to a Wi-Fi network Use this procedure if your phone is not configured to connect to a specific Wi-Fi network.
Ensure that the system administrator gave you access to perform this task.
Select Wi-Fi as your network mode. When you set the network mode, note the SSID, as
this is the name of the Wi-Fi network that the phone will attempt to connect to.
Depending on the type of security in the Wi-Fi network, obtain the required credentials. Contact your system administrator for more details.
Ensure that the system administrator enables hidden Wi-Fi feature.
1. Press Main Menu. 2. Scroll to Settings and press Select. 3. Scroll to Network and press Select. 4. To access the list of available Wi-Fi networks, scroll to
Wi-Fi network and press Select. The phone displays all available Wi-Fi network, including the hidden Wi-Fi.
5. Scroll to the required Wi-Fi network and press Connect to start the connection process. You can connect to the hidden Wi-Fi network.
6. To restart the phone, press OK. 7. If the security is WEP or WPA/WPA2 PSK, in
Password, enter the password for the Wi-Fi network. 8. If the security is 802.1x EAP, enter the following:
Identity: Either your personal user ID or the shared user ID provided by your system administrator.
Anonymous Identity: Leave blank or use the shared Anonymous Identity provided by your system administrator.
Password: Either your personal password or the shared password provided by your system administrator.
If the credentials are authenticated successfully, the phone automatically restarts to complete the connection.
Viewing USB menu Use this procedure to view the USB menu for information on connected USB devices.
6
Connect the USB device to the phone and ensure that USB support is enabled.
1. Press Main Menu. 2. Scroll to Settings and press
| Doc ID | DOCS100800 | |
| Version: | 4.0 | |
| Status: | Published | |
| Published date: | 06 Jul 2020 | |
| Created Date: | 23 Jun 2020 |
| Author: |
Simon Gonzalez |
Details
Please click on the attachment below to download & view the User guide for Avaya J159 IP Phone in an Avaya Cloud Office
Attachment Description
Using Avaya J159 Avaya IP Phone in an Avaya Cloud Office
Attachment File
Using Avaya J159 IP Phone in an Avaya Cloud Office_Issue2.pdf
928K • 3 minute(s) @ 56k, < 1 minute @ broadband
Avaya — Proprietary. Use pursuant to the terms of your signed agreement or Avaya policy
Avaya J159 Manuals come in various types, each serving a specific purpose to help users effectively operate and maintain their devices. Here are the common types of Avaya J159 User Guides and the information they typically include:
- User Manuals: Provide comprehensive instructions on how to use the device, including setup, features, and operation. They often include troubleshooting tips, safety information, and maintenance guidelines.
- Service Instructions: Designed for technicians and repair professionals, these manuals offer detailed information on diagnosing and repairing issues with the device. They include schematics, parts lists, and step-by-step repair procedures.
- Installation Guides: Focus on the installation process of the device, providing detailed instructions and diagrams for proper setup. They are essential for ensuring the device is installed correctly and safely.
- Maintenance Manuals: Provide guidance on routine maintenance tasks to keep the device in optimal condition. They cover cleaning procedures, part replacements, and regular servicing tips.
- Quick Start Guides: Offer a concise overview of the essential steps needed to get the device up and running quickly. They are ideal for users who need immediate assistance with basic setup and operation.
Each type of Avaya J159 instruction is designed to address specific needs, ensuring users have the necessary information to use, maintain, and repair their devices effectively.