

U7062
First Edition V1
Jan. 2012
Xonar Phoebus
PCI Express 7.1-Channel
Gaming Soundcard
Quick Start Guide
U7062_Xonar-Phoebus_QSG.indb 1 18.01.2012 16:12:15 Uhr

Table of content
English ………………………………………………………………………………….. 1
Français ………………………………………………………………………………… 18
Deutsch ………………………………………………………………………………… 33
Italiano ………………………………………………………………………………… 48
Español ………………………………………………………………………………… 63
Português ……………………………………………………………………………… 78
Pyccкий
……………………………………………………………………………….. 93
Türkçe ………………………………………………………………………………. 108
U7062_Xonar-Phoebus_QSG.indb 2 18.01.2012 16:12:15 Uhr

3
ASUS Xonar Phoebus Quick Start Guide
English
1. Introduction
1.1 System requirements
Before installing the Xonar Phoebus audio card, ensure that your computer must meet
the following requirements:
• One PCI Express 1.0 (or higher) compatible slot for the audio card
• 6-pin peripheral power cable connector from your computer’s power supply unit
(PSU)
• Microsoft® Windows® Vista / 7 (32/64bit) / XP (32/64bit) / MCE2005
• Intel® Pentium® 4 1.4GHz or AMD Athlon 1400 CPU or faster CPU
• More than 256 MB system memory
• More than 60 MB available storage space for driver installation
• CD-ROM drive (or DVD-ROM drive) for software installation
• High-quality headphones, powered analog speakers, or a Dolby Digital decoder, to
enjoy the audio card’s high delity sound
1.2 Package contents
Check your ASUS Xonar Phoebus audio card package for the following items:
• ASUS XonarTM Phoebus 7.1 Channel PCI Express Audio Card
• Phoebus Control Box
• Driver CD
• S/PDIF TOSLINK optical adapter x 1
• ATX 4P-to- 6P power cable x 1
• Quick Start Guide
U7062_Xonar-Phoebus_QSG.indb 3 18.01.2012 16:12:16 Uhr
4
ASUS Xonar Phoebus Quick Start Guide
English
2. Hardware
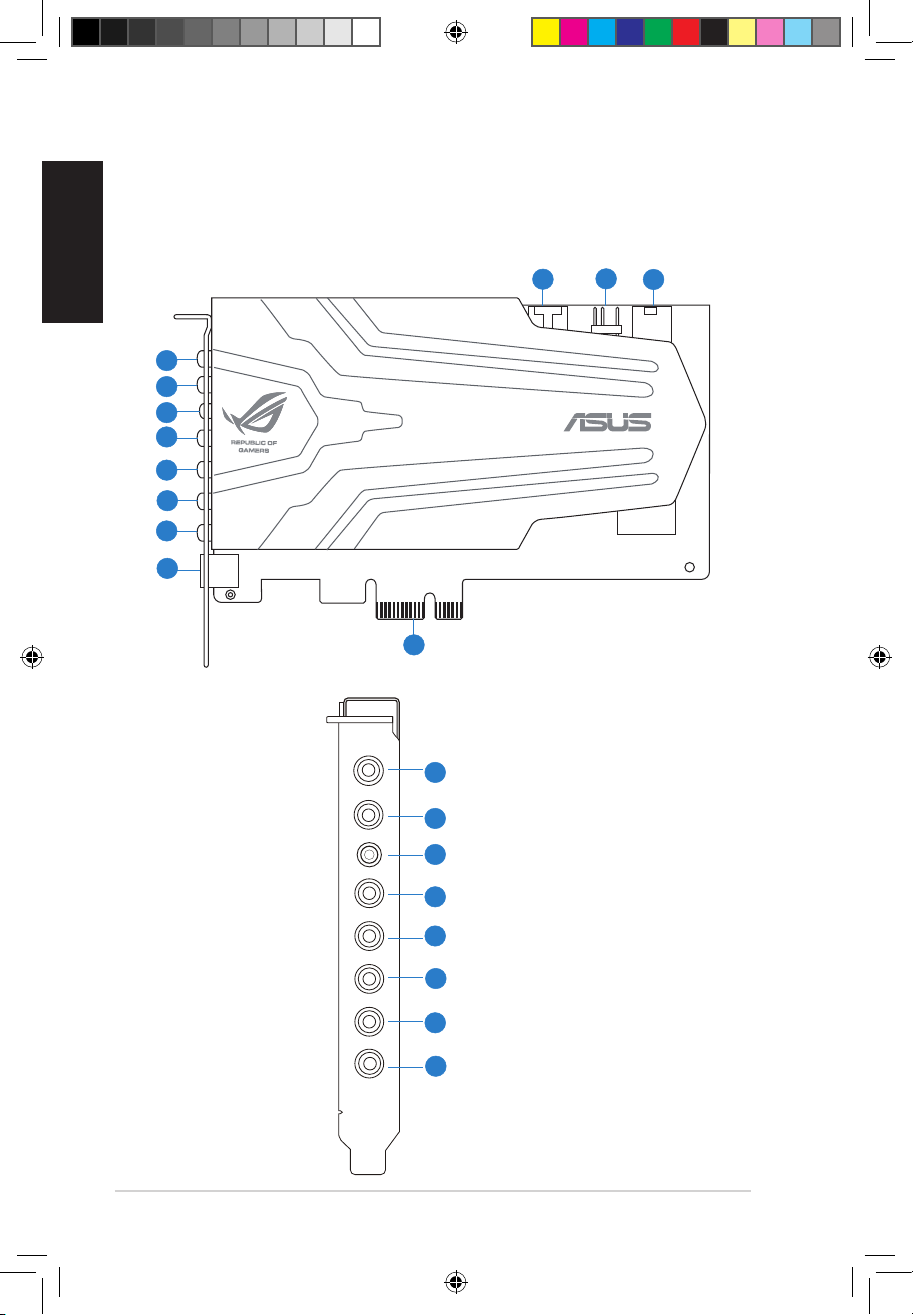
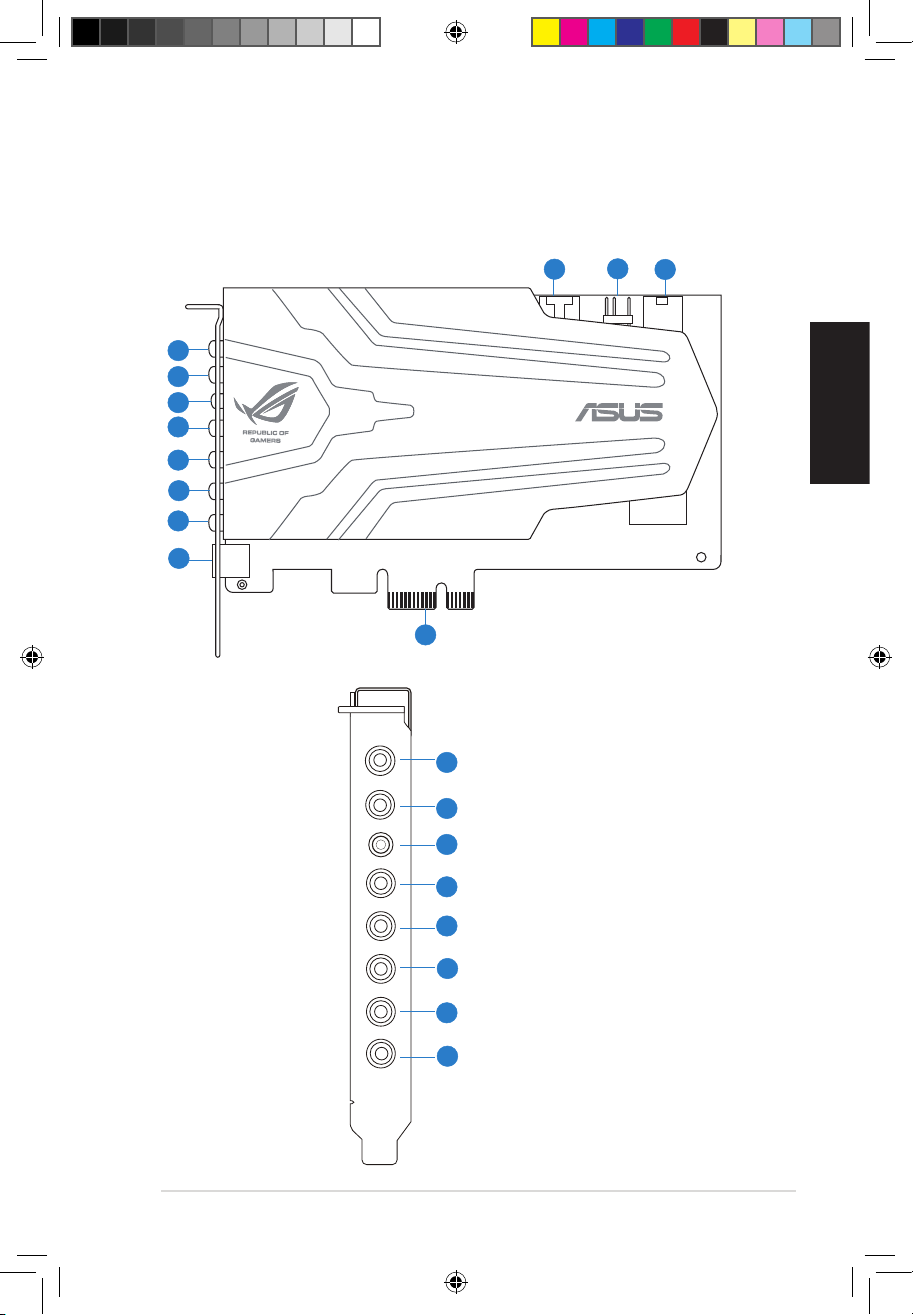
2.1 Xonar Phoebus Audio Processing Card
Mic in
HP out
Box link
Line in
Front
Ctr / Sbw
Rear
Side /
SPDIF out
1
2
3
4
5
6
7
8
1
2
3
4
5
6
7
8
9
10
11
12
U7062_Xonar-Phoebus_QSG.indb 4 18.01.2012 16:12:18 Uhr
5
ASUS Xonar Phoebus Quick Start Guide
English
No Item Description
1 Microphone In port
Connect your external PC microphone to this 3.5mm port
for voice input. Built-in high-quality Microphone preamplier.
2
Headphone Out
port
Connect your headphone to this port.
3 Box Link
Connect the Xonar Phoebus Control Box to this 2.5mm
port.
4 Line In port
Connect analog devices like MP3 players, CD players, music
synthesizers, and other line-level sound sources to this
3.5mm port for audio recording or processing.
5 Front Out port
For 2 channel speaker systems, connects to the front
left/right input on the powered speakers.
6
Center/Subwoofer
Out port
Connect to the center/subwoofer input on 5.1/7.1 powered
analog speakers.
7 Rear Out port
Connect to the back surround input on 7.1 powered analog
speakers.
8
S/PDIF Out/Side
Out port
Digital output port. Connect to an external digital decoder
or digital speaker systems, Home Theater systems, AV
receivers for outputting digital audio including PCM,
Dolby Digital, DTS, WMA-Pro, etc. Connect to the surround
channel input on 5.1 powered analog speakers.
9 Aux Input Header
4-pin header. Usually connects to the Analog Audio output
of TV tuner card or other sound source inside your PC
system. (To monitor your TV tuner card’s audio from this
Aux-In, you must enable the “monitor” function for Aux-In
in the Xonar Audio Center software’s recording mixer.)
10 S/PDIF Out Header
Connect to the graphics card with HDMI support.
11 Power Connector
Connect to the 6-pin power cable of your power supply
unit.
12
PCI Express Bus
Golden Fingers
Insert into the PCI Express slot on your motherboard.
U7062_Xonar-Phoebus_QSG.indb 5 18.01.2012 16:12:19 Uhr
6
ASUS Xonar Phoebus Quick Start Guide
English
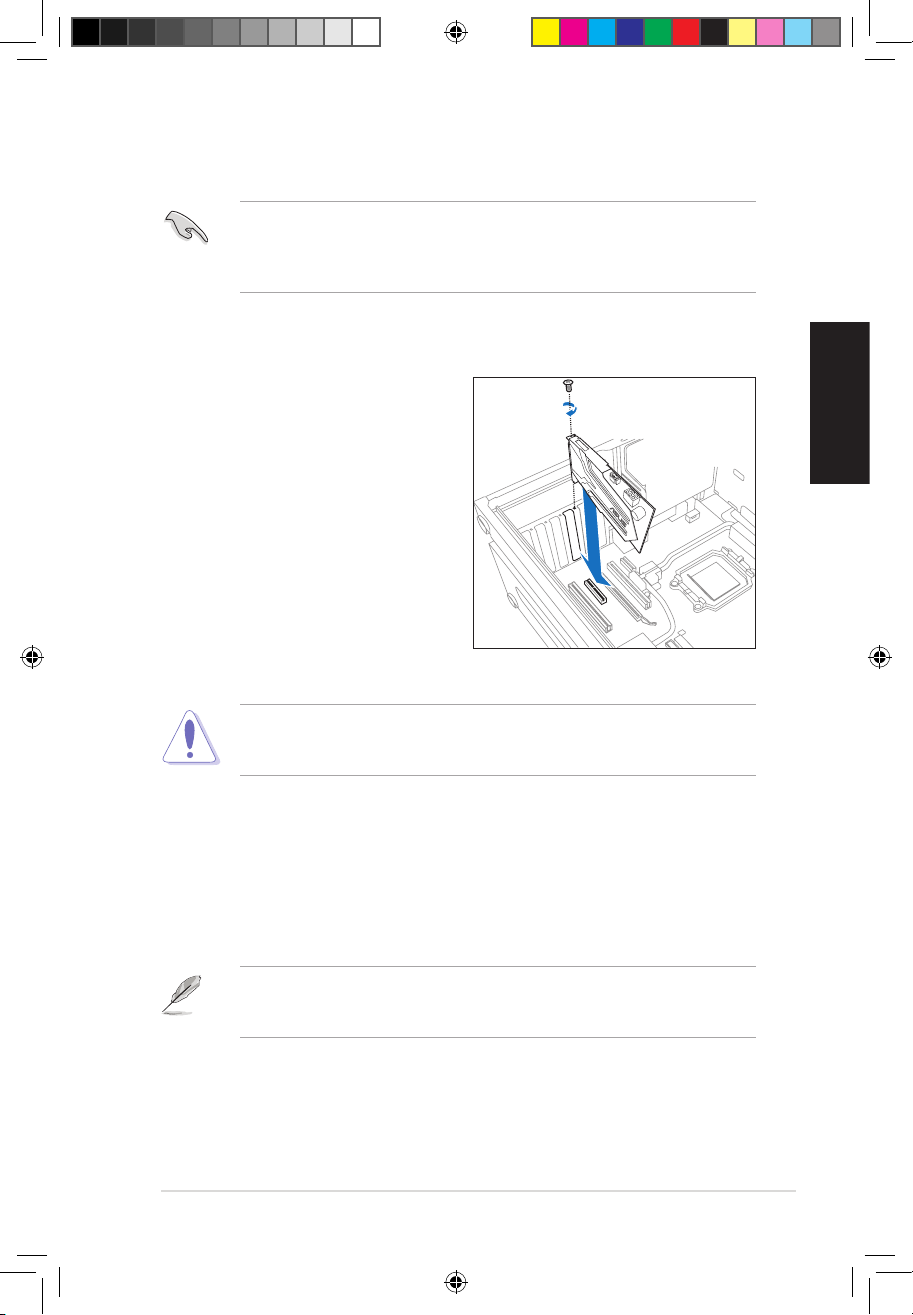
2.1 Card Installation
Before you proceed with the following installation steps, it’s recommended that you
disable your onboard audio device in your BIOS settings, or uninstall any other sound
cards on your PC. (For BIOS setting or uninstallation of other sound cards, please refer
to the user manuals of your motherboard and sound card)
The PCI Express high-quality audio card requires additional power from your
computer. If the power cable is not connected properly, the audio card will not work
at all.
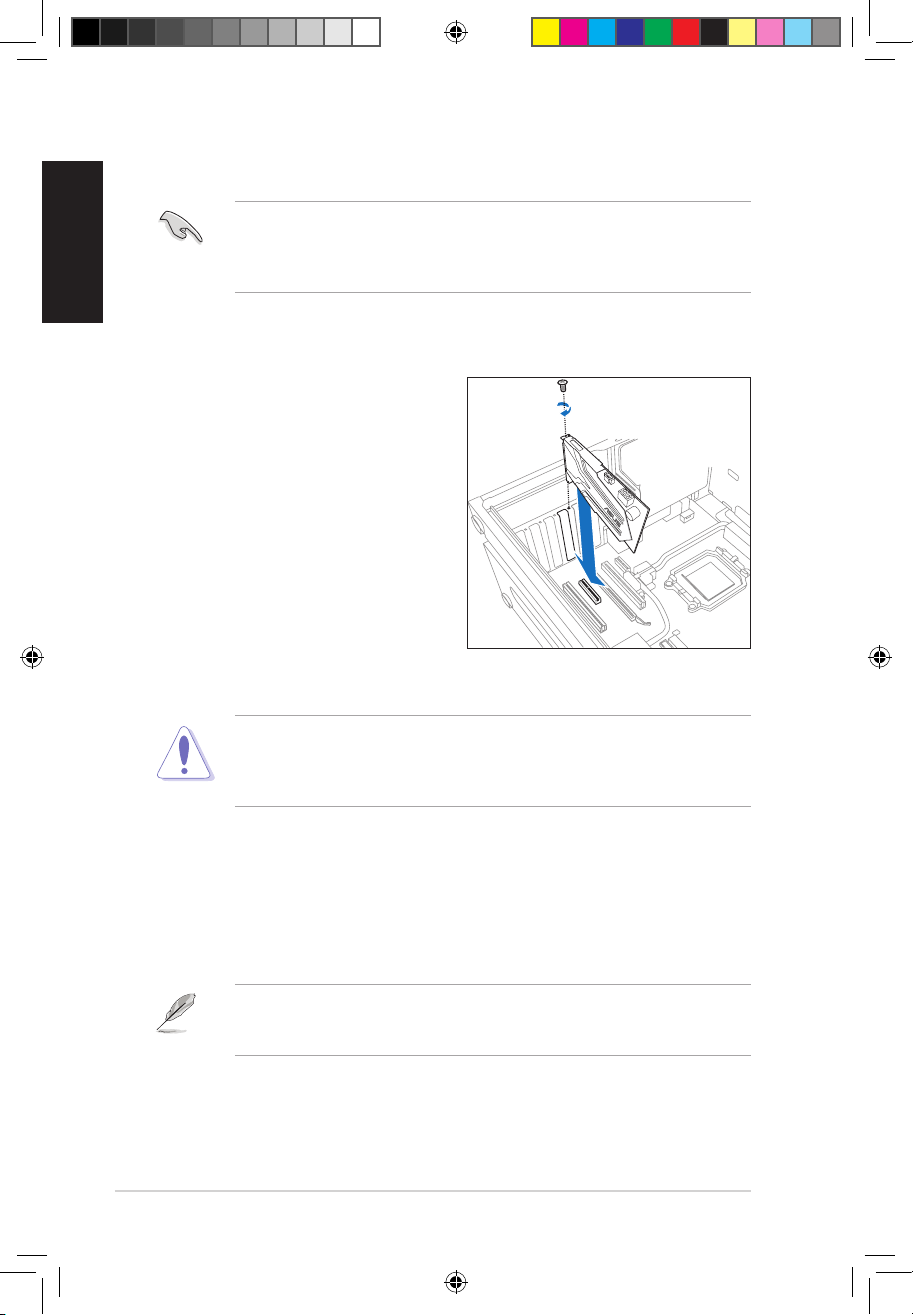
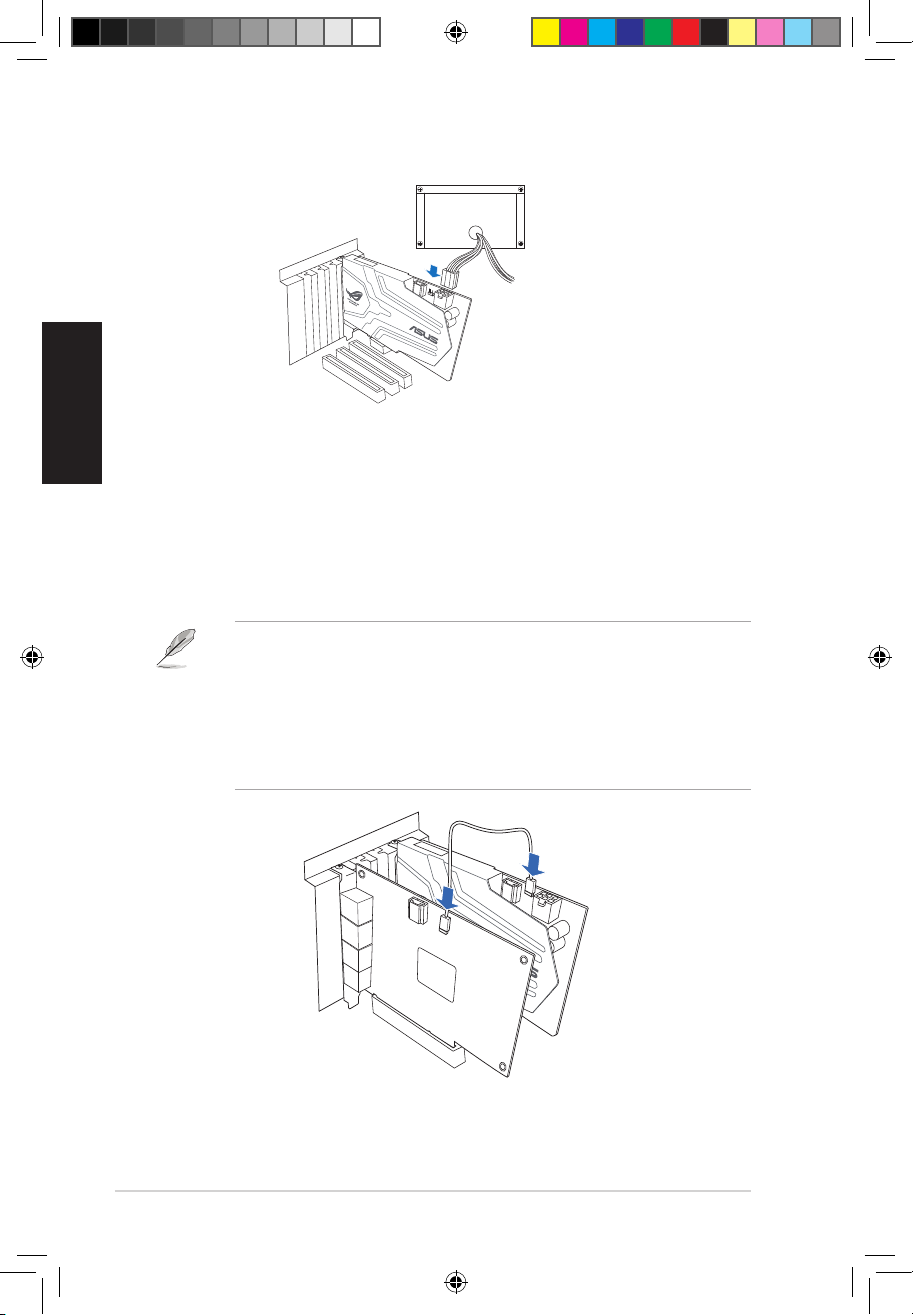
2.1.1 Installing the Xonar Phoebus Card
To install the Xonar Phoebus audio card:
1. Power OFF the computer, the monitor,
and all other peripheral devices
connected to your computer.
2. Unplug the computer power cord from
your computer and power outlet.
3. Touch the metal back or side panel of
the computer to avoid static electricity.
4. Remove the chassis cover.
5. Remove the metal bracket from
an available PCIE slot for the Xonar
Phoebus audio card.
6. Carefully insert the audio card into the PCIE slot. Ensure the audio card sits
properly in place.
Do not force the audio card into the slot. Make sure that the gold pins of the card’s
PCI Express connector are aligned with the motherboard’s PCI Express connector
before you insert the card into the PCI Express slot. If it does not t properly, gently
remove it and try again.
7. Secure the audio card with screws and the metal bracket.
8. Put back the chassis cover.
9. Reconnect all cables.
10. Plug the power cord to the computer and to a power outlet.
11. Power ON the computer.
U7062_Xonar-Phoebus_QSG.indb 6 18.01.2012 16:12:22 Uhr
7
ASUS Xonar Phoebus Quick Start Guide
English
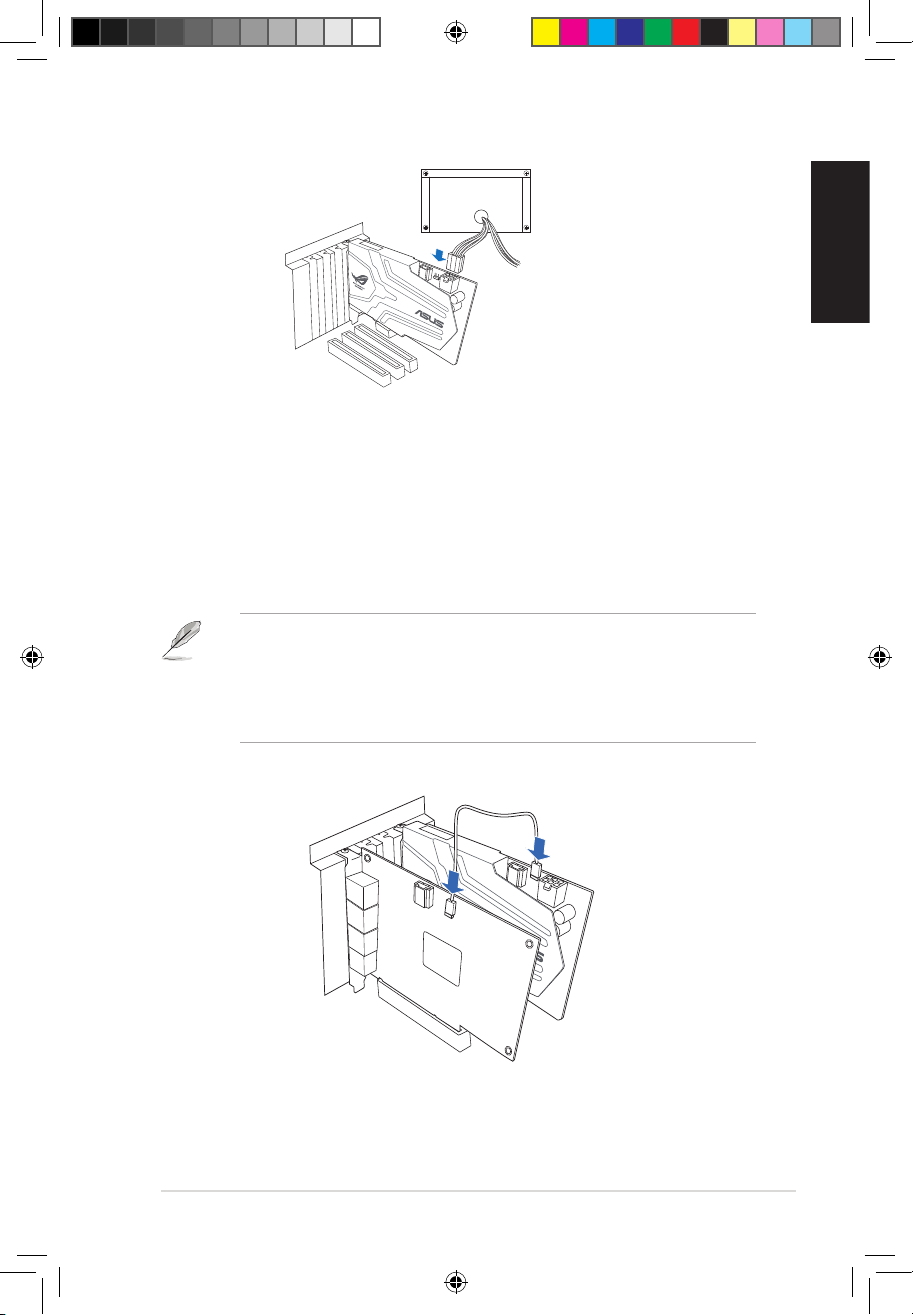
2.1.2 Connecting the TV Tuner Card
If you have a traditional PCI or PCI Express TV tuner card on your computer, you may
need to connect it to the audio card to send the tuner card’s sound to your computer’s
speakers.
1. Secure the PCI/PCI Express TV tuner card and screw it into the back panel.
2. Connect the audio output header from the TV tuner card to the Aux-In header of
the audio card, as shown in the gure below.
For optimum TV audio quality, Xonar uses ADC recording to digitize the signal and
loops it back to DAC playback. Please select Aux-In as the recording source in the
Xonar Audio Center’s recording mixer and enable the monitoring button to pass this
signal to the audio output. Using this setup, you can even turn on sound eects such
as Pro-Logic IIx to expand the stereo TV audio to 5.1 or 7.1 channel surround sound.
TV audio on your PC will become even better than on your TV set!
U7062_Xonar-Phoebus_QSG.indb 7 18.01.2012 16:12:23 Uhr
8
ASUS Xonar Phoebus Quick Start Guide
English
3. Driver Installation
3.1 Installing the Xonar Phoebus Card Driver
To install the Xonar Phoebus card driver:
1. After you have installed the Xonar Phoebus card, turn on your computer. Windows®
automatically detects the audio card and searches for device drivers. When
prompted for the audio drivers, click Cancel.
2. Insert the Support CD into the optical drive. If Windows® Autorun is enabled
in your system, the setup starts automatically. If not, run setup.exe from your
support CD.
3. Follow the onscreen instructions to nish the installation.
The version and content of the support CD are subject to change without notice.
3.2 Uninstalling or Reinstalling the Xonar Phoebus Card
Driver
3.2.1 Uninstalling the Xonar Phoebus Card Driver
To uninstall the Xonar Phoebus card driver:
1. Click Start -> Settings -> Control Panel.
2. Double-click the Add/Remove Programs icon.
3. Click the Change or Remove Programs button.
4. Select each program you would like to remove, and then click the Add/Remove
(or Change/Remove) button.
5. In the InstallShield Wizard dialog box, select the Remove option.
6. Restart your computer when prompted.
3.2.2 Reinstalling the Xonar Phoebus Card Driver
To reinstall the Xonar Phoebus card driver:
1. Before reinstalling any software, it’s recommended to uninstall the existing
software rst.
2. After nishing the uninstallation of the software, please follow the installation
process again to reinstall the same or updated software.
U7062_Xonar-Phoebus_QSG.indb 8 18.01.2012 16:12:23 Uhr
9
ASUS Xonar Phoebus Quick Start Guide
English
4. Connecting Speakers and Peripherals
4.1 Connecting Phoebus Box
4.1.1 Connecting Phoebus Box
4.1.2 Connecting Phoebus Control Box with external headphone and
microphone
No Item Description
1 Microphone In
Port
Connect the microphone’s 3.5mm plug from the Phoebus
Control Box into this Mic-In port for voice communication,
recording or karaoke.
2 Headphone Port
The headphone port has a built-in high-quality amplier
to drive headphones. Connect the Phoebus Control box
directly to this port.
3 Box Link Port
Connect Phoebus Control box directly to this port.
No Item Description
1 Headphone Port
Connect the headphone to the headphone port on the
Phoebus Control box.
2 Microphone In
Port
Connect the microphone’s 3.5mm plug to the Mic-In port
on the Phoebus Control Box.
Mic in
HP out
Box link
Line in
Front
Ctr / Sbw
Rear
Side /
SPDIF out
U7062_Xonar-Phoebus_QSG.indb 9 18.01.2012 16:12:26 Uhr
10
ASUS Xonar Phoebus Quick Start Guide
English
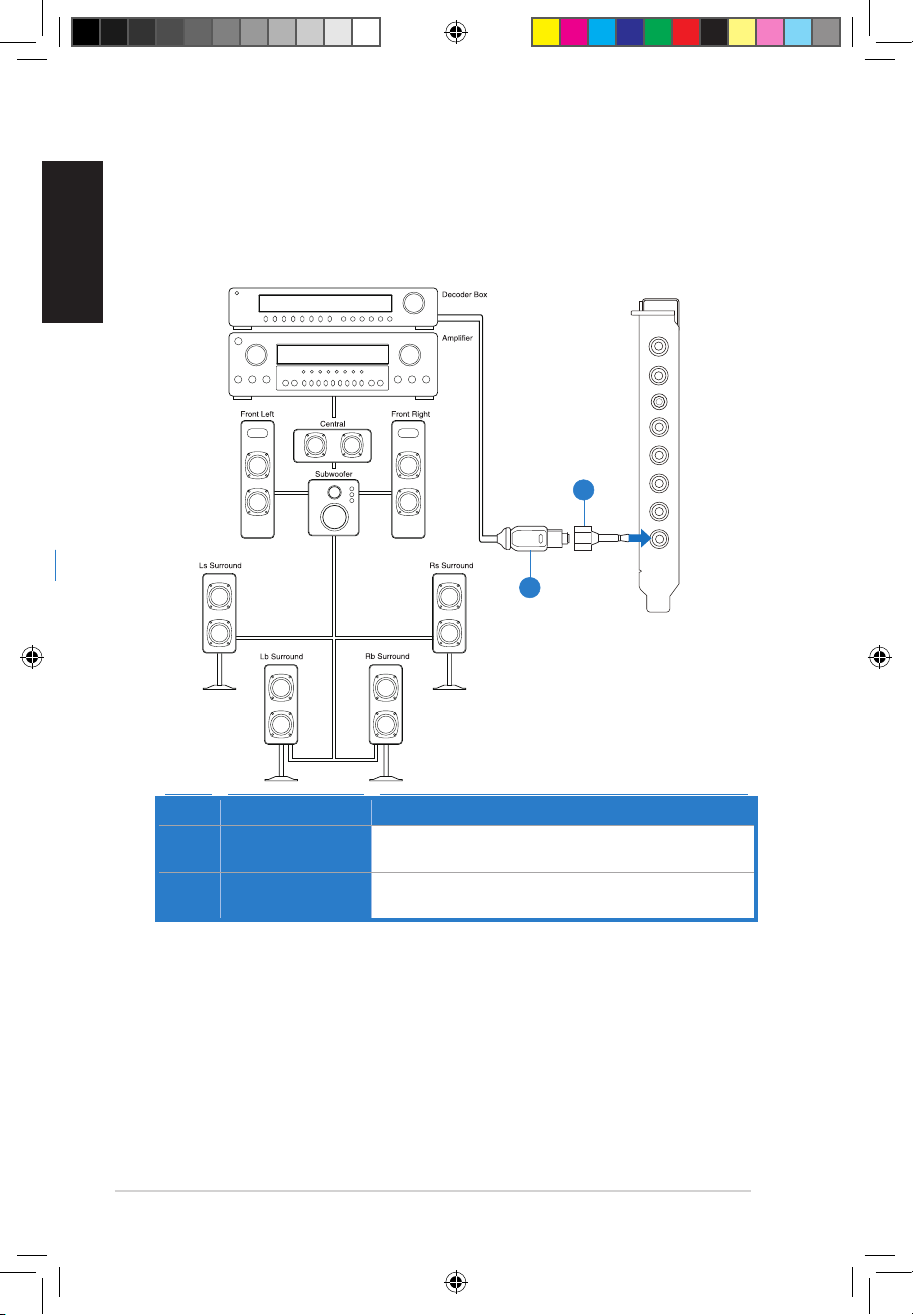
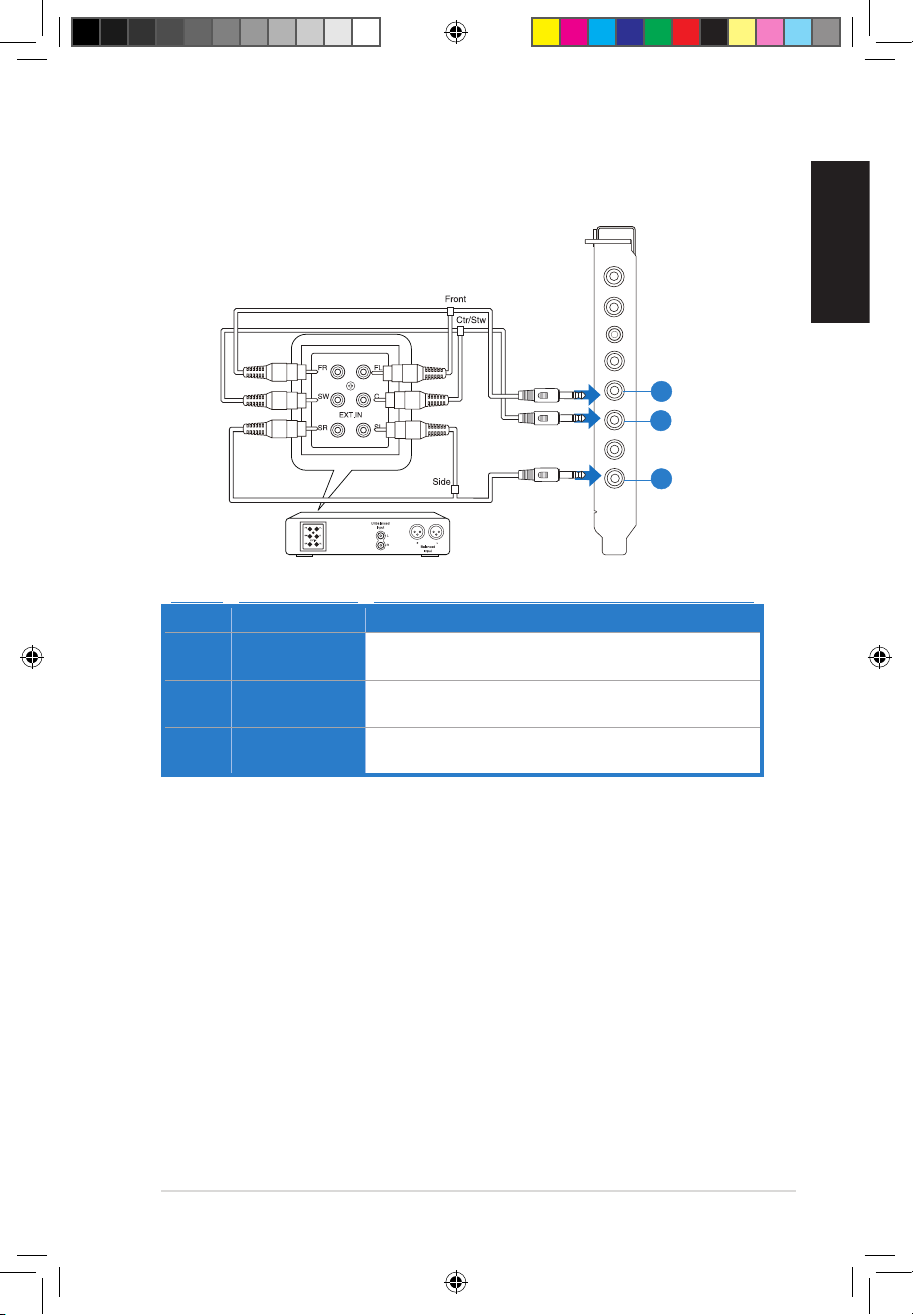
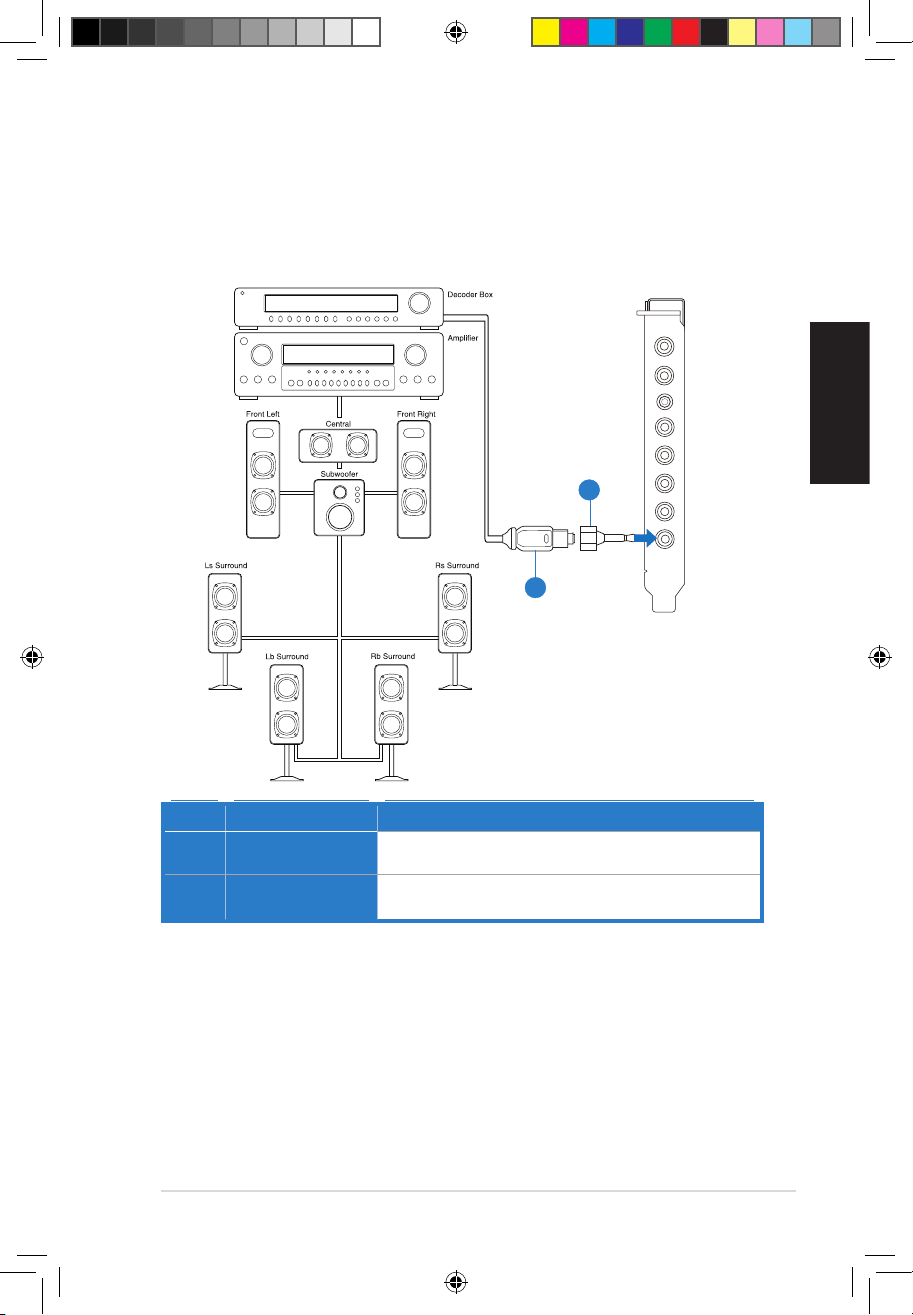
4.1.3 Connecting Digital Speaker Systems (Home Theater)
Xonar Phoebus makes playback through your home theater system possible, creating
an impressive surround sound experience. A single digital cable connection can carry
high-quality digital audio from any of your PC audio sources to any digital speakers or
AV Receivers.
No Item Description
1 Optical adapter
Plug the optical TOSLINK adapter into the S/PDIF-Out
connector.
2 Optical cable
Connect your decoder’s S/PDIF-In port to the optical adapter
with the TOSLINK optical cable
Mic in
HP out
Box link
Line in
Front
Ctr / Sbw
Rear
Side /
SPDIF out
U7062_Xonar-Phoebus_QSG.indb 10 18.01.2012 16:12:28 Uhr

11
ASUS Xonar Phoebus Quick Start Guide
English
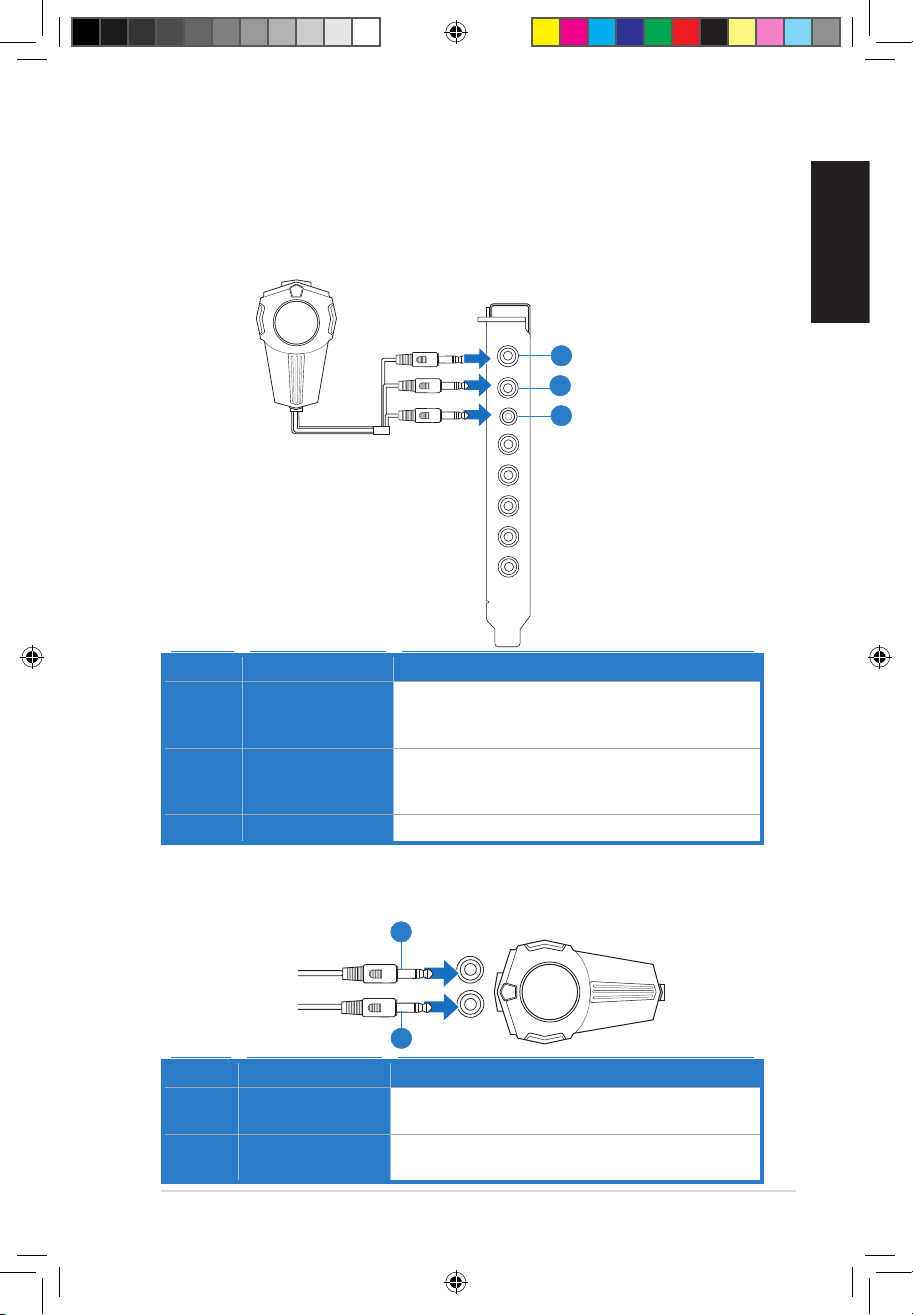
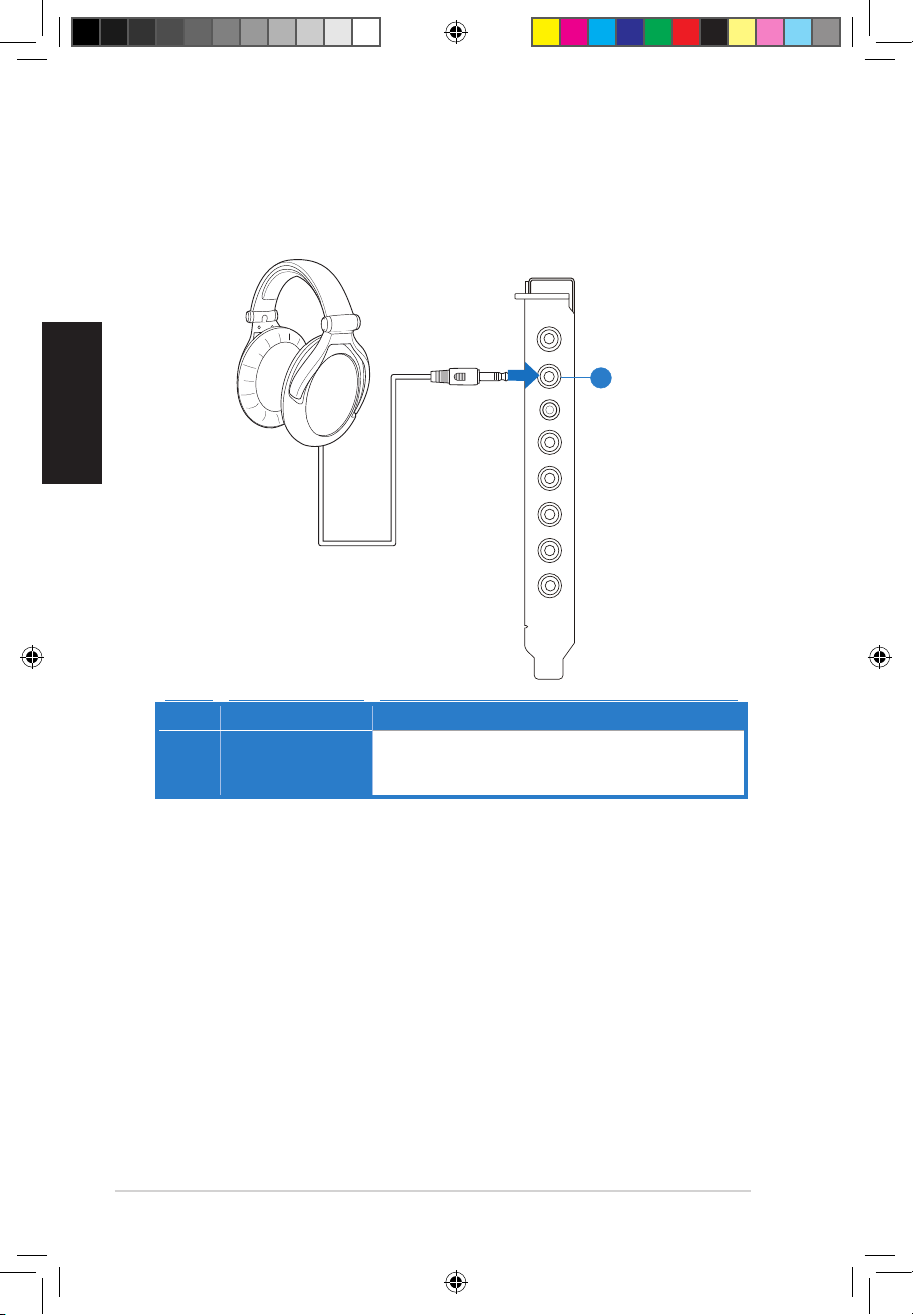
4.1.4 Connecting stereo headphones
Connecting stereo hadphones
Mic in
HP out
Box link
Line in
Front
Ctr / Sbw
Rear
Side /
SPDIF out
No Item Description
1 Headphone Out
Port
The Headphone Out Port has a built-in high-quality
amplier to drive headphones. Please connect your stereo
headphones directly to this jack.
1
U7062_Xonar-Phoebus_QSG.indb 11 18.01.2012 16:12:29 Uhr
12
ASUS Xonar Phoebus Quick Start Guide
English
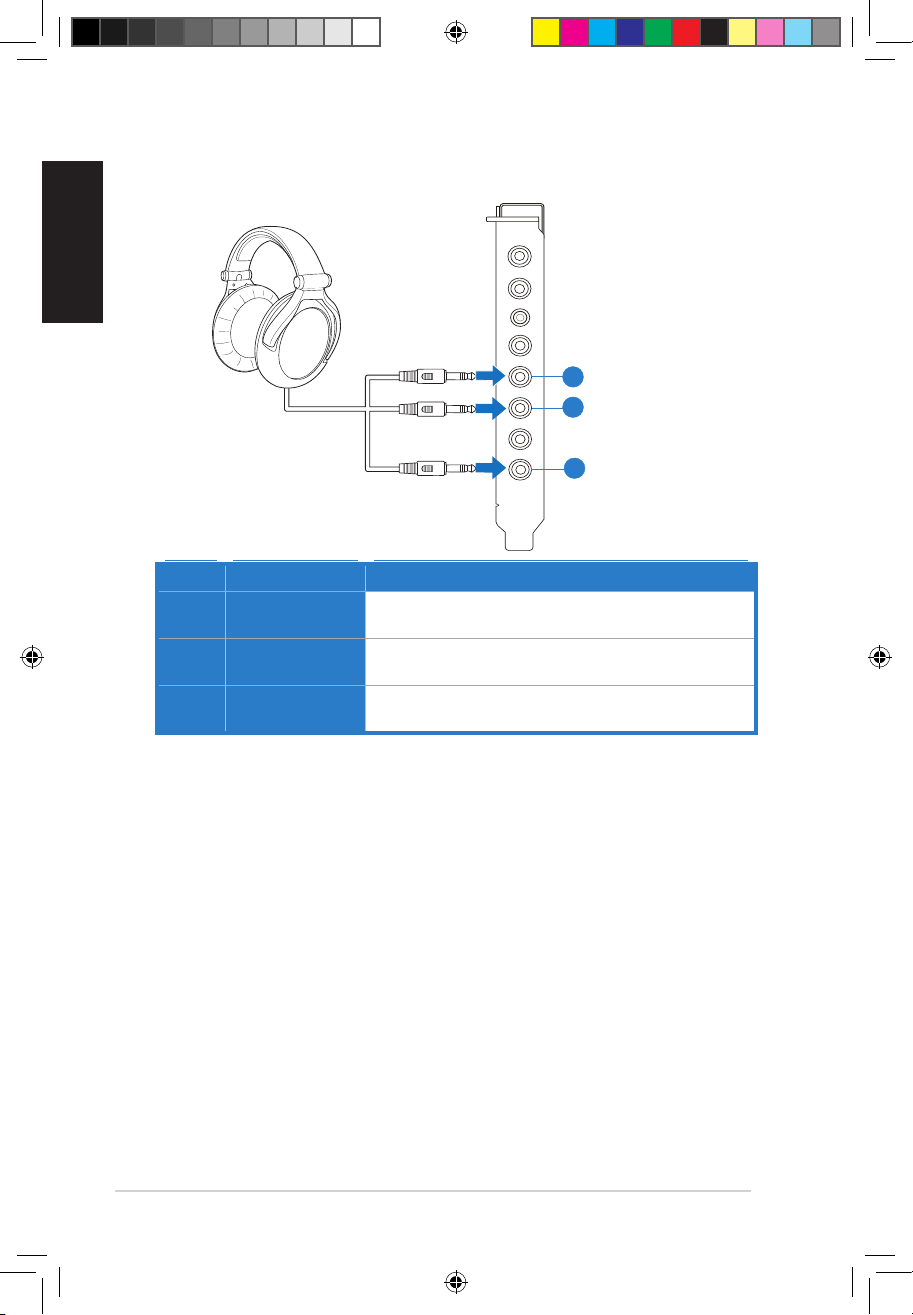
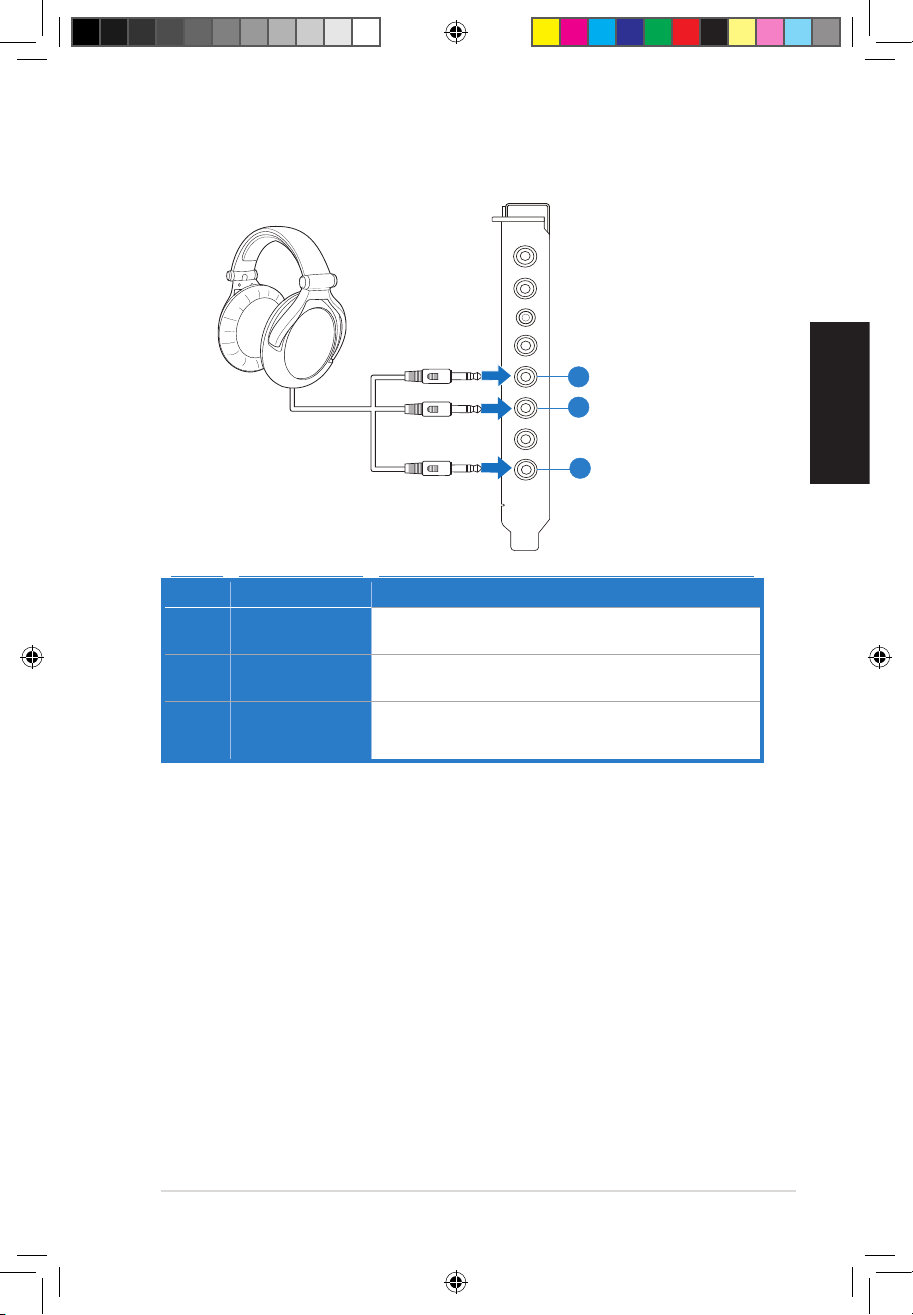
No Item Description
1 Front Out
Connect the front-channel 3.5mm plug of your 5.1
headphones into this jack.
2 Side Surround
Out
Connect the surround-channel 3.5mm plug of your 5.1
headphone into this jack.
3 Center/
Subwoofer Out
Connect the Center/Bass-channel 3.5mm plug of your 5.1
headphone into this jack.
Connecting 5.1 channel hadphones
Mic in
HP out
Box link
Line in
Front
Ctr / Sbw
Rear
Side /
SPDIF out
U7062_Xonar-Phoebus_QSG.indb 12 18.01.2012 16:12:31 Uhr
13
ASUS Xonar Phoebus Quick Start Guide
English
4.1.5 Connecting analog speaker systems
Connecting analog power amplier
Mic in
HP out
Box link
Line in
Front
Ctr / Sbw
Rear
Side /
SPDIF out
No Item Description
1 Front Out
Connects to the “left front” and “right front” input ports of the
analog amplier with the mini-jack to RCA cable.
2 Side Surround
Out
Connects to the “left surround” and “right surround” input ports
of the analog amplier with the mini-jack to RCA cable.
3 Center/
Subwoofer
Connects to the “Center” and “subwoofer” input ports of the
analog amplier with the mini-jack to RCA cable.
1
2
3
U7062_Xonar-Phoebus_QSG.indb 13 18.01.2012 16:12:32 Uhr

14
ASUS Xonar Phoebus Quick Start Guide
English
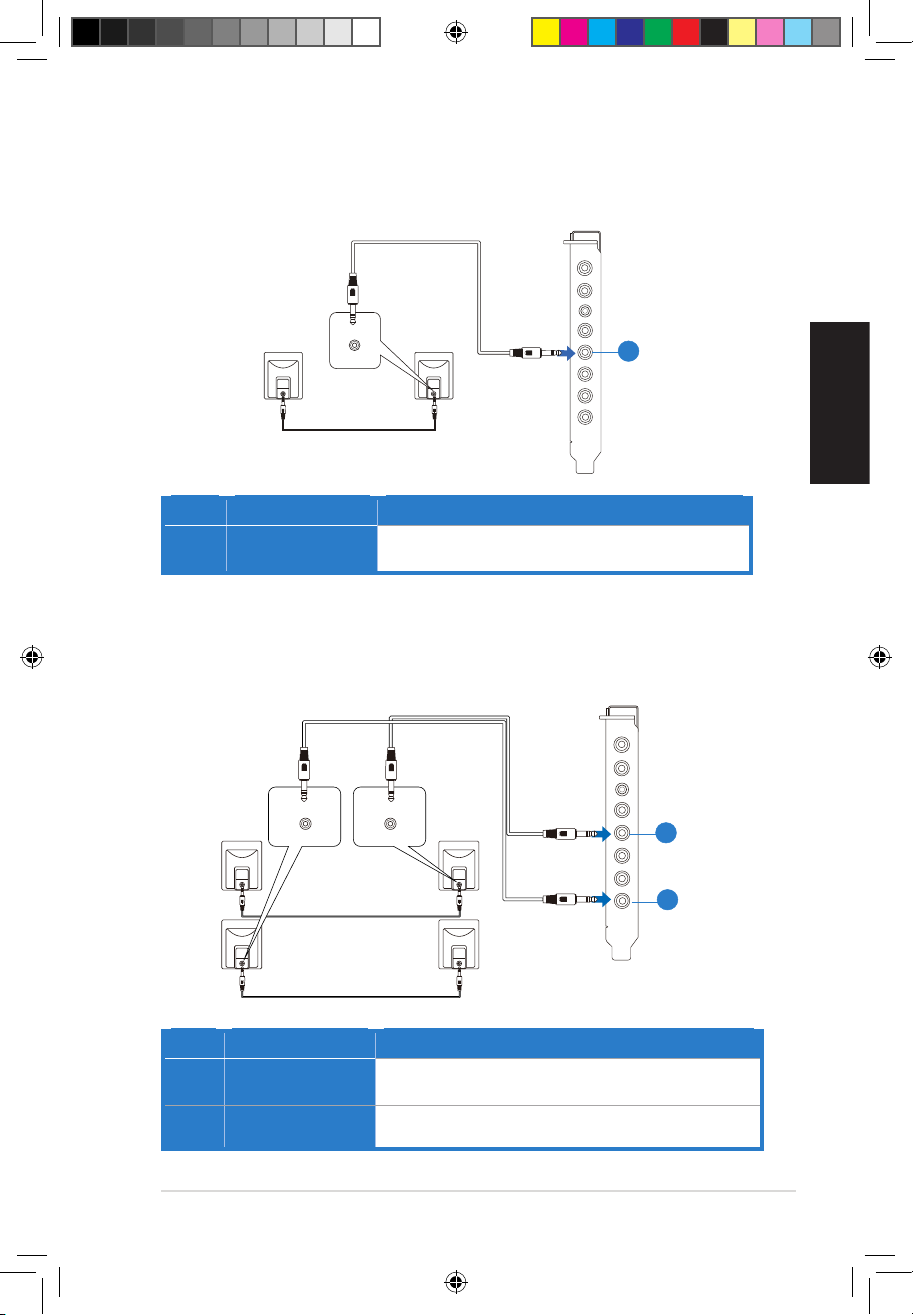
Connecting 2 channel speakers
2 speakers
No Item Description
1 Front Out Port
Connect the 2 channel speaker set’s 3.5mm plug into this
Front Out jack.
Connecting 4 channel speakers
4 speakers
No Item Description
1 Front Out
Connects to the Front input port of the 4/4.1 speakers with
the mini-jack cable.
2 Side Surround
Out
Connects to the Surround input port of the 4/4.1 speakers
with the mini-jack cable.
AUDIO
INPUTS
Mic in
HP out
Box link
Line in
Front
Ctr / Sbw
Rear
Side /
SPDIF out
AUDIO
INPUTS
Side
AUDIO
INPUTS
Front
Mic in
HP out
Box link
Line in
Front
Ctr / Sbw
Rear
Side /
SPDIF out
U7062_Xonar-Phoebus_QSG.indb 14 18.01.2012 16:12:34 Uhr
15
ASUS Xonar Phoebus Quick Start Guide
English
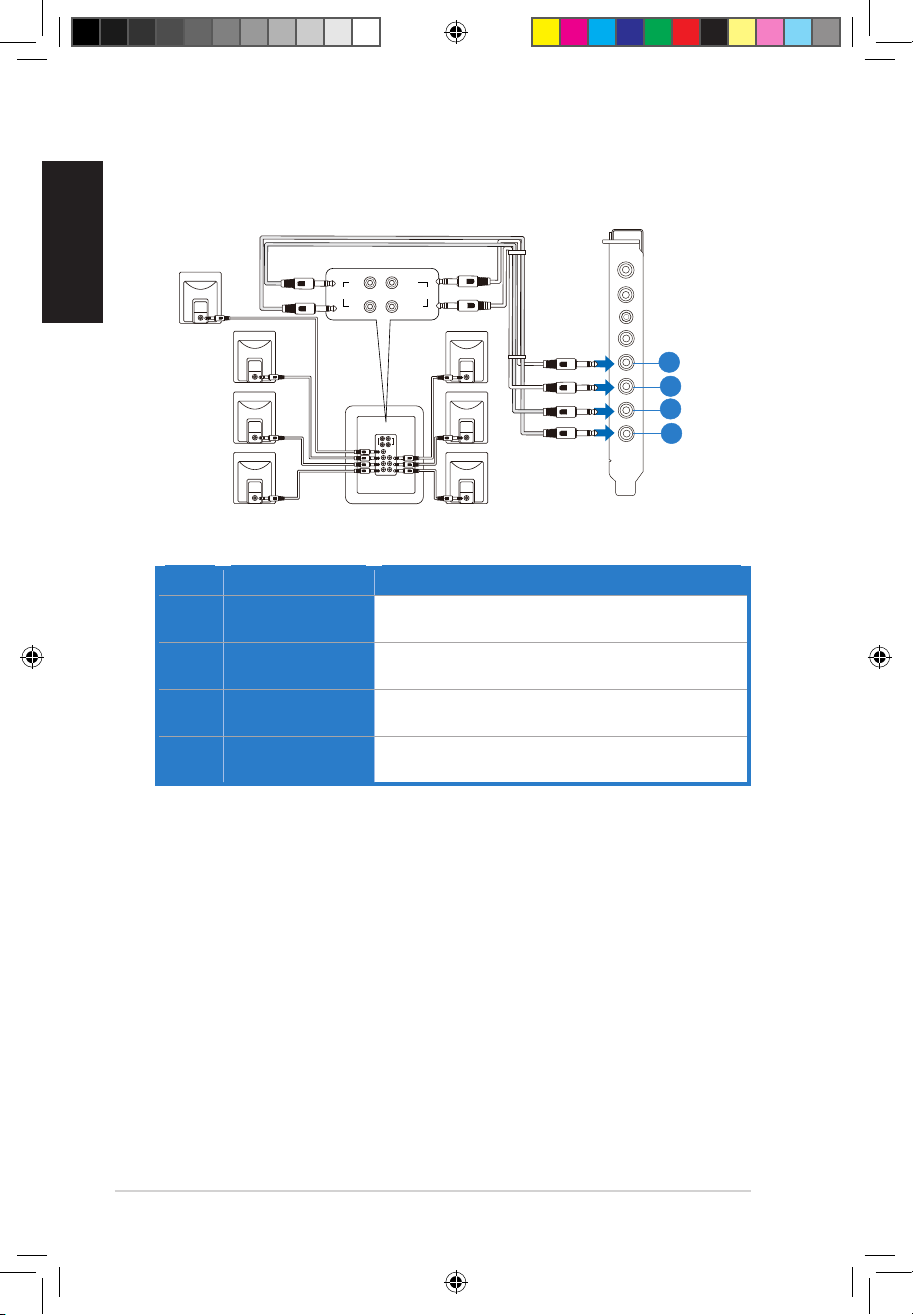
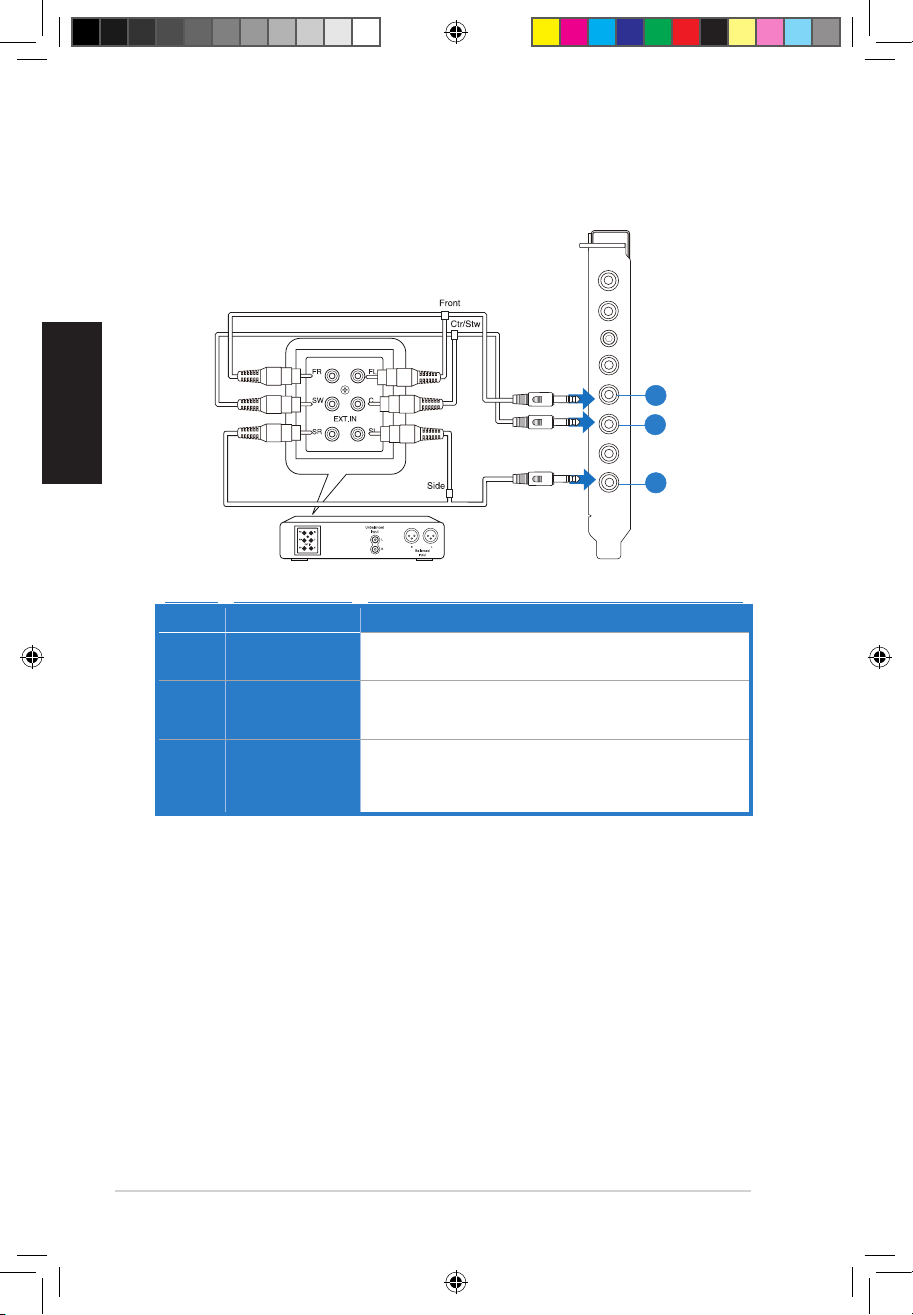
Connecting 5.1 channel speakers
5.1 speakers
Mic in
HP out
Box link
Line in
Front
Ctr / Sbw
Rear
Side /
SPDIF out
Side
Front
Center/
Subwoofer
AUDIO
INPUTS
No Item Description
1 Front Out
Connects to the Front input port of the 5.1 speakers with the
mini-jack cable.
2 Side Surround
Out
Connects to the Surround input port of the 5.1 speakers with
the mini-jack cable.
3 Center/
Subwoofer
Connects to the Center/Subwoofer input port of the 5.1
speakers with the mini-jack cable.
1
2
3
U7062_Xonar-Phoebus_QSG.indb 15 18.01.2012 16:12:35 Uhr
16
ASUS Xonar Phoebus Quick Start Guide
English
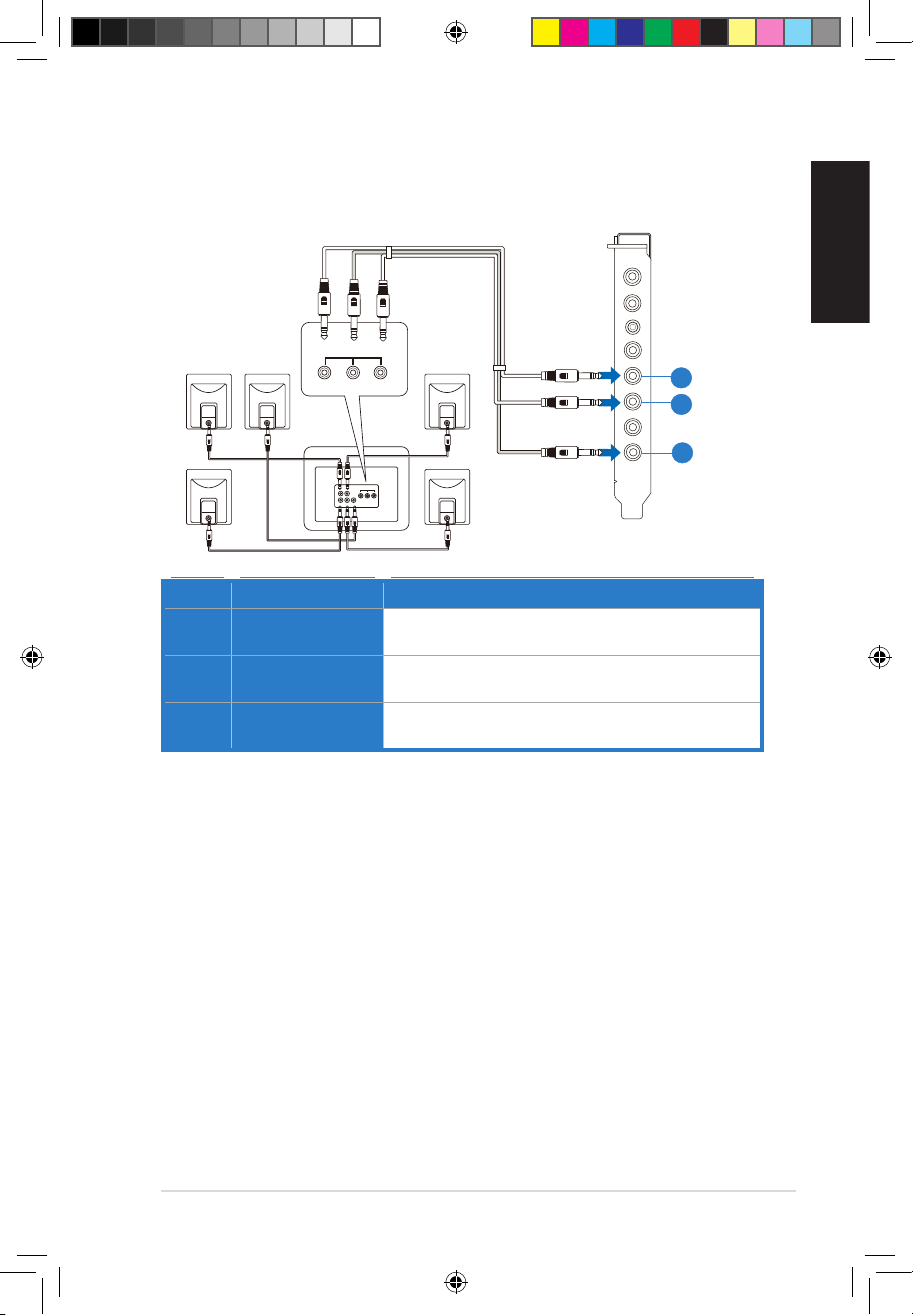
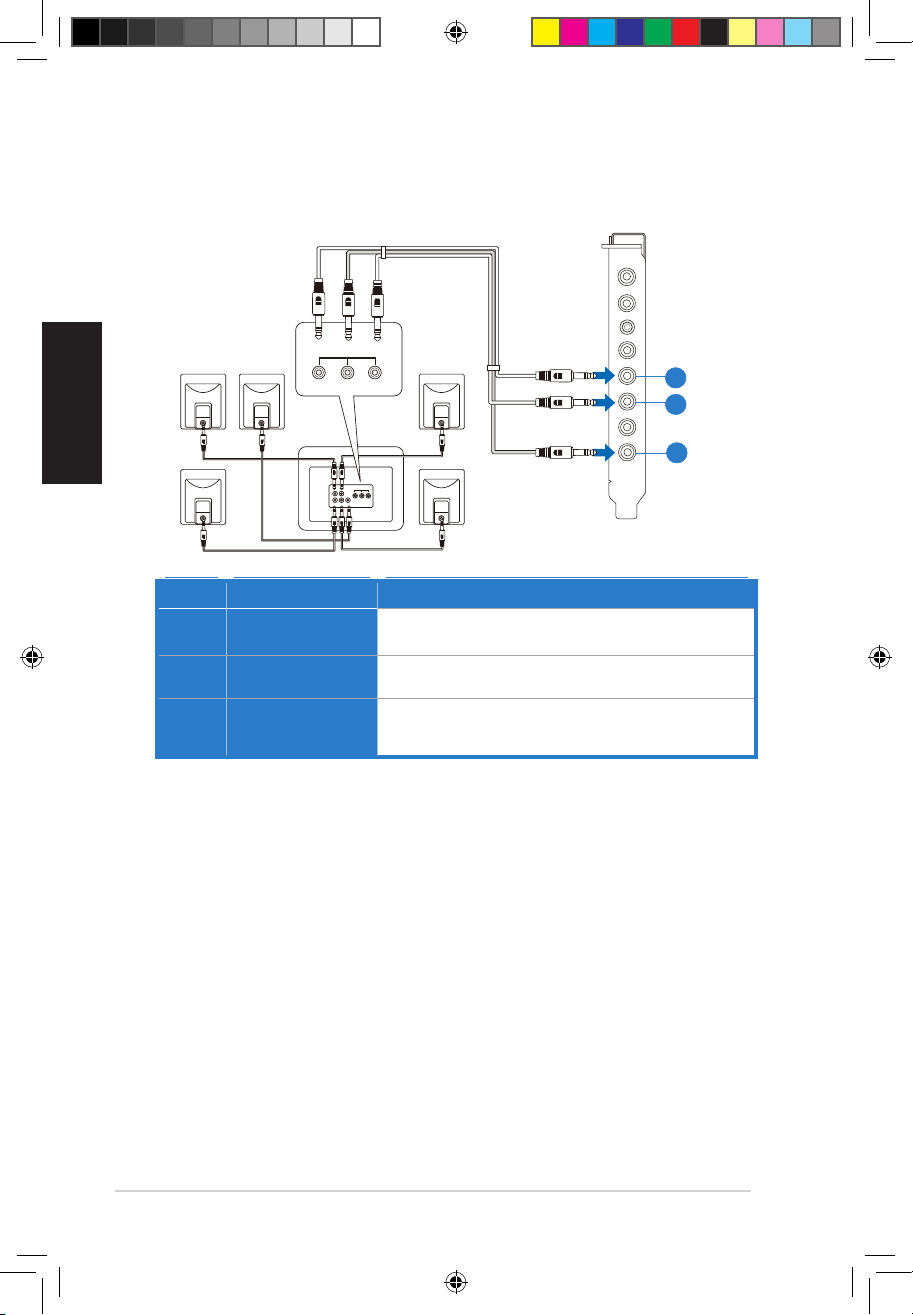
Connecting 7.1 channel speakers
7.1 speakers
Rear
Side
Front
Center/
Subwoofer
AUDIO
INPUTS
AUDIO
INPUTS
Mic in
HP out
Box link
Line in
Front
Ctr / Sbw
Rear
Side /
SPDIF out
No Item Description
1 Front Out
Connects to the Front input port of the 7.1 speakers with
the mini-jack cable.
2 Side Surround
Out
Connects to the Surround input port of the 7.1 speakers
with the mini-jack cable.
3 Center/
Subwoofer
Connects to the Center/Subwoofer input port of the 7.1
speakers with the mini-jack cable.
4 Back Surround
Out
Connects to the Back Surround input port of the 7.1
speakers with the mini-jack cable.
1
3
4
2
U7062_Xonar-Phoebus_QSG.indb 16 18.01.2012 16:12:37 Uhr
17
ASUS Xonar Phoebus Quick Start Guide
English
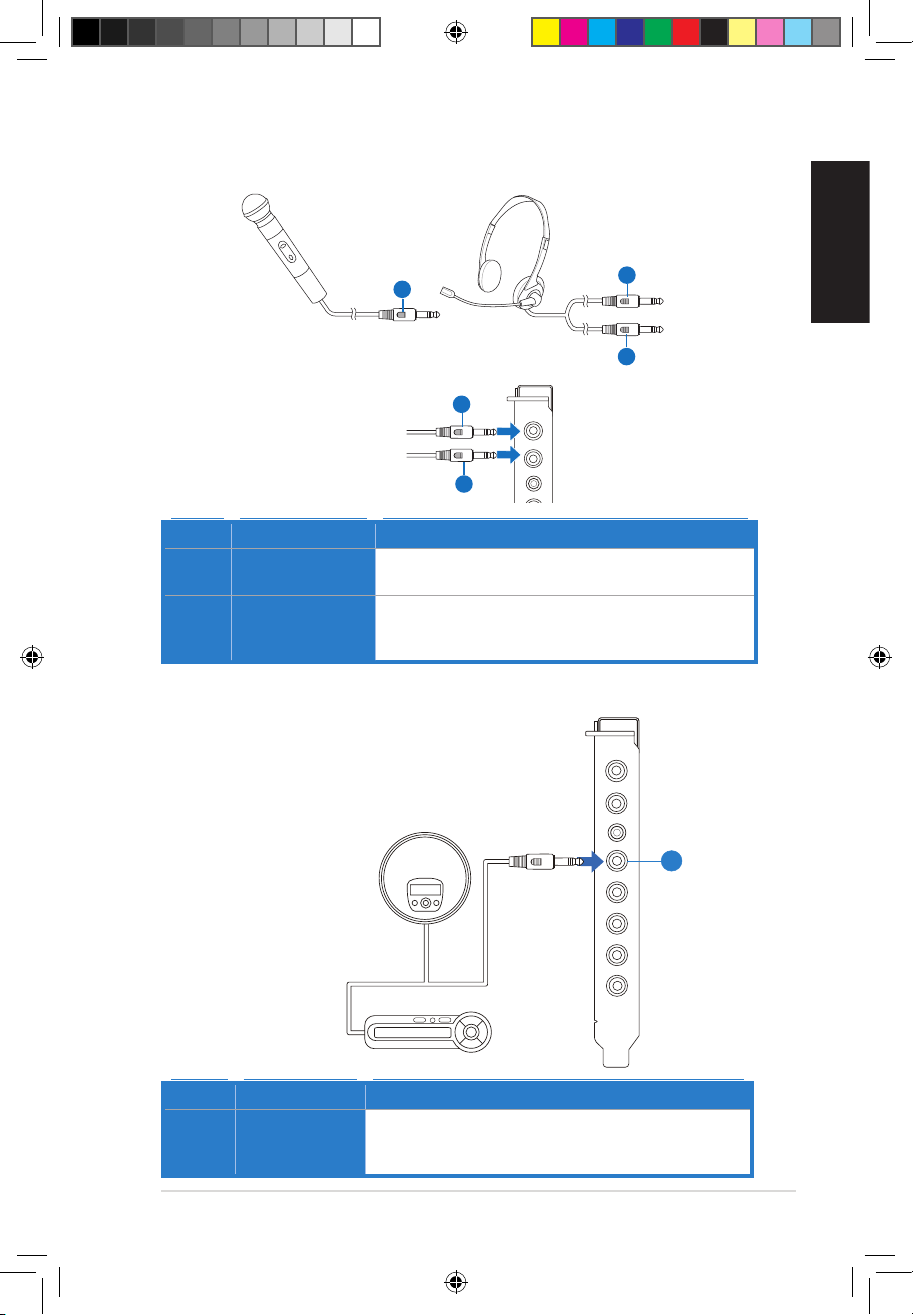
4.1.6 Connecting Microphone
2
Mic in
HP out
Box link
1
2
1
1
No Item Description
1 Microphone In
Port
Connect the microphone’s 3.5mm plug into this Mic-In port
for voice communication, recording, or karaoke.
2 Headphone Port
The headphone port has a built-in high-quality amplier to
drive headphones. Connect your stereo headphones directly
to this jack.
4.1.7 Connecting Line-In audio sources
CD Player
MP3 Player
Mic in
HP out
Box link
Line in
Front
Ctr / Sbw
Rear
Side /
SPDIF out
No Item Description
1 Line In Port
Connect the 3.5mm plug of the CD/MP3 Player or any other
Line level analog audio sources into this Line-In jack for sound
recording.
1
U7062_Xonar-Phoebus_QSG.indb 17 18.01.2012 16:12:40 Uhr
18
Guide de démarrage rapide pour carte son ASUS Xonar Phoebus
Français
1. Introduction
1.1 Pré-requis système
Avant d’installer la carte son Xonar Phoebus, assurez-vous que votre ordinateur puisse Xonar Phoebus, assurez-vous que votre ordinateur puisseassurez-vous que votre ordinateur puisse
satisfaire aux critères suivants :
• Un slot PCIE 1.0 (ou supérieur) pour la carte sonUn slot PCIE 1.0 (ou supérieur) pour la carte son
• Une prise d’alimentation 6 broches reliée au bloc d’alimentationUne prise d’alimentation 6 broches reliée au bloc d’alimentation
• Microsoft® Windows® Vista / 7 (32/64bit) / XP (32/64bit) / MCE2005
• Intel® Pentium® 4 1.4GHz or AMD Athlon 1400 CPU or faster CPU
• > 256 Mo de mémoire vive> 256 Mo de mémoire vive
• > 60 Mo d’espace disque disponible pour l’installation des pilotes
• CD-ROM drive (or DVD-ROM drive) for software installation
• Des écouteurs de haute qualité, des haut-parleurs analogiques alimentés, ou unDes écouteurs de haute qualité, des haut-parleurs analogiques alimentés, ou un
décodeur Dolby Digital pour proter pleinement de la qualité audio délivrée par la
carte son
1.2 Contenu de la boîte
Vériez que la boîte de votre carte son ASUS Xonar Phoebus contient bien les éléments ASUS Xonar Phoebus contient bien les élémentscontient bien les éléments
suivants :
• Carte son PCIE ASUS XonarCarte son PCIE ASUS XonarASUS XonarTM Phoebus
• Boîtier de contrôle Phoebus
• CD de supportCD de support
• Adaptateur TOSLINK S/PDIF optique x 1Adaptateur TOSLINK S/PDIF optique x 1
• Câble d’alimentation ATX 4 à 6 broches x 1
• Guide de démarrage rapide x 1Guide de démarrage rapide x 1
U7062_Xonar-Phoebus_QSG.indb 18 18.01.2012 16:12:40 Uhr
19
Guide de démarrage rapide pour carte son ASUS Xonar Phoebus
2. Matériel
2.1 Diagramme de la carte son Xonar Phoebus
Mic in
HP out
Box link
Line in
Front
Ctr / Sbw
Rear
Side /
SPDIF out
1
2
3
4
5
6
7
8
1
2
3
4
5
6
7
8
9
10
11
12
U7062_Xonar-Phoebus_QSG.indb 19 18.01.2012 16:12:42 Uhr
20
Guide de démarrage rapide pour carte son ASUS Xonar Phoebus
Français
N° Élément Description
1
Port d’entrée
microphone
Connectez le port microphone externe de votre PC sur ce
port 3.5mm. Intègre un préamplicateur de microphone de
haute qualité.
2 Prise casque
Connectez votre casque audio sur ce port.
3 Lien boîtier
Connectez le boîtier de contrôle Xonar Phoebus sur ce port
de 2.5mm.
4 Port d’entrée audio
Connectez des périphériques analogiques (lecteur MP3,
lecteur CD, etc) ou autres sources audio sur ce port 3.5mm.
5
Sortie de signal
avant
Connectez le câble audio droit (rouge) de votre système de
haut-parleurs 2/2.1 sur ce port.
6
Port de sortie
centre/caisson de
basse
Se connecte au port d’entrée centre/caisson de basse
des systèmes de haut-parleurs analogiques alimentés
5.1/6.1/7.1.
7
Port de sortie
arrière
Se connecte au port d’entrée Surround arrière des systèmes
de haut-parleurs analogiques alimentés 6.1/7.1
8
S/PDIF Out/SortieSortie
latérale
Port de sortie numérique TOSLINK. Se connecte à un
décodeur numérique externe, un home cinéma, un
système de haut-parleurs numériques ou un récepteur
pour la transmission d’un signal audio numérique
supportant les technologies PCM, Dolby Digital, DTS,
WMA-Pro, etc.
Se connecte au port d’entrée Surround des systèmes de
haut-parleurs analogiques alimentés 4/4.1/5.1/6.1/7.1.
9
En-tête d’entrée
auxiliaire
Se connecte généralement au port de sortie audio
analogique d’une carte tuner TV ou tout autre source
audio interne du PC. (Pour surveiller les signaux audio de
votre carte tuner TV depuis ce port, vous devrez activer
la fonction de surveillance du port “Aux-In” à partir de
l’utilitaire audio Xonar Audio Center.)
10
En-tête sortie
S/PDIF
Se connecte à une carte graphique avec support HDMI.
11
Connecteur
d’alimentation
Se connecte à l’un des câbles 6 broches du bloc
d’alimentation.
12
Connecteurs dorés
PCI Express
Connectent la carte son au slot PCI Express de la carte
mère.
U7062_Xonar-Phoebus_QSG.indb 20 18.01.2012 16:12:43 Uhr
21
Guide de démarrage rapide pour carte son ASUS Xonar Phoebus
2.1 Installation de la carteInstallation de la carte
Avant de continuer, il est recommandé de désactiver le chipset audio embarqué
dans le BIOS ou de désinstaller les autres cartes audio de votre système. (Pour les
options du BIOS ou la désinstallation d’autres cartes son, référez-vous aux manuels
d’utilisation de la carte mère et de la carte audio)
La carte son PCI Express nécessite d’être alimentée pour pouvoir fonctionner
correctement. Assurez-vous d’avoir relié un câble d’alimentation à la carte avant de
l’utiliser.
2.1.1 Installer la carte son Xonar Phoebus
Pour installer la carte son Xonar Phoebus :
1. Éteignez l’ordinateur, le moniteur et
tous les périphériques connectés au PC.
2. Débranchez le cordon d’alimentation de
l’ordinateur et de la prise électrique.
3. Touchez l’arrière métallique ou
le panneau latéral du châssis de
l’ordinateur pour vous décharger de
l’électricité statique.
4. Retirez le panneau latéral du châssis.
5. Retirez le cache métallique d’un slot PCI
Express disponible.
6. Insérez délicatement la carte son sur le slot PCI Express. Assurez-vous que la carte
est bien en place.
NE PAS forcer la carte son sur le slot PCI Express. Assurez-vous que les connecteurs
dorés de la carte sont correctement alignés sur le slot PCI Express de la carte mère. Si
la carte n’est pas bien sécurisée au slot PCI Express, retirez-la puis réessayez.
7. Sécurisez la carte à l’aide de la vis retirée du cache métallique.
8. Replacez le panneau latéral du châssis.
9. Reconnectez tous les câbles.
10. Reliez le cordon d’alimentation à l’ordinateur et à une prise électrique.
11. Allumez l’ordinateur.
U7062_Xonar-Phoebus_QSG.indb 21 18.01.2012 16:12:46 Uhr
22
Guide de démarrage rapide pour carte son ASUS Xonar Phoebus
Français
2.1.2 Connexion à une carte tuner TV
Si vous possédez une carte tuner TV PCI/PCI Expresss sur votre ordinateur, vous devrez la
connecter à la carte son pour que le ux audio puisse être envoyé vers votre système de
haut-parleurs.
1. Sécurisez la carte tuner TV PCI/PCI Express au châssis à l’aide d’une vis.Sécurisez la carte tuner TV PCI/PCI Express au châssis à l’aide d’une vis.
2. Connectez l’en-tête de sortie audio de la carte tuner TV à l’en-tête d’entrée
auxiliaire de la carte son.
Pour une qualité d’achage optimale, la carte son Xonar utilise le procédé
d’enregistrement ADC pour numériser le signal et le convertir en lecture DAC.
Sélectionnez Aux-In (entrée auxiliaire) comme source d’enregistrement dans
l’utilitaire audio Xonar Audio Center et activez la fonction de surveillance pour que
le signal soit acheminé vers la sortie audio. Grâce à cette conguration, vous pouvez
même activer certains eets sonores comme la technologie Pro-Logic IIx permettant
de convertir un signal TV stéréo classique en son surround 5.1 ou 7.1. Ce procédé
ore une meilleure qualité audio sur votre ordinateur que sur votre téléviseur.
U7062_Xonar-Phoebus_QSG.indb 22 18.01.2012 16:12:47 Uhr

23
Guide de démarrage rapide pour carte son ASUS Xonar Phoebus
3. Installation du pilote de la carte son
3.1 Installer le pilote de la carte Xonar Phoebus
Pour installer le pilote de la carte son :
1. Une fois la carte son installée, allumez votre PC. WindowsUne fois la carte son installée, allumez votre PC. Windows® détectera
automatiquement la carte son et lancera la recherche du pilote approprié. Lorsque
la fenêtre d’installation du pilote apparaît, cliquez sur Annuler.
2. Insérez le CD de support dans votre lecteur optique. Si l’Exécution automatique
est activée, le processus de conguration démarre automatiquement. Si ce n’est
pas le cas, cliquez sur le chier setup.exe contenu dans le CD de support.
3. Suivez les instructions à l’écran pour terminer l’installation.
La version et le contenu du CD de support peuvent être modiés sans avis préalable…
3.2 Désinstaller ou réinstaller le pilote
3.2.1 Désinstaller le pilote
Pour désinstaller le pilote de la carte son :
1. Dans le Bureau de Windows®, cliquez sur Démarrer > Panneau de conguration.
2. Double-cliquez sur Ajout/Suppression de programmes.
3. Cliquez sur Modier ou supprimer des programmes.
4. Sélectionnez le pilote audio, puis cliquez sur Ajouter/Supprimer (ou Modier/
Supprimer).
5. À l’apparition de l’assistant d’installation, sélectionnez l’option Remove
(Supprimer).
6. Redémarrez votre ordinateur.
3.2.2 Réinstaller le pilote
Pour réinstaller le pilote de la carte son :
1. Avant toute chose; il est fortement recommandé de désinstaller le pilote et le
logiciel audio de l’ordinateur.
2. Une fois terminé, répétez les étapes d’installation fournies plus haut pour
réinstaller ou mettre à jour le pilote.
U7062_Xonar-Phoebus_QSG.indb 23 18.01.2012 16:12:48 Uhr

24
Guide de démarrage rapide pour carte son ASUS Xonar Phoebus
Français
4. Connexion de haut-parleurs et de
périphériques
4.1 Connexion du boîtier Phoebus
4.1.1 Connecter le boîtier Phoebus
4.1.2 Connecter le boîtier de contrôle Phoebus à un casque ou un
microphone
N° Élément Description
1 Port d’entrée
microphone
Connectez le port microphone du boîtier Phoebus sur
cette prise 3.5mm pour les enregistrements audio ou les
communications vocales..
2 Prise casque
Cette prise est dotée d’un amplicateur de haute qualité
dédié aux casques audio. Connectez directement le boîtier
Phoebus sur ce port.
3 Lien boîtier
Connectez le boîtier de contrôle Xonar Phoebus sur ce
port de 2.5mm.
N° Élément Description
1 Prise casque
Connectez votre casque audio sur cette prise.
2 Prise d’entrée
microphone
Connectez votre microphone sur cette prise.sur cette prise.
Mic in
HP out
Box link
Line in
Front
Ctr / Sbw
Rear
Side /
SPDIF out
U7062_Xonar-Phoebus_QSG.indb 24 18.01.2012 16:12:50 Uhr
25
Guide de démarrage rapide pour carte son ASUS Xonar Phoebus
4.1.3 Connecter un système d’enceintes numérique (Home cinéma)
La carte Xonar Phoebus permet de relier votre home cinéma à votre ordinateur pour
orir une expérience audio impressionnante. Une connexion à un seul câble numérique
permet d’acheminer un son numérique de haute qualité de votre ordinateur à un
quelconque équipement audio numérique.
N° Élément Description
1 Adaptateur
optique
Reliez l’adaptateur optique TOSLINK à la sortie S/PDIF.
2 Câble optique
Reliez le port d’entrée S/PDIF de votre décodeur à
l’adaptateur optique via le câble optique TOSLINK
Mic in
HP out
Box link
Line in
Front
Ctr / Sbw
Rear
Side /
SPDIF out
U7062_Xonar-Phoebus_QSG.indb 25 18.01.2012 16:12:52 Uhr
26
Guide de démarrage rapide pour carte son ASUS Xonar Phoebus
Français
4.1.4 Connecter un casque audio
Casque stéréo
N° Élément Description
1 Port casque
(sortie)
Cette prise est dotée d’un amplicateur de haute qualité
dédié aux casques audio. Branchez directement votre. Branchez directement votre
casque sur ce port.
Mic in
HP out
Box link
Line in
Front
Ctr / Sbw
Rear
Side /
SPDIF out
U7062_Xonar-Phoebus_QSG.indb 26 18.01.2012 16:12:53 Uhr
27
Guide de démarrage rapide pour carte son ASUS Xonar Phoebus
N° Élément Description
1 Sortie audio
avant
Connectez la prise de votre casque 5.1 dédiée au son surround
avant à ce port.
2 Sortie surround
latérale
Connectez la prise de votre casque 5.1 dédiée au son surround
latéral à ce port.
3 Sortie centrale/
caisson de
basses
Connectez la prise de votre casque 5.1 dédiée au son surround
latéral / caisson de basses à ce port.
Casque 5.1
Mic in
HP out
Box link
Line in
Front
Ctr / Sbw
Rear
Side /
SPDIF out
U7062_Xonar-Phoebus_QSG.indb 27 18.01.2012 16:12:55 Uhr
28
Guide de démarrage rapide pour carte son ASUS Xonar Phoebus
Français
4.1.5 Connecter un système d’enceintes analogique
Connexion à un amplicateur audio
N° Élément Description
1 Sortie audio
avant
Se connecte aux prises audio de l’amplicateur dédiées au
haut-parleur avant droit et gauche via un câble audio RCA.
2 Sortie
surround
latérale
Se connecte aux prises audio de l’amplicateur dédiées au
haut-parleur latéral gauche et droite via un câble audio RCA.
3 Sortie
centrale/
caisson de
basses
Se connecte aux prises audio de l’amplicateur dédiées au
haut-parleur central et au caisson de basses via un câble audio
RCA.
Mic in
HP out
Box link
Line in
Front
Ctr / Sbw
Rear
Side /
SPDIF out
U7062_Xonar-Phoebus_QSG.indb 28 18.01.2012 16:12:56 Uhr
29
Guide de démarrage rapide pour carte son ASUS Xonar Phoebus
Connexion à un système d’enceintes 2.0
2 enceintes
N° Élément Description
1 Sortie audio
avant
Se connecte aux prises audio du haut-parleur avant droit
et gauche.
Connexion à un système d’enceintes 4.0/4.1
4 enceintes
N° Élément Description
1 Sortie audio
avant
Se connecte aux prises audio du haut-parleur avant droit et
gauche.
2 Sortie surround
latérale
Se connecte aux prises audio des haut-parleur latéraux.
AUDIO
INPUTS
Mic in
HP out
Box link
Line in
Front
Ctr / Sbw
Rear
Side /
SPDIF out
AUDIO
INPUTS
Side
AUDIO
INPUTS
Front
Mic in
HP out
Box link
Line in
Front
Ctr / Sbw
Rear
Side /
SPDIF out
U7062_Xonar-Phoebus_QSG.indb 29 18.01.2012 16:12:58 Uhr
30
Guide de démarrage rapide pour carte son ASUS Xonar Phoebus
Français
Connexion à un système d’enceintes 5.1
Enceintes 5.1
N° Élément Description
1 Sortie audio
avant
Se connecte aux prises audio du haut-parleur avant droit et
gauche.
2 Sortie surround
latérale
Se connecte aux prises audio des haut-parleur latéraux.
3 Sortie centrale/
caisson de
basses
Se connecte aux prises audio dédiées au haut-parleur
central et au caisson de basses.
Mic in
HP out
Box link
Line in
Front
Ctr / Sbw
Rear
Side /
SPDIF out
Side
Front
Center/
Subwoofer
AUDIO
INPUTS
U7062_Xonar-Phoebus_QSG.indb 30 18.01.2012 16:13:00 Uhr
Loading…

99
Краткое руководство для ASUS Xonar Phoebus
Ру
сский
4. Подключение колонок и периферии
4.1
Подключение пульта Phoebus
4.1.1
Подключение пульта Phoebus
Элемент
Описание
1
Разъем для
микрофона
Предназначен для подключения разъема микрофона
от пульта Phoebus для голосовой связи, записи звука
или караоке.
2
Разъем для
наушников
Разъем для наушников оснащен высококачественным
встроенным усилителем.
3
Разъем для
пульта
Предназначен для подключения пульта Phoebus.
Элемент
Описание
1
Разъем для
наушников
Предназначен для подключения наушников к пульту
управления Phoebus.
2
Разъем для
микрофона
Предназначен для подключения микрофона к пульту
управления Phoebus.
Mic in
HP out
Box link
Line in
Front
Ctr / Sbw
Rear
Side /
SPDIF out
1
2
3
Mic In
Headphone Out
1
2
U7062_Xonar-Phoebus_QSG.indb 99
18.01.2012 16:14:54 Uhr
Manuals.eu
- Manuals.eu
- ASUS
- Computers & Peripherals
- Audio Cards
- PCI-E Audio
- ROG Xonar Phoebus
- User’s Manual (English)
×
1
2
3
4
5
6
7
8
9
10
11
12
13
14
15
16
17
18
19
20
21
22
23
24
25
26
27
28
29
30
31
32
33
34
35
36
37
38
39
40
41
42
43
44
45
46
47
48
49
50
51
52
53
54
55
56
57
58
59
60
61
62
63
64
65
66
67
68
69
70
71
72
73
74
75
76
77
78
⟨
⟩
Copyright © Manuals.eu
Agreement
Privacy Policy
Contact us
Type: Package contents manual
Pages: 72
Size: 7.24 Mb
The Asus XONAR PHOEBUS is a high-performance sound card that comes packed with advanced features tailored for gamers and audiophiles alike. This product is designed to deliver an unparalleled audio experience, making it a premium choice in the world of sound cards. Its impressive specifications combined with cutting-edge technology elevate the sound quality in gaming, music, and movies.
One of the standout features of the XONAR PHOEBUS is its unique 7.1 surround sound technology. This allows for an immersive audio experience that places you directly in the middle of the action, whether you’re traversing through a fantasy world or trying to hear the slightest movement in a tense shooter game. The sound card provides realistic audio cues and excellent soundstage, which can be a game-changer in competitive gaming scenarios.
Specifications of the XONAR PHOEBUS include:
- Audio chips: High-fidelity DAC (Digital-to-Analog Converter) for exceptional sound quality.
- Signal-to-Noise Ratio (SNR): 118dB for crystal-clear audio performance.
- Sampling rates: Up to 192kHz sample rate for rich and detailed sound reproduction.
- Connectivity: A wide range of inputs including optical and coaxial, enabling versatile connectivity options.
- Gaming features: Includes a dedicated headphone amplifier that supports headphones with impedances up to 600 ohms.
- Software: Comes with the XONAR audio software that provides various sound enhancements and customization options.
The build quality of the Asus XONAR PHOEBUS is commendable. It features a sleek design that fits well with modern gaming setups. The card is equipped with high-end capacitors and a robust layout, ensuring durability and longevity. The intuitive interface is user-friendly, allowing for easy configuration of various audio settings, supporting novice users and experienced audiophiles alike.
Another highlight of the XONAR PHOEBUS is its high-performance headphone jack, which significantly enhances audio clarity and depth. Gamers will appreciate the ability to hear environmental sound cues with exceptional precision, providing an edge in competitive gaming environments. This level of sound detail is particularly impressive in first-person shooters where auditory cues can dictate movement and strategy.
If you’re a multimedia enthusiast, the Asus XONAR PHOEBUS excels at music reproduction. It converts digital audio signals into high-quality sound with remarkable clarity, making it suitable for various music genres. The sound card’s ability to handle complex audio compositions while maintaining balance and detail is noteworthy, allowing listeners to enjoy their favorite tracks as intended by the artists.
Moreover, the card integrates seamlessly with modern gaming PCs and consoles, thanks to its versatile design. The software that accompanies the XONAR PHOEBUS offers several preset audio profiles, which can be customized according to user preferences. Whether you are watching movies, playing games, or enjoying music, you can tweak the sound settings for optimal performance.
In conclusion, the Asus XONAR PHOEBUS is an exceptional sound card that combines outstanding audio fidelity with a suite of features designed for gamers and music lovers. With robust specifications and a focus on delivering an immersive audio experience, it stands out as a top-tier choice. If you’re in the market for a sound card that offers both quality and versatility, the XONAR PHOEBUS should be at the top of your list.
Related XONAR PHOEBUS Manuals and Guides
Type: Manual
Brand: Analog Devices
Category: Processor
Pages: 564
Type: Installation manual
Brand: Panasonic
Category: PCI Card
Pages: 27
Type: Operation manual
Brand: Omron
Category: Processor
Pages: 763
Type: Operation & user’s manual
Brand: Digitus
Category: PCI Card
Pages: 6 0.83 Mb
Type: Operation & user’s manual
Brand: StarTech.com
Category: PCI Card
Pages: 12 0.55 Mb
Type: Operation & user’s manual
Brand: Zonet
Category: PCI Card
Pages: 28
Type: Operating manual
Brand: Ashly
Category: Processor
Pages: 28 3.58 Mb
Type: Operation & user’s manual
Brand: JETWAY
Category: Processor
Pages: 56
Type: Installation and operation manual
Brand: Omnia
Category: Sound Card
Pages: 71
Type: Instruction manual
Brand: Trust
Category: Sound Card
Pages: 32
Type: Brochure
Brand: ASROCK
Category: Processor
Pages: 6 1.53 Mb
Type: Operation & user’s manual
Brand: Smacq Technologies
Category: PCI Card
Pages: 30
-
Драйверы
8
-
Инструкции по эксплуатации
6
ASUS ROG Xonar Phoebus инструкция по эксплуатации
(78 страниц)
- Языки:Английский
-
Тип:
PDF -
Размер:
4.34 MB -
Описание:
ROG Xonar Phoebus User’s Manual (English)
Просмотр
ASUS ROG Xonar Phoebus инструкция по эксплуатации
(72 страницы)
-
Тип:
PDF -
Размер:
6.9 MB -
Описание:
ROG Xonar Phoebus user manual
Просмотр
ASUS ROG Xonar Phoebus инструкция по эксплуатации
(122 страницы)
-
Тип:
PDF -
Размер:
7.61 MB -
Описание:
ROG Xonar Phoebus Quick Start Guide (European Version)
Просмотр
ASUS ROG Xonar Phoebus инструкция по эксплуатации
(107 страниц)
-
Тип:
PDF -
Размер:
10.11 MB -
Описание:
ROG Xonar Phoebus Quick Start Guide (Asian Version)
Просмотр
ASUS ROG Xonar Phoebus инструкция по эксплуатации
(46 страниц)
-
Тип:
PDF -
Размер:
6.73 MB -
Описание:
Xonar_Phoebus_manual
Simple chinese
Просмотр
ASUS ROG Xonar Phoebus инструкция по эксплуатации
(2 страницы)
-
Тип:
PDF -
Размер:
839.73 KB -
Описание:
Quick Start Guide for Xonar Phoebus
Added Arabic and CE/FCC/YEEE LOGO certifications.
Просмотр
На NoDevice можно скачать инструкцию по эксплуатации для ASUS ROG Xonar Phoebus. Руководство пользователя необходимо для ознакомления с правилами установки и эксплуатации ASUS ROG Xonar Phoebus. Инструкции по использованию помогут правильно настроить ASUS ROG Xonar Phoebus, исправить ошибки и выявить неполадки.