
RT-AC66U
Двухдиапазонный 3×3 802.11ac гигабитный роутер
Ультратонкий и стильный RT-AC66U поддерживает частоты 2.4ГГц и
5ГГц, SMB , UPnP AV, FTP сервера для круглосуточного доступа к файлам,
одновременную работу до 300,000 сессий; а также технологию ASUS Green
Network, обеспечивающую энергосбережение до 70%.
Руководство

2
Copyright © 2012 ASUSTeK Computer Inc. Все права защищены.
Любая часть этого руководства, включая оборудование и программное
обеспечение, описанные в нем, не может быть дублирована, передана,
преобразована, сохранена в системе поиска или переведена на другой язык
в любой форме или любыми средствами, кроме документации, хранящейся
покупателем с целью резервирования, без специального письменного разрешения
ASUSTeK COMPUTER INC. (“ASUS”).
Гарантия прекращается если: (1)изделие отремонтировано, модифицировано
или изменено без письменного разрешения ASUS; (2)серийный номер изделия
поврежден, неразборчив либо отсутствует.
ASUS предоставляет данное руководство «как есть» без гарантии любого типа,
явно выраженной или подразумеваемой, включая неявные гарантии или условия
получения коммерческой выгоды или пригодности для конкретной цели, но не
ограничиваясь этими гарантиями и условиями. Ни при каких обстоятельствах
компания ASUS, ее директора, должностные лица, служащие или агенты не
несут ответственности за любые косвенные, специальные, случайные или
являющиеся следствием чего-либо убытки (включая убытки из-за потери
прибыли, потери бизнеса, потери данных, приостановки бизнеса и т.п.), даже
если ASUS сообщила о возможности таких убытков, возникающих из- за любой
недоработки или ошибки в данном руководстве или продукте.
Технические характеристики и сведения, содержащиеся в данном руководстве,
представлены только для информативного использования, и могут быть
изменены в любое время без уведомления, и не должны быть истолкованы как
обязательства ASUS. ASUS не берет на себя никакой ответственности или
обязательств за любые ошибки или неточности в данном руководстве, включая
изделия или программное обеспечение, описанные в нем.
Продукты и названия корпораций, имеющиеся в этом руководстве могут
являться зарегистрированными торговыми знаками или авторскими правами
соответствующих компаний и используются только в целях идентификации.
R7415
Первое издание
Май 2012


5
1 Быстрый обзор
Комплект поставки
ПРИМЕЧАНИЯ:
• Если какие-либо элементы комплекта поставки отсутствуют
или повреждены, обратитесь в службу техподдержки ASUS.
Горячую линия службы технической поддержки смотрите в
конце этого руководства.
• Сохраните оригинальную упаковку на случай, если в
будущем потребуется гарантийное обслуживание, например
ремонт или замена.
Беспроводной роутер RT-AC66U Сетевой кабель (RJ-45)
Блок питания Краткое руководство
Компакт-диск (руководство, утилиты) Гарантийный талон
Подставка
Данный беспроводной роутер
5
1
2
3
4
6
8
7
10
12
11
9

6
1
Индикатор питания
Выключен: Нет питания.
Вкл: Устройство готово.
Медленно мигает: Режим восстановления
Быстро мигает: Обработка WPS.
2
Индикатор LAN
Откл: Нет питания или физического соединения.
Вкл: Имеется физическое соединение с локальной сетью (LAN).
3
WAN индикатор
Откл: Нет питания или физического соединения.
Вкл: Имеется физическое соединение с глобальной сетью (WAN).
4
2.4ГГц/5ГГц индикатор
Откл: Нет сигнала 2.4 ГГц или 5 ГГц.
Вкл: Беспроводная система готова.
Мигает: Передача данных через беспроводное подключение.
5
Индикатор USB
Откл: Нет питания или физического соединения.
Вкл: Подключено USB-устройство.
6
Разъем питания (DC-In)
Подключение блока питания.
7
Кнопка питания
Нажмите эту кнопку включения/отключения системы.
8
Порты USB 2.0
Подключение USB-устройств, например USB жесткого диска или USB флэш-диска.
Подключение iPad для подзарядки.
9
Кнопка сброса
Эта кнопка предназначена для сброса системы к настройкам по умолчанию.
10
Порт WAN (Internet)
Подключение сетевого кабеля для установки WAN подключения.
11
4 сетевых порта
Подключение сетевых устройств.
12
WPS кнопка
Эта кнопка запускает мастер WPS.
On Off

7
ПРИМЕЧАНИЯ:
• Используйте только блок питания, поставляемый с
устройством. При использовании других блоков питания
устройство может быть повреждено.
• Спецификация:
Блок питания
Выходная мощность: +19В с
максимальным
током 1,58 A
Температура при
работе
0~40°C
0~70°C
Влажность при
работе
50~90%
20~90%

8
2 Создание сети
Размещение роутера
Для улучшения беспроводной связи между беспроводным роутером
и сетевыми устройствами, подключенными к нему, выполните
следующее:
• Поместите беспроводной роутер в центре беспроводной сети
для максимального покрытия.
• Поместите устройство подальше от металлических преград и
прямых солнечных лучей.
• Для предотвращения помех поместите устройство подальше
от устройств стандарта 802.11g или устройств, работающих на
частоте 20 МГц или 2.4ГГц, устройств Bluetooth, беспроводных
телефонов, трансформаторов, мощных двигателей,
флюоресцентных ламп, микроволновых лучей, холодильников
и другого промышленного оборудования.
• Используйте последнюю прошивку. Для получения подробной
информации о наличии свежей прошивки посетите сайт ASUS
http://www.asus.com.
• Для обеспечения оптимального сигнала, расположите три
съемные антенны, как показано на рисунке ниже.
• Для оптимальной производительность настройте внутреннюю
систему охлаждения.
45°
45°
90°

9
Что вам нужно
Для настройки сети, необходим один или два компьютера,
соответствующие следующим требованиям:
• Сетевой порт RJ-45 (10Base-T/100Base-TX/1000BaseTX)
• Беспроводной интерфейс IEEE 802.11a/b/g/n/ac
• Установленный протокол TCP/IP
• Браузер, например Internet Explorer, Firefox, Safari или
Google Chrome
ПРИМЕЧАНИЯ:
• Если компьютер не имеет встроенных беспроводных
сетевых адаптеров, для подключения к сети Вы можете
установить в компьютер беспроводной адаптер IEEE
802.11a/b/g/n/ac.
• Беспроводной роутер одновременно поддерживает работу
на частотах 2.4 ГГц и 5 ГГц. Это позволяет выполнять
интернет-серфинг и работать с электронной почтой,
используя частоту 2,4 ГГц и одновременно смотреть
потоковое видео высокой четкости, или слушать музыку,
используя диапазон 5 ГГц.
• Е с л и В ы и с п о л ь з у е т е т о л ь к о о д и н к о м п ь ю т е р с
однодиапазонным сетевыми адаптером IEEE 802.11 b/g/n, по
умолчанию будет использоваться диапазон 2.4 ГГц.
• Е с л и В ы и с п о л ь з у е т е т о л ь к о о д и н к о м п ь ю т е р с
двухдиапазонным сетевыми адаптером IEEE 802.11 b/g/n/ac,
Вы можете использовать диапазон 2.4 ГГц или 5 ГГц.
• Если Вы используете два компьютера с сетевыми
адаптерами IEEE 802.11 b/g/n/ac, Вы можете использовать
диапазоны 2.4 ГГц и 5 ГГц одновременно.
• Длина Ethernet кабеля, используемого для подключения
сетевых устройств не должна превышать 100 метров.

10
Подготовка беспроводного роутера
Проводное подключение
ОСТОРОЖНО!
• Во избежание возможных помех с беспроводной связью, при
настройке беспроводного роутера используйте проводное
соединение .
• Перед настройкой беспроводного роутера, выполните
следующие действия:
• При замене существующего роутера, отключите его от
сети.
• Отключите провода/кабели от модема. Если на модеме
есть аккумулятор, отключите его.
• Перезагрузите компьютер (рекомендуется).
ПРИМЕЧАНИЕ: Беспроводной роутер имеет функцию
автоматического определения кабеля, следовательно можно
использовать любой кабель (прямой или перекрестный).
RT-AC66U
Computer
Modem
LAN
Power
Wall Power Outlet
Power
WAN
1
2
3
4
Для настройки беспроводного роутера через проводное
соединение:
1. Подключите блок питания роутера к разъему DC-In и к
розетке.

29:53
Роутеры Asus RT-N66U, RT-AC66U, RT-AC66U B1, RT-AC68U — что между ними общего
12:12
Обзорчик роутера ASUS RT-AC66U
14:42
WiFi роутер (маршрутизатор) ASUS RT-AC68U
05:28
СЕКРЕТНАЯ ФУНКЦИЯ РОУТЕРОВ — Что такое AiMesh
06:14
Настройка роутера ASUS RT-N66U
15:00
Ремонт роутера Asus RT-AC66U. Пропадает Wi-Fi 5G
23:07
Обзор роутера ASUS RT — AC66U B1
03:33
ASUS RT-AC66U — обзор и технические характеристики роутера — Keddr.com
Нажмите на кнопку для помощи

RT-AC66U
Dual Band 3×3 802.11AC Gigabit Router
User Guide

2
Copyright © 2013 ASUSTeK Computer Inc. All Rights Reserved.
No part of this manual, including the products and software described
in it, may be reproduced, transmitted, transcribed, stored in a retrieval
system, or translated into any language in any form or by any means, except
documentation kept by the purchaser for backup purposes, without the
express written permission of ASUSTeK Computer Inc. (“ASUS”).
Product warranty or service will not be extended if: (1) the product is repaired,
modied or altered, unless such repair, modication of alteration is authorized
in writing by ASUS; or (2) the serial number of the product is defaced or
missing.
ASUS PROVIDES THIS MANUAL “AS IS” WITHOUT WARRANTY OF ANY KIND,
EITHER EXPRESS OR IMPLIED, INCLUDING BUT NOT LIMITED TO THE IMPLIED
WARRANTIES OR CONDITIONS OF MERCHANTABILITY OR FITNESS FOR A
PARTICULAR PURPOSE. IN NO EVENT SHALL ASUS, ITS DIRECTORS, OFFICERS,
EMPLOYEES OR AGENTS BE LIABLE FOR ANY INDIRECT, SPECIAL, INCIDENTAL,
OR CONSEQUENTIAL DAMAGES (INCLUDING DAMAGES FOR LOSS OF PROFITS,
LOSS OF BUSINESS, LOSS OF USE OR DATA, INTERRUPTION OF BUSINESS
AND THE LIKE), EVEN IF ASUS HAS BEEN ADVISED OF THE POSSIBILITY OF
SUCH DAMAGES ARISING FROM ANY DEFECT OR ERROR IN THIS MANUAL OR
PRODUCT.
SPECIFICATIONS AND INFORMATION CONTAINED IN THIS MANUAL ARE
FURNISHED FOR INFORMATIONAL USE ONLY, AND ARE SUBJECT TO CHANGE
AT ANY TIME WITHOUT NOTICE, AND SHOULD NOT BE CONSTRUED AS A
COMMITMENT BY ASUS. ASUS ASSUMES NO RESPONSIBILITY OR LIABILITY
FOR ANY ERRORS OR INACCURACIES THAT MAY APPEAR IN THIS MANUAL,
INCLUDING THE PRODUCTS AND SOFTWARE DESCRIBED IN IT.
Products and corporate names appearing in this manual may or may not be
registered trademarks or copyrights of their respective companies, and are used
only for identication or explanation and to the owners’ benet, without intent
to infringe.
E7891
Second Edition
January 2013

3
Table of contents
1 Getting to know your wireless router
1.1 Welcome! …………………………………………………………………………….6
1.2 Package contents ……………………………………………………………….6
1.3 Your wireless router ……………………………………………………………7
1.4 Positioning your router ……………………………………………………..9
Mounting to the stand ……………………………………………………………10
1.5 Setup Requirements ………………………………………………………. 11
1.6 Router Setup ……………………………………………………………………. 12
1.6.1 Wired connection …………………………………………………………12
1.6.2 Wireless connection …………………………………………………….13
2 Getting started
2.1 Logging into the Web GUI …………………………………………….. 15
2.2 Quick Internet Setup (QIS) with Auto-detection ……….. 16
2.3 Connecting to your wireless network ………………………….. 20
3 Conguring the General settings
3.1 Using the Network Map ………………………………………………… 21
3.1.1 Setting up the wireless security settings ………………….22
3.1.2 Managing your network clients …………………………………24
3.1.3 Monitoring your USB device ………………………………………25
3.2 Creating a Guest Network ……………………………………………… 28
3.3 Using the Trac Manager ……………………………………………… 30
3.3.1 Managing QoS (Quality of Service) Bandwidth……….30
3.3.2 Monitoring Trac ………………………………………………………..34
3.4 Setting up Parental Control …………………………………………… 35
3.5 Using the USB Application …………………………………………….. 37
3.5.1 Using AiDisk …………………………………………………………………….37
3.5.2 Using Servers Center ……………………………………………………39

4
Table of contents
3.5.3 3G/4G …………………………………………………………………………….45
3.6 Using AiCloud ………………………………………………………………….. 47
3.6.1 Cloud Disk ……………………………………………………………………..48
3.6.2 Smart Access …………………………………………………………………49
3.6.3 Smart Sync …………………………………………………………………….50
4 Conguring the Advanced Settings
4.1 Wireless …………………………………………………………………………….. 52
4.1.1 General …………………………………………………………………………..52
4.1.2 WPS ………………………………………………………………………………..55
4.1.3 Bridge …………………………………………………………………………….57
4.1.4 Wireless MAC Filter ………………………………………………………59
4.1.5 RADIUS Setting …………………………………………………………….60
4.1.6 Professional …………………………………………………………………..61
4.2 LAN ……………………………………………………………………………………. 63
4.2.1 LAN IP …………………………………………………………………………….63
4.2.2 DHCP Server ………………………………………………………………….64
4.2.3 Route ……………………………………………………………………………..65
4.2.4 IPTV …………………………………………………………………………………..66
4.3 WAN ………………………………………………………………………………….. 67
4.3.1 Internet Connection …………………………………………………….67
4.3.2 Port Trigger ……………………………………………………………………70
4.3.3 Virtual Server/Port Forwarding ………………………………….72
4.3.4 DMZ………………………………………………………………………………..75
4.3.5 DDNS ……………………………………………………………………………..76
4.3.6 NAT Passthrough ………………………………………………………….77
4.4 IPv6 ……………………………………………………………………………………. 78
4.5 VPN Server ……………………………………………………………………….. 79
4.6 Firewall ……………………………………………………………………………… 80
4.6.1 General …………………………………………………………………………..80
4.6.2 URL Filter ……………………………………………………………………….80

5
Table of contents
4.6.3 Keyword lter ……………………………………………………………….81
4.6.4 Network Services Filter ……………………………………………….82
4.7 Administration ………………………………………………………………… 83
4.7.1 Operation Mode …………………………………………………………..83
4.7.2 System ……………………………………………………………………………84
4.7.3 Firmware Upgrade ……………………………………………………….85
4.7.4 Restore/Save/Upload Setting …………………………………….85
4.8 System Log ………………………………………………………………………. 86
5 Utilities
5.1 Device Discovery …………………………………………………………….. 87
5.2 Firmware Restoration …………………………………………………….. 88
5.3 Setting up your printer server ………………………………………. 89
5.3.1 ASUS EZ Printer Sharing ……………………………………………..89
5.3.2 Using LPR to Share Printer ………………………………………….93
5.4 Download Master ……………………………………………………………. 98
5.4.1 Conguring Bit Torrent download settings ……………..99
5.4.2 NZB settings: ……………………………………………………………… 100
6 Troubleshooting
6.1 Basic Troubleshooting …………………………………………………..101
6.2 Frequently Asked Questions (FAQs) …………………………..104
Appendices
Notices ………………………………………………………………………………………..114
ASUS Contact information …………………………………………………………128
Networks Global Hotline Information………………………………………129

6
1 Getting to know your wireless
router
NOTES:
• If any of the items are damaged or missing, contact ASUS for
technical inquiries and support, Refer to the ASUS Support Hotline
list at the back of this user manual.
• Keep the original packaging material in case you would need future
warranty services such as repair or replacement.
RT-AC66U Wireless Router Network cable (RJ-45)
Power adapter Quick Start Guide
Support CD (Manual, utility software) Warranty card
Stand
1.1 Welcome!
Thank you for purchasing an ASUS RT-AC66U Wireless Router!
The ultra-thin and stylish RT-AC66U features a 2.4GHz and 5GHz
dual bands for an unmatched concurrent wireless HD streaming;
SMB server, UPnP AV server, and FTP server for 24/7 le sharing;
a capability to handle 300,000 sessions; and the ASUS Green
Network Technology, which provides up to 70% power-saving
solution.
1.2 Package contents

7
1.3 Your wireless router
Power LED
O: No power.
On: Device is ready.
Flashing slow: Rescue mode
Flashing quick: WPS is processing.
LAN LED
O: No power or no physical connection.
On: Has physical connection to a local area network (LAN).
Flashing: Transmitting or receiving data via wireless connection.
WAN LED
O: No power or no physical connection.
On: Has physical connection to a wide area network (WAN).
Flashing: Transmitting or receiving data via wireless connection.
2.4GHz LED / 5GHz LED
O: No 2.4GHz or 5GHz signal.
On: Wireless system is ready.
Flashing: Transmitting or receiving data via wireless connection.

8
NOTES:
• Use only the adapter that came with your package. Using other
adapters may damage the device.
• Specications:
DC Power adapter DC Output: +19V with max 1.58A current;
Operating
Temperature 0~40oC Storage 0~70oC
Operating Humidity 50~90% Storage 20~90%
USB LED
O: No power or no physical connection.
On: Has physical connection to USB devices.
Power (DC-IN) port
Insert the bundled AC adapter into this port and connect your router to a
power source.
Power button
Press this button to power on or o the system.
USB 2.0 ports
Insert USB 2.0 devices such as USB hard disks or USB ash drives into these
ports.
Insert your iPad’s USB cable into one of these ports to charge your iPad.
Reset button
This button resets or restores the system to its factory default settings.
WAN (Internet) port
Connect a network cable into this port to establish WAN connection.
LAN 1 ~ 4 ports
Connect network cables into these ports to establish LAN connection.
WPS button
This button launches the WPS Wizard.

9
1.4 Positioning your router
For the best wireless signal transmission between the wireless
router and the network devices connected to it, ensure that you:
• Place the wireless router in a centralized area for a maximum
wireless coverage for the network devices.
• Keep the device away from metal obstructions and away from
direct sunlight.
• To prevent signal interference or loss, keep the device away
from 802.11g or 20MHz only Wi-Fi devices, 2.4GHz computer
peripherals, Bluetooth devices, cordless phones, transformers,
heavy-duty motors, uorescent lights, microwave ovens,
refrigerators, and other industrial equipment.
• To ensure the best wireless signal, orient the three detachable
antennas as shown in the drawing below.

10
Mounting to the stand
To mount to the stand:
• Align and insert the stand’s mounting hooks to the wireless
router’s mounting holes.

11
1.5 Setup Requirements
To set up your wireless network, you need a computer that meets
the following system requirements:
• Ethernet RJ-45 (LAN) port (10Base—T/100Base—TX/
1000BaseTX)
• IEEE 802.11a/b/g/n/ac wireless capability
• An installed TCP/IP service
• Web browser such as Internet Explorer, Firefox, Safari, or
Google Chrome
NOTES:
• If your computer does not have built-in wireless capabilities, you may
install an IEEE 802.11a/b/g/n/ac WLAN adapter to your computer to
connect to the network.
• With its dual band technology, your wireless router supports 2.4GHz
and 5GHz wireless signals simultaneously. This allows you to do
Internet-related activities such as Internet surng or reading/writing
e-mail messages using the 2.4GHz band while simultaneously
streaming high-denition audio/video les such as movies or music
using the 5GHz band.
• Some IEEE 802.11n devices that you want to connect to your network
may or may not support 5GHz band. Refer to the device’s manual for
specications.
• The Ethernet RJ-45 cables that will be used to connect the network
devices should not exceed 100 meters.

12
1.6 Router Setup
1.6.1 Wired connection
IMPORTANT!
• Use a wired connection when setting up your wireless router to
avoid possible setup problems.
• Before setting up your ASUS wireless router, do the following:
• If you are replacing an existing router, disconnect it from your
network.
• Disconnect the cables/wires from your existing modem setup. If
your modem has a backup battery, remove it as well.
• Reboot your cable modem and computer (recommended).
NOTE: You can use either a straight-through cable or a crossover cable
for wired connection.
RT-AC66U
Computer
Modem
LAN
Power
Wall Power Outlet
Power
WAN
To set up your wireless router via wired connection:
1. Insert your wireless router’s AC adapter to the DC-IN port and
plug it to a power outlet.

13
2. Using the bundled network cable, connect your computer to
your wireless router’s LAN port.
IMPORTANT! Ensure that the LAN LED is blinking.
3 Using another network cable, connect your modem to your
wireless router’s WAN port.
4. Insert your modem’s AC adapter to the DC-IN port and plug it
to a power outlet.
1.6.2 Wireless connection
To set up your wireless router via wireless connection:
1. Insert your wireless router’s AC adapter to the DC-IN port and
plug it to a power outlet.
2 Using the bundled network cable, connect your modem to
your wireless router’s WAN port.

14
3. Insert your modem’s AC adapter to the DC-IN port and plug it
to a power outlet.
4. Install an IEEE 802.11a/b/g/n/ac WLAN adapter on your
computer.
NOTES:
• For details on connecting to a wireless network, refer to the WLAN
adapter’s user manual.
• To set up the security settings for your network, refer to the section
Setting up the wireless security settings in Chapter 3 of this user
manual.

15
2 Getting started
2.1 Logging into the Web GUI
Your ASUS Wireless Router comes with an intuitive web graphical
user interface (GUI) that allows you to easily congure its various
features through a web browser such as Internet Explorer, Firefox,
Safari, or Google Chrome.
NOTE: The features may vary with dierent rmware versions.
To log into the web GUI:
1. On your web browser, manually key in the wireless router’s
default IP address: 192.168.1.1
2. On the login page, key in the default user name (admin) and
password (admin).
3. You can now use the Web GUI to congure various settings of
your ASUS Wireless Router.
NOTE: If you are logging into the Web GUI for the rst time, you will be
directed to the Quick Internet Setup (QIS) page automatically.
Navigation
panel
QIS
Top command buttons
Information
banner
middle column right column

16
2.2 Quick Internet Setup (QIS) with Auto-
detection
The Quick Internet Setup (QIS) function guides you in quickly
setting up your Internet connection.
NOTE: When setting the Internet connection for the rst time, press
the Reset button on your wireless router to reset it to its factory default
settings.
To use QIS with auto-detection:
1. Log into the Web GUI. The QIS page launches automatically.
NOTES:
• By default, the login username and password for your wireless
router’s WEB GUI is admin. For details on changing your wireless
router’s login username and password, refer to section 4.7.2 System.
• The wireless router’s login username and password is dierent from
the 2.4GHz/5GHz network name (SSID) and security key. The wireless
router’s login username and password allows you to log into your
wireless router’s WEB GUI to congure your wireless router’s settings.
The 2.4GHz/5GHz network name (SSID) and security key allows Wi-Fi
devices to log in and connect to your 2.4GHz/5GHz network.

17
2. The wireless router automatically detects if your ISP connection
type is Dynamic IP, PPPoE, PPTP, L2TP, and Static IP. Key in
the necessary information for your ISP connection type.
IMPORTANT! Obtain the necessary information from your ISP about
the Internet connection type.
for Automatic IP (DHCP)
for PPPoE
NOTES:
• The auto-detection of your ISP connection type takes place when
you congure the wireless router for the rst time or when your
wireless router is reset to its default settings.
• If QIS failed to detect your Internet connection type, click Skip to
manual setting and manually congure your connection settings.

18
for Static IP
for PPTP and L2TP

19
3. Assign the wireless network name (SSID) and security key for
your 2.4GHz and 5 GHz wireless connection. Click Apply when
done.
4. Your Internet and wireless settings are displayed. Click Next to
continue.
5. Read the wireless network connection tutorial. When done,
click Finish.

20
2.3 Connecting to your wireless network
After setting up your wireless router via QIS, you can connect your
computer or other smart devices to your wireless network.
To connect to your network:
1. On your computer, click the network icon in the notication
area to display the available wireless networks.
2. Select the wireless network that you want to connect to, then
click Connect.
3. You may need to key in the network security key for a secured
wireless network, then click OK.
4. Wait while your computer establishes connection to the
wireless network successfully. The connection status is
displayed and the network icon displays the connected
status.
NOTES:
• Refer to the next chapters for more details on conguring your
wireless network’s settings.
• Refer to your device’s user manual for more details on connecting it
to your wireless network.

21
3 Conguring the General
settings
3.1 Using the Network Map
Network Map allows you to congure your network’s security
settings, manage your network clients, and monitor your USB
device.

22
3.1.1 Setting up the wireless security settings
To protect your wireless network from unauthorized access, you
need to configure its security settings.
To set up the wireless security settings:
1. From the navigation panel, go to General > Network Map.
2. On the Network Map screen and under System status, you can
configure the wireless security settings such as SSID, security
level, and encryption settings.
NOTE: You can set up dierent wireless security settings for 2.4GHz and
5GHz bands.
2.4GHz security settings
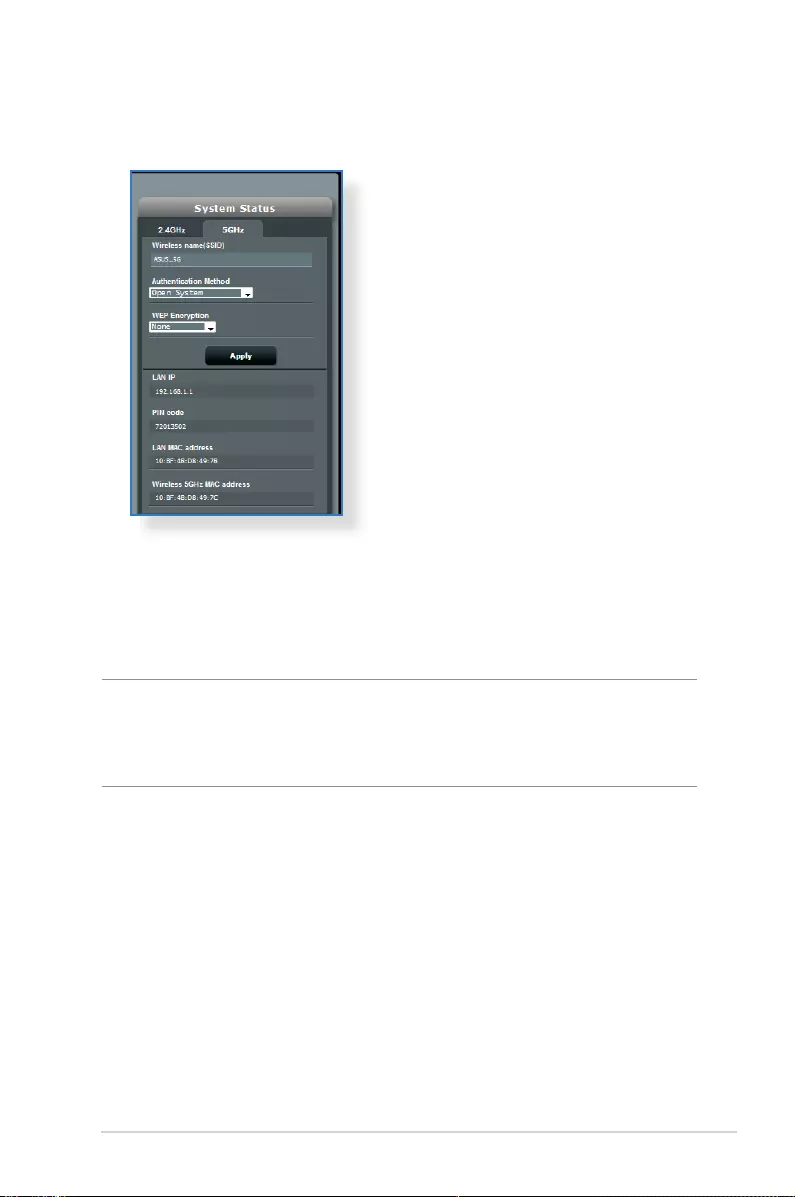
23
5GHz security settings
3. On the Wireless name (SSID) field, key in a unique name for
your wireless network.
4. From the Security Level dropdown list, select the encryption
method for your wireless network.
IMPORTANT! The IEEE 802.11n standard prohibits using High
Throughput with WEP or WPA-TKIP as the unicast cipher. If you use these
encryption methods, your data rate will drop to IEEE 802.11g 54Mbps
connection.
5. Key in your security passkey.
6. Click Apply when done.

24
3.1.2 Managing your network clients
To manage your network clients:
1. From the navigation panel, go to General > Network Map tab.
2. On the Network Map screen, select the Client Status icon to
display your network client’s information.
3. To block a client’s access to your network, select the client and
click block.

25
3.1.3 Monitoring your USB device
The ASUS Wireless Router provides two USB 2.0 ports for
connecting USB devices or USB printer, to allow you to share files
and printer with clients in your network.
NOTES:
• To use this feature, you need to plug a USB storage device, such as
a USB hard disk or USB ash drive, to the USB 2.0 port on the rear
panel of your wireless router. Ensure that the USB storage device is
formatted and partitioned properly. Refer to the Plug-n-Share Disk
Support List at
http://event.asus.com/networks/disksupport
• The USB ports support two USB drives or one printer and one USB
drive at the same time.
IMPORTANT! You rst need to create a share account and its
permission /access rights to allow other network clients to access the
USB device via an FTP site/third-party FTP client utility, Servers Center,
Samba, or AiCloud. For more details, refer to the section 3.5.Using the
USB Application and 3.6 Using AiCloud in this user manual.
To monitor your USB device:
1. From the navigation panel, go to General > Network Map.
2. On the Network Map screen, select the USB Disk Status icon to
display your USB device’s information.

26
3. On the AiDisk Wizard field, click GO to set up an FTP server for
Internet file sharing.
NOTES:
• For more details, refer to the section 3.5.2 Using Servers Center in
this user manual.
• On USB External HDD/Flash disk:
• The wireless router works with most USB HDDs/Flash disks (up to 2TB
size) and supports read-write access for FAT16, FAT32, EXT2, EXT3,
and NTFS.

27
Safely removing the USB disk
IMPORTANT: Incorrect removal of the USB disk may cause data
corruption.
To safely remove the USB disk:
1. From the navigation panel, go to General > Network Map.
2. In the upper right corner, click > Eject USB disk. When
the USB disk is ejected successfully, the USB status shows
Unmounted.

28
3.2 Creating a Guest Network
The Guest Network provides temporary visitors with Internet
connectivity via access to separate SSIDs or networks without
providing access to your private network.
NOTE: RT-AC66U supports up to six SSIDs (three 2.4GHz and three 5GHz
SSIDs).
To create a guest network:
1. From the navigation panel, go to General > Guest Network.
2. On the Guest Network screen, select 2.4Ghz or 5Ghz frequency
band for the guest network that you want to create.
3. Click Enable.

29
4. To congure additional options, click Modify.
5. Click Yes on the Enable Guest Network screen.
6. Assign a wireless name for your temporary network on the
Network Name (SSID) eld.
7. Select an Authentication Method.
8. Select an Encryption method.
9. Specify the Access time or choose Limitless.
10. Select Disable or Enable on the Access Intranet item.
11. When done, click Apply.

30
3.3 Using the Trac Manager
3.3.1 Managing QoS (Quality of Service) Bandwidth
The Quality of Service (QoS) allows you to set the bandwidth
priority and manage network trac.
NOTES:
• The default rule sets online gaming and web surng as the highest
priority and are not inuenced by P2P applications (peer-to-peer
applications such as Bit Torrent).
• If QoS is turned o, the P2P (peer-to-peer) applications will be given
the top priority to use the upload and download bandwidths. If a
P2P application is used, you may encounter some lag during web
surng.
To set up bandwidth priority:
1. From the navigation panel, go to General > Trac Manager >
QoS tab.
2. Click ON to enable QoS. Fill in the upload and download
bandwidth elds.
NOTE: Get the bandwidth information from your ISP.
3. Click Save.
NOTE: The table on the screen below is for advanced settings. If you
want to prioritize specic network applications and network services,
select User-dened QoS rules or User-dened Priority from the drop-
down list on the upper-right corner.

31
4. On the user-dened QoS rules page, there are four default
online service types – web surf, HTTPS and le transfers.
Select your preferred service, ll in the Source IP or MAC,
Destination Port, Protocol, Transferred and Priority, then
click Apply. The information will be congured in the QoS rules
screen.

32
NOTES
• To ll in the source IP or MAC, you can:
a) Enter a specic IP address, such as «192.168.122.1».
b) Enter IP addresses within one subnet or within the same IP
pool, such as “192.168.123.*”, or “192.168.*.*”
c) Enter all IP addresses as “*.*.*.*” or leave the eld blank.
d) The format for the MAC address is six groups of two
hexadecimal digits, separated by colons (:), in transmission
order (e.g. 12:34:56:aa:bc:ef )
• For source or destination port range, you can either:
a) Enter a specic port, such as “95”.
b) Enter ports within a range, such as “103:315”, “>100”, or
“<65535”.
• The Transferred column contains information about the upstream
and downstream trac (outgoing and incoming network trac) for
one section. In this column, you can set the network trac limit (in
KB) for a specic service to generate specic priorities for the service
assigned to a specic port. For example, if two network clients, PC
1 and PC 2, are both accessing the Internet (set at port 80), but PC 1
exceeds the network trac limit due to some downloading tasks, PC
1 will have a lower priority. If you do not want to set the trac limit,
leave it blank.
5. On the User-dened Priority page, you can prioritize the
network applications or devices into ve levels from the user-
dened QoS rules’ dropdown list. Based on priority level, you
can use the following methods to send data packets:
• Change the order of upstream network packets that are sent

33
• Under Upload Bandwidth table, set Minimum Reserved
Bandwidth and Maximum Bandwidth Limit for multiple
network applications with dierent priority levels. The
percentages indicate the upload bandwidth rates that are
available for specied network applications.
NOTES:
• Low-priority packets are disregarded to ensure the transmission of
high-priority packets.
• Under Download Bandwidth table, set Maximum Bandwidth
Limit for multiple network applications in corresponding order.
The higher priority upstream packet will cause the higher priority
downstream packet.
• If there are no packets being sent from high-priority applications, the
full transmission rate of the Internet connection is available for low-
priority packets.
6. Set the highest priority packet. To ensure a smooth online
gaming experience, you can set ACK, SYN, and ICMP as the
highest priority packet.
NOTE: Ensure to enable QoS rst and set up the upload and download
rate limits.

34
3.3.2 Monitoring Trac
The trac monitor function allows you to access the bandwidth
usage and speed of your Internet, wired, and wireless networks. It
allows you to monitor network trac even on a daily basis.
Note: Packets from the Internet are evenly transmitted to the wired and
wireless devices.

35
3.4 Setting up Parental Control
Parental Control allows you to control the Internet access time.
Users can set the time limit for a client’s network usage.
To use the parental control function:
1. From the navigation panel, go to General > Parental control.
2. Click ON to enable Parental Control.
3. Select the client whose network usage you want to control.
You may also key in the client’s MAC address in the Client MAC
Address column.
NOTE: Ensure that the client name does not contain special characters
or spaces as this may cause the router to function abnormally.
4. Click to add or delete the client’s prole.
5. Set up the allowed time limit in Time Management map. Drag
and drop a desired time zone to allow client’s network usage.

36
6. Click OK.
7. Click Apply to save the settings.

37
3.5 Using the USB Application
The USB Applications function provides AiDisk, Servers Center,
Network Printer Server and Download Master submenus.
IMPORTANT! To use the server functions, you need to insert a USB
storage device, such as a USB hard disk or USB ash drive, in the USB
2.0 port on the rear panel of your wireless router. Ensure that the USB
storage device is formatted and partitioned properly. Refer to the ASUS
website at http://event.asus.com/2009/networks/disksupport/ for the
le system support table.
3.5.1 Using AiDisk
AiDisk allows you to share les stored on a connected SB device
through the Internet. AiDisk also assists you with setting up ASUS
DDNS and an FTP server.
To use AiDisk:
1. From the navigation panel, go to General > USB application,
then click the AiDisk icon.
2. From the Welcome to AiDisk wizard screen, click Go.

38
4. Create your domain name via the ASUS DDNS services, read
the Terms of Service and then select I will use the service and
accept the Terms of service and key in your domain name.
When done, click Next.
You can also select Skip ASUS DDNS settings then click Next
to skip the DDNS setting.
5. Click Finish to complete the setting.
6. To access the FTP site that you created, launch a web browser
or a third-party FTP client utility and key in the ftp link
(ftp://<domain name>.asuscomm.com) you have previously
created.
3. Select the access rights that you want to assign to the clients
accessing your shared data.

39
3.5.2 Using Servers Center
The Servers Center allows you to share the media les from the
USB disk via a Media Server directory, Samba share service, or FTP
share service. You can also congure other settings for the USB
disk in the Servers Center.
Using Media Server
Your wireless router allows DLNA-supported devices to access
multimedia les from the USB disk connected to your wireless
router.
NOTE: Before using the DLNA Media Server function, connect your
device to the RT-AC66U’s network.
To launch the Media Server setting page, go to General > USB
application > Servers Center > Media Servers tab. Refer to the
following for the descriptions of the elds:
• Enable DLNA Media Server: Select ON/OFF to enable/
disable the DLNA Media Server.

40
• Enable iTunes Server?: Select ON/OFF to enable/disable the
iTunes Server.
• Media server directory: Select your media server directory
and click Apply to share les from the USB disk to media
devices in the network.
• Media Server Status: Displays the status of the media server.
Using Network Place (Samba) Share service
Network Place (Samba) Share allows you to set up the accounts
and permissions for the Samba service.
To use Samba share:
1. From the navigation panel, go to General > USB application >
Servers Center.
NOTE: Network Place (Samba) Share is enabled by default.
2. Follow the steps below to add, delete, or modify an account.

41
To delete an existing account:
a) Select the account that you want to delete.
b) Click .
c) When prompted, click Delete to conrm the account
deletion.
To add a folder:
a) Click .
b) Enter the folder name, and click Add. The folder that you
created will be added to the folder list.
To create a new account:
a) Click to add new account.
b) In the Account and Password elds, key in the name and
password of your network client. Retype the password to
conrm. Click Add to add the account to the list.

42
3. From the list of folders, select the type of access permission
that you want to assign for specic folders:
• R/W: Select this option to assign read/write access.
• R: Select this option to assign read-only access.
• No: Select this option if you do not want to share a specic
le folder.
4. Click Apply to apply the changes.
Using the FTP Share service
FTP share enables an FTP server to share les from USB disk to
other devices via your local area network or via the Internet.
IMPORTANT:
• Ensure that you safely remove the USB disk. Incorrect removal of the
USB disk may cause data corruption.
• To safely remove the USB disk, refer to the section Safely removing
the USB disk under 3.1.3 Monitoring your USB device.

43
To use FTP Share service:
NOTES: Ensure that you have set up your FTP server through
AiDisk. For more details, refer to the section 3.5.1 Using AiDisk.
1. From the navigation panel, click General > USB application >
Servers Center > FTP Share tab.
2. From the list of folders, select the type of access rights that you
want to assign for specic folders:
• R/W: Select to assign read/write access for a specic folder.
• W: Select to assign write only access for a specic folder.
• R: Select to assign read only access for a specic folder.
• No: Select this option if you do not want to share a specic
folder.
3. Click Apply to conrm the changes.
4. To access the FTP server, key in the ftp link
ftp://<hostname>.asuscomm.com and your user name and
password on a web browser or a third-party FTP utility.

44
Miscellaneous setting
Miscellaneous setting allows you to congure other settings for
the USB disk, including the maximum number of user logins,
the device name, work group, and character set used on the FTP
server.
To congure Miscellaneous settings:
1. From the navigation panel, click General > USB application >
Servers Center > Miscellaneous setting tab.
2. Congure the following settings:
• Maximum Login User
Set the maximum number of concurrent connections of the
Network Neighborhood or FTP Server.
NOTE: Some FTP clients may establish more than one connection.
Setting this number too low will lead to login failures.
• Device Name
Assigns the name of the device as shown on the network.
For example, for a device with the name ABC, enter //ABC on
the Internet Explorer address bar to access the Network Place
service.
• Work Group
Assigns the name of the local RT-AC66U network as seen in
Network Neighborhood.

45
To set up 3G/4G internet access:
1. From the navigation panel, click General > USB application >
3G/4G.
2. In the Enable USB Modem eld, select Yes.
3. Set up the following:
3.5.3 3G/4G
3G/4G USB modems can be connected to RT-AC66U to allow
Internet access.
NOTE: For a list of veried USB modems, please visit:
http://event.asus.com/2009/networks/3gsupport/
NOTE: For Device Name and Work Group, the standard input
characters include letters (a-z, A-Z), digits (0-9), space, underscores(_),
and hyphens(-). The rst and last character should not contain any
spaces. An invalid workgroup name makes it harder for other devices to
nd your device in the network.
• Character set on FTP Server
Select the appropriate encoding used during data exchange
on the FTP server.

46
• Location: Select your 3G/4G service provider’s location from
the dropdown list.
• ISP: Select your Internet Service Provider (ISP) from the
dropdown list.
• APN (Access Point Name) service (optional): Contact your
3G/4G service provider for detailed information.
• Dial Number and PIN code: The 3G/4G provider’s access
number and PIN code for connection.
NOTE: PIN code may vary from dierent providers.
• Username / Password: The username and password will be
provided by the 3G/4G network carrier.
• USB Adapter: Choose your USB 3G / 4G adapter from the
dropdown list. If you are not sure of your USB adapter’s
model or the model is not listed in the options, select Auto.
4. Click Apply.
NOTE: The router will reboot for settings to take eect.

47
3.6 Using AiCloud
AiCloud is a cloud service application that allows you to save, sync,
share, and access your les.
To use AiCloud:
1. From Google Play Store or Apple Store, download and install
the ASUS AiCloud aspp to your smart device.
2. Connect your smart device to your network. Follow the
instructions to complete the AiCloud setup process.

48
3.6.1 Cloud Disk
To create a cloud disk:
1. Insert a USB storage device into the wireless router.
2. Turn on Cloud Disk.
3. Go to https://www.asusnetwork.net and enter the router
login account and password. For better user experience, we
recommend that you use Google Chrome or Firefox.
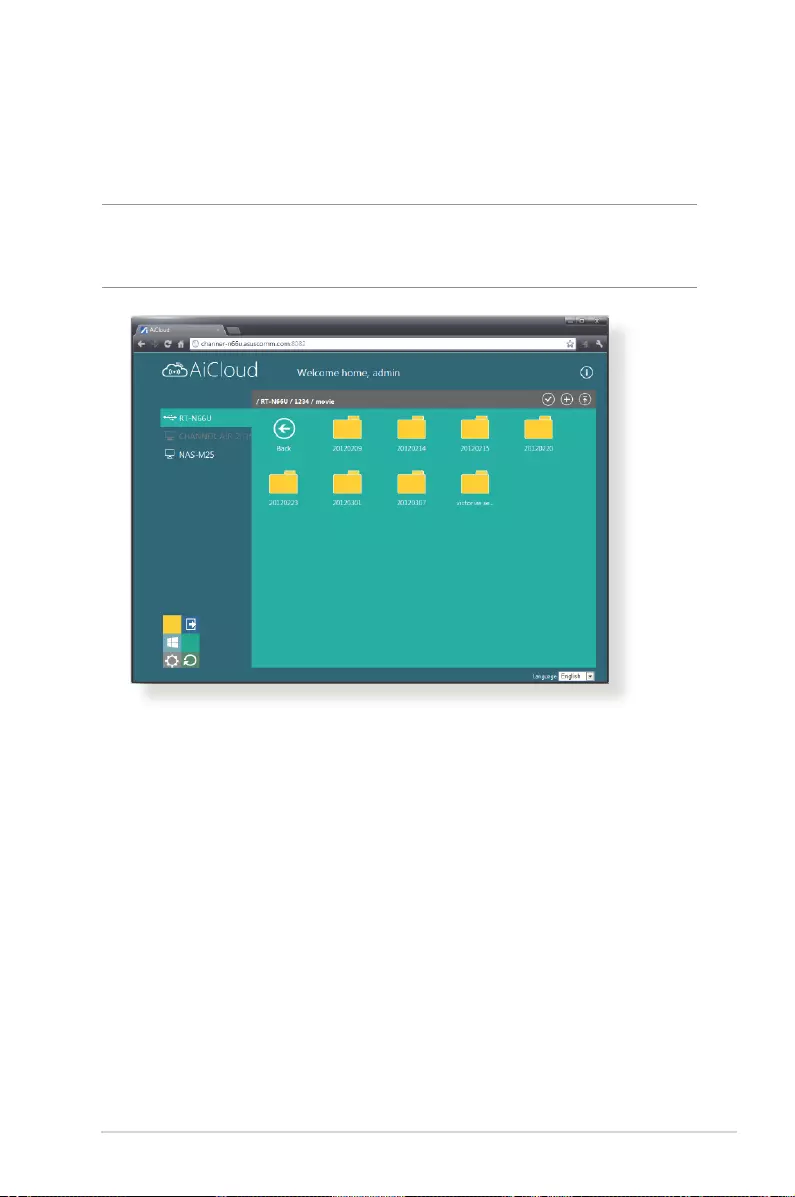
49
4. You can now start accessing Cloud Disk les on devices
connected to the network.
NOTE: When accessing the devices that are connected to the network,
you need to enter the device’s user name and password manually, which
will not be saved by AiCloud for security reason.
50
3.6.2 Smart Access
The Smart Access function allows you to easily access your home
network via your router’s domain name.
NOTES:
• You can create a domain name for your router with ASUS DDNS. For
more details, refer to section 4.3.5 DDNS.
• By default, AiCloud provides a secure HTTPS connection. Key in
https://[yourASUSDDNSname].asuscomm.com for a very secure
Cloud Disk and Smart Access usage.

51
3.6.3 Smart Sync
To use Smart Sync:
1. Launch AiCloud, click Smart Sync > Go.
2. Select ON to enable Smary Sync.
3. Click Add new account.
4. Enter your ASUS WebStorage account password and select the
directory that you want to sync with WebStorage.

52
4 Conguring the Advanced
Settings
4.1 Wireless
4.1.1 General
The General tab allows you to congure the basic wireless
settings.
To configure the basic wireless settings:
1. From the navigation panel, go to Advanced Settings >
Wireless > General tab.
2. Select 2.4GHz or 5GHz as the frequency band for your wireless
network.
3. Assign a unique name containing up to 32 characters for your
SSID (Service Set Identier) or network name to identify your
wireless network. Wi-Fi devices can identify and connect to
the wireless network via your assigned SSID. The SSIDs on the
information banner are updated once new SSIDs are saved to
the settings.
NOTE: You can assign unique SSIDs for the 2.4 GHz and 5GHz frequency
bands.

53
4. In the Hide SSID eld, select Yes to prevent wireless devices
from detecting your SSID. When this function is enabled, you
would need to enter the SSID manually on the wireless device
to access the wireless network.
5. Select any of these wireless mode options to determine the
types of wireless devices that can connect to your wireless
router:
Auto — Select Auto to allow 802.11AC, 802.11n, 802.11g, and
802.11b devices to connect to the wireless router.
Legacy — Select Legacy to allow 802.11b/g/n devices to
connect to the wireless router. Hardware that supports
802.11n natively, however, will only run at a maximum speed
of 54Mbps.
N only — Select N only to maximize wireless N performance.
This setting prevents 802.11g and 802.11b devices from
connecting to the wireless router.
6. Select the operating channel for your wireless router. Select
Auto to allow the wireless router to automatically select the
channel that has the least amount of interference.
7. Select any of these channel bandwidth to accommodate higher
transmission speeds:
40MHz: Select this bandwidth to maximize the wireless
throughput.
20MHz (default): Select this bandwidth if you encounter some
issues with your wireless connection.
8. Select any of these authentication methods:
• Open System: This option provides no security.
• Shared Key: You must use WEP encryption and enter at least
one shared key.
•
•
•

54
• WPA/WPA2 Personal/WPA Auto-Personal: This option
provides strong security. You can use either WPA (with
TKIP) or WPA2 (with AES). If you select this option, you must
use TKIP + AES encryption and enter the WPA passphrase
(network key).
• WPA/WPA2 Enterprise/WPA Auto-Enterprise: This option
provides very strong security. It is with integrated EAP server
or an external RADIUS back-end authentication server.
• Radius with 802.1x
NOTE: Your wireless router supports the maximum transmission rate
of 54Mbps when the Wireless Mode is set to Auto and encryption
method is WEP or TKIP.
9. Select any of these WEP (Wired Equivalent Privacy) Encryption
options for the data transmitted over your wireless network:
• O — Disables WEP encryption
• 64-bit — Enables weak WEP encryption
• 128-bit — Enables improved WEP encryption.
10.When done, click Apply.

55
4.1.2 WPS
WPS (Wi-Fi Protected Setup) is a wireless security standard that
allows you to easily connect devices to a wireless network. You
can congure the WPS function via the PIN code or WPS button.
NOTE: Ensure that the devices support WPS.
To enable WPS on your wireless network:
1. From the navigation panel, go to Advanced Settings >
Wireless > WPS tab.
2.. In the Enable WPS eld, move the slider to ON.
3. WPS uses 2.4GHz by default. If you want to change the
frequency to 5GHz, turn OFF the WPS function, click Switch
Frequency in the Current Frequency eld, and turn WPS ON
again.

56
Note: WPS supports authentication using Open System, WPA-Personal,
and WPA2-Personal. WPS does not support a wireless network that uses
a Shared Key, WPA-Enterprise, WPA2-Enterprise, and RADIUS encryption
method.
3. In the WPS Method eld, select Push Button or Client PIN
code. If you select Push Button, go to step 4. If you select
Client PIN code, go to step 5.
4. To set up WPS using the router’s WPS button, follow these
steps:
a. Click Start or press the WPS button found at the rear of the
wireless router.
b. Press the WPS button on your wireless device. This is
normally identied by the WPS logo.
Note: Check your wireless device or its user manual for the location of
the WPS button.
c. The wireless router will scan for any available WPS devices.
If the wireless router does not nd any WPS devices, it will
switch to standby mode.
5. To setup WPS using the Client’s PIN code, follow these steps:
a. Locate the WPS PIN code on your wireless device’s user
manual or on the device itself.
b. Key in the Client PIN code on the text box.
c. Click Start to put your wireless router into WPS survey mode.
The router’s LED indicators quickly ash three times until the
WPS setup is completed.
57
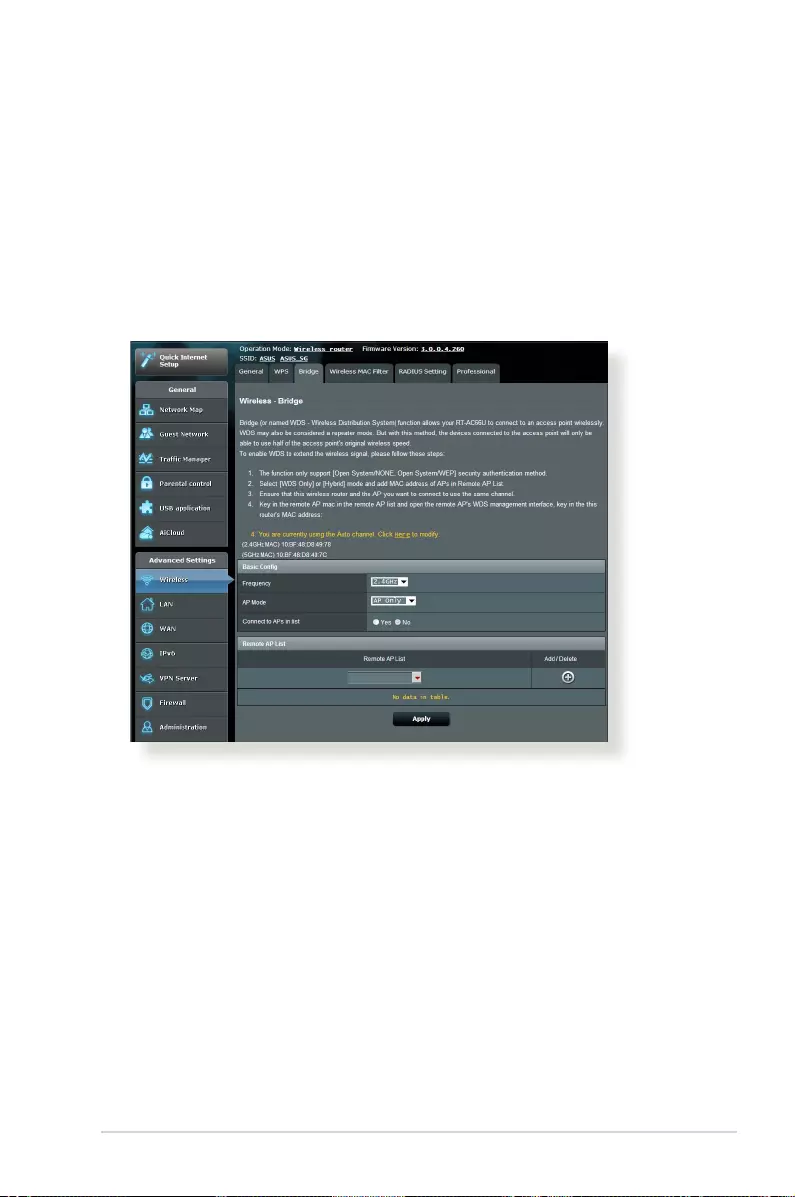
4.1.3 Bridge
Bridge or WDS (Wireless Distribution System) allows your ASUS
wireless router to connect to another wireless access point
exclusively, preventing other wireless devices or stations to access
your ASUS wireless router. It can also be considered as a wireless
repeater where your ASUS wireless router communicates with
another access point and other wireless devices.
To set up the wireless bridge:
1. From the navigation panel, go to Advanced Settings >
Wireless > Bridge tab.
2. Select the frequency band for the wireless bridge.
3. In the AP Mode eld, select any of these options:
• AP Only — Disables the Wireless Bridge function.
• WDS Only — Enables the Wireless Bridge feature but prevents
other wireless devices/stations from connecting to the
router.
• HYBRID — Enables the Wireless Bridge feature and allows
other wireless devices/stations to connect to the router.

58
NOTE: In Hybrid mode, wireless devices connected to the ASUS wireless
router will only receive half the connection speed of the Access Point.
4. In the Connect to APs in list eld, click Yes if you want to
connect to an Access Point listed in the Remote AP List.
5. In the Control Channel eld, select the operating channel
for the wireless bridge. Select Auto to allow the router to
automatically select the channel with the least amount of
interference.
NOTE: Channel availability varies per country or region.
6. On the Remote AP List, key in a MAC address and click the Add
button to enter the MAC address of other available Access
Points.
NOTE: Any Access Point added to the list should be on the same Control
Channel as the ASUS wireless router.
7. Click Apply.

59
4.1.4 Wireless MAC Filter
Wireless MAC lter provides control over packets transmitted to
a specied MAC (Media Access Control) address on your wireless
network.
To set up the Wireless MAC lter:
1. From the navigation panel, go to Advanced Settings >
Wireless > Wireless MAC Filter tab.
2. Select the frequency band that will be used for the Wireless
MAC Filter.
3. In the MAC Filter Mode dropdown list, select either Accept or
Reject.
• Select Accept to allow devices in the MAC lter list to access
to the wireless network.
• Select Reject to prevent devices in the MAC lter list to
access to the wireless network.
4. On the MAC lter list, click the Add button and key in the
MAC address of the wireless device.
5. Click Apply.

60
4.1.5 RADIUS Setting
RADIUS (Remote Authentication Dial In User Service) Setting
provides an extra layer of security when you choose WPA-
Enterprise, WPA2-Enterprise, or Radius with 802.1x as your
Authentication Mode.
To set up wireless RADIUS settings:
1. Ensure that the wireless router’s authentication mode is set to
WPA-Enterprise, WPA2-Enterprise, or Radius with 802.1x.
NOTE: Please refer to the Wireless — General section for conguring
your wireless router’s Authentication Mode.
2. From the navigation panel, go to Advanced Settings >
Wireless > RADIUS Setting.
3. Select the frequency band.
4. In the Server IP Address eld, key in your RADIUS server’s IP
Address.
5. In the Connection Secret eld, assign the password to access
your RADIUS server.
6. Click Apply.

61
In the Professional Settings screen, you can congure the
following:
• Frequency: Select which frequency band the professional
settings will be applied to.
• Enable Radio: Select Yes to enable wireless networking.
Select No to disable wireless networking.
• Date to Enable Radio (weekdays): You can specify which
days of the week wireless networking is enabled.
4.1.6 Professional
The Professional screen provides advanced conguration options.
NOTE: We recommend that you use the default values on this page.

62
• Time of Day to Enable Radio: You can specify a time range
when wireless networking is enabled during the week.
• Date to Enable Radio (weekend): You can specify which
days of the weekend wireless networking is enabled.
• Time of Day to Enable Radio: You can specify a time range
when wireless networking is enabled during the weekend.
• Set AP isolated: The Set AP isolated item prevents wireless
devices on your network from communicating with each
other. This feature is useful if many guests frequently join or
leave your network. Select Yes to enable this feature or select
No to disable.
• Multicast rate (Mbps): Select the multicast transmission
rate or click Disable to switch o simultaneous single
transmission.
• Preamble Type: Preamble Type denes the length of time
that the router spent for CRC (Cyclic Redundancy Check). CRC
is a method of detecting errors during data transmission.
Select Short for a busy wireless network with high network
trac. Select Long if your wireless network is composed of
older or legacy wireless devices.
• RTS Threshold: Select a lower value for RTS (Request to
Send) Threshold to improve wireless communication in a
busy or noisy wireless network with high network trac and
numerous wireless devices.
• DTIM Interval: DTIM (Delivery Trac Indication Message)
Interval or Data Beacon Rate is the time interval before a
signal is sent to a wireless device in sleep mode indicating
that a data packet is awaiting delivery. The default value is 3
milliseconds.
• Beacon Interval: Beacon Interval is the time between one
DTIM and the next. The default value is 100 milliseconds.
Lower the Beacon Interval value for an unstable wireless
connection or for roaming devices.
• Enable TX Bursting: Enable TX Bursting improves
transmission speed between the wireless router and 802.11g
devices.

63
• Wireless multicast forwarding: Select Enable to allow the
wireless router to forward multicast trac to other wireless
devices that support multicast. Select Disable to prevent the
router from forwarding multicast transmissions.
• Enable WMM APSD: Enable WMM APSD (Wi-Fi Multimedia
Automatic Power Save Delivery) to improve power
management between wireless devices. Select Disable to
switch o WMM APSD.
• TX Power adjustment: TX Power adjustment refers to the
milliWatts (mW) needed to power the radio signal output of
the wireless router. Enter a value between 0 to 100.
NOTE: Increasing the TX Power adjustment values may aect the
stability of the wireless network.
4.2 LAN
4.2.1 LAN IP
The LAN IP screen allows you to modify the LAN IP settings of your
wireless router.
NOTE: Any changes to the LAN IP address will be reected on your
DHCP settings.
To modify the LAN IP settings:
1. From the navigation panel, go to Advanced Settings > LAN >
LAN IP tab.
2. Modify the IP address and Subnet Mask.
3. When done, click Apply.

64
4.2.2 DHCP Server
Your wireless router uses DHCP to assign IP addresses
automatically on your network. You can specify the IP address
range and lease time for the clients on your network.
To congure the DHCP server:
1. From the navigation panel, go to Advanced Settings > LAN >
DHCP Server tab.
2. In the Enable the DHCP Server item, tick Yes.
3. In the Domain Name text box, enter a domain name for the
wireless router.
4. In the IP Pool Starting Address item, key in the starting IP
address.
5. In the IP Pool Ending Address item, key in the ending IP
address.
6. In the Lease Time item, specify in seconds when an assigned
IP address will expire. Once it reaches this time limit, the DHCP
server will then assign a new IP address.

65
NOTES:
• We recommend that you use an IP address format of 192.168.1.xxx
(where xxx can be any number between 2 and 254) when specifying
an IP address range.
• An IP Pool Starting Address should not be greater than the IP Pool
Ending Address.
7. In the DNS and Server Settings section, key in your DNS
Server and WINS Server IP address if needed.
8. Your wireless router can also manually assign IP addresses to
devices on the network. On the Enable Manual Assignment
eld, choose Yes to assign an IP address to specic MAC
addresses on the network. Up to 32 MAC Addresses can be
added to the DHCP list for manual assignment.
4.2.3 Route
If your network makes use of more than one wireless router, you
can congure a routing table to share the same Internet service.
NOTE: We recommend that you do not change the default unless you
have advanced knowledge of routing tables.
To congure the LAN Routing table:
1. From the navigation panel, go to Advanced Settings > LAN >
Route tab.

66
2. On the Enable static routes eld, choose Yes.
3. On the Static Route List, enter the network information of
other access points or nodes. Click the Add or Delete
button to add or remove a device on the list.
4. Click Apply.
4.2.4 IPTV
The wireless router supports connection to IPTV services through
an ISP or a LAN. The IPTV tab provides the conguration settings
needed to set up IPTV, VoIP, multicasting, and UDP for your
service. Contact your ISP for specic information regarding your
service.

67
4.3 WAN
4.3.1 Internet Connection
The Internet Connection screen allows you to congure the
settings of various WAN connection types.
To congure the WAN connection settings:
1. From the navigation panel, go to Advanced Settings > WAN >
Internet Connection tab.
2. From the WAN Connection Type dropdown list, select any of
these Internet connection types: Automatic IP, PPPoE, PPTP,
L2TP, and Fixed IP.
NOTE: For details about your Internet connection type, refer to the
information on next pages.
3. Follow the default settings in Basic Cong and WAN DNS
Setting.
4. ISPs may require additional log-in information to connect to
the Internet. Contact your ISP if you require this information.
5. The host name identies your router to the ISP. Input the host
name provided by your ISP.

68
WAN Connection Type: Choose your Internet Service
Provider type. The choices are Automatic IP, PPPoE, PPTP,
L2TP or xed IP. Consult your ISP if the router is unable
to obtain a valid IP address or if you are unsure the WAN
connection type.
Enable WAN: Select Yes to allow the router Internet access.
Select No to disable Internet access.
Enable NAT: NAT (Network Address Translation) is a system
where one public IP (WAN IP) is used to provide Internet
access to network clients with a private IP address in a LAN.
The private IP address of each network client is saved in a NAT
table and is used to route incoming data packets.
Enable UPnP: UPnP (Universal Plug and Play) allows several
devices (such as routers, televisions, stereo systems, game
consoles, and cellular phone), to be controlled via an IP-based
network with or without a central control through a gateway.
UPnP connects PCs of all form factors, providing a seamless
network for remote conguration and data transfer. Using
UPnP, a new network device is discovered automatically.
Once connected to the network, devices can be remotely
congured to support P2P applications, interactive gaming,
video conferencing, and web or proxy servers. Unlike Port
forwarding, which involves manually conguring port
settings, UPnP automatically congures the router to accept
incoming connections and direct requests to a specic PC on
the local network.
Connect to DNS Server: Allows this router to get the DNS
IP address from the ISP automatically. A DNS is a host on
the Internet that translates Internet names to numeric IP
addresses.
Authentication: This item may be specied by some ISPs.
•
•
•
•
•
•

69
Check with your ISP and ll them in if required.
Host Name: This eld allows you to provide a host name for
your router. It is usually a special requirement from your ISP.
If your ISP assigned a host name to your computer, enter the
host name here.
MAC Address: MAC (Media Access Control) address is a
unique identier for your networking device. Some ISPs
monitor the MAC address of networking devices that connect
to their service and reject any unrecognized device that
attempt to connect. To avoid connection issues due to an
unregistered MAC address, you can:
• Contact your ISP and update the MAC address associated
with your ISP service.
• Clone or change the MAC address of the ASUS wireless router
to match the MAC address of the previous networking device
recognized by the ISP.
•
•

70
4.3.2 Port Trigger
Port range triggering opens a predetermined incoming port for a
limited period of time whenever a client on the local area network
makes an outgoing connection to a specied port. Port triggering
is used in the following scenarios:
More than one local client needs port forwarding for the
same application at a dierent time.
An application requires specic incoming ports that are
dierent from the outgoing ports.
•
•
To set up Port Trigger:
1. From the navigation panel, go to Advanced Settings > WAN >
Port Trigger tab.
2. On Enable Port Trigger, choose Yes.
3. If the online task or application is on the Well-Known
Applications List, select it from the list.
4. On the Trigger Port List section, enter a description, the trigger
ports, and protocol. Click the Add button.
5. Click Apply.

71
Enable Port Trigger: Choose YES to enable Port Trigger.
Well-Known Applications: Select popular games and web
services to add to the Port Trigger List.
Description: Enter a short name or description for the service.
Trigger Port: Specify a trigger port to open the incoming
port.
Protocol: Select the protocol, TCP, or UDP.
Incoming Port: Specify an incoming port to receive inbound
data from the Internet.
Protocol: Select the protocol, TCP, or UDP.
NOTES:
• When connecting to an IRC server, a client PC makes an outgoing
connection using the trigger port range 66660-7000. The IRC server
responds by verifying the username and creating a new connection
to the client PC using an incoming port.
• If Port Trigger is disabled, the router drops the connection because
it is unable to determine which PC is requesting for IRC access.
When Port Trigger is enabled, the router assigns an incoming port to
receive the inbound data. This incoming port closes once a specic
time period has elapsed because the router is unsure when the
application has been terminated.
• Port triggering only allows one client in the network to use a
particular service and a specic incoming port at the same time.
• You cannot use the same application to trigger a port in more than
one PC at the same time. The router will only forward the port back
to the last computer to send the router a request/trigger.
•
•
•
•
•
•
•

72
4.3.3 Virtual Server/Port Forwarding
Port forwarding is a method to direct network trac from the
Internet to a specic port or a specic range of ports to a device
or number of devices on your local network. Setting up Port
Forwarding on your router allows PCs outside the network to
access specic services provided by a PC in your network.
NOTE: When port forwarding is enabled, the ASUS router blocks
unsolicited inbound trac from the Internet and only allows replies
from outbound requests from the LAN. The network client does not
have access to the Internet directly, and vice versa.
To set up Port Forwarding:
1. From the navigation panel, go to Advanced Settings > WAN >
Virtual Server / Port Forwarding tab.
2. On the Enable Port Forwarding item, select Yes.
3. Select either a server or game from the Famous Server List or
Famous Game List. The Port Forwarding information will be
automatically lled out on the Forwarding List. Click the Add
button.

73
4. If the server or game is not on the Famous Server or Famous
Game List, input the Port Forwarding information manually
and click the Add button.
5. Click Apply.
Enable Port Forwarding: Choose YES to enable Port
Forwarding.
Famous Server List: Determine which type of service you
want to access.
Famous Game List: This item lists ports required for popular
online games to work correctly.
FTP Server Port: Avoid assigning the port range 20:21 for
your FTP server as this would conict with the router’s native
FTP server assignment.
Service Name: Enter a service name.
Port Range: If you want to specify a Port Range for clients
on the same network, enter the Service Name, the Port
Range (e.g. 10200:10300), the LAN IP address, and leave the
Local Port empty. Port range accepts various formats such
as Port Range (300:350), individual ports (566,789) or Mix
(1015:1024,3021).
NOTES:
• When your network’s rewall is disabled and you set 80 as the HTTP
server’s port range for your WAN setup, then your http server/web
server would be in conict with the router’s web user interface.
• A network makes use of ports in order to exchange data, with each
port assigned a port number and a specic task. For example, port 80
is used for HTTP. A specic port can only be used by one application
or service at a time. Hence, two PCs attempting to access data
through the same port at the same time would fail. For example, you
cannot set up Port Forwarding for port 100 for two PCs at the same
time.
•
•
•
•
•
•

74
Local IP: Key in the client’s LAN IP address.
NOTE: Use a static IP address for the local client to make port forwarding
work properly. Refer to section 4.2 LAN for information.
Local Port: Enter a specic port to receive forwarded packets.
Leave this eld blank if you want the incoming packets to be
redirected to the specied port range.
Protocol: Select the protocol. If you are unsure, select BOTH.
To check if Port Forwarding has been congured successfully:
Ensure that your server or application is set up and running.
You will need a client outside your LAN but has Internet
access (referred to as “Internet client”). This client should not
be connected to the ASUS router.
On the Internet client, use the router’s WAN IP to access the
server. If port forwarding has been successful, you should be
able to access the les or applications.
Dierences between port trigger and port forwarding:
Port triggering will work even without setting up a specic
LAN IP address. Unlike port forwarding, which requires a
static LAN IP address, port triggering allows dynamic port
forwarding using the router. Predetermined port ranges are
congured to accept incoming connections for a limited
period of time. Port triggering allows multiple computers
to run applications that would normally require manually
forwarding the same ports to each PC on the network.
Port triggering is more secure than port forwarding since the
incoming ports are not open all the time. They are opened
only when an application is making an outgoing connection
through the trigger port.
•
•
•
•
•
•
•
•
•
•

75
Setting up a port trigger is applicable if you use similar
applications in two PCs during dierent times of the day.
However, it is not suitable for servers behind a router
because it relies on specic applications to make an outgoing
connection before it can receive incoming ones. Port
forwarding can be congured for a server located behind a
router.
4.3.4 DMZ
Virtual DMZ exposes one client to the Internet, allowing this
client to receive all inbound packets directed to your Local Area
Network.
Inbound trac from the Internet is usually discarded and routed
to a specic client only if port forwarding or a port trigger has
been congured on the network. In a DMZ conguration, one
network client receives all inbound packets.
Setting up DMZ on a network is useful when you need incoming
ports open or you want to host a domain, web, or e-mail server.
Caution: Opening all the ports on a client to the Internet makes the
network vulnerable to outside attacks. Please be aware of the security
risks involved in using DMZ.
To set up DMZ:
1. From the navigation panel, go to Advanced Settings > WAN >
DMZ tab.
2. On the IP Address of Exposed Station text box, enter the IP
address of the computer which you want to assign to DMZ.
IP address of Exposed Station: Key in the client’s LAN IP address that will
provide the DMZ service and be exposed on the Internet. Ensure that
the server client has a static IP address.
To remove DMZ:
1. Delete the client’s LAN IP address from the IP Address of
Exposed Station text box.
2. When done, click Apply.
•

76
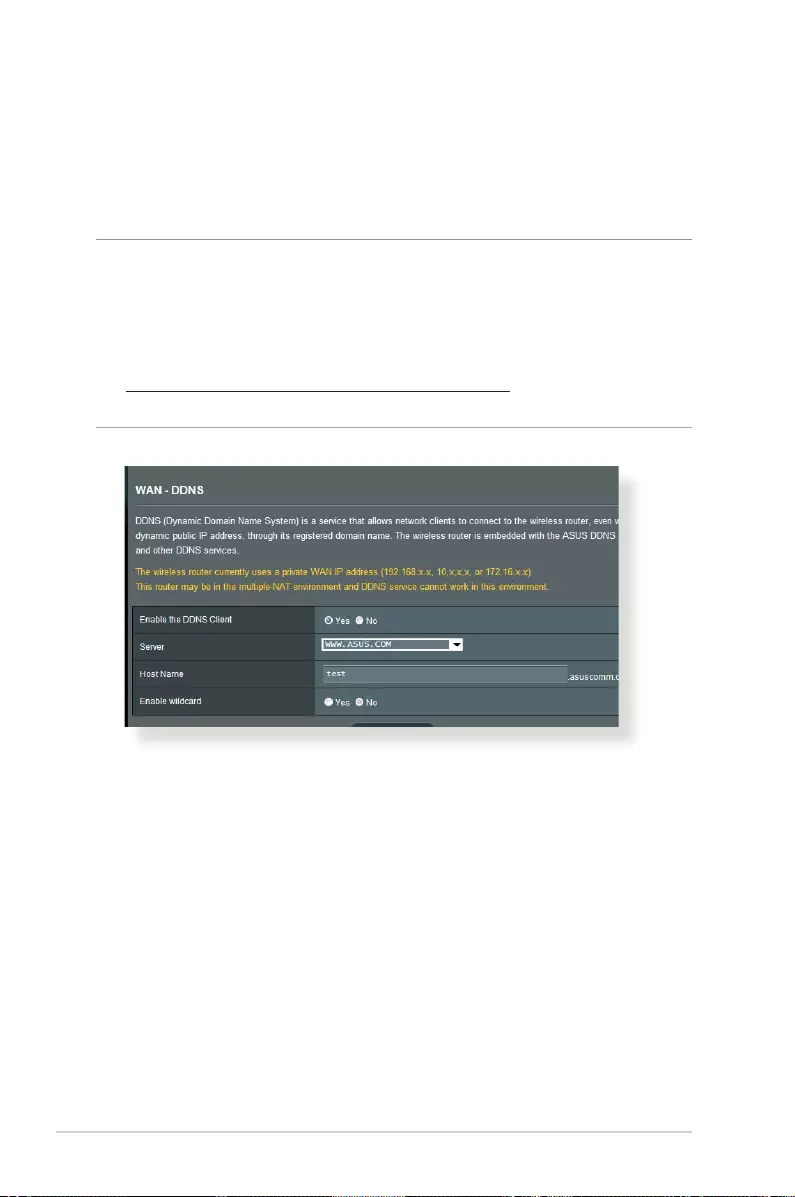
4.3.5 DDNS
Setting up DDNS (Dynamic DNS) allows you to access the router
from outside your network through the provided ASUS DDNS
Service or another DDNS service.
To set up DDNS:
1. From the navigation panel, go to Advanced Settings > WAN >
DDNS tab.
2. Click the following settings below. Click Apply when done.
Enable the DDNS Client: Enable DDNS to access the ASUS
router via the DNS name rather than WAN IP address.
Server and Host Name: Choose ASUS DDNS or other DDNS.
If you want to use ASUS DDNS, ll in the Host Name in the
format of xxx.asuscomm.com (xxx is your host name).
If you want to use a dierent DDNS service, click FREE TRIAL
and register online rst. Fill in the User Name or E-mail
Address and Password or DDNS Key elds.
Enable wildcard: Enable wildcard if your DDNS service
requires one.
NOTES:
DDNS service will not work under these conditions:
• When the wireless router is using a private WAN IP address (192.168.
x.x, 10.x.x.x, or 172.16.x.x), as indicated by a yellow text.
• The router may be on a network that uses multiple NAT tables.
•
•
•
•

77
4.3.6 NAT Passthrough
NAT Passthrough allows a Virtual Private Network (VPN)
connection to pass through the router to the network clients.
PPTP Passthrough, L2TP Passthrough, IPsec Passthrough and RTSP
Passthrough are enabled by default.
To enable / disable the NAT Passthrough settings, go to the
Advanced Settings > WAN > NAT Passthrough tab. When done,
click Apply.

78
4.4 IPv6
This wireless router supports IPv6 addressing, a system that
supports more IP addresses. This standard is not yet widely
available. Contact your ISP if your Internet service supports IPv6.
To set up IPv6:
1. From the navigation panel, go to Advanced Settings > IPv6.
2. Select your Connection Type. The conguration options vary
depending on your selected connection type.
3. ENTER your IPv6 LAN and DNS settings.
4. Click Apply.
NOTE: Please refer to your ISP regarding specic IPv6 information for
your Internet service.

79
4.5 VPN Server
VPN (Virtual Private Network) provides a secure communication
to a remote computer or remote network using a public network
such as the Internet.
NOTE: Before setting up a VPN connection, you would need the IP
address or domain name of the VPN server you are trying to access.
To set up access to a VPN server:
1. From the navigation panel, go to Advanced Settings > VPN
Server.
2. On the Enable PPTP Server eld, select Yes.
3. On the Network Place (Samba) Support eld, select Yes.
4. Enter the user name and password for accessing the VPN
server. Click the button.
5. Click Apply.
NOTE: For advanced VPN server settings, click the VPN Server tab to
congure broadcast support, authentication, MPPE Encryption, and
Client IP address range.

80
4.6 Firewall
The wireless router can serve as a hardware rewall for your
network.
NOTE: The Firewall feature is enabled by default.
4.6.1 General
To set up basic Firewall settings:
1. From the navigation panel, go to Advanced Settings >
Firewall > General tab.
2. On the Enable Firewall eld, select Yes.
3. On the Enable DoS protection, select Yes to protect your
network from DoS (Denial of Service) attacks though this may
aect your router’s performance.
4. You can also monitor packets exchanged between the LAN
and WAN connection. On the Logged packets type, select
Dropped, Accepted, or Both.
5. Click Apply.
4.6.2 URL Filter
You can specify keywords or web addresses to prevent access to
specic URLs.
NOTE: The URL Filter is based on a DNS query. If a network client has
already accessed a website such as http://www.abcxxx.com, then the
website will not be blocked (a DNS cache in the system stores previously
visited websites). To resolve this issue, clear the DNS cache before
setting up the URL Filter.
To set up a URL lter:
1. From the navigation panel, go to Advanced Settings >
Firewall > URL Filter tab.
2. On the Enable URL Filter eld, select Enabled.
3. Enter a URL and click the button.
4. Click Apply.

81
4.6.3 Keyword lter
Keyword lter blocks access to webpages containing specied
keywords.
To set up a keyword lter:
1. From the navigation panel, go to Advanced Settings >
Firewall > Keyword Filter tab.
2. On the Enable Keyword Filter eld, select Enabled.
3. Enter a word or phrase and click the Add button.
4. Click Apply.
NOTES:
• The Keyword Filter is based on a DNS query. If a network client has
already accessed a website such as http://www.abcxxx.com, then
the website will not be blocked (a DNS cache in the system stores
previously visited websites). To resolve this issue, clear the DNS cache
before setting up the Keyword Filter.
• Web pages compressed using HTTP compression cannot be ltered.
HTTPS pages also cannot be blocked using a keyword lter.
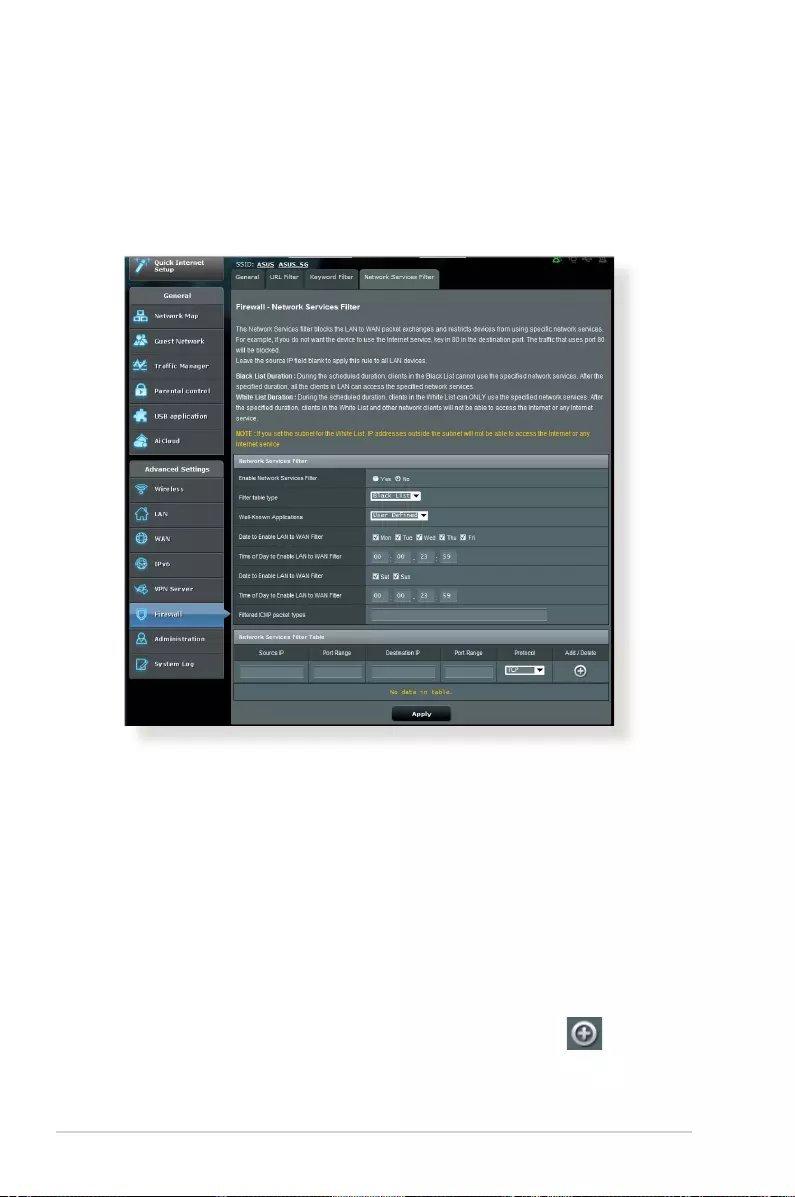
82
4.6.4 Network Services Filter
The Network Services Filter blocks LAN to WAN packet exchanges
and restricts network clients from accessing specic web services
such as Telnet or FTP.
To set up a Network Service lter:
1. From the navigation panel, go to Advanced Settings >
Firewall > Network Service Filter tab.
2. On the Enable Network Services Filter eld, select Yes.
3. Select the Filter table type. Black List blocks the specied
network services. White List limits access to only the specied
network services.
4. Specify the day and time when the lters will be active.
5. To specify a Network Service to lter, enter the Source IP,
Destination IP, Port Range, and Protocol. Click the button.
6. Click Apply.

83
4.7 Administration
4.7.1 Operation Mode
The Operation Mode page allows you to select the appropriate
mode for your network.
To set up the operating mode:
1. From the navigation panel, go to Advanced Settings >
Administration > Operation Mode tab.
2. Select any of these operation modes:
• Wireless router mode (default): In wireless router mode,
the wireless router connects to the Internet and provides
Internet access to available devices on its own local network.
• Media Bridge: This setup requires two wireless routers.
The second router serves as a media bridge where multiple
devices such as Smart TVs and gaming consoles can be
connected via ethernet.
• Access Point mode: In this mode, the router creates a new
wireless network on an exising network.
3. Click Apply.
NOTE: The router will reboot when you change the modes.

84
4.7.2 System
The System page allows you to congure your wireless router
settings.
To set up the System settings:
1. From the navigation panel, go to Advanced Settings >
Administration > System tab.
2. You can congure the following settings:
• Change router login password: You can change the
password and login name for the wireless router by entering
a new name and password.
• WPS button behavior: The physical WPS button on the
wireless router can be used to activate WPS or switch o
wireless networking.
• Time Zone: Select the time zone for your network.
• NTP Server: The wireless router can access a NTP (Network
time Protocol) server in order to synchronize the time.
• Enable Telnet: Click Yes to enable Telnet services on the
network. Click No to disable Telnet.
• Authentication Method: You can select HTTP, HTTPS, or
both protocols to secure router access.
• Enable Web Access from WAN: Select Yes to allow devices
outside the network to access the wireless router GUI
settings. Select No to to prevent access.
• Only allow specic IP: Click Yes if you want to specify the IP
addresses of devices that are allowed access to the wireless
router GUI settings from WAN.
• Client List: Enter the WAN IP addresses of networking
devices allowed to access the wireless router settings. This
list will be used if you clicked Yes in the Only allow specic
IP item.
3. Click Apply.

85
4.7.3 Firmware Upgrade
NOTE: Download the latest rmware from the ASUS website at
http://www.asus.com
To upgrade the rmware:
1. From the navigation panel, go to Advanced Settings >
Administration > Firmware Upgrade tab.
2. In the New Firmware File eld, click Browse to locate the
downloaded le.
3. Click Upload.
NOTES:
• When the upgrade process is complete, wait for some time for the
system to reboot.
• If the upgrade process fails, the wireless router automatically enters
rescue mode and the power LED indicator on the front panel starts
ashing slowly. To recover or restore the system, refer to section 5.2
Firmware Restoration.
4.7.4 Restore/Save/Upload Setting
To restore/save/upload wireless router settings:
1. From the navigation panel, go to Advanced Settings >
Administration > Restore/Save/Upload Setting tab.
2. Select the tasks that you want to do:
• To restore to the default factory settings, click Restore, and
click OK in the conrmation message.
• To save the current system settings, click Save, navigate to
the folder where you intend to save the le and click Save.
• To restore from a saved system settings le, click Browse to
locate your le, then click Upload.
If issues occur, upload the latest rmware version and start with new
settings.

86
4.8 System Log
System Log contains your recorded network activities.
NOTE: System log resets when the router is rebooted or powered o.
To view your system log:
1. From the navigation panel, go to Advanced Settings > System
Log.
2. You can view your network activities in any of these tabs:
• General Log
• DHCP Leases
• Wireless Log
• Port Forwarding
• Routing Table

87
5 Utilities
NOTES:
• Install the wireless router’s utilities from the bundled support CD.
• If Autorun is disabled, run setup.exe from the root directory of the
support CD.
• The utilities are not supported on MAC OS.
5.1 Device Discovery
Device Discovery is an ASUS WLAN utility that detects an ASUS
wireless router device, and allows you to congure the wireless
networking settings.
To launch the Device Discovery utility:
• From your computer’s desktop, click
Start > All Programs > ASUS Utility > RT-AC66U Wireless
Router > Device Discovery.
NOTE: When you set the router to Access Point mode, you need to use
Device Discovery to get the router’s IP address.

88
5.2 Firmware Restoration
Firmware Restoration is used on an ASUS Wireless Router that
failed during its rmware upgrading process. It uploads the
rmware that you specify. The process takes about three to four
minutes.
To launch the rescue mode and use the Firmware Restoration
utility:
1. Unplug the wireless router from the power source.
2. Hold the Reset button at the rear panel and simultaneously
replug the wireless router into the power source. Release the
Reset button when the Power LED at the front panel ashes
slowly, which indicates that the wireless router is in the rescue
mode.
3. Set a static IP on your computer and use the following to set up
your TCP/IP settings:
IP address: 192.168.1.x
Subnet mask: 255.255.255.0
4. From your computer’s desktop, click
Start > All Programs > ASUS Utility RT-AC66U Wireless
Router > Firmware Restoration.
IMPORTANT: Launch the rescue mode on the router before using the
Firmware Restoration utility.
NOTE: This feature is not supported on MAC OS.

89
5. Specify a rmware le, then click Upload.
NOTE: This is not a rmware upgrade utility and cannot be used on a
working ASUS Wireless Router. Normal rmware upgrades must be done
through the web interface. Refer to Chapter 4: Advanced Settings for
more details.
5.3 Setting up your printer server
5.3.1 ASUS EZ Printer Sharing
ASUS EZ Printing Sharing utility allows you to connect a USB
printer to your wireless router’s USB port and set up the print
server. This allows your network clients to print and scan les
wirelessly.
NOTE: The print server function is supported on Windows® XP,
Windows® Vista, and Windows® 7.

90
NOTE: Network printer utility is supported on Windows® XP, Windows®
Vista, and Windows® 7 only. To install the utility on Mac OS, select Use
LPR protocol for sharing printer.
3. Unzip the downloaded le and click the Printer icon to run the
network printer setup program.
To set up the EZ Printer sharing mode:
1. From the navigation panel, go to General > USB Application >
Network Printer Server.
2. Click Download Now! to download the network printer utility.

91
4. Follow the onscreen instructions to set up your hardware, then
click Next.
5. Wait a few minutes for the initial setup to nish. Click Next.
6. Click Finish to complete the installation.

92
8. After the printer’s driver installation is complete, network
clients can now use the printer.
7. Follow the Windows® OS instructions to install the printer driver.

93
5.3.2 Using LPR to Share Printer
You can share your printer with computers running on Windows®
and MAC operating system using LPR/LPD (Line Printer Remote/
Line Printer Daemon).
Sharing your LPR printer
To share your LPR printer:
1. From the Windows® desktop, click Start > Devices and
Printers > Add a printer to run the Add Printer Wizard.
2. Select Add a local printer and then click Next.

94
3. Select Create a new port then set Type of Port to Standard
TCP/IP Port. Click New Port.
4. In the Hostname or IP address eld, key in the IP address of
the wireless router then click Next.

95
5. Select Custom then click Settings.
6. Set Protocol to LPR. In the Queue Name eld, key in
LPRServer then click OK to continue.

96
7. Click Next to nish setting up the standard TCP/IP port.
8. Install the printer driver from the vendor-model list. If your
printer is not in the list, click Have Disk to manually install the
printer drivers from a CD-ROM or le.

97
9. Click Next to accept the default name for the printer.
10. Click Finish to complete the installation.

98
5.4 Download Master
Download Master is a utility that helps you download les even
while your laptops or other devices are switched o.
NOTE: You need a USB device connected to the wireless router to use
Download Master.
To use Download Master:
1. Click General > USB application > Download Master to
download and install the utility automatically.
NOTE: If you have more than one USB drive, select the USB device you
want to download the les to.
2. After the download process is nished, click the Download
Master icon to start using the utility.
3. Click Add to add a download task.
4. Select a download type such as BitTorrent, HTTP, or FTP. Provide
a torrent le or a URL to begin downloading.
NOTE: For details on Bit Torrent, refer to section 5.4.1 Conguring the
Bit Torrent download settings.

99
5. Use the navigation panel to congure the advanced settings.
To congure BitTorrent download settings:
1. From Download Master’s navigation panel, click Bit Torrent to
launch the Bit Torrent Setting page.
2. Select a specic port for your download task.
3. To prevent network congestion, you can limit the maximum
upload and download speeds under Speed Limits.
4. You can limit the maximum number of allowed peers and
enable or disable le encryption during downloads.
5.4.1 Conguring Bit Torrent download settings
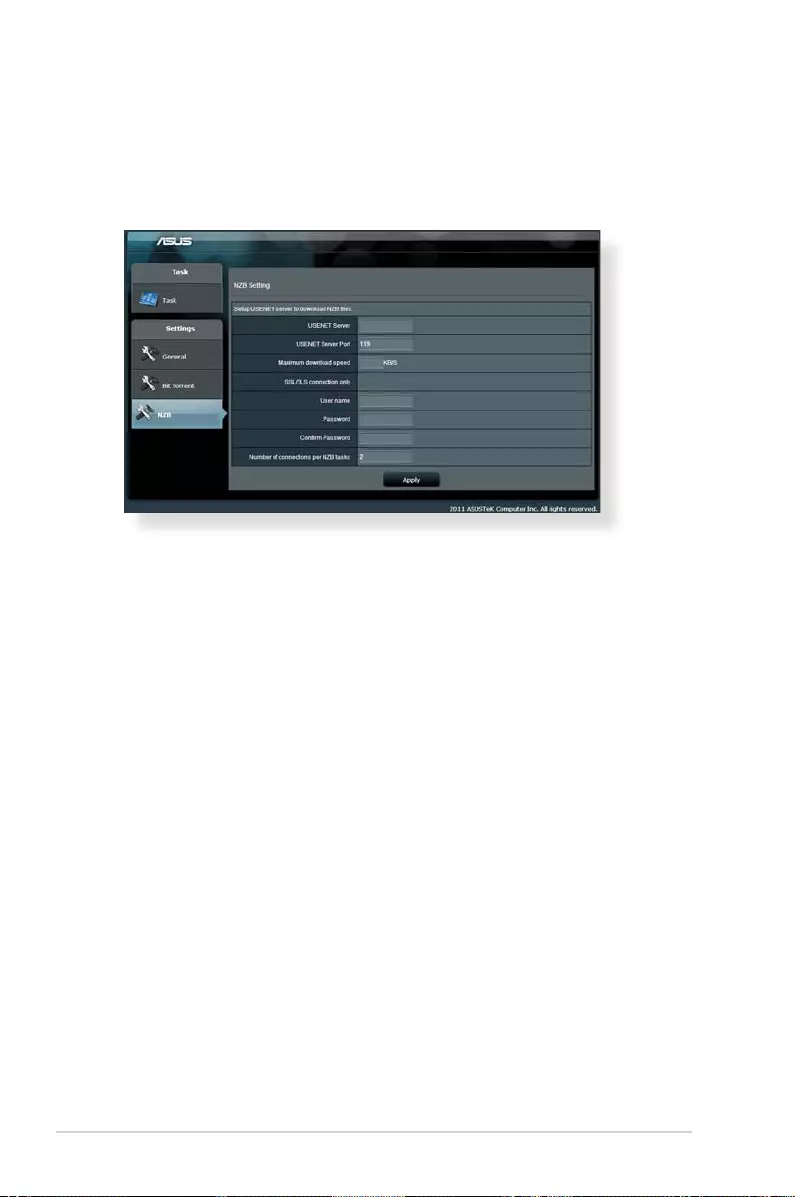
100
5.4.2 NZB settings
You can set up a USENET server to download NZB les. After
entering USENET settings, Apply.
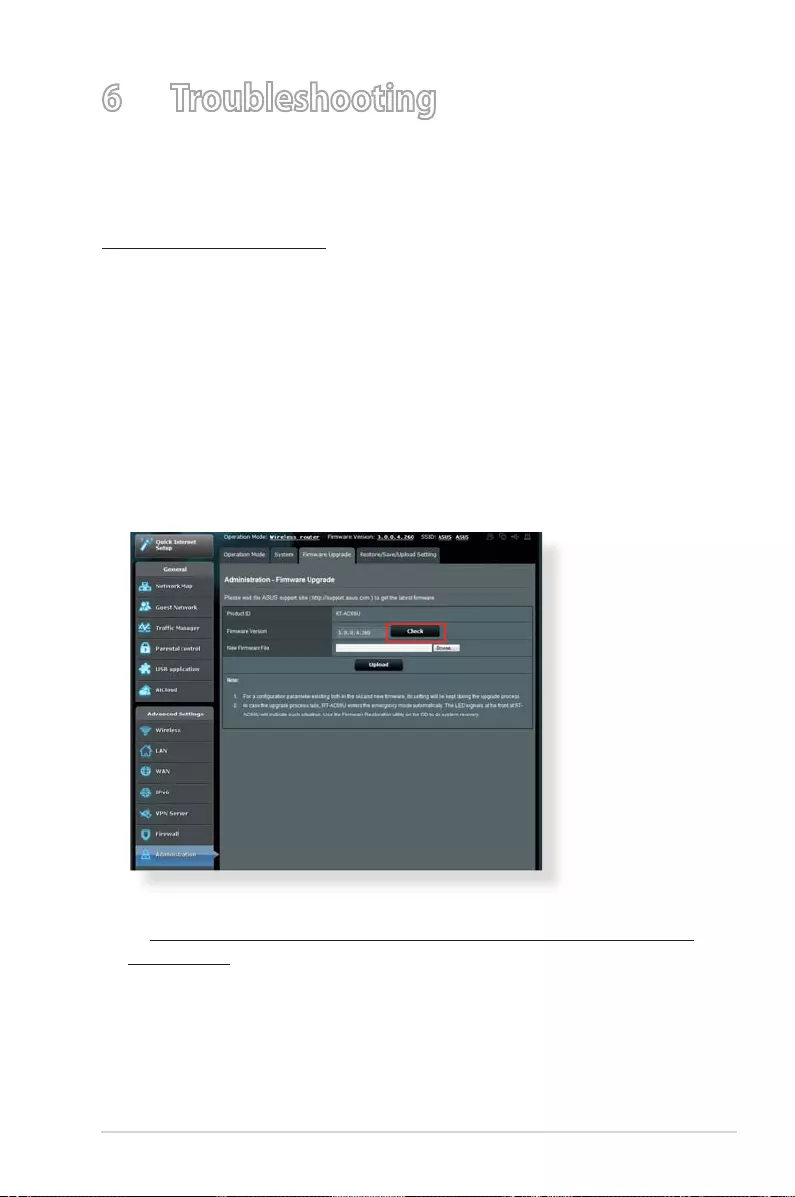
101
6 Troubleshooting
This chapter provides solutions for issues you may encounter with
your router. If you encounter problems that are not mentioned in
this chapter, visit the ASUS support site at:
http://support.asus.com/ for more product information and
contact details of ASUS Technical Support.
6.1 Basic Troubleshooting
If you are having problems with your router, try these basic steps
in this section before looking for further solutions.
Upgrade Firmware to the latest version.
1. Launch the Web GUI. Go to Advanced Settings >
Administration > Firmware Upgrade tab. Click Check to
verify if the latest rmware is available.
2. If the latest rmware is available, visit the ASUS global website
at http://www.asus.com/Networks/Wireless_Routers/RTAC66U/
#download to download the latest rmware.
3. From the Firmware Upgrade page, click Browse to locate the
rmware le.
4. Click Upload to upgrade the rmware.

102
Restart your network in the following sequence:
1. Turn o the modem.
2. Unplug the modem.
3. Turn o the router and computers.
4. Plug in the modem.
5. Turn on the modem and then wait for 2 minutes.
6. Turn on the router and then wait for 2 minutes.
7. Turn on computers.
Check if your Ethernet cables are plugged properly.
• When the Ethernet cable connecting the router with the
modem is plugged in properly, the WAN LED will be on.
• When the Ethernet cable connecting your powered-
on computer with the router is plugged in properly, the
corresponding LAN LED will be on.
Check if the wireless setting on your computer matches that
of your computer.
• When you connect your computer to the router wirelessly,
ensure that the SSID (wireless network name), encryption
mehtod, and password are correct.
Check if your network settings are correct.
• Each client on the network should have a valid IP address. ASUS
recommends that you use the wireless router’s DHCP server to
assign IP addresses to computers on your network.

103
• Some cable modem service providers require you to use
the MAC address of the computer initially registered on
the account. You can view the MAC address in the web GUI,
Network Map > Clients page, and hover the mouse pointer
over your device in Client Status.
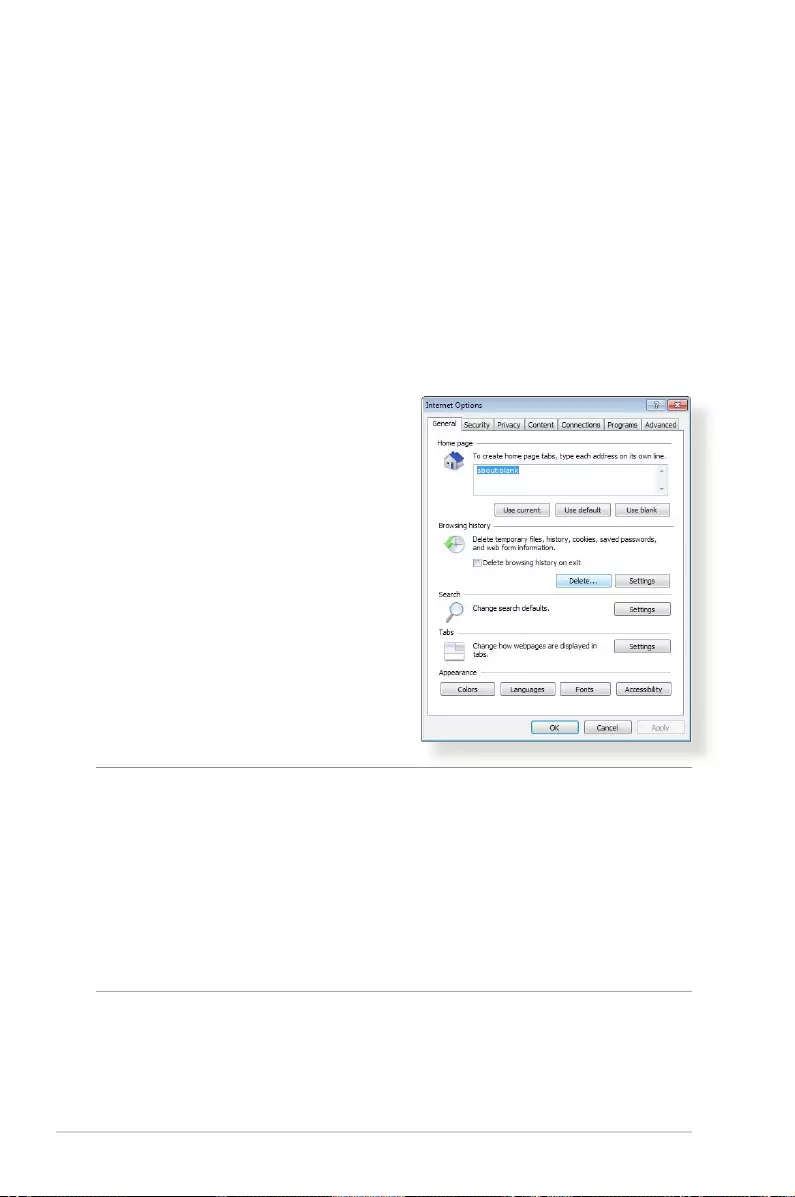
104
6.2 Frequently Asked Questions (FAQs)
I cannot access the router GUI using a web browser
• If your computer is wired, check the Ethernet cable connection
and LED status as described in the previous section.
• Ensure that you are using the correct login information. The
default factory login name and password is “admin/admin”.
Ensure that the Caps Lock key is disabled when you enter the
login information.
• Delete the cookies and les in your web browser. For Internet
Explorer 8, follow these steps:
1. Launch Internet Explorer 8,
then click Tools > Internet
Options.
2. In the General tab, under
Browsing history, click
Delete…, select Temporary
Internet Files and Cookies
then click Delete.
NOTES:
• The commands for deleting cookies and les vary with web
browsers.
• Disable proxy server settings, cancel the dial-up connection,
and set the TCP/IP settings to obtain IP addresses automatically.
For more details, refer to Chapter 1 of this user manual.
• Ensure that you use CAT5e or CAT6 ethernet cables.

105
The client cannot establish a wireless connection with the
router.
NOTE: If you are having issues connecting to 5Ghz network, make
sure that your wireless device supports 5Ghz or features dual band
capabilities.
• Out of Range:
• Move the router closer to the wireless client.
• Try to adjust antennas of the router to the best direction as
described in section 1.4 Positioning your router.
• DHCP server has been disabled:
1. Launch the web GUI. Go to General > Network Map>
Clients and search for the device that you want to connect
to the router.
2. If you cannot nd the device in the Network Map, go to
Advanced Settings > LAN > DHCP Server, Basic Cong
list, select Yes on the Enable the DHCP Server.

106
• SSID has been hidden. If your device can nd SSIDs from other
routers but cannot nd your router’s SSID, go to Advanced
Settings > Wireless > General, select No on Hide SSID, and
select Auto on Control Channel.
• If you are using a wireless LAN adapter, check if the wireless
channel in use conforms to the channels available in your
country/area. If not, adjust the channel, channel bandwidth,
and wireless mode.
• If you still cannot connect to the router wirelessly, you can reset
your router to factory default settings. In the router GUI,click
Administration > Restore/Save/Upload Setting and click
Restore.

107
Internet is not accessible.
• Check if your router can connect to your ISP’s WAN IP address.
To do this, launch the web GUI and go to General> Network
Map, and check the Internet Status.
• If your router cannot connect to your ISP’s WAN IP address,
try restarting your network as described in the section
Restart your network in following sequence under Basic
Troubleshooting.
• The device has been blocked via the Parental Control function.
Go to General > Parental Control and see if the device is
in the list. If the device is listed under Client Name, remove
the device using the Delete button or adjust the Time
Management Settings.

108
• If there is still no Internet access, try to reboot your computer
and verify the network’s IP address and gateway address.
• Check the status indicators on the ADSL modem and the
wireless router. If the WAN LED on the wireless router is not ON,
check if all cables are plugged properly.
You forgot the SSID (network name) or network password
• Setup a new SSID and encryption key via a wired connection
(Ethernet cable). Launch the web GUI, go to Network Map,
click the router icon, enter a new SSID and encryption key, and
then click Apply.
• Reset your router to the default settings. Launch the web GUI,
go to Administration > Restore/Save/Upload Setting, and
click Restore. The default login account and password are both
“admin”.
How to restore the system to its default settings?
• Go to Administration > Restore/Save/Upload Setting, and
click Restore.
The following are the factory default settings:
User Name: admin
Password: admin
Enable DHCP: Yes (if WAN cable is plugged in)
IP address: 192.168.1.1
Domain Name: (Blank)
Subnet Mask: 255.255.255.0
DNS Server 1: 192.168.1.1
DNS Server 2: (Blank)
SSID (2.4GHz): ASUS
SSID (5GHz): ASUS_5G

109
Firmware upgrade failed.
Launch the rescue mode and run the Firmware Restoration utility.
Refer to section 5.2 Firmware Restoration on how to use the
Firmware Restoration utility.

110
Cannot access Web GUI
A. Disable the proxy server, if enabled.
Windows® 7
1. Click Start > Internet Explorer
to launch the browser.
2. Click Tools > Internet options
> Connections tab > LAN
settings.
Before conguring your wireless router, do the steps described in
this section for your host computer and network clients.
3. From the Local Area
Network (LAN) Settings
screen, untick Use a proxy
server for your LAN.
4. Click OK when done.

111
MAC OS
1. From your Safari
browser, click Safari
> Preferences >
Advanced > Change
Settings…
2. From the Network
screen, deselect FTP
Proxy and Web Proxy
(HTTP).
3. Cllick Apply Now when
done.
NOTE: Refer to your browser’s help feature for details on disabling the
proxy server.
B. Set the TCP/IP settings to automatically obtain an IP
address.
Windows® 7
1. Click Start > Control Panel
> Network and Internet
> Network and Sharing
Center > Manage network
connections.
2. Select Internet Protocol
Version 4 (TCP/IPv4) or
Internet Protocol Version
6 (TCP/IPv6), then click
Properties.

112
3. To obtain the IPv4 IP
settings automatically,
tick Obtain an IP address
automatically.
To obtain the IPv6 IP
settings automatically, tick
Obtain an IPv6 address
automatically.
4. Click OK when done.
MAC OS
1. Click the Apple icon
located on the top left of
your screen.
2. Click System
Preferences > Network
> Congure…
3. From the TCP/IP tab,
select Using DHCP in
the Congure IPv4
dropdown list.
4. Cllick Apply Now when
done.
NOTE: Refer to your operating system’s help and support feature for
details on conguring your computer’s TCP/IP settings.

113
C. Disable the dial-up connection, if enabled.
Windows® 7
1. Click Start > Internet Explorer
to launch the browser.
2. Click Tools > Internet options >
Connections tab.
3. Tick Never dial a connection.
4. Click OK when done.
NOTE: Refer to your browser’s help feature for details on disabling the
dial-up connection.

114
Appendices
Notices
ASUS Recycling/Takeback Services
ASUS recycling and takeback programs come from our
commitment to the highest standards for protecting our
environment. We believe in providing solutions for you to be able
to responsibly recycle our products, batteries, other components,
as well as the packaging materials. Please go to http://csr.asus.
com/english/Takeback.htm for the detailed recycling information
in dierent regions.
REACH
Complying with the REACH (Registration, Evaluation,
Authorisation, and Restriction of Chemicals) regulatory
framework, we published the chemical substances in our products
at ASUS REACH website at
http://csr.asus.com/english/index.aspx
Federal Communications Commission Statement
This device complies with Part 15 of the FCC Rules. Operation is
subject to the following two conditions:
• This device may not cause harmful interference.
• This device must accept any interference received, including
interference that may cause undesired operation.
This equipment has been tested and found to comply with the
limits for a class B digital device, pursuant to part 15 of the FCC
Rules. These limits are designed to provide reasonable protection

115
Prohibition of Co-location
This device and its antenna(s) must not be co-located or operating
in conjunction with any other antenna or transmitter
CAUTION: Any changes or modications not expressly approved by
the party responsible for compliance could void the user’s authority to
operate the equipment.
IMPORTANT! This device within the 5.15 ~ 5.25 GHz is restricted to
indoor operations to reduce any potential for harmful interference to
co-channel MSS operations.
against harmful interference in a residential installation.
This equipment generates, uses and can radiate radio frequency
energy and, if not installed and used in accordance with
the instructions, may cause harmful interference to radio
communications. However, there is no guarantee that interference
will not occur in a particular installation. If this equipment does
cause harmful interference to radio or television reception, which
can be determined by turning the equipment o and on, the user
is encouraged to try to correct the interference by one or more of
the following measures:
• Reorient or relocate the receiving antenna.
• Increase the separation between the equipment and receiver.
• Connect the equipment into an outlet on a circuit dierent
from that to which the receiver is connected.
• Consult the dealer or an experienced radio/TV technician for
help.

116
Safety Information
To maintain compliance with FCC’s RF exposure guidelines, this
equipment should be installed and operated with minimum
distance 20cm between the radiator and your body. Use on the
supplied antenna.
Declaration of Conformity for R&TTE directive 1999/5/EC
Essential requirements – Article 3
Protection requirements for health and safety – Article 3.1a
Testing for electric safety according to EN 60950-1 has been
conducted. These are considered relevant and sucient.
Protection requirements for electromagnetic compatibility
– Article 3.1b
Testing for electromagnetic compatibility according to EN
301 489-1 and EN 301 489-17 has been conducted. These are
considered relevant and sucient.
Eective use of the radio spectrum – Article 3.2
Testing for radio test suites according to EN 300 328 & EN 301
893 have been conducted. These are considered relevant and
sucient.
Operate the device in 5150-5250 MHz frequency band for indoor
use only.
CE Mark Warning
This is a Class B product, in a domestic environment, this product
may cause radio interference, in which case the user may be
required to take adequate measures.

117
Canada, Industry Canada (IC) Notices
This Class B digital apparatus complies with Canadian ICES-003
and RSS-210.
Operation is subject to the following two conditions: (1) this
device may not cause interference, and (2) this device must accept
any interference, including interference that may cause undesired
operation of the device.
Radio Frequency (RF) Exposure Information
The radiated output power of the Dell Wireless Device is below
the Industry Canada (IC) radio frequency exposure limits. The
Dell Wireless Device should be used in such a manner such that
the potential for human contact during normal operation is
minimized.
This device has been evaluated for and shown compliant with
the IC Specic Absorption Rate (“SAR”) limits when installed in
specic host products operated in portable exposure conditions
(antennas are less than 20 centimeters of a person’s body).
This device has been certied for use in Canada. Status of the
listing in the Industry Canada’s REL (Radio Equipment List) can be
found at the following web address: http://www.ic.gc.ca/app/sitt/
reltel/srch/nwRdSrch.do?lang=eng
Additional Canadian information on RF exposure also can be
found at the following web: http://www.ic.gc.ca/eic/site/smt-gst.
nsf/eng/sf08792.html
Canada, avis d’Industry Canada (IC)
Cet appareil numérique de classe B est conforme aux normes

118
canadiennes ICES-003 et RSS-210.
Son fonctionnement est soumis aux deux conditions suivantes:
(1) cet appareil ne doit pas causer d’interférence et (2) cet appareil
doit accepter toute interférence, notamment les interférences qui
peuvent a ecter son fonctionnement.
NCC 警語
經型式認證合格之低功率射頻電機,非經許可,公司、商號或
使用者均不得擅自變更頻率、加大功率或變更原設計之特性及
功能。低功率射頻電機之使用不得影響飛航安全及干擾合法通
信;經發現有干擾現象時,應立即停用,並改善至無干擾時方
得繼續使用。前項合法通信,指依電信法規定作業之無線電通
信。低功率射頻電機須忍受合法通信或工業、科學及醫療用電
波輻射性電機設備之干擾。
GNU General Public License
Licensing information
This product includes copyrighted third-party software licensed
under the terms of the GNU General Public License. Please see The
GNU General Public License for the exact terms and conditions
of this license. We include a copy of the GPL with every CD
shipped with our product. All future rmware updates will also be
accompanied with their respective source code. Please visit our
web site for updated information. Note that we do not oer direct
support for the distribution.
GNU GENERAL PUBLIC LICENSE
Version 2, June 1991
Copyright (C) 1989, 1991 Free Software Foundation, Inc.
59 Temple Place, Suite 330, Boston, MA 02111-1307 USA

119
Everyone is permitted to copy and distribute verbatim copies of
this license document, but changing it is not allowed.
Preamble
The licenses for most software are designed to take away your
freedom to share and change it. By contrast, the GNU General
Public License is intended to guarantee your freedom to share
and change free software—to make sure the software is free for all
its users. This General Public License applies to most of the Free
Software Foundation’s software and to any other program whose
authors commit to using it. (Some other Free Software Foundation
software is covered by the GNU Library General Public License
instead.) You can apply it to your programs, too.
When we speak of free software, we are referring to freedom, not
price. Our General Public Licenses are designed to make sure that
you have the freedom to distribute copies of free software (and
charge for this service if you wish), that you receive source code or
can get it if you want it, that you can change the software or use
pieces of it in new free programs; and that you know you can do
these things.
To protect your rights, we need to make restrictions that forbid
anyone to deny you these rights or to ask you to surrender the
rights. These restrictions translate to certain responsibilities for
you if you distribute copies of the software, or if you modify it.
For example, if you distribute copies of such a program, whether
gratis or for a fee, you must give the recipients all the rights that
you have. You must make sure that they, too, receive or can get
the source code. And you must show them these terms so they
know their rights.

120
We protect your rights with two steps: (1) copyright the software,
and (2) oer you this license which gives you legal permission to
copy, distribute and/or modify the software.
Also, for each author’s protection and ours, we want to make
certain that everyone understands that there is no warranty for
this free software. If the software is modied by someone else and
passed on, we want its recipients to know that what they have is
not the original, so that any problems introduced by others will
not reect on the original authors’ reputations.
Finally, any free program is threatened constantly by software
patents. We wish to avoid the danger that redistributors of a free
program will individually obtain patent licenses, in eect making
the program proprietary. To prevent this, we have made it clear
that any patent must be licensed for everyone’s free use or not
licensed at all.
The precise terms and conditions for copying, distribution and
modication follow.
Terms & conditions for copying, distribution, & modification
0. This License applies to any program or other work which
contains a notice placed by the copyright holder saying it may
be distributed under the terms of this General Public License.
The “Program”, below, refers to any such program or work, and
a “work based on the Program” means either the Program or
any derivative work under copyright law: that is to say, a work
containing the Program or a portion of it, either verbatim or
with modications and/or translated into another language.
(Hereinafter, translation is included without limitation in the
term “modication”.) Each licensee is addressed as “you”.
Activities other than copying, distribution and modication are
not covered by this License; they are outside its scope. The act

121
of running the Program is not restricted, and the output from
the Program is covered only if its contents constitute a work
based on the Program (independent of having been made by
running the Program). Whether that is true depends on what
the Program does.
1. You may copy and distribute verbatim copies of the Program’s
source code as you receive it, in any medium, provided that
you conspicuously and appropriately publish on each copy
an appropriate copyright notice and disclaimer of warranty;
keep intact all the notices that refer to this License and to the
absence of any warranty; and give any other recipients of the
Program a copy of this License along with the Program.
You may charge a fee for the physical act of transferring a
copy, and you may at your option oer warranty protection in
exchange for a fee.
2. You may modify your copy or copies of the Program or any
portion of it, thus forming a work based on the Program, and
copy and distribute such modications or work under the
terms of Section 1 above, provided that you also meet all of
these conditions:
a) You must cause the modied les to carry prominent
notices stating that you changed the les and the date of any
change.
b) You must cause any work that you distribute or publish, that
in whole or in part contains or is derived from the Program or
any part thereof, to be licensed as a whole at no charge to all
third parties under the terms of this License.
c) If the modied program normally reads commands
interactively when run, you must cause it, when started
running for such interactive use in the most ordinary way, to
print or display an announcement including an appropriate
copyright notice and a notice that there is no warranty (or
else, saying that you provide a warranty) and that users may
redistribute

122
the program under these conditions, and telling the user how
to view a copy of this License. (Exception: if the Program itself is
interactive but does not normally print such an announcement,
your work based on the Program is not required to print an
announcement.)
These requirements apply to the modied work as a whole.
If identiable sections of that work are not derived from the
Program, and can be reasonably considered independent and
separate works in themselves, then this License, and its terms,
do not apply to those sections when you distribute them as
separate works. But when you distribute the same sections
as part of a whole which is a work based on the Program, the
distribution of the whole must be on the terms of this License,
whose permissions for other licensees extend to the entire
whole, and thus to each and every part regardless of who
wrote it.
Thus, it is not the intent of this section to claim rights or contest
your rights to work written entirely by you; rather, the intent is
to exercise the right to control the distribution of derivative or
collective works based on the Program.
In addition, mere aggregation of another work not based on
the Program with the Program (or with a work based on the
Program) on a volume of a storage or distribution medium
does not bring the other work under the scope of this License.
3. You may copy and distribute the Program (or a work based on
it, under Section 2) in object code or executable form under the
terms of Sections 1 and 2 above provided that you also do one
of the following:
a) Accompany it with the complete corresponding machine—
readable source code, which must be distributed under the
terms of Sections 1 and 2 above on a medium customarily used
for software interchange; or,
b) Accompany it with a written oer, valid for at least three
years, to give any third party, for a charge no more than your

123
cost of physically performing source distribution, a complete
machine-readable copy of the corresponding source code, to
be distributed under the terms of Sections 1 and 2 above on a
medium customarily used for software interchange; or,
c) Accompany it with the information you received as to the oer
to distribute corresponding source code. (This alternative is
allowed only for noncommercial distribution and only if you
received the program in object code or executable form with
such an oer, in accord with Subsection b above.)
The source code for a work means the preferred form of
the work for making modications to it. For an executable
work, complete source code means all the source code for all
modules it contains, plus any associated interface denition
les, plus the scripts used to control compilation and
installation of the executable. However, as a special exception,
the source code distributed need not include anything that
is normally distributed (in either source or binary form) with
the major components (compiler, kernel, and so on) of the
operating system on which the executable runs, unless that
component itself accompanies the executable.
If distribution of executable or object code is made by
oering access to copy from a designated place, then oering
equivalent access to copy the source code from the same place
counts as distribution of the source code, even though third
parties are not compelled to copy the source along with the
object code.
4. You may not copy, modify, sublicense, or distribute the
Program except as expressly provided under this License. Any
attempt otherwise to copy, modify, sublicense or distribute
the Program is void, and will automatically terminate your
rights under this License. However, parties who have received
copies, or rights, from you under this License will not have
their licenses terminated so long as such parties remain in full
compliance.
5. You are not required to accept this License, since you have
not signed it. However, nothing else grants you permission to
modify or distribute the Program or its derivative works. These

124
Therefore, by modifying or distributing the Program (or any
work based on the Program), you indicate your acceptance
of this License to do so, and all its terms and conditions for
copying, distributing or modifying the Program or works based
on it.
6. Each time you redistribute the Program (or any work based
on the Program), the recipient automatically receives a license
from the original licensor to copy, distribute or modify the
Program subject to these terms and conditions. You may not
impose any further restrictions on the recipients’ exercise of
the rights granted herein. You are not responsible for enforcing
compliance by third parties to this License.
7. If, as a consequence of a court judgment or allegation of patent
infringement or for any other reason (not limited to patent
issues), conditions are imposed on you (whether by court order,
agreement or otherwise) that contradict the conditions of this
License, they do not excuse you from the conditions of this
License. If you cannot distribute so as to satisfy simultaneously
your obligations under this License and any other pertinent
obligations, then as a consequence you may not distribute
the Program at all. For example, if a patent license would not
permit royalty-free redistribution of the Program by all those
who receive copies directly or indirectly through you, then the
only way you could satisfy both it and this License would be to
refrain entirely from distribution of the Program.
If any portion of this section is held invalid or unenforceable
under any particular circumstance, the balance of the section
is intended to apply and the section as a whole is intended to
apply in other circumstances.
It is not the purpose of this section to induce you to infringe
any patents or other property right claims or to contest
validity of any such claims; this section has the sole purpose
of protecting the integrity of the free software distribution
system, which is implemented by public license practices.
Many people have made generous contributions to the wide
range of software distributed through that system in reliance

125
on consistent application of that system; it is up to the author/
donor to decide if he or she is willing to distribute software
through any other system and a licensee cannot impose that
choice.
This section is intended to make thoroughly clear what is
believed to be a consequence of the rest of this License.
8. If the distribution and/or use of the Program is restricted in
certain countries either by patents or by copyrighted interfaces,
the original copyright holder who places the Program under
this License may add an explicit geographical distribution
limitation excluding those countries, so that distribution is
permitted only in or among countries not thus excluded. In
such case, this License incorporates the limitation as if written
in the body of this License.
9. The Free Software Foundation may publish revised and/or new
versions of the General Public License from time to time. Such
new versions will be similar in spirit to the present version, but
may dier in detail to address new problems or concerns.
Each version is given a distinguishing version number. If the
Program species a version number of this License which
applies to it and “any later version”, you have the option of
following the terms and conditions either of that version or of
any later version published by the Free Software Foundation. If
the Program does not specify a version number of this License,
you may choose any version ever published by the Free
Software Foundation.
10. If you wish to incorporate parts of the Program into other free
programs whose distribution conditions are dierent, write to
the author to ask for permission.
For software which is copyrighted by the Free Software
Foundation, write to the Free Software Foundation; we
sometimes make exceptions for this. Our decision will be
guided by the two goals of preserving the free status of all
derivatives of our free software and of promoting the sharing
and reuse of software generally.

126
NO WARRANTY
11 BECAUSE THE PROGRAM IS LICENSED FREE OF CHARGE,
THERE IS NO WARRANTY FOR THE PROGRAM, TO THE EXTENT
PERMITTED BY APPLICABLE LAW. EXCEPT WHEN OTHERWISE
STATED IN WRITING THE COPYRIGHT HOLDERS AND/OR OTHER
PARTIES PROVIDE THE PROGRAM “AS IS” WITHOUT WARRANTY
OF ANY KIND, EITHER EXPRESSED OR IMPLIED, INCLUDING,
BUT NOT LIMITED TO, THE IMPLIED WARRANTIES OF
MERCHANTABILITY AND FITNESS FOR A PARTICULAR PURPOSE.
THE ENTIRE RISK AS TO THE QUALITY AND PERFORMANCE OF
THE PROGRAM IS WITH YOU. SHOULD THE PROGRAM PROVE
DEFECTIVE, YOU ASSUME THE COST OF ALL NECESSARY
SERVICING, REPAIR OR CORRECTION.
12 IN NO EVENT UNLESS REQUIRED BY APPLICABLE LAW OR
AGREED TO IN WRITING WILL ANY COPYRIGHT HOLDER, OR
ANY OTHER PARTY WHO MAY MODIFY AND/OR REDISTRIBUTE
THE PROGRAM AS PERMITTED ABOVE, BE LIABLE TO YOU FOR
DAMAGES, INCLUDING ANY GENERAL, SPECIAL, INCIDENTAL
OR CONSEQUENTIAL DAMAGES ARISING OUT OF THE USE
OR INABILITY TO USE THE PROGRAM (INCLUDING BUT NOT
LIMITED TO LOSS OF DATA OR DATA BEING RENDERED
INACCURATE OR LOSSES SUSTAINED BY YOU OR THIRD PARTIES
OR A FAILURE OF THE PROGRAM TO OPERATE WITH ANY OTHER
PROGRAMS), EVEN IF SUCH HOLDER OR OTHER PARTY HAS
BEEN ADVISED OF THE POSSIBILITY OF SUCH DAMAGES.
END OF TERMS AND CONDITIONS

127
For Turkey only
Authorised distributors in Turkey:
BOGAZICI BIL GISAYAR SAN. VE TIC. A.S.
Tel. No.: +90 212 3311000
Address: AYAZAGA MAH. KEMERBURGAZ CAD. NO.10
AYAZAGA/ISTANBUL
CIZGI Elektronik San. Tic. Ltd. Sti.
Tel. No.: +90 212 3567070
Address: CEMAL SURURI CD. HALIM MERIC IS MERKEZI
No: 15/C D:5-6 34394 MECIDIYEKOY/
ISTANBUL
EEE Yönetmeliğine Uygundur.

128
ASUS Contact information
ASUSTeK COMPUTER INC. (Asia Pacific)
Address 15 Li-Te Road, Peitou, Taipei, Taiwan 11259
Website www.asus.com.tw
Technical Support
Telephone +886228943447
Support Fax +886228907698
Online support support.asus.com
ASUS COMPUTER INTERNATIONAL (America)
Address 800 Corporate Way, Fremont, CA 94539, USA
Telephone +15107393777
Fax +15106084555
Website usa.asus.com
Online support support.asus.com
ASUS COMPUTER GmbH (Germany and Austria)
Address Harkort Str. 21-23, D-40880 Ratingen, Germany
Telephone +491805010923*
Fax +492102959911
Website www.asus.de
Online contact www.asus.de/sales
Technical Support
Telephone (Component, Networking) +491805010923*
Telephone (System/Notebook/Eee/LCD) +491805010920*
Fax +492102959911
Online support support.asus.com
* EUR 0.14/minute from a German xed landline; EUR 0.42/minute from
a mobile phone.
129
Area Hotline Number Support
Languages Working
Hour Working
Day
Australia 1300-2787-88 English 8:00-20:00 Mon. to Fri.
Austria 0043-820240513 German 9:00-18:00 Mon. to Fri.
Belgium 0032-78150231 Dutch /French 9:00-17:00 Mon. to Fri.
China 400-620-6655 Simplied
Chinese 9:00-18:00 Mon. to
Sun.
Denmark 0045-3832-2943 Denish/English 9:00-17:00 Mon. to Fri.
Finland 00358-9693-7969 Finnish/English/
Swedish 10:00-18:00 Mon. to Fri.
France 0033-170949400 France 9:00-17:45 Mon. to Fri.
Greece 00800-44-14-20-44 Greek 9:00-13:00;
14:00-18:00 Mon. to Fri.
Hong Kong 3582-4770
Cantonese/
Chinese/
English
10:00-20:00 Mon. to Fri.
10:00-17:00 Sat.
Ireland 0035-31890719918 English 9:00-17:00 Mon. to Fri.
Japan 0800-123-2787 Japanese 9:00-18:00 Mon. to Fri.
9:00-17:00 Sat. to Sun.
Malaysia
+603 2148 0827 (Check
Repair Detail Status
Only)
+603-6279-5077
Bahasa Melayu/
English 10:00-19:00 Mon. to Fri.
Netherlands
/ Luxembourg 0031-591-570290 Dutch / English 9:00-17:00 Mon. to Fri.
New Zealand 0800-278-788 /
0800-278-778 English 9:00-17:00 Mon. to Fri.
Norway 0047-2316-2682 Norwegian
/English 9:00-17:00 Mon. to Fri.
Philippine +632-636 8504;
180014410573 English 9:00-18:00 Mon. to Fri.
Poland 00225-718-033
00225-718-040 Polish 9:00-17:00
8:30-17:30 Mon. to Fri.
Portugal 707-500-310 Portuguese 9:00-17:00 Mon. to Fri.
Networks Global Hotline Information

130
Area Hotline Number Support
Languages Working
Hour Working
Day
Russia +8-800-100-ASUS; +7-
495-231-1999
Russian/
English 9:00-18:00 Mon. to Fri.
Singapore
+65-6720-3835
(Check Repair Detail
Status Only)
-66221701
English 11:00-19:00 Mon. to Fri.
Slovak 00421-232-162-621 Czech 8:00-17:00 Mon. to Fri.
Spain 902-88-96-88 Spanish 9:00-18:00 Mon. to Fri.
Sweden 0046-8587-6940 Swedish/
English 9:00-17:00 Mon. to Fri.
Switzerland
0041-848111010 German/French 9:00-18:00 Mon. to Fri.
0041-848111014 French 9:00-17:45 Mon. to Fri.
0041-848111012 Italian 9:00-17:00 Mon. to Fri.
Taiwan 0800-093-456;
02-81439000
Traditional
Chinese
9:00-12:00;
13:30-18:00 Mon. to Fri.
Thailand +662-679-8367 -70; 001
800 852 5201 Thai/English 9:00-18:00 Mon. to Fri.
Turkey +90-216-524-3000 Turkish 09:00-18:00 Mon. to Fri
United Kingdom 0044-870-1208340;
0035-31890719918 English 9:00-17:00 Mon. to Fri.
USA/Canada 1-812-282-2787 English
8:30-12:00am
EST
(5:30am-
9:00pm PST)
Mon. to Fri.
9:00am-
6:00pm EST
(6:00am-
3:00pm PST)
Sat. to Sun.
NOTE: For more information, visit the ASUS support site at:
http://support.asus.com
Networks Global Hotline Information

131
Manufacturer: ASUSTeK Computer Inc.
Tel: +886-2-2894-3447
Address: 4F, No. 150, LI-TE RD., PEITOU,
TAIPEI 112, TAIWAN
Authorised
representative
in Europe:
ASUS Computer GmbH
Address: HARKORT STR. 21-23, 40880
RATINGEN, GERMANY
Quick Start Guide
RT-AC66U Dual Band
3×3 802.11AC Gigabit Router
EEU7417/ First Edition / May 2012
EEU7417_RT-AC66U_QSG.indd 1 5/22/12 5:58:55 PM

Table of contents
English …………………………………………………………………………………4
Български …………………………………………………………………………..17
Čeština …………………………………………………………………………………30
Eesti ……………………………………………………………………………………..43
Magyar ………………………………………………………………………………..56
Latviski ………………………………………………………………………………..69
Lietuvių ……………………………………………………………………………….82
Polski ……………………………………………………………………………………95
Română ……………………………………………………………………………….108
Русский ………………………………………………………………………………. 121
Slovensky…………………………………………………………………………….134
Türkçe ………………………………………………………………………………….147
Українська ………………………………………………………………………….160
Deutsch ……………………………………………………………………………….173
EEU7417_RT-AC66U_QSG.indd 2 5/22/12 5:58:56 PM

Note / Забележка / Poznámka /märkus /
Megjegyzés/piezīme/ Pastaba/ Uwaga/
Notă
/
Примечание
/ Obs/not/
Примітка
/ Hinweis
• For more details, refer to the user manual included in the
support CD.
•
За повече информация, вижте ръководството на потребителя,
намиращо се на помощния CD диск.
• Podrobnější informace viz uživatelská příručka na podpůrném
disku CD.
• Täpsemat teavet leiate seadmega kaasnenud tugijuhendi CD-lt.
• A további részleteket illetően tekintse meg a támogató CD-n
lévő felhasználói útmutatót.
• Detalizētāku informāciju meklējiet atbalsta CD esošajā lietotāja
rokasgrāmatā.
• Išsamiau žr. vartotojo vadovą, esantį šiame pagalbos
kompaktiniame (CD) diske.
• Dalsze szczegółowe informacje znajdują się w podręczniku
użytkownika na pomocniczym dysku CD.
•
Pentru mai multe detalii, consultaţi manualul de utilizare inclus pe CDul suport.
•
Для получения дополнительной информации обратитесь к
руководству пользователя на компакт-диске.
•
Viac podrobností nájdete v návode na obsluhu na CD s
podporou.
•
Daha fazla ayrıntı için destek CD’sinde bulunan kullanıcı
kılavuzuna bakın.
•
Детальніше див. посібник користувача на компакт-диску
підтримки
.
• Weitere Details nden Sie im Benutzerhandbuch auf der
Support-CD.
EEU7417_RT-AC66U_QSG.indd 3 5/22/12 5:58:56 PM

4
English
Package contents
RT-AC66U AC adapter
Network cable Quick Start Guide
Support CD (User Manual/utilities) Warranty card
Stand
A quick look
1) Power LED 5) 5GHz LED 9) USB 2.0 ports
2) LAN LED 6) USB 2.0 LED 10) Reset button
3) WAN LED 7) Power (DC-IN) port 11) Internet & LAN ports
4) 2.4GHz LED  Power switch 12) WPS button
NOTE: If any of the items is damaged or missing, contact your retailer.
7 9 10 12
11
8
1 2
3
5
6
4
EEU7417_RT-AC66U_QSG.indd 4 5/22/12 5:59:00 PM

5
English
NOTES:
•
USB External HDD/Flash disk:
• The wireless router works with most USB HDDs/Flash disks up to
2TB and supports read-write access for FAT16, FAT32, EXT2, EXT3,
and NTFS.
• To safely remove the USB disk, launch the web GUI
(http://192.168.1.1), then in the Network Map page’s upper right
corner, click the USB icon and click Eject USB 1.
• Incorrect removal of the USB disk may cause data corruption.
• For the list of le system and hard disk partitions that the
wireless router supports, visit http://event.asus.com/networks/
disksupport
• For the list of printers that the wireless router supports, visit
http://event.asus.com/networks/printersupport
EEU7417_RT-AC66U_QSG.indd 5 5/22/12 5:59:00 PM
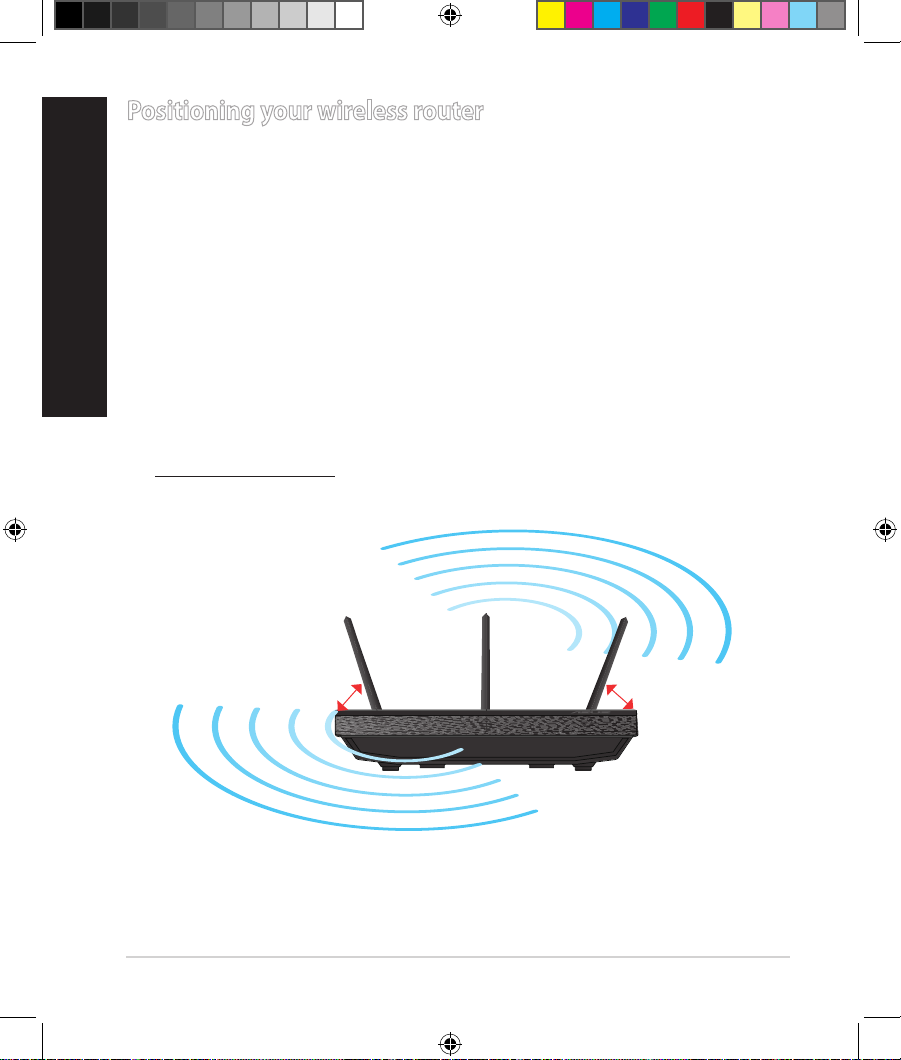
6
Positioning your wireless router
For the best wireless signal transmission between the wireless router and the
network devices connected to it, ensure that you:
• Place the wireless router in a centralized area for a maximum wireless coverage
for the network devices.
• Keep the device away from metal obstructions and away from direct sunlight.
• Keep the device away from 802.11g or 20MHz only Wi-Fi devices, 2.4GHz
computer peripherals, Bluetooth devices, cordless phones, transformers,
heavy-duty motors, uorescent lights, microwave ovens, refrigerators, and other
industrial equipment to prevent signal interference or loss.
• To ensure the best wireless signal, orient the three detachable antennas as
shown in the drawing below.
• For optimum performance, adjust the internal cooling system. Refer to the user
manual for details.
• Always update to the latest rmware. Visit the ASUS website at
http://www.asus.com to get the latest rmware updates.
45
0
45
0
90
0
English
EEU7417_RT-AC66U_QSG.indd 6 5/22/12 5:59:02 PM

7
Mounting to the stand
• Align and insert the stand’s mounting hooks
to the wireless router’s mounting holes.
Before you proceed
1. Unplug and disconnect the wires/cables from your existing modem setup
and release your computer’s outmoded IP address.
a: Unplug the AC adapter from the power outlet and disconnect it from your
cable/ADSL modem.
b: Disconnect the network cable from your cable/ADSL modem.
c: Reboot your computer (recommended).
EEU7417_RT-AC66U_QSG.indd 7 5/22/12 5:59:03 PM
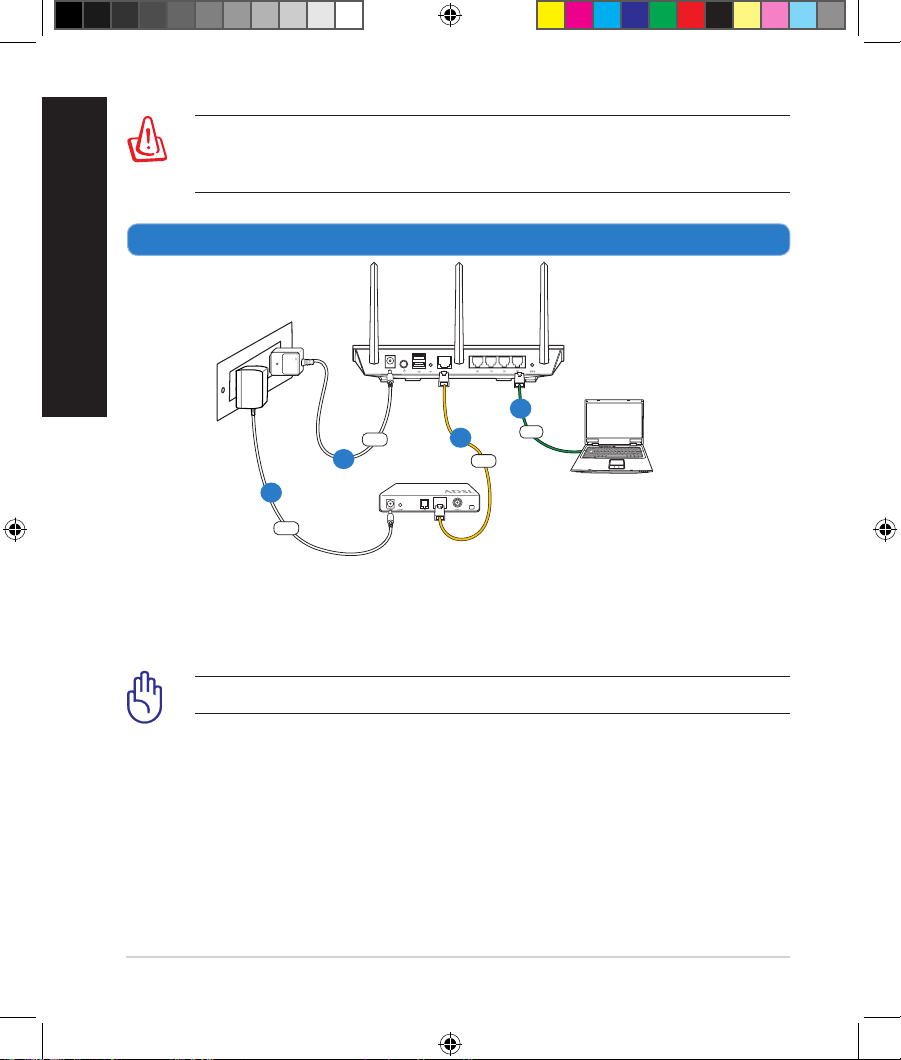
8
WARNING! Before disconnecting the wires/cables, ensure that your
cable/ADSL modem has been turned o for at least two minutes. If your
modem has a backup battery, remove it as well.
2. Set up your wireless environment.
a: Insert your wireless router’s AC adapter to the DC-IN port and plug it to a
power outlet.
b: Using the bundled network cable, connect your computer to your wireless
router’s LAN port.
IMPORTANT! Ensure that the WAN and LAN LEDs are blinking.
c: Using another network cable, connect your modem to your wireless router’s
WAN port.
d: Insert your modem’s AC adapter to the DC-IN port and plug it to a power
outlet.
English
RT-AC66U
Computer
Modem
LAN
Power
Wall Power Outlet
Power
WAN
EEU7417_RT-AC66U_QSG.indd 8 5/22/12 5:59:05 PM
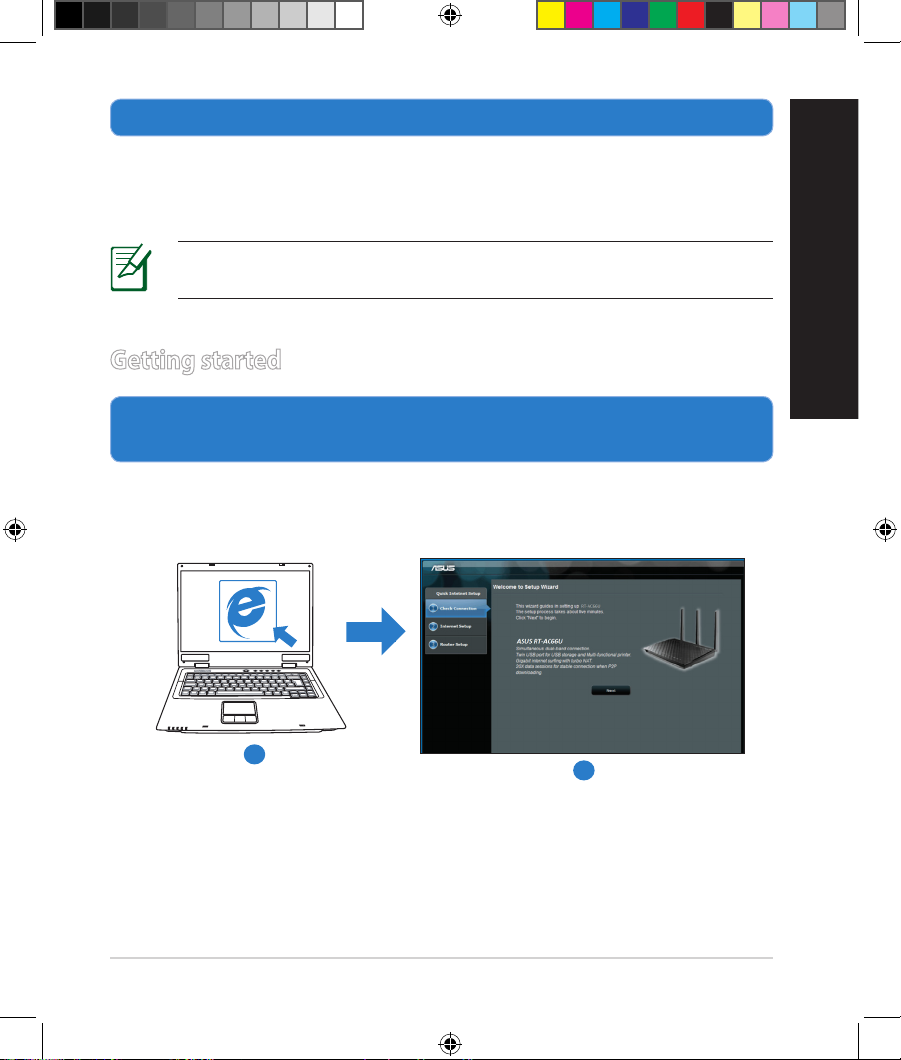
9
3. Disable some settings on your computer.
A. Disable the proxy server, if enabled.
B. Set the TCP/IP settings to automatically obtain an IP address.
C. Disable the dial-up connection, if enabled.
NOTE: For more details on disabling your computer settings, refer to
Frequently Asked Questions (FAQs).
1. Congure your wireless settings via the wireless router’s web graphics
user interface (web GUI).
a: Launch your web browser such as Internet Explorer, Firefox, Google Chrome,
or Safari.
Getting started
English
b
a
EEU7417_RT-AC66U_QSG.indd 9 5/22/12 5:59:07 PM
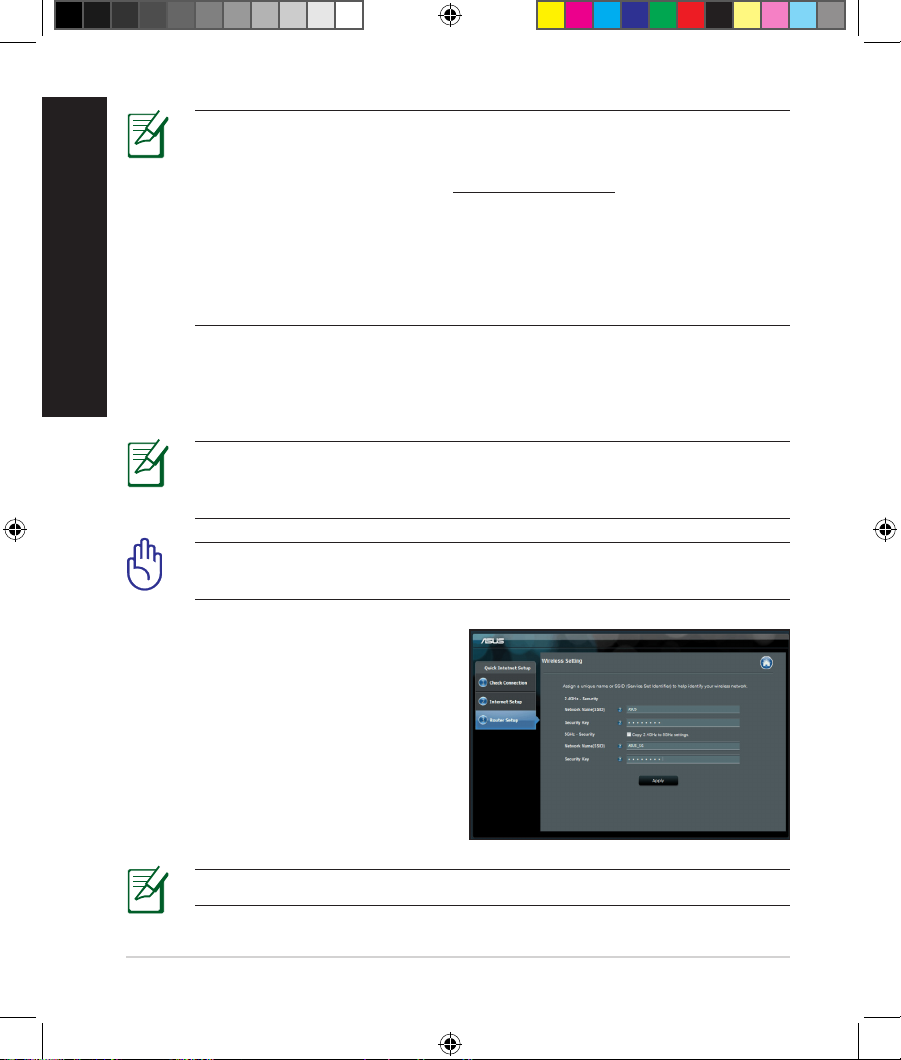
10
NOTE: If QIS does not launch automatically, follow these steps to
manually launch QIS:
• On your web browser, key in
http://192.168.1.1 and run the Quick
Internet Setup (QIS) Wizard again.
• Disable the proxy settings, dial-up connection, and set your TCP/IP
settings to automatically obtain an IP address. For more details, refer
to the FAQs section or use the Setup Wizard in the support CD for
auto-diagnosis.
b: The wireless router’s Quick Internet Setup (QIS) feature automatically detects
if your ISP connection type is Dynamic IP, PPPoE, PPTP, L2TP, and Static IP.
Key in the necessary information for your connection type.
IMPORTANT! Obtain the necessary information about your Internet
connection type from your Internet Service Provider (ISP).
NOTE: The auto-detection of your ISP connection type takes place
when you congure the wireless router for the rst time or when your
wireless router is reset to its default settings.
NOTE: You can assign a network name with up to 32 characters.
c: Assign the network name (SSID) and
security key for your 2.4GHz and
5GHz wireless connection. Click Ap-
ply when done.
d: Your Internet and wireless settings
are displayed. Click Next to continue.
e: Read the wireless network con-
nection tutorial. When done, click
Finish.
English
EEU7417_RT-AC66U_QSG.indd 10 5/22/12 5:59:08 PM

11
Frequently Asked Questions (FAQs)
After following the steps, I still cannot access the wireless router’s web
graphics user interface (web GUI) to congure the wireless router settings.
A. Disable the proxy server, if enabled.
Windows® 7
1. Click Start > Internet Explorer to launch the web
browser.
2. Click Tools > Internet options > Connections tab
> LAN settings.
3. From the Local Area Network (LAN) Settings
screen, untick Use a proxy server for your
LAN.
4. Click OK when done.
English
EEU7417_RT-AC66U_QSG.indd 11 5/22/12 5:59:09 PM
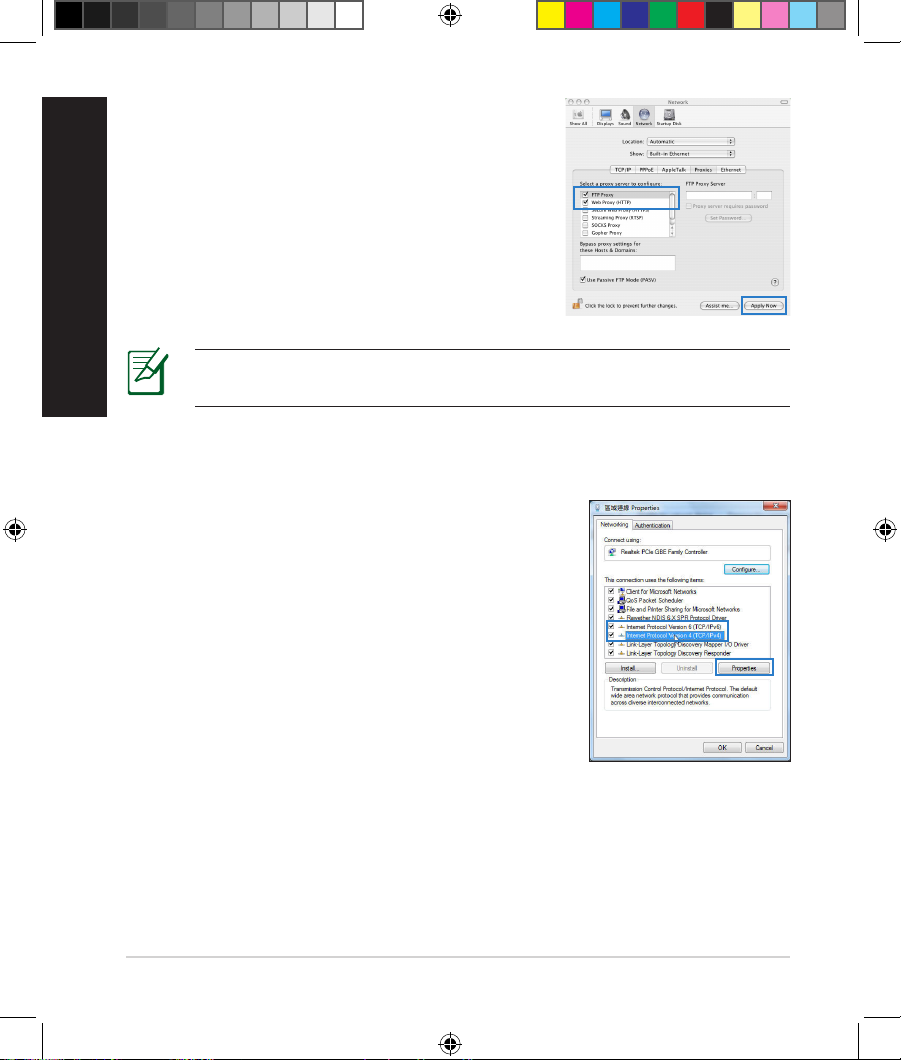
12
MAC OS
1. From your Safari browser, click Safari > Preferences > Advanced > Change Settings…
2. From the Network screen, deselect FTP Proxy
and Web Proxy (HTTP).
3. Cllick Apply Now when done.
NOTE: Refer to your browser’s help feature for details on disabling the
proxy server.
B. Set the TCP/IP settings to automatically obtain an IP address.
Windows® 7
1. Click
Start > Control Panel > Network and
Internet > Network and Sharing Center >
Manage network connections.
2. Select Internet Protocol Version 4 (TCP/IPv4),
then click Properties.
English
EEU7417_RT-AC66U_QSG.indd 12 5/22/12 5:59:10 PM
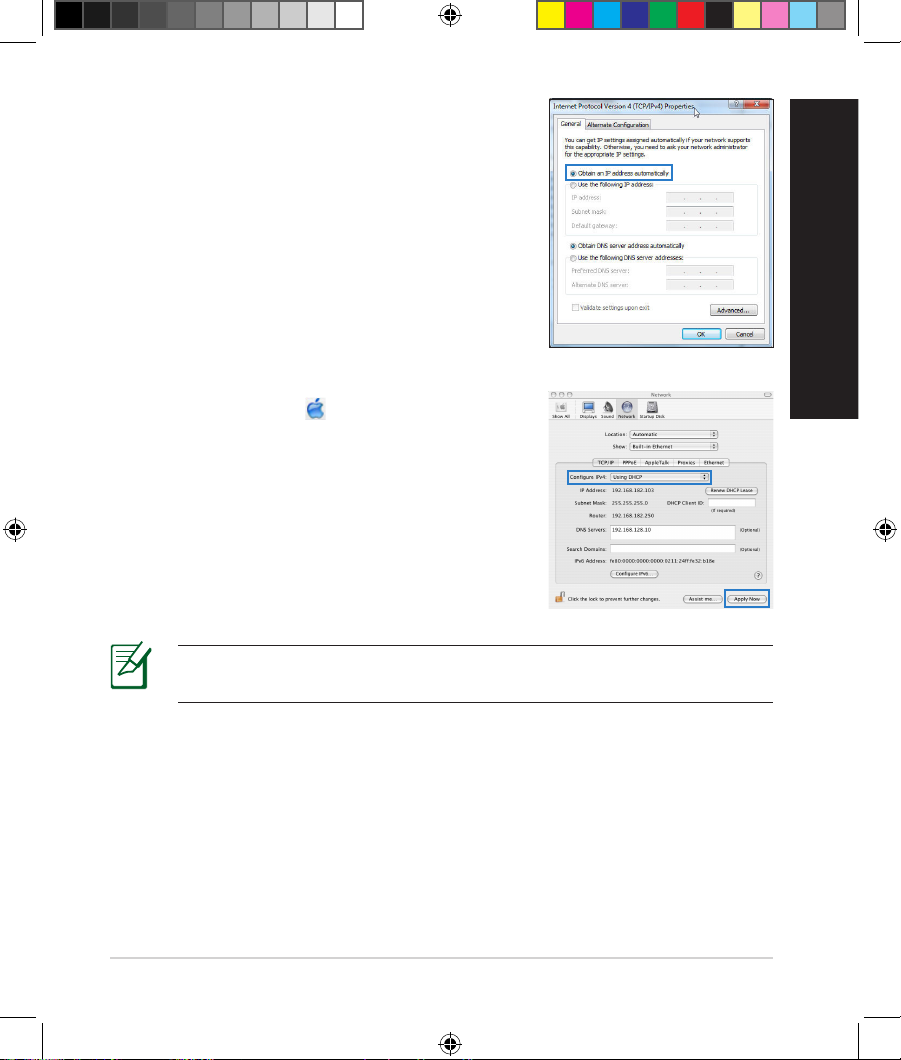
13
3. To obtain the iPv4 IP settings automatically, tick
Obtain an IP address automatically.
4. Click OK when done.
MAC OS
1. Click the Apple icon located on the top left of
your screen.
2. Click System Preferences > Network >
Congure…
3. From the TCP/IP tab, select Using DHCP in the
Congure IPv4 dropdown list.
4. Cllick Apply Now when done.
NOTE: Refer to your operating system’s help and support feature for
details on conguring your computer’s TCP/IP settings.
English
EEU7417_RT-AC66U_QSG.indd 13 5/22/12 5:59:10 PM
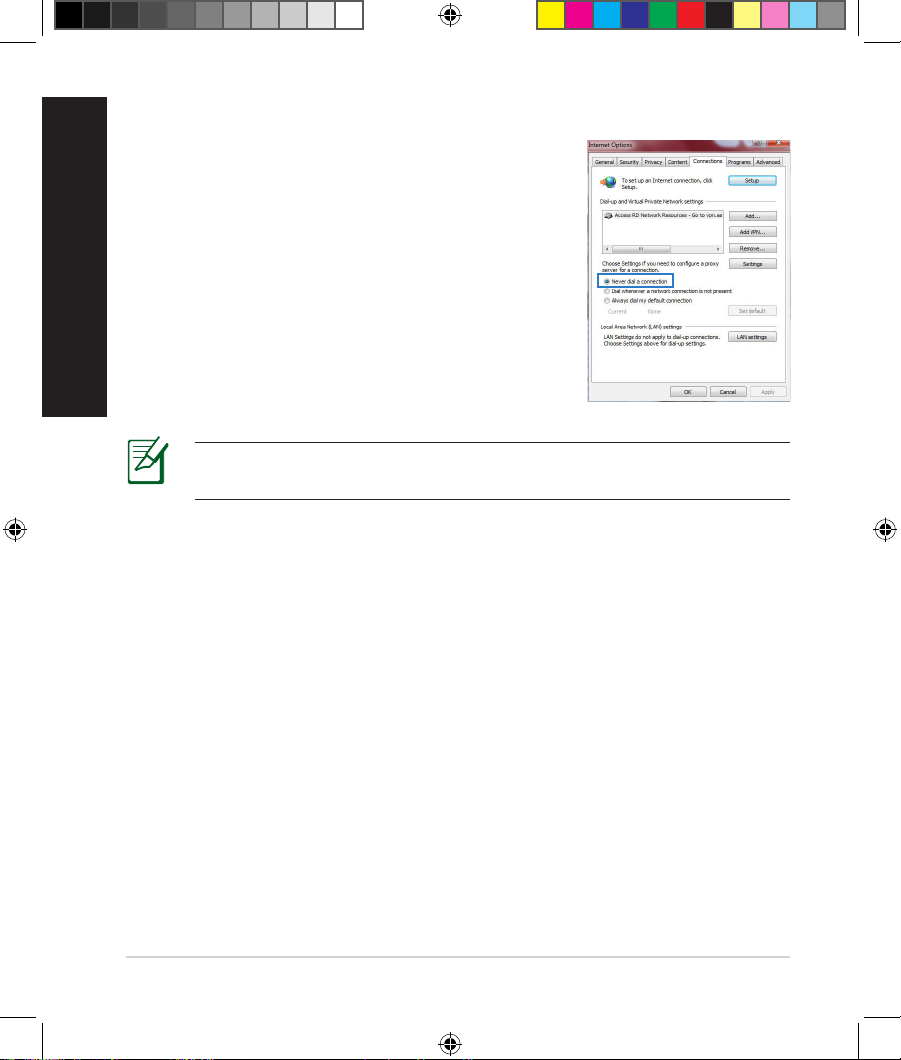
14
C. Disable the dial-up connection, if enabled.
D. Close all running web browsers.
NOTE: Refer to your browser’s help feature for details on disabling
the dial-up connection settings.
Windows® 7
1. Click Start > Internet Explorer to launch the
browser.
2. Click Tools > Internet options > Connections tab.
3. Tick Never dial a connection.
4. Click OK when done.
The client cannot establish a wireless connection with the router.
Out of Range:
• Put the router closer to the wireless client.
• Try to change the channel settings.
Authentication:
• Use wired connection to connect to the router.
• Check the wireless security settings.
• Press the Reset button at the rear panel for more than ve seconds.
English
EEU7417_RT-AC66U_QSG.indd 14 5/22/12 5:59:11 PM

15
Cannot nd the router:
• Press the Reset button at the rear panel for more than ve seconds.
• Check the setting in the wireless adapter such as SSID and encryption
settings.
Cannot access the Internet via wireless LAN adapter.
• Move the router closer to the wireless client.
• Check whether the wireless adapter is connected to the correct wireless
router.
• Check whether the wireless channel in use conforms to the channels available in your country/area.
• Check the encryption settings.
• Check if the ADSL or Cable connection is correct.
• Retry using another Ethernet cable.
If the ADSL “LINK” light blinks continuously or stays o, Internet access is
not possible — the Router is unable to establish a connection with the ADSL
network.
• Ensure that all your cables are all properly connected .
• Disconnect the power cord from the ADSL or cable modem, wait a few minutes, then reconnect the cord.
• If the ADSL light continues to blink or stays OFF, contact your ADSL service
provider.
Network name or encryption keys are forgotten.
• Try setting up the wired connection and conguring the wireless encryption
again.
• Press the Reset button of the wireless router for more than ve seconds.
• Factory default settings:
User name / Password:
admin / admin
IP address:
192.168.1.1
SSID: ASUS
English
EEU7417_RT-AC66U_QSG.indd 15 5/22/12 5:59:11 PM
16
Where can I nd more information about the wireless router?
• User Manual in the support CD
• Online FAQ site: http://support.asus.com/faq
• Technical Support site: http://support.asus.com/techserv
• Customer Hotline: Refer to the Support Hotline in this Quick Start Guide
English
SUPPORT HOTLINE
Area Hotline Number Support
Languages
Availability
Taiwan 0800-093-456;
02-81439000
Traditional
Chinese
Mon. to Fri.
9:00-12:00;
13:30-18:00
USA/
Canada
1-812-282-2787 English Mon. to Fri.
8:30-12:00am EST
(5:30am-9:00pm PST)
Sat. to Sun.
9:00am-6:00pm EST
(6:00am-3:00pm PST)
Brazil 4003 0988 (Capital) Portuguese
Mon. to Fri.
9:00am-18:00
0800 880 0988
(demais localidades)
EEU7417_RT-AC66U_QSG.indd 16 5/22/12 5:59:12 PM
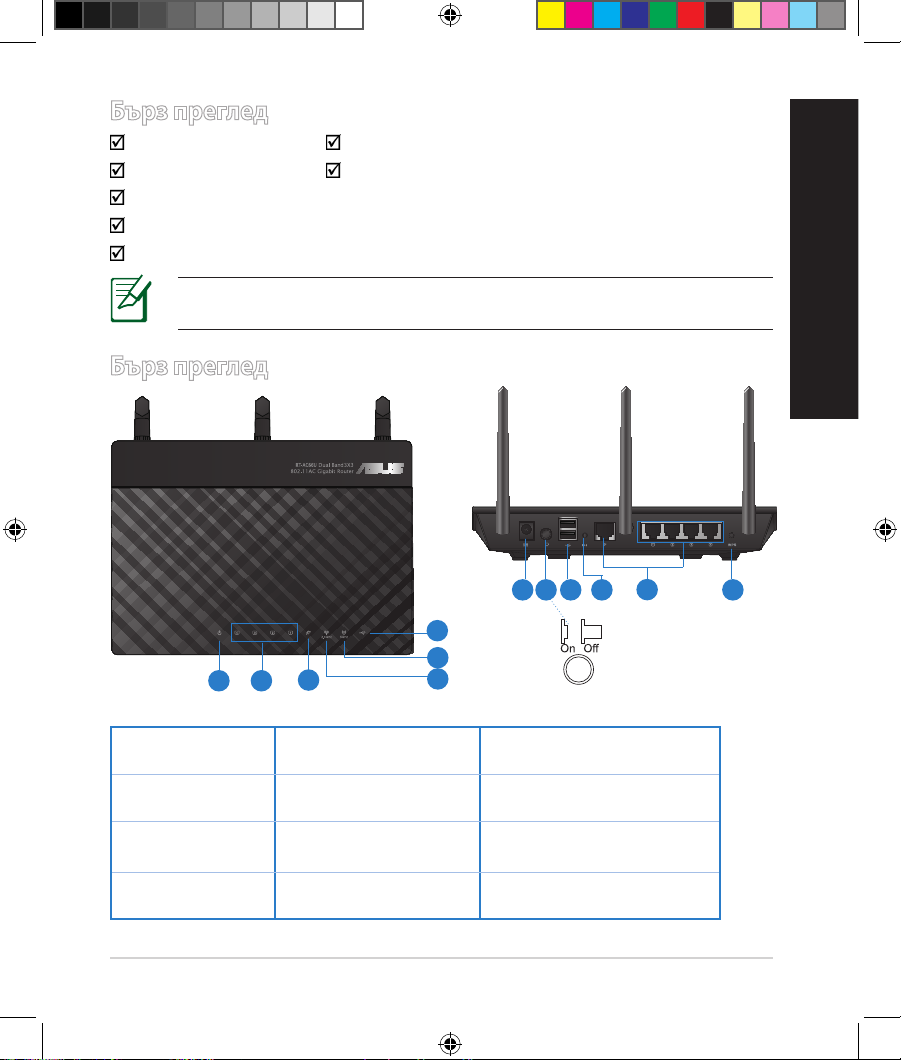
17
Бърз преглед
RT-AC66U Адаптер за променлив ток
Мрежов кабел Ръководство за бърз старт
Помощен CD диск (Ръководство на потребителя/помощни програми)
Гаранционна карта
Стойка
Бърз преглед
1) Индикатор
на
5) 5GHz индикатор 9) USB 2.0 портове
2) LAN
индикатор
6) USB 2.0 индикатор 10) Бутон за нулиране
3) WAN
индикатор
7) Порт захранване
(DC-IN)
11) Портове Интернет
и LAN
4) 2.4GHz
индикатор
Power switch 12) WPS бутон
ЗАБЕЛЕЖКА: Ако някой от компонентите е повреден или липсва,
свържете се с Вашия търговски представител.
7 9 10 12
11
8
български
1 2
3
5
6
4
EEU7417_RT-AC66U_QSG.indd 17 5/22/12 5:59:14 PM

18
ЗАБЕЛЕЖКИ:
•
USB Външен хард / флаш диск:
• Безжичният рутер работи с повечето USB хард дискове и флаш
дискове до 2 TB и поддържа достъп четене-писане за FAT16,
FAT32, EXT2, EXT3 и NTFS.
• За сигурно изключване на USB диска стартирайте
потребителския интерфейс от мрежата GUI (http://192.168.1.1),
след това на страница Network Map (Карта на мрежата) в
горния десен ъгъл щракнете иконата на USB и щракнете Eject
USB 1 (Изхвърляне на USB 1).
• Неправилното изваждане на USB диска може да предизвика
повреждане на данните.
• Списъка на системните и дискови раздели, поддържани от
безжичния рутер, можете да намерите на http://event.asus.
com/networks/disksupport
• Списъка на принтерите, поддържани от безжичния рутер, можете
да намерите на
http://event.asus.com/networks/printersupport
български
EEU7417_RT-AC66U_QSG.indd 18 5/22/12 5:59:14 PM
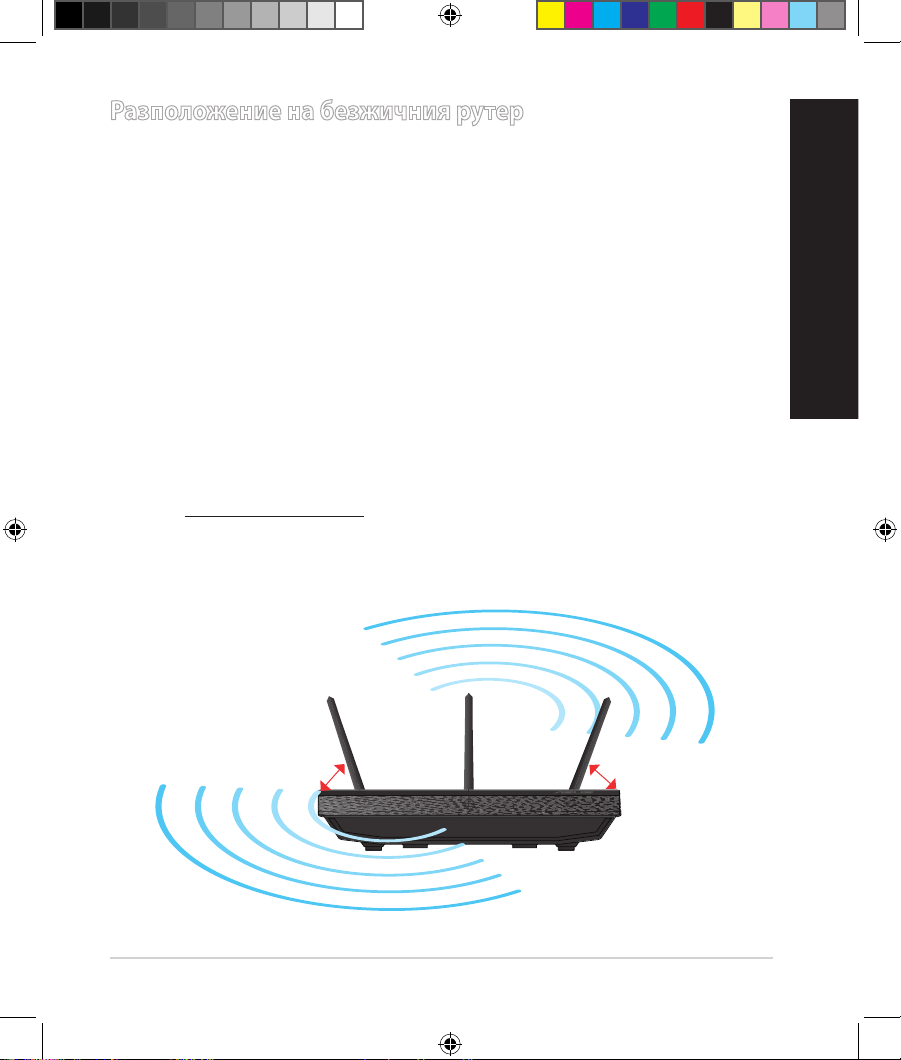
19
Разположение на безжичния рутер
За постигане на максимално добро предаване на безжичните сигнали
между безжичния рутер и свързаните с него мрежови устройства трябва:
• Да поставите безжичния рутер на централно място за максимално покритие
на мрежовите устройства.
• Рутерът да е отдалечен от метални прегради и да не е изложен на слънчева
светлина.
• Рутерът да е отдалечен от Wi-Fi устройства 802.11g или 20MHz, компютърни
периферни устройства 2.4GHz, Bluetooth (блутут) устройства, безжични
телефони, трансформатори, мощни мотори, флуоресцентни лампи,
микровълнови печки, хладилници и други промишлени машини за
избягване на смущенията или загубите на сигнала.
• За осигуряване на максимално добър сигнал трите свалящи се антени да се
ориентират както е показано на схемата по-долу.
• За оптимална да се регулира вътрешната охлаждаща система. Повече
подробности са дадени в ръководството на потребителя.
• Винаги използвайте най-новите версии на фърмуера. Посетете сайта на
ASUS http://www.asus.com за сваляне на последните версии на фърмуера.
45
0
45
0
90
0
български
EEU7417_RT-AC66U_QSG.indd 19 5/22/12 5:59:15 PM
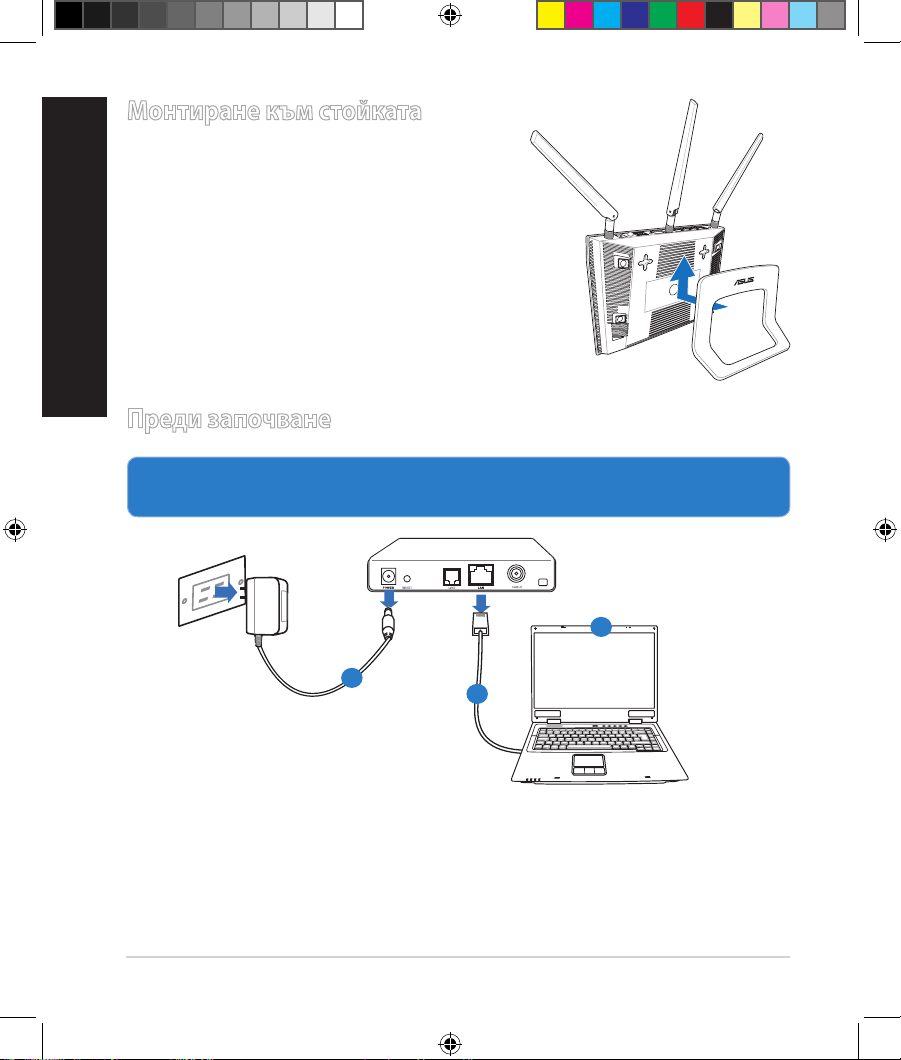
20
1. Откачете жиците и кабелите от съществуващата система с модем и
освободете стария IP адрес на компютъра.
Монтиране към стойката
•
Подравнете и поставете куките за монтаж
на стойката към отворите за монтаж на
безжичния рутер
.
Преди започване
а
: Изключете адаптера за променлив ток от контакта и го извадете от
кабелния/ADSL модем.
б
: Извадете мрежовия кабел от Вашия кабелен/ADSL модел.
в
: Рестартирайте компютъра (препоръчително).
EEU7417_RT-AC66U_QSG.indd 20 5/22/12 5:59:15 PM
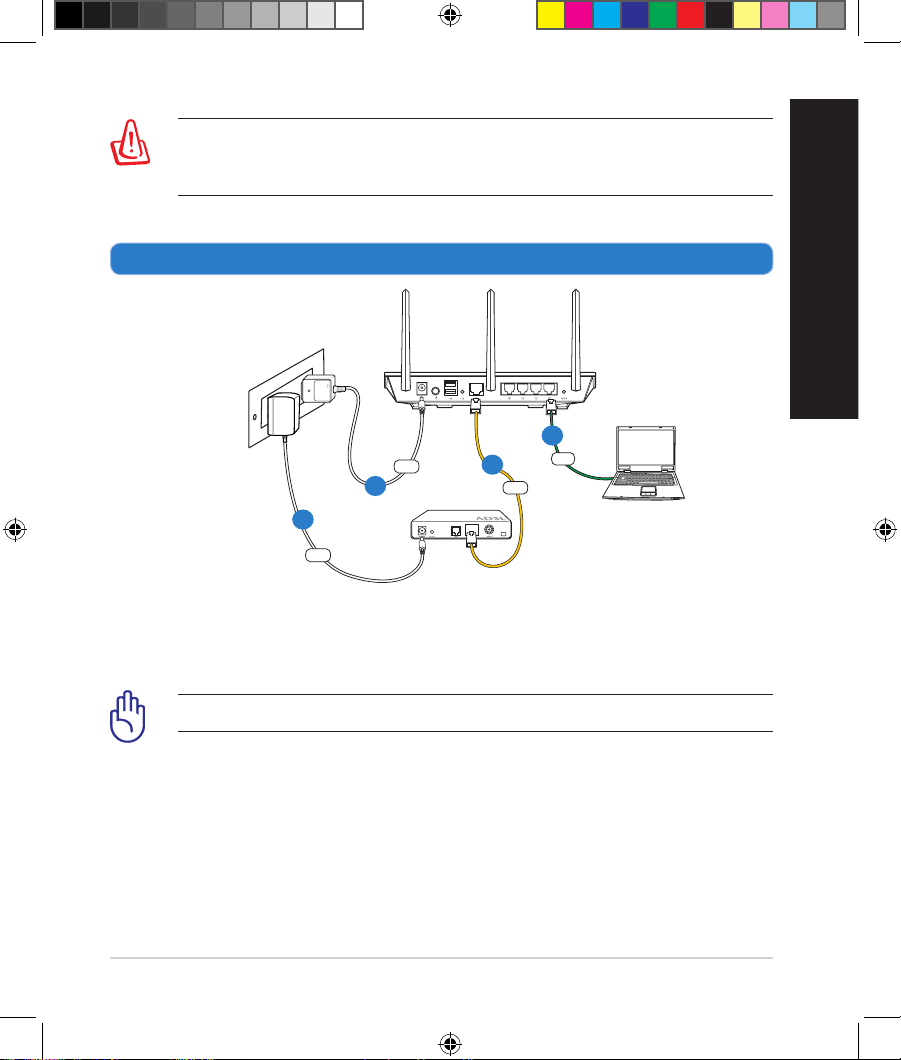
21
ПРЕДУПРЕЖДЕНИЕ: Преди да откачите жиците и кабелите вашият
кабелен или ADSL модем трябва да бъде изключен най-малко за две
минути. Ако модемът има поддържаща батерия, свалете и нея.
2. Конфигурирайте безжичната среда.
а: Свържете своя безжичен рутер с входа за прав ток, след което го включете в
контакт.
б: С помощта на мрежов кабел, свържете компютъра си с LAN порта на
безжичния рутер.
ВАЖНО! Уверете се, че WAN и LAN индикаторите мигат.
в: С помощта на друг мрежов кабел свържете модема си с WAN порта на
безжичния рутер.
г: Свържете адаптера за променлив ток на модема с входа за прав ток, след което
го
включете в контакт.
български
RT-AC66U
Computer
Modem
LAN
Power
Wall Power Outlet
Power
WAN
EEU7417_RT-AC66U_QSG.indd 21 5/22/12 5:59:16 PM
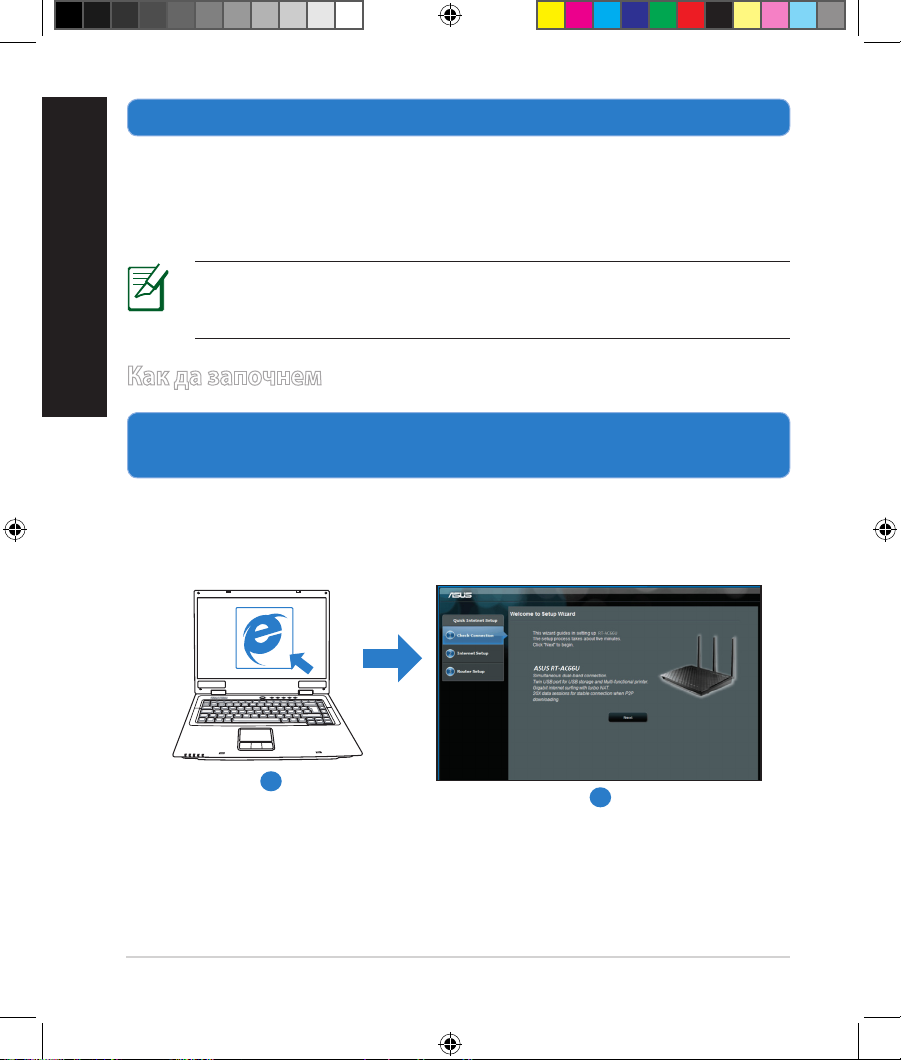
22
3. Блокирайте някои настройки на компютъра.
A. Деактивирайте прокси сървъра, ако е активиран.
B. Конфигурирайте TCP/IP настройките за автоматично получаване на IP
адрес.
C. Деактивирайте комутируемата връзка, ако е активирана.
ЗАБЕЛЕЖКА: По-подробни сведения за блокирането на
настройките на компютъра ще намерите в Често задавани
въпроси (FAQs).
1.
Конфигурирайте своите безжични настройки чрез уеб графичен
потребителски интерфейс (уеб GUI).
а: Стартирайте своя уеб браузър като Internet Explorer, Firefox, Google
Chrome и Safari.
Как да започнем
български
b
a
EEU7417_RT-AC66U_QSG.indd 22 5/22/12 5:59:18 PM
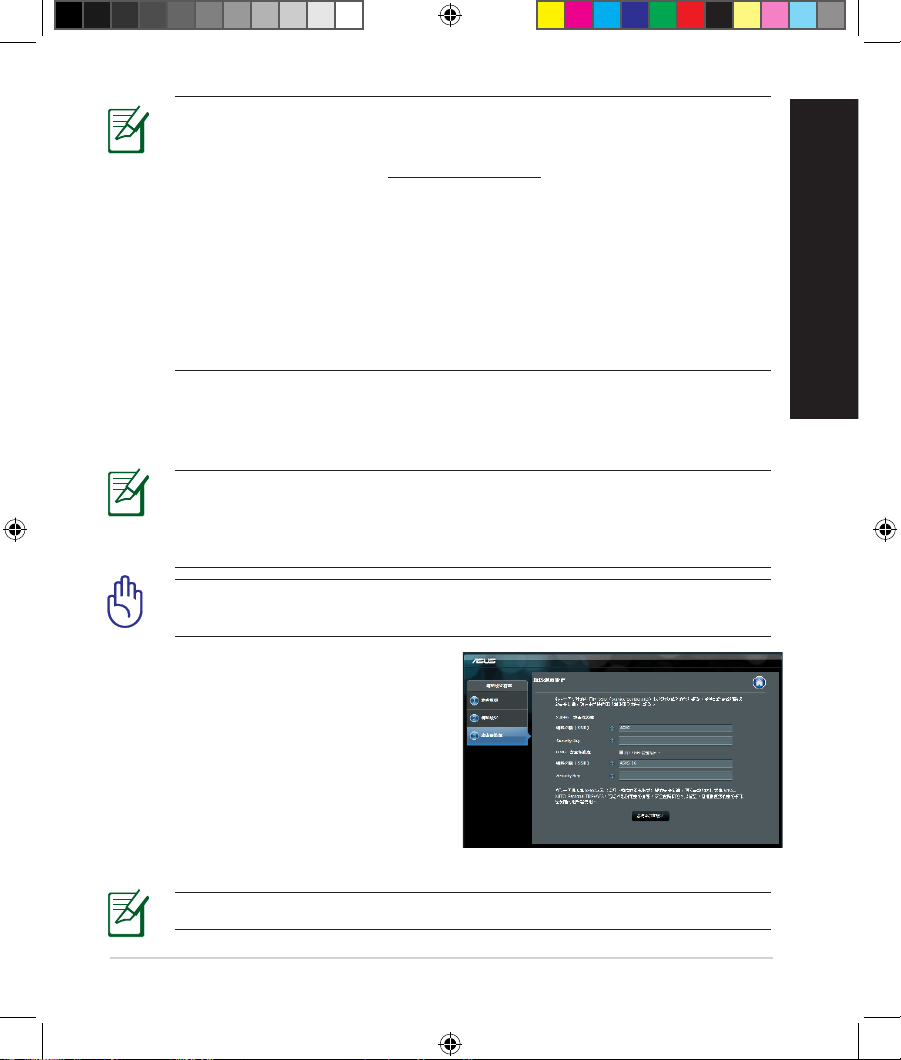
23
български
ЗАБЕЛЕЖКИ: Ако QIS (БИН) не стартира автоматично, изпълнете
следното за ръчно стартиране на QIS:
• От браузера извикайте
http://192.168.1.1 и стартирайте отново
помощната програма Quick Internet Setup (QIS) Wizard – Помощник за
бързи интернет настройки (БИН).
• Деактивирайте настройките на прокси сървъра и комутируемата
връзка, след което конфигурирайте TCP/IP настройките за
автоматично получаване на IP адрес. За повече информация, вижте
раздел
Често задавани въпроси (FAQs)
или използвайте Setup
Wizard (Съветник за настройка) от помощния CD диск за автоматична
диагностика.
b: функцията за бързи интернет настройки (QIS) на рутера автоматично
определя дали ISP връзката е от вида Dynamic IP,
PPPoE, PPTP, L2TP или Static IP. Въведете необходимата информация за
вида на връзката.
ВАЖНО! Необходимата информация за вида на интернет връзката
ще получите от вашия интернет доставчик (ISP).
ЗАБЕЛЕЖКА: Автоматичното определяне на ISP връзката се
осъществява при първото конфигуриране на безжичния рутер или
след като са били върнати началните подразбиращи се настройки
на рутера.
ЗАБЕЛЕЖКА: Можете да зададете мрежово име до 32 символа.
c: Задайте мрежово име (SSID) и ключ за
защита на безжичните връзки 2,4GHz
и 5GHz. След завършване щракнете
Apply (Прилагане).
d: На екрана се извеждат безжичните
настройки. Щракнете Next
(Следващ), за да продължите.
e: Прочетете ръководството за
безжична мрежова връзка. След
завършване щракнете Finish (Край).
EEU7417_RT-AC66U_QSG.indd 23 5/22/12 5:59:19 PM
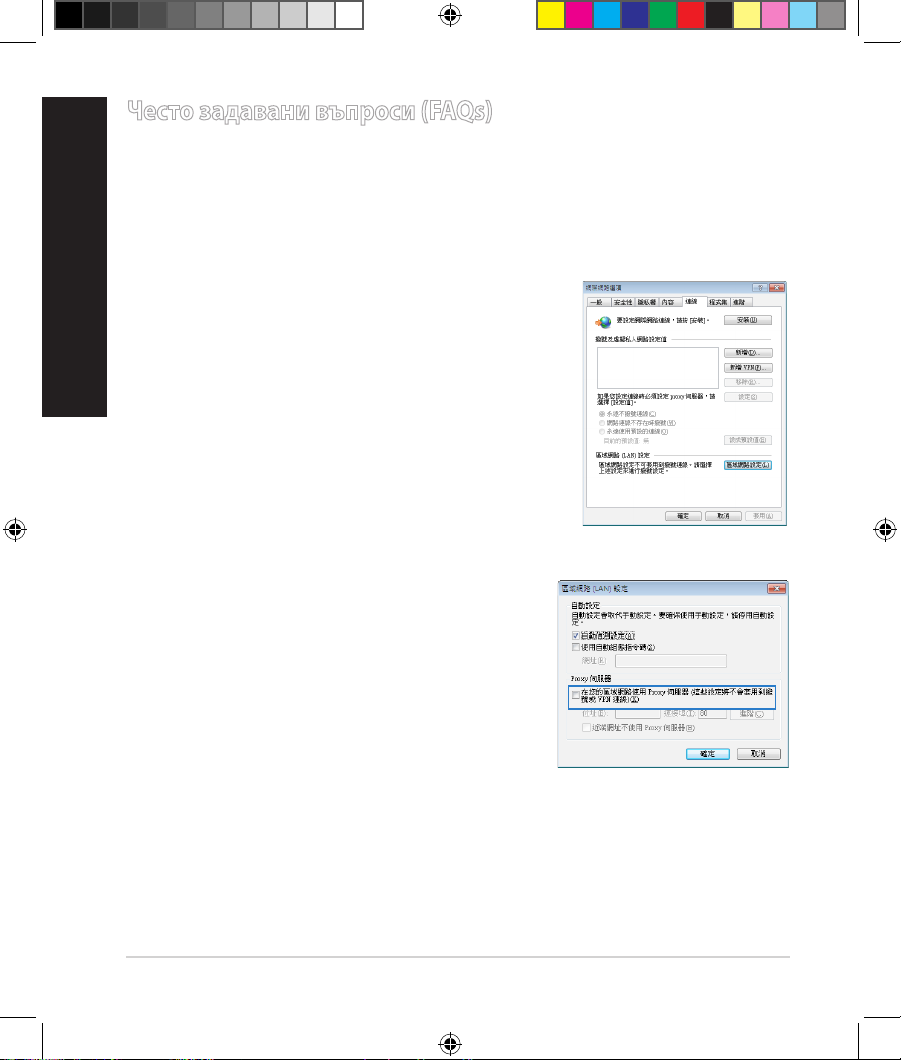
24
Често задавани въпроси (FAQs)
Следвах всички стъпки, но нямам достъп до графичния мрежов
потребителски интерфейс (web GUI) на безжичния рутер, за да
конфигурирам неговите настройки.
A. Деактивирайте прокси сървъра, ако е активиран.
Windows® 7
1. Щракнете върху Start (Старт) > Internet
Explorer, за да стартирате уеб браузъра.
2. Щракнете върху Tools (Инструменти) >
Internet options (Опции за интернет) > раздел
Connections (Връзки) > LAN settings (LAN
настройки).
3. От екрана Local Area Network (LAN) Settings
(Настройки на локална мрежа), махнете
отметката в Use a proxy server for your LAN
(Използвайте прокси сървър за Вашата
локална мрежа).
4. Щракнете върху OK (ОК), когато сте готови.
български
EEU7417_RT-AC66U_QSG.indd 24 5/22/12 5:59:20 PM
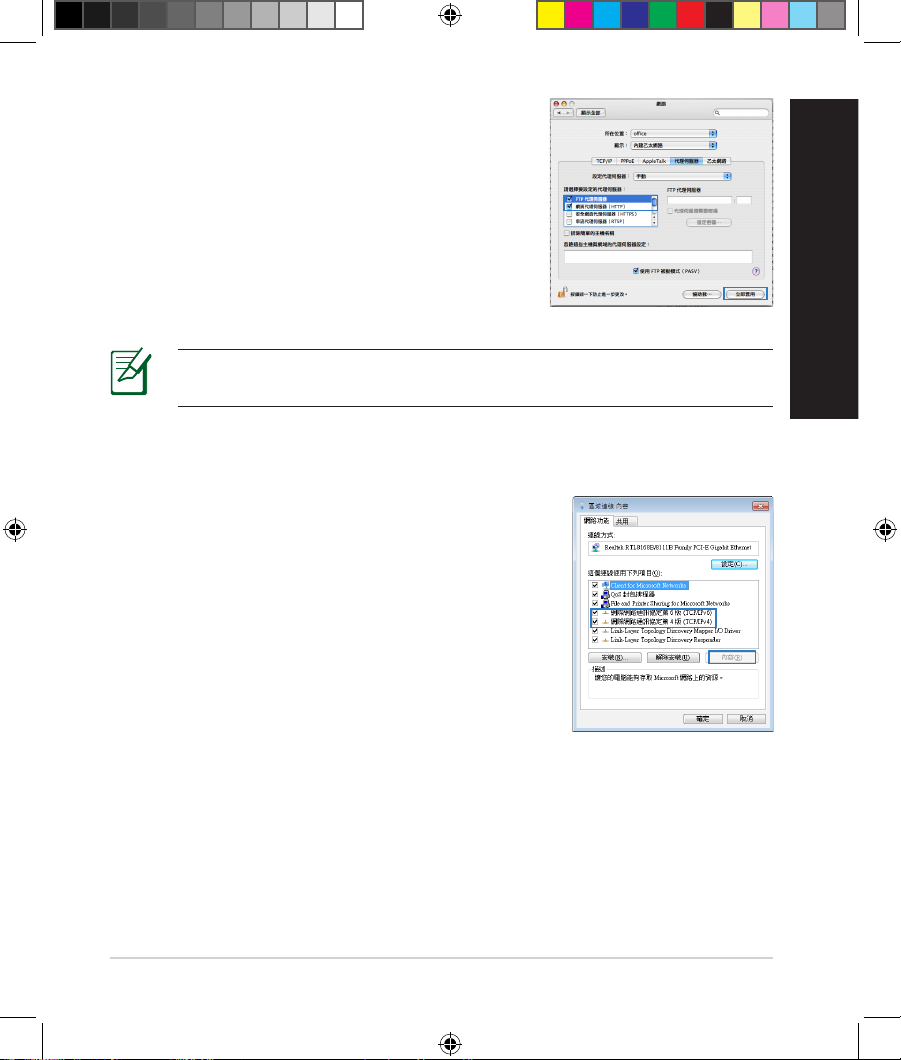
25
MAC OS
1. От лентата с менюто щракнете върху Safari >
Preferences… (Предпочитания…) > раздел
Advanced (Разширени) > Change Settings…
(Промяна на настройки…)
2. От списъка с протоколи премахнете FTP
Proxy (FTP прокси) и Web Proxy (HTTPS) (Уеб
прокси (HTTPS)).
3. Щракнете върху Apply Now (Приложи сега),
когато сте готови.
ЗАБЕЛЕЖКА: Вижте помощните указания в справочника help на
браузера как да блокирате прокси сървъра.
B. Конфигурирайте TCP/IP настройките за автоматично получаване на IP
адрес.
Windows® 7
1. Щракнете върху
Start (Старт) > Control Panel
(Контролен панел) > Network and Internet
(Мрежа и интернет) > Network and Sharing
Center (Център за мрежи и интернет) >
Manage networkconnections (Управление на
мрежовите връзки).
2. Изберете
Internet Protocol Version 4 (TCP/IPv4)
(Интернет протокол версия 4(TCP/IPv4)) и
натиснете Properties (Свойства).
български
EEU7417_RT-AC66U_QSG.indd 25 5/22/12 5:59:20 PM
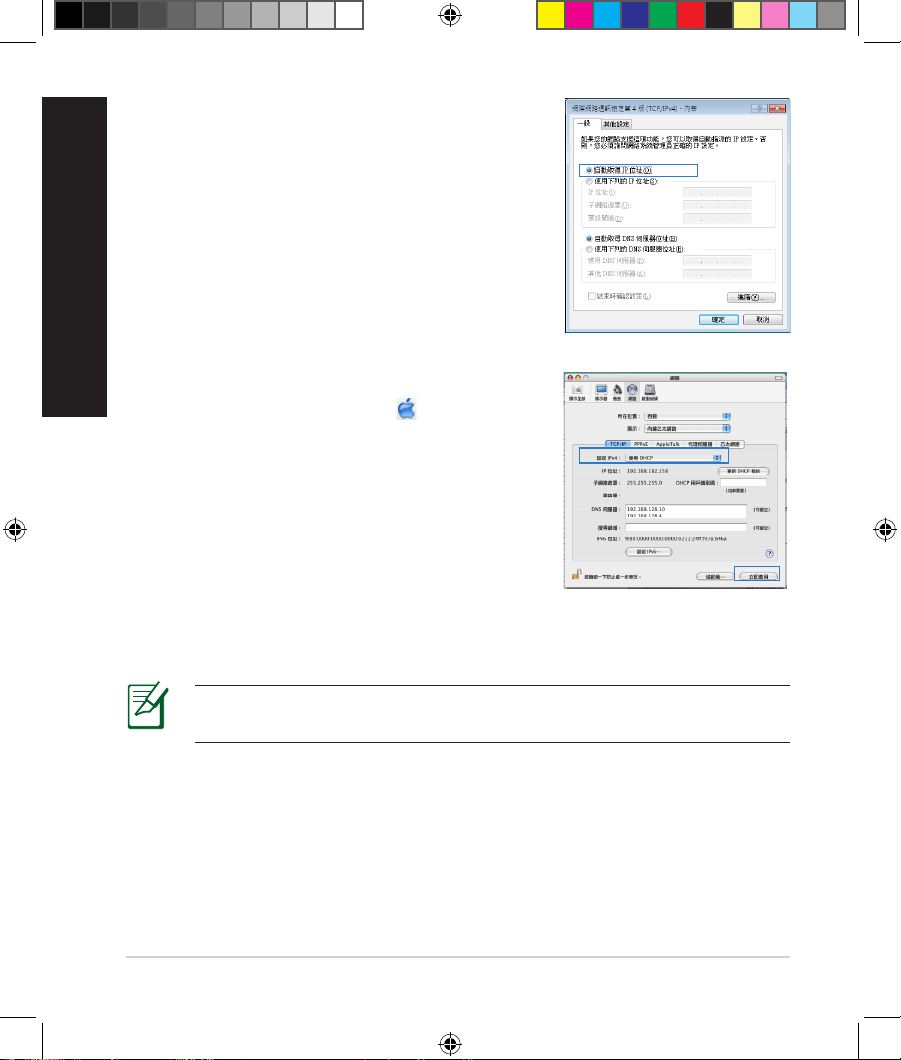
26
3. За автоматично задаване на настройки iPv4 IP
изберете Obtain an IP address automatically
(Получавай автоматично IP адрес).
4. Щракнете върху
OK (ОК), когато сте готови.
MAC OS
1. Щракнете иконата на Apple горния ляв ъгъл
на екрана.
2. Щракнете върху иконата на System
Preferences (Системни предпочитания)
> Network (Мрежа) > Congure…
(Конфигуриране…)
3. В прозорчето TCP/IP изберете
Using DHCP (използване на DHCP) в падащия
списък Congure IPv4 (конфигуриране на
IPv4).
4. Щракнете върху Apply Now (Приложи сега), когато сте готови.
ЗАБЕЛЕЖКА: Вижте помощните указания на вашата операционна
система за конфигуриране на TCP/IP настройките на компютъра.
български
EEU7417_RT-AC66U_QSG.indd 26 5/22/12 5:59:21 PM
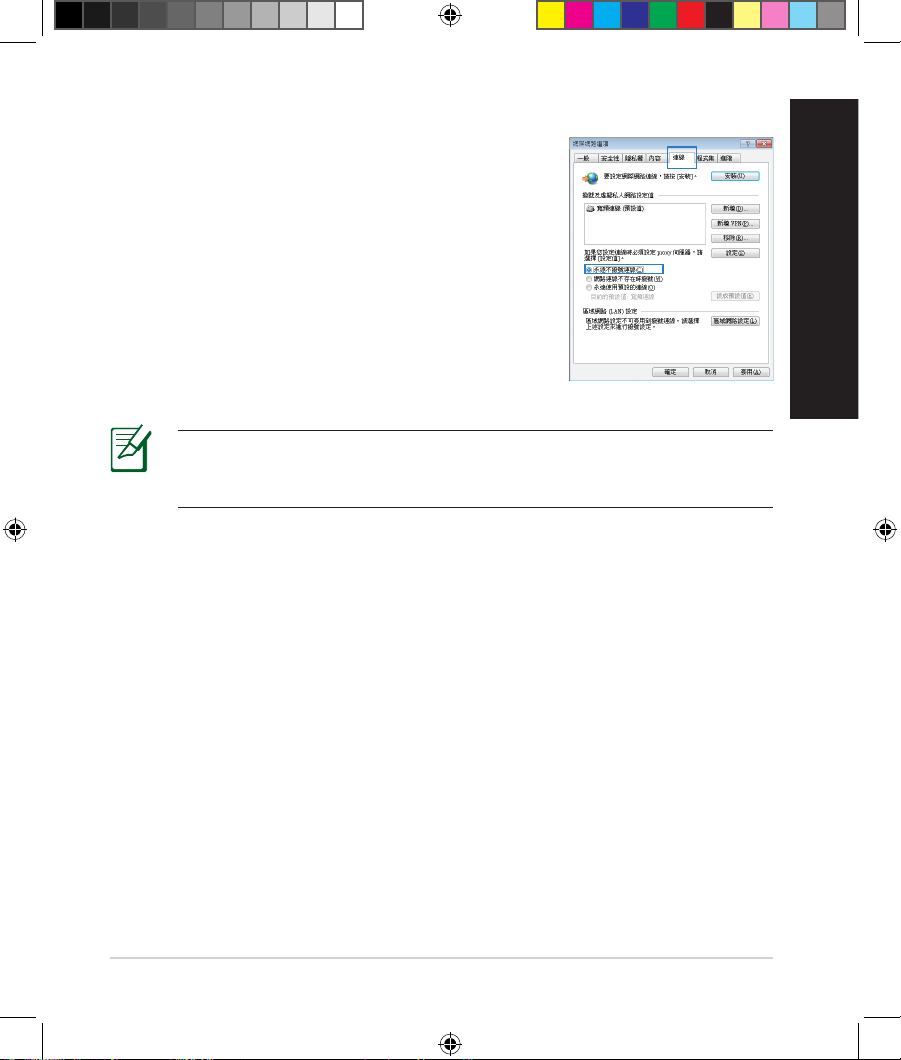
27
C. Деактивирайте комутируемата връзка, ако е активирана.
D. Затворете всички работещи мрежови браузери.
ЗАБЕЛЕЖКА: Вижте помощните указания в справочника help на
браузера как да блокирате настройките на комутируемата връзка
по телефона.
Windows® 7
1. Щракнете върху Start (Старт) > Internet
Explorer, за да стартирате уеб браузъра.
2. Щракнете върху Tools (Инструменти) >
Internet options (Интернет опции)> раздел
Connections (Връзки).
3. Сложете отметка в Never dial a connection
(Никога не набирай връзка).
4. Щракнете върху OK (ОК), когато сте готови.
Клиентът не може да установи безжична връзка чрез рутера.
Извън диапазона:
• Преместете рутера по-близо да безжичния клиент.
• Опитайте да промените настройките на каналите.
Потвърждение:
• Използвайте кабелна връзка за свързване с рутера.
• Проверете настройките за безжична защита.
• Натиснете бутон Reset (възстановяване) на задния панел за повече от
пет секунди.
български
EEU7417_RT-AC66U_QSG.indd 27 5/22/12 5:59:22 PM

28
български
Не мога да открия рутера:
• Натиснете бутон Reset (възстановяване) на задния панел за повече от
пет секунди.
• Проверете настройките на безжичния адаптер — SSID и настройки за
криптиране.
Нямам достъп до интернет през безжичния LAN адаптер.
• Преместете рутера по-близо да безжичния клиент.
• Проверете дали безжичният адаптер е свързан с подходящия безжичен
рутер.
• Проверете дали използваният безжичен канал съответства на
разрешените канали във вашата страна и област.
• Проверете настройките за криптиране.
• Проверете дали връзката ADSL или кабел е изправна.
• Опитайте отново, като използвате друг Ethernet (етернет) кабел.
Ако индикаторът ADSL “LINK” (връзка) мига непрекъснато или не свети,
достъпът до интернет е невъзможен – рутерът не може да установи
връзка с ADSL мрежата.
• Проверете дали всички кабели са правилно свързани.
• Откачете захранващия кабел на ADSL или кабелния модем, изчакайте
няколко минути и го свържете отново.
• Ако индикаторът на ADSL продължава да мига или не свети, свържете се
с доставчика на ADSL услуги.
Забравено е името на мрежата или ключовете за защита.
• Опитайте отново да конфигурирате безжичната мрежа и настройките на
безжичното шифроване.
• Натиснете бутона Reset (Нулиране) за повече от пет секунди, за да
нулирате или възстановите фабричните настройки по подразбиране на
системата.
• Фабрични настройки по подразбиране:
EEU7417_RT-AC66U_QSG.indd 28 5/22/12 5:59:22 PM

29
български
Потребителско име/ Парола:
admin / admin
IP адрес:
192.168.1.1
SSID: ASUS
Къде мога да намеря допълнителна информация за безжичния рутер?
• В ръководството на потребителя на помощния CD диск
• Онлайн, на сайта с въпроси и отговори: http://support.asus.com/faq
• На сайта за техническа поддръжка: http://support-org.asus.com/
• На горещата линия за обслужване на клиенти: Вижте горещата линия за
поддръжка в Допълнително ръководство.
SUPPORT HOTLINE
Area Hotline Number Support
Languages
Availability
Taiwan 0800-093-456;
02-81439000
Traditional
Chinese
Mon. to Fri.
9:00-12:00;
13:30-18:00
USA/
Canada
1-812-282-2787 English Mon. to Fri.
8:30-12:00am EST
(5:30am-9:00pm PST)
Sat. to Sun.
9:00am-6:00pm EST
(6:00am-3:00pm PST)
Brazil 4003 0988 (Capital) Portuguese
Mon. to Fri.
9:00am-18:00
0800 880 0988
(demais localidades)
EEU7417_RT-AC66U_QSG.indd 29 5/22/12 5:59:23 PM
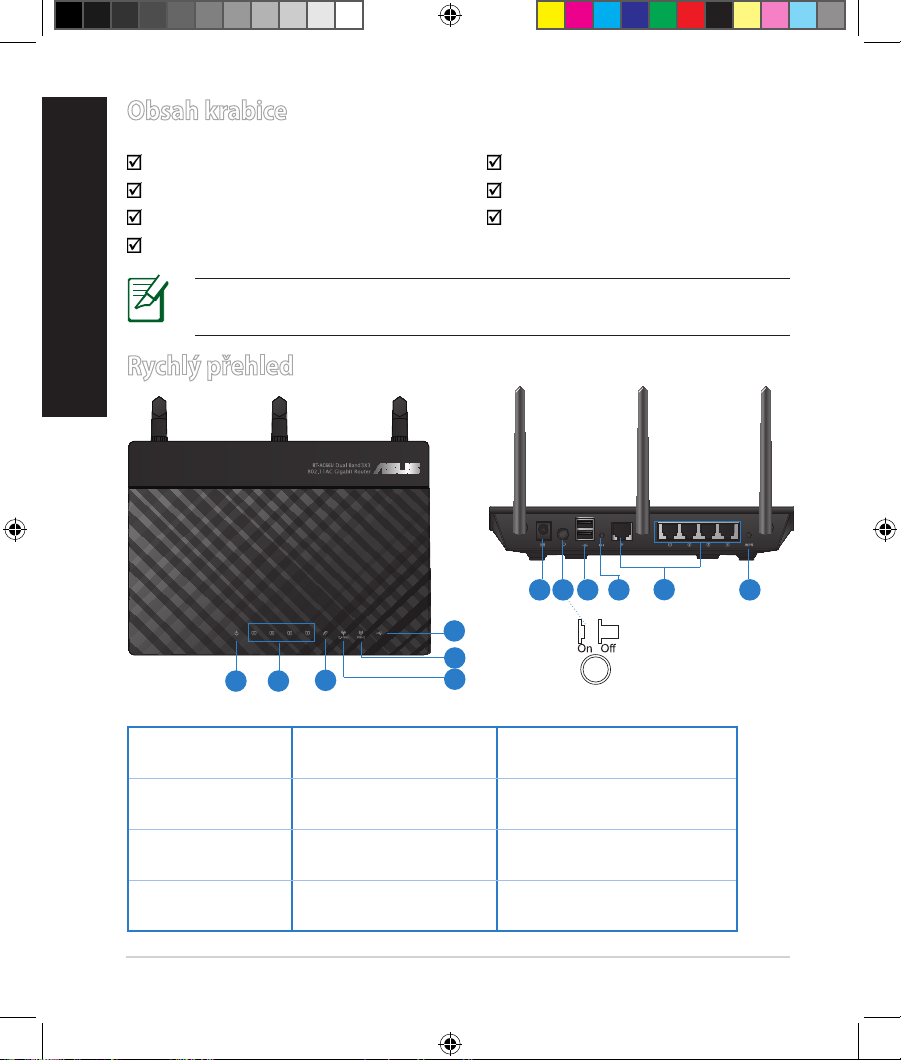
30
Čeština
Obsah krabice
RT-AC66U Napájecí adaptér
Síťový kabel Stručná příručka
Podpůrný disk CD (příručka, nástroje) Záruční karta
Stojánek
Rychlý přehled
1) Indikátor LED
napájení
5) Indikátor LED
5GHz
9) Porty USB 2.0
2) Indikátor LED
LAN
6) Indikátor LED USB
2.0
10) Resetovací tlačítko
3) Indikátor LED
WAN
7) Napájecí port
(DC-IN)
11) Porty internet a LAN
4) Indikátor LED
2.4GHz
Síťový vypínač 12) WPS tlačítko
POZNÁMKA: Pokud je některá z položek poškozena nebo chybí, se
obraťte na prodejce.
7 9 10 12
11
8
1 2
3
5
6
4
EEU7417_RT-AC66U_QSG.indd 30 5/22/12 5:59:24 PM
Loading…
Manufacturer:ASUS
Category:Computers & Peripherals
Device:ASUS RT-AC66U
Name:User’s manual
Language:Svenska
Pages:130
Size:8.89 MB
Manufacturer:ASUS
Category:Computers & Peripherals
Device:ASUS RT-AC66U
Name:How to install Mac Utility on router
Pages:2
Size:308.90 KB
Manufacturer:ASUS
Category:Computers & Peripherals
Device:ASUS RT-AC66U
Name:QSG (Quick Start Guide)
Version:APAC7417
Pages:85
Size:4.37 MB
Manufacturer:ASUS
Category:Computers & Peripherals
Device:ASUS RT-AC66U
Name:User’s manual
Language:Suomi
Pages:130
Size:9.08 MB
Manufacturer:ASUS
Category:Computers & Peripherals
Device:ASUS RT-AC66U
Name:User’s manual
Version:FI7891
Pages:130
Size:9.08 MB
Manufacturer:ASUS
Category:Computers & Peripherals
Device:ASUS RT-AC66U
Name:QSG (Quick Start Guide)
Language:БългарскиČeštinaEnglishEestiHrvatskiMagyarLatviešuPolskiRomânăРусскийSlovenskiSrpskiTürkçe
Version:EEU8262
Pages:174
Size:11.37 MB
DescriptionASUS RT-AC66U QSG (Quick Start Guide) for East European
Language: English, Bulgarian, Czech, Estonian, Hungarian, Latvian,
Lithuanian, Polish, Romanian, Russian, Slovensky, Turkish,
Ukrainian, Croatian, Serbian, Slovenian
View ASUS RT-AC66U QSG (Quick Start Guide) EEU8262 (Български, Čeština, English, Eesti, Hrvatski, Magyar, Latviešu, Polski, Română, Русский, Slovenski, Srpski, Türkçe)
Manufacturer:ASUS
Category:Computers & Peripherals
Device:ASUS RT-AC66U
Name:QSG (Quick Start Guide)
Language:DeutschΕλληνικάEnglishEspañolSuomiFrançaisItalianoNederlandsNorskPortuguêsSvenska
Version:WEU8262
Pages:136
Size:9.51 MB
DescriptionASUS RT-AC66U QSG (Quick Start Guide) for West European
Language: English, Dutch, Finnish, French, German, Norwegian,
Danish, Swedish, Greek, Italian, Portuguese, Spanish
View ASUS RT-AC66U QSG (Quick Start Guide) WEU8262 (Deutsch, Ελληνικά, English, Español, Suomi, Français, Italiano, Nederlands, Norsk, Português, Svenska)
Manufacturer:ASUS
Category:Computers & Peripherals
Device:ASUS RT-AC66U
Name:User’s manual
Language:English
Pages:131
Size:8.28 MB
Manufacturer:ASUS
Category:Computers & Peripherals
Device:ASUS RT-AC66U
Name:User’s manual
Version:E7891
Pages:131
Size:8.28 MB
Manufacturer:ASUS
Category:Computers & Peripherals
Device:ASUS RT-AC66U
Name:User’s manual
Language:中文中文(简体)
Pages:70
Size:6.75 MB
Manufacturer:ASUS
Category:Computers & Peripherals
Device:ASUS RT-AC66U
Name:User’s manual
Language:Čeština
Pages:70
Size:7.40 MB
Manufacturer:ASUS
Category:Computers & Peripherals
Device:ASUS RT-AC66U
Name:User’s manual
Language:English
Pages:70
Size:6.92 MB
Manufacturer:ASUS
Category:Computers & Peripherals
Device:ASUS RT-AC66U
Name:User’s manual
Language:Français
Pages:71
Size:6.09 MB
Manufacturer:ASUS
Category:Computers & Peripherals
Device:ASUS RT-AC66U
Name:User’s manual
Language:Deutsch
Pages:70
Size:7.37 MB
Manufacturer:ASUS
Category:Computers & Peripherals
Device:ASUS RT-AC66U
Name:User’s manual
Language:Ελληνικά
Pages:70
Size:6.66 MB
Manufacturer:ASUS
Category:Computers & Peripherals
Device:ASUS RT-AC66U
Name:User’s manual
Language:Magyar
Pages:70
Size:7.35 MB
Manufacturer:ASUS
Category:Computers & Peripherals
Device:ASUS RT-AC66U
Name:User’s manual
Language:Italiano
Pages:71
Size:7.33 MB
Manufacturer:ASUS
Category:Computers & Peripherals
Device:ASUS RT-AC66U
Name:User’s manual
Language:Português
Pages:70
Size:7.26 MB
Manufacturer:ASUS
Category:Computers & Peripherals
Device:ASUS RT-AC66U
Name:User’s manual
Language:Polski
Pages:70
Size:6.80 MB
Manufacturer:ASUS
Category:Computers & Peripherals
Device:ASUS RT-AC66U
Name:User’s manual
Language:Русский
Pages:70
Size:7.37 MB
Manufacturer:ASUS
Category:Computers & Peripherals
Device:ASUS RT-AC66U
Name:User’s manual
Language:Română
Pages:70
Size:7.08 MB
Manufacturer:ASUS
Category:Computers & Peripherals
Device:ASUS RT-AC66U
Name:User’s manual
Language:Español
Pages:70
Size:7.39 MB
Manufacturer:ASUS
Category:Computers & Peripherals
Device:ASUS RT-AC66U
Name:User’s manual
Language:中文中文(繁體)
Pages:69
Size:6.80 MB
Manufacturer:ASUS
Category:Computers & Peripherals
Device:ASUS RT-AC66U
Name:User’s manual
Language:Türkçe
Pages:70
Size:7.39 MB
Manufacturer:ASUS
Category:Computers & Peripherals
Device:ASUS RT-AC66U
Name:User’s manual
Version:C7415
Pages:70
Size:6.75 MB
Manufacturer:ASUS
Category:Computers & Peripherals
Device:ASUS RT-AC66U
Name:User’s manual
Version:CZ7415
Pages:70
Size:7.40 MB
Manufacturer:ASUS
Category:Computers & Peripherals
Device:ASUS RT-AC66U
Name:User’s manual
Version:E7415
Pages:70
Size:6.92 MB
Manufacturer:ASUS
Category:Computers & Peripherals
Device:ASUS RT-AC66U
Name:User’s manual
Version:F7415
Pages:71
Size:6.09 MB
Manufacturer:ASUS
Category:Computers & Peripherals
Device:ASUS RT-AC66U
Name:User’s manual
Version:G7415
Pages:70
Size:7.37 MB
Manufacturer:ASUS
Category:Computers & Peripherals
Device:ASUS RT-AC66U
Name:User’s manual
Version:GK7415
Pages:70
Size:6.66 MB
Manufacturer:ASUS
Category:Computers & Peripherals
Device:ASUS RT-AC66U
Name:User’s manual
Version:HUG7415
Pages:70
Size:7.35 MB
Manufacturer:ASUS
Category:Computers & Peripherals
Device:ASUS RT-AC66U
Name:User’s manual
Version:I7415
Pages:71
Size:7.33 MB
Manufacturer:ASUS
Category:Computers & Peripherals
Device:ASUS RT-AC66U
Name:User’s manual
Version:PG7415
Pages:70
Size:7.26 MB
Manufacturer:ASUS
Category:Computers & Peripherals
Device:ASUS RT-AC66U
Name:User’s manual
Version:PL7415
Pages:70
Size:6.80 MB
Manufacturer:ASUS
Category:Computers & Peripherals
Device:ASUS RT-AC66U
Name:User’s manual
Version:R7415
Pages:70
Size:7.37 MB
Manufacturer:ASUS
Category:Computers & Peripherals
Device:ASUS RT-AC66U
Name:User’s manual
Version:RO7415
Pages:70
Size:7.08 MB
Manufacturer:ASUS
Category:Computers & Peripherals
Device:ASUS RT-AC66U
Name:User’s manual
Version:S7415
Pages:70
Size:7.39 MB
Manufacturer:ASUS
Category:Computers & Peripherals
Device:ASUS RT-AC66U
Name:User’s manual
Version:T7415
Pages:69
Size:6.80 MB
Manufacturer:ASUS
Category:Computers & Peripherals
Device:ASUS RT-AC66U
Name:User’s manual
Version:TR7415
Pages:70
Size:7.39 MB
Manufacturer:ASUS
Category:Computers & Peripherals
Device:ASUS RT-AC66U
Name:QSG (Quick Start Guide)
Version:APAC7417
Pages:77
Size:6.11 MB
Manufacturer:ASUS
Category:Computers & Peripherals
Device:ASUS RT-AC66U
Name:QSG (Quick Start Guide)
Version:EEU7417
Pages:194
Size:12.48 MB
Manufacturer:ASUS
Category:Computers & Peripherals
Device:ASUS RT-AC66U
Name:QSG (Quick Start Guide)
Version:NA7417
Pages:76
Size:5.77 MB
Manufacturer:ASUS
Category:Computers & Peripherals
Device:ASUS RT-AC66U
Name:QSG (Quick Start Guide)
Version:WEU7417
Pages:181
Size:11.22 MB