
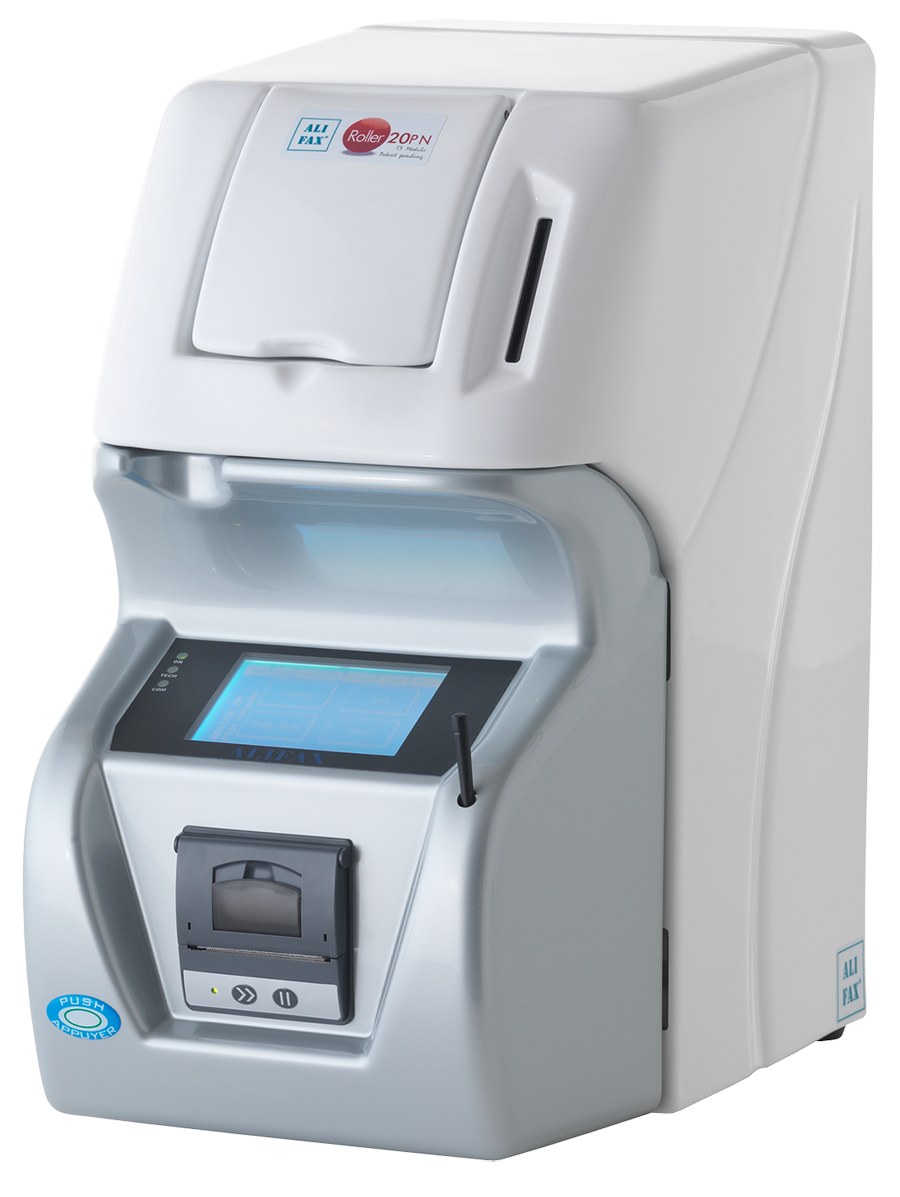
Описание анализатора Alifax Roller 20 PN
Alifax Roller 20 PN автоматический анализатор СОЭ позволяет получить точный результат за 20 секунд из капиллярной крови с ЭДТА. Вместе с автоматическим гематологическим анализатором обеспечивает доступность результата полного общего анализа крови (анализ клеточного состава крови и анализ СОЭ) за 60 секунд. Точность анализа гарантируется соответствием метода всем рекомендациям ВОЗ и CLSI, а также возможностью включения анализа СОЭ в систему контроля качества (наличие контролей и калибраторов). Наличие системы перемешивания образца, термостататирования, поддерживающего постоянную температуру и калиброванного многоразового капилляра обеспечивает стандартизацию аналитической процедуры определения СОЭ.
Roller PN обеспечивает сокращение расходов лаборатории. Roller не требует для определения СОЭ отдельного сбора крови, кровь с ЭДТА, которая используется для автоматического гематологического анализа применяется для анализа СОЭ. Roller минимизирует расход материалов для определения СОЭ: не требуется капилляр, нет расходов на дополнительный сбор крови, нет расходов на обработку многоразовых материалов. Для проведения анализа СОЭ не требуется жидких реагентов с ограниченным сроком годности. Используется только магнитная Смарт-карта, имеющая неограниченный срок хранения и без специальных требований к условиям хранения. Функция самодиагносики, автопромывка с использованием только дистиллированной воды.
Особенности Alifax Roller 20 PN
- Результат за первые 20 секунд агрегации эритроцитов;
- Первый результат через 5 минут от начала анализа;
- Не требует реагентов;
- Результаты в мм/ч шкалы Вестергрена;
- Высокая корреляция с референсным методом Вестергрена;
- Отсутствие влияния низкого гематокрита на результат;
- 100 мкл капиллярной крови с ЭДТА на исследование при ручной подаче и 175 мкл венозной крови с ЭДТА на исследование при автоматической подаче;
- Общий объем крови в пробирке (с учетом мертвого объема): 200 мкл капиллярной и 800 мкл венозной;
- Общий объем крови в пробирки (с учетом мертвого объема) 800 мкл;
- Работа со стандартными вакуумными и педиатрическими пробирками для общего анализа крови;
- Латексные контроли и калибраторы;
- Единственный расходный материал – смарт-карты с тест-единицами;
- Измерение при фиксированной температуре 37°C;
- Автоматическое перемешивание образца в соответствии с требованиями CLSI*;
- Сенсорный экран;
- Дружественный пользователю интерфейс, русскоязычное ПО;
- Совместимость с ЛИС;
- Простая процедура замены иглы;
- Встроенный термопринтер;
- Автоматическая промывка.
Технические характеристики Alifax Roller 20 PN
- Принцип работы: Микрофотометрический капиллярный анализ по принципу «остановленной струи»; измерение кинетики агрегации эритроцитов на начальном участке сигмоидной кривой седиментации с последующей математической обработкой, позволяющей преобразовать полученный результат в общепринятые единицы СОЭ
- Длина волны регистрации сигнала: 620 нм
- Параметры регистрации сигнала: 1000 считываний, 20 секунд, 37°С
- Тип используемой пробы: Венозная кровь с ЭДТА, Капиллярная кровь (при заборе пробы внешней иглой)
- Рабочий объем пробы: 175 мкл (первые две пробы по 225 мкл), при заборе пробы внешней иглой — 100 мкл (первая проба 150 мкл)
- Вместимость: 20 проб
- Производительность: 75проб/час
- Время до первого результата: 5 мин
- Ед/измерения: мм/ч (корреляция с методом Вестергрена)
- Электрические параметры: 85-264 В, 47-63 Гц (Саморегулировка выбора напряжения )
- Потребление энергии: 66 Вт (при включении 132 Вт)
- Размеры: 24 х 38 х 45 см
- Вес: 16 кг
- Требования к окружающей среде: Температура 10-30°С, Влажность 15-85% (без конденсата)
- Расходные материалы: Термобумага, смарт-карты с тест-единицами, латексные контроли
- Возможность подключения к компьютеру: Через последовательный порт RS232
- Возможность использования пробирок со штрих-кодом: Да (дополнительно нужен внешний сканер штрих-кодов).
- Производительность, тестов/час: 75
- Принтер: Встроенный
- Подключение к ЛИС: Да
- Считыватель штрих-кода: Внешний, Встроенный
- Тип прибора: Автоматический
- Единовременная загрузка, проб: 20
- Выдача результатов по Панченкову: Нет
- Диапазон измерения, мм/час: 2-120
- Тип исследуемого образца: Венозная кровь, Капиллярная кровь
- Минимальный объем образца, мл: 0.8, 0.2
- Расход пробы анализатором: Расходует
- Реагенты: Промывающие растворы
- Отсутствие жидких отходов: Нет
- Температурная коррекция: Нет
- Требования к пробиркам: Первичные пробирки
FAQ: Types of Manuals and Their Contents
Alifax Roller 20 Manuals come in various types, each serving a specific purpose to help users effectively operate and maintain their devices. Here are the common types of Alifax Roller 20 User Guides and the information they typically include:
- User Manuals: Provide comprehensive instructions on how to use the device, including setup, features, and operation. They often include troubleshooting tips, safety information, and maintenance guidelines.
- Service Instructions: Designed for technicians and repair professionals, these manuals offer detailed information on diagnosing and repairing issues with the device. They include schematics, parts lists, and step-by-step repair procedures.
- Installation Guides: Focus on the installation process of the device, providing detailed instructions and diagrams for proper setup. They are essential for ensuring the device is installed correctly and safely.
- Maintenance Manuals: Provide guidance on routine maintenance tasks to keep the device in optimal condition. They cover cleaning procedures, part replacements, and regular servicing tips.
- Quick Start Guides: Offer a concise overview of the essential steps needed to get the device up and running quickly. They are ideal for users who need immediate assistance with basic setup and operation.
Each type of Alifax Roller 20 instruction is designed to address specific needs, ensuring users have the necessary information to use, maintain, and repair their devices effectively.
Related Instructions for Alifax Roller 20:
2
Roller 20
Service manual #Q4NK9O: Roller 20 Measuring Instruments Service manual
172
1360
259
Measuring Instruments Devices by Other Brands:
|
Wisco Industries DP70 Manual DP70 (Measuring Instruments ePDF User Guide, #611F51) WISCO DP70 Manual V2.0 25 Feb 2025 | 17 |
|
|
Ametek BARBEN ANALYTICAL OXY visor Installation, Operation And Maintenance Manual BARBEN ANALYTICAL OXY visor Installation, operation and maintenance manual — IE56X2 IOM (Safety) — 16 May 2025 | 24 |
|
|
ABB 6553 Series Instruction Manual #D88J3Q: 6553 Series Measuring Instruments Instruction manual Model 6553 Series (ATEX) 12 Dec 2024 | 48 |
|
|
MRC CD-4303 Operation Manual CD-4303 Operation manual — 4E98D2 CODUCTIVITY METER 29 Mar 2025 | 12 |
Categories:
Measuring Instruments
Артикул: SI R20-PN
Производитель: Alifax
Анализаторы СОЭ Alifax – единственные на рынке, обеспечивающие получение результата в течение 20 секунд благодаря измерению скорости агрегации эритроцитов, что позволяет преодолеть ограничения и зависимость от переменных факторов методов определения СОЭ, основанных на явлении оседания, также упоминаются в документе CLSI*
Письмо Росздравнадзора о смарт-картах Alifax »
Задать вопрос менеджеру
Специалист по продукту Alifax
Наталия Савостина
+7 (495) 748-43-50/51 доб.1413
ПРЕИМУЩЕСТВА
- Результат за первые 20 секунд агрегации эритроцитов
- Первый результат через 5 минут от начала анализа
- Не требует реагентов
- Результаты в мм/ч шкалы Вестергрена
- Высокая корреляция с референсным методом Вестергрена
- Отсутствие влияния низкого гематокрита на результат
- 100 мкл капиллярной крови с ЭДТА на исследование при ручной подаче и 175 мкл венозной крови с ЭДТА на исследование при автоматической подаче
- Общий объем крови в пробирке (с учетом мертвого объема): 200 мкл капиллярной и 800 мкл венозной
- Общий объем крови в пробирки (с учетом мертвого объема) 800 мкл
- Работа со стандартными вакуумными и педиатрическими пробирками для общего анализа крови
- Латексные контроли и калибраторы
- Единственный расходный материал – смарт-карты с тест-единицами
- Измерение при фиксированной температуре 37°C
- Автоматическое перемешивание образца в соответствии с требованиями CLSI*
- Сенсорный экран
- Дружественный пользователю интерфейс, русскоязычное ПО
- Совместимость с ЛИС
- Простая процедура замены иглы
- Встроенный термопринтер
- Автоматическая промывка
CLSI H02-A5 Процедура определения СОЭ, Одобренный стандарт 5-е издание Том 31 № 11
Технические характеристики
| Принцип работы |
Количественная капиллярная фотометрия для определения скорости оседания эритроцитов (СОЭ) |
| Длина волны регистрации сигнала | 620 нм |
| Параметры регистрации сигнала | 1000 считываний, 20 секунд, 37°С |
| Тип используемой пробы | Венозная кровь с ЭДТА Капиллярная кровь (при заборе пробы внешней иглой) |
| Рабочий объем пробы | 175 мкл (первые две пробы по 225 мкл), при заборе пробы внешней иглой — 100 мкл (первая проба 150 мкл) |
| Вместимость | 20 проб |
| Производительность | 75проб/час |
| Время до первого результата | 5 мин |
| Ед/измерения | мм/ч (корреляция с методом Вестергрена) |
| Электрические параметры | 85-264 В, 47-63 Гц (Саморегулировка выбора напряжения ) |
| Потребление энергии | 66 Вт (при включении 132 Вт) |
| Размеры | 24 х 38 х 45 см |
| Вес | 16 кг |
| Требования к окружающей среде | Температура 10-30°С, Влажность 15-85% (без конденсата) |
| Расходные материалы | Термобумага, смарт-карты с тест-единицами, латексные контроли |
| Возможность подключения к компьютеру | Через последовательный порт RS232 |
| Возможность подключения к ЛИС | Да |
| Возможность использования пробирок со штрих-кодом | Да (дополнительно нужен внешний сканер штрих-кодов). |
Alifax Roller 20 Measuring Instruments PDF User Guides and Manuals for Free Download: Found (2) Manuals for Alifax Roller 20 Device Model (Operation & User’s Manual, Service Manual)
The Alifax Roller 20 is a remarkable piece of equipment designed for clinical laboratories aiming to enhance their efficiency and accuracy in various blood testing processes. As a part of Alifax’s esteemed lineup, the Roller 20 exemplifies the company’s commitment to innovation and quality. This review aims to provide an in-depth analysis of the product, discussing its features, performance, and overall value to users.
One of the standout features of the Alifax Roller 20 is its advanced automated system. This device leverages cutting-edge technology to ensure that samples are mixed uniformly, which is crucial in achieving reliable test results. The automated mixing process not only saves valuable time but also reduces human error, which is often a concern in laboratory settings.
Another impressive feature is the compact design of the Roller 20. While many laboratory devices tend to be bulky, Alifax has engineered the Roller 20 to occupy minimal space without compromising on functionality. This is particularly beneficial for laboratories with limited space, allowing them to integrate the device efficiently into their existing workflows.
The Roller 20 is designed to accommodate various tube sizes and types, providing versatility for different laboratory needs. This adaptability is a significant plus for laboratories that handle a range of samples. Additionally, it supports a wide temperature range, which is essential for maintaining sample integrity during various testing procedures.
In terms of usability, Alifax has ensured that the Roller 20 is user-friendly. The intuitive interface allows operators to easily set up and monitor the mixing process. Furthermore, the device comes with a comprehensive user manual, enriching the overall user experience. It’s worth noting that training on the Roller 20 is straightforward, enabling laboratory technicians to quickly become proficient in its operation.
Regarding maintenance, the Roller 20 boasts a design that facilitates easy cleaning and upkeep. Regular maintenance is crucial in any laboratory environment, and Alifax has made it easier by incorporating materials that resist contamination. This design choice not only prolongs the lifespan of the device but also ensures that safety standards are upheld.
When it comes to performance, the Alifax Roller 20 does not disappoint. Users have consistently reported improved mixing results, which translates to more reliable assay outcomes. The automated process reduces variability, thereby enhancing the credibility of test results. This reliability is invaluable in clinical settings where accurate diagnoses are essential.
In summary, here are some key benefits of the Alifax Roller 20:
- Automated mixing for enhanced efficiency
- Compact design for space-saving convenience
- Compatibility with various sample types
- User-friendly interface for easy operation
- Low maintenance requirements
- Consistent and reliable performance
Overall, the Alifax Roller 20 stands out as an exceptional tool for modern laboratories. Its combination of advanced technology, ease of use, and reliability makes it a worthwhile investment for any facility looking to improve its blood testing capabilities. Whether you are a small lab just starting or a larger facility aiming to enhance your productivity, the Roller 20 is an asset that will undoubtedly pay dividends in the long run.
301—4480 Revision AA
Alifax Roller 20 Service
Manual
All manuals and user guides at all-guides.com
all-guides.com
Rev: Ed. 2 — Rev. 10
Issue: 24.April .2014
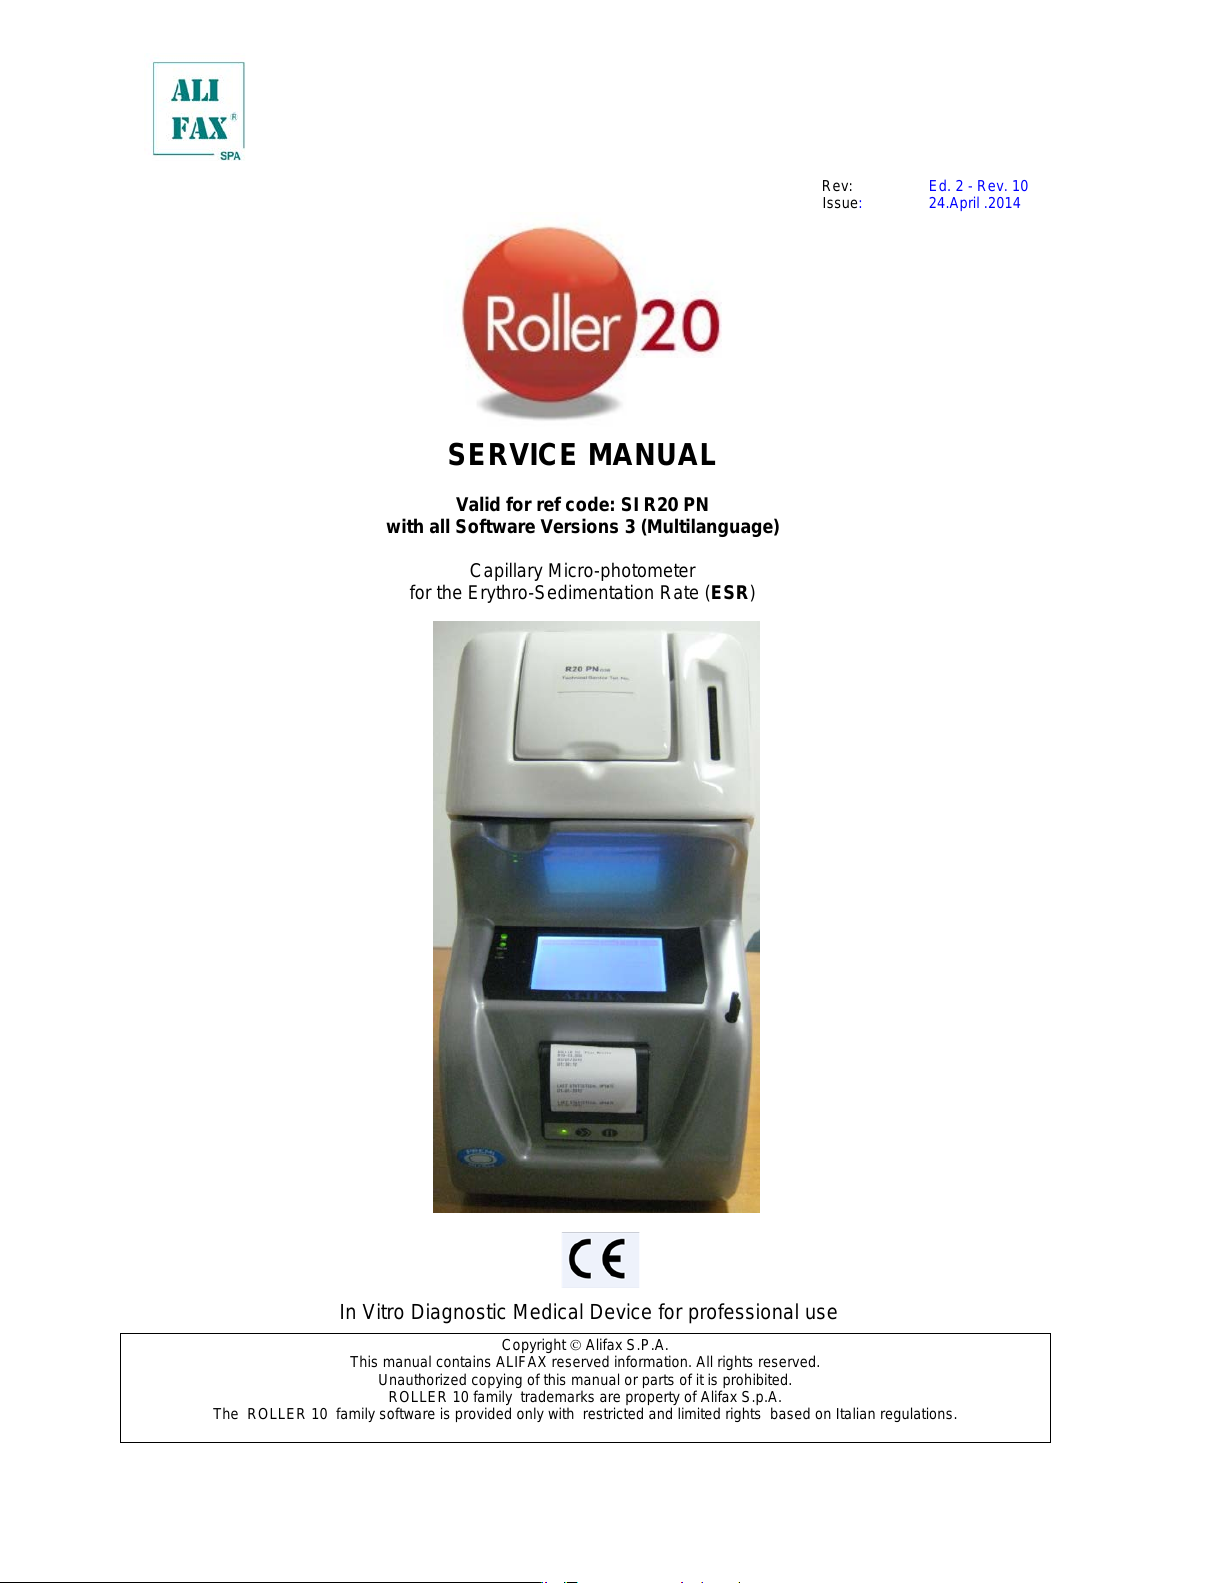
SERVICE MANUAL
Valid for ref code: SI R20 PN
with all Software Versions 3 (Multilanguage)
Capillary Micro—photometer
for the Erythro—Sedimentation Rate (ESR)
In Vitro Diagnostic Medical Device for professional use
Copyright Alifax S.P.A.
This manual contains ALIFAX reserved information. All rights reserved.
Unauthorized copying of this manual or parts of it is prohibited.
ROLLER 10 family trademarks are property of Alifax S.p.A.
The ROLLER 10 family software is provided only with restricted and limited rights based on Italian regulations.
All manuals and user guides at all-guides.com
INDEX
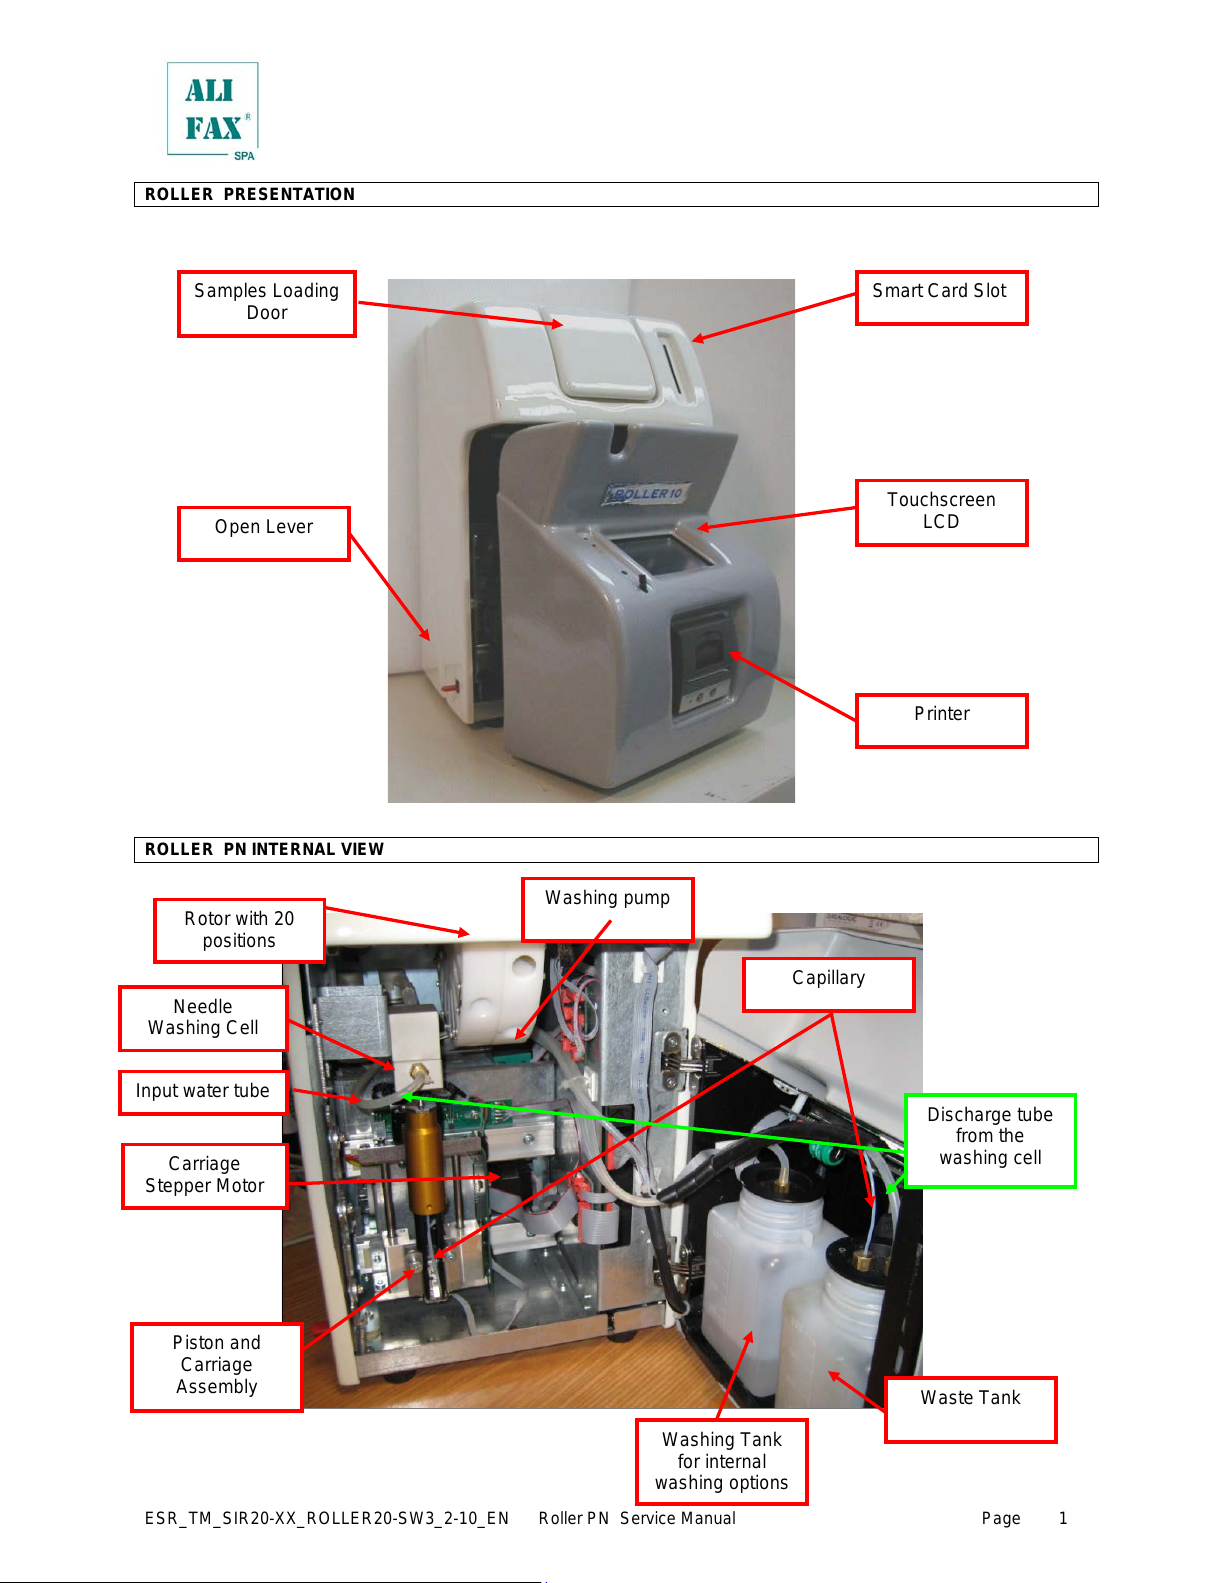
ROLLER PRESENTATION …………………………………………………………………………………………………………………………………… 1
ROLLER PN INTERNAL VIEW ……………………………………………………………………………………………………………………………… 1
ROLLER REAR SIDE VIEW …………………………………………………………………………………………………………………………………. 3
INSTRUMENT PLASTIC COVER REMOVING ………………………………………………………………………………………………………… 4
1.0 – ROLLER PN TECHNICAL SPECIFICATIONS ESR_PTDS_SI205_ROLLERPN_2—4_EN 2014—Janwary—31 ……… 5
2.0 — WARNINGS …………………………………………………………………………………………………………………………………………………. 9
2.1 INDEX OF SYMBOLS ……………………………………………………………………………………………………………………………………. 11
3.0 — UNPACKING AND INSTALLATION ………………………………………………………………………………………………………………. 12
4.0 – PRELIMINARY CHECKS, FIRST INSTALLATION AND SOFTWARE UPGRADE ………………………………………………. 13
5.0 – WASTE TANK REPLACE / EMPTY ……………………………………………………………………………………………………………… 13
6.0 – WASHING TANK LEVEL CONTROL…………………………………………………………………………………………………………….. 13
7.0 – INCREASE AVAILABILITY TEST USING THE SMART CARD …………………………………………………………………………. 14
7.1 – SMART CARD ERRORS ………………………………………………………………………………………………………………………………………………………….. 16
7.2 – MULTIPARAMETRIC CARDS ………………………………………………………………………………………………………………………………………………….. 16
7.2 – PAPER ROLL LOADING — REPLACEMENT ……………………………………………………………………………………………………………………………. 17
8.0 – SWITCH ON ……………………………………………………………………………………………………………………………………………… 18
9.0 – MENU DESCRIPTION ………………………………………………………………………………………………………………………………… 18
9.1 – MAIN MENU ……………………………………………………………………………………………………………………………………………… 19
9.1.1 – MEASURE MENU ……………………………………………………………………………………………………………………………………. 19
9.1.1.1 – PATIENT IDENTIFICATION BY External Bar Coded Reader ………………………………………………………………………. 20
9.1.1.2 – MANUAL INSERTION OF THE PATIENT ID …………………………………………………………………………………………….. 21
9.1.1.3 – AUTOGENERATED ID ………………………………………………………………………………………………………………………….. 22
9.1.1.4 – RESTORE LAST SESSION ……………………………………………………………………………………………………………………. 23
9.1.1.5 – EXTERNAL SAMPLING PROCEDURE, USING INTERNAL MIXING …………………………………………………………… 24
9.1.1.6 – EXTERNAL SAMPLING WITHOUT INTERNAL MIXING ……………………………………………………………………………. 26
9.1.1.7 – ANALYSIS RESULTS (Display and Printouts) …………………………………………………………………………………………… 28
9.1.1.8 – ANALYSIS RESULTS DURING SECOND TAKE OF SAMPLE AND SAMPLE MISSING ………………………………… 29
9.1.2 – WASH MENU………………………………………………………………………………………………………………………………………….. 30
9.1.2.1 – INTERNAL WASH ………………………………………………………………………………………………………………………………… 30
9.1.2.2 – AUTOMATIC WASH ……………………………………………………………………………………………………………………………… 31
9.1.2.3 – EXTERNAL WASH ……………………………………………………………………………………………………………………………….. 32
9.1.2.4 –WASHINGS PROCEDURE DESCRIPTION ………………………………………………………………………………………………. 33
WASHING USING 2 TEST TUBES …………………………………………………………………………………………………………………………………………………… 33
WASHING USING 3 TEST—TUBES (optionally third tube filled with a detergent liquid) ……………………………………………………………………. 34
WASHING PROCEDURE FOR MAINTENANCE ……………………………………………………………………………………………………………………………… 34
9.1.2.5 WASHING PROCEDURE IN CASE OF USE OF LATEX CONTROLS ………………………………………………………………………………. 35
9.1.2.6 – END OF WORKING DAY WASHING PROCEDURE ( Wash and Sleep) ……………………………………………………….. 36
9.1.2.7 – WASHING ERRORS …………………………………………………………………………………………………………………………….. 37
9.1.2.8 –WASHINGS PROCEDURE ERRORS (MEANING OF WASHING FLAGS IN DEBUG ON) ……………………………… 37
9.1.3 – STANDARD (Latex control / calibration) ……………………………………………………………………………………………………… 40
9.1.3.a – BoosterY adjustment when comparing against Westergreen Method …………………………………………………………… 45
9.1.4 – MIXER …………………………………………………………………………………………………………………………………………………… 47
All manuals and user guides at all-guides.com
9.1.5 – EMPTY ROLLER …………………………………………………………………………………………………………………………………….. 47
9.1.6 – INTERNAL QUALITY CONTROL ………………………………………………………………………………………………………………. 48
9.1.6.1 – WASHING QUALITY CONTROL PRINTOUT — Graph meaning …………………………………………………………………… 49
9.1.6.2 – “NORMAL” ESR AVERAGE CONTROL PRINTOUT — Graph meaning …………………………………………………………. 50
9.1.6.3 – “GLOBAL” ESR AVERAGE CONTROL PRINTOUT — Graph m eani ng ………………………………………………………….. 52
9.1.6.3.b – INTERPRETATION OF THE STATI STICAL MEANING …………………………………………………………………………… 54
9.1.6.4 – “NORMAL” CUMULATIVE ESR DISTRIBUTION PRINTOUT — Graph meaning …………………………………………….. 56
9.1.6.5 – “GLOBAL” CUMULATIVE ESR DISTRIBUTION PRINTOUT — Graph m eaning ……………………………………………… 57
9.1.6.6 – “NORMAL” DAILY ESR DISTRIBUTION PRINTOUT — Graph meaning ………………………………………………………… 58
9.1.6.7 – “GLOBAL” DAILY ESR DISTRIBUTION PRINTOUT — Graph meaning …………………………………………………………. 59
9.1.6.8 –INSTRUMENT VERIFICATI ON USING THE LATEX CONTROL KIT ……………………………………………………………. 60
9.1.6.9 – ERASE STATISTICAL DATABASE …………………………………………………………………………………………………………. 63
9.2 – SETUP MENU …………………………………………………………………………………………………………………………………………… 65
9.2.1 – CPS MENU …………………………………………………………………………………………………………………………………………….. 65
9.2.1.1 – CPS’ PARAMETERS …………………………………………………………………………………………………………………………….. 65
9.2.1.1.a – MODIFY TYPE OF REFERENCE (CHOOSE BOOSTERY TYPE) (Technical password required) ………………… 66
9.2.1.1.b – MODIFY BOOSTERY’s VALUE (Technical password required) ……………………………………………………………….. 67
9.2.1.1.c – MODIFY WHOLE PARAMETRES’ VALUES …………………………………………………………………………………………. 68
9.2.1.1.d – MODIFY MODEL FACT’s VALUES (Technical password required) ………………………………………………………….. 68
9.2.1.1.e – MODIFY Offset Sensors VALUES (Technical password required) ……………………………………………………………. 68
9.2.1.1.f – MODIFY THERMOSTAT reference value ( Technical password required) …………………………………………………… 69
9.2.1.2 – CPS Correctors Parameters (Available only if a Multiparametric card is used) (Technical password required) ……. 69
9.2.1.3 – CPS Read ADC ……………………………………………………………………………………………………………………………………. 70
9.2.1.4 – FIRST UP ……………………………………………………………………………………………………………………………………………. 70
9.2.2 – MIX MENU ……………………………………………………………………………………………………………………………………………… 70
9.2.3 – DATE TIME MENU …………………………………………………………………………………………………………………………………. 71
9.2.3.1 – MODIFY DATE TIME VALUE (User level password required) …………………………………………………………………….. 71
9.2.4 – FL (Flag List) MENU ………………………………………………………………………………………………………………………………… 73
9.2.5 – SETTINGS MENU …………………………………………………………………………………………………………………………………… 75
9.2.5.1 – SOFTWARE VERSION …………………………………………………………………………………………………………………………. 75
9.2.5.2 – PRINT EXPANDED ………………………………………………………………………………………………………………………………. 75
9.2.5.3 – PRINT IN RUN ……………………………………………………………………………………………………………………………………… 76
9.2.5.4 – LANGUAGE SETUP ……………………………………………………………………………………………………………………………… 76
9.2.6 – SETTINGS MENU with “USER LEVEL” PASSWORD LEVEL ACCESS ………………………………………………………….. 76
9.2.6.1 – WASH TIME ………………………………………………………………………………………………………………………………………… 77
9.2.7 – SETTINGS MENU with “TECHNICAL LEVEL” PASSWORD LEVEL ACCESS …………………………………………………. 77
9.2.7.1 – INSTRUMENT SERIAL NUMBER …………………………………………………………………………………………………………… 78
9.2.7.2 – DEBUG ……………………………………………………………………………………………………………………………………………….. 79
9.2.7.3 – CONFIGURATION OF KIND OF ROLLER ( Available from software version 1.00N) ……………………………………….. 79
9.2.7.4 – MAINTENANCE LEVEL RESET ……………………………………………………………………………………………………………… 80
9.2.7.5 – MAINTENANCE LEVEL THRESHOLD SETUP …………………………………………………………………………………………. 80
9.2.7.6 – INSTRUMENT GENERAL RESET ………………………………………………………………………………………………………….. 81
All manuals and user guides at all-guides.com
9.2.7.7 – PRINT PARAMETERS ………………………………………………………………………………………………………………………….. 81
9.2.7.8 – 2 CPS …………………………………………………………………………………………………………………………………………………. 82
9.2.7.9 – LATEX PRIMING ………………………………………………………………………………………………………………………………….. 82
9.2.7.10 – SYRINGE FAST ………………………………………………………………………………………………………………………………….. 82
9.2.7.11 – PEDIATRIC SAMPLES ………………………………………………………………………………………………………………………… 83
9.2.7.12 – ERROR LOG ……………………………………………………………………………………………………………………………………… 83
9.2.8 – LOG IN—OUT …………………………………………………………………………………………………………………………………………… 84
9.3 – AVAILABILITY MENU …………………………………………………………………………………………………………………………………. 85
9.3.1 – WARNING LEVEL (User level password required) ……………………………………………………………………………………….. 85
9.3.2 – DISPLAY AVAILABILITY ………………………………………………………………………………………………………………………….. 86
9.4 – COMM MENU (Technical password required) ………………………………………………………………………………………………… 87
9.4.1 – SETUP MENU ………………………………………………………………………………………………………………………………………… 88
9.4.1.1 – INSTRUMENT NUMBER ……………………………………………………………………………………………………………………….. 88
9.4.1.2 – TIMEOUT …………………………………………………………………………………………………………………………………………….. 89
9.4.1.3 – ATTEMPTS ………………………………………………………………………………………………………………………………………….. 89
9.4.1.4 – MISSING ID …………………………………………………………………………………………………………………………………………. 90
9.4.1.5 – DO ON TIMEOUT UART ……………………………………………………………………………………………………………………….. 90
9.4.1.6 – ACK ……………………………………………………………………………………………………………………………………………………. 90
9.4.1.7 – BAYER (only with BCI interface) ……………………………………………………………………………………………………………… 91
9.4.1.8 – 6 Parameters Transmission (under developm ent). …………………………………………………………………………………….. 91
9.4.1.9 – Curve Parameters Transmission (under dev el opm ent). ………………………………………………………………………………. 91
9.4.1.10 – PROTOCOL INTERFACE OPTIONS …………………………………………………………………………………………………….. 92
9.4.1.10.a – DAT 8 INTERFACE (NO QUERY) ………………………………………………………………………………………………………. 93
9.4.1.10.b – DAT 15 INTERFACE (NO QUERY) …………………………………………………………………………………………………….. 94
9.4.1.10.c – BCI INTERFACE (QUERY) ………………………………………………………………………………………………………………... 95
9.4.1.10.d – No HOST ………………………………………………………………………………………………………………………………………… 95
9.4.1.11 – PROTOCOL INTERFACE EXPLICATION ………………………………………………………………………………………………. 95
9.4.1.12 – LATEX PROTOCOL INTERFACE EXPLICATION……………………………………………………………………………………. 97
9.4.1 – TEST MENU …………………………………………………………………………………………………………………………………………… 98
9.5 – TECH MENU (Technical password required) ………………………………………………………………………………………………… 100
9.5.1 – PUMP CONFIGURATION ………………………………………………………………………………………………………………………. 101
• Internal taking: ………………………………………………………………………………………………………………………………………………………………………………. 101
• External taking: …………………………………………………………………………………………………………………………………………………………………………….. 101
• Fast: ……………………………………………………………………………………………………………………………………………………………………………………………… 102
• Retention: ……………………………………………………………………………………………………………………………………………………………………………………… 102
• Reset persistaltic: …………………………………………………………………………………………………………………………………………………………………………. 102
• Wash pump: …………………………………………………………………………………………………………………………………………………………………………………. 102
9.5.2 – SYRINGE AUTO ……………………………………………………………………………………………………………………………………. 103
• Up and Down: ……………………………………………………………………………………………………………………………………………………………………………….. 103
• Up in Wash: ………………………………………………………………………………………………………………………………………………………………………………….. 103
9.5.3 – SYRINGE MAN ……………………………………………………………………………………………………………………………………… 104
9.5.4 – CARRIAGE ALIGNMENT (AVAILABLE ONLY ON ROLLER 20 PN/LC INSTRUMENTS) ………………………………… 105
9.5.5 – ROTOR ………………………………………………………………………………………………………………………………………………… 106
9.5.6 – SENSORS ……………………………………………………………………………………………………………………………………………. 107
All manuals and user guides at all-guides.com
9.5.6. a – ROTOR ADJUSTMENT FOR SARSTEDT TUBES …………………………………………………………………………………. 107
10.0 – FIRST INITIALIZATION AND STARTUP ……………………………………………………………………………………………………. 109
11.0 – LATEX CALIBRATION …………………………………………………………………………………………………………………………….. 111
12.0 – NEEDLE REPLACE ………………………………………………………………………………………………………………………………… 119
13.0 – ROLLER Start—Up Sequence and Boards Description ………………………………………………………………………………….. 123
13.1 – UI Board and Syringe Group …………………………………………………………………………………………………………………….. 127
13.2 – Syringe Group Replacement and/or carriage realignment …………………………………………………………………………….. 128
13.3 –Syringe Group Replacement ONLY for Roller 20 PN …………………………………………………………………………………….. 131
13.4 – Adjusting Needle excursion inside sample tube …………………………………………………………………………………………… 133
13.5 – Motor and Communication Boards …………………………………………………………………………………………………………….. 135
13.5.1 – Motor Boards Details …………………………………………………………………………………………………………………………… 136
13.6 – Peristaltic Pump ……………………………………………………………………………………………………………………………………… 139
13.7 – Reading Unit (CPS) ………………………………………………………………………………………………………………………………… 140
13.8. a – Un—mounting the Reading Unit and Capillary Replacement (Internal Circuit) ………………………………………………… 141
13.8. b –Capillary Replacement and Un—mounting the Reading Unit (External Circuit) ……………………………………………….. 146
13.9 – Rotor Motor, Rotor Alignment and Rotor’s Sensors ……………………………………………………………………………………. 147
13.10 – INSIDE ROLLER 10: Power Supply Board ……………………………………………………………………………………………….. 151
14 – SOFTWARE UPGRADE …………………………………………………………………………………………………………………………….. 152
14.1 – Operative Software Upgrade …………………………………………………………………………………………………………………….. 152
15.0 – ERROR LIST …………………………………………………………………………………………………………………………………………. 155
16.0 — SANITATION PROCEDURE …………………………………………………………………………………………………………………….. 157
17.0 — SWITCHING OFF ……………………………………………………………………………………………………………………………………. 157
18.0 PROGRAMMED MAINTENANCE PROCEDURE ………………………………………………………………………………………….. 158
19.0 – SPARE PART LIST…………………………………………………………………………………………………………………………………. 160
20.0 — ROLLER – REFERENCES ………………………………………………………………………………………………………………………. 163
APPENDIX A — IMPROVEMENTS WITH SOFTWARE VERSIONS from 1.00A to 3.X ………………………………………………. 163
APPENDIX B – SANITATION FORM ………………………………………………………………………………………………………………….. 166
Note: The paragraphs written with the italic characters (as on this note), have been added or modified respect
to the previous version of the manual; the same is true in case the chapter appears in blue in the index,
this means the chapter has been added or there changes done inside this chapter.
All manuals and user guides at all-guides.com
all-guides.com
ESR_TM_SIR20—XX_ROLLER20—SW3_2—10_EN Roller PN Service Manual Page
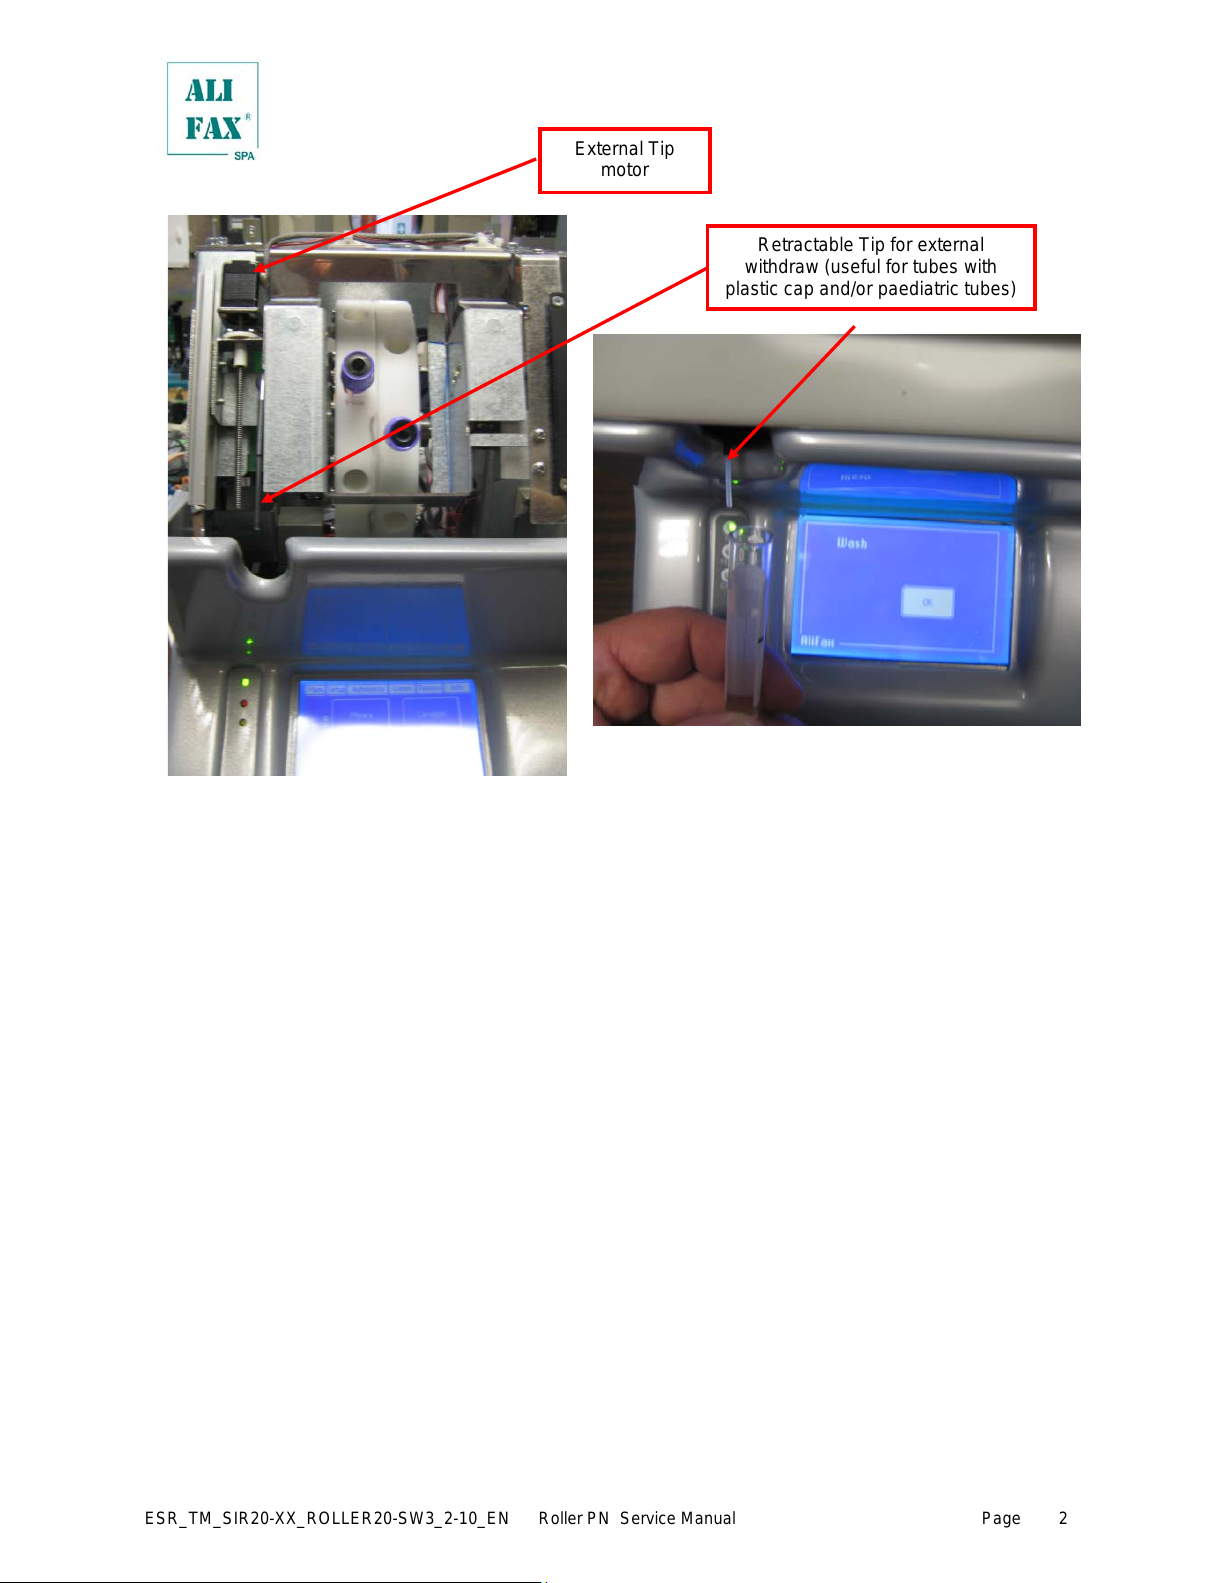
ROLLER PRESENTATION
ROLLER PN INTERNAL VIEW
All manuals and user guides at all-guides.com
ESR_TM_SIR20—XX_ROLLER20—SW3_2—10_EN Roller PN Service Manual Page
Retractable Tip for external
withdraw (useful for tubes with
plastic cap and/or paediatric tubes)
All manuals and user guides at all-guides.com

ESR_TM_SIR20—XX_ROLLER20—SW3_2—10_EN Roller PN Service Manual Page
ROLLER REAR SIDE VIEW
To replace the fuses use the following procedure:
• Locate the fuses’ box
• Using a flat screwdriver push down the small tongue that keeps the box inside the
switch block and pull it out using a small pliers (if necessary).
• Remove completely the fuse box
• Remove completely the fuse box and replace BOTH
fuses (*)
• Insert again the fuse box inside the Main Switch block
pressing it firmly to assure the box’s tongue fits on the
hook.
(*)
The fuse which is placed in appliance inlet shall be replaced
only by a T5,0 A L 250 V dimensions 5x20 mm or T5,0 A H
250 V dimensions 5x20 mm.
A T5,0 Ampere fuse; it is suitable for both 115 and 230 Vac.
Supply Plug.
Voltage: 115 – 230
Switch Mode Power Supply
(SMPS)
All manuals and user guides at all-guides.com

ESR_TM_SIR20—XX_ROLLER20—SW3_2—10_EN Roller PN Service Manual Page
INSTRUMENT PLASTIC COVER REMOVING
To remove instrument’s plastic cover proceed as follows:
Remove the 4 screws using a Phillips screw driver and then unthread the cover form the instrument pulling a bit
both sides and then lifting up the whole plastic cover.
Remove the 2 screws located at the instrument’s upper rear side using a Phillips screw driver, there are also two
screws located below the loading door, these also must be removed, then unthread the metallic cover pulling
toward you and then lifting up
.
All manuals and user guides at all-guides.com
ESR_TM_SIR20—XX_ROLLER20—SW3_2—10_EN Roller PN Service Manual Page
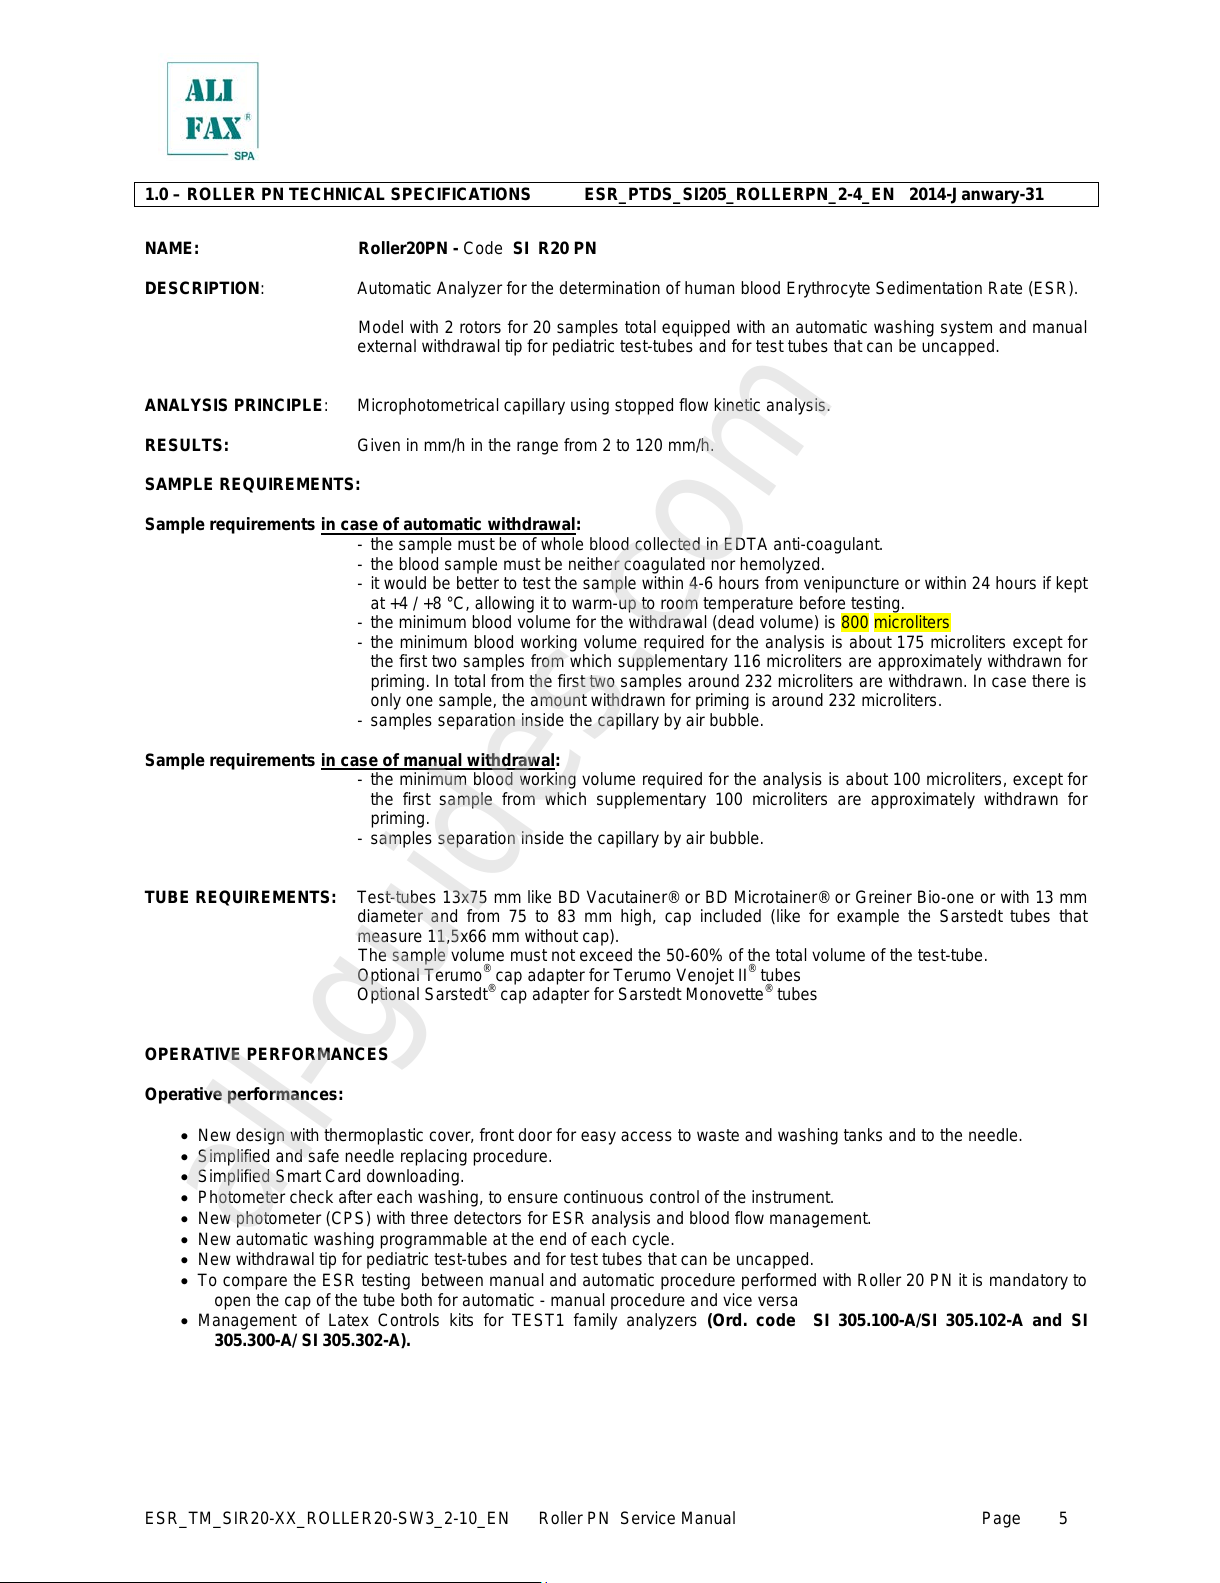
1.0 – ROLLER PN TECHNICAL SPECIFICATIONS ESR_PTDS_SI205_ROLLERPN_2-4_EN 2014—Janwary—31
NAME: Roller20PN — Code SI R20 PN
DESCRIPTION: Automatic Analyzer for the determination of human blood Erythrocyte Sedimentat ion R ate (ESR).
Model with 2 rotors for 20 samples total equipped with an automatic washing system and manual
external withdrawal tip for pediatric test—tubes and for test tubes that can be unc apped.
ANALYSIS PRINCIPLE: Microphotometrical capillary using stopped flow kinetic analysis.
RESULTS: Given in mm/h in the range from 2 to 120 mm/h.
SAMPLE REQUIREMENTS:
Sample requirements in case of automati c withdrawal:
— the sample must be of whole blood collected in EDTA anti—coagulant.
— the blood sample must be neither coagulated nor hemolyzed.
— it would be better to test the sample within 4—6 hours from venipuncture or within 24 hours if kept
at +4 / +8 °C, allowing it to warm—up to room temperature before testing.
— the minimum blood volume for the withdrawal (dead volume) is 800 microliters
— the minimum bl ood working volume required for the analysis is about 175 microliters except for
the first two samples from which supplementary 116 microliters are approximately withdrawn for
priming. In total from the first two samples around 232 micr oliter s are withdrawn. In case there is
only one sample, the amount withdrawn for priming is around 232 microliters.
— samples separation inside the capillary by air bubble.
Sample requirements in case of manual withdrawal:
— the minimum blood working volume required for the analysis is about 100 microliters, except for
the first sample from which supplementary 100 microliters are approximately withdrawn for
priming.
— samples separation inside the capillary by air bubble.
TUBE REQUIREMENTS: Test—tubes 13x75 mm like BD Vacutainer® or BD Microtainer® or Greiner Bio—one or with 13 mm
diameter and from 75 to 83 mm high, cap included (like for example the Sarstedt tubes that
measure 11,5x66 mm without cap).
The sample volume must not exceed the 50—60% of the total volume of the test—tube.
Optional Terumo
®
cap adapter for Terumo Venojet II® tubes
Optional Sarstedt
®
cap adapter for Sarstedt Monovette® tubes
OPERATIVE PERFORMANCES
Operative performances:
• New design with thermoplastic cover, front door for easy access to waste and washing tanks and to the needle.
• Simplified and safe needle replacing procedure.
• Simplified Smart Card downloading.
• Photometer check after each washing, to ensure continuous control of the instrument.
• New photometer (CPS) with three detectors for ESR analysis and blood flow management.
• New automatic washing programmable at the end of each cycle.
• New withdrawal tip for pediatric test—tubes and for test tubes that can be uncapped.
• To compare the ESR testing bet ween manual and automatic procedure perfor med with Roller 20 PN it is mandator y to
open the cap of the tube both for automatic — manual procedur e and vice versa
• Management of Latex Controls kits for TEST1 family analyzers (Ord. code SI 305.100—A/SI 305.102—A and SI
305.300—A/ SI 305.302—A).
All manuals and user guides at all-guides.com
all-guides.com
ESR_TM_SIR20—XX_ROLLER20—SW3_2—10_EN Roller PN Service Manual Page
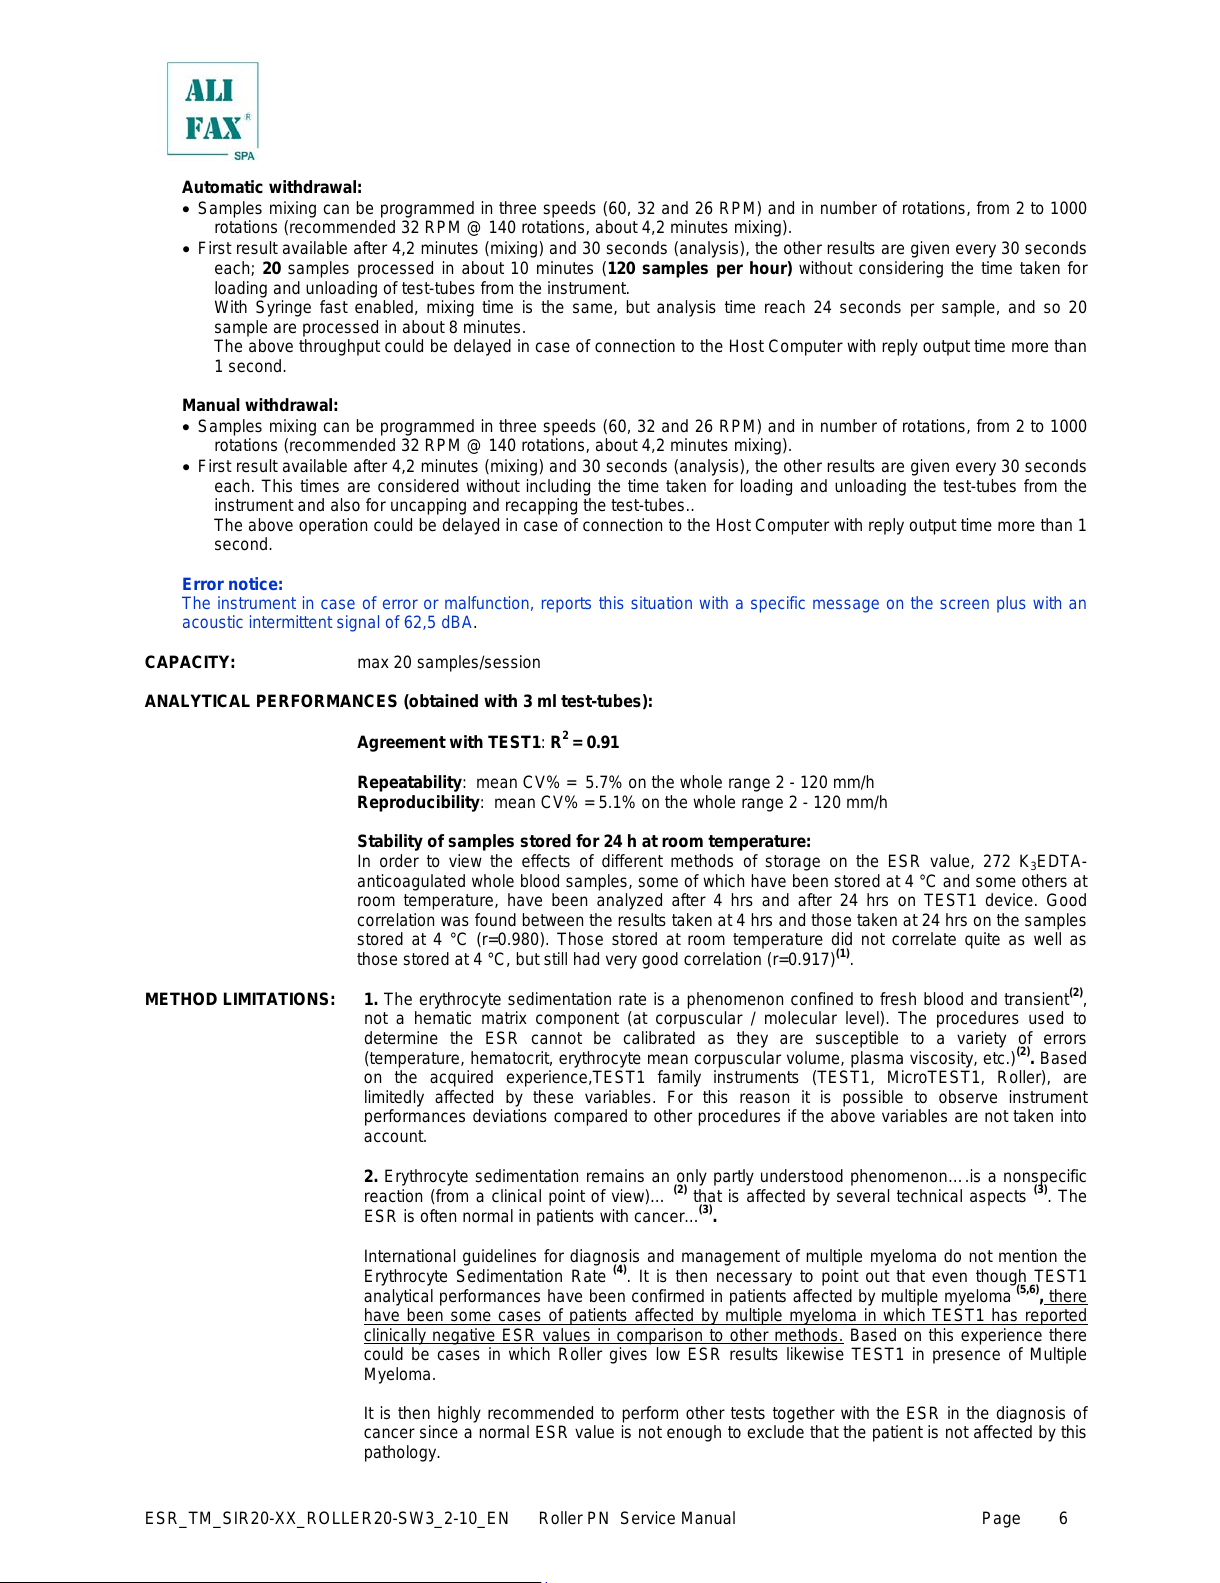
Automatic withdraw al:
• Samples mixing can be programmed in three speeds ( 60, 32 and 26 RPM) and in number of rotations, from 2 to 1000
rotations (recommended 32 RPM @ 140 rotations, about 4,2 minutes mixing).
• First result available after 4,2 minutes (mixing) and 30 seconds (analysis), the other results are given every 30 seconds
each; 20 samples processed in about 10 minutes (120 samples per ho ur) without considering the time taken for
loading and unloading of test—tubes from the instrument.
With Syringe fast enabled, mixing time is the same, but analysis time reach 24 seconds per sample, and so 20
sample are processed in about 8 minutes.
The above throughput could be delayed in case of connection to the Host Computer with reply output time more than
1 second.
Manual withdrawal:
• Samples mixing can be programmed in three speeds ( 60, 32 and 26 RPM) and in number of rot ations, from 2 to 1000
rotations (recommended 32 RPM @ 140 rotations, about 4,2 minutes mixing).
• First result available after 4,2 minutes (mixing) and 30 seconds (analysis), the other results are given every 30 seconds
each. This times are cons idered without including the time taken for loading and unloading the test—tubes from the
instrument and also for uncapping and recapping the test—tubes..
The above operation could be delayed in case of connection to the Host Computer with reply output time mor e than 1
second.
Error notice:
The instrument in case of error or malfunc tion, reports this situation with a spec ific message on the screen plus with an
acoustic intermittent signal of 62,5 dBA.
CAPACITY: max 20 samples/session
ANALYTICAL PERFORMANCES (obtained with 3 ml test-tubes):
Agreement with TEST1: R
2
= 0.91
Repeatability: mean CV% = 5.7% on the whole range 2 — 120 mm/h
Reproducibility: mean CV% = 5.1% on the whole range 2 — 120 mm/h
Stability of samples stored for 24 h at ro om temperature:
In order to view the effects of different methods of storage on the ESR value, 272 K
3
EDTA—
anticoagulated whole blood samples, some of which have been stored at 4 °C and some others at
room temperature, have been analyzed after 4 hrs and after 24 hrs on TEST1 device. Good
correlation was found between the results taken at 4 hrs and those taken at 24 hrs on the s am pl es
stored at 4 °C (r=0.980). Those stored at room temperature did not correlate quite as well as
those stored at 4 °C, but still had very good correlation (r=0.917)
(1)
.
METHOD LIMITATIONS: 1. The erythroc yte sedimentation rate is a phenomenon confined to fresh blood and transient
(2)
,
not a hematic matrix component (at corpuscular / molecular level). The procedures used to
determine the ESR cannot be calibrated as they are susceptible to a variety of errors
(temperature, hematocrit, erythrocyte mean corpuscular volume, plas ma viscosity, etc.)
(2)
. Based
on the acquired experience,TEST1 family instruments (TEST1, MicroTEST1, Roller), are
limitedly affected by these variables. For this reason it is possible to observe instrument
performances deviations compared to other procedures if the abov e variables are not taken into
account.
2. Erythrocyte sedimentation remains an only partly understood phenomenon….is a nonspecif ic
reaction (from a clinical point of view)…
(2)
that is affected by several technical aspects
(3)
. The
ESR is often normal in patients with cancer...
(3)
.
International guidelines for diagnosis and management of multiple myeloma do not m ention the
Erythrocyte Sedimentation Rate
(4)
. It is then necessary to point out that even though TEST1
analytical performances have been confirmed in patients affect ed by multiple myeloma
(5,6)
, there
have been some cases of patients affected by multiple myeloma in which TEST 1 has reported
clinically negative ESR values in comparison to other methods. Based on this experience there
could be cases in which Roller gives low ESR results likewise TEST1 in presence of Multiple
Myeloma.
It is then highly recommended to perform other tests t ogether with the ESR in the diagnosis of
cancer since a normal ESR value is not enough to exclude that the patient is not affected by this
pathology.
All manuals and user guides at all-guides.com

ESR_TM_SIR20—XX_ROLLER20—SW3_2—10_EN Roller PN Service Manual Page
Furthermore in presence of this dis ease it is possible to observe deviations form other m ethods
since other phenomena in addition to the rouleaux format ion can contribute to the sediment ation
like for example amorphous aggregates formation (crystallization of paraproteins or mineral
materials like calcium) resulting from bone tissue alteration.
3. Samples mixing is programmed at the beginning of the analysis with the purpose of
disaggregating erythrocytes. An inefficient disaggregation or micro—clot s presence can affect the
result given by the instrument that in fact measures erythrocytes aggregation kinetics.
4. The above instrument performances have been obt ained using test tubes with a capacity of 3
ml and 13x75 mm size with K
3
EDTA anticoagulant. The use of such tubes opti mizes the mixing
phase and consequently the results reproducibility.
ENVIRONMENTAL AND PHYSICAL SPECIFICATIONS
Permissible environment conditions for operation: Temp.: from 10 to +30°C
Humidity: from 15% to 85% — no dew
Permissible environment conditions for transportation
and storage: Temp.: from —20 to +65°C
Humidity : from 5% to 95% — no dew
Size and weight: Width: 240 mm
Depth: 380 mm
Height: 450 mm
Weight: 16 Kg
ELECTRICAL SPECIFICATIONS
Voltage: 115 — 230 Vac Power consumption: 115 VA
Switch Mode Power Supply (SMPS) Switch on cons: 132 W
Frequency: 50/60 Hz
Classification: Class I (EN61010—1 – IEC 1010—1 – CEI 66—5)
OTHER OPERATIVE SPECIFICATIONS:
Heat dissipation in the environment: about 230 BTU/hour
Noise: at low speed mixing: 55,0 db(A)
at high speed mixing: 50,6 db(A)
Maximum rated altitude: 3000 mt asl
Communication: 2 serial RS232 ports located on the rear side of the instrument:
Port 1 (DB25) is dedicated to connect an external scanner
Port 2 (DB) is dedicated to connect the instrument to an Host Computer
1 USB serial ports (for future applications)
Functioning: The instrument is designed to rem ain switched ON 24 hours a day, it is however suggested
to switch it off at the end of the working day, applying previously a washing procedure using
3 washing tube to ensure a long capillary’s and sensors’ life.
Restrictions: Indoor user appliance
Rated pollution degree: Grade 2
Working life of the instrument: 10 years (if maintenance is done correctly)
All manuals and user guides at all-guides.com

ESR_TM_SIR20—XX_ROLLER20—SW3_2—10_EN Roller PN Service Manual Page
INTERNAL QUALITY CONTROL
Latex Controls: Latex Controls for TEST1 family analyzers allow the control of the calibration stability of
TEST1, MicroTEST1; Roller and JO-PLUS. They are available in two kinds of test tubes:
♦ 13x75 mm Greiner: Latex Controls (6 tests) — code SI 305.100—A;
Latex Controls (30 tests) – code SI 305.300—A
♦ 11,5x66 mm Sarstedt: Latex Controls (6 tests) — code SI 305.102—A;
Latex Controls (30 tests) — code SI 305.302-A
TEST1 Family Quality Control: it is a software (code SI195620) designed to collect and process the data from one or more
TEST1 family analyzers (TEST1, MicroTEST1, Roller) for evaluating their performances.
CONSUMABLES
Printer Paper: Thermal roller paper 58 +0/—1 mm x Max 32 mm external diameter
Smart Card: Conform to ISO 7816—1 specifications – 85.6 x 54 x 0.8 mm
Coded using SIRE Analytical Systems / Alifax Group proprietary algorithm
Available for 1,000 (Ord. code SI 195901) — 4,000 (Ord. code SI 195904) — 10,000 (Ord.
code SI 195910) — 20,000 (Ord. code SI 195920) tests / Universal Card for TEST1 family
analyzers (TEST1; MicroTEST1; Roller).
Waste Tank: 500 ml plastic waste tank with screw cap.
Wash Tank: 500 ml plastic waste tank with screw cap (Available only on SI R20 PN Model)
OPTIONAL AVAILABLE TOOLS
Patient identification: External CCD bar—code reader (SI195820)
REFERENCES:
1. E. Heverin (Galway—Mayo Institute of Technology, Ireland): ”Comparison of the Westergren method versus
the TEST1 technique for determining the Eryth rocyte Sedimentation Rate”, May 2002, private communicati on
2. NCCLS “Reference and Selected procedure for the Erythrocyte Sedimentation rate (E SR) Test; Approved
Standard—Fourth Edition”, Vol. 20 No. 27
3. Sox HC, Liang MH: “The Erythrocyte Sedimentation Rate”, Annals of Internal Medicine 1986; 105:515—523.
4. NCCN (National Comprehensive Cancer Network) Clinical Practice Guidelines in Oncology “Multip le
Myeloma” (V.I.2007)
5. Ajubi et al.: “Determination of the lenght of sedimentation reaction in blood using the TEST1 system:
comparison with the Sedimatic 100 method, turbidimetric fibrinogen levels, and the influence of M—proteins”,
Clin Chem Lab Med 2006; 44 (7): 904—906
6. Mercurio S. et al.: “Comparison between two methods for ESR measure in patients affect ed by myeloma”,
37° SIBioC National Congress, 11—14 October 2005 Rome.
All manuals and user guides at all-guides.com
ESR_TM_SIR20—XX_ROLLER20—SW3_2—10_EN Roller PN Service Manual Page
7.
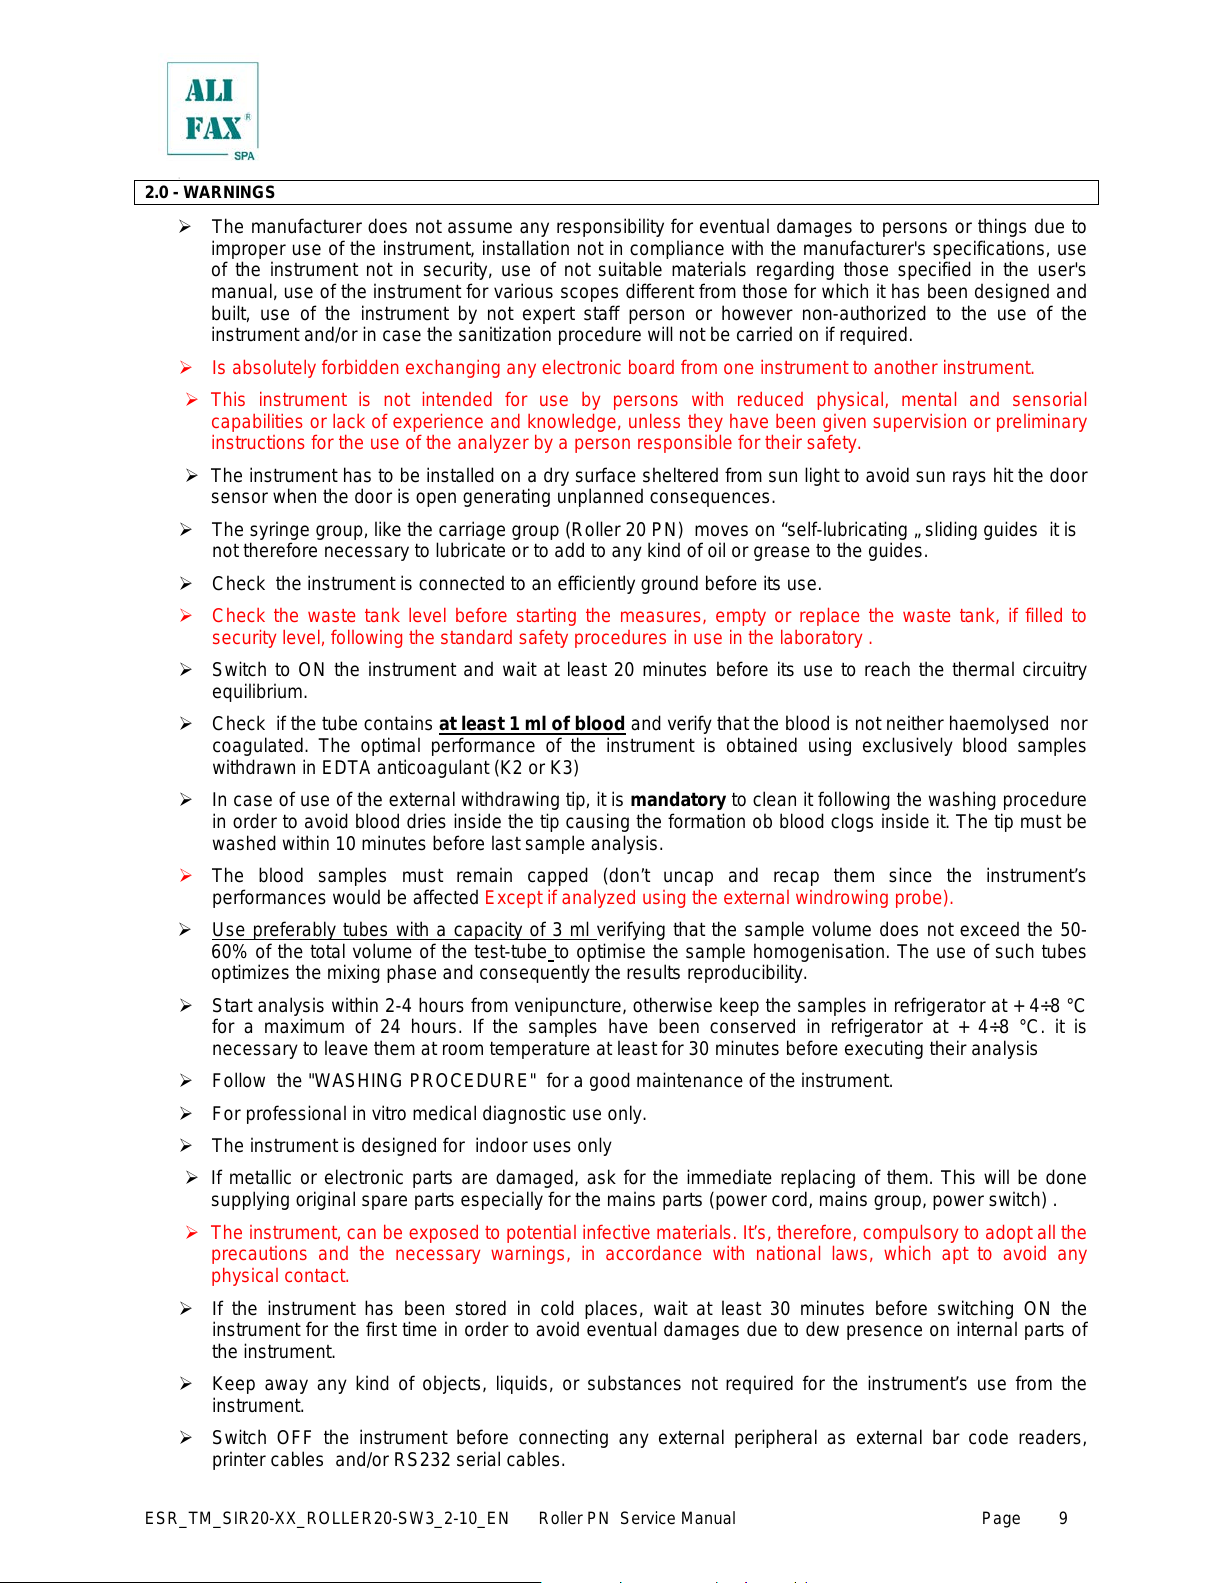
2.0 — WARNINGS
The manufacturer does not assume any responsibility for eventual damages to persons or things due to
improper use of the instrument, installation not in compliance with the manufacturer‘s specifications, use
of the instrument not in security, use of not suitable materials regarding those specified in the user‘s
manual, use of the instrument for various scopes different from those for which it has been designed and
built, use of the instrument by not expert staff person or however non—authorized to the use of the
instrument and/or in case the sanitization procedure will not be carried on if required.
Is absolutely forbidden exchanging any electronic board from one instrument to another instrument.
This instrument is not intended for use by persons with reduced physical, mental and sensorial
capabilities or lack of experience and knowledge, unless they have been given supervision or preliminary
instructions for the use of the analyzer by a person responsible for their safety.
The instrument has to be installed on a dry surface sheltered from sun light to avoid sun rays hit the door
sensor when the door is open generating unplanned consequences.
The sy ringe group, li ke the carriage group (Roller 20 PN) moves on “self—lubricating „ sliding guides it is
not therefore necessary to lubricate or to add to any kind of oil or grease to the guides.
Check the inst rum ent is connected to an efficiently ground before its use.
Check the waste tank level before starting the measures, empty or replace the waste tank, if filled to
security level, following the standard safety procedures in use in the laboratory .
Switch to ON the instrument and wait at least 20 minutes before its use to reach the thermal circuitry
equilibrium.
Check if the tube contains at least 1 ml of blood and verify that the blood is not neither haemolysed nor
coagulated. The optimal performance of the instrument is obtained using exclusively blood samples
withdrawn in EDTA anticoagulant (K2 or K3)
In case of use of the external withdrawing tip, it is mandatory to clean it following the washing procedure
in order to avoid blood dries inside the tip causing the formation ob blood clogs inside it. The tip must be
washed within 10 minutes before last sample analysis.
The blood samples must remain capped (don’t uncap and recap them since the instrument’s
performances would be affected Except if analyzed using the external windrowing probe).
Use preferably tubes with a capacity of 3 ml verifying that the sample volume does not exceed the 50—
60% of the total volume of the test—tube to optimise the sample homogenisation. The use of such tubes
optimizes the mixing phase and consequently the results reproducibility.
Start analysis within 2—4 hours from venipuncture, otherwise keep the samples in refrigerator at + 4÷8 °C
for a maximum of 24 hours. If the samples have been conserved in refrigerator at + 4÷8 °C. it is
necessary to leave them at room temperature at least for 30 minutes before executing t hei r anal ysis
Fol l ow the «WASHING PROCEDURE« for a good maintenance of the instrument.
For professional in vitro medical diagnostic use only.
The i nst rument is designed for indoor uses only
If metallic or electronic parts are damaged, ask for the immediate replacing of them. This will be done
supplying original spare parts especially for the mains parts (power cord, mains group, power switch) .
The instrument, can be exposed to potential infective materials. It’s, therefore, compulsory to adopt all the
precautions and the necessary warnings, in accordance with national laws, which apt to avoid any
physical contact.
If the instrument has been stored in cold places, wait at least 30 minutes before switching ON the
instrument for the first time in order to avoid eventual damages due to dew presence on internal parts of
the instrument.
Keep away any kind of objects, liquids, or substances not required for the instrument’s use from the
instrument.
Switch OFF the instrument before connecting any external peripheral as external bar code readers,
printer cables and/or RS232 serial cables.
All manuals and user guides at all-guides.com

ESR_TM_SIR20—XX_ROLLER20—SW3_2—10_EN Roller PN Service Manual Page
Use only original spare parts supplied by the manufacturer.
Do not remove the panels neither camper the reading sensor. The maintenance operations must be
carried out only by technical personnel authorized by the manufacturer.
For your safety, if any parts are damaged, ask for the immediate replacing with original spare parts,
specially for the parts connected to mains (power cord, fuse—holder and mains switch …)
Prior to install and use the instrument for the first time, it is suggested an evaluation of the
electromagnetic environment
Do not use the instrument in proximity of sources of strong electromagnetic radiations (e.g. mobiles,
CB’s, radio transmitting units and similar or unshielded intentional RF sources) as these may interfere
with the proper operation of the instrument
In order to avoid possible mistakes in the Query—Host communication and/or the transmission of patient
ID to the Host computer, it is recommended the use of bar—code codification which includes the “check—
digit” option in its protocol.
Battery for Unit Interface board SI205001 (S25.001x) is Kinetic #MH60B3AL3; Ni MH; 3,6V 60 mAh
Instrument is compliant with IEC 61326 emissions and immunity requirements
THE FOLLOWING LABELS ARE STUCK AS WARNINGS ON THE INSTRUMENT AND MUST NOT BE REMOVED..
PROCEDURE OF INSTRUMENT DISPOSAL AT THE END OF ITS OPERATIONAL LIFE
As stated on European directive 2002/ 96/CE relative on wast e of electrical and electronic equipment (WEEE) appropriate
measures should be adopted to minimize the disposal as unsorted municipal w aste and to achieve a high level of separate
collection of WEEE, according to the applicable local laws and rules.
The crossed—out wheeled bin symbol on s ide, placed also close to the plate of the apparatus , points out the necessity of the
separate collection of (WEEE).
The separate collection of this instrument at the end of it s life is organized and managed by You as Importer . The user then,
will contact You and follow the system you have adopted in compliance with your national requirements.
The unauthorized disposal will be pursued according to the local l aws and the rules in the nation of use. T he penalties will be
effective, proportionate and dissuasive.
All manuals and user guides at all-guides.com
all-guides.com
ESR_TM_SIR20—XX_ROLLER20—SW3_2—10_EN Roller PN Service Manual Page
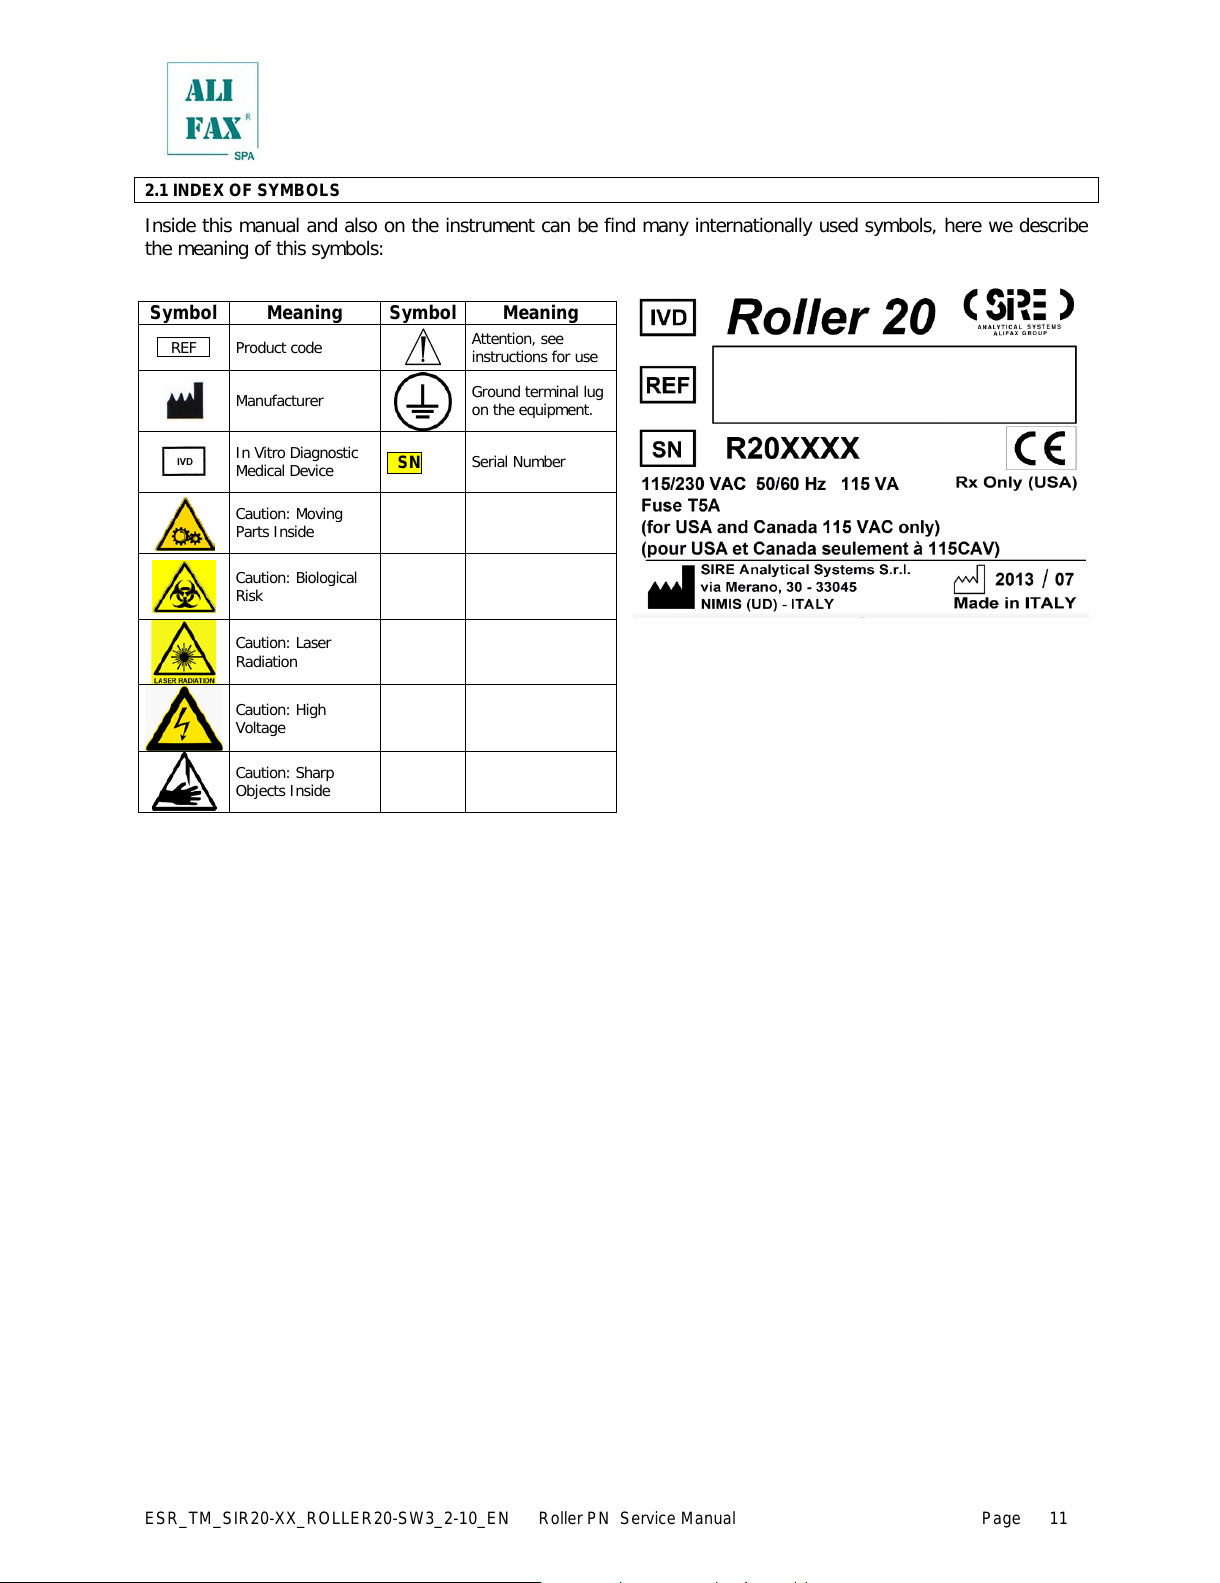
2.1 INDEX OF SYMBOLS
Inside this manual and also on the instrument can be find many internationally used symbols, here we describe
the meaning of this symbols:
Attention, see
instructions for use
Manufacturer
Ground terminal lug
on the equipment.
In Vitro Diagnostic
Medical Device
Caution: Moving
Parts Inside
Caution: Sharp
Objects Inside
All manuals and user guides at all-guides.com
ESR_TM_SIR20—XX_ROLLER20—SW3_2—10_EN Roller PN Service Manual Page
3.0 — UNPACKING AND INSTALLATION
Personnel qualified for the installation
The installation of this apparatus cannot be done from the final user, but it must be done only from a qualified
technician authorized from the manufacturer, to avoid the invalidation of the guarantee. In this way, each possible
problematic that it could jeopardize the operation of the instrument of its results, can be evaluated and eventually
resolved from fully trained personnel for these eventualities.
Packing control
The instrument comes packed in a carton box. Before proceeding with the unpacking, perform a control of the
packing, verifying the sides and the corners of the box for possible damages. Any damage must be reported on
the Installation and Testing Form, enclosed to the documentation of the instrument .
Unpacking
Open the pack from the top, extracting the first box that contains the accessories and then extract the instrument.
Place the instrument on the table for allowing the removal of the protective nylon foil. Report any damage of
instrument plastic covers on the Installation and Testing Form.
Packing control contents
Beyond the instrument, the pack contains a flat box with all the necessary accessories for the correct installation
and the correct operation of the instrument; all these accessories are exactly listed on the Packing List form and
they could vary according to the instrument configuration.
The content of the packing and the accessories box must be at least the following:
no. 01 ROLLER 10 instrument
no. 01 operative manual (this one that you are reading now)
no. 01 Packing List form
no. 01 Installation and Testing form
no. 01 Declaration of CE compatibility
no. 01 Final Testing certificate
no. 01 mains cable
no. 02 rolls of thermal paper (one is installed, one into the accessories box)
no. 02 waste tank (one is installed, one into the accessories box)
no. 02 mains fuses
Moreover, in accordance with the configuration, the following accessories can be present:
no. 01 external bar—code reader (EBCR)
Refer however to the Packing List form for the control of the packing and accessories box contents, signaling any
difference between the pack contents and those listed on the Packing List on the Installation and Testing form.
This will help us to guarantee better controls during manufacturing and packing.
Instrument installation
The instrument must be installed on a working table able to support its weight (about 16 Kg) and providing
enough space on the right side to reach the power supply switch, located on the high back side of the instrument.
Choose a location sheltered from the sun direct light and far from sources of moisture, to allow a reliable
operation and a better duration of instrument operational life.
Besides, provide at least 10 cm of clearance on the back side of the instrument to allow the connection of the
mains cable and eventually the data cable for the connection with the Lab Informativ e System (LIS).
Avoid if possible the connection to mains through plug adapters and choose an electrical outlet far from any
strong impulsive voltages, usually generated from centrifuges, refrigerators, elevators and freight el evators.
As reported on the technical specifications, the instrument can handle a voltage from 85 to 256 Vac thus it is not
necessary a voltage selector.
Before power on the instrument, control also the presence and the connection of the waste tank, opening the
front door of the instrument.
After above controls, proceed with the lighting of the instrument, verifying that all the initialization procedure is
correctly completed as described on the Technical Manual of the instrument.
Any possible anomaly must be signaled on the Installation and Testing form.
All manuals and user guides at all-guides.com
ESR_TM_SIR20—XX_ROLLER20—SW3_2—10_EN Roller PN Service Manual Page
4.0 – PRELIMINARY CHECKS, FIRST INSTALLATION AND SOFTWARE UPGRADE
Before switching on the instrument is MANDATORY to
• check out the waste tank level and empty or replace it if filled to security level, following the standard
safety procedures in use in the laboratory.
• if it is installed check the wash tank level and fill up with distillate water.
After switching on the instrument is MANDATORY to
• Check the availability of thermal paper
• In case of use of Sarstedt tubes, please refer to chapter 9.5.6.a
• Wait 20 minutes to allow the reading unit reach the thermal stability
For the first installation, please refer to chapter 10
For software upgrade, please refer to chapter 11
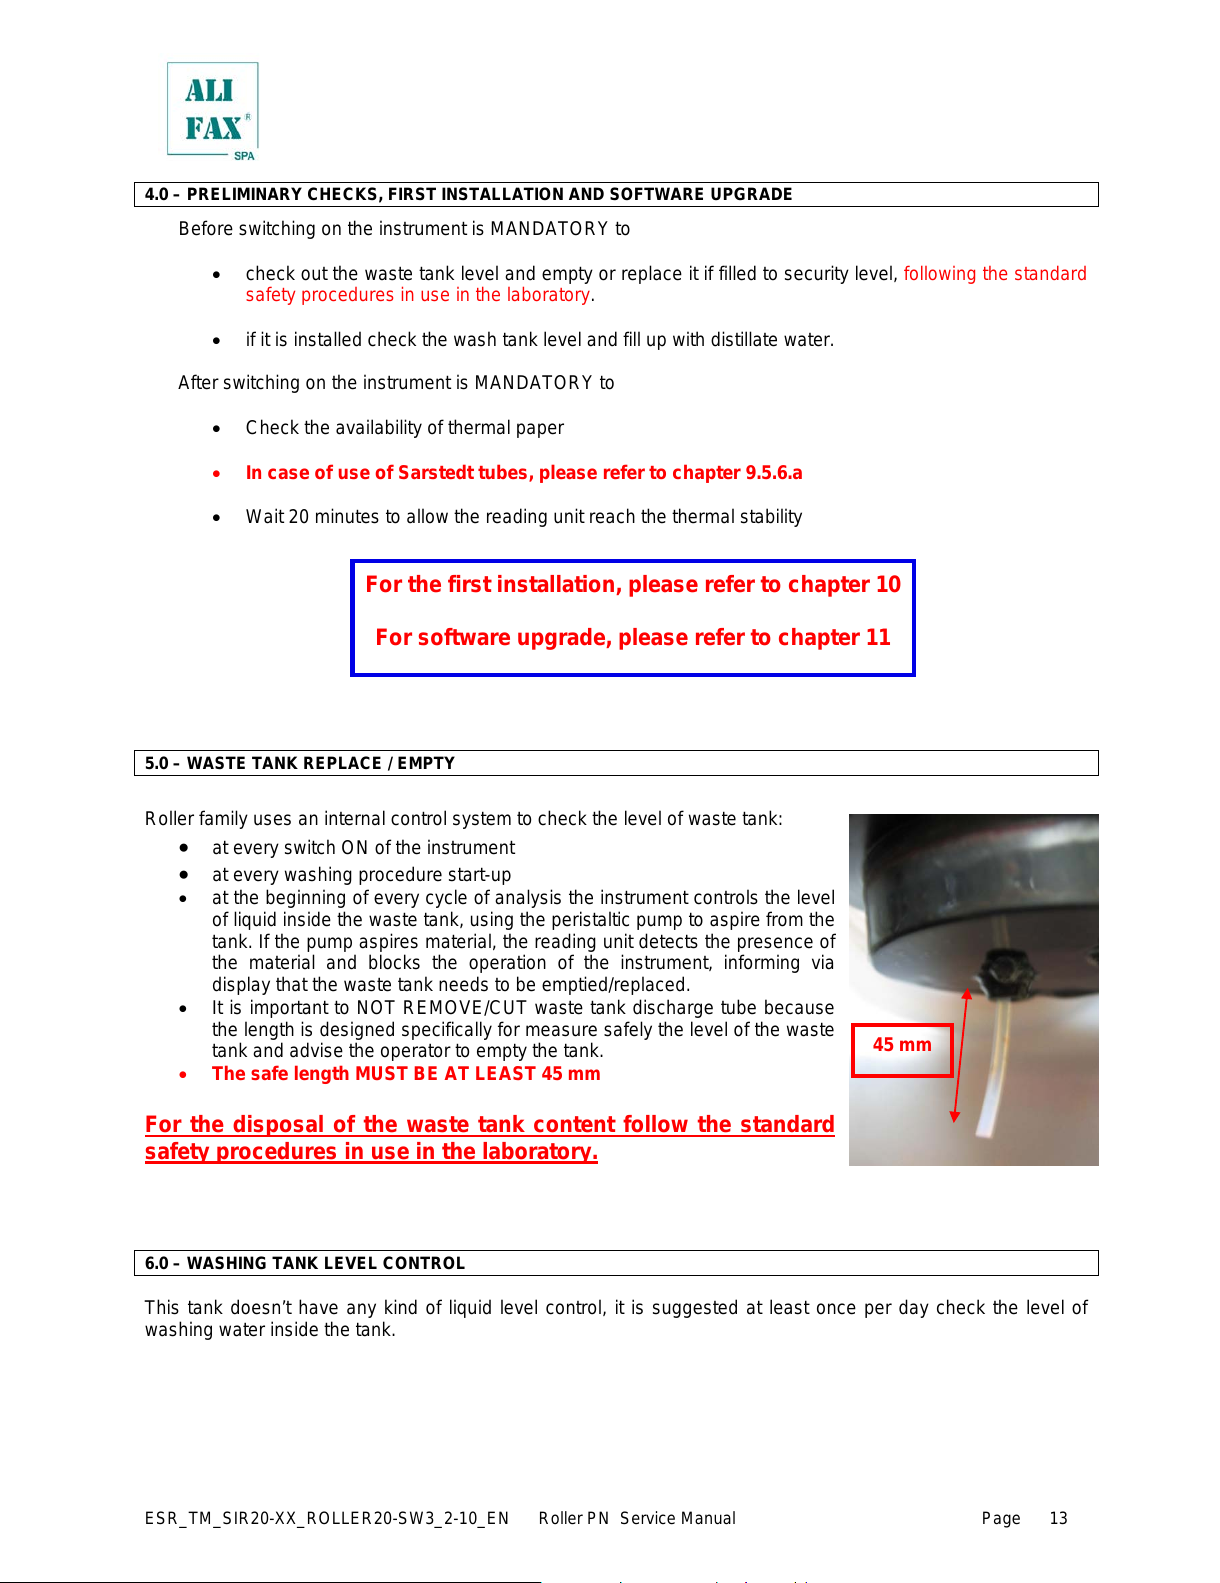
5.0 – WASTE TANK REPLACE / EMPTY
Roller family uses an internal control system to check the level of waste tank:
• at every switch ON of the instrument
• at every washing procedure start—up
• at the beginning of every cycle of analysis the instrument controls the level
of liquid inside the waste tank, using the peristaltic pump to aspire from the
tank. If the pump aspires material, the reading unit detects the presence of
the material and blocks the operation of the instrument, informing via
display that the waste tank needs to be emptied/replaced.
• It is important to NOT REMOVE/CUT waste tank discharge tube because
the length is designed specifically for measure safely the level of the waste
tank and advise the operator to empty the tank.
• The safe length MUST BE AT LEAST 45 mm
For the disposal of the waste tank content follow the standard
safety procedures in use in the laboratory.
6.0 – WASHING TANK LEVEL CONTROL
This tank doesn’t have any kind of liquid level control, it is suggested at least once per day check the level of
washing water inside the tank.
All manuals and user guides at all-guides.com
ESR_TM_SIR20—XX_ROLLER20—SW3_2—10_EN Roller PN Service Manual Page
7.0 – INCREASE AVAILABILITY TEST USING THE SMART CARD
Roller has been developed to analyze up to six blood parameters. This means that according to the blood
desired parameters to be analyzed, will be available different test cards and each single card will upgrade only
the tests for which has been programmed.
Independently from the kind of test, the warning threshold is the same for all them, in other words, setting the
warning level to a specific value, means that that value will be the reference for all type of tests that has been
charged.
When the prefixed threshold alarm is reached by ESR parameter, display will show a warning message requiring
to increase the availability. All the other test will be also automatically increased.
Instrument allows to go in negative availability only one time; supposing the ESR availability is 1,
instrument allows to run up to 20 samples and goes in a negative availability of —19; at the next test
increase, the availability of test will be discounted by 19 tests.
WARNING!! If at the end of cycle no one parameter has a positive residual availability, the instrument will set
itself in idle and will not allow any kind of activities up when the availability will be increased using the specific
smart card.
To increase availability, it is necessary to be in MAIN SCREEN (if the card is inserted while the display shows a
different menu, it will not considered) then insert the appropriate smart card in the reading slot, facing the card
with the integrated circuit toward the left side, like displayed on the picture on chapter 7.1
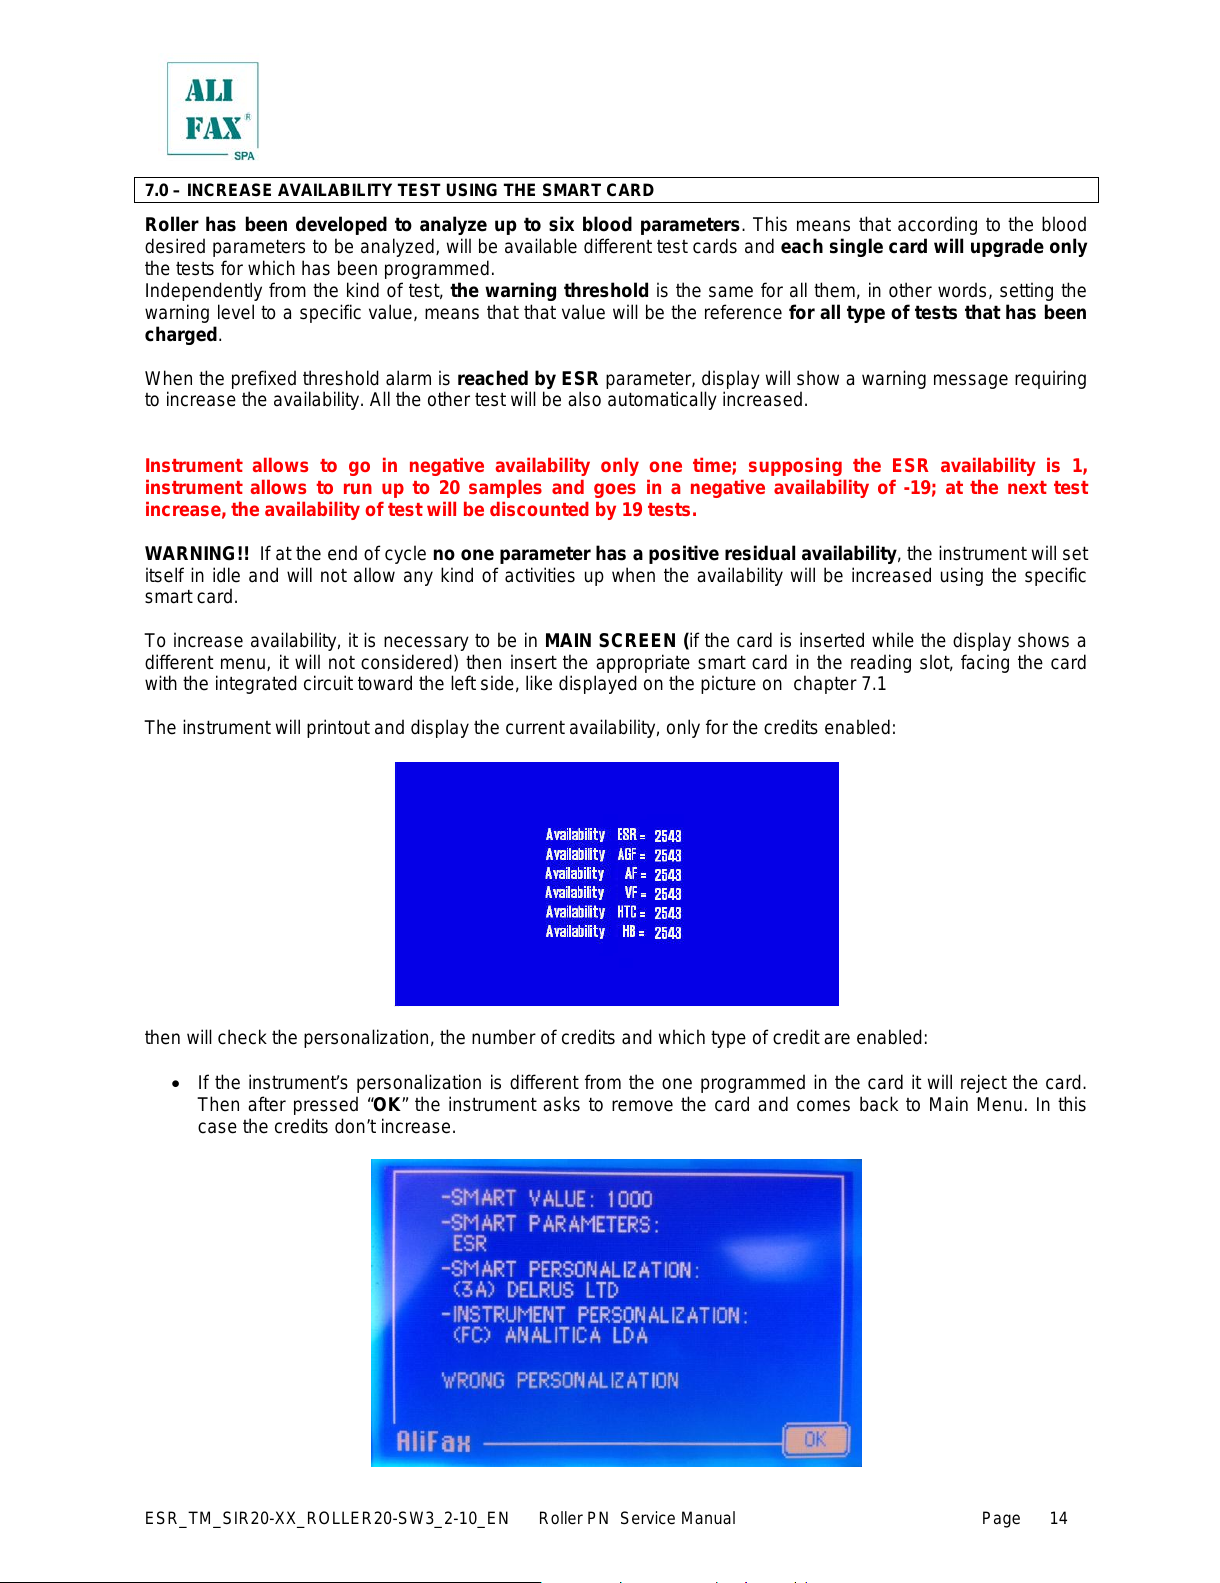
The instrument will printout and display the current availability, only for the credits enabled:
then will check the personalization, the number of credits and which type of credit are enabled:
• If the instrument’s personalization is different from the one programmed in the card it will reject the card.
Then after pressed “OK” the instrument asks to remove the card and comes back to Main Menu. In this
case the credits don’t increase.
All manuals and user guides at all-guides.com
ESR_TM_SIR20—XX_ROLLER20—SW3_2—10_EN Roller PN Service Manual Page
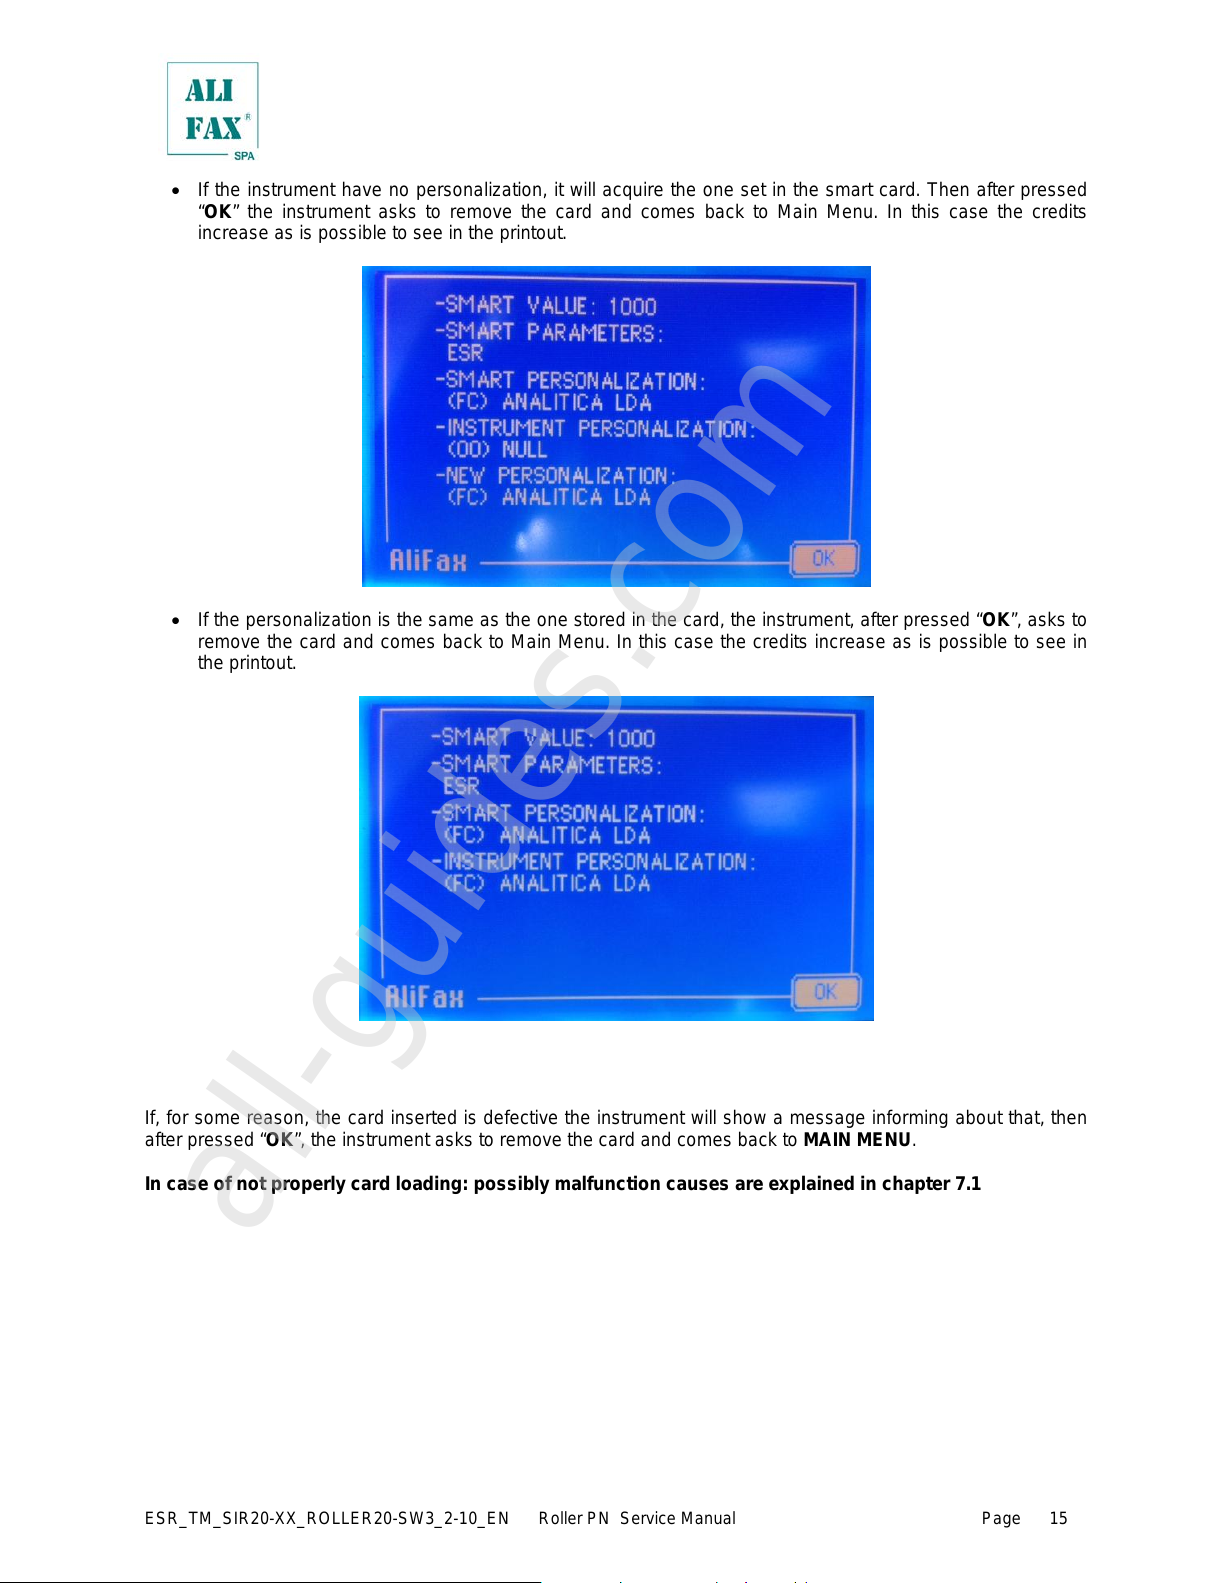
• If the instrument have no personalization, it will acquire the one set in the smart card. Then after pressed
“OK” the instrument asks to remove the card and comes back to Main Menu. In this case the credits
increase as is possible to see in the printout.
• If the personalization is the same as the one stored in the card, the instrument, after pressed “OK”, asks to
remove the card and comes back to Main Menu. In this case the credits increase as is possible to see in
the printout.
r
If, for some reason, the card inserted is defective the instrument will show a message informing about that, then
after pressed “OK”, the instrument asks to remove the card and comes back to MAIN MENU.
In case of not properly card loading: possibly malfunction causes are explained in chapter 7.1
All manuals and user guides at all-guides.com
all-guides.com
ESR_TM_SIR20—XX_ROLLER20—SW3_2—10_EN Roller PN Service Manual Page
7.1 – SMART CARD ERRORS
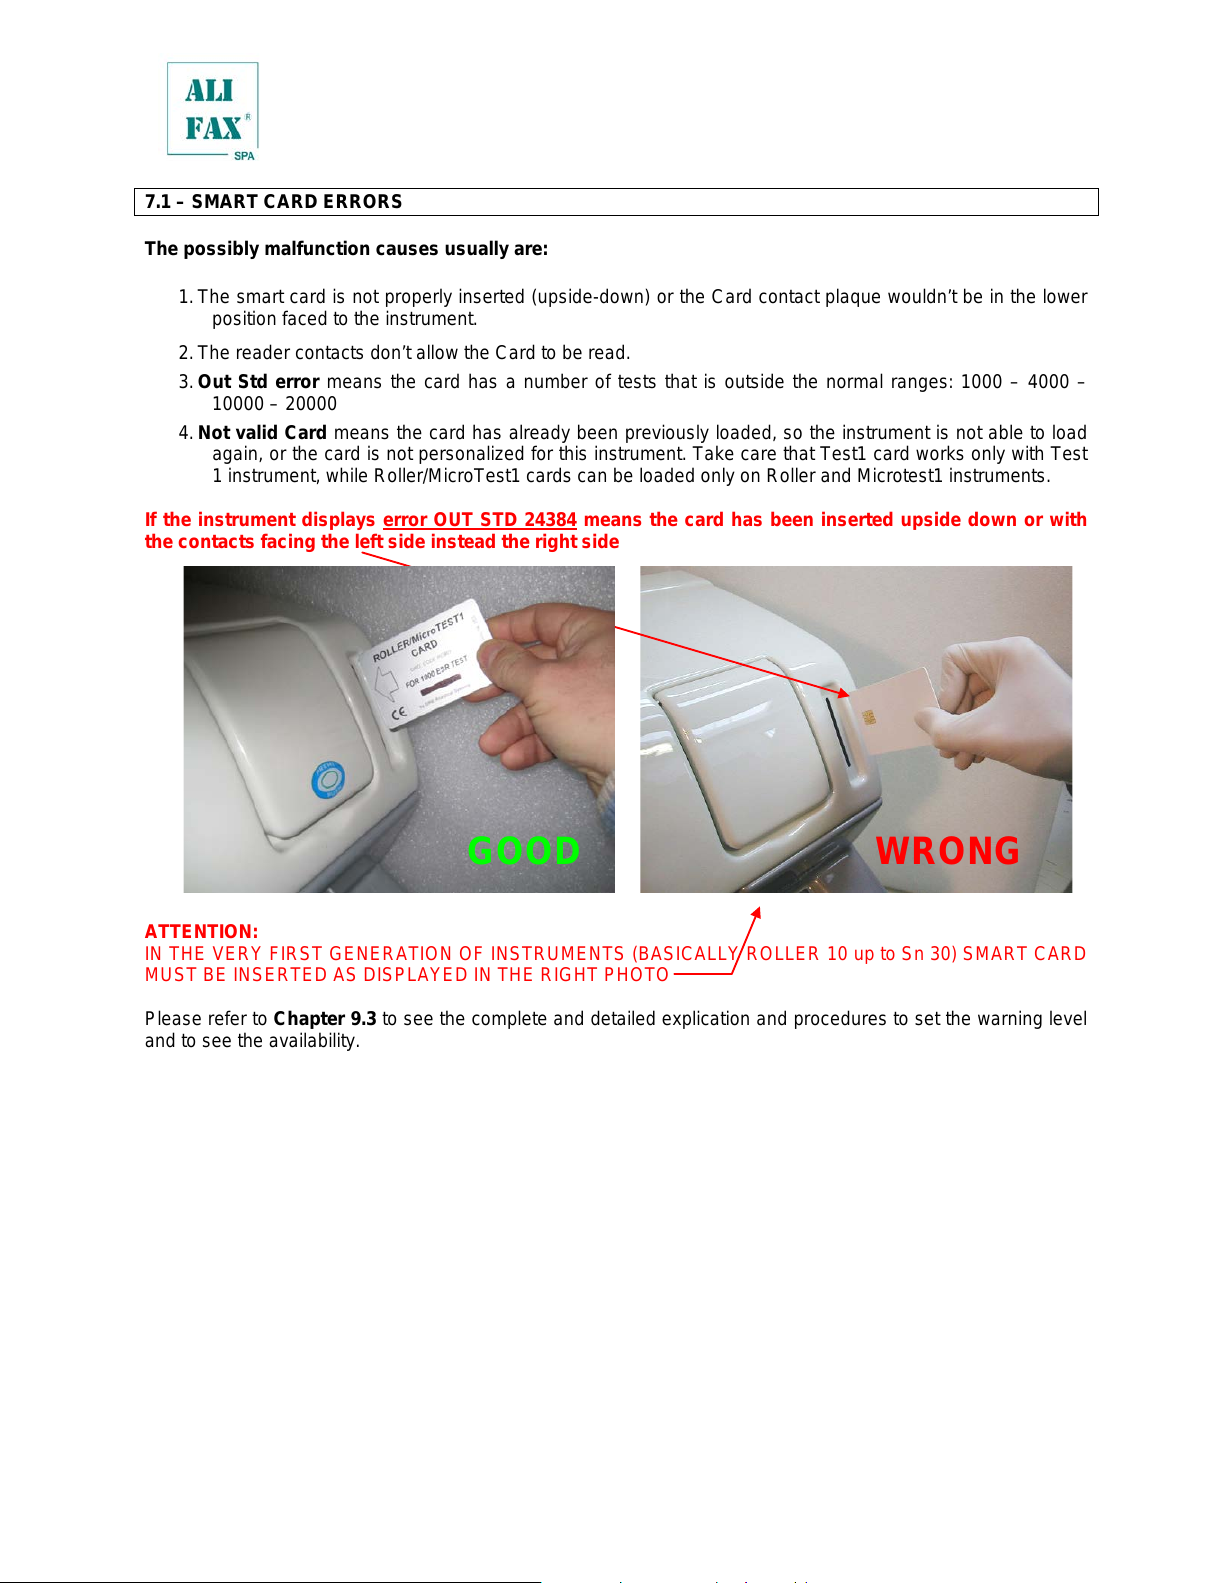
The possibly malfunction causes usually are:
1. The smart card is not properly inserted (upside—down) or the Card contact plaque wouldn’t be in the lower
position faced to the instrument.
2. The reader contacts don’t allow the Card to be read.
3. Out Std error means the card has a number of tests that is outside the normal ranges: 1000 – 4000 –
10000 – 20000
4. Not valid Card means the card has already been previously loaded, so the instrument is not able to load
again, or the card is not personalized for this instrument. Take care that Test1 card works only with Test
1 instrument, while Roller/MicroTest1 cards can be loaded only on Roller and Microtest1 instruments.
If the instrument displays error OUT STD 24384 means the card has been inserted upside down or with
the contacts facing the left side instead the right side
ATTENTION:
IN THE VERY FIRST GENERATION OF INSTRUMENTS (BASICAL LY ROLLER 10 up to Sn 30) SMART CARD
MUST BE INSERTED AS DISPLAYED IN THE RIGHT PHOTO
Please refer to Chapter 9.3 to see the complete and detailed explication and procedures to set the warning level
and to see the availability.
7.2 – MULTIPARAMETRIC CARDS
With the use of multiparametric cards is possible to activate the analysis of one or more parameters.
At the moment is available the classical ESR card and the ESR + AnF Factor
All manuals and user guides at all-guides.com
ESR_TM_SIR20—XX_ROLLER20—SW3_2—10_EN Roller PN Service Manual Page
7.2 – PAPER ROLL LOADING — REPLACEMENT
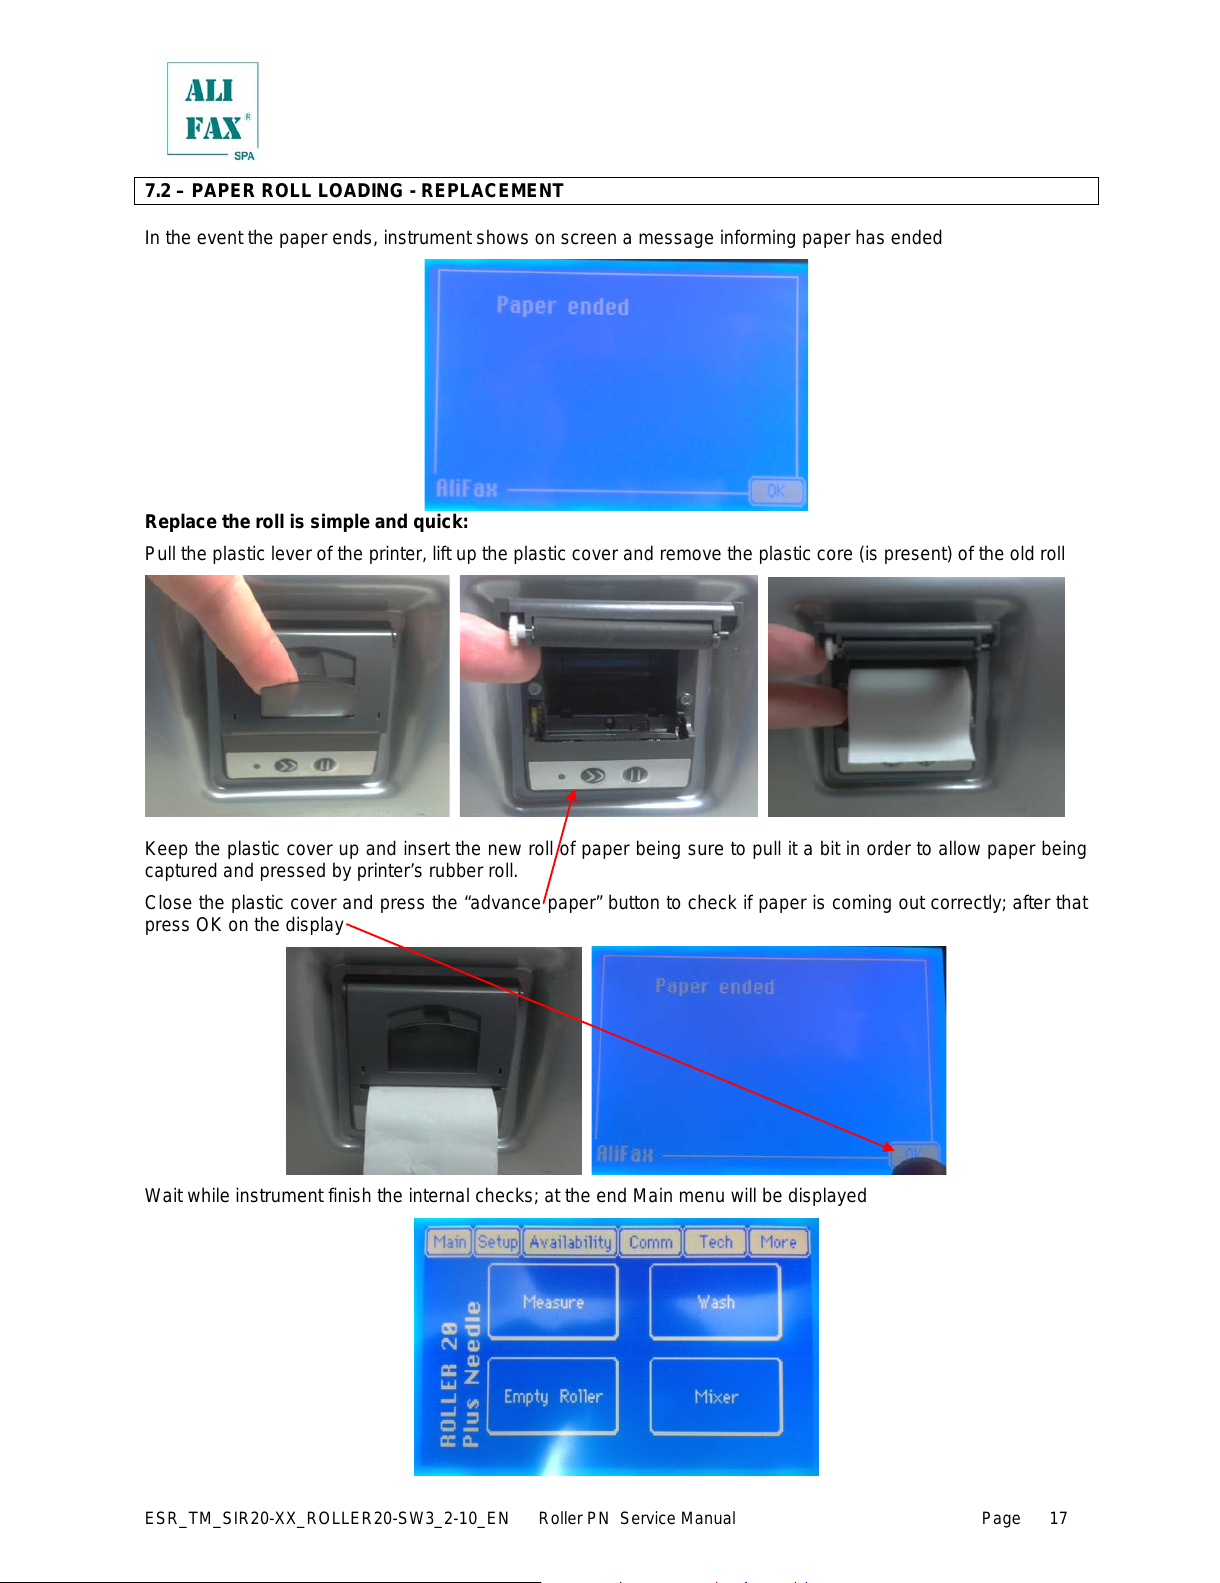
In the event the paper ends, instrument shows on screen a message informing paper has ended
Replace the roll is simple and quick:
Pull the plastic lever of the printer, lift up the plastic cover and remov e the plastic core (is present) of the old roll
Keep the plastic cover up and insert the new roll of paper being sure to pull it a bit in order to allow paper being
captured and pressed by printer’s rubber roll.
Close the plastic cover and press the “advance paper” button to check if paper is coming out correctly; after that
press OK on the display
Wait while instrument finish the internal checks; at the end Main menu will be displayed
All manuals and user guides at all-guides.com
ESR_TM_SIR20—XX_ROLLER20—SW3_2—10_EN Roller PN Service Manual Page
8.0 – SWITCH ON
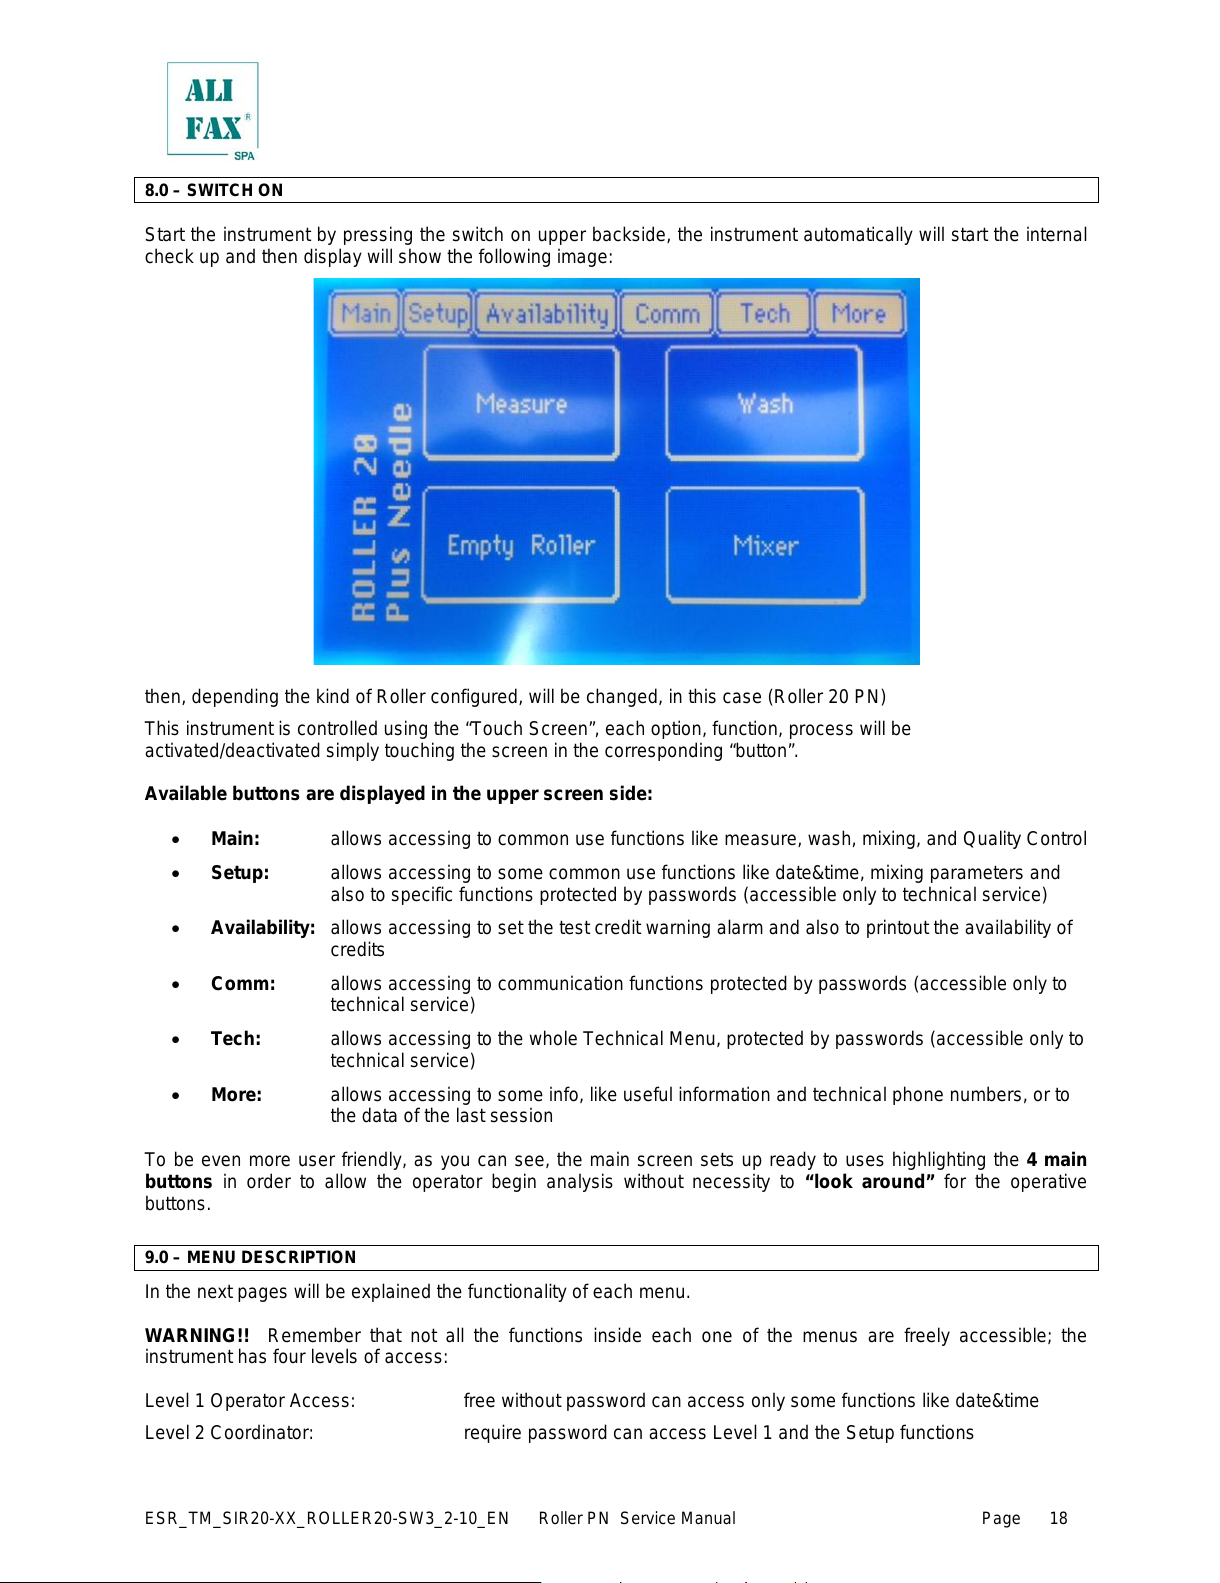
Start the instrument by pressing the switch on upper backside, the instrument automatically will start the internal
check up and then display will show the following image:
then, depending the kind of Roller configured, will be changed, in this case (Roller 20 PN)
This instrument is controlled using the “Touch Screen”, each option, function, process will be
activated/deactivated simply touching the screen in the corresponding “button”.
Available buttons are displayed in the upper screen side:
• Main: allows accessing to common use functions like measure, wash, mixing, and Quality Control
• Setup: allows accessing to some common use functions like date&time, mixing parameters and
also to specific functions protected by passwords (accessible only to technical service)
• Availability: allows accessing to set the test credit warning alarm and also to printout the availability of
credits
• Comm: allows accessing to communication functions protected by passwords (accessible only to
technical service)
• Tech: allows accessing to t he whole T echnical M enu, protected by passwords (accessible only to
technical service)
• More: allows accessing to some info, like useful information and technical phone numbers, or to
the data of the last session
To be even more user friendly, as you can see, the main screen sets up ready to uses highlighting the 4 main
buttons in order to allow the operator begin analysis without necessity to “look around” for the operative
buttons.
9.0 – MENU DESCRIPTION
In the next pages will be explained the functionality of each menu.
WARNING!! Remember that not all the functions inside each one of the menus are freely accessible; the
instrument has four levels of access:
Level 1 Operator Access: free without password can access only some functions like date&time
Level 2 Coordinator: require password can access Level 1 and the Setup functions
All manuals and user guides at all-guides.com
ESR_TM_SIR20—XX_ROLLER20—SW3_2—10_EN Roller PN Service Manual Page
Level 3 Technical Service: require a password, allow access to all functions; this password is ONLY
for Technical Service and Alifax Manufacturing dept.
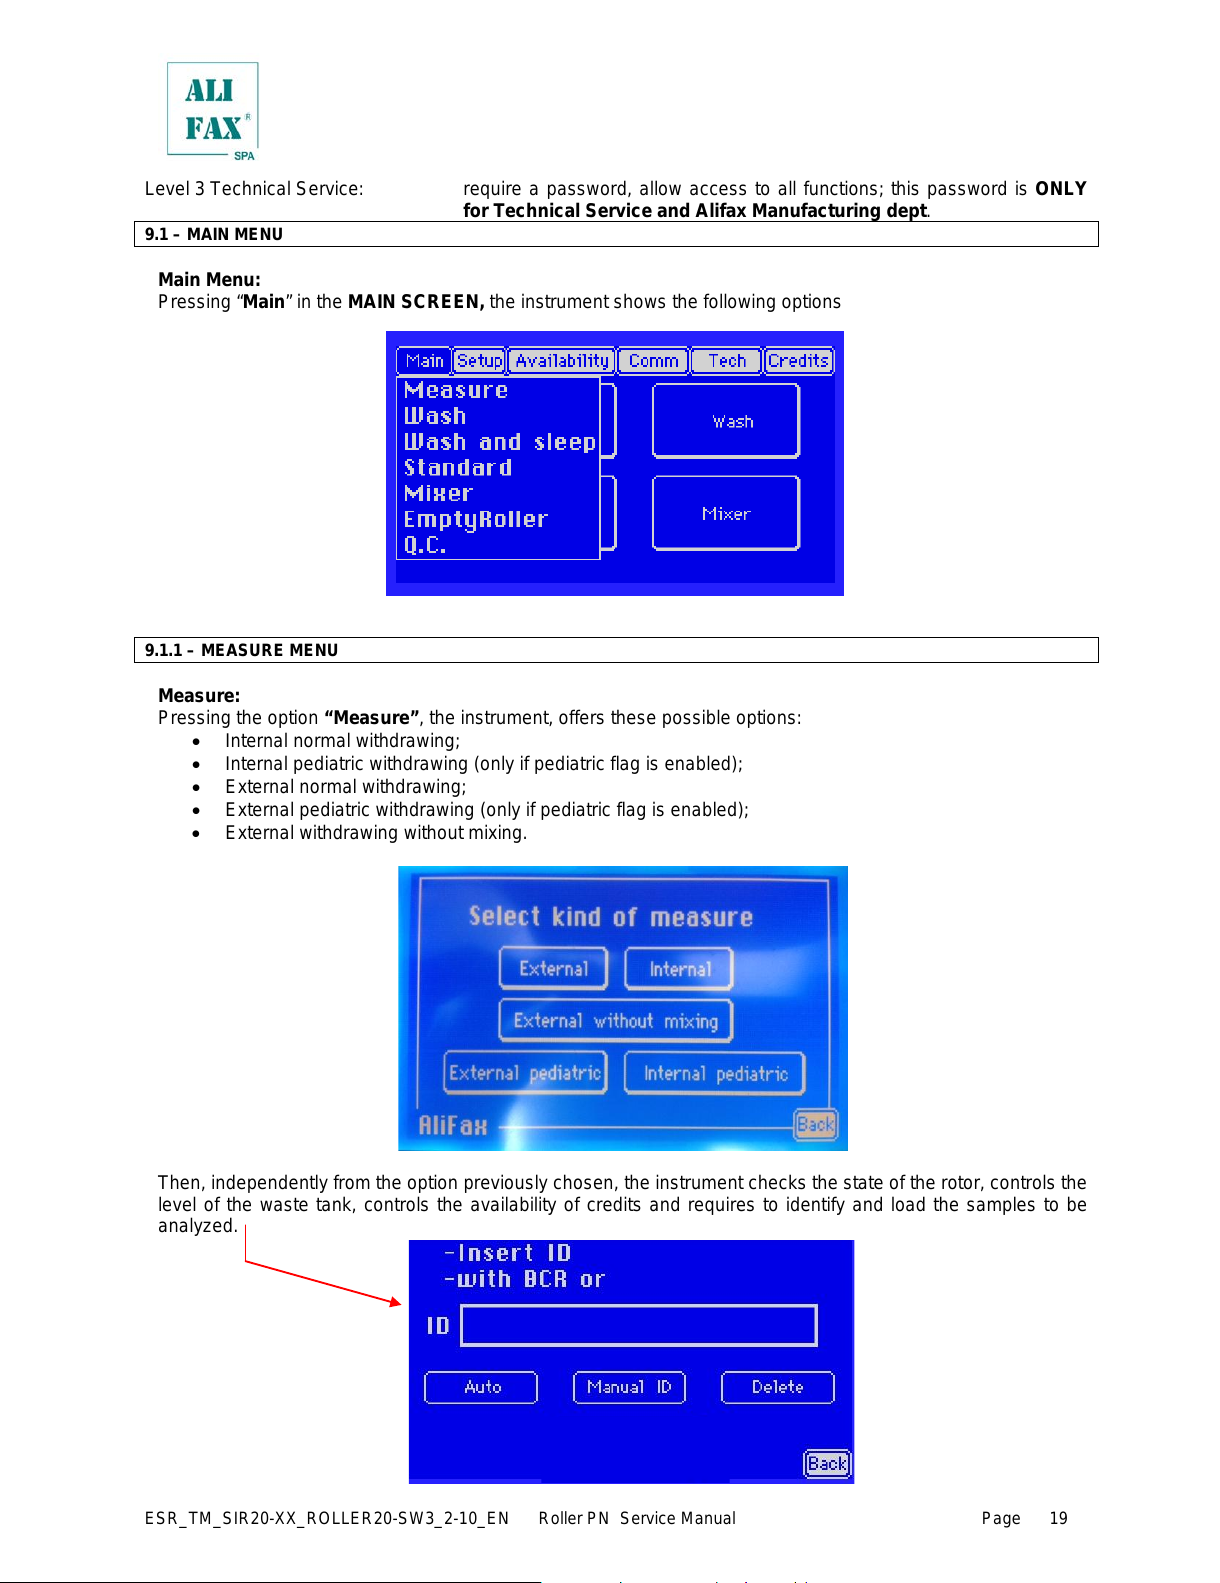
9.1 – MAIN MENU
Main Menu:
Pressing “Main” in the MAIN SCREEN, the instrument shows the following options
9.1.1 – MEASURE MENU
Measure:
Pressing the option “Measure”, the instrument, offers these possible options:
• Internal normal withdrawing;
• Internal pediatric withdrawing (only if pediatric flag is enabled);
• External normal withdrawing;
• External pediatric withdrawing (only if pediatric flag is enabled);
• External withdrawing without mixing.
Then, independently from the option previously chosen, the instrument checks the state of the rotor, controls the
level of the waste tank, controls the availability of credits and requires to identify and load the samples to be
analyzed.
All manuals and user guides at all-guides.com
ESR_TM_SIR20—XX_ROLLER20—SW3_2—10_EN Roller PN Service Manual Page
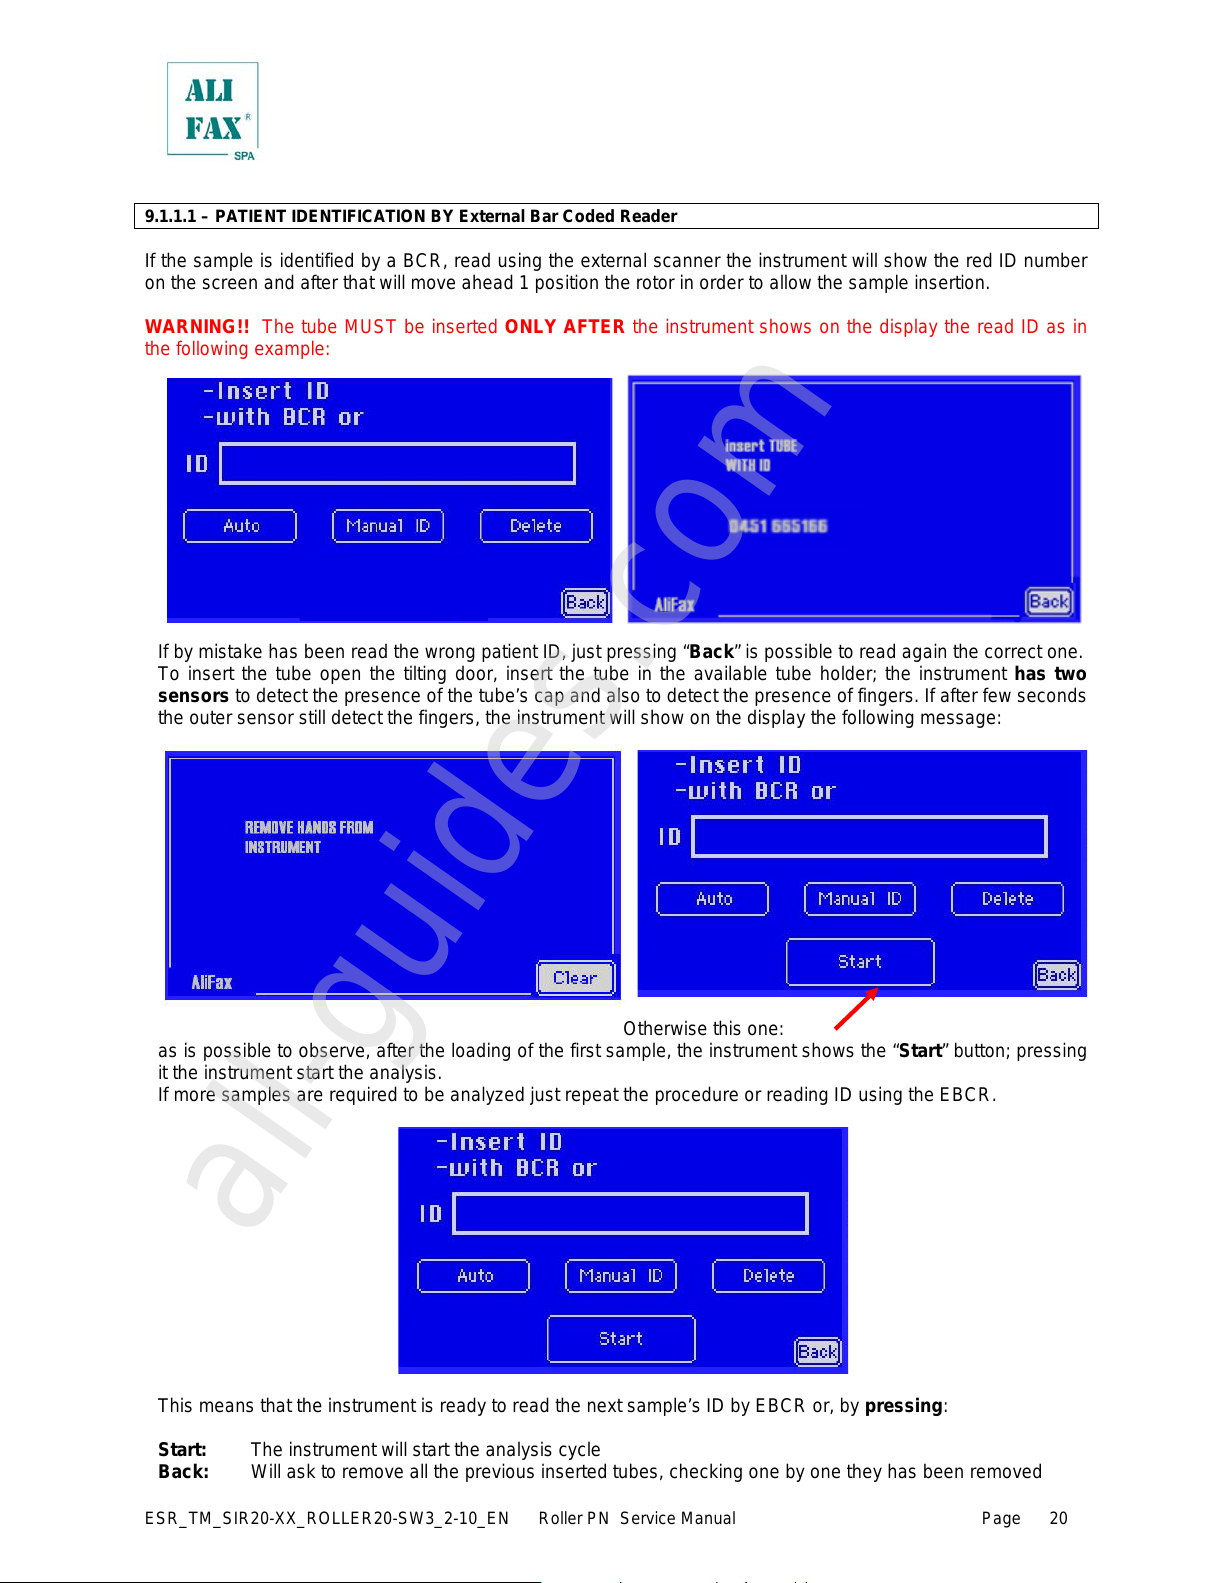
9.1.1.1 – PATIENT IDENTIFICATION BY External Bar Coded Reader
If the sample is identified by a BCR, read using the external scanner the instrument will show the red ID number
on the screen and after that will move ahead 1 position the rotor in order to allow the sample insertion.
WARNING!! The tube MUST be inserted ONLY AFTER the instrument shows on the display the read ID as in
the following example:
If by mistake has been read the wrong patient ID, just pressing “Back” is possible to read again the correct one.
To insert the tube open the tilting door, insert the tube in the available tube holder; the instrument has two
sensors to detect the presence of the tube’s cap and also to detect the presence of fingers. If after few seconds
the outer sensor still detect the fingers, the instrument will show on the display the fol lowing m essage:
Otherwise this one:
as is possible to observe, after the loading of the first sample, the instrument shows the “Start” button; pressing
it the instrument start the analysis.
If more samples are required to be analyzed just repeat the procedure or reading ID using the EBCR.
This means that the instrument is ready to read the next sample’s ID by EBCR or, by pressing:
Start: The instrument will start the analysis cycle
Back: Will ask to remove all the previous inserted tubes, checking one by one they has been removed
All manuals and user guides at all-guides.com
all-guides.com
ESR_TM_SIR20—XX_ROLLER20—SW3_2—10_EN Roller PN Service Manual Page
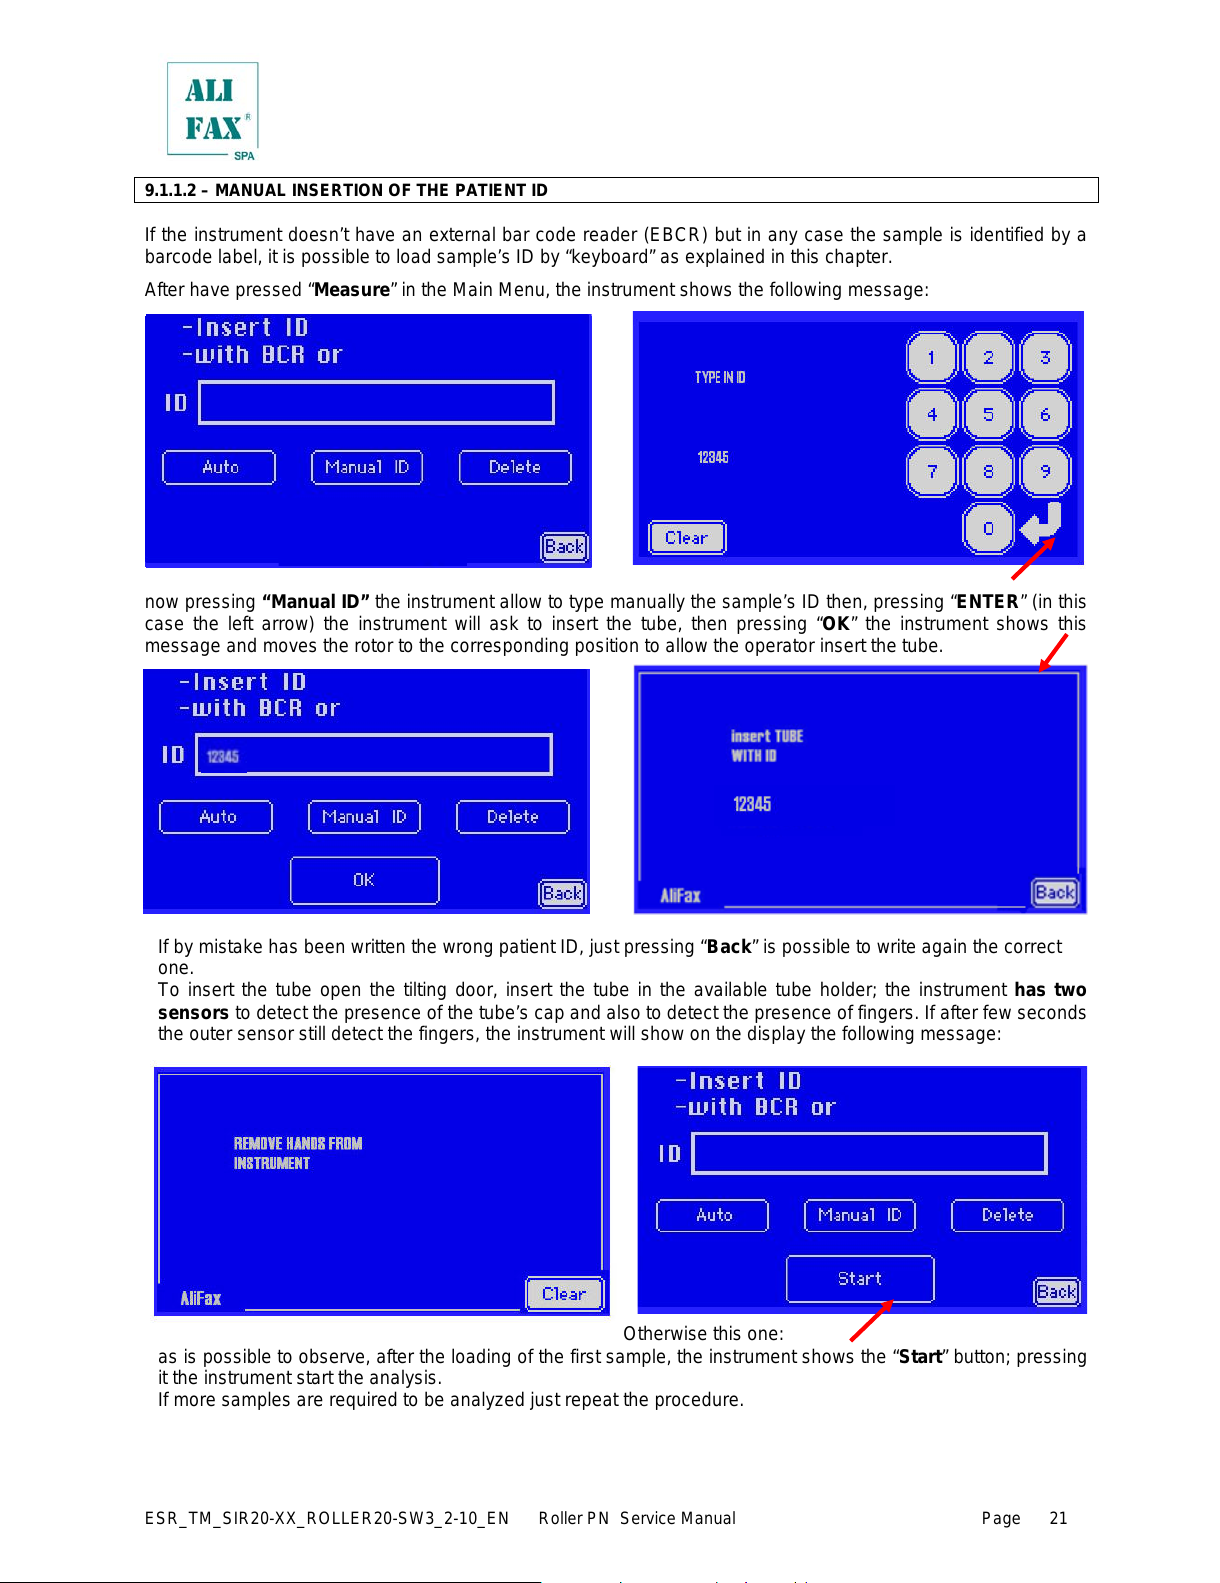
9.1.1.2 – MANUAL INSERTION OF THE PATIENT ID
If the instrument doesn’t have an external bar code reader (EBCR) but in any case the sample is identified by a
barcode label, it is possible to load sample’s ID by “keyboard” as explained in this chapter.
After have pressed “Measure” in the Main Menu, the instrument shows the following message:
now pressing “Manual ID” the instrument allow to type manually the sample’s ID then, pressing “ENTER” (in this
case the left arrow) the instrument will ask to insert the tube, then pressing “OK” the instrument shows this
message and moves the rotor to the corresponding position to allow the operator insert the tube.
If by mistake has been written the wrong patient ID, just pressing “Back” is possible to write again the correct
one.
To insert the tube open the tilting door, insert the tube in the available tube holder; the instrument has two
sensors to detect the presence of the tube’s cap and also to detect the presence of fingers. If after few seconds
the outer sensor still detect the fingers, the instrument will show on the display the following m essage:
Otherwise this one:
as is possible to observe, after the loading of the first sample, the instrument shows the “Start” button; pressing
it the instrument start the analysis.
If more samples are required to be analyzed just repeat the procedure.
All manuals and user guides at all-guides.com
ESR_TM_SIR20—XX_ROLLER20—SW3_2—10_EN Roller PN Service Manual Page
This means that the instrument is ready to read the next sample’s ID by EBCR or, by pressing:
Start: The instrument will start the analysis cycle
Back: Will ask to remove all the previous inserted tubes, checking one by one they has been removed
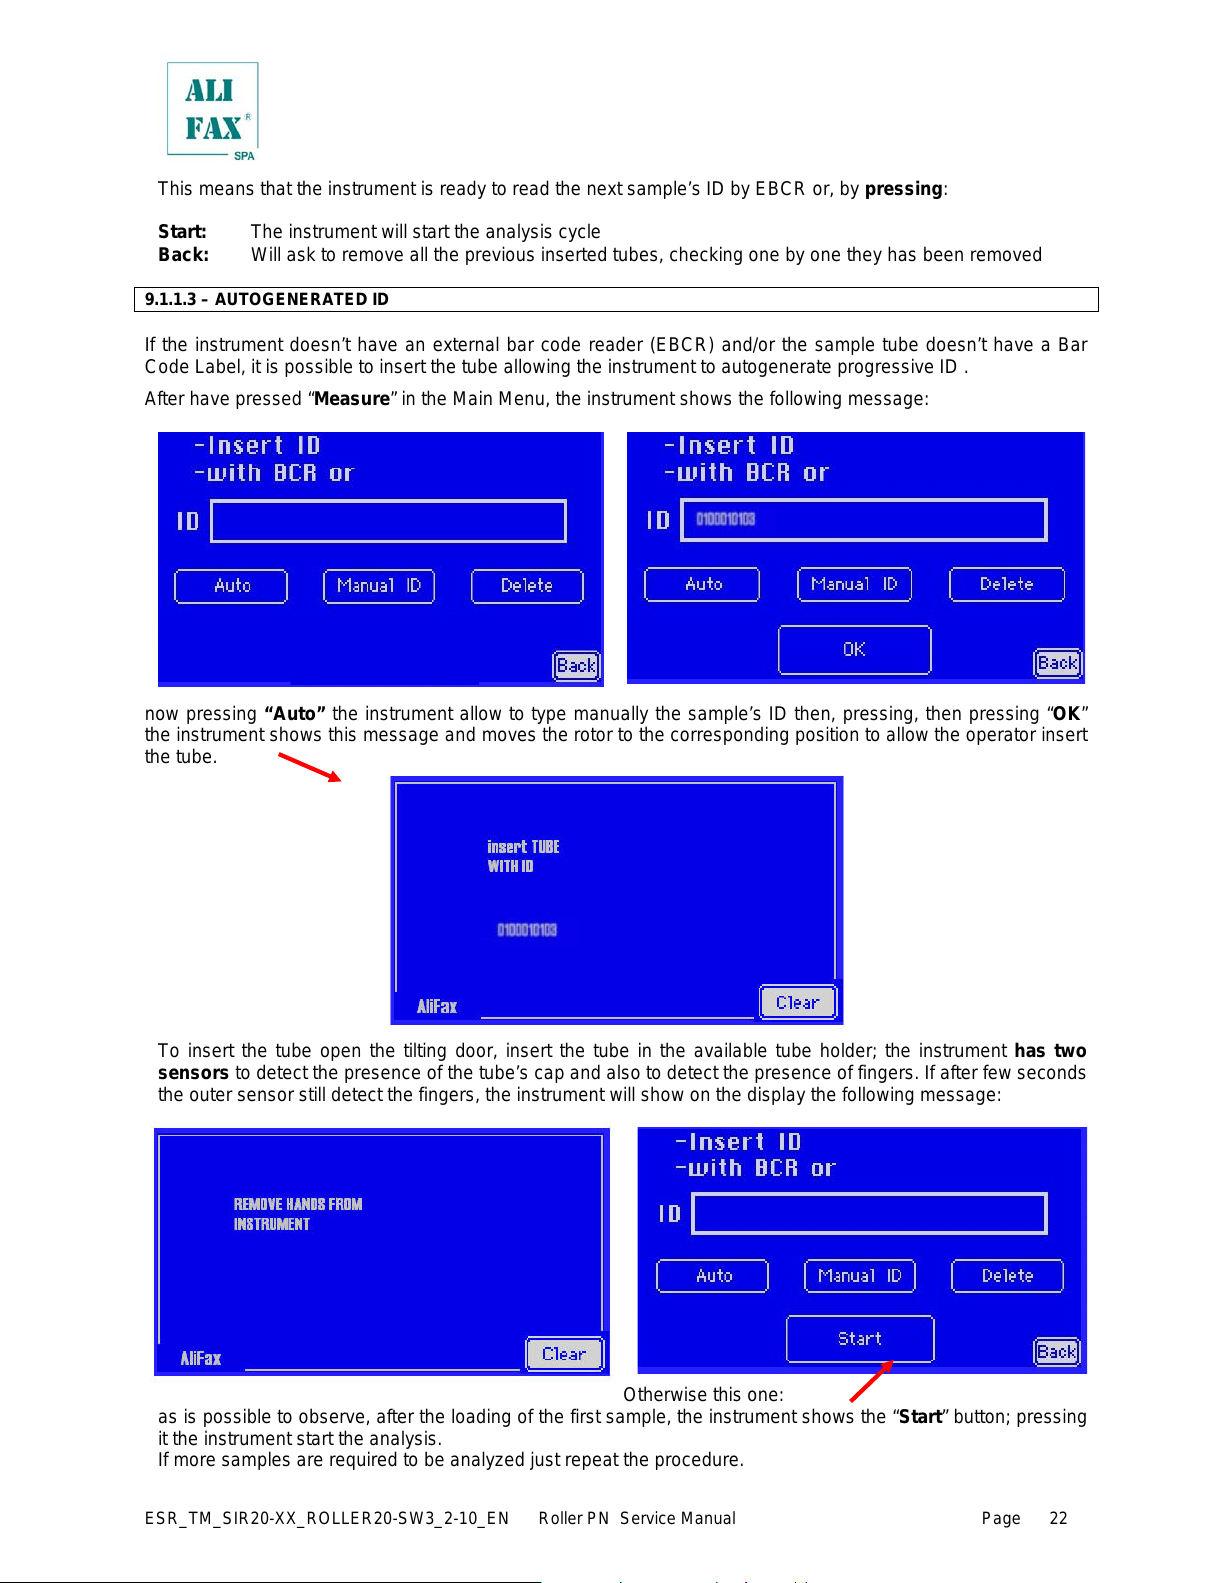
9.1.1.3 – AUTOGENERATED ID
If the instrument doesn’t have an external bar code reader (EBCR) and/or the sample tube doesn’t have a Bar
Code Label, it is possible to insert the tube allowing the instrument to autogenerate progressive ID .
After have pressed “Measure” in the Main Menu, the instrument shows the following message:
now pressing “Auto” the instrument allow to type manually the sample’s ID then, pressing, then pressing “OK”
the instrument shows this message and moves the rotor to the corresponding position to allow the operator insert
the tube.
To insert the tube open the tilting door, insert the tube in the available tube holder; the instrument has two
sensors to detect the presence of the tube’s cap and also to detect the presence of fingers. If after few seconds
the outer sensor still detect the fingers, the instrument will show on the display the fol lowi ng m essage:
Otherwise this one:
as is possible to observe, after the loading of the first sample, the instrument shows the “Start” button; pressing
it the instrument start the analysis.
If more samples are required to be analyzed just repeat the procedure.
All manuals and user guides at all-guides.com
ESR_TM_SIR20—XX_ROLLER20—SW3_2—10_EN Roller PN Service Manual Page
This means that the instrument is ready to read the next sample’s ID by EBCR or, by pressing:
Start: The instrument will start the analysis cycle
Back: Will ask to remove all the previous inserted tubes, checking one by one they has been removed
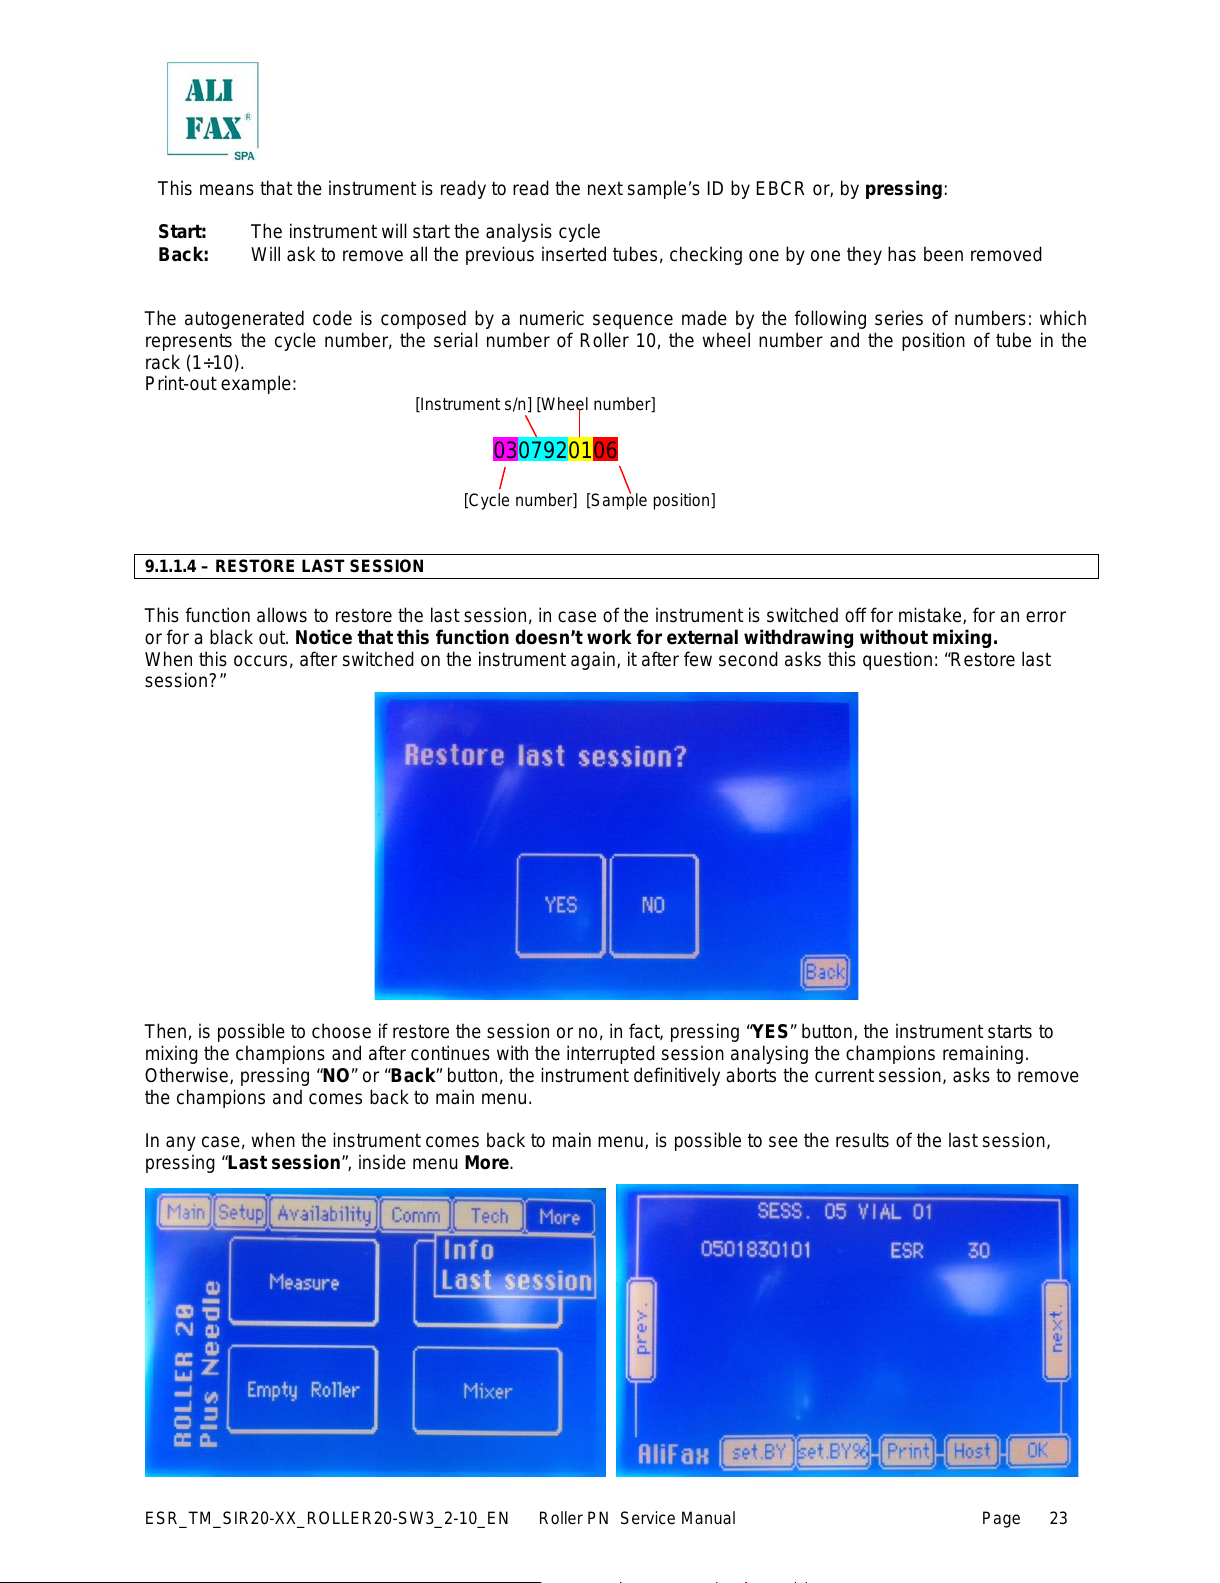
The autogenerated code is composed by a numeric sequence made by the following series of numbers: which
represents the cycle number, the serial number of Roller 10, the wheel number and the position of tube in the
rack (1÷10).
Print—out example:
[Instrument s/n] [Wheel number]
[Cycle number] [Sample position]
9.1.1.4 – RESTORE LAST SESSION
This function allows to restore the last session, in case of the instrument is switched off for mistake, for an error
or for a black out. Notice that this function doesn’t work for external withdrawing without mixing.
When this occurs, after switched on the instrument again, it after few second asks this question: “Restore last
session?”
Then, is possible to choose if restore the session or no, in fact, pressing “YES” button, the instrument starts to
mixing the champions and after continues with the interrupted session analysing the champions remaining.
Otherwise, pressing “NO” or “Back” button, the instrument definitively aborts the current session, asks to remove
the champions and comes back to main menu.
In any case, when the instrument comes back to main menu, is possible to see the results of the last session,
pressing “Last session”, inside menu More.
All manuals and user guides at all-guides.com
ESR_TM_SIR20—XX_ROLLER20—SW3_2—10_EN Roller PN Service Manual Page
9.1.1.5 – EXTERNAL SAMPLING PROCEDURE, USING INTERNAL MIXING
When using the external withdrawal procedure, it is mandatory to use gloves and all the others protective tools,
precautions and warnings necessary apt to avoid the contact in accordance with national laws.
In case the option chosen is external sampling normal or pediatric (with internal mixing), the instrument will ask
to load the samples and will mix them; then (after the mixing cycles have been executed) the instrument will
require to remove the samples from the rotor.
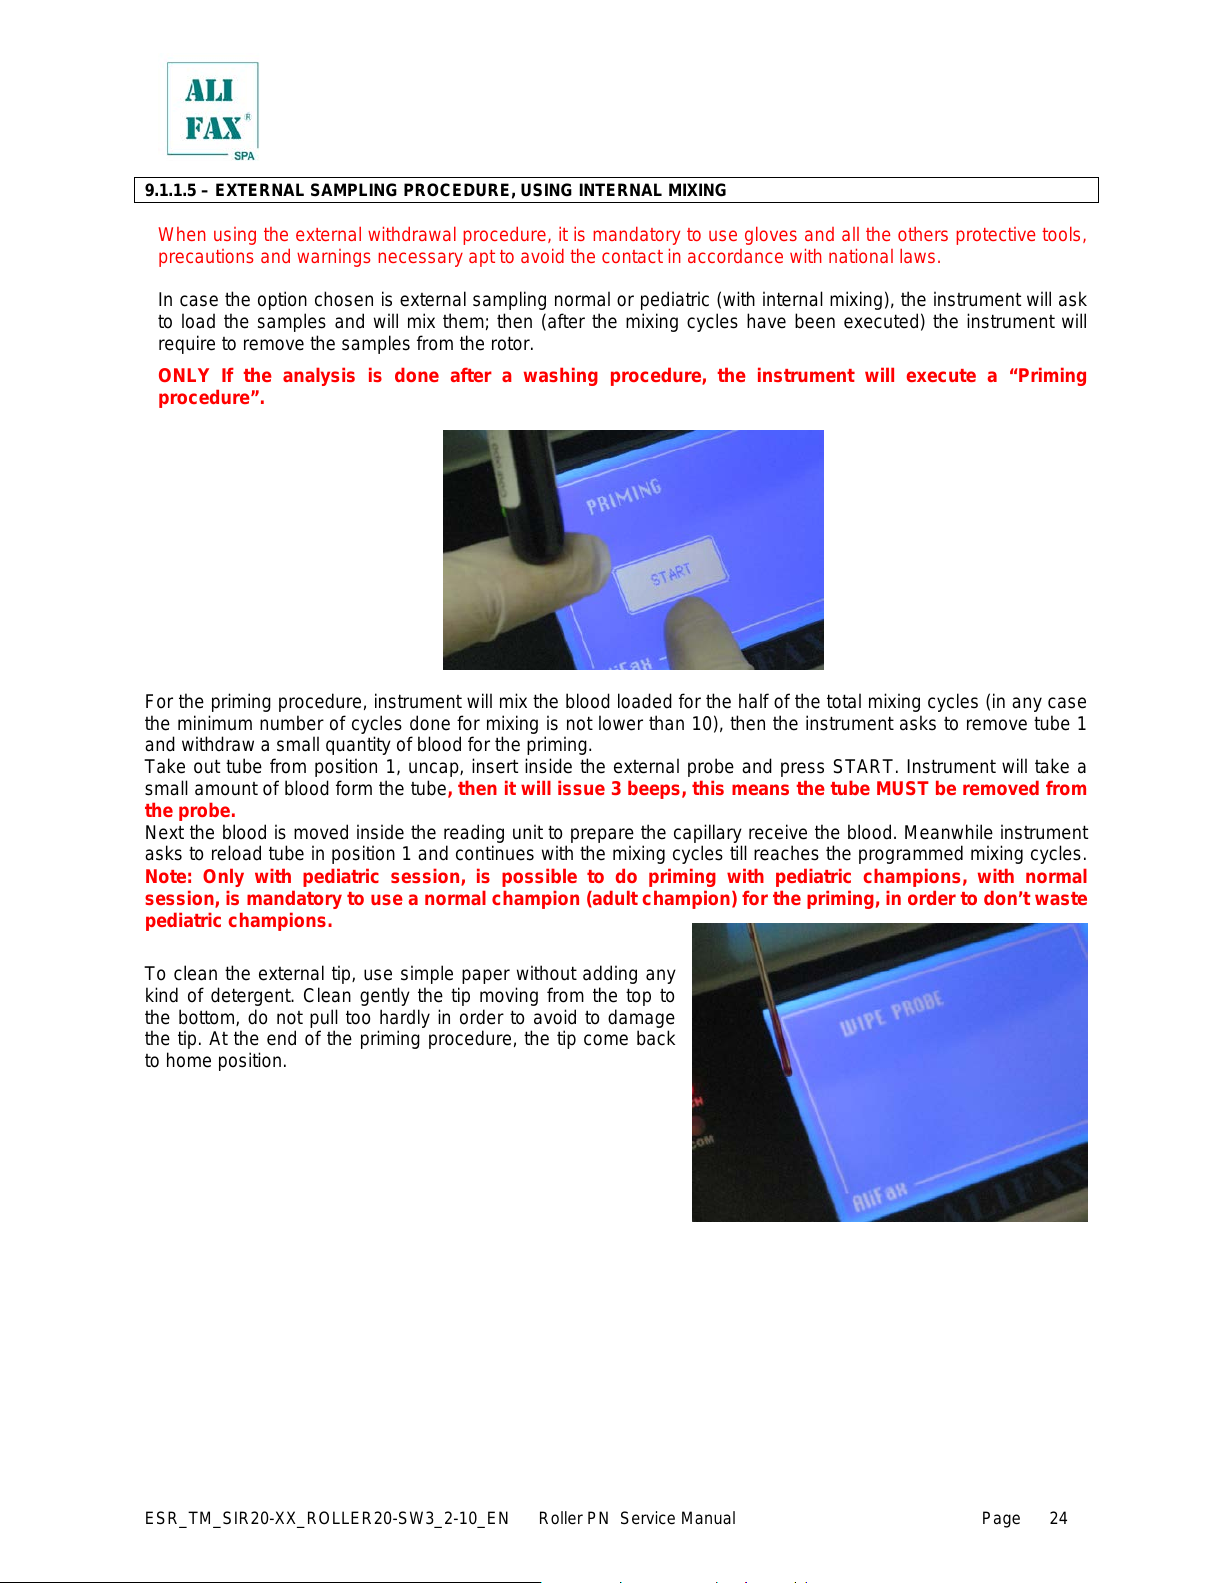
ONLY If the analysis is done after a washing procedure, the instrument will execute a “Priming
procedure”.
For the priming procedure, instrument will mix the blood loaded for the half of the total mixing cycles (in any case
the minimum number of cycles done for mixing is not lower than 10), then the instrument asks to remove tube 1
and withdraw a small quantity of blood for the priming.
Take out tube from position 1, uncap, insert inside the external probe and press START. Instrument will take a
small amount of blood form the tube, then it will issue 3 beeps, this means the tube MUST be removed from
the probe.
Next the blood is moved inside the reading unit to prepare the capillary receive the blood. Meanwhile instrument
asks to reload tube in position 1 and continues with the mixing cycles till reaches the programmed mixing cycles.
Note: Only with pediatric session, is possible to do priming with pediatric champions, with normal
session, is mandatory to use a normal champion (adult champion) for the priming, in order to don’t waste
pediatric champions.
To clean the external tip, use simple paper without adding any
kind of detergent. Clean gently the tip moving from the top to
the bottom, do not pull too hardly in order to avoid to damage
the tip. At the end of the priming procedure, the tip come back
to home position.
All manuals and user guides at all-guides.com
Loading…